Transcripts
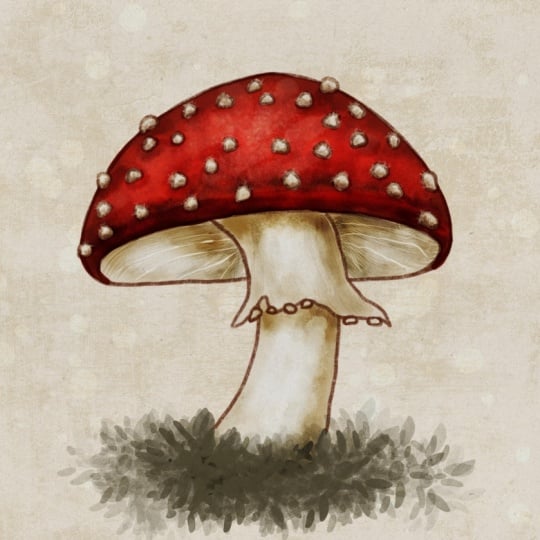
1. Intro: I have you ever wanted to create a cozy woodland piece
of art that feels warm vintage and full
of storybook charm. In this class, I'll show
you exactly how to paint this rustic mushroom
illustration in Procreate, using simple techniques, textured brushes and
warm earthy colors. Hi, I'm Kimber. I'm a digital artist,
crochet designer, as well as a teacher who loves teaching and creating
whimsical rustic art. We'll walk step by step through the entire
illustration process from sketching the
mushroom shape building the
textured background, all the way to adding
shadows and highlights, as well as those final details that really bring
the artwork to life. I'll personally be using my Rustic Farmhouse
Bushet during this class, but don't worry if
you don't have these because I'll also
suggest procreate built in brushes as
alternatives throughout these lessons so everyone can
follow along successfully. As a bonus, I'm also adding some free
resources to help you get started like a cozy
fall color palette, a textured canvas file. Mushroom Anatomy
Image, along with a Canvas size guide that may come in handy on
your future projects. By the end of his class, you'll have your own finished
mushroom illustration. So if you're ready,
grab your iPad, Apple Pencil, open, Procreate,
and let's get started.
2. Class Project: For the class project, you'll be creating your own
rustic mushroom illustration by using the techniques we
cover throughout this class. The goal of this project
isn't perfection. It's about creating
artwork that feels warm, textured, cozy, and yours. You're welcome to follow along exactly with my illustration, or you can personalize
your project by experimenting with
different mushroom colors. Additional foliage, alternative
background textures, or even create an entirely
different mushroom variety. One of my favorite things
about rustic artwork is that the imperfections actually add
character and charm. So don't stress about
making everything perfectly symmetrical
or overly polished. Once your artwork is complete, I highly encourage you to upload your project to the
Skillshare Project Gallery. Sharing your work not only
helps inspire other students, but it also helps build confidence in your
creative journey. In the next lesson,
I'll walk you through all the free resources
included in this class.
3. Free Resources : Before we begin illustrating, let's quickly go over
the free resources included with this class so you can set yourself
up for success. Inside the resource section, you'll find several
helpful downloads that will make following along
easier and more enjoyable. First, I've included a
cozy fall color palette that features warm, earthy tones, creamy neutrals, rustic reds, mossy greens, and vintage inspired shades that work beautifully together for
this cozy mushroom artwork. I've also included a texture
file that you can use for this class or create your
own and start from scratch. I've included the shapes
from the sketching lesson, as well as the finished
linework in case you want to use it to help
build your confidence up. I also included
the background as well as the paper texture
just in case you don't have the exact brushes I'll
be using since I'll be personally using my brushes from my Rustic Farmhouse Brush
Set throughout this class, because they help
create a lot of the soft painterly texture and vintage characteristics
that I love. I wanted to also include a reference sheet
for your convenience showing the brushes that I'll be using along with
alternatives that come pre installed and Procreate
that you can use instead. I'll also mention alternatives
on the video screen as well to help make this illustration more
convenient for you. I'll show you how to gather all your alternatives
in one easy set so you don't have to go
searching as we go along. This will be shown
during the Canvas setup. For this class, I've
created a reference for you for your
Canvas size Guide. This is something that you
can keep on hand for anything that you want to
create in the future. If you're new, I would
suggest starting out with a 3,000 by 3,000
pixel and 300 DPI. That's what we're going
to be creating today. I also want to include a
simple mushroom anatomy chart, and it doesn't necessarily
cover the complete, fully technical
coverage of a mushroom, just the basics to
get you started and not overwhelm you with
the creative process. I've included another
secondary color palette. If you'd like to use it, all you need to do is just hold
a color that you want. And you can pick the color
up and just start using it. We're going to focus
on these simple things and we're going to add the cap. We're going to have
the gills, which is underneath the mushroom cap. We'll have this
extra layer here, which they call a ring
and you'll have the stem. This is basically
just the root system, and the vobal cap is what
touches here on the ground. Also there's patches or words. This is just remnants
of the Universal Vail. Not all mushrooms have it, but ours will have
it this time around. If there's any notes
you want to add as we go along, you
can add it here. Once you have your
resources downloaded from the projects and resource
section of this class, we will begin to set
up our Canvas and gather our inspiration
in the next lesson.
4. Canvas Setup: You want to touch that plus
symbol at the top right, tap the plus symbol again, and we're going to create a
3,000 pixel by 3,000 pixel. We're going to keep it
or set it at 300 DPI. We're going to tap Done
and the check mark. This will give you a good size screen in case you want to use this artwork for anything
else down the road. Make sure you download your color palette and
upload it into Procreate. And that can be easily
done by tapping the color wheel Palette, the plus, and you want to
create one from a file, and you'll upload
wherever you download go. And you just tap it
and it will come to the very top if you're
using my texture file, you're going to want to tap Import and you want to go to
wherever your downloads are, so I'm going to tap that. Within this file, you will have background textures
already installed. You can turn them on and off. There will be a
background color, but you can choose
any other color. We also have paper texture
that you can turn off. I do have the linework
already installed, but you can definitely add another layer and you
can draw your mushroom. Using this simple shape
in the sketching lesson. But I have included the
simple shapes here, should you just
need a little bit of extra help you can trace. This is something that I thought might be
helpful for you. You can gather all
the alternatives. If you do not have the
Rustic Farmhouse Brush Set, if you gather all
these in one place, it'll make creating this
illustration much faster. It's so helpful in any
other class that you take, if they give you a list of alternative brushes
to gather them now, especially since
the brush library can be split up in
numerous libraries. So I have mine split out
with several at the moment. Basically, I made sure anything that's pre
installed in Procreate, I have it listed as
appropriate library, and I just go tap it to
go back to libraries. This is where all my bought
or created brushes are. And then I did break
it down into right now watercolor and
painterly specific. But if you want to go to
the appropriate library, if you don't have the
Rustic Farmhouse brushes, you'll want to use
these as alternatives, and we're just going to tap and we want to create a new set. Let's just call this Rustic
mushroom for right now. You can always delete this. I'm going to show you exactly
how to create this and not move your originals so that you have it
for another class. So it's definitely beneficial. Take the time to do this. For sketching, you want to scroll through and find out
where you're sketching, and this is just going
to be a sketching brush. I'm suggesting you
could use a six B, but you can use any of
your favorite brushes. I want to duplicate that and you'll see that
it'll be a number two. You want to hold that tap
it and then hold it and you want to move it up to where your new category of
brush set will be. And we're going
to do that again, we want to go to
grunge is my next one. And I suggest instead of
using the background stamp, you can use Mountain
Lilac. There's that. Again, duplicate it,
tap your second one, hold, and we're going
to move that up. And you have that. I do have the background upload it
inside the texture file, as well as the paper texture. I don't have alternatives just for the paper
texture files. That's why I have this asterix
here that you will have to use the textured file for
those specific paper texture. Again, the next one, the alternative is spray
paints and flicks. Let's go to spray paint. And we want to go to flick, so we're going to swipe it, duplicate it, tap, hold, and we're going to move
that just like that. Just take the time to go
through and do all these. You don't have to, but it
does make it a lot easier. Even for any class other
than this one as well, it just makes it easier to
be able to have it handy. In the next lesson, we'll start sketching out our
rustic mushroom.
5. Sketch : We're going to start off with the salty sketch brush and I'm just going to draw a
circle to begin with. This is going to be
my guide for the cap. I'm just going to do a curve
line and a straight shape. I don't want to be
perfect. I don't want it to be symmetrical. I'm just drawing this
freestyle and I'm going to draw another oval at
the bottom of the base. This will be where
the gills show. I will draw two
lines for the stem. I wanted to do it more of a curve rather than
a straight stem. I'm just going to
do a slight curve at the bottom for my mushroom. I want to add my little skirt
like part of the mushroom. This is flowing and
they call this a ring. I'm going to lower the opacity and I'm going
to put the blemo to multiply and add another layer below so we can work
on the linework.
6. Linework : So in this lesson, we're going
to perfect the linework. I do want more of a
textured linework, so I'm going to be
using the salty sketch. At about 30%, you can use the
alternative on the screen. I'm just going to
outline my mushroom. I'm going to be using a
darker brown for my lines. I'm just going to take
the time to draw out my mushroom using my
previous sketch layer. Again, I'm using
the salty sketch because I wanted more of a textured looking line
rather than a smooth one. Now I'm going to go back
and make sure I erase these areas because this is my linework rather
than my sketch. I also want to add those
patches on top of my cap. I'm going to go
along and just draw out some little boards here, and I will have to go back
and erase the cap layer. I'm going to add
some to the ring. So in the next lesson, I'm going to show you how
I created the background, which is already installed
in the texture file, but I also give you alternative
brushes that you can use. In case you want to create a different background yourself.
7. Background: I want to add a couple layers and move my linework
up to the top. I'm going to set this
linework to multiply. You can draw this out yourself or you can use a textured
file that's supplied. This is a linework and if
you haven't done so yet, make sure you alpha lock it. This way we don't draw on this
layer at a different time. Let's start with the
background color. I'm going to use
this color here. Again, I do have this
supplied in the texture file. I also want to
lighten this up just a little bit more so this way, the colors that you
see will really pop. I'm going to use the
grunge stamp number two. But if you're going
to do this yourself, you can use the alternative Mountain Lilac in
the grunge section. I want to use the
light color again. I need to change the blemoe to multiply and just
tap the screen, and we want to make sure it
covers the entire canvas. I want to add a layer. We're
going to go to Canvas blobs using that same color and we want to change
the layer to add, I'm just going to
run my brush all over the canvas and I want to go back and lower the opacity down so you can just
faintly see it. Like there. Up next, we'll begin to
color our rustic mushroom.
8. Color: I'm going to use one
of these layers and let's start coloring
the mushroom. I'm going to use a
light color here. I'm going to grab the
cozy soft brush and I'm just going to color
in the stem of this. To save some time, I am
going to use color fill. I just want to make
sure my outline is completely filled in. I'm going to pull that
down and color it. I'm going to add another
layer and I'm going to do that same for up here. And I just want to add
it on a different layer because I'm going to be
using different textures. Let's add another layer
and we're going to go with this reddish color here and I'm going to do the
top of the mushroom. Again, to save time, I'm just going to use
the color fill. Add a layer and I'm going to
go back to that light color, and I'm going to fill
in all these spots. It So I am going to fast forward this
why I finish this process up. Up next, we will work on
our shadows and highlights.
9. Shadows and Highlights: These are our base layers. Let's go back down
to the stem here. We're going to add a
layer, we're going to tap and change it
to clipping mask. I'm going to change
the blemo to multiply. I want the gritty sponge. I'm just going to add
some darker colors here. I'm going to bump that size up a little just to add
some variation. As you can see, I'm not trying
to make it look perfect. My goal here is to just
make it look hand drawn. Let's add another layer, change it to clipping mask, and we're going to
change the blend mode to multiply and change the
brush to concrete grunge. We just want to add a
little bit more texture. You can tap or you can just
move the brush around. We're going to add
another layer, change it to clipping mask, and I want to change
this blemo to screen, and we're going to
grab the fuzzy brush. This is just going to
add more texture but more lighted areas just to show that the stem
isn't completely flat. And I'm going to add another
layer clipping mask, and I just want a little bit
darker like this one here. And I want the tarnish texture. It may be hard to
see in this video, but it shows these speckles
and the scratched effect, which is great for
this illustration. I really love using
this texture. I'm going to move up to
the mushroom base here, add a layer, turn that
into a clipping mask, and I want to change
the blemo to multiply. I'm going to keep
this same color and I want the distressed brush. We're going to create these ridges that's
usually under a mushroom. And I'm going to add
another lighter color just to give it
some more variety. Our goal is to create
this illusion of dark and light area
to appear less flat. Maybe lower my brush. Let's grab a little darker. I'm just lightly
brushing over it. Is that some more light. I so these brushes were made with adding lots of layers. I love adding texture on texture just to give
it a little bit more of a realistic look but not
a complete realistic look. I'm going to add a
layer clipping mask. I'm going to use the
same distressed brush, but I want to change this to
screen because I want to add a lot more lighter areas just to give it that depth
of those ridges. Just to add a little bit more, I'm going to use
the tattered taper. This is a brush that
is pressure sensitive. It allows variation
in your lines. See if you push on it, you
can add a little bit wider. It gives a variable in size. Going to go to my top
of my mushroom cap, add a layer, change
it to clipping mask. I'm going to use the fuzzy
brush and this red here. Change this to color
dodge and this is just going to give it a little
bit of a brighter hue. I did it. Add a layer, change it to clipping mass, change the blend
mode to multiply, and I want to get that
gritty sponge brush. I'll stay with the same color. This is going to be added in the bottom ridge area here just to show
some shadowed areas, maybe some around these spots. If you have too much, just hold your smudge
brush here at the top. I should switch to
your current brush and use it to smudge
some of this out. Going to add more texture by adding another layer,
clipping mask, changing it to multiply, and I want to grab
the blotchy brush. This is just going to
add some more texture. You can tap or just
swish it back and forth. It gives it that
spotted texture, and I'm going to add a layer, change it to screen, and a clipping mask and I'm
going to keep the same color. I just want to add some
later areas just to give it more of a speckled look throughout the
whole mushroom cap. Add a layer, change
it to clipping mask. I'm going to change
this to overlay. Let's grab the lighter orange and use the blurred
vintage brush. I want to continue to add more texture by
using this brush. I'm just going to smudge
it out just a bit. Up next, we'll add
some extra details.
10. Extra Details: I want to add a layer, change it to soft light, clipping mask, and use
this light color here. I want to use the age spots. I actually want to double tap for white since it
isn't showing up. I want to add a clipping
mask layer above the spots. Use this color here and use the haystack brush and tap a screen at the
base of these spots. This will give more
texture and depth. I need to change my color so
it shows up a lot better. Add a layer, change
to a clipping mask. Change a blemo to screen, change to a lighter color, just to add more highlights. I'm going to remove
the clipping mask. This allows our highlights
to show above the outline. Let's add this above our sketch. I love how this is turning out. Sometimes you just got to experiment and explore
what your brushes can do and how they can interact with your illustration
with placement as well. It's subtle, but I can see it. Let's go back down
here, add a layer, change it to clipping mask, multiply, and I'll
keep that color. And I want to get
to just dressed. I want to add a little
bit more texture to this area right here. I'm moving to the top
underneath the sketch. Add a layer, change the
blend mode to soft light, double tap the bottom for black. And I'm going to use
the gritty sponge and create more shadow under the cap to look like
it has more curves. And underneath the skirt to
look like it's overlapping. Gonna add a little more at the bottom and around the
very bottom of the cap edge. And more here. Now I want to double tap here for white to give it
some more highlights. We could keep going to add
more and more texture to this, but I feel that this was
really looking great as is. I do want to add another layer, change it to overlay,
and go back to black. I'm going to use the
concrete grunge just to add a little more depth
to these shadowed areas. Don't worry. We can lighten this up since it is a little
dark and overpowering. I do want to add some
white for highlights. And now we can lower it down to wherever you feel that it's a good look for
your illustration. Up next, we will add
some paper texture. A
11. Paper Texture: In this lesson,
I'll show you how I added some paper texture, but you can use the textured
file that's supplied. I'll be using a gray, and I'm going to grab the recycled brush from
this brush set. I'm going to make sure it's
a layer above everything, and I'm going to change the
ble mode to linear burn. Going to swipe over the
whole top like this. Add another layer
and I'm going to change this bleme to multiply, and I'm going to use
the speckled brush. You can adjust these
layers however you prefer. This just adds a
little more texture overall. And no worries. If you don't have these brushes, you can use the
textured file supplied. Up next, we will add some foliage to finish
up our illustration.
12. Foliage: You can also decide to add
a layer down here and let's grab a green and we'll
grab the foliage. Filler. Tap. We'll have to go up here above the sketch layer and we'll add a little more just
to cover up that bottom. We can even go to
the sketch layer, tap and add a mask using
the same leaf filler, you can tap at the
bottom edge and you can remove some of
that sketch line. Up next, is my heartfelt
thank you to all of you.
13. Thank you: And there we have it our finished rustic
mushroom Illustration. Thank you so much
for joining me and creating a long sign
with me in this class. I hope you enjoyed slowing down, experimenting
with texture, and watching all those
simple layers and little details come together
in a finished piece. Throughout this class,
we started with a simple sketch and built our
illustration step by step. We added our base colors, developed depth with
shadows and highlights, added some warm
textured background, and brought everything together
with those extra details, paper texture and foliage. More importantly, I hope you've learned a few techniques
that you can take beyond a particular mushroom and use it in your own artwork. And don't be afraid
to let some of those imperfect
brush strokes show. And remember, you don't need the exact brushes I use to create beautiful
textured artwork. I've given you appropriate
brush alternatives so you can continue experimenting with the brushes you already have. However, if you enjoyed the rustic textures and the effects you saw me use
throughout this class, I created my Rustic
Farmhouse procure brush set specifically for
this type of artwork. It includes the textured
and detailed brushes I love using to
create that warm, slightly weathered
handmade look. I'll leave a link for the full
Rustic Farmhouse Brush Set under the About
page of this class. Before you go, please
don't forget to upload your finished mushrooms to
the class Project Gallery. If you enjoy creating
with me today, be sure to follow me
here on Skillshare. That way, you'll be notified
when I publish new classes. I have more
apcriateillustration, texture, and creative
projects planned and I love to have you
join me again.
 Kimber Shook, Artist | Designer | Creator | Teacher