Transcripts
1. Intro to course Skillshare: Welcome aboard. This is where your journey to three
D car modeling begins. In this course, you'll
master the art of modeling stunning
three D car models from scratch using Maya, all within just 6 hours of
detailed video tutorials. Not familiar with
Maya. No worries. I've got to cover with a bonus video that will
walk you through the basics so you can dive
right in with confidence. I'll guide you through each
step of the process from importing blueprints and
shaping the main body, to adding details, and
perfecting the material. So don't miss out on this
exclusive opportunity. Welcome to Han Systems. I'm your instructor adrian, and I can't wait to start this amazing adventure with you. Let's unleash your
imagination and bring your car designs to
reality. Let's dive in.
2. Basic Intro to MAYA: Okay. What's up, everybody. We'll come back. This video will be learning the basics of My. If you'll read to know
the basic essentials of Mark in May, you
can skip this video. But if you don't, this
video just made for you. After completing this video
we'll be starting off model City cars in My
So let's get started. All right, so here we
are. I have opened May, and this is the home
screen which you will get. Here we have the Maya logo. Here we have new button from which we can create a new
scene or a new project. From here we can
open the project, and here we have some menu which you can
discover if you want. For now, let's go ahead
and create a new scene. All right. So here's the
main interface of Maya where you create three D models or any machine or
whatever you want, right? Here we got the home button. If we click on that, we'll
come back to the home screen. If we click on this, we'll get back to the main
interface of Maya. Here we have some menus. We can change it if we click on this and change
it to rigging. For example, if
we're doing rigging, we can change the
menus to rigging, and we will get the specific
menus used for rigging. All right? Let's go
back to modeling. From this menu, we have
tools related to the file. Here we have edit where if you want to edit
your object, from here, we can create objects, and here are a few other tools. And if we move here, here we have a workspace, which will usually
be in general. We can change the
workspace to for example, modeling standard
or modeling expert, or if you're doing sculpting, you will change the
workspace to sculpting. Or, for example, animation
or whatever you want. For now, let's go back to
modeling standard, not journal. Let's go to modeling standard because our main focus
will be modeling. And here we have some
other tools which are mainly used to change
the modes of modeling. After this, we have rendering
tools or material tools, like for example,
ranger settings. If you click on it, we'll get a window of render settings. And for now, let's
just close it. After this, we have
a few windows. Like, for example,
if I click on this, we get the channel box, which we will discuss
for analysis close it. Here we have the tool settings. This is the attribute editor. Here's the toolbox. And if we go to the
bottom of the screen, we get a display of short helps tips for tools
and selections. For example, if I
go to the cube, at the bottom, we can see polygon create a polygon
cube on the grid. Means it gives a small hint
to the tool your mouse is on. If I go to the sphere, we get polygon sphere, create a polygon
sphere on the grid. For example, if I go here, my cursor on this tool, we get ten new vertexes edges faces from existing
spots on a mesh. Now, what is mesh? In Maya, three D objects are called mesh. We will discuss these tool
later when we model the car. And here, back to the
bottom of the interface. Here we have the D bug area. And if you click on this, we get the script editor. And most importantly, here
we have the viewport. These are Xs, X, Y, and Z. This is the name of our camera, and from here, we can move
the viewport like this. As you can see, if I
move the viewport, if you look the axis, they will move
with the viewport. It basically shows at what
angle you are, right? If I click on this pattern, it will reset our camera. Here we got some more menus. Specifically for the viewport. Here we have camera
related tools, and all of these
tools are mainly used for changing your
modes to viewport. Like for example, from here I can hide and unhide the grid. This is the grid. For example, from these buttons, I can change the quality of
our viewport, like this. If you look closely, basically, change the
sharpness of our grid. If I create a cube, if I turn it off, like the
quality doesn't look good. So I'd like to turn it on. Anyways, here we
got the X ray mode, if I create a sphere. And if I own the X ray mode, I can see the cube
through it. All right? Let me just zoom in for you. I'll show you how I did
that in a few seconds. So here we got the cube
inside the sphere. If you look closely, and if
I turn the X ray mode off, I can't see the cube anymore. That's why you especially
if you're modeling the car, we always turn the
X ray mode on. And here we got the basically
the filter of our port. From here, we can change
the filters of port. If you want it to
be more bright, you can change the
mode to this one. The default is this
one. All right. So let me just reset the
viewport, reset the camera. And let me just
delete all of these. Objects. All right. Now, let me show you how
you can move your viewport. If you go to the view menu, and if we go here camera tools. A menu that has small
dots like this, and if you put your
mouse on those dots, we can right click and that specific menu will
come out as a window, and then we can move
it or close it. Anyway, for example,
if I select this, I can move the viewport. From here, I can track it. From here, I can dolly
basically zoom in, but in three D. From here, I can zoom, but only
in two D, right? Like, for example, if
I create eight a cube, I am not going close to it. I'm just zooming
in. If I want to go closer to it or if I
want to go inside of it, let me just zoom out. I will have to dolly. All right. Like this. I hope you got the difference
of Dolly and Zoom, okay? Let me just reset it for
now, let's just close it. Now, let me show you
how you can move your viewport with your
keyboard and your mouse. If you hold alt on your keyboard and left mouse button
key on your mouse, you can move your viewport,
something like this. If you hold alt and the middle mouse button on your mouse, you can track. On your viewport. And if you hold alt and the right mouse
button on your mouse, you can dolly basically. There is no there is no short
key for zooming, all right? If you want to zoom in, you can go to view camera tools, and from here, you can
zoom in or zoom out. You can dolly with the
mouse wheel as well. Anyway, now, let me
show you how you can create three
D shapes in Maya. Let me just select this
and then delete it. You can select objects
by clicking left mouse, but if you press F, you will get closer
to that object, the specific object
that you're selecting. For example, if I go, let me just create a sphere, and if I move my viewpoint
to somewhere like here, if I select the
sphere and press F, My camera will automatically
get closer to that object, which I selected
and then press F. So that's pretty cool. Anyway, for now, let me
just delete this sphere. Now let's look how we can create three D objects
in more detail. Now, I'd like to create objects from here
from create menu. If I go to create menu, polygon primitives, I can create basically any
three D shape I want. Like this. Let me press
F, like this. All right. Now, as you can see,
whenever I create any shape, Maya automatically creates it
on the middle of the grid. Alright, so now I'm going to
show you how you can create objects with your
own height and your own with basically with your own properties and make wherever you
want on the grid. So go to create menu,
polygon primitives, and then you have to check this option,
interactive creation. Then go back to create
polygon primitives. Now let's create a shape. Now, first we have to
draw the base like this, and now we have to
set its height. Okay, so that's
how you can create shapes with your own requirements
and your own location. This applies with
every other shape. For example, if we
make the tours, first we have to set its base, then we have to set
its radius, like this. Like C. This works with every three D
shape inside of Maya. Now, let me show
you one more thing. If we go to create
polygon primitives, and if we uncheck this
exit on completion, you can create the
shape unlimited time. Let me show you how. So
the tool doesn't exit. I can still create. Okay. I hope you got the point. Okay. Now, let me show
you how you can change the shapes, its properties. Like, for example, if
I select the sphere, and then if I click on
this button right here, there's a window that pops
up called Tool setting. From here, I can
change its properties. For example, the
default is 20 by 20. If I change it to, for example, like ten by six, maybe. Now if I create the sphere, You can see it's made
in a bit low quality. It's not that smooth. So that's how you can
change the tool settings. You can reset the
tool settings by click on this reset tool button. Let's do the same thing with
the other shape as well. For example, tours. We can change its divisions, basically the skull divisions. And, so this is not basically
a tours or a donut anymore. It's basically a triangle. Let's reset it for
now. And here we go. Okay, I hope you got it. All right. So let me
just reset the viewport. Now let me show you
some more tools. Like, here we go
here we got a tool, which has about four
cameras, four views. Like, if we click on it, we get four different cameras or four different viewports. We can move them like this. This camera shows the top, this camera shows the front, and this camera shows the back. We can't create more
cameras like if we go to panels orthographic,
new, and then back. Now, this shows the back. If I want to go back to front, go to orthographic
and select the front. And from here, if we
go to perspective, we can create new, which is going to
be a three D camera because all of these
cameras are not three D. They're two D basically. If you press space space
par on your keyboard, you can basically
do the same thing. If we hold space bar, we get all the tools which are
displayed here, like this. For example, if I want
to create like this, we can create, which
is really cool. Anyways, for example, if I go
to perspective one camera, and if I move here, we can see the camera
in our perspective we can see that perspective one camera inside the
perspective camera. Now, you might be thinking why I can't see this
perspective camera with the perspective one
because we can see the perspective one camera
with the perspective, right? So that's basically the
perspective camera. I mean, the BE RSP is
called perspective. The perspective camera
is It is made by Maya. Whenever we create a new scene, it will automatically it will automatic
matically come with it. So you cannot delete it or hide. Like, if I go to
Perspective one from here, we can select the camera. Okay? Now, if I go
to attribute editor, We got its attributes
or its properties. Now, the attribute error
is basically used to edit or add the attributes to the object you're selecting. Like, I can change
this angle of view. And if I press H on
my keyboard, now, I can't see that camera anymore in my perspective
camera because I hide it. We can definitely
still see with it, but the camera is hidden. If I press H again, now I can see the camera again. And that camera is our back
camera that we just created. Anyways, let me just go back
to front camera, right? Then press F. Now we
got back to our shapes. Okay. So from here, if you click on this
camera lock button, the R camera will be locked, and we cannot move it anywhere. Like whatever we try. I cannot move it from here. We cannot move it from here or anywhere
because it's locked. From here, I can
change its properties. Basically, it will take you
to attribute editor, right? And I can change its properties or angle of view focal
length, everything. Okay. Let me just unlock
it and reset the viewport. All right. I hope you got that. Now, let me show you
a few more tools. Like I mentioned before you
can turn on the X ray mode. You can also change the view to few others like this,
if I click on this. We can see its edges. Like, just remember these
blue lines are called edges. This gray area, which
is inside of the edges. The blue lines is called face. And these corners are
called vertexes, right? So if I turn it on, I can see the material. I mean, its original
color and it's edges. And faces are basically
already visible. All of these are
literally faces, like if I press f the
object and then press. This entire thing right
here is called face. And this line is
called what edge. And this dot is called vertex. We can add it as well, which I will teach you. Anyway, if I click on
this button, wire frame. This will show
only the edges and remove its material
or remove its color. We can go back
basically an xray mode, not exactly an ray
mode because Xray mode definitely shows the
material a little bit, but this will
completely hide it. This will remove it. Not remove it from the project,
but just hide it. Right? So that's how you do it. Here are some other few tools, which we will discuss at the end of the
modeling of the car, of course, because these tools are mainly used for rendering, and we'll do the ranging at
the end of the car modeling. Now, let's talk
about the toolbox. You can find the tool box on the left side
of your interface. This tool is called tool, and this default tool
is called select tool. It's short key is Q. All right? Here we have the move tool, rotate tool and scale tool. Of course, let's
learn the move tool. If I select the move tool and
select any object I want, I can now move it like this. Right? From here, I can
rotate it like that. And lastly, from
here, I can scale it. Now, let's learn
the channel box. After that, we're going to
learn how to edit faces, edges and verte sees in my. So let me just open
the channel box. I can put it wherever I want. Like for example, I'm going
to put it right here. Also, before we
move any further, let me just tell you
about the lock budget. Basically, what it does is. If I turn it on, I cannot move
anything anywhere I want. If I unlock it, or enable it. Now, I will be able to move it. Right. And also, if you go to
workspace, if I click here, and if I click on the
reset current workspace, it will automatically reset
the current workspace. And our channel box
is gone as well. So let me just put it back
here and then lock it. Lock the workspace. Anyway, let me just go back to channel box. Now, the channel box is almost the same as
attribute error. It has almost the same
tool that attribute error. But in a different style
and in a different way. For example, if you want
to manage or make clears, you can only do that
from the channel box. Or if you want to make
materials or manage materials, you can only do that
from attribute dor. So they're a bit similar, but they both have
different purposes. Anyway, in the channel box
from here, you can move, rotate, or you scale your
objects bust in numbers. Down here, we've got inputs. They're kind of attributes. You can change them as well. Like, for example, from here, I can reduce its subdivisions. Subdivisions are
basically a combination of faces, vertexes and edges. So that's how you
use the channel box. Anyway, now, let's talk about the faces, vertexes and edges. For example, if I press be. Let me just delete all of these shapes because
we don't need them. I'm just going to
create a new cube. So if I select the
object that I want, then hold right mouse button. We'll get few modes and tools for the object
you have selected. Like, for example,
if I go to face, this will change its
mode to face mode, okay? Let me just go to move tool, and I can move its face, okay? If I go to rotate, I can rotate its face, and I can scale it as well. If I go to vertex mode, I can move its vertex. The corner is called vertex. Like, every shape has an
edge vertex and face, okay You cannot scale
the vertex, okay? Basically, whatever you do, you cannot scale it. We can definitely scale edge your face like this. All right? That's how you can
change the mode and edit it edges, vertex and face. If I hold right mouse
button on my mouse, and if I go to object mode, it will enter in its
default mode. Okay? If I hold shift on my keyboard, and then I hold right
mouse button on my mouse, we get more tools that are
only used for modeling. Like for example,
if I go to extrude, We can extrude it like that. All right? Now I'm going to go to face mode and then we'll extrude it. Like this face, shift, hold right mouse button, and then extrude face. That's how we can
extrude the face, okay? And that's how we
model cards as well. Okay. All right. I
hope you get that. If I press control
Z, it will undo. If I press control,
y, it will redo. Okay? Now, the last thing, which I'm going to
tell you, is how to save open and create new files. I told you how you
can create new files, but you can create new
files from here as well. The short key of new scene
is Control N. F here. I mean, from here or from here, you can create new scenes from here from here as well, okay? We can open scene from here
and from here as well. Let me just press Control O. Okay. And now you have to select the location of the file
that you have to open. Like, for example, let
me just open this. We have this file
opened, all right? Okay. Let me just
create new scene again. Don't save. And if I create
this cylinder, for example, and then press Control
S or click here, we can save the file, okay? Save on desktop, and then
name it for example, T. Okay? Now, if I go to home, open, we can open seat
from here as well. We just open this, and
we got our file opened. We can save as well, like if I create this cube. I want a file that has only cylinder and another
file that has this cube. Like this empty file
shouldn't have this cube. Like this empty dot B
shouldn't have this cube, but I want to create another file that have this
cylinder and the cube. Okay. So for that, we need
to go to file and save seen as empty two. It's not basically empty. I don't know why I
name it to empty. Let me just name it to
empty two just for now. And now if I go to home, we got all of the
files recent files. Empty has no cube. And empty two has cube in it. Now, now, this will not work, like if I create cone now I want empty three file
to have this cone. And before saving as, I press control S, and then file save that will not work
because I just saved it. So you shouldn't save first
when you're saving S. Like if I save as, empty not really empty empty. If I go to T two, There's a cone inside, okay? Solem is deleted and
then control S. Now, if I go to home, mT
three has a cone in it, but mt two don't. Just because I deleted
that cone right now. I hope you get the concept. Before ending up this lecture, we need to change our
interface a little bit. So let me just click here. Outliner, we got the outliner. Now, what is outliner
Outliner is basically a place where you see all of the objects that
are in the scene. For example, if we want to
make a group of something, and then I decided to add
something in that group. We mostly do that
from the outliner. Anyway. I'm going to go to windows, setting, flash preferences,
color settings. From here, we can
change the color. And if we press to
be on keyboard, I can change its color, and there's even a
gradient one, right? So let me just select
this to a bit red, maybe. I mean, let's just
go like gray one. Like that. Okay. Then save. Next thing that I'm going to
do is go to display grid, click here, and change its properties like
40 by ten by 40. Apply. Then what I'm going
to do is I'm going to change the axis to the
grid lines and numbers to, I believe, then save This
one black and this 1 gray. Yeah, basically. Let's go with this one with the gray
one and this one is red. Yeah. Let's like this one. Then close, and we change the color of our
grid and the viewport. Now we can save this workspace, save current workspace as and, for example, do like
three D modeling. Okay. All right. I
hope you got it. This is the basics of Maya, how you basically use Maya. Now, when we will
start car modeling, then we will use these
tools in detail, and you'll get the concept in detail and in a
better way easily. So yeah, I hope you
enjoyed this lecture, and I will see you
in the next one. Bye.
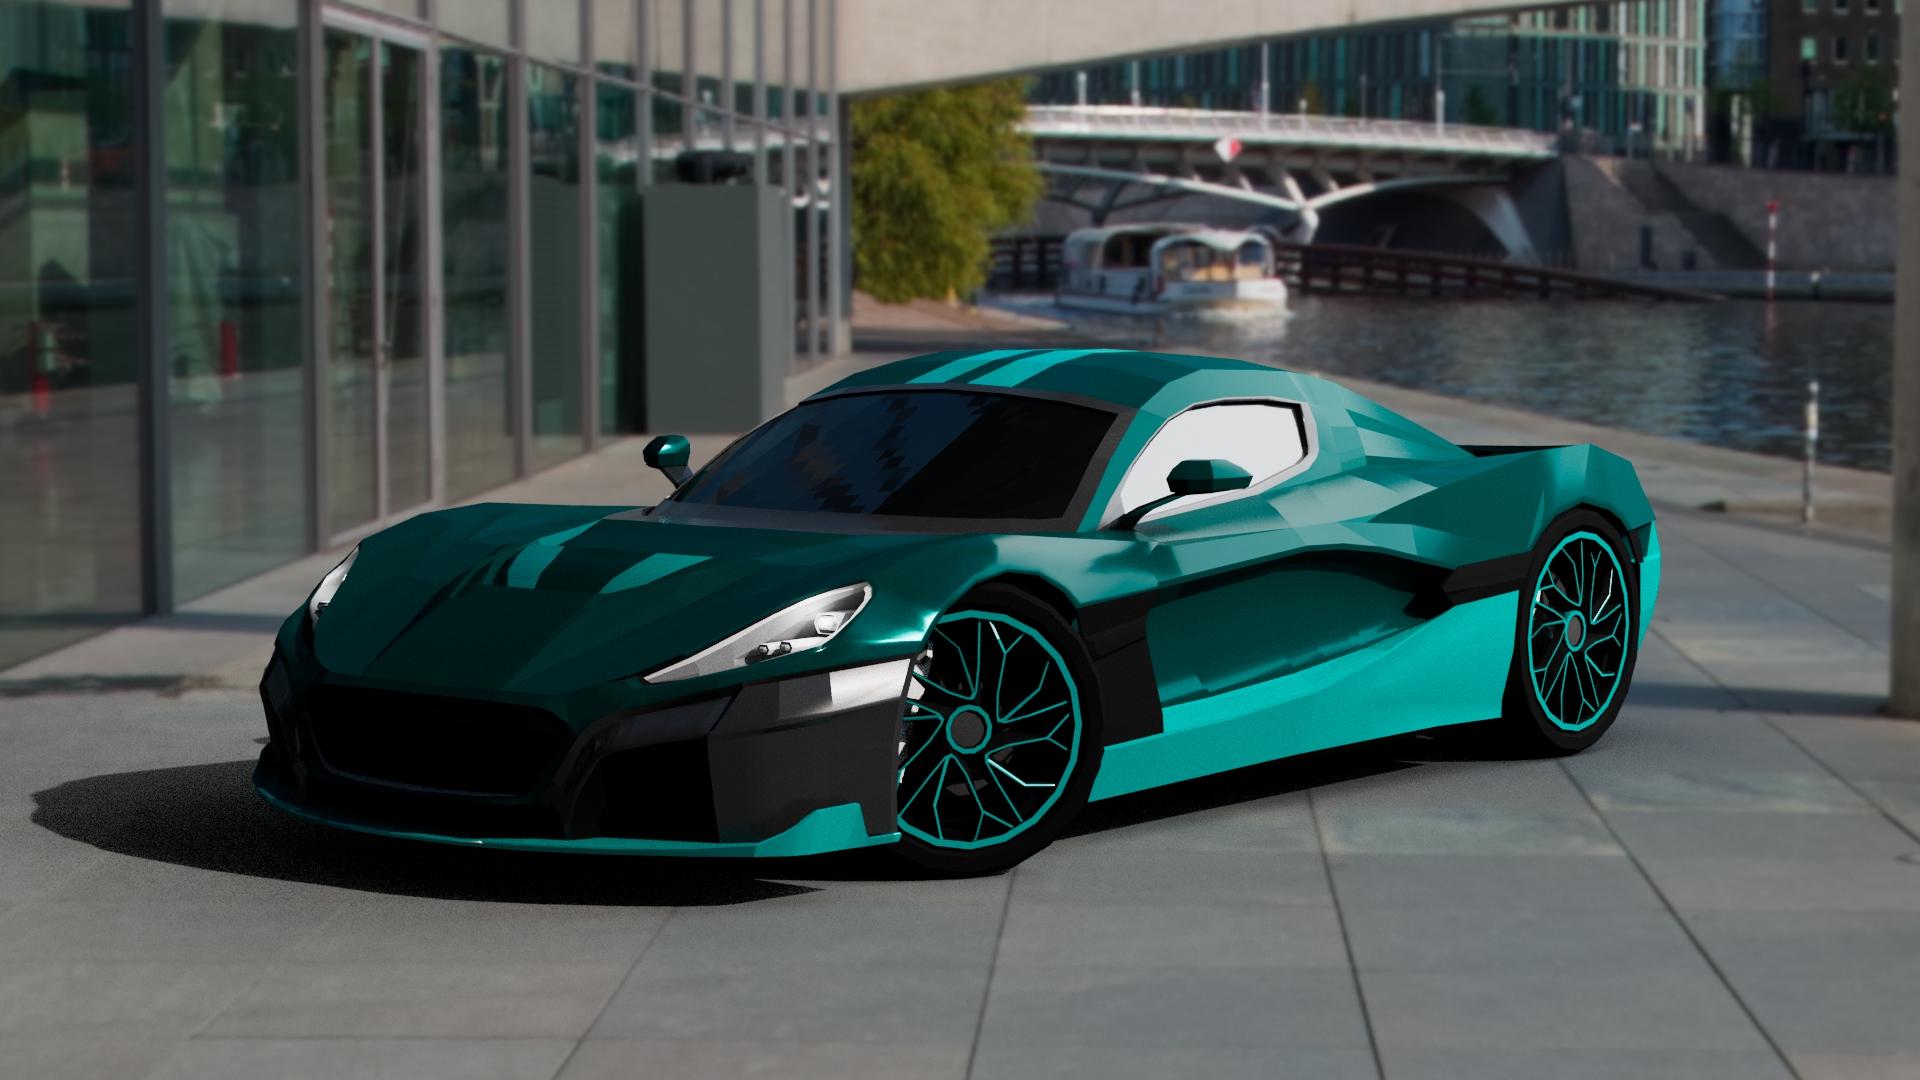
3. EP 1 Importing Blueprints in MAYA: What's up, everybody,
and welcome back. And this video we'll be
learning how to import blueprints in Maya.
So let's get started. Okay. So what you
have to do is you have to download this
blueprint file zip, and then you have to extract it. And once you have it extracted, you will get a folder
called blueprint, and then you have to open it. And in that folder, you will get four images of the blueprint, including the main
photo of blueprint, which we'll be having all of
these four different views. Okay? Now, this is a car model
by Vera Tech on Sketchfab, which I purchased
and downloaded. Then I rendered it and made
blueprints for it for you. Each of them have its own
different photo each view. Okay, once you have
it downloaded, now let's go to Maya, create a new file. Then, what I'm going to
do is I'm going to press control space bar on my keyboard to enter in full screen mode. Then I'm going to
open the outliner. Okay. After that,
what you have to do is you have to press space
bar on your keyboard. Now, you will get four
different viewports. Okay. Go to top view image
plane, imports image. Go to the location where
you saved your blueprints. Now, in the top camera, the image you are going
to import is going to be the top -100 Import it. Then let's do the same
thing with the front. Ve image plane, imports image. Copy. Let me copy
this path front side, do the same thing
with the side camera. Okay. After that, what you have to do is
have to go to panels, orthographic, and then create a new camera here called back. Okay. View image plate
import image, Now, whenever you import an image
plane on the back camera, it will automatically
create there, okay? So what you have to
do is you have to bring it right over here. The the back view should be
behind the front image, okay? Then select this front
camera front image, I mean, then go to channel box, then rotate it to 90. Or I think 90. And then what you have
to do you have to go to rotate y and then type here 90, 90, okay. After that, what we can
do is we can select all of these blueprints,
all of these images, except the top and
then move it right here somewhere,
right over there. Okay. After that,
I'm going to rename the back one camera to back
then put it right here. Okay. When you have to drag or move anything
in the outliner, you have to select from
its icon, like this. Then what I mean is to
rename these blueprints, these photos like
this one is top. This one is front. This one is side, and
this one is back. You can rename it
by double clicking, or you can rename it from here or the attribute
editor, right here. Then what you have
to do is you have to select these four images, then go to edit group. The shark key for grouping
is Control G. After that, I rename it to blueprints. Then collect all of
these four views, and then you can
press edge to hide them. Now they're hidden. That's simply how you
prepare blueprints. One thing that I want
to do is I'm going to change the panel to
graphic and then front. Then press F in every
view in every viewport. Now, turn out the grids
because we don't need them. Also, turn on the X ray mode. X ray mode is basically
if I create a cube here, and then scale it, I can see through it. I can see the image
plane through the cube. So make sure to open that Let's do that in
verview verview port. And then we're good. Also, let me go to perspective camera. If you press Alt four
on your keyboard, not Alt four, Alt four
on your keyboard. It will automatically
hide your image planes. Basically, whenever you're
importing blueprints in Maya, you will import it
from here, okay? And then when you
import it from here, it will be it will be imported
in a type of image planes. The logo for image planes is, this type of icon is
for image planes. Let's put that right ward. Okay. Because why not? Okay. So that's how you
hide your image planes. You can hide the
form here as well, go to show, then image
planes like that. Or, for example, if I create
a cube, and then scale it. Now, if I go to show,
and then polygons, the short polygons is two, all of the all polygons will be automatically hide in
the perspective camera. I can see in the front
or the side camera, but not in the
perspective camera. If you want to hide
in front as well, you have to go show and
then polygons. Like that. Let me just press
two to bring them back and in the perspective
camera as well. Okay. Let me just delete it
because we don't need it, and then four on my
keyboard as well. Who's default fighting. Also, don't forget to save
your file. File, save. Okay. So the next with you, we will be starting off modeling
the car, the actual car. So for now. Okay.
4. EP 2 Modeling the Main Body: What's up by everybody,
and welcome back. And this video we'll be
learning how to import blueprints in Maya.
So let's get started. Okay, so I'm going to open the blueprint file that we just made in the previous episode. Okay. After that, I'm going
to save scene as this file. I'm going to create
a folder here. Episode two. Okay. Modeling, the main body. Open that and then in this file to main body. Then save as. Okay? I'm going to press control space bar on my keyboard to enter into full screen mode. Now I can start modeling. Now, from where I like to start modeling is from this part, from this section, go to create polygon primitives
and create a pipe. Go to channel box plyipe and then chain the
thickness to 0.07. Okay. Something like that.
Then scale this, and then we can
rotate this two 90, rotate Z, and then
give it at 90. Okay? Will automatically
rotate it and then put it right here. Okay. That looks perfect. I think we can change this to
maybe like 0.06. Yeah. That looks perfect. After that, we are going to
put it right here. We're going to adjust it from the front camera as
well. Like that. Now, all we can do is we can
change the filter to U and tune mapped because it's
more brighter than usual. Our image looks
really dark so we can change it. Now it looks better. Okay. Now what we can
do is we can enter in face mode and then
delete these faces. After that, delete
these faces as well. Now we have to
adjust these artexs, enter in war text mode, and now let's start
adjusting them. Put that are there. This
one should be here. This one should be here. Let's
put this one right here. Scale these vertexes. Now, you can scale two vertexes, but you can't scale one vertex. For example, if I slight
this, I can scale it. If I slick both of these, now I will be able
to scale them. Okay. Put this right over there. After that, let's do the same thing with
the front as well. Controls that to do. I will be doing a
lot in this course. 'Cause I'm modeling it
live with you right now. I did not model this before, model this car model. This model. I do have
model cars a lot, but never model this card. Okay. Anyway. Now, I'm going to teach you a tool
called Multica tool. Go to mesh tools, Multica tool basically
with this tool. You can draw an edge. So click on a vertex and then on an edge or a vertex
anywhere you want. T you will be able
to draw an edge. But we don't have to draw
it right over there. We have to draw it right here. Then press enter, it will automatically make
you an edge, okay? Like this. Okay. Anyway, we are going to learn one more tool
called insert edge loop, go to insert edge
then basically, you have to draw an edge
to make an edge, okay? Like this and press enter
to finish or exit the tool. Okay? Everything looks perfect. Now what we have to do
is we have to adjust every one of these vertex
in the front camera. Not every, for example, we have to adjust only these, not those, select these, one, two, one, one, two, three, four, five,
these five edges. These ten word taxis, basically, these ten word taxis. And then put them
right over there. After that's like
these two warts. These two, put them right there. These two should be here. These one should be
here, right here. After that, what we can
do is we have to go to insert an here. Go to vertex mode, put that right over there. Anyway, after that's the
tumor taxes right there. After that, if you press, it will automatically open the tool that you
lastly used, okay? So if I press D, it will open the insert edge loop because that's the last
tool that I used. So insert an edge
loop right over here, and then put that right
over there, like that. Text mode, put the
downward. Okay. Looks perfect. Okay. Now, we can't see the back
section like this, this this back section of
this mesh in the blueprint. So what we have to
do is we have to check the real
images of this car. If you have a three D
car model of this car, you can check that as well. For now, I'm going
to check images. Search name of
this carmivers 22. That's the car that
we're modeling. Then we can check images. Okay. So Let's find
that we want to check. Okay? Let's open this image. Let's open this one as well. Can we open this one as well. And this is the mean
that I was looking for. Okay? Oh no both images
are basically the same. Anyway, so this is
how it is modeled. Basically, there's a
curve or something. Okay. So go back to Maya,
select the mesh, and then what we have
to do is we have to basically move it inside. Yeah. There is a curve only here, not here, I think. So let's just do that
for these two wixes. Okay? Okay. Our or
texts or our part is now the's time to start
extruding this mesh. Okay, so select the mesh
and then go to edge mode. Then what we are going to do is we are going
to select this edge, then hold shift and
double click here. This will automatically select all the edges that are in
between these two edges. Then we're going to do
is we are going to press control on our keyboard. This is with this by
pressing contro you can extrude or you can control, or you can go to edit mesh and then extrude
from here as well. Then extrude it like that, and then now let's
start adjusting. So put this word
text right here. This one should be over here. This one should be right
over here, scale them. These two word taxes, like that. Let's put it right here. This should be here. Put this one right here. This one right here. We can insert energy
loop here later. Let's put that right here. This one should be
right right here. Then go to mesh tools, insert insert gre and here. Sure. Then what we have to do is we
have to adjust them in the French camera or the top. Let's take the top as well at
the same time. Right dear. And right. Yes. Like that. Put this one right here. Okay. Right here. This one should be here. These are already perfect. Okay. Then this one is off. Basically, where you have put your word text or edge
in the side camera, you have to put it the same where it is in
the side camera. You have to put that in the
front camera as well, okay. In our case, it should
be right over here. After that, let's insert loop. Then what we can do is we can go to a mesh tool and
insert an edge loop here. We need an edge loop. So then the three taxis
and then put it by. Then the tax. Yes. After that. Okay? So. After that, I'm going to move
these two taxes here. Oh, wait, now, it's already. We don't have to do that. Okay. Basically, we need this
part a little bit inside. So that's what I'm
doing right now. Let's check reference
images, okay? So this is a little bit inside. So that's what we
are going to do. You say perfect. I'm going to move this way. After that, these two edges, and then we're going
to extrude these or let's insert loop
two edges, gps. Okay. So again, let's
these two edges. Control E, put them right
here, right over here. Okay. Like that control again with that right. Now we are going to move
this words downward. Then insert energy loop. Like that. Insert one more edge. Okay? Like that. Me perspective camera. So basically. Basically, we don't need an git. Y? Try perfect. I was confused with this part. This part is basically
this, and this part, this line is coming in front
of this section, Okay? Okay. So patrol, that's
put it right here. And to adjust them that. After that, control E to extrude again. Like that. Something like that. After that, again, extrude, right over here. Now, what we are going
to do, we are going to insert a newer, okay? After that like these
two edges, hold on. I just move this right here. As I control E. Again, get to go to ge Mo Control E. Control E. Well, in an edge loop here. I think we will be doing
two edge loops, I believe. So we'll do that in a second. Slightly. There. That Must insert in a loop by pressing g to open the last
two that just used. After that slick these
two edges. Or hold on. Let me just insert here. So go to mode. These two it is control
old x to snap snap. Basically, when you hold x, it will automatically
open a snap mode, which you can use to
snap on the grid. For example, if I
turn on the grid, now I can snap my
mesh on the grid. Let me just open the
viewport so that you can understand or see
easily. Scale it. Now by hold X, I can snap on the grid, hold x to snap on the middle of the grid
because after that, we are going to
duplicate this part, this right part to the
left side, do that. Let me just turn the grid. Put this vertex here. Right here. This
one should be here. Okay? Okay. After that,
we're going to do. I'm going to go to
me insert a loop. I think we need to
me. Yes, we do. Okay. Let's insert an
loop here as well. Okay? Mesh look smooth. Okay. After that's like
this edge loop. I mean this edge,
not an edge loop. So what I'm going to
do is I'm going to insert an edge loop.
Then we'll go there. Then we'll extrue this part. Let me just insert
an edge loop here. Okay. After that's like
this edge control E r. Wait. Let's do the top
camera for this part. After that, again, press control E d x to snap on the grid. We are going to snap in
the middle of the grid. After that, go to mes tools, is there a here Let's move it up upward. This one as well. B
this vertex right here. Let's take this part. That looks smooth and perfect. Now we are going to do we are
going to press control S, so you never lost
your file if you Maya or your comparator
accidentally crashes. Safe better. So select select this edge, then double hold shift and
double click on this edge to select all of all of the edges that are
between these two edges. After that, w per Like that. That's already
perfect. That leaves. After that, let's come
back to this part, control E. Select them
and then press control. No, no. Basically,
this part so be here, this ortho be here. This one shod be here. This one here. This where text should be here. Okay? After that, press control. Now, if you hold, now you can
snap a vertex with vertex. Basically, you can snap a
mesh with the mesh, okay? It can be phase edge or
an object, anything. So hold to snap this vertex
with this vertex. Okay. After that, no
adjust this vortex. Ho that right here, right here. Basically, it used
to be, I think. Let's check our fence images. Okay. Let's put that right. M two will insert an year
later, not right now. I don't know why I opened
that in two. I don't know. Let's move works downward.
Thing like that. After that, mesh tool at
look now we are ten A look. Like that. Let's put his way into the air. I'll wait. Let's be back where it was. Yes, basically. That's
how it modeled. It's modeled. So that's
how we have to model it. Keep checking your
reference images or your reference model
whenever you're modeling. Okay. After that, what
we are going to do. Yeah. So remember, we merged, we basically snap this
vertex with this vertex. So whenever I
select this vertex, not both of them
are being selected. So what I have to do is
whenever I select this, both of them will get selected. Okay? So we have to do
is we have to select both of these vortex right now, whenever I want to select
Both of these vortexes, I have to drag and
then select. Okay? But what I want is whenever
I click one of them, both of them get selected. So what we can do is we can
merge them, so select them, both of them by dragging
and then go to merge, merge both of them are selected. Both of them are
merged together. So whenever I select one, both of them will get selected. Okay. Anyway, after that, let's extrude more, select
all of these edges, holding shift, then press
control to extrude. So snap this vertex
with the Yes. Snap this vertex with
this, and move them back. Now we can merge them.
So let's do that. Then we'll insert
at loops and then we'll snap them with
these vertexes. Okay? So let's move
this one there, right over there, right
there and right there. Let's move this right here. Are you to move here? Now, what we have
to do is we have to select these these three edges, and press control E. Then
snap this vertex with this. This one shod be go. Snap this vertex with this. Okay. Downward. Okay? That's what we have to do. Before we extra more, let me just insur two loops, then snap them right here, and then select added
mesh, and then merge. This will automatically
merge all of the vertices that are
snapped with each other. Well, I don't really recommend
it because for example, if this vertex is really
close to this vertex, and then I didn't
mention that merge. Sir. Now can merge. This will automatically
merge both of them. And in reality, we might not
needed them to be merged. So that's why I don't
really recommend it. Okay. Okay. After that, we are going to do. We are going to select
these edges, control. Direct dear. What that. And then control E snap
in the middle of a grid. Okay. Then I have
some tax. And then. Yeah, I remember I said
I don't recommend it, but what I remember is there is no word text
in this mesh right now, right now, which is really closer to each to the other one. Okay? But yeah, I don't
really recommend it. I shouldn't do it.
I shouldn't have? Anyway. Let's put this here. I know. Slick this. Then what we can do is we have to mesh tool in the edge loop. Then what we have to do
is basically we have. Basically what we
have to do this edge. And then shifts this. That again. Okay. I think I triple
click, I believe. I think or whatever, select these that is then
press control right now, move them downward like that, then press control,
and put them right. Now let's adjust them. The snap them. After that, let me go to aim and
then merge wait. I said it's not recommended, so select these two edges merge. I believe this also the
last tool that you just. I will be giving comment
on every tool that I use, so you never forget. Okay. Anyway, so after that, control, press again, control, again, we are going
to move down. Okay. Then or wait. Let's not extrude it right now. So we should extrude it. But this will be the last extrude for this
mesh for this section, y? Because we will be adding
these two parts or these two objects
later when we will be adding details to
the scar. Okay? Mm. Okay. Control S looks perfect. Okay. So basically, the front section of
this scar is done. We will make this part later when we'll be
making the details. Okay? So what I'm going
to do now we are going to go ahead and make the
side and the back section. So let's do that. Let's
start doing that. We don't really need an
edge loop right here. So what we can do No. Let's go to multictns Let's go to multicu and draw an edges. We can draw multiple
edges with this tool. Exit from the tool
and after that, select this and Then press control to extrude. Let's put that right there. I does this. Then go to me to insert. What text mode? D edge loop area as well. After that edge control. Right, dear. After that
go to my shoulder loop. I don't know how many time times I have said Insert Edge loop. True and insert edge loop is the main key of
modeling any department. Okay? G to open the last tool
that you just used. Okay. After that, select
these four edges, yes, then press control E, hold x to snap of the grid. Real now it out right now. Now it's right there
that is right there. So move all of these
vertexes there like that. Then go to mesh tools or group, the straws A zero b I mean. Okay. Now, what we are going
to do now is we are going to change the
camera to back camera. Okay? We're at the
back section now. So let's select control. Control E here or tax mode. There Maged holes and loop three loops that there select these two edges. Control. Let's put that right
there. Right here. And let's put that right here. Select from side. Okay. Okay. After that. So basically, we need to draw edge from here till here. Enter mode. Is that right there. After that, slightly
that just control that **** more Old we
just snap that ****. Then why are you do
them to edge here. Like that. After that, like this, then
shift just like this edge, both of these, then hole
shift and right mouse button. Then click on this,
not click on this. Just put your mouse or
cursor on the bridge, and then you release both of
these moon and the shift. I will automatically bridge
both of these edges. After that these three edges, control, Now, snap this. I mean, this vertical with this. And this one so with this. This should be here. Is that side. Like that. Added me. Two, and then Let's put that idea. Let's check our persimages. We search for the top view. The top view. Okay. So basically, we have
to put them right here. Actually, I don't think it's a great idea to merge
all of these vertexes. So put this, right? And then put these
vert right here, right here, like that. These two. Okay. After last select this
edge Control E to snap. Then select this edge
Control E again. Like that. So this one should be. I mean, this one should be
right here, right here. Let's bring it back.
And there the look. Then exert miss
Loop here as well. After that, select these edges, 1231, two, three,
four, yes, four. W here Snap quortx with
this with that, I mean. Then we can do
select these edges. In control true these two
edges and adjust them. I think Let's put that idea for now. Then select this edge
or no, this edge. Basically, all of
this whole shift and double then press control Put that right here. My God. This one should be a
right ear right ear. So. Yeah. After that, all we can do is insert here. Is like both of these edges, shaft and right not and then is. Then double click on this. This polls out all of
these three edges, then shaft and right not. Simple. Okay. That's
likely that is, that. It's just like test. And lovely ideas. Control. Let's put that right to you. Basically right here. Then that. And with that. After that, with
that right there. We will cut here. We cut I mean this
face from like this. The loops. Like that. Let's insert one more edge. After that, slick these two
edges and then bridge them. I think they're already bridged. Yes, they're already bridged. Slick these two and
then bridge them. Wait, no. Hold ship to the bridge them. G. Let's select the vertex. So basically, you
shouldn't select anything when you have
modeled, for example, if you shouldn't select
anything like this, if you know there is something behind this vertex as well. Basically, for example, if I select like this, this section, it might select vertex that
are behind these as well. For example, you shouldn't
select like that. It might make problems
in your mesh. Select from here and there. Control is S C. This takes this right
here. I be right. We will insert loops. Fix this mesh. Okay? This
looks perfect for now. So let's insert loops. I here here and right. Put this takes right here. This one would be right
here, right here. Let's insert two more. After that, what we can do is I'm going to go to mesh tool and dirt edge
loop plus dirt gp here. Put this right here like that. Then these two edges, control, bring it right here. Then Pest Control E again. Bring it right here,
snap both of them. Right here. Control E. Now I'm going to merge
both of these taxes, mesh tool and sera wait. Okay. Let's merge both this and mesh merge merge. You know why I cannot
change the loop. Controls that controls that So this is put right
here and control. I immediately press W when I stewed here, Merge Multica tool and chair like that. After that merge here. Now, let's snap added meson. Now let's go to merge two
into the glue mean here. After that, Okay. After that, we can do, we can s this edge. Look at that. Then I am going to press
control E. Then, first, I am going to hold V and snap this word with
this word text here, but in x xs, only in x axis. So you can snap with one
selected axis as well. Okay. After that, again, press control E. Yes, control E right here. Now, what we can do is we can mesh to insert in
this loop like that. After that, press control again. Now move this tics here that Then we are going
to like this and then press control keyboard, right here, like that. After that mesh tool
in the deg loop. Well, actually, let's
just put it right here. So like this. Like that. Mesh tools that you need. After that, after that. I suggest this first.
Now after that. Now after that. So
like this edge. Yeah. Before that, what I'm
going to do I to go to and edges like this. Now, what I'm going to do, I'm going to draw an edge like this so that this vertex
also have an edge. Then delete these faces. These faces, yeah,
hold tab and you can select these faces
like this, okay? Yes. Okay. After that, let's
let these eight edges. Press control and keyboard. After that them. I mean, minappen then. Okay. The body is done.
Basically this is done. Okay? Well, there is one thing left. Still, which is this part. Words You see it automatically merges,
which we don't want. We just want this
takes to merge. Okay? After that, let's press control After I left controlled the old snap it to
middle of the grid. Snap Okay. Then like these
three is controlled. Like this. Just like this edge. Control E. Ms to insert loops here. After that, like this. The lick here. The well not here. So let's just this edge
here and press control. I think we need to write
the septics with this. Okay. I think. Well, actually, not like that. I have checked a few references. Let's press control. Basically, we have to select
these three edges Control E. Then we mode snap this word text with this. Like this. Like. Thus the album to this part. I mind, This section is ready. We'll make the spoiler later when we will be adding
details to this thing. The last thing that
I'm going to do, we can go to edit. Or well, not group, we have to press D
on our keyboard, and then click right here, to center the pivot, and then control D to duplicate or you can
duplicate from here, added duplicate, and then
scale x, put minus, -3.258. I think we have to do
it with the z -3.258. Nope, maybe. Yes. Now we have duplicated our right
side to the left side. This is not the final.
I'm just giving you. This looks perfect. I hope you get the same result as me or
even better result as me. So the next episode, we will be adding
details to this thing. This looks in same. S in
the next episode pro.
5. EP 3 Adding Details to the Body: What's up everybody,
and welcome back. And this video will be
adding details to our car. So start. All right. So let's start adding details. Now, one thing that
I want to tell you about is as you can see, there is no tool
that we discussed here on top of a top view on top of the
interface basically. And I want those tools back. Basically, that line which have those tools is called
status line, and it's gone. So this happens to
me all the time, and it might happen
to you as well. So I'm going to tell you
how you can bring it back. You have to do is you have to go to windows settings,
preferences. From here you can basically
change the things of Ma. Go to UI elements and bring
back the status line. That's how you do it. Let me just turn that off. Object x. We might learn this
tool, object x Lor. Anyway, for now, let's
start adding pails. So I'm going to
delete this shape, this left side of the body
or left side of the yes, left side of the body. Because this was
just for an example. So let's delete pressing
delete button on keyboard. Okay. So I am thinking to start from
here from this section. And, let's do that. What we can do is we
can open this or turn on wire frame on shaded mode, y. On the top, basically. Okay. So let's go to edge mode and start by inserting
an edge loop here. Vertex mode move
this vertex down. Then we can do is we can select this edge
right here hold on. Uh, yes. That's how we want. Yeah. Anyway, go to edge mode, select this edge, hold shift and select all of these edges
that are in between. Basically, hoops, not like that. Yes. Slick this edge as well. Then press control to ex that. Let's start by I
just think that. Okay, so select this and
snap this vertex with that. And all we are going
to do is we are going to move this inside like that. Then select this vertex
on your ear, like that. Like that. Way like this vortex right here. This Vortex, as well. So like this Vortex,
put it here. Like this word text. Like that. And then snap this
word text with this. Mgh tools or hold all we can do is we should have merged them when we
snapped right now. Merged After that, this edge right
here, then press control. Move it first. Then put that right there
and this one here, snap this t with that. Then me down a little bit. Then what I'm going to do is I want to go to the
mesh tool and there is. Let's try scaling it first. Scale it from the top. List one more vertex adjust
that vertex. Put it down. Put it down a little bit. Okay. So after that, let's go to mesh tool
in the edge loop. Let's move this edge
a little bit up. Not edge all of these edges. Then go to vertex
like this vertex, and I'll move this upward. After that, what I'm going to do is I'm going to go to Edge, double click on this
edge right here, then press Control
E. Control E. We can move it from the ex tool and then
scale it or hold on. I press control. Controls until that
extrude never happened. Control E again, and
now I'm going to simply press R, then scale it. After that vertex mode, start by distin vertex Today. Today, dear. God. Okay. This should be right here. This one should be here. Let's have this vertex
with that previous vertex. Then go here and
then we'll select. So that nothing gets
selected from from behind. P that vertex right there. I mean, not move the Or maybe, yes, we can move
them. Like that. Okay. Hold on. I got to check
the reference photos. Me. Yes. I guess who modeled
it correctly. They did. I believe That's good to object, and then check. Perfect. Okay. And then Let's I guess we
have to where sixes. We did not adjust them, adjusted them from
the top of you. Anyway, let's go
to create polygons and create a claim Okay. After that hole
just snap this mesh with this vertex so that
I don't have to move. It's like that to to redo that shape so that I
don't have to move this plane mesh
all the way here. I can simply snap it and then
put that right over here. Anyway, so go to channel box. We don't need this
much division, so subdivision basically. So we can give it one by one. After that turn off and walk. Let's rotate this by holding J. After that select this vertex
snap that vertex with that. This one with that downward, select this snap again right Snap Like that Wait. Mm. Let's just so like that. Uh, like that. Control that. Let me
put it right here. Put it right there,
I mean, okay. After that, first
control E to extrude. Mm. I mean, wait
to control that. Let's just follow
the side as well. Yeah. Yeah, school. Or we can try my u Moving that takes.
Yes, basically. I guess we have to follow. We have to put it right
here because that's how it looks in the reference
during the real life photo. So let's never ignore it. Follow that anyway. So like this edge controlled. So what I'm going to do is
I'm simply going to put that put this edge here. And then we'll insert
edge loops here. Because I think I found inserting
edge loops much easier. I mean, if you want to try, you can go by extruding
it if you want to. You will learn more by doing
experiments like this. It's not really an experiment
by trying new other ways. A way so here. Go to open the last tool
that you just used. Word takes mode. That G invert. Like that. Move these vertexes right there. And yeah, perfect. After that, what we're going to do is that we are going to go open the edge mode,
enter edge mode. After that these edges
by holding shift, then press control scale that then adjust these or texs ideidea then. Like that or let's use the
top view because it's to see. We can definitely look at
the ref fence as well. I mean, look at the original
car that we are modeling. Not like that. Okay. That's okay. So after that's like
these two edges, I hold shift or less like these four edges because that's how it's modeled, or that's how it's
made in the photo and the real photo a
real photo of the car. So then press control to After that, like these
two edges, control. Now, go to vertex mode. What we can do is we can
snap this vertex with this. Then snap this vertex as well. Then the mesh tool. Is there a loop. Put that right here. Okay. After that, we can
enter meson the merge, just a small shape. So I guess we can simply merge. We can simply merge it. Not really big of a deal. Okay. Like that. So after that. Let's put this ps right here. First, then So like this edge shifts like please. Should we make this as well. Let's look at some
other photos as well. I mean, it's not made
in this blue print, but we can't evitably
make it if we want. Yeah, I think we make it. Anyway, let's press
control for now to extrude the move it
somewhat like fear. Then. What we can do is we can select the three edges and
press control E. Right here, right there. Okay. Uh, I guess. Let's put it right here 'cause this part is going
to be for this light. What takes bad mood this
per takes up there. Then we can do is. What's So let's extrude this part, I guess. Control E. Let me
go to vertex mode. Lessons and first, let's, let's go to Vertex mode. Then select vertex down one. What right here. So let's select these
two these two edges again and press control. Well, let's not rotate it. And then Let's put it somewhere here. That's t. Than press control E almost done not almost
are basically done. And select this vertex. Put that right there. So these two vertex that So what we can do is we
can select these for aced and move them a
little bit to the left, I guess, so that we can see from here from this angle that's how it looks
in the image. That's what the angle
shows in the photo. No. No. No. No. No. No. C. Then mesh tool inserted loop. I mean, extruding is easy, but adjusting them is
a complicated part. Let's insert the loop here that Control S to save the
scene. That looks perfect. So after that, I guess I
should have done this before. What I'm doing right
now is I'm going to double click on this
head to stack all of these and press control and then move them, I guess. So. What was that? I was just not move it
upward or downward. Let's not scale it. Then, what I'm going
to do is I'm going to press on this
button right here, which will make me only see
the math that I'm selecting. I can edit or I can
do whatever I want with the meth that I
selected and then tres. Okay. After that, this edge and this edge shift told shift and right mouth button,
then bridge them. The double quick on this. You can bridge three edges, but not one, of course. Shift bridge. G to use the last
tool that you use. I mean, we can select or well, then press G. After
that, select. I don't know why
you can't press in this isolate mode
is called ate mode. Anyway, after that press
again, we're done. Perfect. Then let's
model this as well. Yep. Let's look for a closer photo
of this provides. I mean, I think the shape is is not really like it is
modeled in this blueprint. I'm going to show
you how I think it's basically
made in your life. So let's create a
plane to snap here, hold been then snap
here with any of these vortex with any of the
front vortex of the body, then subdivision with two one. Then hold tate two 90 t to 90. Then Basically,
I'm going to keep this plane right
here and then make another duplicate of it
by pressing control D, control to say s. Let's
this Managed to loop. Okay. After that, S this.
That's how I think. I think it then we
can press control. Like that, W. W d control E R to scale it then
press control again. And press control again. Scale it again control. After that, all we can do is we can go to
it meson then Bevel. This is another tool. All right, never mind. We're
not going to balance this. Controls that controls it. I don't want to
do it. Let's like these two faces control. Let's do this. Okay. Los Then put it somewhere here. I think what we have to do is select this mesh
then isolate mode. Then select these edges. We shift to all of them
and put them right here. Okay. Now, let's it. O. After that control D. Let's scale it a little bit. Like that. I guess it's so far away. 'Cause it looks to this
object to this part in them. So we're going to do the
same as our model as well. Okay. After that, what we can do
is we can control D again. Scale. I mean, scale
Control D to duplicate and an scale Mash to consider two
edge loops here and there. Select the taxes
are. Let's do this. I don't know why
inserted these loops, but let's just do it. Okay, so the front
light is done. Then after that we're g to do, is we are going to
model this part. But So, I mean to
hold space bar. Yeah, Maya. Go to Maya. Click on Hold on Maya. And then I mean hold on this Maya text and
then go to perspective view. We can do this like
this as we Okay. Any way. Well, what I'm going to do now is I'm going to press Control D, enter an isolate mode. Select this mesh right here. Remember to control D.
Then select these faces, and then move them right here. Then hold shift and
select all of this. Now all of this will be
selected except this part. Then press the lead, then turn out the isolated. We got the cover of
the light lights now. Which we will change its color to transparent. That's perfect. Now, let's start making
this part really quick. Select this whole ship and select all of this. Let
me just check this. I mean, we can select this. And what we can do is we can
put a move this word tax. You can insert a loop as well. If you want. Anyway,
after that control, Control that. Let's just scale it. Don't do that extrude do that move of the extrude if you've
done it as well with me. Anyway, I adjust these Right there, right there. Right there. Like that. I mean, we have to
move this vertex. This Vortex should be here
because it's behind this. Let's select the tree
vertex at the same time. Then we can do check
reference. Okay. In the press I tend, I did a sharp key
for hiding something in Maya hiding in mesh. Anyway. Like that. And like that. Yeah. Oh, God. I should have looked
at the top before. Uh. Um. I mean, uh. Yeah, I don't think this is
behind other than this yes. Yeah. After that, You can move this vertex downward. Same with this vertex. This vortex should be
right here like that. After that, snap the vortex. Then insert an edge loop here. Then move this
vertex down there. That there one more
edge loop or maybe not. Okay. So select all of these all of these
edges that we extruded, then press control on them, and then put them right here. Then snap this vertex that text. Like that. Okay. Then all of these taxes at the same time. Not
at the same time. Move them at the same time. I guess to make
it more detailed. After that, what I'm going to do is I'm
going to merge this. Okay. Control S s s. So what I'm going to do
here is I'm going to select this three and press
control, right there. Then I'm going to do is I'm going to merge
this word text with that wordex All we can do is control mesh
tool in the rite loop, snap this takes that. Now we can snap that. Also, let's snap this as well. That's how it looks
in the image. Yes. Then what I am going to do is. So like these two
edges, control. War. Yeah. Oh, wait. I forgot to. So like this edge. Why am I slipped in the edge? Now, extrude right here. Then again, press Control
E Then what we can do is we can select this edge and then
move it here somewhere here. Okay. After that mesh
tool and Zedge loop, de loop here, tex mode. Then move them. Or maybe let's not
do it right now. Troll that. Then control. Oh. Like that adjust them
in the front camera. Okay? Looks perfect in the top as well with
top camera as well. Then press control
control control control. Right here, te mode. Okay. Then mesh tool inserted
loop loop loop. Like that. Then now can do I put this vertex
right here here that. Now, go to mesh tool there
are two loops here and there. Vertex mode edit
them now add them in the front camera from here so that we don't s any
of the back section. After that, these two edges, press control control de control and hold x to snap to
the middle of the grid. Let me just scale it
then put it right here. Now, let's put these down
mesh to insert edge loop. Let's add them. After that, like all of these edges, control, Control control then R scale them Like that. Then move them. Somewhat like that. Then hold to snap this vertex
to the middle of the bed. I think. So we can do. We can select these Ides shift just like them. Then slag hold shift
just like all of them, then press control E. Move them. Like that. Snap te. Then. Next thing that I am going to do is going to select. These three edges controlled. Just like these two
edges. Move them there. Merge to zerted loop. Andertedop and then adjust it. Then snap this text with this. Then then. Mm. Yeah. I think we need to go
to face mode and select all of these faces and move literally
all of them back there. Put it in right there. Then S Okay. Press control like this tech snap that made a merging merge if there's anything
to merge there. Then then we can merge snap two with each other. Then merge. We need to merge this
as well and mesh merge. I'm making 38 loop here. Merge to multiply two here. I'm trying to do this
thing like that. Trying to get that
type of resolve. Okay, let's just move on. Now, what I'm going to do is select at this and move
them a little bit inside her. Then what we have to do. Is we have to
extrude this inside. First, let me go
to a mesh tool and edge here and select
these two edges or this there and then control E r my dear. After that, select
all of these edges. Then press control. Control and put right
here somewhere here. Like that. Then, what I'm going to do here is, I'm going to select these
edges. Then put them there. Now, scale it and it. Like that. And then
we're almost there. But let me get that result. So what I'm going to do is I'm going to select these faces till here
and move it there. Now, go to Wet mode
to edit them and look smooth. Like that. I hope I didn't select
anything. I did. Great. After that, going to select as the press control
control and put the So like I did like this, even if I did not select anything from there
because there's nothing. But still, I'm trying
to make a habit. You should, let's look at this. Okay, looks insane. Not going to lie.
That looks good. Yeah, that looks really good. So select these to move this
part as well. Really quick. We're going to do
this really quick. Then select these two vertexes, snap it to the
middle of the grid, then move it somewhere there. No, not there. We can see
this part from the top. So let's that. Thank you, top.
Right. Like that. Basically. Then Les not less. Let me fix this then let's Okay. Now. Yeah. Now, let's just control E and then
put it inside there. We actually don't really need
this because this face like this part be exactly on top of this on
top of this project. I'm just going to add that model that trolls model this part. Okay. So let's go to
create or no, create. Remember, we say this plane. It's time to use it. Let's duplicate it again because we will be in need of this plane when we'll
be modeling this part. That part slick this edge hold X to snap to
the middle of the grid. And then, right here, this one should be
right here, here, and put that here text mode. Like that. Okay. Okay. After that to insert
edge loop inert edge loops. Now, let's adjust
those words then. That mesh tool in the loop. Then like control mode a bit I was pt inside. No problem. No, not control. Control. LF mode. A. Okay, it looks perfect. I can hide this
by pressing edge. And yeah, that looks good. Now, let me just
create a brill qu to make this rotate it. Like the faces. I mean, slick these faces and hold ship and drag on these two bases, and it will
automatically un them. Keep slicking these bases. Then rotated a little bit. Like that. Then press control. Rotate it a little bit. Then press control again. Control the again. After that, I am going to go
to Vertex mode and select these faces
These vertexes, I mean. Yeah. I guess we can move it
here forward, I mean. Let's like those Vortex then. There? Yes. I think we can go to toe
and move it like that. Then maybe go to tee again. And then do something like this. Because that's how it
looks like in the image. Then go to edge mode
like these edges, and we scale them down and Yeah. Perfect. Then I'm going to go to mesh Top ten loop here. Now what I'm going to
do is I am going to select these three edges control are to kill them,
snap it on the grid. No, it's not on the grid. So snap it on the middle of
the grid, then test them. To that mest loop. Going to select the and
move it up a little bit that merged loop. That. So I think, yeah, we have to select these vertexes and move
them up like that. Basically, snap this
vertex with that vertex. Then snap this vertex with that. Like that. Then go to vertex mode
and merge and then merge. Move this vertex somewhere
there. Like that. Let's just move this
vertex as well. Like that. After that, select this edge control the duplicate
this plane. Put this right here. These ones shod be
right over there. S put them right there. Ms to in the edge loop. That's two edge loops and
one right here. Maybe two. Like that. Males ones as well. Like that. Okay. After that,
let's see it is again, control. Let's do that. And then what we can do is we can add measure and the bridge. Not like that. You know what? Let's not bridge them. Okay. Now, we can bridge one. At mode Bridge these two together to move done. Okay. Basically,
the front is done. The front is done. Yeah, it is done. Or very small thing
that I'm going to do is 10309 loop here, move it a little bit up. Then I am going to switch
it node. All of these. Then press or maybe no No, no, no. We can select sites. Yeah. Control. Snap this with that. No no, no, no snap that. Don't snap that. It. Like that. Okay. So but I'm going to let me
just like this for tex and this with that. No, no, no, no. I let's not do that. So the control. I'm going to move them
a little bit down. After that, I am M I believe I snapped a few more
taxis here in that section. So after that, is now control E R Like that snap it in the middle of the grid. Like that. No. I take them. Nothing is selected. Or maybe necessary. I know I did not anything, but let's make a habit. Because in future, believe me, it might make you a lot of problems might make
you get trouble. Anyway, we done here. So they control. Now I'm going to
break these make the indosdo Mike that Okay. Okay. Yeah, front looks
perfect. And it's time. Now, let me look
what else is left. So the windows. Okay 121 to two. Five Then we have to make
the complete back section. Now, this isn't to require
time back section. I believe it's called back. No. What we can do is we
can select control. I don't know why I
haven't done it. I still haven't done it. So let's do it right
now right now. After that, control snapped. Like that. Uh, yes, let's do that. And we're talking. To that. Let me express
the edge and look. Okay. We'll bring that. Okay, so let me
look at reference. Let's try to find back. Yes. Yes, that's fine. Okay. Let me Make this look cleaner
in my model as well. Okay. I look perfect. So. Let's make
these three things. These three or First Let's just delete these spaces. You don't need them. What I'm going to do is I mean
to select these edges. Let's snap this vertex
let's not snap it. Let's control. Mere merge. Okay? Now, I'm going to do. I'm going to select all
of the ages then as well. Uh. Let's let again. No problem. Then press control. Now, after that, let's insert edge loops so
that we can bridge. This one can bridge with that. Okay, so G in the
last I used onetar Then one. Then I want to do the merge tool and continue these tools. Continue making them. Let's make. Let's make their edge let's let's draw the edge
chill at the bottom. So that these vertexes
have their edges continuing and built
up chill down, okay? Anyway, as time to bridge. I think we have
the same amount of edges on the top and the bottom. So I think we can simply bridge. Yes, we can bridge. Okay. After that, I'm
going to insert here. And that What's this face? So that. Then combine them. Like that. Yes, it now. So to this part merge and merge. Great. Then mesh to loop. Then draw here as well. I think we can do something So after that. This looks great. Smooth. Perfect. And snap it. Not only to do to make this part open the wireframe mode,
wireframe shaded mode. Yeah. Yeah. To. After that, control. No. Mute. I was
basically pressing G. I thought I just used in
solute tool, which I did not. I used extrude tool and
you cannot extrude text. Okay? Why am I making a curve? Well, we don't need a curve. Let's move that curve. Like that. So like this pace control. That. That Like that can it like that? I think we can. No. No. No. No. I mean, I don't look
back great honestly. But not the worst though. So that. Then let's make this as well. Create polygon cube. After that, put all right
here by snapping it. Let's turn off the wire
frame shaded mode for now. Let's look at the
reference photos. Idea that face mode. Select faces like this. Then hold shift ones
like these two. I will automatically keep this pace which we want
select meant to select. Okay. After that I'm going to do is if you basically
hold control, you can do the same thing of
inserted loop on the tool. So let's do that. Then
what I'm going to do is to this first. Okay. Actually that I need to do is I like these two vertex
goal would be to snap it. In that why? Same thing with this vertex as well
that merge and merge. After that, go to vertex mode. Like that merge to inserted loop that After that basically. How do me inserted loop. Merge to multiple to Let's try yourself. Put your right here, then hold the snap snap it again. Added merge merged takes mode. Like that. We have to fix from there. Which we will do
in a few seconds. Like that. There is no such thing
to be fixed here. Yeah. I think there was, ah. But these two vertexes are so close that
they can basically get merged even without the snapping without
the help of snap. Okay? After that more
forward, maybe. Oh, no. What we can do is we can go to the face mode and s
all of these spaces, control the key faces
together, move off. And yeah. Not exactly. It's perfect. I mean, it's good. That. That mesi and merge. Okay. Is to do. No need for that, never mind. Okay, let's just go with it. And the last thing on that side, I think that we have to do is, which is going to
be e So basically, you have to do I have to go to text mode right
here, right here. Here. Here. Well, why did you married
to? I don't know. That's an insertion into here. Perfect. Control. Looks perfect. Okay. So after that, let's. Let me just go to to loop. Control the. Like that. Like that. Control again. No. I do
the extrude as well. Control E. Let's
do it like this, then W and move it a
little bit inside. Then press control the
again and move it inside. Now, let's bridge out of this at a mesh bridge that is used to as we G. Like that. On the edge G double click or any of these on
any of these three edges, then G. Okay, great. I mean, let's fix this as well. Yep. It's almost
gone. Like that. Yep. Okay, we can accept that. Okay. Let's make the back as well. Here. T S. Keep saving your seam piled whenever you're
modeling my like that. Let me fix this as well. Then go to merge tools. Let's insert loops here
and one here. Or wait. What I'm going to
do is I'm going to press g again and
then insert an here. A little bit there on
the left a little bit. A little bit. Okay. I mean, I selected that word text. I hope I did not move it. Yes, I did not. I think. After that, can control
the move inside. I mean, downward, then I
think it's time to read them. So basically, you're
going to turn on ale mode on edges as well. So now I can bridge
these like that. But I don't really recommend you to use isolate mode
on es or faces because sometimes it doesn't even work sometimes. Bridge. Mm. Okay. The move it. She So this G. So yeah, that's why I don't
recommend you using mode. A press T. Okay. Okay. We're done with
all of the windows. Now the next thing
that we have to do are basically to model the
entire back section, this back section, the mirrors, and the spoiler, yeah, that's almost
basically it. And one thing that we have to do is that we have to
add these lines, which will not take
a lot of time. It will be easy. So don't really have
to worry about it. Let me just live this
plane right out. Okay. So we have to make
the mirror, the spooler, the back section at the line. And yeah. Then lastly, we will make
the body back section like this section
and at a plane here. Okay? But that will be easy. And I don't think
that's a part of having details,
honestly, I guess. Anyway, let's continue further. All right, so let's
open the camera. After that, I'm going to once I have opened
the back camera, then what I am going to when you go to mesh
tool zirt gop. Let's Izert gop here. Yes. That's in blue. Then let's move a
little bit down. After that, I'm going to
do the move edge mode. I still like these three edges. Then I'm going to
press control E. Move. Then I'm going to press control again. Somewhere right here. Let's move forward. A not forward according
to the side came forward. It's basically
forward to the edges. I like this edge. Somewhere here, y. After that, I'm going to fast control again. It's like this, then control E. This time we're
going to move it here. P. So this edge and press control. Two vertex mode right here, T should be here. Then that vertex there like
this vertex that here. Then I'm going to
go to mesh two. Let's insert here. G open the last
poll that you used. Now we can do is we can
put this vertex here. This takes here. After that, like this edge, hold shift and double here, just like all the edges that
are in between these two, or in between those
two that you selected. Then what I'm going
to do is I ti press shops in in
here like that. Like that. Should we move it. More back. I don't think so. List dirty loop here. Maybe. Let's try that. I'm just trying this to
see how the rope looks. I just spread to hide it. Yeah. That's how it's made. And that's what we did here. Then after that. Select this edge hold shift. Or maybe we can move this edge. Down. Then select
this edge hold shift. Double click here. Control E Let's put that here. Okay. Adjust them like this edge, make sure to select this
word takes, I mean, that. Then that there. This one should be here. Then this word takes here. Like that mesh tool in
the edge loop here, let me move this text there, then this edge
control text mode. Here. This one should
be here edge loops. Let me do the top mode. I take it. This edge. Control E again.
I mean, hold on. Let me put that vertex. Then first control extruded. We have to put this vertex here. This one should be. Okay. I I I don't select like this. After that mesh tool
in ertae loop here. Like that. Then select
this edge control. Then this edge hold shift. I'll click here. Control
E. Let me scale that. Then we can do is an
insert in a globe here, then select these two
vertexes, then move these. Don't move both of these edges. After that, look at the
reference that I opened. Okay. Mesh tool ertgpertg loop, then select this edge,
put that right there. Then set this edge, hold shift and slip all of them. Then press control again. Move that there.
Then move it inside. Then That's all I pop my thing. So I'm just don't know. That is not perfect. Yeah. Just like these two edges, press control scale
them right dear. Then, mesh tool in the edge loop. What text mode. Like that. Then like
these were taxis, I mean, the aj them. Let me insert a
loop here as well. Okay. Then now what we can do is slick with that
shaft and slick all of them, then press control E. Vertex mode. Okay. So basically, this looks something
like hold on. That somehow in the image, it looks something like this. It is not modeled like that
in the blueprint, though, but we can do it ourself even though
it's not in the blueprint. Okay. Then I'm going to go
to Mon zzzarp here. Then let's bridge them
shift and rights button. G use the last tool
that you used. S these two is. Let me put that here. I think for noise
perf globe here. Then do that. Yeah, no, no, no, I think it is this thing, which we are seeing in the
side blueprint side view. Then what I'm going to
do is we are going to move these vertices. Like that. After that, went
to the edge mode. Time to bridge them. Then I'm going to go to mesh to an inverted lo,
inordinate loop here, and then snap that add mehly towards the added
mesh and then emerge. Okay. I think that
looks perfect. O. Yeah. So basically, you don't have to put these edges too far
away from these edges. Just like this edge shift
flip all of these. And W. I think we have to
do it ourselves. You have to do it manually. Okay. After that, Let's move it. Now, let's adjust them
from our taxis. Like that. After that, M. Like that. Then these two edges control. Put that there, then go to
me loop Margin loop here. Then snaps After that, let's merge them. Merge after that. So what we can do here
is select these edges. Let me turn out the grid.
Then press control. Put that, put them there. Like that. It's not this
vertex with that vertex. After that, press control E X to snap to the
middle of the grid. Then snap them and
then merge them. All of them the merge. Because there might be some
snapped but not merged. Like that. Okay. That looks. Okay. I think we
still need to fix this part. Like that. Object mode. Let's check that. Okay. Yeah, I guess. No. Like that. Now, G to this edge all the
shift, all of them. Then press control. Now, let's try snapping them. We'll insert few more
edges if we need and of course, we wil
6. EP 4 Combining & Seperating: What's up, everybody,
and welcome back. In this video, we will be separating the parts of our car. Then we'll duplicate
it to the left side, and then we will be combining the right side
parts to the left side. So let's go started. So what we are going to do
first is that we are going to separate parts that we
need to do on this mesh. Okay? So we are going to do first is we are going
to go to face mode. Then hold tab to select
all of these faces. You can select items or select faces like this
by holding tab. Okay. We have to select these
two bases as well. After that, we are
going to select the back as well,
the back window. Select this whole shift and select all of them.
I didn't work. And a little bit, okay? Perfect. After that, as well. I'm going to go to it
mesh detach or detach, then we can move this. This is basically the
opposite of merging. We can select this, and then
we will separate the later. Let's select this as well. Or maybe we can separate
this right now, okay? So go to mesh and then separate. This will automatically,
separate these three windows. Basically, it will separate
anything that we have Datached three are a
complete separate mesh from this main body. Okay? So then what I'm going to do is I'm going
to go back to face mode and then select
all of these faces. He's busy as well? Okay. Then add mesh detached. Okay. So this type of
bug sometimes happen. So to fix this is
what we can do is we can select this vertex
and then add me detach. Now, hopefully this will work. Yeah, it's not detached. Then we can mesh separately. What else. Okay. So now let's the attach or separate
the back section. Shift to hear. Hey. Hey. I did manage to touch. Now, this is the
complete separate mesh. This is a complete
other separate mesh. Let's do the same
thing with the lights. But first, let me fix this and we have to
select like this. We cannot simply click and
then select because we have basically the attached edges,
spaces, and everything. I'll go to fade I emerged to touch
this one as well. Okay, so we have
to control that. Then I'm going to
do this vertex. So the tex, I think, I believe emerged to
tach's try this again. No. I did manage to detach. Oh, it's basically detached. Okay. Never mind. Good. After that, let's do the same thing with
the body back section. I mean, this part right here. Great. Add it merge detach. Now, let's simply press
mes separate and will automatically separate every
part that needs to be. Good. Now, let's see
what else is left. Enter an isolate mode What's this in mind? Okay, so we need to
separate this part as well. It's like this whole shift. It's like this as well. This part. And also, this one right here. A M, dotach Great. Me separate the isolate mode. I want to check one thing here. Basically, we forgot to select this face when we were about
to detach or separate. Depate select these two faces, then go to these two meshes, basically, then go to mesh, and then combine
automatically combined. Then we can edit
mesh merge as both. Okay. Now, if we just
simply press anywhere, it will automatically look
everything entire measure. Let's fix this well. No. Okay. After that,
what I'm going to do is I'm going to
select all of this and press Control G. Control D. You can do that
from here as well it, then delete these two groups. Okay, then edit and then. Okay. Then I'm going to
select everything again, and then control G.
Then press Control D, scale, give it a
minus one. Great. Now we are going to start combining things
that we need to. So let's combine this combine
then combine this as well. Let's combine every window. Same thing with the
mirrors, spoiler as well. G, am brassingG to use the
last tool that we just used, then G select three
or four meshes and G G. Please meshes. That's one of around. G. Now, this one, well, G. Then I'm going to hide this
and keep keep your eye on this mesh cause we just
hide it and we cannot unhide it or show it
from the outliner. G. G. G. G. G. G. I think we forgot to do this. I'm going to first show this. After that, we have to
separate this section as well. Okay. So what I'm going to do
here is I'm going to go to general mode, general mode. Go to windows, setting
preferences, preferences. So go to your elements and
then show the status line. Now, go here and then object, so this will automatically its opposite faces
as well. Okay? Like that. Like that. Okay. I think we are done. Add mesh, detach, turn off that. And yeah, we're done. Now, add it mesh and then
mesh and then separate. Now we can do here is again, combine these as well and G Th one as well. Okay. After that I'm going to do is I'm going to
merge everything, but not like that, I'm
going to select everything, then go to word ex mode. Then show off the grid, then turn of the object x mode. Then select like
this, then me merge. Okay. Now, if I just
simply press to face Mod, I can sit like this. It's not de attached.
It's merged. These two merges are
merged. Okay, great. Okay. So I hope you'll
like this video, and I'll see you in the
next one for now. Bye.
7. EP 5 Adding Matirials: What's up, everybody,
and welcome back. In this video, we will be
adding materials to our car. So let's get started. All right, so let's start adding materials. So first thing that we are
going to do is seen, okay. So select this mesh. The main body, and then
hold right mouth button. Go to assign new material, then select the
lambert or blind. Plan is basically
a bit shinier and lambert is basically
a standard one. It doesn't have any shine. You can see that on
their icons as well. I honestly prefer Lambert because it's better
for rendering. We can change this
material type later. So for now, let's
just go for Lambert. Then hold right mouse
button material attributes. Basically, you have to hold your cursor on the mesh that we need to check for for the mesh that we need to
check material attributes. So put your mouse cursor on this mesh and then
material attributes. If I hold here and
then material but, it might open its
material mesh material. Let's material for this mesh
and then change the name to maybe main body
match or material. Let's go to go for
main body for now. And then we are going to
select that color here. Like let's go for something like This maybe. Like that. We
contained it later. Then what I'm going to do is I'm going to select this mesh. Assign material,
lambert second main. Okay? Then this one so be
grave, something like that. Then what I'm going to do
is I'm going to select this merge assign
existing material, and we are going to
apply the main body. Great. Now, I select this assign new material lumbrt
body back section. And then this one should
be black, like that. Then this one assigned
imteral lambert, then what should we name it? Let's do a third may. Or we can name the color
as well if you want. I'm going to this gray, I think we forgot to combine
this that really quick. Sometimes it happens. Okay. Should be in body, I guess. Now I'm going to give this part color of
body back section. Should be second main. This one as well. This
one as well, second main. Then what I'm going to do is I'm going to go to base mode. Let's turn on the optic x mode, then select this part, automatically select
here as well. Then the main body. After that, to select
this new material. Let's actually go for
blind in this then mirrors I believe I wrote
this spelling, correct. Let's give it a complete white. Now, let's sign material
for the windows windows. Maybe completely
black. Would great. This 1 second Second be. We can name this simple name. Maybe a third name. May. Is like this in new material ight Same thing here. Bight. Let me check. Perfect. Sign new material here. Members front light one. Give it a transparency
like here. Give a transparency
bar here, some. This will make this transparent. Then let's just hide it for now. We'll hide it later. Let's give the second second main Let's make it material. Front light. Two. We have to give it a two. Maybe here, this one. Lights three,
complete white color. And this one should be maybe
like body back section, maybe. Then let me. Then what I'm going to do
is I'm going to select then then assign existing
material to front light. Good. Okay. Is there
anything left? Yeah. Body back second sole.
Okay, we're done. Now, I am thinking to maybe like select this,
Assign you material. Maybe like main. It's not actually fourth main, I know. Fourth main. Then we need a white
complete white color and do this assigned
existing material, this material fourth
main to the spoiler. Fourth main. Let's do
this here as well. Is there anything else? Okay. So I'm going to do that
I'm going to go to base mode and then Select these faces. Like that. Then I'm going to get
to edit mesh and then detach this and mesh separate. Okay. Let's combine these then assign existing
material for to me. I don't know I'm just
trying to make it look. Maybe let's try this as well. Like that face mode. Look at this in existing
material or main. Looks cool. We can change the color by
going into material tribes, then do like black or
something like blue, maybe. Let's change this color. Something like that. Yeah, that looks cool, honestly. Let's do this a
little bit darker. Go to red, yellow. Let me go to face mode and then detach and then
separate these. Add Detache. Let me try red for this. And then make to black. Maybe, this looks cool, of a more darker. Yeah. That looks cool, honestly. We can change the
colors as well. If you want you chan chan blue But I'm
going to go for red. Okay. After that,
let's unhide this. Okay. Okay, the color looks great. I hope you enjoyed adding
materials to this car. The next lecture or
in the next episode, we'll make the wheels. So see you there for now.
8. EP 6 Modeling the Wheels: We'll sub everybody,
and welcome back. In this video, we'll be
modeling the wheel of our car, and then we'll add
materials to it. So let's just start. All right. So I have created
a new scene file, and then I'm going to do to side view view image
plain import images. So this is the wheels image that we are going to use
to create our wheel. You can download
this source files from this episode source file, and then I'm going to
scale this and maybe like change the filter
to maybe into a map. Okay. So after that I'm going
to do is I'm going to go to polygon primitives and
then create a pipe here, scale that E, and then
hold J to rotate that. You have to give it a
-90 and rotate C or 90, both will work just fine. Okay? You to map here as well. After that, I'm going
to just sell it more. Let's turn on the extreme mode. After that, like
two maybe two, 0.2. And yeah, that looks great. After that, I am going
to Go to face mode, select the back and the front
faces by holding shift, then press control E, and then Officer two maybe 0.21. That's too low, 0.3. Maybe Yeah, that looks good. After that, I am going to press W and then
go to mesh tool, open the tool box for
the insert edge loop, and then select multiple
multiple edge loops and then do maybe
like five or four. Let's do five. After
that insert edge loops. I think that's to
maybe let's do eight. How about that? Yeah,
that looks good. After that just reset the tool. Then exit the tool. Text mode. After that, what I'm going to
do is I'm going to select these texs or maybe this. No, no, let's just go
for tax after that. Skip this tex, this line
of taxis. Go for this. Skip this in this Skip
this in this one. Okay? Honestly, I think we
have to press control Z. And then merge to Z toolbox. Now, let's go for nine. We have to give it
an odd number, okay. Let's do the same thing again. So let's select the edges, and then let's select
this by dole clicking. Skip this, go for
this, skip this, go for this, this, go for this, that this. Okay? Then press, and then just simply
rotate that, like that. After that, I'm going to basically slop
all of these faces, press control, and then
key faces together to off, and then maybe like
move that car. Oh, no, no, no, Control Z. Select again, and
then we have to slip. By holding tab. Let's slit by holding tab. Okay, now press control K phases together
to offset to 0.3. Maybe like 0.10 0.3 a. Let's go for this, maybe. Oh, no controls that
controls that control sad faces together first, we have to control E. Don't move it just off point to one. 0.3. 20.14, maybe. Yep. I think that's a lot.
Let's go for 0.1. That is enough. Then go to object
and looks okay. After that, create a cylinder or create a cylinder and a pipe. Let's let both of them. Give it a 90. Scale them. Not don't scale
them. Let's move them. Then let's make this pipe bigger pull pipe two to 0.1, k. Maybe 0.06. And then select this
and then snap this with the cylinder so that it's
exactly in the middle. Then select this pipe
down a little bit. Then Then go to face mode the faces control E. Sal it from x x. Then again press control
E and then move it. After that, Let's
model this part. Then let's create a plane here. Pipe one inputs then give us
subdivisions to one and one. Then scale it. Let's
move it somewhere here. Now, go to vertex mode, move this vertex here. This one should be here. This one here. Okay. Two edge mode Tru this edge. Again, extrude tate it. Then again, press control E. Extrude then again,
press control that. Then again, control Control E, put this one here. Control again. Control again. Put this one here. Control E. Then just simply
bred these edges. Then now what we can do
is select these edges, all these edges
that are inside and press control E, like that. Then move these edges to
select these edges again. Put them here. Then what I'm going to do is select this edge and
this edge press control. Maybe snap this vertex
with that vertex. Put this vertex right here. This one so be here. Ms dotinate loop here on mesh
to inverted loop toolbox, reset the tool then
dirtinate loop. That Then extrude this edge. Maybe scale it, and
again, press control E. I know the image is
a bit pixilated, but let's just ignore that. Then control's put it
here somewhere here. Go to vertex mode.
Put that right there. Mesh tool insert,
insert loop here. Then what I'm going to do is I'm going to press D and then set basically it's better to use the insert key
on your keyboard. Click on that insert key. We'll do the same thing and
then set the Pivot to here, then press D to turn
off it or insert. Sometimes D simply doesn't work, so you can use the two, insert keyboard the
key on keyboard. Then press Control E.
Like these that then press Control E.
Move them there. Then control D E hold j and
rotated somewhere here. So basically, I think we
don't even need these faces. I think so. So let's delete that and
delete these faces as well. Then bridge the mesh bridge. Then go to face mode, select all of these faces. Control E faces together to of W mesh merge to remove
that grading effect. Then control D, E,
Let's that now. Then turn out don't hold J
anymore, and then maybe. Now, press Shift D. No it doesn't work, so rotate it here, and then press
Shift D shift yeah. We can rotate it like that. Now, after that, Let's press all four, then turn out the x ray mode. Put it right here.
This one here. Word, one here. There. Okay. Let's that with that here. Let's press all four to bring those blueprints or
that image back. Let's turn on the grid mode. I mean, let's turn
on the x ray mode. Let's put the cylinder here. Move that. After that, let's get it further, like that. Then go to face these
faces controlled. But first, let me
go to poly Cylinder and then reduce
its subdivisions. Let's put that was back. Then faces like these faces control key faces
together to off. Nope, you don't have to do that. What we can do here is just
make it bigger than faces. So like these faces. Control E, offset that to
maybe something like that, then control E. Like that. After that's all of these faces. I want to che control key
face together to off. Mm. Let's just keep faces
together to on. And then here, let's start
maybe like doing this. Actually just controls led and select these faces. Then hold shift to and select these front faces from here. So the M. Or how about select one? Press Control E. Maybe we take that Select this face with this one here. This one. I select
these as well. Now, what I'm thinking
to do is delete these meshes because I don't
think they're perfect. Then we'll duplicate them later. But let's fix this This verdict should be here. Now if we control D, and rotate. Got it. Troll to you again. So basically, I think we have to
put this vertex here. And we don't even
need these faces. Physically, this
image is not perfect, so it's confusing
to see from it. Maybe. Then go to Vertex mode. Fix these vertexes. Enter an isolate mode edge mode. Add shift your spat to bridge
this. It's not working. I think we have to
do it manually. Okay, now I exit the colt mode. Likely there is
two of them there. Now if we duplicate, hopefully. Yeah. They're perfect now. D delay that to take this
piso is perfect now. That's like this control D, let me rotate that
to somewhere here. Here, then press Shift D. Shift shift. M. Okay, now, select
the face my sees. Select this face move that here. Face mode, select this
face move that here. This face here. Space here. And the last one adjust
this one as well. Okay? So I think
this looks perfect. We can hide this image plane. Okay. After that, Vertex mode,
select these vertexes. Put them, no less select again. Now if we put these
vertexes here. Yep. Let's put them here, and then scale this tire. Then sell like this again. Put this here. Open vertex mode. So again. R scale them. Let's move them back as well. I think I made them too big. Okay. Okay, looks perfect. Let's Let's bring
that image plane back and then create polygon
primitive polygon primitive. Let's just duplicate
this cylinder, maybe. Scale that I'll for to hide image planes from
this main perspective camera. Select these faces.
Put them here. Not that much. I like that. Okay. Now, I think it's
time to make the breaks. So I just download
one more image. Image play part images. You can download
this break image as well from the source files. Okay, so put that. Let's just hide this for
now and make the breaks. For now, let's just
control G and before that, let me say this
file. We'll save. Okay. Then let's create a plane here, Polyplne subdivision
width and height two one. Take that to 90 or
-90 and the rotate Z. Put that here. So as you can see, it's black here and gray here. The material we can see is here and we want
it to be here. So what we can do
is can give it -90. Or we can go to mesh
plan then reverse. Okay. Then let's. Let's start making the breaks. I'm going to keep
this control D. Okay? Now, let's make the
breaks from here, from this plane here. I'm not going to get into
so much details like that. Control E. Control. So six there this
one should be here. Control E. Control E again. Control. Control B. Control B again. What takes mode. Control again. Ms to less dirty lobe here. Text mode, put that there, extra edge, control, scale
it a little bit like that. Tate it and scale it. G to mesh tool lets
and dirty glop here. Let's fix that. Then this and no, no, no. Okay. Now, so like this
edge and this edge, press control E, put these here. The swan should be here. Then control. Here, move them there. Swing should be here and then go to perspective cameras
like both of these edges, then move them somewhere here. Then After that, let's
slick these edges. Or maybe slick all
of these edges. Control E R, scale
them, put them here. Control E again. A just these vertexes. Select the edges. Or maybe all we can do
is a mesh tool mesh tool inserted loop, Aj vertex. Then put this vertex here. Then select the edges control. Move them move them here, control again, R, scale
them, then rotate them. Like that vortex mode, let's snap that vertex
with that vertex. This one vertex. Should be snapped with this. Then merge. Then I'm going to select
all of these edges, bistable clicking
the outside edge, then press Control E scale
that move that there. Sal that again. W control. Let's scale that and
then rotate that. Then again, press control. Move that here. Then what we can do here is
D or insert, put that here. Put the pivot here, then control D Skalx
I think minus. Minus I think it's. After that, merge
combine it merge merge. Okay. We're done. We can do is go to face mode, control, all of these faces, keep faces together to off, then edit merge, merge. Okay. We're done. The brakes are done. It's not that detailed, but it's good. It looks good, honestly. Then unhide this wheel
to leave this plane. We never had to use it. Then hide this brake photo
as well, the side camera. Then D the pivot are
scale it like that. Put it somewhere here. Okay. Looks great. After that, I'm going
to select all of this control Control D, delete these edit and group. Let's show the grid. Then what we can do
is control D again, we'll modify center pivot. Show the grid. Now, one thing that I'm going
to do here is first of all, snap this to the
middle of the grid. Then, what I'm going
to do is I'm going to make a group in in the group, control G, and the breaks shod be heights outside of this
group, like this. Break. And then this one
should be wheel. Now, I'll tell you why
because for example, if you want to use
this in a gain, and if you want to
rotate the wheel, you will not rotate all of them. You will only rotate this wheel, Because breaks don't
rotate with the wheel. Modify Now rotate case of
brakes aren't rotating. If you want to move, then we
can move like that. Okay. And. We're done. We can press D
and set this pivot to here. Hold x to snap here. Let me rename this real brakes Control Okay. Show them and then
unhide the entire group. Okay, so wheel is done. Now what we are
going to do is I'm going to go back
to our main file, then import, go to file, import, and then go
to source files, wheels like the wheels, and this will import that file. Everything that is in the file. So we are going to
delete the references, and then I'm going to duplicate this and delete
the previous one. Okay. Now, What we
can do here is, let me turn of the grids and the shaded
wireframe shaded mode in all of the views. Okay? And tune mat. Okay. The wheel looks great, now let's add materials
to this wheel. We can do that on the
wheels valve as well, but I'm going to do it here. You can do that
that valve as well. So tire m one, m one. This one should be black. Now, here what I'm going to do is I'm going to go to face mode. So like these faces
assign existing material, and let's do maybe I mean
for it to main, okay? Same thing with all
of these as well. Let's do maybe one, then go to face mode. Hold on and select these pass. Then select them. Then assign existing
material for in. This one should be rims two. Then breaks should
be breaks, Breaks. Breaks are usually
in yellow color. But I had seen for and the inside be Rms two, and this should be ms one. Okay. Honestly, this
color looks bad. So the looks red and make the tire material
a little bit more darker. After that, we can
duplicate this. But we will do that
in the next episode. Hope you like this episode. Hope you enjoyed this episode. You made this w with me. Then the next lecture in the next episode will organize everything. I'll see you there. Bye for now.
9. EP 7 Final Organizing Everything: Okay. What's up, everybody. This is the final
episode of this course. In this video, we'll be
organizing our project. So let's just tide. Alright, so let's
hide this wheel. Select everything. So basically, I'm going to show you
first, why am I doing this? So if I open this group and
there's something called TransFo and there's a
mesh of this, okay? Oh, my God. I think
that's a bug. So let's just fix
that mesh combined. Is called I think
it is second main. Yeah, it is. So we
fixed it. Okay. So if I open this group maybe. So if I open this group and there's
something called transform 46. And if I delete that, it will delete the mesh as well. Basically, there's a
connection between this and this I mean, this transform and this mesh. There's a connection
between that. And if I delete the connection, it will delete
that mesh as well. So if I select everything here, control G, control D and delete everything
except the wheels. Now, there's no more transform
or anything like that, and there's no more
connection between them. Basically, if we
export and import, or if we duliate will
delete that connection. For example, if I
rigged a corrector, and if I dublicate
the mesh of it, the rig for that crctor won't be work for the new mesh, okay? So the connection
between the rig and the mesh will be
removed or deleted. So that's what I did here. Then what I'm going
to do is I'm going to name this to body. Then this one so let's
unhide the wheel. This one should be wheel, we front, I don't know
to say left or right. Let's from top you. Yes, it is right. So let's do that right. If we check from front, it's right and if we check from back, it's physically left. So let's do right for now. You can name it to
wherever you want. Okay. After the wrong
to do is going to press Control D. Put this one here. Okay. Let's kal it, and then I'm going to scale
it from the x axis as well. Move it a little bit inside. Name it two wheel back right. After that, I'm going
to group this control, control D to box, and then scale x minus minus. Make that. Then group this and then group that as
well. By pressing. T one should be el left word, then paste it here as well. Let's put this here, here. Okay. Let's grip these
control G wheels. Then control the
entire car and two, the name mark era. Let's be blueprints. I'll p to show the blueprints in this main in the main
perspective camera. Then let's turn off
the extreme mode. Okay. Set the pivot
to ready perfect. Should be modified center prev. Now, as you can see, if
I select, for example, if I select this and
state is 34 minus 1810, and I honestly don't like it. I want it to be 11100
like this in this mesh. So what we can do here
is select everything, go to modify freeze
transformation, and now everything is reset, You can do with
the group as well. G is perfect. It's done. Okay. That looks perfect. Okay, so
our car is officially done, but before that, I really
don't like this color. And I searched on Google. And this color looks great, but I'm not going to
go for the Oh, it. We can go for it, actually. So yeah, let's do this color. That looks great, honestly. So let's do this color. Right now, one looks bad. It
doesn't look good at all. So What we can do here
is go to object x, and then the main color
is already perfect. This one should be like green. Like that's somewhat. Then Here, we need to give it like main. Yes. The top. Less insertinit loop. Select the existing
material main. Oh, no, not like that. Face mode shift and select
all of them to select this. And this one should
be main and this one should be for main.
Okay like that. After that, let's go
back here. I think. That's how it looks
like. Like that. So let's go for Main. Mesh tool, let's organizer. Faces like faces. For main Let's do this back. No, no, no. Let's
list like this, and then no, no, no. All of this, then back light. Okay. After that can give this main, I guess. Oh, wait. What we
can do here is, let's go for second main, okay. And I'm going to change the second main color to
a little bit like that, and then select these. Then change it to four main. I mean, four main. Yeah. Back as well. Let's go to side view. Select that And select this. It's an existing material for main isolate mode, let's open isolate mode. Select these faces. Then give it a main material. Okay. So that. Now the material looks good. Or what we can do here Oh. The faces. Not this one. And give it a main default one. Okay. Now, the
material looks great. And honestly, it's not the exact that we
see in the image. It's I think this
one. If we do red? No. Let's go for red. Okay. Okay. So now
the car looks good. One more thing,
we need to change this color to a
fourth main as well. Fourth main, not a front light. Okay? So we're done. You can change the color
to wherever you want. Turn off this and then duplicate this MacNev and then
delete the previous one. Just for, you know,
delete its history. Okay. Hope you enjoyed this. I hope you enjoyed
making this car with me. And hope you had a great time. Hope you get really good result like me or even
better result as me. And see you next time for now. Bye.
 Rehan Ali Waqas, EDUCATION THAT MATTERS!