Transcripts
1. Introduction: Hey guys, welcome to Maya, basic scores, and I am actually Sony and I'm teaching 3D game art for more than two years, and I've already completed 6 thousand students. And in this course, I will teach you how to create a basic tracers Chester in a complex way as possible. So you will get the best and better overview of Maya about knowing the different type of tools that you can use to create the same object, we will choose a complex path to create a simple object because it will help you to understand how to use different type of tools, such as how to use the multimedia tools, how to use loops, where to add the loops, we're not to add the loops how to use the bevel and these kind of basic stuff. We will start from the basic and then we'll also do a lot of awesome and advanced stuff. So what are you waiting for? Start discourse and I will see you inside the first lecture.
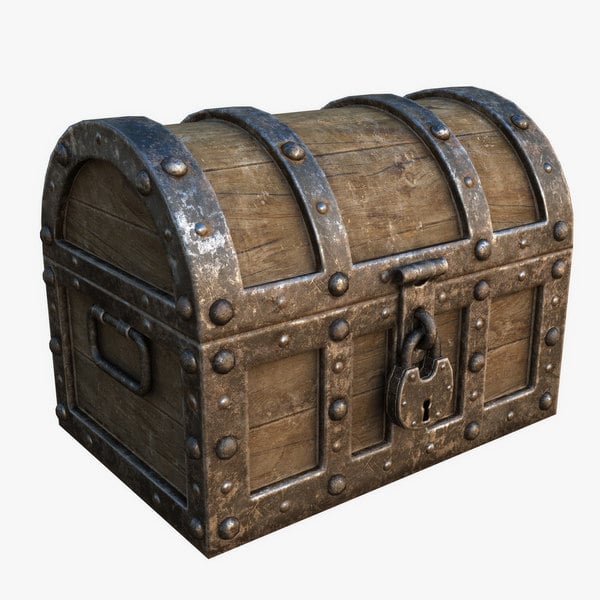
2. Introduction to Maya UI: So hello everyone hears Sony and welcome to the first lecture of modelling in Maya. So this is like the basic of Maya. So you will learn a lot of stuff in the basics. One caveat, just going to get started with creating the silicate treasure chest or something like a chest. Okay, so so let's get started. The first thing that you will always have to look into any kind of model that you are going to like model first tried to just dissected or like break it into different type of parts. Okay? So you can see like the, let's think about from the basic geometry, what is happening here, what kind of things are actually in here? So you can see this top part is basically just like a half a cylinder and the down part is like our rectangle, like a cube. Okay? And the leader things he say here a cylinder here is a cube here, the half or I can say like a, like a tube thing, and then the lock is here and then this grappled stuff from which you just start grappling. So that's it. It's simple, so we will just get started. So the first thing that I will just going to get started is the first thing is navigation. So how to navigate in Maya? So navigating in Maya is basically easy. You just have to press Alt key and right-click so you will get the option to just rotate it. So this is how you can rotate. And if you press the middle mouse button like this one, so you can just hold it, you will be able to move it like this. It's like this. Okay? If you want to move it and if you're pressed a right-click, okay, holding the Alt key, okay, and then you can just zoom in and zoom out just like this. It's simple. So that's how you can basically do it. Now the next thing that you want to learn is the changing views that will help us a lot in this first lecture basically. So the first lecture is just going to be navigation and all about the Maya. So if you'll press the space key, you will get the option to go to the four viewport. So if you're if you're not getting the option to go to the four viewports section which will have all these kind of view board like this is the side, okay, this is the top, this is the TI side and this is the front. Okay, so front side top and here's the perspective. We're okay. But let's say you just want to perspective view. So you can just simply do that. That's a little bit advanced, but let's just learn it. Just press the space key, hold it, okay, and just click on this Maya. And now you can just choose any way you like. Let's say this is also a perspective. So now you can see I also have like one perspective view from this side, okay? And I can just, okay, for now, what is basically happening via using the same camera. Okay, so that's why if I change this one, this one will also change. So that's why the reason is because it's just like the same camera. That's why it has have happening, having the same thing, but you can also use it and that relate just make it. This one is like the wireframe one. This one is the shaded one, something like this. If you want different angles, you will have to create more cameras. So that's simple. Now, if, let's say I just want to only to reuse, I can just go in the left side and I could just choose this view, and I can just choose any of you. And this one also, like, I can choose any views as I want, like just go to the fourth one. Let's select this one. And now I can say this one. So that's why it will have this kind of stuff. There's no mortal, that's why you are not able to find out which view is. They're basically okay. I will just also have to turn on the display option for each of the views basically. So that's how you can just navigate and do all this kind of stuff. Maya, now let's move on to the next thing and that is the most important and that is called the outliner. So in the outliner you will see all the perspective and the top side. All this kind of cameras are over here and your default light set is here, object set is here, we're here. And that's basically the basic default things in mile. So that's enough. You wanted to know about the basic navigation about Maya. In this left side. In the right side, you will find the Layers option in there. This is the leg, the channel box, each objects that you reveal it. If you want to just create any object, just click on the cube and you will be able to add a model in here. So in the right side you will find out like weird is it, what is the translate is rotation. You can just control the rotation. I'm just pressing the left mouse button and I'm able to rotate it like this. Okay? And if you want to use the tools, so for the tools you will just have to click over here so you will find out this translate option and the rotation options. And the next thing is the scale option. So if you wanted to school back, this press Control said you will go back to the previous layer. You can just undo it. It's exactly the same thing in the old software. It's like controls that and you'll go back to that. And now let's add this one to switch into all these three. I don't want to just move my cursor again and again. So for that I will just press W key to move it, okay? And E to resize it and are to basically scale it. Okay? And I can just scale it into any way I want, just like this with the help of this ones. And if I select this one, I can select it and I can just scale it into only two sides, like the top one is y and the different one is x, just like this. So I can say I just wanted to brace it like this. And I wanted to just grow only on the one to access. I can just do it with the help of this square. You can just find out the red square is just for these two and the green scores as for these two and the center squared is 4, the all of them it will just to unify, it will just make all of them in a unified, like the way they are basically like pressing the shift in the Photoshop. So that's the basic about mile. Let's get started. And then from the next lecture we're just going to, let's get started creating and modelling our first thing and that is the tracers chest. So let's move on.
3. Creating Base shapes: So that's it. Here we are, and let's get started. So the first thing that we have to do is add the basic object that we need. So here I can basically see the top part is just cylinder, the bottom part it's just a cube. So what I'm going to do, I'm just going to create a cube. Okay? So I will just scale it first of all, okay, I'm just pressing the Alt key and I can just rotate it and just assume it and just move it. That's what we learned in the previous lecture. So that's how we can do it. So if I'll just scale it, I'm just going to scale it like enough so that will be properly visible for us. And it's according to the grid. So let's say if you are going to make it for unreal or Unity, you can just make your grade bigger that much. So you will have a proper identification of your sizes with your sizing of your proper, let's say the game engine. So for that, so now first thing is, let's just choose our reference here. So we have a reference photo and this reference photo in the top side you have the slender and then the cube. The cube is a little bit large. So let's do one thing. I'll just enlarge this month, so that's it. But there's one thing that I just want you all to know. First of all, is we're not going to make exactly one-to-one copy of this reference, but we will try. Okay, It's simple. We will try. But always remember if you only have one side view like a, like a perspective view, you can go like 99 percent, but that is not going to be like a 100 percent. Same as the reference photo. Why? Because it's in the perspective of if I find out the same thing in a top and a right and all the angles, then I can make it a 100 percent same. Okay, so always remember that. Now the first thing that we are going to do, we created the cylinder v. We created our first cube. Who are here? I'm just going to place it in here and that's what our treasure chest down sided this part is basically so let me just explain you with help of rocky. So this part is like a cube. So that's what we created. And we will cut a hub of cylinder and we will add it over here like a cylinder and a cube. Okay? And then we will create the designs, and that's how we are going to create it. Okay, So let's okay. Yep. So let's move to the Maya. And so we created our first cube here. Now with the help of this Q, we're going to measure and create our next object. So our next object is over here. If you're not able to see this just stored on the wireframe mode. So to turn on the wireframe mode, just click on this wireframe and you will be able to have a better look. Like you can see all of your wireframes off your model, simply just the left key. And now this is how you can select more object as you want. And if you wanted to select more than like what, let's say one object is over here and one object is like over here to clone it, I'm just pressing the shift key. So with the help of Shift key, I can just clone it as much as I want. Now, let's say you have one over here, so you selected this one and then you can just press the Shift key and select another object. So that's how you can select multiple objects. So let's, for now, let's delete it and let's get back to the shaded view. So for the shadow, I'm just going to press five, with the help of five. I'm just going to turn on the shaded view. Or if you also want to see wireframe and cherry, both at the same time, just go to this one and click this option. And now you will be able to see wireframe and shaded viewport at the right time. So this will help you a lot of your modeling for games and also, as well as 400 TV effects also. Because this will also show you the poly count and you will be able to see that also. But there is also one option and that is this basically and this one. You can see that all the word diocese ages and all things are listed over here. So turn least on basically just go to the, go to the display and go to the heads-up display. And now you can just turn on this poly count with the help of polygons. You can just basically see all the counts of your poly and eat and everything. Let's say I selected this one. Okay, it will just show me this, like how many faces I selected. It's like 660 phases. So we don't want 60 phases for now. We will just do all the stuff. So for that to just decrease and increase the faces, I'm just going to click on this inputs and from this place I can also just modify all the faces and all stuff, but I can also do one more thing and that will be like modeling. Just go to the, this is basically for the modelling tools, basically the same things that you will also get with the help of shift and right-click. You can see these are the same thing and this is also the same thing. So we don't have, we basically don't use it, but if you don't want, if you want to use it, you can go with it. So then you can just come to the attribute editor. And after coming to the attribute editor, you will find out all the properties added. Let's say we have a, we have our default material here. You'll find the default material here, all and each and everything. So let's come to the poly cylinder. That is basically the basic thing and this, there are a lot of things like initial shading group. What kind of shading group is it belongs to and all of those things that are related. So I'm just going to go to the poly cylinder and now I can just select how much polygons I want. So I'm just going to go with something that I can just like substract from the middle because as you can see, we just want half of the cylinder. So for that, what I'm going to do is I will just choose this one. Okay. And I will just increase it like this march listed 20 is I can just okay. I got a better line here. I can just delete this this most part. Okay, Now I will just remove all the caps. I don't even know need any cap side, just want this part to be like normal. And you can also increase and decrease the radius. So for now, I will just let the radius b same we will reside is lease, resize it later. So for now, all the things are set. I'm just going to rotate it so I can just rotate it. You were using the rotate tool also and I can just place it the way I want. But if I'm, if you're having difficulty, you can simply come over here. You can see the rooted x's here. I'm just going to place it 90, and that's it. It is now properly set into 90 degree here you can see it. Okay, Let's come to the fore reuse, OK, and here you can see it is set to 90 degree. Okay? That's what we wanted. Now what I'm going to do, I'm just going to place it like properly here, okay. Like this. Or we can do one more thing. I can just increase the size like the way you wanted. Let's come to the other view. Okay, just press the space, space and just go to any viewport you want. And dispersed space once again, so you'll just come to that. So let's just come, let us turn on the wireframe also in this one. And now here we have the wireframe. So I'm just going to look from which part. I'm just going to cut it. So let's see. I'm just going to cut it from the basically the center. So the center line is over here, okay? Basically which is over here. So I'm just going to place that part over here, then I will cut the down part. So for that we'll just have to first place it. So to place it, I will just simply come over here and place it like this. Okay, here you can see we placed it and I will just increase the size to match the actual dimensions of our cube. Okay, the way I am basically making is not a professional wastes like easy way for a beginner. So that will help you a lot to understand all your stuff because I can just create the same thing. There are also ways to create the same thing. I can just create this same thing in ten minutes, okay? But that will not be like beginner fend friendly. That will be like two advanced. That's why we are creating using this kind of measures, which will help you a lot, understanding a lot of tools, okay. It's like a kind of a long road, but with, but with advantage and that will help you to make me better. So I'm just going to increase the size like this and that's it. Here you can see we created the basic shape that FIFO wanted for our trailer chair. So let's look at the reference and let's look at what we created. So I'm just going to decrease the size. But what if, right now if I just decrease the size, you can see you will have to reset all the stuff. But what if I just reset, decreases the size using the word diocese and feces of all these things. So what are our diocese? Let's learn what is the word dices and faces and all these things in the next lecture. So let's move on to the next lecture.
4. Edge, vertex and Faces : So what is basically the word isis? Faces and edges are for model. So the first thing is the edges. So edges are basically these things. These are the things that reaches basically edges. The lines are actually godless edges. And if I just press the right-click, if you will press the right link, you will find out all of this like a spider web stuff to select anything that you want it. So let's say I just want to select face. I can just hold the right-click and I can just come to face. And then I will be able to select the faces. So fairly faces are just like the face as you know, like a faces in queue. Simple. And the next thing is vertexes. So where taxes are these kind of points like, like corners of the model, like this kind of corners. You can move them, you can rotate them, you can even extrude them. You can just squeeze it and you can do anything with all of these things. Okay, this is basic. So that's how you can just select all of the things him. And the next thing is basically the vertex faces. These are like this. They're the same thing of like the between like saw, Southwest kind of thing. It will just show you all of the things like in separate way, like, let's say you did some kinda, you messed up somewhere and you wanted to see the actual face like this. You can just go and see. And a separate all the faces and see like where you lied and rears the problem is something like this. So I'm just going back to the object mode with the help of the right-click. And then I can go to any mode I want. So let's say I just wanted to go to select the word x's, select the top where it exists, and just drag it down, okay, and not this top one. I'm just going to select the top level one and I just wanted to decrease the size a little bit so I can just drag it like this much. And I will select both the object and I'll drag them down on the edge. Now, you can see without moving it and without doing a lot of stuff, I just decrease the height of our basic stuff. So here you can see just a little bit not matching with the cube. So I'm just going to increase the size like this, okay, this much. And that's how I can select this one. So I'm just going to select the face also. And I will just make sure it's just matching the corner. So it's now matching the corner. If you are facing this kind of stuff, don't worry, we're obviously going to read the phases. We don't even need them. So I'm just going to select this one, okay? And I'm also going to match them over here, say like this. So it is mast right now. I'm just going to delete this face here and delete this face also from here. And what more? The next thing that we wanted is we also want to delete the bottom part of this one also. So for that, what we are going to do is I will just come over here. Okay. I'm sorry, I'm just come over here and go to the wireframe mode. And I will just select the faces that we don't want. Read the help of Shift key, I can select multiple and I can also select the same thing in quick and double-click out of select this one, press the right leg and come to the endless grit double-click, and that's how I can select it. So I'll just delete it. And that's it. That's what I wanted. So let's come back to the shaded moment and with the help of five. And here you can see we have or the basic staff here and that's how it is going to end. But the thing is, I just want this thing to be closed, Okay? And it should basically matched. So for that I'm going to just delete this, this phase also. So it will be like, like a proper object here, okay? Because we are not making it like openable stuff for now. We're just making it like a static, just looking exactly like this and with the proper typology. So that's our goal. So for that, I'm just going to select both of these things, okay? Uh, first of all, let's look from the left side is the where this is our matching. So where does this or not basically matching properly? So I'm just going to increase it just like a little bit like this much everything like this much is right. Okay. And there's no problem, we'll fix it. So how to do that? Just select bottle this object, press Shift, right-click and just come down to the combine. And after coming over here, I will just come, I've just combined the both two different objects into only one staff. And in the outliner you can see all the, each, each and other object is set as group. Okay? We can also, I will also teach you how to remove them. But that's let's be, let it be for now. Okay, so after this, I just want to just merge these two edges for now. So let's do that. Just select this first edge, and let's select the ending edge and just press the right-click and just come to merge and press the Shift right-click, not only the right-click shift, right-click, hold it, just come to the edge. Edge to center. You're going to select any of them. All of them were dosing. They only accept the collapse edges. It will just collapse it like a square as same as the icon. So now I'm just going to select the merge border edges. So I will just select it. I will increase the tolerance. And once I increase the tolerance, you can see it will just match it like this. So that's how we can do that. So I'm also going to do the same thing with this one. Let's say I just selected both of these things, things. But now, instead of going back to all this stuff, I can also press the cheeky really helped off, like selecting GG. I will get back the previous tool that I have used, like President Dickey and you will get the previous tool. I'll increase the tolerance and that's how you can see like yo, it's matched. But the problem right now here is, if I'll come to the side, you can see that oh, this thing is just a little bit bend like this much. How to fix that? I'm just going to select ball of them. Just select the scale tool with the help of our, okay, and just drag it like this. Now here you can see what is basically happening. Just if you will do this, it will just be straight always. It will just simply put both of them, both of the word diocese into 19. So that's how you can do that. Okay, so I've just selected the word dices, but just by right-click and go to where diocese, and then you can select your taxes. So that's it. That's what we wanted. But here you can see there is a hole that V1 to fix. So to fix this whole, what we are going to do, I'm just going to select the, the edges. So select all the edges. Let's say you are selecting all of them like this. Let's say this thing is already in a loop. So what is loop? Loop means all the edges are connected to each other in a proper way, which is not intersecting, are like it's not ending the end basically over here. So let's say if there is a hole in here, if these, if, let's say if I just remove this edge over here, it will not be called as a loop. So that's what the meaning of loop-based. I will just double-click and I will just click the other one also, just like this. And I will press Shift right-click and I'll just come to the fill whole. So with the help of fill hole, it will automatically fill the hole. Okay. I'm sorry. It just some kind of problem happened over here. And let's select this one also, right-click and select a fiddle whole and we'll fill it like this. Do the same that the other one and just fill it. So that's how you can see. It's just fiddle that it's simple. Right? Now, what we have to do next thing, and that is like going for the other modeling of designs. So the first thing, congratulations, we completed the first and the basic structure of our stuff. So now I can also modify the whole and both of them like this because I have combined both of the models. Okay. Like I can do this kind of stuff. So let's move to the next lecture and we will start doing the details. Okay, So let's move on.
5. Multicut Tool and edgeLoop: So here we are, and now let's create the details. So here you can see are the first detail is in one line and the second detail is another line and another line and another line. So how we are going to create it? So let's learn. So the first thing is vivant word dices to extrude. Okay? So here you can see file come down. You can see it is extruded. It's like from outside. Okay. You can see the bevel over here like it's just outside, kind of like an iron keys or stuff. To make this kind of stuff, we'll first have to create a proper dimension. So to create the dimension, what we are going to do is let's first of all count 1234, okay, So these are four lines that we need. So to do that, what we are going to create is edge loop, okay? And I'll also, we will also learn extruding then creating the details. So for that, press the Shift right-click and then you will get all these other options. Now I will select the Insert Edge Loop and there's also want to get to all of them. So I'm just going to come over here and select this edge loop tool software. Selecting the edge loop tool, I will just go to the front view. Here we have the front view and with the help of the use of grids, like you can see the grades are over here. I'm just going to count all of them. So I'm just going to add one loop over here is simply have to click over there. It will start showing you how the loop is going to be created. So let's add Year 1, 1 here. Okay, it's like a too small, so let's add some more. Likes this much. Okay, and I can also add one more which is like or here also like this. So that's how you can add. And we also have to add more like tumours. I'm just going to add one here, one here with a gap of two squares. So here you can see that two squared is here. Oops, I did a little bit mistakes. I'm just going to just press Control said. And once again, select guide here and come back here. And that's how I can just select it. So that's it. We just added our lines over here, okay, Here you can see we have created our loops now, but the next thing that we've all have to create is details for the other side. So to create the details for the other side, I'm just going to select the faces and select the pose. Let's select the first phase for now. And now we're going to use the extrude tool. So to extrude it, I'm just going to press the scale one. I'm just going to press the Shift key. Now you will think like a lot of things are done by Shift key. Like you can even select a lot of things. You can even just clone it. You can also use the extrude game. That's so simple, yet it is. So the first thing that we have to do is you can also create a lot of, you can also do the same thing with a lot of different methods. One of you are just going to use a quick method. So to make a loop inside here, what we are going to do, I'll just select the Shift key and just right-click using the scale one and I'll just drag it like this. That's actually a total simple way of creating the, this structure that we want with the help of loop, okay? This structure, okay, this side. Now I've just selected this one and that's how you can see it's accurate. Okay. It's exactly the way it was. Now the next thing that I have to create is I have also to create one for this side. So I'm just going to do the same thing shift and just press the center one. Okay, basically you can use the same I extrude tool also just by going to the right side and the modeling tool here you will find the Extrude one also, let's deselect this one. I will just click the extrude and you will just find out all of the thickness and all the offset options and all these kind of options basically, There's also when we do the same thing. But if you just do this one, you can just come over here and I can just do the same thing from this side. Okay? So I just want to match the boat situs cytosol just come to the other other view, okay, this one and I'll just select the wireframe mode. And now I'm basically just try to match the accurate positions, okay, like this. And I will just do the same thing with this one. Basically, there are a lot of ways to use the same tools, okay? There are two ways to do the same thing. So that's why I basically use the shortcuts and shortcuts will save you a lot of times. Okay, so that's it. Now, what is the next thing that I also have the extruded child just selected the face and come to the left real just extruded down. And that's how you can see. We just extra credit this much. So if you're continuing, if you're creating the same thing with me, That's the way you will learn more quickly than even any other ways, okay, Any others. So that's it. Here you can see we created the edge loops and we created the basic stuff over here. And the next thing that VR going to do is, let's say, let's look what are the more things, okay, there is also one loop over here. Okay, and the next loop is over here. And also there's one more loop or in the down. Okay, so here we also have to create them. So to do that, what I'm going to do, basically, I will just simply select the right-click Insert Edge Loop. I will add one edge loop over here, but the thing is over here. What if I just use this same line as a loop? So how can I do that? So to do that, I will just select the object or rest or right-click and I will just select the multi cut tool. With the help of multi cut tool, I can simply select this one. Ok, and you can see this, this is how I can select the end-to-end. So to do that with the help of multi cut tool, I will just have to select the corners and you start showing me. And with the help of multi-tiered, you can also just create loops. Okay? So if you wanted to create a loop, okay, Let's just don't do anything. Uses how to do this kind of stuff. And you can just press the Control key and it will start showing you like an edge loop stuff. Okay? So the thing, this thing that we did, we can also do with different ways. So let's learn the different way to, because we are learning the edge loop and the loop creation basically. So just come back controls ADH and just remove all the stuff. Okay, That's how you can remove it. Now, let's just start creating a loop for here. So with the help of Edge Loop tool, you can also create a loop and you can also create as loop using the multi cut tool. There's no problem with that. You can use anything. So the first loop will be over here, okay? And the second loop will be over here. And the next thing that I want is I want the loop to be added over here. The another loop to be added over here. Here you can see if you create the loop of it this way, both of the sides will be same and the geometry will be just a little bit different. Here you can see there will be one more cube over here. Not like the previous one. We only had like the fourth software here, but we have like more additional like eight cubes over here, like eight polygons. I'm sorry, I just said cube. It's called polygons. Now you can see we have the stuff over here. That's how you can also add this. Actually I can say like another way of doing the same stuff. Now the next thing that I want to do is creating loop inside this. So to add the loop or here, who is ok, so I'm just going to use the previous mother and just drag it down like this. Why we, okay, so there's one problem that uses have to learn while you as a beginner. So you, why you're not able to create a loop inside this, please. Why? Because there is no polygons, there is no loop or anything. Okay, it's just one single face. That's why you can't create loop over here. And there is a lot of polygons over here recharge just directing, which are just calculating the path and it's just creating the pod automatically. There is no one. That's why we're just using this method. So let's just drag it down like this. Always remember you are matching this one like this, okay? Because we are just going to always match it. So that's it here. You can see if I just drag down, I'm just measuring with the help of this. So that's it. Now, let's start extruding in the next lecture.
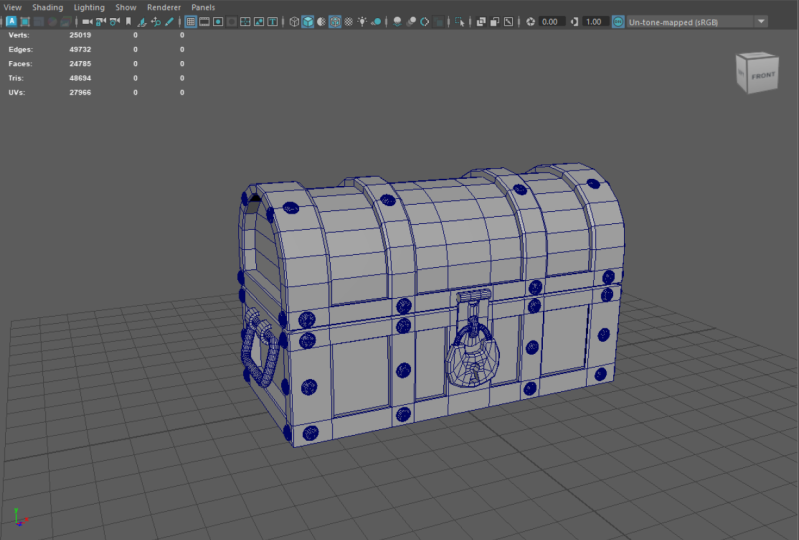
6. Extrude and mirror : Hey guys, in this one we are going to learn extrude and how does the extrude basically works? And what are the ways to extruding and went to x2 and not touch tour and a lot of kind of stuff. So let's get started. So the first thing that is your here is you will like fixed. Okay. First of all, let me just finish this one. Archaeologists extruded like this. Okay. So before extruding that, I would like to just fix the typology a little bit. You can see this phase is kind of going off. You can see that this one is just a little bit off, so it's just going this way. So how can we fix it and just delete the face, okay? Okay, So we are doing it for the first side basically then we will do for the second title. So, or you can just add one over here and delete and mirror it also that we will also learn later in this course. So the first thing is over here. Here you can see we just basically don't want this face to be over here. And what I would like to have is not this face. There should be only one space and that, this one, we'll be like a one. I can say like a one polygon. Okay, so for that, what I'm going to do is first of all, I will just delete this face model. These faces we see Italy, and then I will just select the selected vertexes and I'll just first of all, merge. This vertex is just doing the same thing. Shift, right-click and go to merge. Rectus is Moore's words, he says and here you can see it has marched over here. Just don't worry about the polygon. So I'm just going to select both of them and then do the motorway diocese and just increase the distance ratio or so it will be like connected. It's the same like as, as the tolerance for that previous one. Okay, so here you can see it is connected. Now what about this triangle? We don't even need this triangle. So what we are going to do, so for this one on power, how we are going to fix that, It's simple. First thing that we're going to do is just, uh, so there are a lot of ways for doing the same thing, basically. What you can also do it in a different way. I can say like a different kind of mastered. And there can be a lot of options to do the same thing. Okay, so for now, for the first of all, I will just like to just go back, okay, first of all, this type controls it. And here I think that this thing should be connected to this one and that and will be deleted. So what we actually do of what we actually did if you press Control Y, it will do that a tree do okay, so we just connected all of them. And now the next thing that I want is I will select this edge, okay? And I will just delete this edge off or deleting this edge, I will select the word diocese and I will delete the vertices. But you can delete the vertex basically because if it is connected or doing some kind of work like that. So for that I'm just going to first delete this face, okay? And then I will just delete the word deci is like this. So this is how you can do this, okay, delete it and that's it here you can see we have a proper typology. So now for that I'm just going to select the edges, okay? And I will also select this one also, and I will just fill the hole and boom, here you can see we just fix the typology and look what we have here. We have a proper loop, as you can see over here. Okay, it is connected. Now our loop is just breaking it this place, don't worry, we will also fix for this one. It will do exactly the same thing that we did for the previous one. Okay? I'm still going to just connect all these two vertexes and go to merge my tests is turn it on, Okay? And then I will just select these two faces in order to lead the faces all back to vertex until the, the word taxes. Okay, before deleting the, delete the edge, then delete the vertex which will be deleted. Okay? And then just select the edges and then feel the whole. So just like this. So here we have a nice typology without even any problem. And the best thing about it is we have great blue. So to check the loop, just click two polygons and then double-click. So it will just automatically select the whole loop here you can see we have agreed and a good loop as you can say. And here you can see this one is also a good lobe and this one is also a good law. And even here is a good loop, here is a good loop, so it is all about a good lobe, and that's actually an ideal way of making a better typology. Now what you can also do is if you, let's say you just want to extrude it, you can also just do this kind of, I'm sorry, like increase the area over here. You can also increase it. So let's first of all look at our reference here we have animalistic. So now what we are going to do is we're going to learn basically the basic loop and all this. I can say like the creation over here, okay, the extrude, I can say it like that. So there can be a lot of ways to do the same thing. You can just select the whole loop here. So let's just come over here and let's see that there are extruded and it's there will be like an obvious thing that there will be a gap between the stuff. Okay, so the first thing that I'm just going to do is I will select the another loop like this one loop, like this one loop. And the next thing is going to be like this, okay, so the first thing is also, I will just drag it down a little bit because we wanted like a little bit more space over here. And I will also add one more edge loop or here. So. I didn't like kind of a different thing over here, just dragged it down or even I can I could have added one more also, we're here, so there's no problem with that. So that said, all those things are selected. Now I will just select the faces, all the faces that we just wanted to extrude, okay? Like a proper loop, okay, till the end. And even if I select this part, like let's select this one also select this one. Also make sure you are selecting all the things OK. And always make sure you're checking your reference. Okay? So, and I'm just going to select it like this, okay, here we are. And I can just do it like this. So it will automatically select the loop for me. And I will also select this one. So let's select this one. It's just like a selecting process of all the loops. Okay? Just like this, after selecting all the loops and everything you wanted, press Dean, extrude and just extrude it like this. Okay. And offer it is extruded. You can see we got the basic and actual shape of our crew, our trades at chess. So I'm just going to put it inside over here software doing that, you'll see like, oh, this place is just a little bit clumsy in kind of caught dead. Don't worry, we'll fix that. But first thing, It's like Maya. In Maya, you always have to look for one thing always at the one time. If you are doing all the things at the same time, basically, in simple words, you will make sure that you fix the inside one and then you can do the liter one after that. So I'm just going to select this part basically for now. So I'm just going to select this angle over here on this extrude, like increase the size a little bit just like this, okay, over here. And then I will just drag it down just a little bit. So it will be like a center centered, okay? Like this obviously. And then I will just select the edges that we did earlier. Okay? And here you can see we just did a little bit mistake that it just got like kind of like sliding options so we don't have to do that. So now here you can see it is properly set. So the next thing is select the edges still over here. Okay, I'm sorry, just select the loop pocket till the actual end. So offer selecting it till the actual, and I will just drag it a little bit DHAP and try to make sure that the basic edge loop should match the actual side, just like this. Okay, and so it's like this, and select it over here, drag it up like this, and this is how you are going to match it. And I will just select all the vertices and just do the same thing that we did earlier, just like this. Okay? So I'm just going to select them like this. And here we did it. I know it's like a little bit clumsy process, but that's good if you're just understood them in a two time when you were learning, you're beginner face. Okay? That's going to be simple for you Exactly. And that's it here. I just fixed it. Okay. Now the next thing is to fix the bottom part. To fix the bottom part, I will just simply select the edges and tried to add them like this, and just drag them like this. Rag them like face. Okay, and that is it. Here. We just completed it. Now the next thing is we have to just go for the next thing and it's the, basically the other parts like this part. Okay, so let's select this part, okay? And just for now, let's select the whole loop, okay, which is over here. And I'll just drag it down like this. Okay, here we go. Just like this. And I can just select this word ISS and drag it like this town. Okay? So we just already existed that part so that we don't have to worry about that much. It's already completed. And I'm not also doing for the right side too, because we will just do the simple thing and that is just add multicasts. Use a multi cut tool that's its own you, okay, how you want to use is just add one loop over here, okay, I'll just selected, select the whole thing to lead it. Okay. Make it it's half, okay, like 1.5. And then after just doing that, and just make sure that you fix your model. Okay, here we go. I'm just going to fix the model a little bit that kind of like the problem. We had a cave-like face. And after just making it like in center. Okay. And just drag it like this track down. Here, we go. It over here, drag it down like this. And that's how it is going to work. Okay. So we just completed the left side and it's looking proper. So what I'm going to do, I'm just going to select the earth. So if right-click and just emitter it. So when you come to emitter it, That's is actually simple to mirror it. Just select it. Okay, I'm sorry, I just did it. Okay. I'm sorry. Now, just select their shift right-click. And after doing that, I'm just going to do with the mirror. You can just directly go to emitter and then just select the axis where you want to just do that. So it's like a set X's, you can see over here. Okay? So I'm just going to select the set axis from this side, okay? Like this. And I will just select the direction to be plus or minus like this. So now you can see it's perfectly duplicated. And here you can see without even doing it again and again, we just completed and created the actual extruded part. So here you can see if all of this place it over here. You can see you are getting that proper field and exact look that we wanted for our model. So wait a minute, okay, here you can see it. So now in the next one we will start creating the other parts over here, like this part and this part. Okay, so let's continue to the next lecture.
7. Nurbes and handle Creation: So here we are in this next lecture and we are going to continue creating this part. But before starting to create this part, there are some improvement that you can do to your crate. So how did they do that? Here you can see this, some of this workplaces are just going, the edges are going like this, okay, like this, this, they know how to fix that. So to do that, you can just simply come to the front view and just make this wireframe okay, and offers this wireframing it, just come to the word diocese and select the whole line, okay? And go press R and just do this. This is how you can just make this whole thing like as a flat, like a proper surface. So you can do that. Now. Just do the same thing with all the other things. Okay, let's say this, the all are just going in a different direction. And instead of choosing one and placing it like phase, you'll get us do one thing. Select the whole line, do this. Select the whole line. Do this. Okay? Just select this line to this. And when it's just like going not so create, just select the whole line. Do this, okay? To select the whole line, do this. And I'm not going to do this for the right side because I don't even want to do that. I will just duplicate. I will just I'm saying like I will just basically mirror it. So that's how you can do and I will try it like Don, and this is how we can do it. So just select the whole part, okay? And just do it like this. Select the whole line. Select this whole line. Basically analysts say drag it down like this. And that's how you can just make it straightforward kind of plane I can say. And then it comes to the next part. And this is here. You can see this part is proper. I can say you like, but I can also adjust the word ISS, room year, kinda also just a word SS, but now there's also one more option to slide it. Okay, so do slided, just press control shift, okay, and then you will just see the small slide stuff written over here. And then you can just slide it like this. Okay? You can just slide it over here in the center. So it should be like proper or here, or here. Okay, and after just doing it, you can just find out this all the things are not properly placed. And R for that to select the edges over here. And r for selecting the edges, make sure it just you go. And just make sure that they are just hiding behind the edges. So it should look like a straight stuff, okay, Or here and there should be no our displacements or let's select all of them. Those ragged down, like this, okay, and also select the whole word DSS. Let's come to the front for you. And here you can see this places like just a little bit messed up. So I'm just going to select this whole line, okay? Basically like this whole line. And not that, just select this whole line, not that are increasingly and drag it down like this. And this is how it is perfectly fixed, okay, here. So wait a minute, let me just do it for the whole and then just do it. So here to drag it and that's it. Now look, if something is messed up or not. So everything is proper and it's all right. I did only for the right side. You can just see the previous one is over here. And the thing that we, after we fixed that you can see now it's like more static and more proper. So to do this one also, I will just come to this side and I'll just keep doing this same thing to make them in one line. Just like one line, I can say they stick one line. So like these are now inline. You can see this proper enlightenment stuff or here, okay? And let's see if something is left are not okay. It's it's proper. So I'm just going to do the same thing. Just delete the right side, okay? And just select the whole model. Just press Shift right-click and just do the mirror. After doing the emitter, It will just show you which direction you wanted to do. Just select the Z and just do the plus or minus and I just said minus. And now it's proper here you can see we've fixed the actual model. Now if you're doing that, we are going to continue creating the handle of our crate. So here we have the handle. So to create the handle of order this crate, what we have to do is we have to add our curve. So let me just give you a quick example what will happen if I'm not using the core? So what the COV 2 will help us. Let me just first delete the cap. Okay, so just write it like this. You can just increase and decrease with the help of left-click. So let's say if I don't want to use the curve and I wanted to create a curve without using the curve 2. Let's come to the front view. And now let's say I just want to make this curve like this, going like this, okay? So I'll just keep extruding, extruding, rotating. Okay. I will do all the stuff manually found, not using the curve tool. So I know it's kind of like a too boring thing for me. Okay. Like underscoring like this again and again. And I will just extrude it like this. And I'll do that to the extrude and on the striatum exist. And that will extrude it like this. And I will speak if you like this way, you can also go in this way. Basically there's no problem with that. But the thing is going to be like you will have this poly problems. You will have to just rotated like this and then just use this one leg, rotate it like this. So here you can see there's like here we have the curve. But what I'm going to do is just simple acid this one so forth. For this, what we are going to do is come to the curved surface. Okay. Choose this spline tool, okay, Epi, you can say EP Curve Tool, That's basically the name of this tool. Just come to the other left or I can select the side view or an after coming to the side view, I will just create the actual face, actual shape that I want. Okay? Now I can say it's perfect. So for now, let's be, let it be the same thing. And after just creating the curve, okay? You will say you will come to the attribute and channel box. And after coming to the attribute channel box, you'll find the same properties as the previous one, but what different thing than it has in if you win, you will press the right-click. You will see all these different options. I will just choose the control word desk. And I will just make these left and right part, kinda like Street, okay. So like this and I'll just drag it down like this and make it like car proper curves set, drag it like this as select all of them, track down like this. And select this one and strike it down. You, you'll just need some just a little bit time to just play with it and then you will understand how to do how to use it. So here we have it. Why I use the left view? Because it will always set it in the 000 000 position and that is the center. So now I can just drag it and place it over here. And you can see the pilot is basically in the bottom. So to fix that, just go to the Modify and this Come to the center pilot. And it is in the center. Boom. Now the next thing that you want to do, you want, you should learn is how to manually set your pilot. Let's say I want the pivot to be in each year. Okay. So what I'll do, I'm going to do is just press the d key, hold it. And then you can just move your pilot, just place it over here, and that's it. This is your new pirate. You can just rotate it from this direction. That's a simple. Now the next thing I wanted to do is start making it like extruded the way I wanted. So for that I'm just going to create a cylinder. That's what we are going to extrude. So let's place it over here. Okay. And first of all, I will just remove the cap and I will, okay. It's 20. Let it be 20. Okay. I'm just going to rotate it from the z-axis like 90, okay? And I will just resize it with the help of r. And I will place it like this. Always remember whenever you are extruding and just modifying something with the help of color, always choose the starting point. This was the starting point when I started like creating it. Okay, and always do from the starting. So it will just end it if you're doing it from the end, let me just give you a simple example. If I just place it in the end, okay? Let it be, let it be displaced for now, okay. And I'm just going to place it, okay, you can always press F Let's say if you're over here, you don't have to just go like this. You can just simply select the object, press F and it will be in the center. So press F, okay, and then just select this object, select this curve tool. And I'm sorry, not the object, basically the face, the curve that you created. Okay. I'll right-click and hit the extrude option over here. Okay, So you can also press Control E, but I'm just going to do the extrude for now. Okay? So I'll just do the extrude face. And here you can see if I increase the thickness, you can see it's just going Oh, wait a minute. Let me just go to the wireframe. You can see it's just going over here. Nine, not let's just not move the thickness. Thickness is basically kind of like offset but in a different dimension. So I can just video with the help of offset, you can also do that. So let's increase the division. Now you can see if you just do it from the end part, it will complete the end by coming back to the end. So that's actually a problem. So it was just an example to do that. So we're just going to do it perfectly. I'll just place it over here and do it always from the starting node, from the end, okay? Now I will just place it over here. Okay, look at this. And I will just make sure that the size should be perfect so I don't have to resize it again and again. And I will also remember that it should be in the center, the line should be in the center, so there will be no problem whenever it will be extruded. Okay. So now after creating it, I'm just going to select the face, okay? And I will select the curve tool just pressed the go to the actual phase and just increase the dividends. So you can see 25 is basically the limit. It is a set. And if you find something like this kind of problems, don't worry, we can fix it. It's simply don't even have to worry about that. And that's it. Let's say if you just want a 100 faces, you can just literally type 100 and it will be, I'll have, it will have a 100 divisions. And that's how you can do it. That's the power of using curves for how, let's say that. So that's it. This is how we can create it, but I don't want that much. I will just 6250 are let's say 50 are. Okay. Let's go for 30. Okay, I think 30 is great and that's good. Now, what is the, another advantage that you can also get if you're using color is you can modify it, okay? If I press the F4 key and R, you will go to the wireframe mode. You can literally select the curve, okay, after selecting the curve, you can just press the right-click and select the control vertex. And you can just select what you want to modify and it will start modifying it in the real time so you can fix the car. Okay. Let's say that those those polygons were affecting it. So I can just fix it with the help of this. So this is how you can see like I just fixed it. Here it is, okay. Now, okay, you can see this is just giving us problems. I'll select the edge Shift Control and just slide it to wherever I want. And I can just also rotate it. Just rotate it with the help of control shift. And you can just place it the way you're, the place you want, like this. And that's it, that is it here we created it. Now the next thing that I want to do is I wanted to modify it, like just mirror it so I can just complete the tool. But there's also one more disadvantage and that is whenever you would just want to move it, you will have to move only the model if you're, if you're just moving the model and if you just increase it like this, it will work normally. But if you just move the curve, the model will also move. So you will always have to select the curve like this. Well, the problem is you can't move the curve, okay? So you will have to move them both with the same type like this. If you move it, it will also move the whole curve okay, like that. So that's actually difficult to understand. But you, if you wanted to move it like this, you can move only the object, but if you just want to go with it, this disadvantage basically, you get, you will just press the Shift key and just clone it. And once you clone it, there will be no effect on the clone. So you've got like you whatever you wanted and you could just delete the stuff which is connected with a curve, okay? And that's it. Now for coming over here, I'm just going to just select all the edges and place it over here in the center. And I'll just delete the extra faces that I don't want. And I will also select these. Let's select this face part, okay, and just put it over here in the center. So that said Here you can see we have the handle, the half of the handle and the half and we will create for the help offer emitter. Okay, so just select this face deleted and that's it. Here we have selected it. And now I'm just going to press Shift, right-click go to meter. Okay, and just select the right side that you want. Let's say I just wanted it to be x, okay, because this side is x, you can always look at this place and say x is x and change direction like minus. So it may be plus or it may be minus. So it's minus. And we got it. Okay? And if you're having trouble, let's say this is over here. So you can just change the offset, okay, like this. But for now, let it let DOPS and be same as default for the CDO, so it's not 0, okay? And it's totally based on your pilot pharaohs, your pirate radio. Basically, the asset is placed, that's why I pleased it in the actual center of the mire grade software doing that here I got it. And that is it. I can just press it and here I got it. We just created it within a few clicks. And I know here thinking like of it, it took a lot of time to do that because I was doing it just by explaining. That's why it took a lot of time. But if you're just doing it, it will save you a lot of time. Okay, so let's just place it over here. You can just rotate it like as you wanted to be like that. Okay. And I'm just placing it over here. Now the next thing that, if you wanted to add is these kind of like, like this part, okay, which is just connecting it with the Create, okay? And the connecting it, the handles with the create. So to do that, what I'm going to do is I will just simply like, we can just simply go ahead and create our normal. I can say like a normal cylinder and then I can use that. Okay? Or i then you can just extrude from this and just delete that. Bordeaux those ways are right. There is no right and wrong unless there is some problem with polygons or poly counts, okay? And something which saves you a lot of time, you can use that, okay, There's no problem with anything. Now, just go over here and just to read, okay, we just need a little bit. Capitalists say I just selected cap like this because we want it to be hollow and let it be like 24. Now, I'm just going to select a let's come to the top view. After coming to the top view, I will just select this whole polygons, this much deleted, okay, like this. And I will make it hollow. To make it hollow, I will select this line, this line, and press Shift right-click. And I will say bridge, not fill hole, just bridge it. So here we've got a hollow cylinder. And after having a hollow cylinder, I'll just move it to from Xerox's to 90. And after doing it at 90, I will just place it base we wanted. So I will just decrease the size. And that's how I can just decrease the size. I can place it wherever you want, like this, okay. And just make sure it's setting up properly. Okay, place it over here, just press the Shift key, clone it, and here we got it. So you can see we created the side handles. Okay, so now we will continue creating the later things in the next lecture. So let's move on to the next lecture.
8. Advance shapes Creation : So hey guys, here we are in the next lecture. And in this lecture we are just going to create this, this part, okay, and after that we'll create this lock, okay? Now first thing that I wanted to do is create this lock. So it will be simple for you to create this lock and there's no problem with anything. So what I'm going to do is just come over here and the cylinder because that's what we need for now. Okay, and I'm just going to tune it to have a like a little bit longer height. Okay. And then, okay, Always remember, make sure you see the reef friends are going in again so you will find out what you need, what you do need, okay, so it's just simple to create it. Now let's just make it a little bit. Let it be 15. Let's say it's 15 now. And there should be no caps that we don't need any cap. And you can also add subdivisions on height. Okay? So if you wanted to add subdivisions, you can just add like this. I think that there should be three. Okay? Are I think it's two. So let there be only two from inside out with this brace three, okay? And there is three divisions. Basically, these are 212, but it is called S3. So add it over here. You can see this tiny division. So we're here because that's how it works. You know, this much part is attached to the create and this much part is attached to this thing, okay? Whatever you call it. Okay. Now let's just release it the place we wanted to place. And I will just add it over here and decrease the size a little bit and just rotate it like press 90 and and just rotated like this. Let's press 90 over here. And that's it here we placed it. Now just decrease the size a little bit, hit it up, and let it be like this. So it is added over here and just come to this place and is checked this highest, right or not. Let's say make sure you always check if the psi hide or side is perfect or not. I think this size is just a little bit small for this area. But don't worry, we'll maybe we'll make it We'll fix it. Okay. Now I'm just going to place it over here and just increase the size like this, okay, and I will just make it longer also like this. So that's looking good. That's looking great. So I'll just decrease the size of a little bit, and that's it. That's what we wanted. Now the next thing is you can also do one thing if you wanted to create the bottom part, let's say this bottom part or here, okay? If you wanted to create this bottom part, you can also extrude from this place. Okay, let's select this place. And as you can just extrude it like this. And here you got it, what you wanted. Or you can use a separate object is totally depends on you. But there is one problem that I just noticed right now. We just forget to create this extrude option where here you can see this displays is also extruded, but there was no subdivisions in at all. What should I do now? Okay. It's simple how to do that. I will just simply create, I will just select the object, selected the subdivision tool. Create one more subdivision or here, okay, symbol. And then I will just select the edges, okay, like this edge, I will just place it over here. Okay, I'm sorry, I just need to drag it over here. Place it over here. Also this one, drag it over here, place it like this, okay, and then do one thing, just extrude this area. Now I know what you're thinking. There should be like problems, why we are doing good? Kids was like a huge mistake. Nodes was not a huge mistake. Simple eyes. I'm just going to cover it up. So We just wanted something extremely like this. So for that, we don't want any gap here. I'll just delete these both to faces, okay? And I will just select the one also. I'll press right-click head margin collapse and I will hit the margin collapse. Edges increase the tolerance. You can see we attached it. And the next thing is or here, I'll just select the faces, select all the faces top and bottom, and also select, delete the phases. Select the edges, right-click and just hit like this. Okay, let's select something like the margin. Do this and that's it. This is how you can fix that. So if you've got something like this, this is how you will remember to fix it and extrude or add whatever you want to call it, you can call it. So that's how you can do it. Then the next thing is I will just simply select that part, okay? And others make sure it's its trade as the other things are. Okay, I'm sorry, just select these two and also and do this thing. So it will be an extra heat. That's it. It's simple and how we added it over here. So for the back part, it's going to be the same process, but right now we're just going to continue for this area. The next thing is adding and creating this part, okay? So as you can see, if we have just a little curve, it is attaching the only two subdivisions, this and this part. And the next next thing is over here, please. Like this. Okay. As you know, the mechanics of the lock. So I'm just going to continue making it. So for that, what I'm going to do is I'm not going to select this center part because we will need to create, occur, but even you can do it anyway you want, okay, this, drag down, drag it down like this. Okay. And right now I'm just going to drag it like again, remember, every time you extrude it, you're just creating more subdivisions, which is like more edge loops, okay? If you want only one edge loop, you're going to just continue, just do like this and just drag it like over here. Okay? The next thing is, let's say, the next thing is making the space over here. So for this space, what I'm going to do is we'll just have to create a simple curve. So to create that curve, I will select the object mode, shift right-click and create the Medica tool and create like 12. And let's go like three, okay? Or you can also go like four, okay, hit like this and select that vertex and just drag it down like this. So this is how you can just make it like this. Okay, That's how you can do it. So the next thing is just, you can just delete this edges also if you want do but if you don't want on you. So now after creating it, I'm just going to delete that face like that part. And also the bottom side also, I can see that it's going to be simple. We'll just simply extrude it, but let's just place it in the center so it will be easy for me to look at it. So I'm just going to select this much part. Okay? Not this one, not this one. This much part and still needed. So that's how we are going to delete it. And now we created our subdivisions, so we will have to attach it and as them with the actual loop. So I'm just going to also remember, don't let the things to be lead as it was already. So it's now you can see the thing is added over here. So the next thing is, I wanted to add is going to reason a slick zoom in like this. And here you can see there will be a hole for this thing which connects with the lock. So for this thing will also have to create a lock. So to make that lock, what I'm going to do, I'm also going to select this much part. Okay, let's select this much part, okay? Exactly. It is going to, I'm sorry, let's just first connect all of them. It will be like a proper topology. And I'm just going to connect them. Also want do one thing, let's, let's just extrude the actual edges like this. So it's going to be like extruded like this much. Here. There will be a curve, so it will also create the core. And that's how I'm just going to drag it down. And after doing this, Let's select our multi-tool, okay? And just do the same thing, like create a whole. So the whole will be like, like a smooth one. So I'm just going to create a smooth hole. Select this much, hit Enter, select this much, hit Enter. So it should be connected to the side also. To make the typology proper. Because this will be like a five phase stuff. There should be no five phase or triangles in the model if you're making it for the game or some kind of stuff. But if you are adding some kind of like triangles, polygons, it won't affect the model or not, Okay? But it will just show like the typology is not proper. Okay. We'll somehow affect you and that you will know why you wouldn't just start creating stuff. So I'm just going to select all this things deleted. Here. We got a proper hole that would be vaunted. And the next thing is going to be like a round shape or here. So to make their own shape, I'm just going to just come in and place it over here so I can just see it from the front side, okay, and I'll just press F and the creed, the round side. Okay, I'm just going to select the vertex. It was pleased, misplaced, okay, and just release it the way it should be. Okay. And there should be like a roundness kind of around thing over here. Over here. Okay, I'm sorry, there is some problem that I just saw. Okay? One phase is left over here, don't worry, I will just delete it simple. And let's come back to any faces. There's anything left and nothing is left. So let's make it round. Okay, if you have, if you have reference, you can put the refrained at this point. But for now I'm just going to make it round just like go like this. Drag it like this, and drag it over here or here. Place it over here, place it over here. Here, here. And also the last thing is over here. So also just pleased them, right? This part, this part, and also this part. Also remember to remember your polygons or here, or here. That's it. That's how it is going to work. Now, the next thing that we are going to do is just extruding them. So extruding them is just a little bit kind of a clumsy thing to understand, but don't worry, you will understand them to select all the faces, okay? Simply select them, just extrude them from inside. If you are just doing this kind of stuff, you will have a problem understanding them. So for now what I'm going to do is just extrude the only edges. So I'm just going to select the edges like this and like this kind of edges, okay? Just not to select the atmosphere, we have to combine and merge them. So I'm just going to select this edge is part shift and extruded UAV have created our end over here. And the next thing is just select the whole edges like this, okay? And also like this, and then just press, Okay, Always remember to make sure you are edges that you have extruded is pleased on the right place. So to just do that, I'm just going to go to the left view. And with the help of that here you can see this. It should be like over here. So you don't have to worry about anything. So it should be over here. Okay? So it is added here. And now the next thing that I have to do is after extruding them. Here you can see the stuff is, this should be merged with this one. So I'm just going to press Shift right-click and go to the merge. Merge the border edges, increase the tolerance. And here we add a task did Let's do something different and that is going to be like bridge. So with the help of bridge, it will start bridging the, the edges with each other. So let's just choose the bridge, head bridge. You can just simply select this one. This one just press G, it will start bridging it so you'll just have to bridge it with the help of bridge it will also save your time to recreating all the loops. So just connect all of them. You can see this is just connected it quickly. Select this whole stuff pretty and that's how you can create them. Now the only thing is left is the adjust. I will say like the the Connecting the I guess the loops. Okay, So for the loop, I'm just going to just manually create them with the help of Bridge. You can also create the loops, basically what i, let's, let me just show you how to do them. Okay, so let's say control said, and now what I can do is I can select only one, this one, and this one, and I will just press G. Okay, I'm sorry, I just not created an entity. Let's just select this one and come back to that way and hit bridge. So it will keep doing the bridge. If they're just doing it for the faces, each and every face, like T, select this one, press one G, whereas this one select this one. Hit T cell like this one, select this one too. So that's how we can do that. Now just keep doing all stuff and select this one, press G. Select this one, press G. Keep doing. Basically d is used for using your previous tool that you used, okay? It, it will save you a lot of time if you are going to use it. Instead of going in like this, this and this, doing it again and again. Instead of, I'm sorry, instead of going back to this place and this, you can just simply choose all of this to thing and press T. So that's it here we created our handle. I can select the lock part. Okay. I know it's like a little bit long, but that's how you're going to learn a lot of stuff, okay, it will take time. So here we have the lock or here with us. And as you can see, this much is already done, so we will continue the next thing in the next lecture. We'll create the lock and the part where it is attached to.
9. Fixing typology: So hey guys, here we are in the next lecture. And in this one we're just going to start just making it look better and making it go better and just make them look much more prettier and some kinda stuff like that. Okay, so here you can see it has some kind of like bevel kind of edges. So most of the things are added. The lid me just give you a simple stuff like this kind of like lines are basically with the help of texture. But if you're doing it in modelling, that will make dumb model. Hi Baldi, which is not good for games. But if you want, if you are using for like VFX or some kind of stuffs still it will make it a lot heavier. But if you're using the way that you wanted to make this kind of stuff, you can actually make it that make them. So here we have already created this part and now what we have to add is just going to be the next step. And that is just making this whole section like bevel. Okay, So what we are just going to do though, so let's choose this first thing over here. I'll just click the double click OK. And after clicking this, I will also select this part and I will also click the double-click. I can left-click and just double-click the left click button, okay, and just select this much part with the help of edge, okay, Just going to the edge, right-click and go to the edge. And here you can select this part. And after this one, just press the Shift right-click and you will come to this option, I'm sorry, right-click and you will come to this option. We just call this pivotal edge. With the help of papal edge, you will be able to smooth out and create like a bevel kind of stuff. Okay, So if you do that kind of stuff here, you will see what it will automatically do. It will just create kind of like a triangle in this side. You can also increase or decrease the depth. Let me just give you something. The more you will increase the segments, the more detailed or more smoothed it will be, the more polygons that we'll start adding. Okay? If you're adding more polygons, it will be like more detail. You can say that, okay, so this is how it is going to work. So for now, I'm gonna just going to make it too heavy for now. Let's just make one segment over here. It's still OK and let's see how is it looking even if I just, just go back to the shaded view without the current stock. So here you can see this is what it doesn't look like. It's, it's too realistic and that's good. So that is it. But the next thing is the about how we are going to fix this line. For that, I can say that. So how we are going to fix this part, okay, we just basically the triangle. But if it is triangle, so let me just give you a simple example. If it is triangle and there's some places where you will need a triangle, by default uses neither triangle because here you can see I think that there will be a need of at least one triangle over here to give me this kind of shape, then it is proper, then there is no problem with that. The only thing how is it will look after getting triangulated in the engine? It will look like this here you can see OK, and I'm going to talking about this area because we didn't even fix that typology in this place right now. Okay. So this is what it will look like. After getting triangulated. It will just add some more extra terrorists and which will affect the actual Terry's of this whole model. So here you can see that Terry's of this whole model is already written over here and that is 832. And this is like a, a 132 teres. And the phases are, which means the triangle and the phases are 409, okay, so 409 phases RNN on it and we just basically simple. So I'm just letting it be, there'll be like one triangle over here. So I'm also going to fix this part also. So for now what I'm going to do first of all, is I will start like fixing the some of the detail. I will start adding some of the details and I will also start fixing something. I will also again do the same thing that we did earlier. I will just add one, like one stuff in the middle, so I will just meter it for the purpose of saving time. Okay, so I'm just going to select it. Double-click, select that much area that you want to barrel. Okay? You can also do multiple pivotal angles. Like I can select this much part, okay, like this much Bart. And after selecting this much hole, like I can see like the whole loop or here, I can just say shift right-click and go to pivot. After doing that, it will automatically start making the whole, the whole model pivotal. So as you can see in this part, this part is like a little bit simple. It's just like a whole. So there is no triangle, there's not even any triangle in this part. There is no triangle in this part 2. So I'm just going to increase just a little bit of this fragment, okay. Like this much and the fraction, sorry, not the fragment, I'm sorry, this integral. Okay, So that's what we just want to look to really look like. So that's okay and that's looking good. Now let's move on to the next angle. So I'm just going to select this one, okay? The whole four of this part, okay? Like this and also these four part over here. Okay, like this. And then I will just select the whole loop from this side, Sidak, this loop, even we are going to just cut this dark much part. You don't have to worry about that because we'll just bevel it for the loop, okay, Basically the loop which we have to create. So I'm just going to add select that much edges. And after selecting that mortage, I will just say shift right-click and go to bevel edge. I'm sorry, not the settings. Okay. That cue, that small squares used for the for the settings of the bevel. Okay, you can see we have also added the same fragment I would like to take exactly as we've done for the previous one and that's how it is going to look like. So let's just see how much. Okay, so it's looking great. So that's it here you can see we have small details on our pretty good models. Now let's fix this typology here. I'm just going to use the multicast tool and you just have to connect them. So there will be like a one proper falling on in this place and just for store. So it will be easy for Maya to basically solve it. And there it'll be like one triangle on the top. And that's not a problem. That's okay for now. And I followed us, check it with the help of going to triangulate. Here you can see there is no problem. It's like a proper proper triangulations and it's triangulated. Okay, so that's how it will just show you in the actual game engine. So that's what it will look like. So I'm just going to Control C. You get back here, we have our dividend and a good-looking model. So what I'm going to do next is I will just select that much face here. And I will just hit delete. So it is deleted. Or camps where there's some like Cuban side here. I can just delete it. Now. Just to monitor it. I'm just going to emitter it. Select the z-axis, okay, and the placenta, it's perfect. So here you can see we have our perfect model that we were looking for and with how much polygons, which is like 8590 faces. Okay? Okay, let me just do some little fixes also. We're here. This one should be a little bit bigger, okay, so lets it be like bigger. Before doing that, I'm just going to choose the group. So you remember that how to create a group? Just press Control G and I will just increase it, okay? I will just increase the size because we just want the size to be well every bigger. So I'm just going to set it there be like this. So That's how it is going to work and look, okay, so it's also great. So I'll just have to duplicate our group and splits it also on the left side, like this. And I can just rotate it in this summary and it's added over here. So here you can see we just added it over here. And now the next thing that we'll have to do is we will also have to add this small detail over here. So do to do that basically what I'm just going to do it simple. I will just add one more edge loop over here on the top. One more edge loop in the end, okay, like this. And I will just select that inside edge loop, The Azure loop which was on the center. Okay, I'm sorry, just there's some okay. The loop was not created properly, so don't worry. Okay, I will just select this edge loop. You can also do a Berlin here. So if you'll do the bevel here you can see photos increased, fair increase the decrease the depth. It won't work that way, but it will just help you to add some segments over here. So I'll just add one segment in the center, like let there be two, okay, let just add one. Let's go for the two. Okay, so we just wanted this way. So here uses learns like you can do a lot of stuff just by choosing different kind of options. Okay? So that is it. Just select the whole edges. And after selecting the whole edges, I'm just going to decrease the size a little bit, okay? Like this, how much reward and our list select the another one, drag it down a little bit, put the top one, drag it on top a little bit. And that's how it is going to look like. So here you can see how we just created the edge. However, it's looking just a little bit edgy from this side, so I will just fix it. I'll just select this, this, and this much part over here. Okay, and I will just drag it over here. Okay. I will just drag it over here. And drag it over here. You'll always have to fix some of this stuff. And you'll always have to learn a lot of stuff while this doing this conflict, different things. Okay? So here you can see we've fixed that edge, the area over here that we wanted. Okay, and now the next stuff is over here. And I can just drag it like right side, Okay. Select the word x, drag it up a little bit down and just increase the size a little bit. Okay. It just go like this way. Okay, It's, it's okay here. And slide it. Always remember to slide shift control. And this is how you can just slide it. Just make sure you're sliding right way. And here we completed it. Okay, so now I'll also add one more stuff here. So that is it. And just slide this one too. So it's looking like this. And that's how it is going to earn end here. Okay, so I will just place this whole stuff just a little bit on the top. Okay, So it was a scary me, unlike the proper view. And that said here we can see the exact look that V wanted. Okay, still if you want to just make this top part a little bit more wider, just select the whole three edges and just drag them down. So it will have the particular space stack you I did. So here you can see we just completed it. And for this whole cubes and all these kind of details, you will read, mostly added with the help of textures. But still if you want to add, just come to the spear, just create a sphere, okay? And just make it the how much polygons that you wanted. Let's go four legs some less. Let's go for like ten. Okay. So tenants, it's good for being 10. Let's look like this. Okay. Now there's also another thing. And if you see this dismount just looking a little bit more kind of hard, just go to Mesh tools, I'm sorry, in this goto mesh display and then go to mess shaft. So after doing that a little, just start looking soft even if there is low polygon. So I'll just delete this much part here. Okay, and here we got that bolt, the squeezy deliberate, desperate the help of the Resize tool. I'll just place it over here, okay. And I will just add it here. Okay. So I will just drag down, put it on top. Okay? And that's how you will have to start creating that feature with the hub of this. So it's like the bold stuff that was like the design and kind of stuff. So with the help of these again, displacing it again and again and again everywhere. And that's how you're just going to complete that. So that is it, that's it. The end of the last lecture of this course. And I hope you have learned a lot of stuff.
10. Boolean & Tools: Hello guys, welcome to another lecture. And in this one we're just going to continue and create the lock of the smallest. So for that, what we are going to do is I'm just going to simply select this tool that is called as a torus. Basically not too. It's just like, like I will say like object, a basic object and Maya already created, you know, we can also create it with the help of curve as we have also a lecturer with that. So I'll just add over here and just decrease the size. Place it here, just disaggregate it and added. Read. I think it should be like perfectly added. Like degree is the size a little bit. Here, I can say it will be like this. So this is how it's going to look like. So let's look in the reference, okay? Yep, it's looking like refrence, like we have a reference. So the thing is, the next thing is, I'm just going to displace it perfectly 90 degrees, okay? And the next thing I'm just going to do is you can also just make the, you can also just add just a radius. How much radius you want. Like let's say 0.7 will be how a lot. Let's go for like zero-point four. So four is much more like has a lot of gaps. So let it be like the 0.5 oldest, decrease the size just a little bit and place it over here and drag it down like this here. And that's it. I think it's great, but the problem will be there is no place for the lock. So for that, I'm just going to okay. It's seven. I'm sorry. It should be five. Now, there will be like some place for the lock or I will just increase the size a little bit more like this. And there should be linked gap for that. Decrease it and make it like 0.4. And that's going to work much better way. Ok, and OK up we have the space for the four. So I'm just going to place it like this over here. So for that I will just have to cut it into half. Once you are done with the all size and all stuff, you can just select the half part as you want accounts or electronic part and just press Shift key. And when he will select again the same part, it will just deselect it and that's how it works. So desk deleted. I'll just select the edge. Do this, select this, till this. And that's how it's going to work. And that's, I'm just going to place it down here like this. Okay. And this will be like kind of rotated like this. Okay. Because you're just giving some space for the lock basically. And that's it. A little bit realistic. Okay. Here we have it. I'm just going to put, place it inside of it like this and then summing it the same thing. And heavy like this. So that's it, that's how it is just going to look like when it's just pleased. Perfectly. Okay, Let it be like literally like this. You can just look from the side or you can just go literally from the side angle. Whenever you press F, it will just frame it, framed the object perfectly for the viewport. So for that, I'm just going to place it from the French scientist, decrease the size a little bit and decrease it more like this, and that's how it is going to work. Okay. It's perfect. Now, let's move to the lock basically. Okay. So what I'm going to do is I'm just going to create the lock first. Then we will create this little part and that's just going to complete the Material. Then we'll just move on to the polishing part. So that's it. Now the first thing is create the shape. So the creating the shape is simple. You can just use any squared like a cube. For now I'm just going to use a cube, okay? And I'm just going to come to this side and just increase the size of it a little bit more. Okay, and I will just start adding some depth. And let's, let's just go for this. Right over here. The Gad 12, okay, and at 45 like this. Okay. Now, let's come to the, let's look at the re friends forced. So there should be like 1234, 5, 6, 7, 8, kind of like 12345, okay, five. And the other left for the, making it smoother. And you can also do it like this. You can modify this one also, and you can also do one more thing. And that is just using the Direct. Let's say like using the multi cut tool and villages more simple in which will save you a lot of time. So let's say I just wanted to go like this much, okay? And this much is going to be the basic, okay? And just use the curve. Let's say like this. Just enter, okay. Go for the other side is always, make sure you have an ion, your friends. Always a member. Each click you are doing, you're adding one more subdivision. So just be careful with that. And always, remember. Always try thinking that how much low poly and optimized you can make. But if you're making it for our VFX thing, then you don't have to make it. But if you're making a list for a game stuff, you will have to be optimized. So let's start creating our luck. Let it be like face this, this, this, this, this. So just let it be anything for the right side. I don't I don't care about that. So I'll just place it over here and select one division that is just going to represent the division basically. So just choose that. Okay, So to, to use the normal tool, I just forget to say that, but it's simple and just and just press the W key and you will come back to the normal tool. Okay? That's what we were doing for this tone long time. I'll just delete this one and I'll just delete this part. Will is this whole stuff. Delete this one also, I'm sorry, I should usually I have used the plane, sorry, not the cube. I just used it because I usually use Q for everything. So it's, it's your choice. So now or the next thing is, uses to have to create it as like a smoother little bit like and start adding some more stuff like this, okay, and just come over here, just choose the word ices. Start making it a bit more smoother. Make sure it should be half cone smooth, like this. Okay, I'm sorry. Like, I'm cool, like this. And here to end it over here. So let's go like your face, it's like this. Let's go like this and just end it over here. Remember, you will have, you will have to connect them. So here we have the basics. Basic space are kind of like a basic shape for our lock. Okay, let's always remember, just look at the URI friends and I'm just making it in real time. So that's why I will have to look at the reference. So does it added it over here? Okay, And now the next thing is just adding an adjusting it. So we will also need one more thing and that is just adding this key hole over here to Create, to create the keyhole, we'll do it after duplicating it, like mid after metering it. Okay, so let's do the next thing over here. I'll just press U to right-click and choose the multi cut tool. Start connecting all to lower year and this try adding them like this, okay? Like this, you can just go with any kind of typology that you want. It's all on you, how you want to end it. So that's it here you can see all of them are like a queue proper polygons, there is no problem, anything. Okay, now, what's, what to do next is create the keyhole, okay? And also before anything, let's just look how it will look like. So I'm just going to select all the faces and just extruded. Here you can see the extruded part of the lock, how it is going to look like. So here you can see this look like. So, okay. So now the next thing is just duplicating it. So I'm just going to select this whole stuff. Shift right-click, meter it. And you know, the offset will be like a lot, so I'm just going to decrease the offset. Okay? Okay, the angle is just a little bit from, just go like z or k, z minus z. Ok, and now it's perfect and just degrees the offset. So here we completed it. And now, as you can see here, we are having a little bit problem. When's the offset is just connecting with it. You can see like 11.1 will be perfect. Okay, Still it's not perfect. Let's go for like 11 pointer. Like 11.200.50 is going to be good. It's looking also at o, what will happen? Just, let's go Control-C. Okay, and I think it's perfect. So we can also fix that there is no problem. You will have some kind of problems like this. Don't worry, just have to attach them. So just select all the faces. You know what we're going to next, just delete them. Just select the faces. Okay, not that much, Okay, just only this much. Control Z, select this, select this, this, select this, and just go this way. Shift, right-click merge vertices merge the border, increase the tolerance. Okay? What's the problem? Or here it's the same over here. And I'll just have to test them. So I'll just select abortus like both of them shift right-click merge, advertise, go to merge, want isis, increase the threshold and that's it here, used to ask them. So here you have your lock. So I'm also going to just to select both of them, shift right-click and shift vertex my days, and R for merging them. Here you have, it's the luck that you wanted. Now, the next thing is, I will just have to make the knock a little bit smoother. So make it smoother. I will just increase the size a little bit. You know, the vertex is from here, so it's working and deliberate. Runway, second Assembly, click on this one and that's how I can place it in the center. Going to increase the size of a little bit, and that's it. Here you can see we have black faeces. So this is something I know that you are looking first time in my arm, but we didn't. So what does black faces basically means blackface. This is something which is just reversed. Okay, so how to fix that is press Shift right-click and you can see something as called as reverse, okay, so you just have to reverse it, okay? So there is no option for that over here. So just come to the mesh display. And in the mesh display you will find the survivors. Say that and that's it. You can see never leave the black faces. The black faces means the backside. If, if elder zoom down, you'll start seeing the black faces. The inside part is black faces, which is the backside of the face. Okay, so here you can see the unlock S ready. The next thing that I want to add is some loops to make it smoother. Okay? So I'll add a one of a loop order here, okay, I'm sorry, edge loop, okay, not the multicolored. So just choose this one too different to select both of the edges and just increase the size. So here you can see as having the smooth stuff. Let's look how our references or reference also have a carry here. So it's looking great. Now the next thing that I want to do is making it like a little bit smoother, so just save the iridescence. And now the next thing, the other thing that you should understand is, let's say if I just want this one to have influence on this one also, for that what I will do, I will just press P, But the help of B, it will give me a smoother selection on. You can see it's just working in a better and a smooth way here you can see it's like, kind of like playing with the clay. Now, you can see you are here like slime kind of stuff. So that's it. Our luck is ready. The next thing that I want to add, okay, so to turn in and turn it off, you will just have to press B and B like this. And if you want to just adjust the influence, hold the B key and the left mouse button. And this is how we can control the influence. Second, just make it tiniest you want and as possible in can also make it bigger as possible. So that's how you can do it. I will just press B to turn it off. Now, let's come to the next thing and that is adding the keyhole. So to add the keyhole, to add the keyhole will have to add the multi cut tool or you can also use boolean, but I wouldn't recommend using Boolean for this kind of stuff. But let's learn how the Boolean Watson just going to use. Let's say I'm just going to use a normal size cylinder, okay? And just come over here. I'm just going to decrease the polyenes of it. Let's just go for only six, creates the size, place it over here, press F, just decrease the size also. And just drag down it and make it, make this one has an ID. And for making it 90 here, you can displace it how much, how much bigger hole you wanted. You could just always select the size. Like this marches against, say like perfect. Okay. Perfect. And there's also one more thing I always like to add a little bit more. Let's go for 10. I can't say like 10. Software doing 10, I will just draw dated like Facemash. So there will be one. Polygon left in the ending, I'm sorry, not this way. If you're used to using the red side, you're just using one axis, remember that? And dated this much and the ending should be like this, okay? And displays it in the center, like perfectly in the center. And this, you can just increase it as much as you want. Okay. And to the face, ragged down like this. It's even look like a keyhole. I know like it's not looking at a perfect cube all for now, for Sprite norms is going to lead to understand how to use a Boolean. So to use a Boolean, chelates select both of these things. And now what boolean we'll do boolean we'll subtract this much part from this, this actual object. So to do that, I will just select all of these things, shift right-click and go to the Boolean here you will find the Boolean here. You have the Boolean here, and I'll just go to that difference. And after doing the do friends, okay, I'm sorry, it's selected it on a runway. Always select the the first thing from which you want to delete it and the next thing that you want to delete from and just do this, okay? And after that, if we work like this here you can see we are simply added a hole that you wanted from your way. So let's adjust it. How can I adjust it? Just I'm sorry, and just decrease the size. So now you can just add just the way you want, okay, not that basically lets us go with this unified way. And this is how you can also add the hole. But the problem is, there is no polygons connections. Okay? If, if I'll just go up and up, Let's just press Shift right-click and go to triangulate. And you will do that. You can see this displays is just getting messed up. Like look how much messy, just kidding. There is no even z this, this part is properly unified. Everything is perfect. But only this part is just getting totally mess. Why? Because we use Pollyanna displace. And that's why the calculation will have problem to calculate the proper triangles for that. But if you are using for like, let's say VFX stuff, then there is no problem with anything, anything like that is because the VFX final goal is the render. So the render will be like an image, okay? And for that, you don't even need any typology or any kind of problems, but still you will need topology at the end. Okay? So for a game stuff, if you're making something for GameStop always I will recommend not to use Boolean, but it's still something that you should remember. There is option for doing that. Okay. So I'm just going to go back and I'll use a different method. And that is going to be as using the, the multi cut tool. Okay, we're going to use the multi cut tool. And for that, let's just come over here, select Shift, right-click and come to multiple tool. I will just select simply like this, okay? Like this, this, this, again, multi cut tool is always like, kind of like simple, but the thing is over here. You will just created in having something in your mind and that is connecting the polygons. It's just like this. It will just keep connecting the polygon, select all the stuff. Always remember there should be no triangles like this, okay? If you wanted to cover them, I'm just selected like this and that's it. I think this is over. I can just select it, the loop two over here and here again the, another triangle gums. So I will just select over here and that's it. Everything is fixed, but there's also one more triangle over here. So to fix that, I'll just come to this place and ended or hears Hit Enter and that's it. You can see that it's, the topology is proper, everything is proper for now. So I'll just select the word eggs downgraded like this much. You can see this. Just select the face, write it like this tone to lead this much part. And just delete this part also because I'm not going to do with this second and going again and also delete this part. Okay, simple. I will just know, select the Aedes and not the inside edge is basically okay. I'm just doing it right now in a bit clumsy way. But if you are not connecting with that, don't worry, it's okay. So that's how I'm just going to just extrude it. Okay? And I can also do one more thing. I can just triple, just do the emitter again and again. So just do that. It will save you a lot of time. Shift right-click to the meter. Okay, now, with the help of emitter accounts or controls, it, always look if it's perfectly topology as unknown. Okay, so just do the meter. Okay, Now, once again, just selected shift, right-click. Do the meter. And now I know you, you're, you're not able to find it. So just tools. Let's go for like x, but then different directions. So there is a different direction is here, we're here. So I'm just going to decrease, increase the offset. Make sure it is connected or disconnected. Now, here you can see it's connected perfectly as you wanted. All right? So here you can see it's connected. I will again do the meter. The meter is come to the Z, Z, and then just like go to minus courtesy minus here you can find out your offset is set to decrease it like this, or increase it and disconnected like this. So here you can see it is connected now and the hole is also a desk. So here you can see is data that triple like three dimes. Oh, I'm sorry, The two times mirror. And we have our perfect model in our hands. You can see the keyhole is even here, but there's only one thing is I just didn't made the keyhole like too much high Bali K4 now, but let it be this, okay, there's no problem with that. So that's it. Our keyhole is also said time's going to place our lock place we wanted. And this is how I wanted it. Like this. Okay? Now let's choose that torus once again. And I will just make this torus according to the lock. So just select this one and decrease the size of the section radius. So I'm just going to choose control this much and smudges, okay. I guess. Okay. Let it just be related like 90 degrees. Okay. And I'll just place it down over here like this and just have it over here decrease the size. And the only thing is it should match with the actual stuff that you're going to create. So I'm just going to increase it now we're here and that's what you have to add there. So it is utterly here. Just decrease the size limit, okay, just decrease the size a little bit. Just place it down over here. That said, here's our luck as ready to reuse. So I think it's ready. So for now, I will just delete the extra faces that we don't want. I'm sorry, just come to this right angle and I will just delete this much part. Delete this much part, and that's it. Now, I will just press F. If you are half, just clumsy camera angles, select the Edit and select the edges once again here. Drag it down like this, extruded like this. Okay. You know, the lock have this kind of C-shape and just add it over here. That's it. Everything is perfect. This decrease the size just a little bit. So it should match the actual size. So now let's just connect it. Now we're here and just add it into the place I wanted. And okay, it's perfect. So I'm just going to press Control G, so it will just group it. And you know the G key, how are different key? Pilot? You don't have to worry about that. I'll just press the Enter key and after that, it is in the center. But even I don't want it centered. I just wanted to over here, so due date. So I'll just rotate it like this and said, here you can see we just completed our model stuff. I can just decrease the size also if I want to do. And I can also please it or here and not inlet to be connected with this kind of stuff. So that is Ed here we have our model that we wanted. Now the other stuff is just adding some details, just giving some bevels, making this kind of like rounds or here like this. So that we will do in the next lectures. So, okay, so let's move to the next lecture.
11. Final: So hey guys, this is basically the last lecture of this whole course, which was like a Maya grignard stuff. So here we can see how we just completed the whole, basically the each and every staff of this create an edge. It was just simple stuff for you to create that with the help of that much polygon. So it's also looking good. And it also has like a nice, like the touch that we wanted to create. Okay, So now the next thing that I just wanted to give you as that is assignment, you will get the image OLS. Also, it will be like a downloadable image for you and you will have to just download it and create, are created like this. And if you're worried like there will be problems, there will be like wrong typology triangles. Just don't worry about that. Just make this stuff and just give it to me to submit it to me. And if you will need some attention, if you need some help from you can just go straight out and ask me, and I will help you with that polygons and what, and with that kind of stuff. So that's how it is going to work. So just go ahead and create the grid with yourself. Use your own brain, use your own, we use your own technique. And this created and submit the image of like the like gosh shaded. I will select a shaded like this kind of image over here and take a screenshot, just kill me. Let's go like snapping tool and just take this much screenshot and just like save it and just give me the, the image of that. Okay, So that's how it is going to be worse. Just like simple stuff. Follow the tutorial, follow the lectures, and just ended like that. Okay, so that is it, That's the end of that lecture. I hope you learned a lot of stuff in this whole course. And you'll, and you'll enjoy more future course. Okay, so bye-bye. Thank you so much for watching.
 Akshat Soni, Game art designer & Graphic designer