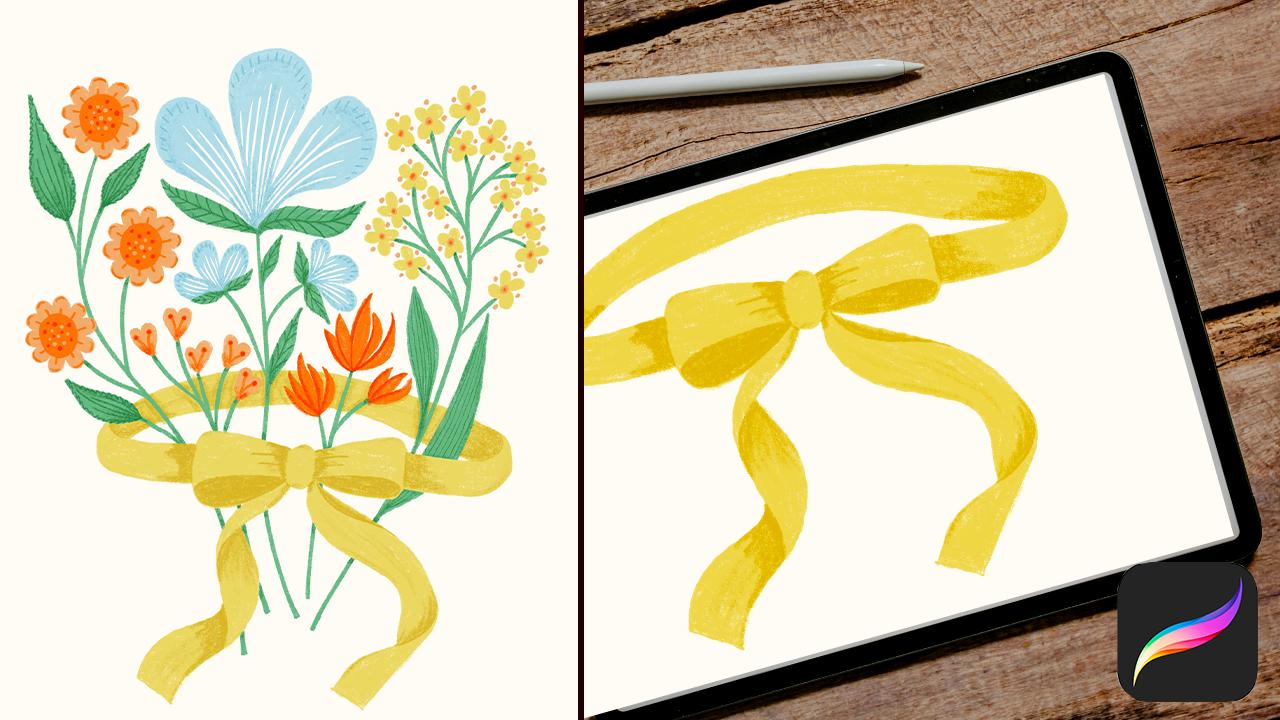
Transcripts
1. Hello & Welcome: In this class, you will
learn to illustrate a delicate ribbon gracefully tied around a flower bouquet. We are going to use
Procreate on the iPad, and I guide you step
by step through my process of illustrating ribbons and floral compositions. You will master techniques
to create flowing lines and soft shadows that bring your ribbon and bouquet to life. This class is perfect for intermediate digital
artists that know how to handle Procreate. By the end, you will have a beautifully illustrated
ribbon and floral bouquet that you can proudly showcase. For those that need to practice how to
draw ribbons first, I highly encourage you to take my "Drawing Ribbons and Banners
in Procreate"-class first. And if you are new to Procreate, I invite you to my "Power
of Procreate"-class. As our class project, you get to create a beautiful flower and
ribbon illustration. As in my first class about drawing ribbons and
banners in Procreate, I'm going to use only one brush, the 6B pencil. This method ensures that
we can totally focus on the drawing and illustration
process instead of spending too much time into
choosing the right brushes. Hi, I'm Nici. I'm your teacher in this class. Without further ado, Let's get started.
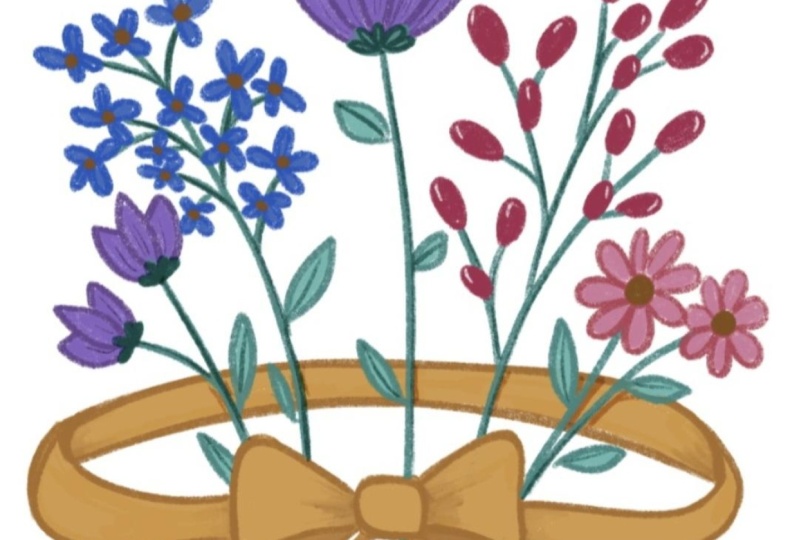
2. Your Project: Your project in this class is to draw a delicate ribbon that ties some flowers
together to a bouquet. Please upload your
artwork to the gallery. I'd love to see what
you've created. And I give you feedback. Please share your artwork and inspire your fellow artists.
3. Sketching the Ribbon: Okay. Let's start with a canvas
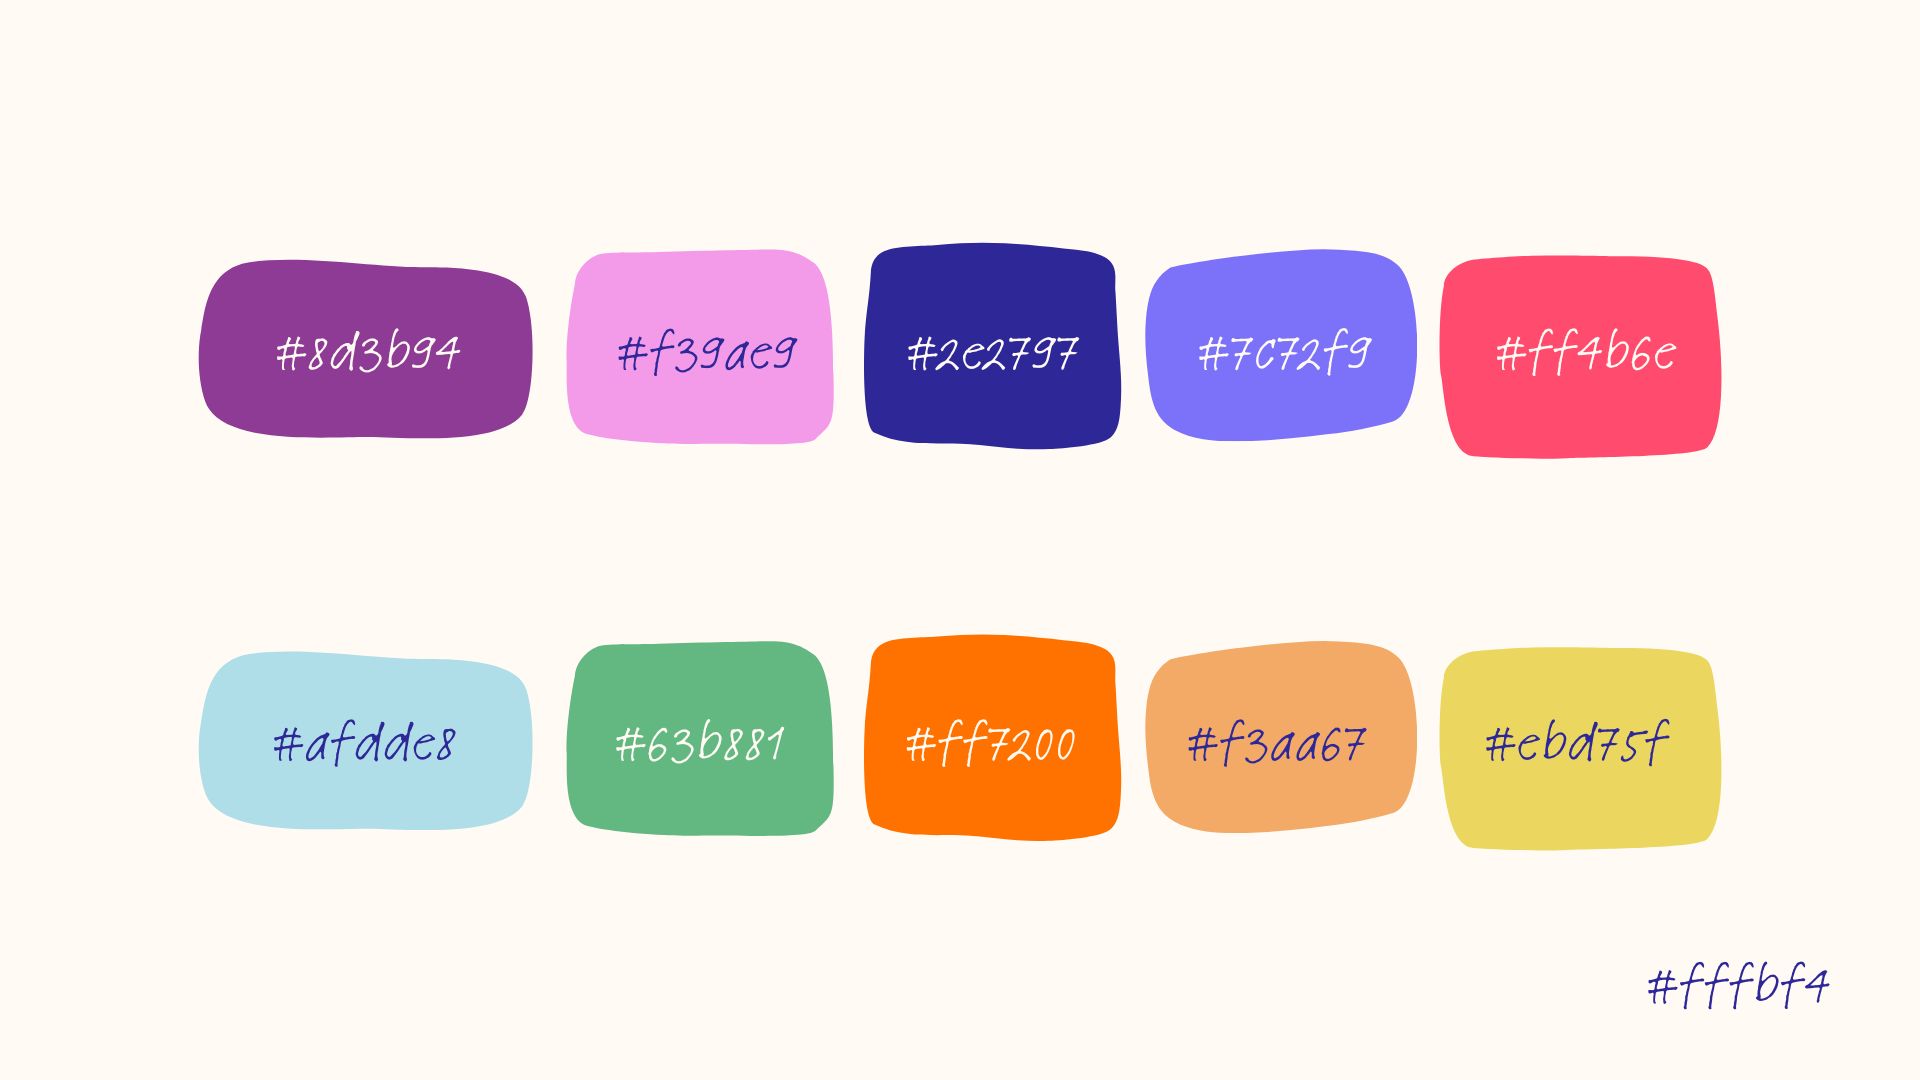
that is eight by 10 " and sRGB color mode. I'd like to start with
the background color, and I choose an off white. You can download my color
palette from the resources, if you like or choose your own. I choose this dark
blue color for my sketching and
the 6B pencil. I'd like to draw
a very loose bow with a ribbon in the
middle of my canvas, and the ribbon should hold
some flowers together. Very loose. This first sketch is very rough and
I refine it later. I like the ends of the bow a bit curly and they should twist a bit and let's see
what we do with that. I reduce the size a bit
and shift it a bit down. And then I make some
stems for my flowers. I think I'd like to
have five flowers, three bigger ones and two smaller ones to receive
a balanced composition. Then I create another
layer and shift it underneath my
sketching layer. And we reduce the opacity
of the sketching layer. You can see your drawing better. Now it's time to refine the
sketching. Let's do it again. This time, I make it a bit more exact and add some details. Here on the bottom, let's add a little loop to see
inside of the bow. I reduce the opacity of my
sketching layer a bit more. Now the other side of the bow. It's okay if one side is bigger than the other
because that's more natural. And now let's make the loop that holds
the flowers together. I try to make it in a bit of a
flowing in the wind shape. This part of the process
needs some more iterations. I try and fail and do it again and refine till I
have a result I like. I used to work in a very
accurate and exact style. But I don't liked it very
much to work in this kind. Lately, I try to work more... I try to work less exact
and more hand drawn. For me, it's okay when this ribbon is bigger
and on other parts smaller. But it depends on your style, do it in your style. Let's make the ends of the bow now and I try to make them curly and twist them on some positions. Here on the top, I make a little fold in
the length of the ribbon. And down here, I twist the ribbon so you can
see the back side. I like it. But this bottom needs to be a bit more thicker. Yes, better. Now let's
make the other side. I'd also like to twist this. Try to play around. We are done with the
ribbon sketching, and in the next video, we are going to add some color.
4. Drawing the Ribbon: Let's add some color. I create an other layer
for our illustration, and I make a group with
our sketching layers. Turn off the first sketching
layer or if you like, you can delete it. We don't need it anymore. I reduce the opacity of the sketching layer again
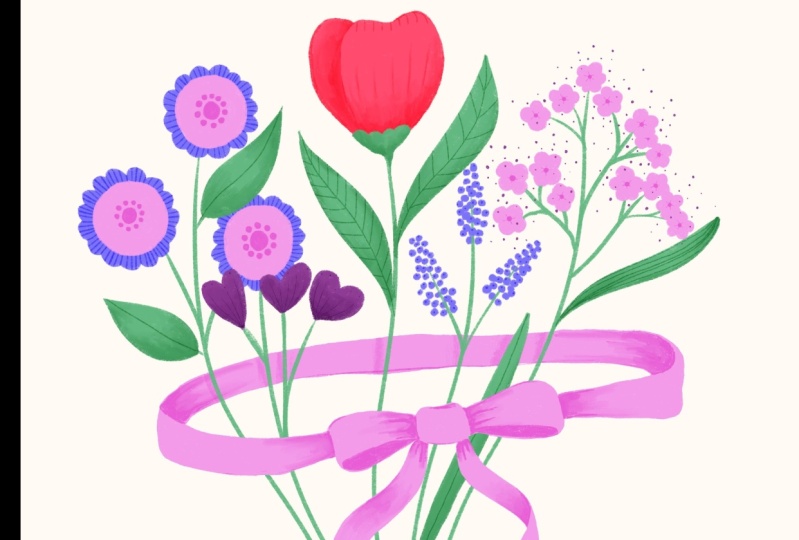
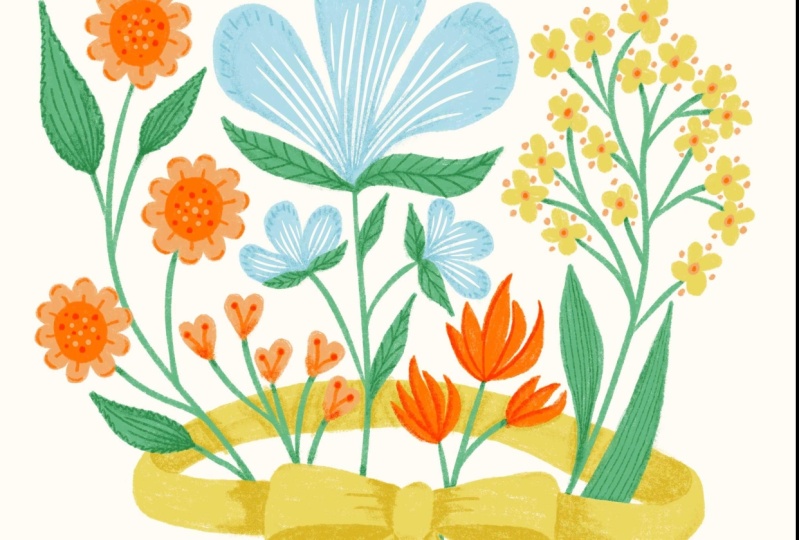
and start with the drawing. I have provided you with two separate color
palettes and you can choose one of them or
go with your own colors, and I select the second
color palette for that. I create another layer
and shift it on top, and then I choose my studio pen and to make it much easier
to drop the colors, I draw on a separate
layer all the colors. I can pick it later from here. Draw it somewhere on the border, so it doesn't disturb
you too much. Okay, that's it. For the ribbon, I'd like to stay with
this yellow color, and I choose my 6B pencil. Go back to the layer
which we've created for the illustration and start to draw the whole
shape on this layer. I stay with the 6B pencil through the whole illustration. But you can choose
whatever brush you like. If you like to go
with a solid brush, you can drop the colors in. But with this brush
with a textured brush, you have to draw
the whole thing. I speed this up for you. To make the details, I create another layer over this layer and make it multiply, make it the multiply mode, turn on my sketching
layer again. And I reduce the opacity
of the sketching more. And with the 6B pencil, I draw all the
edges and shadows. Here on the bottom of the bow, this inner side of the bow. I draw with this on this multiply layer with the slightly darker
yellow color. And also the other side of
the bow. Draw this out. And you can play around
with this method, maybe add some lines here to imitate that the bow
is crashed a bit. Turn off my sketching layer. Yes, I like it. Okay. And I add some details here and there. And here on the outer
side of the bow, make the shadow on the ribbon. Slightly, I shift my pencil, I lean it to the side. So I have this rough texture to
blend the shadow a bit out. And down here. I think I don't like this
line in that direction. I think I'd like to have
it on the other side. The twist is on the other
side of the ribbon. I delete this small part and try to make it
the other way round. I think I like it more
in that direction, so I can draw the shadow in this middle part
of the ribbon. Okay. And we also need
the shadow down here. I turn off the sketching
layer for a moment and make some refinement on
this left ribbon part. I think it's a bit
too much down here. I delete with a solid brush,
with the studio pen. Then I go over the edge again. I don't delete with
the textured brush. I always take a solid
brush and then refine the edges with the
textured brush. We need more shadows
here on the knot. Now, let's care about the
right part of the bow. I think it's a bit
too thick here on the top. I delete a bit. And I also make this
fold a bit thinner. I turn off the sketching
layer again and refine it. And here the shadow
on the bottom. Okay, let's draw the
shadows on this loop. I turn off the sketching layer again and make some
finishing refinement on the ribbon. OK. We are done with the ribbon. Meet me in the next lesson
to sketch our bouquet.
5. Sketching the Flowers: I create another layer
for sketching my flowers, I said at the beginning, I like to draw five flowers, three bigger ones and two
smaller ones in between. I draw them in a very
playful style. My flowers don't
touch each other, but I try to fill
all the gaps with blooms and leaves and
make it in a playful way. And I speed my sketching
process up for you. And in the next video, we are going to add color to
these beauties.
6. Drawing the Flowers: I reduce the opacity of the sketching layer
and make it to multiply. I create another layer
for my illustration. Let's start with this green and I'd like to make all the
stems and leaves in green. Let's start with the stems.
Because I have a shaky hand, I use a little trick to make
my lines not too bumpy. I go inside the brush. And turn the stabilization
of the brush very high, so I can draw a line
without too much bumps. Now let's draw all the stems. I draw all the stems totally and don't break it
because of the ribbon. I draw it and later on, we are going to delete the parts that are
behind the ribbon. And now we are finished
with the stems, and so I can go into my
brush settings again and shift the amount of
stabilization back to 0%. The stems are done. We care
for our leaves later on. Let's create another layer now
and go to this blue color. I'd like to have this
biggest flower in blue. It's time to make
the leaves now, and I go back to the stems, the layer where we've drawn the stems and shift it
over this blue layer, and add the leaves. Okay, I think you've got it. I create a layer for every color and draw the rest of the
illustration in a very speedy mode. And in the next video, we are going to
add some details.
7. Finishing Touches: Let's make all the details and finishing touches
on this illustration. First, I'd like to
delete the parts of the stems that are
overlapping with the ribbon. The parts that should be
hidden by the ribbon. For that, I go to the layer with the stems and you
can choose mask. Instead of deleting these
parts of the stems forever, you can vanish them
without deleting. I reduced the opacity of
the stems layer a bit, so I can also see
all of the ribbon. Oops, that was a little bit
too much to correct that go to the color and change
it to a pure white. Now you can redraw this parts
that are erased too much. Then go back to the
pure black color and go further with masking. That's the big
advantage of masking. You don't delete it forever. You can always bring back your original drawing
with this method. The next stem is
totally behind the bow. But here is a tiny little bit in between the bow and the
ribbon. We have to leave. The next one. You can choose for
yourself if you'd like to have the whole stem behind
the bow and the ribbon. But alternatively, you can only mask the stem behind
the bow and the ribbon. In my case, I think I
like to have it to mask. The next one. It's the same here. We have to leave this tiny little bit between
the bow and the ribbon. It's a bit complicated here on the bottom because the stem
is very close to this ribbon. You can go to the layer with the ribbon and select
this layer and then go back to
the stem and erase the parts that are
overlapping with the ribbon. Because we use a textured brush, there are tiny little bit of greens that are
left on this layer. Deselect the layer and then go over it once again and
delete this tiny greens. The next one. We are done with the stem. So let's go back to full
opacity on this layer. And it's good, but I think I'd like to have
this one stem masked too. You could deselect
this masking layer, and so you have the
whole stems back again. For instance, draw
another ribbon around that and you don't
have deleted the stems. I create another layer over the stem layer and
make it multiply. I leave my green color and make some details on all the
leaves and the stems. And I play around with the brush with
different mark makings. And I lean my pencil to the side to have
different textures. I do this for the rest
of the illustration, create a layer for
every color and make it multiply and on this
layer, draw all the details. We are nearly done and
one thing is left. I'd like to have shadow for
every flower on this ribbon. I go to the multiply layer of the ribbon and
draw some shadows. That's it. We are done with our illustration. Isn't it nice?
8. Thank You!: Thank you so much for
taking this class. I hope you had fun and you
have learned something new. If you liked this class, please click the follow
button by my name, and you will receive messages
if I upload new classes. You can also follow me on Instagram @nicigabrieldesigns. And if you share an artwork you've created during
one of my classes, please tag me so I can share your artwork and comment on it. That's all for now. See
you next time. Bye.
 Nicole Gabriel, Procreate Artist