Transcripts
1. Introduction: [MUSIC] There's so much beauty
in pattern and repetition. You'll see that all through
nature if you look around. Today's class is inspired by patterns, repetition,
and imperfections. I'm Denise Love and
I'm an artist and photographer and today's class, I want to focus on patterns
and repetition and color and mark-making and see what beautiful abstracts
we can come up with. I've got a lot of
different projects that I'm going to share
with you in class, different ideas and
mark-making and line work and shape
and color and pattern. I've got lots of ideas that I'm going to share
with you that are hopefully going to spark an interest in something
that looks like you think I can't wait to sit at my table and try
that or create that, or experiment with that and
see what I can come up with. I find it so relaxing to sit and create a repetitive
shape over and over. I'm not looking for perfection. I'm not looking for
the piece of art to be some amazing thing
when I'm finished, it's more about creating, experimenting with color, testing out my
mark-making tools, and seeing what is it
that I truly love. That's how we get to
finding our own style. It's how we get to
looks that we love. It's how we answer the
question for ourselves. Well, how do you decide
where to do what? Practice, repetition, pattern, those things all help you get to those final
answers for yourself. I want you to sit your table. We're going to end
up with some pieces that we love will start off with some small sampler,
practice warm-up things. Then with each of those, I want you to try
a different color, a different mark-making tool, and I want you to experiment
so you can be like, look at this thing that I love, that I didn't even expect it. There were some nice
unexpected surprises that I decided on
in class as well. I can't wait to see what those
discoveries are for you. We'll start off little
ideas, brainstorming, and I'll translate those into larger projects that I
know you're going to love and want to hang up so I can't wait to see
what you're creating. Today we're going to focus on
pattern and repetition and mark-making and
imperfections because I think the imperfections are what make it the most interesting. I can't wait to see
what you create. I'll see you in class. [MUSIC]
2. Class Project: Your class project
today is to come back and share with me
the little samplers that you experimented
with during our warm-up pieces and then show me what big piece that inspired. I show you lots of different
samples, and ideas, and shapes, and patterns, and just random mark-making. I want to see what you translated that into
for your pieces. I can't wait to see
what you create. Comeback and share that with me and I'll see you in class.
3. Supplies: [MUSIC] Let's take a look
at the supplies that we will be using in class today. I want to make these yummy
repetitious patterns, shapes, colors, and create lovely little
pieces of art that we can love and enjoy
and experiment with. We're playing with color, we're starting off small. We're going a little bit larger, then we do a little bit larger after we discover what color is, what patterns, what
shapes are we loving? I've got lots of
little projects here. These are really
fun and meditative. They're not hard, they are for every
skill level really, but they're great for deciding what do you like
mark-making wise, color wise,
shimmering gold wise. I discover a lot of
good things about myself doing simple art
little projects like this, which I can then take in frame. This right here, one
of my favorites of the day that's really
pretty and can be framed and can go larger. I could do a larger
piece like this. I love all the differences in the color and the
closer you get, the more interesting
these pieces are. I love that. These
are super fun. We're going to be using just 140-pound cold
press watercolor paper. I do recommend the Canson XL. I did try to do some of this on my Canson Heritage paper, and you need to paper
experiment here. This is the Canson XL paper. The watercolor soaked right in, made some pretty
blooms and granulated. This was the Canson Heritage. I had a very hard time with the watercolor soaking in where I wanted it at the
rate I wanted it to, was really wanted to repel the watercolor and not
give me the clean, tight edges that
this Canson did. I definitely recommend you paper experiment and see which
one is going to give you the look that you're wanting to get when you do a
project like this. I'm going to be using
this Canson XL. I also decided to use my Schmincke super
granulating colors. I've put them all
out on a palette. I've got the tundra collection,
the nebula collection. Sorry, this is the
haze collection [LAUGHTER] and the
forest collection. I do have all three
sets just laid out on this little palette here that I'm going
to be using in class. Then what I recommend you do, if you're like, how
do you remember what color is where is, when I put these out there, I actually set these
colors out the side where I had put it on the palette and took
a picture of that. Now if I ever run out of, say, this one which is
the tundra rows, I could go back and say, I need tundra rows because I can refer to that photo I took. That would be an easy way to
keep up with what you put where take a picture of the paint colors with the
tubes out to the side. Now this is my
Schmincke palette. I'm just going to
keep on using it. As long as I want to
use these colors, I'm just going to have
that dedicated palette. Watercolor, watercolor paper
and then I'm going to be using in class today some of
these little mop brushes. I'm using my Raphael soft Aqua, the 3.0, the zero, and I did try the four, but I ended up not loving
the way that looks so large. I wish I had just stuck
with the smaller brush. Pick your favorite brushes and
just experiment with shape and see what ends up giving you something interesting
that you love. The experimenting
is how I came up with some of these shapes and interesting things that I
was creating in class today. These are some different
things that we were making. It's all about play and what is it too
big, is too small? What's going to give you
the look that you want? I'll also be encouraging you to experiment with
your mark-making stuff. Some of the things that
I have pulled out in class or neo color to crayons. I also like graphite, I also love posca pens, white-black, silver and gold
would be some good choices. I have the white
and the gold out. I also have my dip pens. I'm using my dip pen in my gold ink that I love
more than anything. This is the Kuretake
gold mica ink. You can use that
with any dip pen that you want to use it with. I also use it in class
with my ruling pen, which is an interesting tool that you can use as a
dip pen with your art. That's basically it. I've kept it super simple. I want to make dynamic
shapes and patterns, and I want to work with color and gold and just
create some fun, interesting abstracts
focusing on pattern and color
and irregularity. But at the same time, over and over, just super cool and interesting
when we're done. That is basically the
supplies we'll be using in class today so
let's get started. [MUSIC]
4. Paper Testing: [MUSIC] Another thing
I would do before you get good and warmed
up and started on whatever paper it is
that we're going to use as our final projects, I would pull the different types of paper that you
work with or whatever your favorite paper is
that you want to work on and do a paper test. Because this paper here is the Canson Heritage
100 percent cotton paper, and this paper here is the Canson XL 140
pound cheaper paper. It's got wood pulp in it, and the cotton paper
has all cotton in it. The difference here, I actually
started thinking I was going to do my projects
on the Canson, but you can see on the Canson, the problem that we have is that the water almost
repels on that paper. It was really hard to get that shape that I
wanted fairly easily. Whereas if I was using
this Canson paper, it was very easy
to create my shape and the watercolor not
repel off of the paper. I initially thought I'm
going to do this class on my favorite paper,
the cotton paper. But when I did a
paper test, I'm like, oh, that's really not
going to work for me. The edges are very soft
and almost undefined. Whereas the Canson XL paper, it's very defined and I can see some color separation and I can see the
granulation happening. Whereas on the cotton paper, it just was not
working for me at all. Before you get started, I want you to just draw a circle on whatever paper it is
you're thinking you're wanting to use and see how
hard is it going to be to create what you're
trying to create on that paper and do you need
to make a different choice. That was very interesting, and I actually did
not expect that to occur. There you go. Doesn't matter how long you're
doing your art practice, there's always things that
are going to surprise you. All right. I'll see you
back in class. [MUSIC]
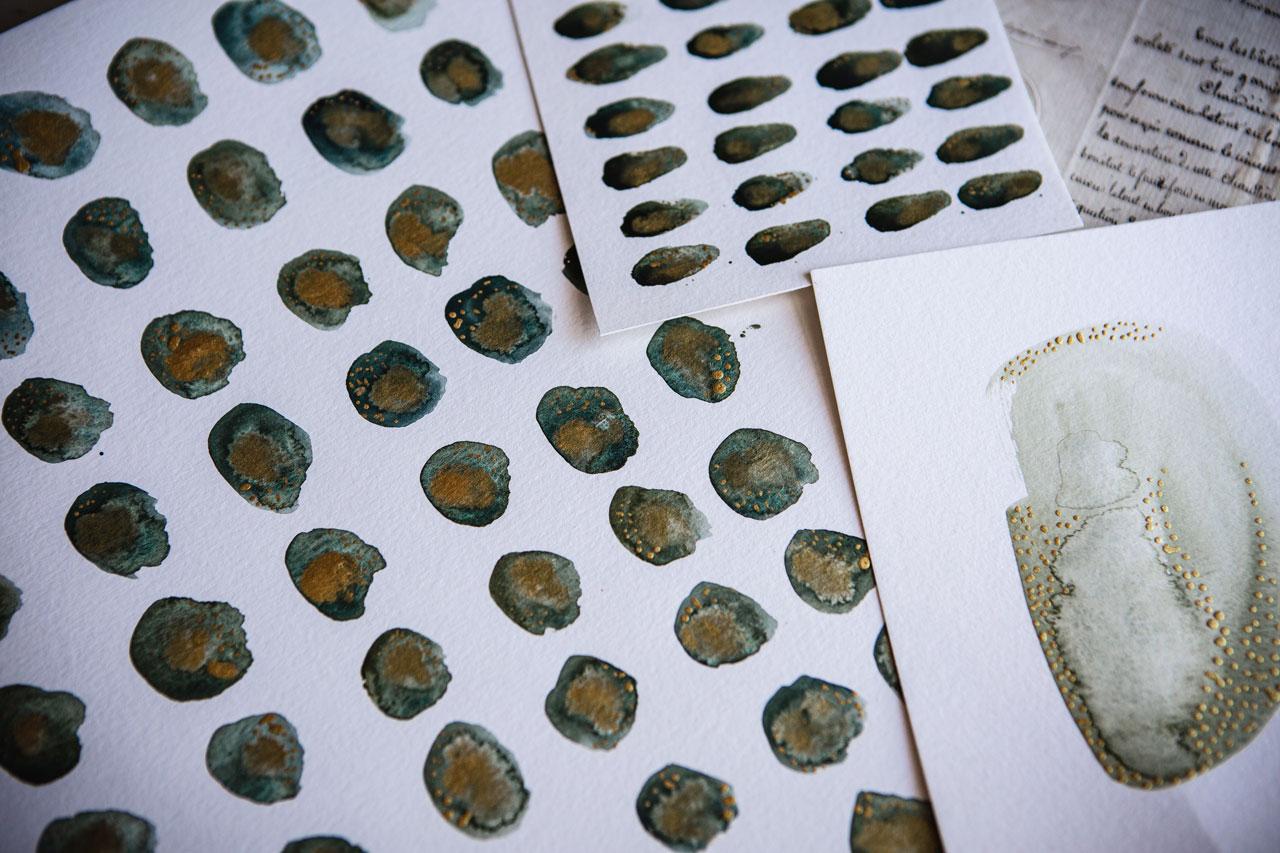
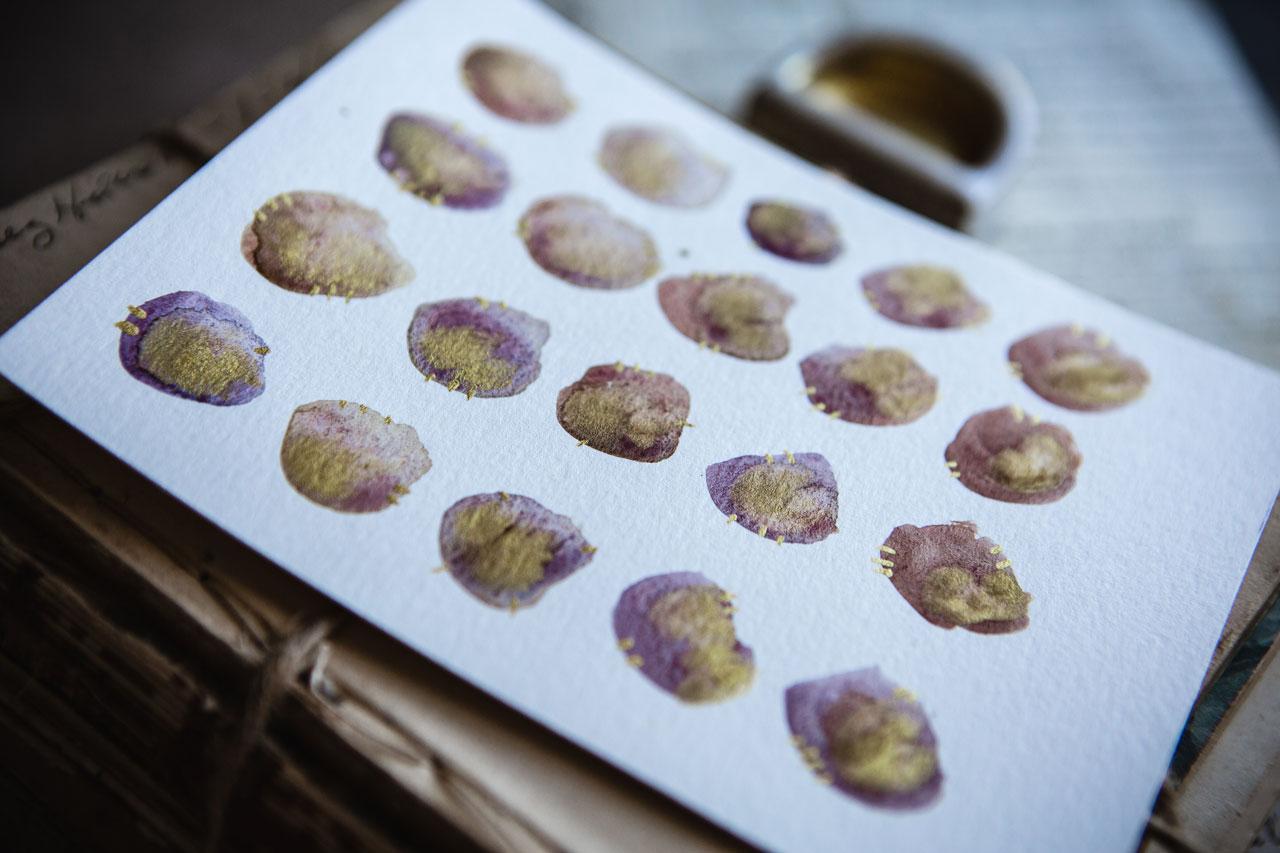
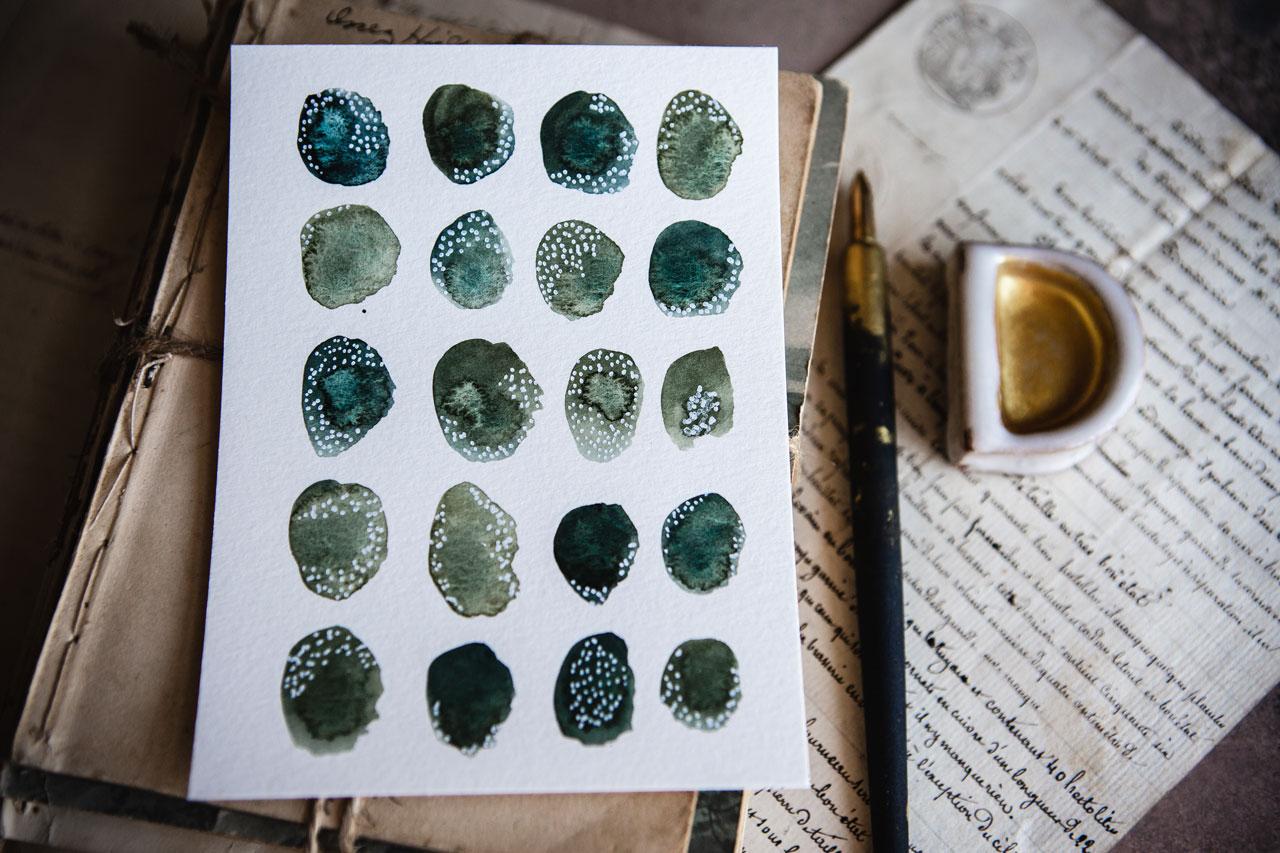
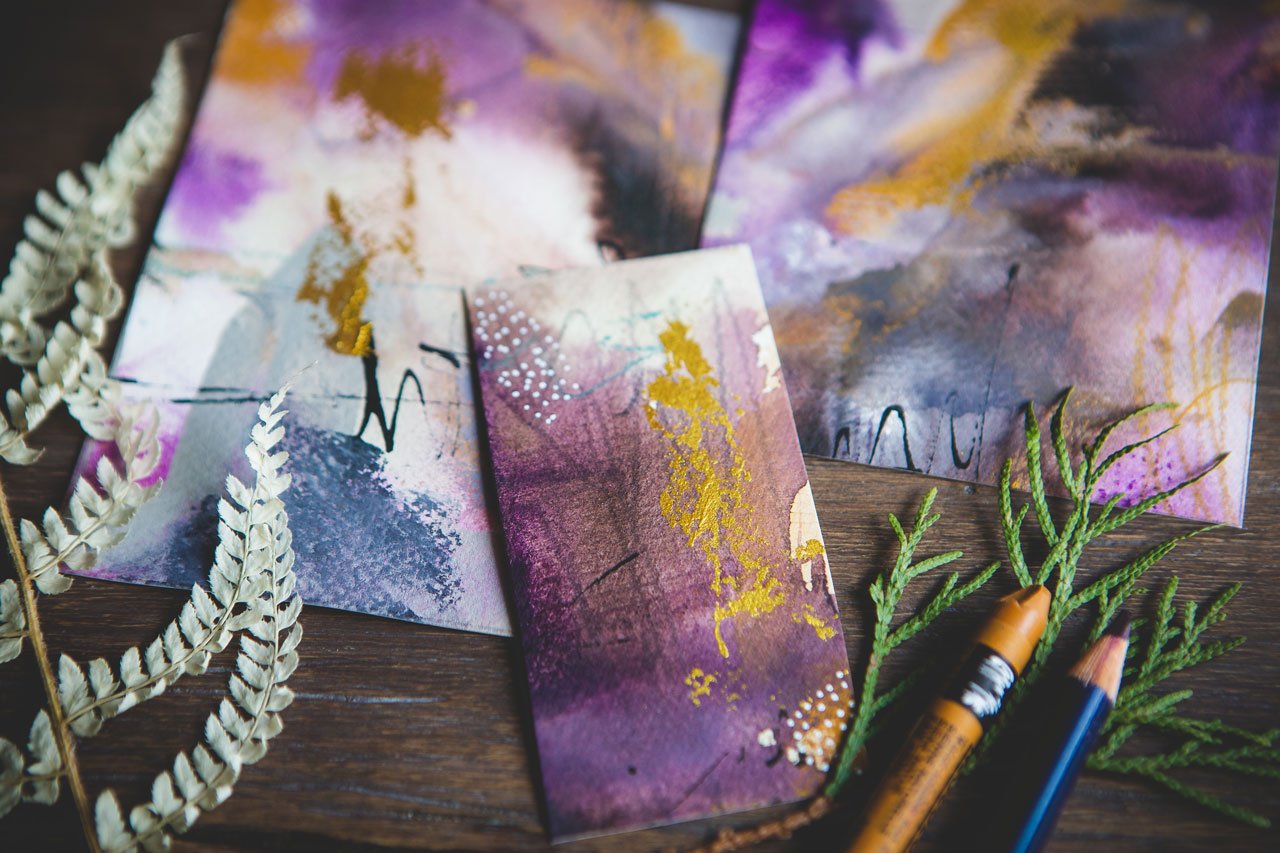
5. Warmup Painting Shapes: Let's start off with
some warm-up exercises and some ideas of what you
might try in this class. I've cut my Schmincke
watercolors. I'm just going to activate
them a little bit here with some water on my palette. I've just got the Schmincke's, put out so that I
can just use them on here going forward. I've got my little
paintbrush and some water, and so several different
types of line and pattern and mark-making that
we might could do. What I think is really fun about warm-up is now we can practice and see what is it that
we're trying to do here. With little circles in my mind, this is all about pattern and repetition, but
not perfection. I like circles. I'm wanting to do
for my art project. As we're doing some
little warm ups, you might start looking
at things going, oh yeah, this is what I want
to do too, or no, I'd rather do whatever
it is that you think up. But part of pattern
and repetition for me also includes color. I don't have to have
every say circle look perfect with the exact
color for every circle, and I don't have to have
every line straight. I don't have to have
every circle perfect. They can be just doing
their own thing. I'm just mixing the two colors
so that when these dry, what I really like
about the Schmincke's is that they granulate. As these dry, I'm going to get
a little bit different look in each of these circles
than I would normally get if I were using a
regular watercolor. First pattern that I'm
going to be thinking about is cool circles. Overall the pattern
is lines and circles and the colors being random. As this dry, we're going to get some cool
pattern and variations. If I come back and maybe dip
some water on some of these, it will reactivate and
create even more pattern and change in those circles
than we're already getting. I love that randomness
and at the same time as you pull back an overall look and feel that's really cool. Then as these dry, then we can come back and mark-making interesting
stuff on top of it. This is one pattern that I'm
going to be using in class, I think is really cool. We can mark-make on top of that. I want these to
dry and granulate and I want every circle
to be really interesting and what's going on within
its little boundaries. At the same time,
when you pull back, you look at a really cool
pattern and you think, oh, look at that. Another thing that
we could consider, I'm just pulling another random
Schmincke's off of here. We could do random rather than, this is more like
a uniform pattern. We're keeping them in rows, we're keeping them similar. While each circle
is not perfect, they're still within
its little confines. But what if we did another set where they were not consistent and they were not confined
to the same size and shape. That's another pattern and the
repetition is the circles. We can change up, what it is that we create
on that piece of paper. That's really cool. Another thing that
we could consider, especially while they're wet, this is my gold Mica
ink by Kuretake. You can use any gold ink or different things that
you would consider. Dip it into your watercolor. But while these are wet, I could consider going ahead and dipping some of
this ink in here and letting it swirl and move
and do its thing naturally. Add maybe some water in there
to really move it around and then we'll get
some slight sparkle when those dry and we
shine the light on it. This is another pattern. It's not the same size, it's not all in a row. It's more random
with a random sizes. But in the repetition part, we're doing circles,
we're doing color, we're doing maybe something
similar with our mark-making and creating a
pattern in that way. I could have dropped a
little golds into these. That could have been
another option. You could do other shapes. I'm going to choose circles and that's why I've
done some ideas here for bigger projects. But you could do
different shapes. You don't have to confine it to the same shape that
I'm going with. Let's say you want to
do more of a line. There's nothing saying
that your pattern can't be something like a
dash or a line, or a square, or just something different
than what I've chose to do. See I can get pretty
consistent here with this pattern
and I can continue to add little
colors in with that so that I get some really
cool variations in color like some slight variations. Now that I've started
creating this, how cool is this? I mean, it's basically the line and the shape of
my brush tip here. I like it. Your pattern could be
something more like this. It doesn't have to be
circles like I'm thinking. This is just as interesting
as my pattern was that I started with some
definitely seeing a lot of potential here
with that right there. Consider something more
like a dash or a line. You could draw triangles, you could try, we
could do egg shapes. That's a good idea. Something more oval than circle. That's another option. I'm just twirling my brush in a couple of different
two different colors. I want you to pick two
colors to do your patterns and mix and match
and do solid color and do mixed color and see what interesting
colors you can get that will draw your
eye around your piece without it being perfect
in all one color. I like the variations. Even if you're using
regular watercolor to do something like
this, pick two colors and then do some
with the one color. Some with both of them mixed, clean your brush
out if you want, and try some with
the other color and just see some
light, some dark. Not all the same value who see. Now look how cool
those are as an oval. Another good shape. I'm personally staying away
from sharp lines and stuff. If I were to do
something like a square, so I'm working with
a watercolor brush. I'm working freehand. Something like a square is
going to be a little harder because it's gotten
the hard lines. For this project, I'm
personally avoiding hard lines. But checkout four
options there on pattern and shape that you
might consider. This right here
could be all ovals. It could have been eggs
rather than planets. Maybe we could just go ahead
and go with that idea. Maybe different
sizes and shapes. I'm loving this set of green. But I'm free handing it. I'm looking for variation, I'm not looking for
hard straight lines. I've personally avoided stuff like squares and triangles
and shapes like that. See, look at that right there. So many ideas on what
you could go forward. Because I'm looking a
little more organically, a little more interest, I've not done the
straight lines, but you can certainly
do your project with triangles and squares
and things like that. But I'm going a
little more interest with the organic shape. The way the colors mesh
and meld and separate. This green and blue
set is gorgeous. This purple and a
pretty orangey color in there is beautiful. I think that's tundra
orange and tundra rose. Then this pretty blue-green
is more like a teal. I think this is
their forest blue and maybe this forest
brown or forest olive. That's where I am with this
colors and those colors. I'm really loving
that some feelings, some bigger projects
in those colorways. Once this one dries, I might really like that blue, orange look there too. It's not dry yet. For starting out, I want you
to experiment with shapes, just laying the
shape on the paper, getting the colors to
mix and just blend and do some interesting things and see what shape feels
good as your painting. Then we'll probably do
a couple of projects with the different
shapes and colors and mark-making to see
what we can come up with. But I need to let these dry before we can experiment
with the mark-making. I'll be right back.
6. Warmup Mark Making: These are 99 percent dry. There's a little bit of
wet here on my planets. Let's just color this planets. It is super cool the way that the planets look with
the gold mixed in, and I love the shine
that the Mica gives. That is one of my favorite. As a great big piece, can you imagine having that hanging on the wall
and as you walk by see the shimmery bits
in all of the planets. Super cool. What I really love
about this page, the one where we are
doing the bigger ovals. Look at all of that
yummy granulation and movement that we've
got within those pieces. Whereas the smaller ones, I don't see as much
of the variation, and yet it's still super cool because of the
color differences. Let me present this as an
option of what we could do. I've got a couple of different mark-making and
things that I love. I love the gold Posca. I love the white Posca Pen. I also love a black Posca Pen. I also love graphite
as a mark-making tool. I also love my Neocolor II
crayons as a mark-making tool. I think I've got some
of those over here. What we could do because
these are our practice pages, we could simply take a few
of our favorite things. I love the gold Mica ink
as a mark-making thing. What we could do and I
have my ruling pen and my Kakimori Brass
nib dipping pen. I can use either one
of these to dip. The ruling pen is a lot more price-friendly
on the budget, but I also have a dip
pen to use with the ink. Three options to use
with your dip ink that are going to be
interesting to play with. What I really love about
all these options, and you could use pencils, you could use charcoal. Another thing I love, but I'm going to
resist using it today is my yummy pastels. Another option, definitely. The reason I'm going to
resist the pastels today, even though I love them, is because I tend to
smear my hands back over and we get pastel dust everywhere as I'm making
stuff and filming and things get in the way. I don't want to ruin my
pieces as we're going. I don't want to
ruin those later. I'm going to resist those today. Anything really that
you can imagine, oil pastels, I got some
of those over here. Those are nice and creamy. Anything that you like
to mark make with and that you love and
think this would be fine, that's what I want you to use these pages to practice
on until you're like, okay, this is it. Let's make something with that. Let's take this green because I like all the variation in here and it gives me lots of options, and we could start
with a Posca Pen. Because there are some
very fun defined lines and outlines within this paint that turned out super cool, what we could do is use that as our guide for some mark-making
within each circle. Pick one pattern. Let's say you like lines. Now I'm going to do lines
in a portion of each circle where the watercolor
are separated and gave me a separation
of an area to do that. For instance, I might do
it in the solid color or I might do it in
the granulated part, but I could do lines or dots. Let's see if I like dots. I could do dots all around here, and dots here, and dots
here, and dots here. Even though I'm
doing all of that in different places
on these pieces, I'm still going to have an overall pattern
and recognition. Let's do dots. I'm still going
to have an overall feel of consistency in
pattern in my piece, the repetition being. Even though everyone
will be different, are they completely different? Not really because, they're using the same elements to create the overall pattern. In your mark-making,
you might like stars, you might like dots, you might like hash marks, you might like dashes. Dashes are another
favorite of mine, especially when I'm
using graphite. Something to keep in mind there. I chose to use the more
solid bits of color to put my pattern in. I'm just going on
each one of these and thinking where is the
most solid part of this and let's put a pattern
within our pattern. These are super cool. Posca Pen is going to be definitely a favorite tool
for something like this. You could also use
acrylic markers. I've seen those pretty cool because it's very controllable. Something that you were doing that was a little
bit uncontrollable and unpredictable was the way we did those and let those dry, which is why I like
those Schminckes so much because of the
unpredictability of how those are going
to dry and granulate. I just love that. Check it out. My goodness. Definitely do a little
white dot, Posca Pen One. Look how beautiful that is. You can see how interesting and the pattern and the shape, those are just gorgeous. That is one option. Another option is, what if we did this
other dot one here? Instead of doing something so consistent all
around in the piece, what if we did
something on the edges? What if we did not
do the same thing? Maybe I'm going to do like a
little line or a little dot. What if we did something
different on everyone? We're doing the
same type of mark, but we're bearing it
up for each piece. Check this out. What if we did something
like that with something super shimmery gold
leaf, Mica ink, whatever ink it is, and then as you move
this towards the light, we can just see those
little bits shimmering. That's super cool. Let's see. I'm trying to get it
to focus for you. Can you see those
little bits in there that are shimmering for
us that are super cool? It's very subtle, but
as a great big piece, how cool would that be if that had shimmery
bits for us like that? I'm truly feeling
good about this one. Definitely feeling
good about that one. Another option for us, and I could have painted
some more stuff, but we could do something
like this graphite and do dashes or lines and we can confine
it in a circle or what if even we did
like a bigger circle and then the dashes and lines came
outside the circle. For instance, I could keep
them in the circle like this or I could bring them
outside the circle as a bigger piece of art. That would be cool. I could also really
get inside the piece and then come outside the
piece even further like this. Look at those, super cool. All three of these
options, super cool. I'm loving that inside,
outside, on the edge, different options there
that we could do there. That's super cool. Another thing that we could do, say if we did
something like this, let's see what could we do. We could definitely add
some interest in some way. We could do it by
adding lines, shapes. I could come back in here
with, say, a color or a gold and have these be in
different spaces on here. I'm just idea brainstorming. The more you do, the
more random they appear. It's not like they're
in the same place doing the same thing every time. I could have done this
with a color too. That would've been
very interesting if I had a bit of color
popping on there. For some reason,
I'm just obsessed with the gold pops
on things though because then as you
move them in the light, they shimmer very interestingly. Another option here for
us is some type of dot or shimmer or something
going on there. Tons of ideas on
mark-making that you could think of to do
different pieces with. But I'm hoping that
this gives you a starting point on what we
could do in class today. Something with one of these, I love the dots and stuff. Maybe a bigger interesting
one with some lines on it. I can now hang these
up on my wall. A big one with
planets, super cool. I can hang these up
on the wall for ideas as we're going forward and let's just create
some bigger ones of these because these came
out super cool, and I want you to
experiment with your color, with your mark-making, with the different tools that
you use for mark-making. I could've even practiced with some Neocolor crayons
to see did I like that, would I want that in my piece. I could even just come over here and experiment a little bit. Look at that. That's very interesting. Lines in a crayon. Look at that, lines. Look at that. I don't know if you can
see what I just did there. Those lines in those circles, super cool, and this is with
one of these semi-metallic. That was super cool
as an undertone. Let's consider this two. We could do an undertone
of something like that with dots on top of there. I was thinking I was
done with ideas. But what if we combine
even some of these as a third layer or
option for our pieces. I could have layered
on top of that green or I could've picked
the other side, layered on top of the other side with a pattern or something. See, very interesting there. I actually like what I
did on this first one the best with that
little edging of a dot. More options, think
as you're going how can I make these as
interesting as possible because once you do some
bigger ones of these, wait until you see
how amazing it is for something really so
simple to create and you'll want to
frame something. They're going to be so cool. I'll see you back in class. Let's do some projects.
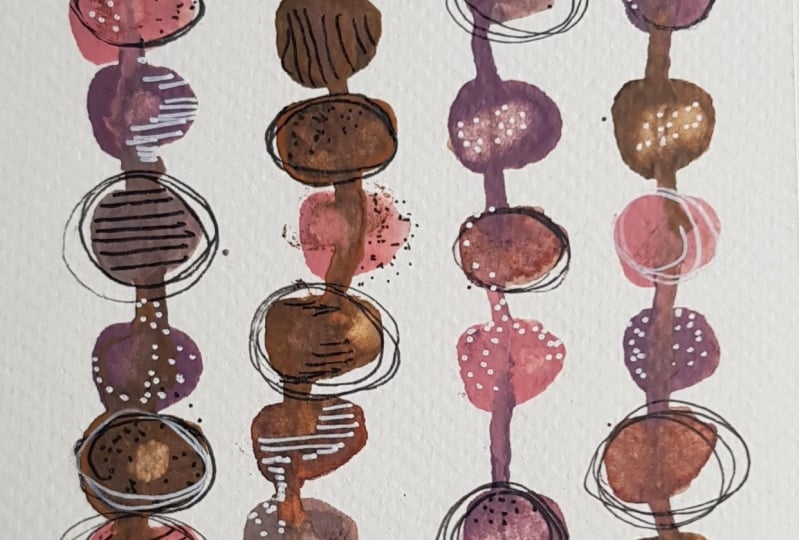
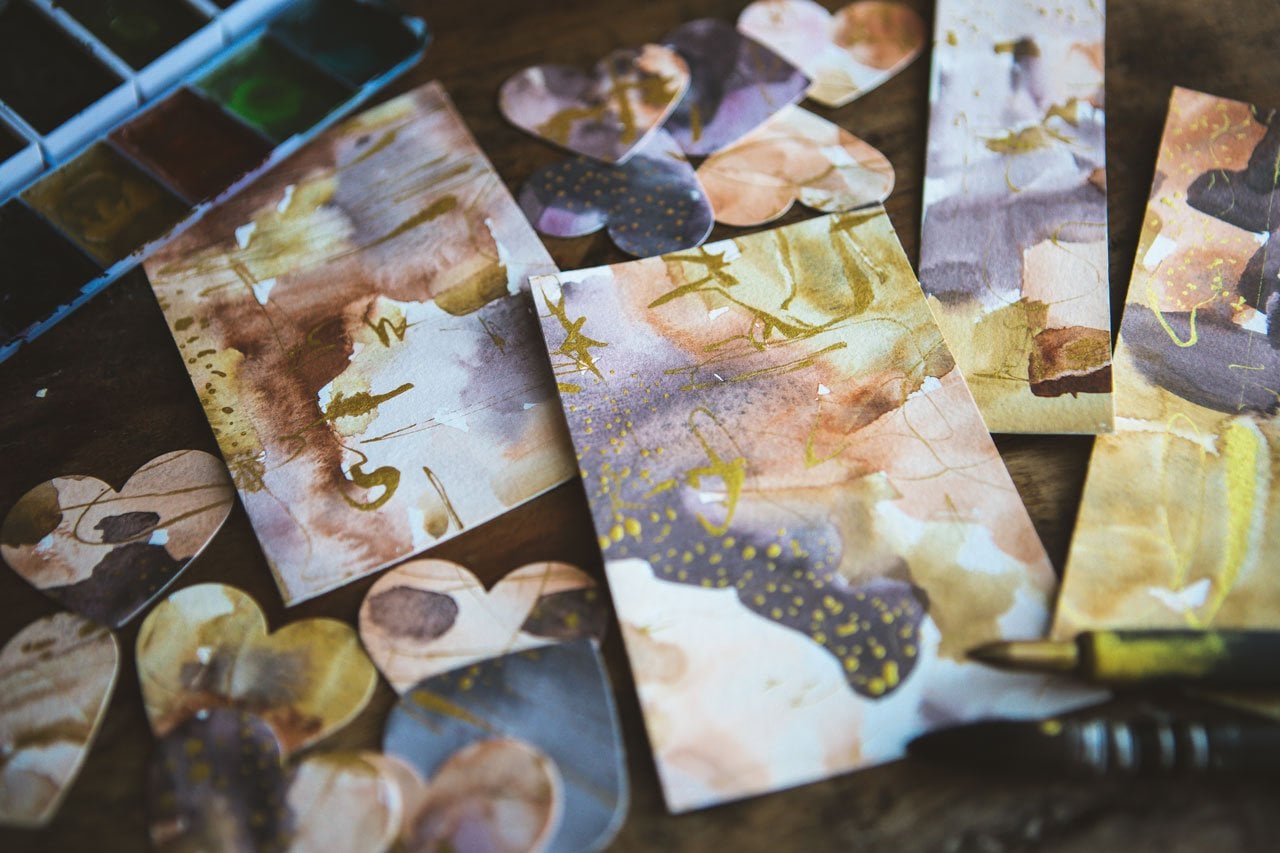
7. Painting Small Samplers: [MUSIC] I want you in this
next project to get started. I want you to take the
ideas that you did on your practice sheets and
do whole sheets with it. I want you to do some with little circles if that's
a shape you came up with, some with little planets, some with ovals, maybe some with bigger ovals that we could do some interesting mark-making to, maybe some lines or dashes like we did with
the paintbrush here. I want to see a lot of these painted so that they
look just like this. These are just quarter pieces of paper of the big sheets
out of my Canson pad. Basically had the pad of paper, that's 9 by 12, cut it in half again. That's what this paper is. For ideas like what we're doing, I like starting off little so I can iron out
what I'm thinking. With the circles,
I've got lots of different colors that
I'm going to be trying. I want you to do
different colors and different shapes on
papers like this, and I want you to
do a bunch of them. I've done a bunch
of the circle ones. I'll just show you real
quick how I did that. Then I'm also personally
going to then spend my morning painting different shapes in
different colors. So that going forward with
the different projects, you don't have to
sit here and watch me paint these same shapes, but maybe we can then add to the shape since we've painted
all of these already. I'm going to paint
some planet ones because I think that'll
be interesting. Once you've done a bunch of
these in the smaller size, these are the ones that
we're going to then say, what do I want to make larger? We're going to get started
by painting lots of small ones of these ideas, and see where we want to
go with a big project. I want you to start
pulling your colors out, pulling out your
mark-making items and then as a bigger
sheet of paper, let's paint one of
these together. Then I want you to paint a
bunch of these with all of your colors and stuff
that you're thinking of. I'm feeling blue-green. I'm going to come over here to this blue-green that I was
using in these Schminckes. Two, you might think of
size versus size of paper. How big do we want
these circles to be? This is actually a tiny
bit bigger than what I was doing on my pieces
that we just looked at. A great way to say, did I size this correctly or do I need to have
more space on the edges? We're experimenting. Doesn't have to be perfect. It's not about perfection, it's about imperfection
and repetition. If I offset this on one
piece of paper like this, but let's say this is
the favorite one I do of all the ones I do, you can see I'm
varying the color by putting my brush in both colors. I want this to be
great variations. By doing this, we're letting go of
perfection and I love that. But let's say this
is my favorite and it's offset weird.
Well, that's okay. We can just come
in with a piece of mat and center it up, and then you don't
even know that it was painted off center, so don't worry about that. There's ways to fix
that in your framing. Just don't make that the most
stressful part of your day. Again, I'm not looking
for perfect circles or ovals or anything of perfection if the
edge is not perfect, I'm doing that on purpose because of the way
I'm holding my brush. I'm purposely not moving
the paper around. I'm not trying super hard to get them all perfectly circular. I don't want you to get
hung up in perfection. Because these
Schminckes are so cool, you could even come
back in and dip water and get it to reactivate
and do something weird. But, I already see some super interesting
things going on with these. I'm pretty excited
about this one. I feel this could be a big one. First project and you
saw how fast that went. It's not like these
take a long time to do even though it
looks like it might, they don't take that long. I want you to try all
the different colors that you think look interesting, and make a bunch of these. These will be different marks
and things that we see. It's a lot smaller and
went a lot bigger. Play with size, play with color, play with dipping the water back in and seeing what you get, because that's going to give us different pieces and different
options to work with. Then we will take these and come back and
mark-make and have fun. I will see you
back in class once you've painted a bunch of these. I'm working on painting all my littles with
my different ideas, and I got so inspired at this
little dot on the dry ink. That I thought, what if we came while these were
all wet and dipped a little gold on each of these and let them do
their wild thing? I thought I would give
you that idea too. While these are wet, let's just dip gold in and let the gold do its thing while it's wet and can move around and
just be interesting in there. So while I was thinking
and doing that, I thought let me just
share this idea with you and see what does
that create for you. This is also how we create
the little planets. But, I thought we
could do that here on these two and let's
just see what we get. Let's see what that gold
adds to our pieces. I'm doing it pretty quick. I want them all to
be in the same spot, or doing the same thing, or having the same amount. I just thought it
was a cool idea, and I thought I'd
share it while I was creating all my yummy littles. Another thing I want you
to do while we're making our little watercolor things because I want you let
these dry naturally, I don't want you to put a
heat gun to them and stuff. I want that watercolor to
really start moving around the paper and doing the very interesting things
that it's going to do. But, I really like the
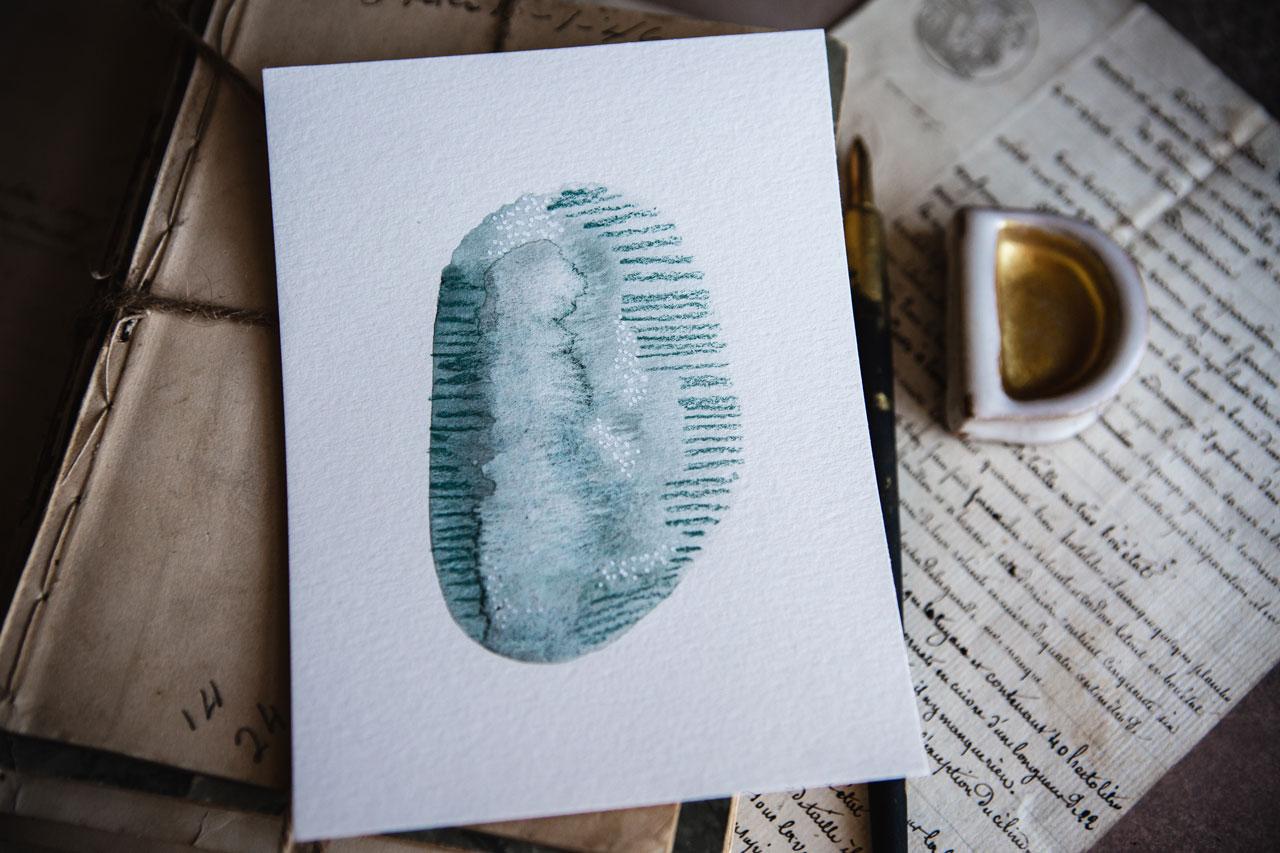
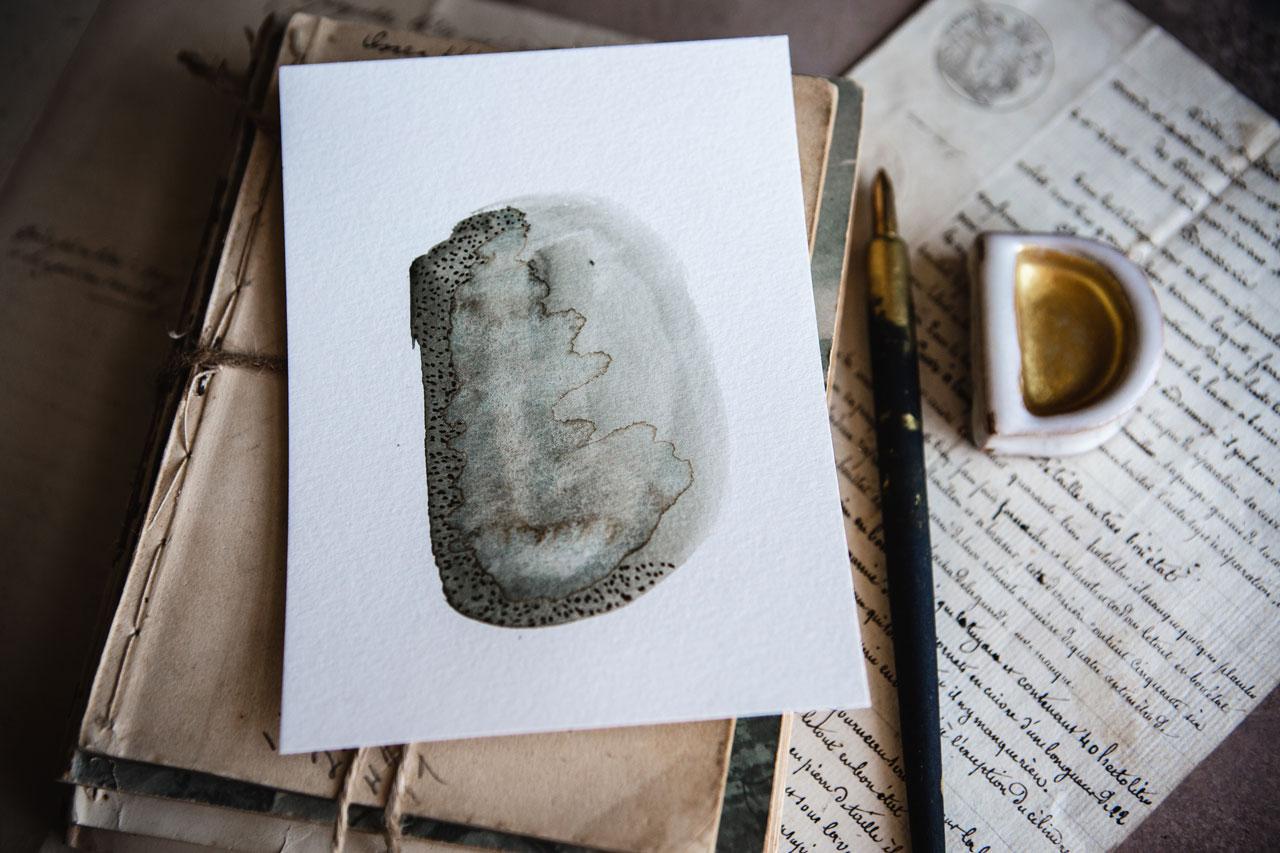
concept of a weird shape with a repetitive line or dot or something
coming off of that shape. It doesn't even have to be lots of shape on the
paper like this, thinking a great big
shape that we can then draw a pattern in the shape to make an
interesting abstract. I'm just going to take
several of these colors. I'm going to draw a large egg
or shape-y thing on there, and then see what
can I do with that once that's dry and I see all this yummy movement and blooms and granulation
in that watercolor. I'm going to paint
a whole bunch of these single shape to put pattern inside of and
see what we can get. I want you to also
give that a try, even though we're doing
little papers with lots of shapes and lots of patterns
to create our piece of art. One big shape with a pattern on it is also a cool piece of art. I want you to paint
some of those also. One more thing, while
I'm creating these, watercolor reactivates
with water. I'm doing it like this. The more you do, the faster you go and you start thinking, I like this or
what if I do that? But if you'll sit
for a second and let that dry a little bit, we can come back and make it do some more
blooms and stuff. If you're doing this
and you're like, "Oh, I'm not getting those
blooms and not interesting color," or whatever it is that we're going to be
seeing on some of these, you're like, "How
did you get that?" Because I've got some that
are blooming really good. If you dry it naturally or say with a little bit
of air like this, your paper doesn't buckle nearly as much as if you
do it with a heat gun. A heat gun makes that
paper buckle pretty good. But let's get that dry. Now, let's drip some water
back on it and this is how I'm going to get
some super cool blooming on one part of the abstract, which I think is going to add interest to our overall piece. When you see some of those
and you think how did she get those big blooms in
there? That's how. Let it dry quite a bit, and then come back
in here and just reactivate that with
some clean water. You'll have that watercolor spread around and do
some interesting things, and then set that in the
floor and let it dry. [MUSIC]
8. Samplers Mark Making Options: So all of my pieces that I painted on quarter sheets are all dry and I have got some
super fun stuff to play with. Look at this one right here with all that yummy shimmer in there. Now, we're going
to look at each of our pieces and evaluate, do we need to add
anything else to these? Or do we like it, how it is? Even did like one
with little planets. I really needed a bigger
piece of paper to do that, but check out how cool that is, how those just shimmer
wherever the gold is. Then I did a whole bunch in different colors of just our
yummy dots down the page. This is a wonderful
way to do a series. Do some little ones, do some big ones, do
some variations, work in a similar color, work in a different color, and just see what you can get, and then I challenged you to paint just a random shape
and then you can come back and pick out your
very favorite and do interesting patterns on these to give you a super
cool abstract piece of art with just single shapes. I can already tell
you right now, I really loved this one because of the shape
and the color. I'm just going to start pulling some of these. I love this one. I liked how when I went
faster with the paint, I got these areas where the
paint didn't hit the paper. You have like little
lines and stuff in there. I loved that. The best. If you're painting a
whole bunch of these, you can then pick out
your very favorites and the ones that you've found
were the most interesting. That's what I'm doing.
I'm just pulling out the ones I
think are the most interesting and these are interesting and I can
do something with them, but I'm going to set
them to the side for now. I love these. Then out of these, the Earths, the little planets. I like the way they look
with the paint and the gold. When you do a whole
big sheet of these, I think that would
be that piece of art for me because I like
what the paint is doing. I like the edges that the watercolor creates
where it bloomed out and separated and I like the shiny
bits and I think there's a lot going on in that for
that to be the piece of art. I would save that. This one is little planets, I guess, I could say if
I'm calling that planets, I did the color and then
I put the gold in it. But I don't think that
this is finished. I think that this could use something additional
and what that is, we'll just have to decide
what we want to do. This one I really love
because check out all the interesting things
within each circle. Super cool. I love that one. This would be a really
cool one to do something simple and this one, I love all the random gold in that that could be the finished piece of
art like the planet, we could say, that's done, or we could come back with some mark-making now and add to that. That's a decision
that you would think about and decide
on for yourself. That one's a 50-50
chance that I'm going to add other stuff to it. Let's set it to the side. I definitely want
to add some stuff to these and then these are ones that I can now
use for experimenting. Let's start mark-making. Let's just see what we can get with some of these
pieces that we love and I think I'm going
to start with this one. It's got the gold in it. Now, do I want to add more
gold as a decoration? Like, let's just look at that versus the one without
the gold pieces. Look at the differences
that we can get there and now that
we're looking at that, what if we do this idea here on our sample sheet where we did just random gold
marks along the edges? I really liked the
way that looks. I like the shimmer that
I get around the edge. I think it'll be a
different focused shimmer than what I have where I
dipped it in the paint. Let's use that as an idea
for this particular set. I'm just going to use one
of my pins and let's just see if we do interesting marks, how it's going to look different than if I do
it on this other one. Similar pattern. If I do a big splot, I'm just not going
to worry about it. I could actually take
like a little baby wipe. If I make a mistake like that, I could take a
baby wipe and very carefully wipe in and get
a little of that off. It'll add a little bit of a mark where it pulls
the paint slightly, but as a whole big
piece of pattern, it actually just adds to the
pattern in this piece here. I'm okay with it. If you drop a piece
of something on top, you could take like a
baby wipe and just see, can you get that out? We did enough of these and
it was so fast to make or if I did do something
I didn't intend to, I could just start over again. Not that I want
to, but you could. I'm just randomly making
little marks along the edges. Nothing the same on either one. I'm not trying to do the
same mark, it's a dash, but I'm not trying
to do the same spot or number on any particular one. It's all about repetition. We are repeating an element, but imperfection and not
necessarily even quantities. Look what that does. When we go to shimmer
that in the light with that extra little tiny bit of
mark-making just into that. I love that. I'm just going to come little random marks
here on this other one. Because I liked it so much in my samples that we were doing, our
little warm-up pieces. I liked that so much that we're just going to keep on going
with that on this colorway. I think my tip is dried out and you can do this
with a gold Posca pen. You could do it with silver, or you could do it with really
any inks that you want. I'm picking out my favorite
and that way I know that going forward I'll
have stuff I like. But you pick out your favorite. You don't have to work with the same tools, marks,
patterns, designs. You don't have to
do the same as me. It's all about just seeing some different
techniques and saying, oh, that's cool, how can I make this my own? What can I do that
I'm going to love for my own art? Here we go. Right now, we have
two of these done. Let me tell you, I'm glad I did these little samplers like
that because I am just going gaga over the one where
I dipped the gold into the paint and when I did these initially
when I was playing. Just up here tinkering, I was doing some and my favorite piece was
a big one where I did just the color with the gold and I didn't try
a dip in the gold in, but now that I've tried
dipping the gold in, I'm obsessed with that
metallic look in there. You know what? You might
could do if you're working in watercolors like I am is do the watercolor and dip some metallic
watercolors in there. You could go back with
metallic watercolor. You don't have to
use the mica ink. You could use acrylic ink. You could dip that in the
water and see what that does. You can experiment there with what you end
up adding to that. But I think for my big piece when I go to make
like a big piece, I'm going to go for the one that's got
the more interest and the gold speckles in it
like that and the gold touched in because
that's gorgeous. Both of these are
really pretty though. I like the shimmer
of the marks on the edges for this one
too, That's super cool. Those win, win, win. I'm going to set those
to the side let them dry and why not? Because I really loved our little sample piece
here with the Posca pen. I did one of these little
bigger so that I could do all Posca pen. Now, I'm just going
to look at these and they're offset but
when I go to mark that, I can mark that
even and frame them in. Don't worry too bad
about if I got the edges completely even because you can frame that in with
some the mat board. But I think I'm going to
do the dot randomly on each circle in say the color
that was the most solid. There's no rhyme or reason. There's no reason I picked that. I just thought, oh, I like that. It's all about just
experimenting and playing. I like experimenting
and playing on this size paper so that
when we get to a big piece, we'll know what we like
and we can duplicate that larger because I'm definitely feeling some of these are
going to be really cool, big. Now that I've done the little
samplers and I've painted enough little pieces
of paper here that I can judge like,
super cool stuff. Now I'm excited to make some big pieces and we can make a whole collection
out of these things. I've painted a whole bunch
of these and what I want you to make your goal is to say do a different
type of mark-making or element on each of
these that you painted. Maybe one of them you could use Neo-color 2 crayons and maybe
one of these you could use silver Posca pen and maybe
one of these you could use white Posca pen and maybe one of these
you could do gold, and maybe one of
these you could do lines instead of dots or hashes or whatever it is
that you like mark-making. I want you to get creative
in what you do for each of these little samplers because you'll discover
things that you're like, oh, I didn't even think I would like that
but check it out. Like this one with
the gold in it. Who knew I was going
to love that one? Oh my goodness but I should
have known because I like everything shimmery. You'll notice, when I
get done with this, there was nothing the same
yet when you pull it back, you can see the
beautiful pattern, the repetition, the
interest that we added. Check it out. Look how cool that looks. Not the same thing in anyone
but as a whole big picture, it looks like the
most amazing piece of art. That I'm loving. Definitely do the
white Posca pen and some dots and just fill in
different areas with the dots. See another area that I think
could benefit from dots. Then just check
it out and think, did I fill in all the
areas that I just thought could benefit
from a dot to make this overall piece really cool and interesting and unique. Look how different it
looks from the gold. Loving that one. We can even do Posca pen and the gold. We
don't have to do. Like if I did this one, let me find something I can dip this on without
it being a big deal. There we go, get it started. What if I wanted to
do this one with marks and I didn't want to use the ink just to see how does this look
different than say, my yummy ink there? I can do that with
the gold Posca pen. It's not as bright and
shimmery and it doesn't quite show up as
much as my mica ink, but it's still very interesting and has
its own little flair. If you've got the gold pens, give those a tryout and
see what you think. This is what I like
about experimenting with different ways on every one of these because check it out, these look completely different, but I can see there's
lines on there. They're not as
shimmery as my gold. I do like the extra shimmery, but that's super cool, and the difference that we got. Check out the five little
differences and I'm still debating on
whether I want to add something else to this one, but it's super cool, just like it is. I could even now that
I'm looking at it. Let's go back to this one
and I want some gold dots. Maybe in addition to
a big splat in here, we can make these more interesting with just
strategic gold dots. Oh my goodness, I
can already see that this is going
to be amazing. Oh my gosh, yes. Check it out. That looks amazing and I
shine that in the light. You can see the little dots. That's the extra
marks it needed. Now, I can feel this
in a big piece. Can you see this one
even larger gold, that green, or that teal dots? That one is looking
insanely good. Out of my favorites, I do love the ones where
I did the gold in and then added extra
mark-making on top of that and you can see it
shimmer in the light. It's so beautiful. I do love the white also. From our own personal
pieces of art, this is the look that
I love and now I've experimented on lots of
different colorways, lots of different mark-making, practiced on different
things and now I can say, I want a big piece of this
or a big piece of this. Now, once you make some
of these in the littles, I want you to
decide which one of the plethora of things that we talked about that you
want to make bigger. In the next video, we will talk about the single
pieces and the mark-making. So I will see you
in the next video.
9. Single Samplers Mark Making: So let's take our single pieces and create something
interesting. These were the
four that I loved. I really want to use graphite. I've got one of my 6B
graphite pencils here. It doesn't matter if it's
water-soluble or not. My main goal here is to add
some line and some pattern. In our warm-up
pieces, I love these. I want you to try just like
we did on those other pieces, try to do different
mark-making in lines on each of these and see what you can get
that you're like, oh, new discovery. Because I also have some
carbon pencils over here. I've got some Chromaflow
pencils over here. I've got all kinds
of things that have come in my art box
that I'm like, oh, let's set these
on the table. I might need to try
this on something. I also have Faber-Castell
sepia pens, which I put over here
because I thought, oh, mark-making in
sepia might be fun. I just want you to
get all your options out and see what we can do, but I truly love
graphite in my art. I've done a lot of
graphite classes. I know graphite is
something I like to use. I've got a graphite pencil here. I really want to
do one of these. Then I will pull out some
of these other things and try different
marks just to see, what would I like? So I'm feeling
lines on this side. I'm just going to go for it. I could either do lines in
say, this lighter area. I could do lines
right through here, or I could just think
outside the box, not follow anything
and bring the lines further out just because. You're just going to
have to decide on that. What do you want to do? Follow the shape exactly? Do you want to go
outside the shape? Do we want to do it on this side because I really love
this element here? Maybe I want to do it that way. I could turn it upside
down, do the marks, and decide which way then
as the right side up. See this can really go any way. Let's do it this way.
Let's just do it. I have these here. Now I'm thinking, let's just
draw this up a little bit. Maybe do some lines in this
light area, because why not? I will say, if there's one that you're like, oh my goodness, this is
my super-duper favorite. I don't want to mess it up by putting the wrong
mark or whatever, set that one to the side and work on all the other pieces. Come back to the one
that you're like, this is my super-duper, most favorite piece I ever made. Come to that one later when you feel confident about your marks, what you really
want to add to it. Save that, if you
need to save it, but paint enough of these
where there's plenty where you don't feel you need to
save, but maybe one. Because this probably
was my most favorite. I went straight to work
in all my favorite. I figured, just paint. I can make some more,
if I mess it up. It is what it is. Really
there's no mistakes in artists. It's just my preference
that day looking at it. I might look at it again
next year and think, oh my God, best thing
I ever created. Don't stress about
it. Check that out. Super cool. Now, did I go far enough
up with that? Don't want to come
down further with this so that it really
comes off the page. Maybe I'm filling that. I feel like it needs
to go further. I just didn't know, which way did it
need to go further? Look at that. That's wild. That's with the graphite pen. See, I can move it
around and think, which way did I
love it the best? I think I'm definitely
going to put it this way. You might disagree
that where I put the marks there were
not the right place. That's fine. That's exactly
what making art is all about. Having an opinion. Just seeing, if what you did
created what you wanted. These are sepia pens. I like sepia pens. What if we do sepia pens
on this right here? Because it's got a
sepia color in there. This has got a brush. I like the brush
because it's got a different mark that it
makes than these other ones. I can do a dot, I can do a line, I can do a line that
has a shape to it. Whereas, if I use
this big fat one, I can do a dot, I can do a line, I can do a shape, but I don't quite get as much
definition in the shape. This would be really good, if you were into calligraphy, getting different
lines and shapes. Then I can just see
different sizes. This one's dry so that
one is now no good. Some of the stuff,
I've had for a while. Obviously, waited too
long to try to use it. Super cool. That one's
still good. Let's see. I'm liking the bold. We'll go with bold. It's this middle one here. We could do dots, lines, shapes. You could do all stuff here. This is the brush, sorry.
Let's do the brush. I got the brush open now. What if we did a dot
in the pretty sepia? How would that
change our piece up? Do I want to do the dot
in the dark or the light? I'm filling it in
the dark now that I have set my pen
down and committed. There we go with a fun
little dot on our piece. Now we could fill in this one. What if on this one, we did that shimmery
blue neocolored crayon. Let's see, what do
we want to do here? I could come back
with a line coming through the lightest part. I can just follow my edges here with the light and
then the edge of this. Again, I'm not worried at
this point about making a great piece of art
or ruining this piece. You can always paint
more of these. It's a little bit
more because we're on this smaller size exploring
and figuring out, what do we like with these? What's going to be our favorite? Then we can take that and go larger with it
because we've already experimented and played with all the different fun options. See, now that's fun. Look at that. If you're doing something
repetitive like we're doing, let's go back with the Posca
pen and make some dots. When you're doing
something so repetitive, try not to get into a hurry
and be sloppy. That's hard. I just got in a hurry on this side and then I
had to remind myself, this is not about speed and
how fast you can do it, this is just about creating
interest, pattern. It's a little bit
meditative if you'll slow down while you're doing it. It doesn't have to be fast. You're not in a hurry. There's no deadline. Slow, deliberate
lines, marks, dots. Don't get in such a
hurry that you end up ruining your piece with something sloppy
you didn't intend. Super fun. I'm loving the
lines and the dots of that. I'm loving the lines of that. I do like the sepia on this brownish grayish
greenish color. I really like on this one, these edges that the
watercolor made that look that same sepia
color. I'm loving that. I've got one more. We've got three different
ways that we tried. What else do I want to try? I could just come back with
some little fine dots on. No, I already did fine dots. Let's see what else is there. Let's make myself
use something else. I did not use gold. Straight away from gold, I could add some gold in here. That's always fun. Let's do it with a ruling pen. I've been using my dip
pen this whole time, but I'm going to use my
ruling pen as a dip pen. I've got a class on
using the ruling pen if you're unsure of how to use
these or what this is for. Even though a ruling
pen is not a dip pen, I'm using it as a dip pen. We're just going to do it. Now, what I like about using
a ruling pen as a dip pen, let me get that started, is it holds a lot more ink
than a regular dip pen, like my Kuretake nib pen
does and I love that. I don't want to dip on the paper first because I can end up with a great big giant circle
where I didn't intend it because there could be a big lip of color
waiting to come out. I do have an extra
piece of paper over here when I'm using either of my dip pens or this as a dip pen to make sure
that I'm not going to have a surprise when
I touched that paper. But I love this because holds a lot more ink than
just a regular dip pen. It's a whole lot cheaper than my brass nib Kakimori
pen that I love so much. You can get these for
a couple of dollars. You can get a set
of four for like 10 bucks. They're pretty cheap. They come in different sizes. It's a fun tool to work with. It's a drafting tool for
engineers and drafters. It's been around for
a long, long time. Like I said, it was
not made as a dip pen, but I'm using it as a dip pen because it holds a
lot of ink and I can. It's my art practice
and I can make tools do things that they
weren't intending to do. Check that out. Oh, my gosh. Totally
made me love this piece even more with
that yummy shimmer that we're going
to keep in that. I don't feel like I need
to do a whole lot to this. I could add just a little
extra few dots at the top. Tie that in if I wanted to, but I don't have
to, but I could. See? Now, that's super fun. I think I'm going to
leave it right there. Check that out. Super fun. Now with the big single
pieces and to wipe this off, you just rinse it
in some water and wipe it off and it's
nice and clean, ready to use for the next time. For these, I definitely want
you to give these a try. It's one big shape. I like the pattern that
the watercolor makes when you've got water
drips and blooms in there. Then try different
mark-making elements and see which one of
these do you love, and which one of
these or you like, probably wouldn't do that
again, and just see. I'm loving that. I love the graphite.
I love the gold. I love these two. Now I got lots of choices, but probably going to
go with that gold. Now we're ready to jump
into a larger project. I can't wait to see
what you're making in your big project, and
I'll see you back in class.
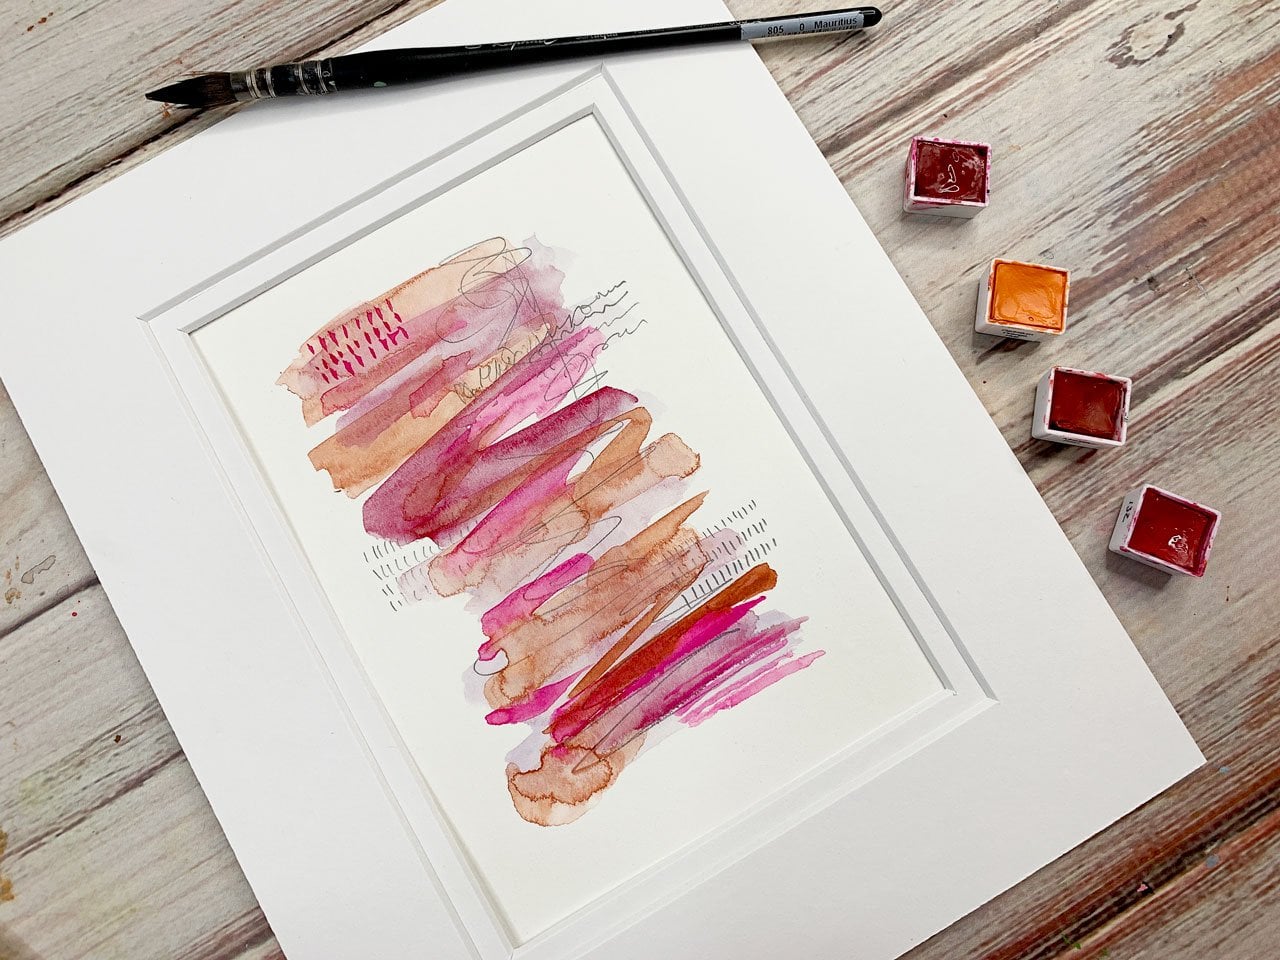
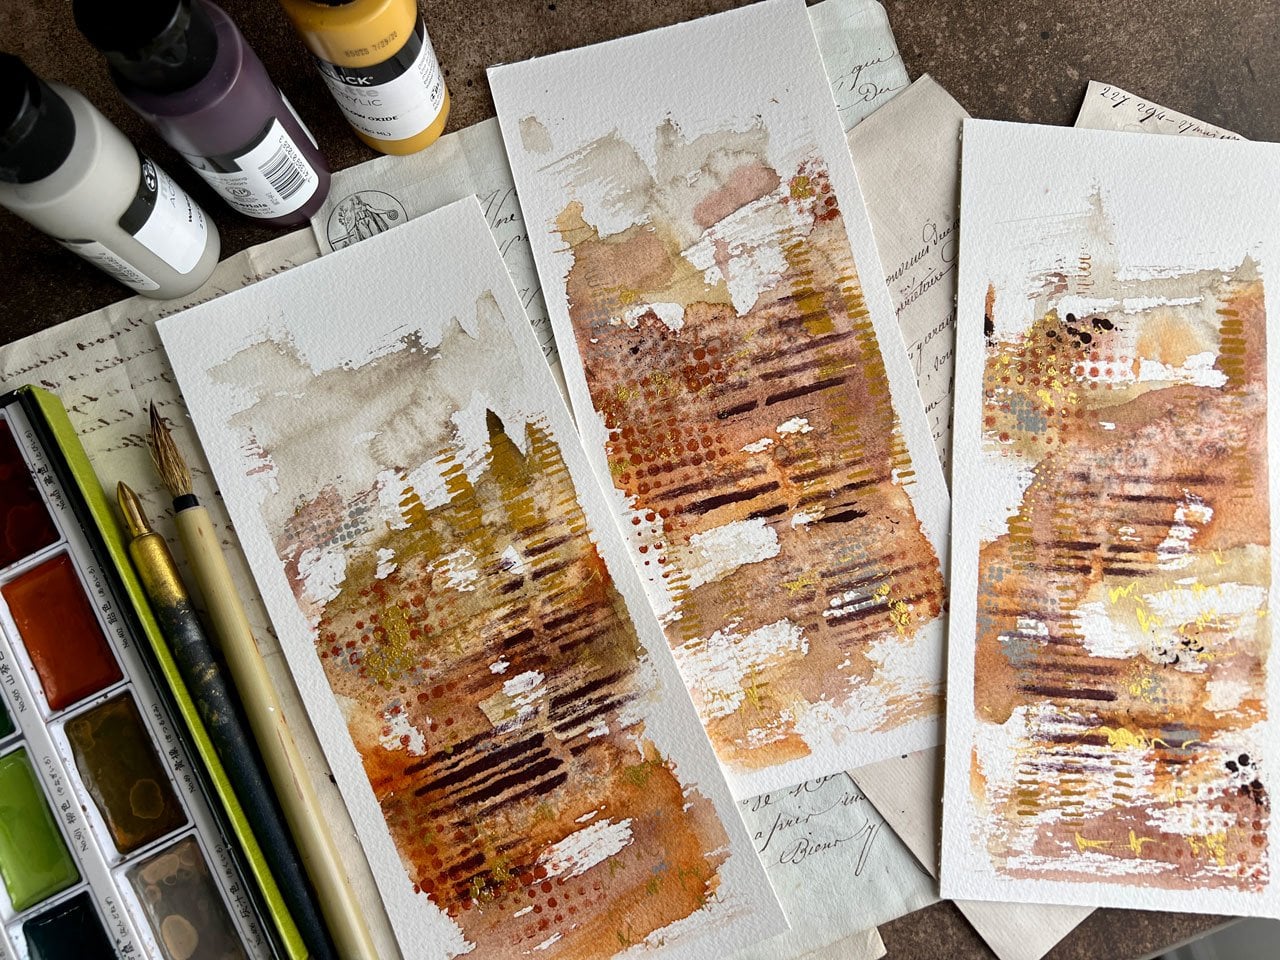
10. Painting Larger: We're ready to go bigger. We've got all of our
yummy smaller pieces that we created
and look at here. I've got this one that
I created smaller. I also have that one that
I created on a half sheet. I've got the full sheets
that I've cut in half and I did a little bit bigger one of those as a half sheet, which I love in these but what I also loved
more than anything out of all the things
I tried was the gold dipped into the watercolor
as I was going, and those are
particularly beautiful. I think my very,
very favorite one is this one with the gold
and the gold dots. I'm feeling like
this is going to be what I make bigger today but I've also got the
white dots and some color. I've got the Posca Pen. I've got the
different-sized earth so I could make a big one with different
planets and stuff. We could go bigger on these two. You can do great
big, single color. Let the watercolor bloom
and do its fun thing and come back in with
some mark-making. We have a whole bunch
of super fun projects and ideas today in class so that you can narrow it
down to what did you love. I loved this one. I'm going to make
this one bigger. Now, in making that bigger, I also loved this one, so definitely give
several of these a try. I want you to, if you're
feeling so inclined, do all these techniques bigger
but let's do at least one. If you're feeling good about
some of these fun projects, and I love this one, I want you to try these bigger. A lot of times when I go bigger, I use a bigger brush. That's how I scale up. On the small pieces of paper, I was using this
Raphael Soft Aqua. It's a little mop brush. Then when I went to that
bigger piece of paper, I was using this Size 0. I've got some other
sizes up here. I don't want you to
stick to the Size 0 or do I want to go up here
and maybe to the Size 4? Bigger brush, we could go bigger and test it out
on a little piece if you're not sure how
it's going to work. I really liked the blue-green, but I also liked
that other color. This one here is
the rose tundra. I'm almost out of that one. You can see I love
that the most out of all these colors on my pad here. I'm just going to squirt
out a bunch of that color. This other one is
the tundra orange. That's what this color here was. Let's just fill that up. I love these ceramic palettes. If you're wondering, what I've got all
these watercolors on, this is going to be my Schmincke super granulating
watercolors palette. I just decided that this
can be that palette because I love those
colors that much. I have these yummy
ceramic palettes that I collect from
different artists. This one's from Sylvan
Clay company, I believe. She's got a website in an Etsy, but I love different ones. I get flat plates like these. Serving platters like this, this is another super
favorite paint palette of mine and you can get
these for $5-10 at TJ Maxx and any kitchenware store. They're made for hors d'oeuvres, so look for white
hors d'oeuvre plates. Super favorite. If you're using
watercolor on it, I'm going to just keep using
these watercolors on that. I'm happy with this
being on here, but you've cleaned
them off each time. Let's get water here. I just want to see how
big is this going to be or don't want to go back
with the size I was doing. We could go ahead
and try that bigger. Let's just try the bigger. If we don't like it,
we can go back in with another piece of paper
and do it again. Then that's cool. The way I can see those colors
really come out of there as they're on my
palette in my brush. That's interesting. Then I can dip gold in
those as we're going. I might use this other one
to be the gold dipper. I might dip that gold as I'm
going rather than at the end because our paper is so big. I might need to dip
it before it dries. Look at those. I think
I really feel on this. I like the way that color
is really granulating. Look at that. You can really see what
that watercolor does. I love that. Now let me open the gold. I'm going to try my best not
to spill it on everything. I'm so terrible about
opening something up. It'd be in my way and I
spill it all over my table. I finally had to replace this little wood part of the
table because I don't know, I'd spilled enough things
on it that it was terrible. I'm going to try to
start pretty even and have a fairly
even edge around it but if you don't get the edge exactly like you want
it, that's okay. You can just put
a mat around it. This is completely different than that little now that
I'm creating this in it but you know what, an
interesting dilemma. As we go bigger,
we can just say, how is this doing? Does it create like
we thought now? See, I like going
bigger on projects and I know you might
see my classes and just roll your
eyes and think, why are we doing that? But it presents
different challenges. The bigger you go, the
bigger your challenges. I think it's very
interesting to learn as you're going what
is that challenge and how do I overcome it and what am I going to do
to not have a problem. After I do this one, I might go back and do a circle because I liked the circles. Try not to just stick
with one of these. Do two of these and do
two different shapes. If you pick out, these dots aren't
even ended up being like that shape I was
thinking I wanted. That elongated shape, these are more like
the shape of eyes. Don't get hung up on that. Just create and see, when you're done
what did you get and did you love it
because I'm liking this. That's not water. I'm about to put that
down in my gold. I'm not trying super hard
to get straight lines. I do want the lines
to be straight, but I'm not focusing all
my attention on that. It's not like I'm putting
heavy thought into, is that perfectly straight? Did you get that same size? Is it exact? Just not trying to think
too hard about it. I want to have fun. I want to just go with the
flow and see as I'm playing. This is part of my art play. What did I get and
did I love it? Let's just see. You know what the Schminckes, this reactivate if you go drop
some water back up there. That'd be interesting to
see if we reactivate that. Do we get a bloom or something
different out of that or did we move the gold
around or did we ruin it? It's all about just play. Just see what can
we create today. Then after you do
enough of this play, you really get into
things that you love like that
graphite that I love. All this play creates that
interest in your work. You start figuring out
what's your favorite thing and how do you like to
work with these tools and what project do you
want to create today. You get to where you start
thinking of these things and you can't wait to sit at
your art table and create. Whereas if you sit down with an expectation that you have to create an amazing piece of
art today and you didn't, and so now you're mad, which I've done many times
you just ruin the fun that really your art
practice can bring you. These are very meditative, so definitely all about
things that are feeling good. I don't know. We're going to love
this one or not. I don't know. Let's go ahead and
dip some this in, and then let's go ahead and get us another
piece of paper because we'll have to
come back to this one. It's dry. Let's do the circles. Let's just go ahead
and do circles. I don't know if I'm
feeling that one or not. You're not going
to fill them all. Maybe the first time you do
it it's going to be terrible, but maybe the second time
you do it it's amazing. I'm going to do
circles this time. Let's do blue-green color. I'm going to dip the gold in so I've got the
number 0 go in here. I'm just going to activate these olive green
and teal green. I'm going to go with these. Again, I'm just making them like originally was, just
little circles. I'm going to get some different
colors in each circle. I don't want the
circles to be even. I don't want them to
be the same color. I want those variations and
those interesting edges. I do actually notice
as I was going, I got further and further over
this way and I've angled, but I don't care. Look how cool that turned out
just as a great big piece. I might have gone a
little closer with the circles I left
off with big spaces. I might do this one again, tightening them up a little bit. This is super cool. Now we need to let it dry and then come back and
add some dots on there. I think we're going to love it. I'm going to let the two
pieces dry that I started and I'll be right back.
11. Mark Making On Larger Pieces: I'm looking at this
and I'm thinking, what do I want to do with that? They're a little further apart, just like on the other one. But I do actually
really love them. I might take the dip pen and
do dots and just see what do the dots look like
if I dot these similar to my little smaller
test piece that I loved. I think that is the way
to go with this one. I do like the dots. I like the interests
that it adds. I don't want the dots to
be on the same place on each piece, so I am
varying that up. Then of course, remember, don't put it right where you're going
to be setting your hand. If you did like I
just did and started right about where your
hand is going to be, flip it over so that
you're not now drawing on all of the pieces
that you just put dots. These almost look like fish. Do you see fishy, sassy fishes? I'm liking it a whole lot
better now that I got dots on here than I did before. I really question this like, am I going to like
that? I don't know. I'm just like you, I question every piece
of art that I make. We all do it. That's normal. I'm
doing the same thing. I'm putting them right where I'm going to
be sitting my hands. Some of these are still wet. I'm trying not to touch
the wet ones also, but I'm doing a
terrible job about not putting this
where I would be sitting my hand. I
got to be careful. When it gets wet and your ink spreads, just go with it. Not a big deal. You could wait a little
longer for these to dry. When I was playing, making some of these
for myself early on, I was painting a whole bunch of just repetitious
dots, and lines, and stuff, and then
I'll let those dry overnight and came back and play with
them the next morning. You can do that. But
when I'm filming, I want to go ahead and get to the next bit and then see what my finished pieces
all in the same day. Some of these are wet. I did get impatient and
want to keep on going. But I recognize that some
of the dots are spread, so I'm okay with that. I'm putting some above
my gold and some below my gold and some in front of my gold and some behind my gold. I just want each little
fish to look different. When I pull back and I
look at the whole piece, I want each one to
look like it's got its own personality basically. This is much prettier
with the dots. Don't stop before you get the finished marks
on. Good lesson here. Because now that I've got all these pretty gold sparkly
dots, I'm digging it. I do wish it was close
or like my original. Look at my original. I need to go back and do it again and I need it to be this. But times four, can you imagine that
being that huge with the smaller brush? I should have done this
with the smaller brush. Sometimes when you go big, you don't have to
up your paintbrush, but that's part of the
lesson of going bigger. Did you like it when you
went bigger or should you have just done more
in that smaller size? Valuable lessons. If we're doing a series, it could definitely
benefit our series to have bigger spread
out, smaller brush. But in this larger size, both those elements could look
good in our final pieces. Look at that. Let's
flip this back over. We could go this way. Actually, I like
it best this way, so check that out with all
the gold sparkles on it. I'm loving that. Definitely try bigger
with a bigger brush. But also try bigger with the
smaller brush because I like this big tightness of
this on this shape. I like that tightness. Very interesting
discovery there. Let's go ahead and dot our spots here because
I'm loving this. I need to move my paint
thing a little bit further over. Here we go. Let's work in a direction that isn't right where my
hand is. How about that? These are still wet, but they're dry enough
for me to start dotting some interesting spots. I like using different tools. I'm using a different tool
to do the dots on this one, but you saw that my
ruling pen works just as good as my Kakimori brass nib. There we go. Choices,
I like choices. Then when you have
choices and you play with those and
then you're like, here's what I like the best. That's how you figure
out your style, the things and elements
that you love. Lot of people are like,
how do you know where to put this or how do you
know where to do that? You don't. You practice experimenting and then
deciding for yourself, what did you like? Where did you like to put it? What color was your favorite? What mark is your favorite? I've found my favorites just
by doing a lot of stuff, and that's the only way you're
going to figure it out. The same with photography. You just got to take a lot of pictures before you're like, oh, I like this lens and
I like these settings. This is how I came up with my style of photographs that I like to take because
I took a whole lot. With every photo that
I took, I'm like, here's the elements I like and here's the
elements I don't like. Let's build on what we like. I like dots, I like gold. You're going to see me use
that in a lot of classes. You might think, maybe you should use
something different. But this is my style and this is the things that
I have discovered. I got to be careful here. I got gold on my pinky there. I don't want to be all
over my piece here. What I'm going to
do? I've got a ruler here and I've actually got
a bigger ruler somewhere. I'm going to use
this ruler to lean my hand on and it's not
touching the paper. I have a big wood
ruler somewhere, but this is the one I can find. If you're working
on something wet and you're afraid
you're going to put your hand down on it, this is a little trick for
saving the paper and saving your hand but allowing you to continue on with the work
that you wanted to do. I'm going to lean on
this ruler so that I don't put my finger in
anything I didn't intend to. I'm not leaning so hard on it that I'm pushing it
down to the paper, but it is helping my hand stay steady and hopefully
off of my paper. A little trick there for continuing to work on
stuff even when it's wet. You're never going to get to your
style fast enough. It took me years, especially in my photography, to be like here is
my signature look. I like this lens, I
like this f-stop. I like this moody backgrounds, nice and dark and moody. It takes years to get to that. Lots of practice and work and
years and just putting in that work and then just seeing, what do you like and
what did you get. The same with your art, it just takes years
to finally say, I like gold, I like dots, I like abstract, I
like smoky colors. I like XYZ, whatever it is that you like. That takes time practicing, trying all the art supplies
you can get your hand on and sitting at your table playing on cheap
paper if you need to. If you have that barrier of messing up a piece
of expensive paper, pick cheap paper,
sketch books, whatever. But try every single
thing, technique, type of art supply that
you can get your hand on and experiment and
then finally be like, I like this and I'm going to be creating this type
of art for a while. I try so many different
types of art, which is why you see 15 different types of
art supply classes on my class roster because I like experimenting
with acrylics, and watercolors,
and alcohol inks, and cold wax, and oil paints, and pouring
things and dipping things. I like it all and I'm very much a next shiny object person. That's why I like to maybe teach you about all the fun different
things I've found and discovered rather
than settling in and saying I'm an alcohol ink
artist and that's all I do. I'm like a little gypsy when
it comes to art supplies. I want to move and try different things and
I don't want to lock myself into one way of doing things and
one set of supplies. That just is not my style. Check that out. Look at that. I'm really loving the gold, the dots, and the shapes, and the color
underneath the gold. I'm definitely feeling
like this is my jam. I do like still going
back, clean off my pen. I don't want to have
any ink dry in there. I do love this shape even
better than the round. That was able to say I love
this shape and this size. That size was the size 3/0
Raphael SoftAqua brush. It was the smaller
brush and I liked that. I can see myself now
making these bigger and seeing like what
does this look like tighter with that smaller head. Super fun. Now, I want you to see what
you can come up with, what brushes do you like, what shapes do you like, what colors and marks
did you end up liking, and I can't wait to see some of these bigger pieces
that you do in class. Definitely come back
and share with me your little pieces and what
big piece that inspired. I can't wait to see those. All right. I'll see
you back in class.
12. Final Thoughts: [MUSIC] What did you think
about patterns and repetition, and colors, and mark-making,
and imperfections? How did you translate some of these yummy themes into the pieces that
you created today? Did you come up
with some surprises like I did, like in mine, I was really surprised that my very favorite
was the color with the gold and then gold marks like dots or
lines on top of that. That ended up being my favorite. That was a very fun, interesting surprise for myself
because when I initially started doing this project and playing with pattern myself, I was doing it just
with the watercolor and maybe a few marks here
and there in a gold, and it didn't even occur
to me that I would love gold in my main piece with gold dots or lines or marks around it and so that was a fun, interesting discovery
for myself and my own art and I love
doing things like this and making those discoveries
and I want you to have those discoveries
and you're not going to have those till you
sit at your art table and you give yourself permission
to play and experiment. What I like about a
project like this was it was really good on
my cheap paper so I could get out my cheap 140-pound cold press
watercolor paper and it gave me the best results. Cut that into
several pieces and I felt like I could
play for hours and I wasn't hemmed in or hampered by the price of the
paper I was working on. I got really excited about that because it's those
moments when you make these discoveries that
you inch that much further into coming
into your own style and things that you like to create or you're like are you turning a corner into a new style
and a new collection, a new thing that you want
to create and I'm always experimenting and finding
joy in that experimenting, getting to that final set of supplies that maybe are my
current favorite and saying, these are the things I love. What can I make with these? I enjoy that process and I enjoy sharing that process
is probably why I like to share different
art supplies and techniques with you
all because gives me permission to sit up here
at my table and play and experiment and I want you to
have that permission too, I give you that permission. I want you to give
yourself that permission. You don't have to sit
down and create something great every time you
sit at your table, sometimes it's about
experimenting and play but when you're
done with this project you may have something
you love and want to hang up as a
yummy piece of art. Even though I say, don't get hung up
in trying to create something amazing some of these are amazing and it's just so cool to sit and play and
experiment and then be like, wow, look how cool
this turned out. I do want to frame this or I do want to make some
more of this or this could be a whole
collection because in the end it is the lovely
little abstracts that we're creating in our experimenting with pattern and repetition and color and mark making
and all the things that kind of go wrong with the projects that
we're doing today. I hope you enjoy the class. I can't wait to see
the pieces that you come up with so come back
and share those with me. I want to see your
little idea pieces and the big piece that inspired if you did a bigger piece and I
can't wait to see, so come back and share and I'll see you
next time. [MUSIC]
 DENISE LOVE, Artist & Creative Educator