Transcripts
1. Introduction: Some days you just need
to have some play days. You need to sit at your art
table without expectations, without a specific
project in your mind and you just need to
play in color and marks and see what you get. That's what this class is about. I'm Denise Love
and I'm an artist and photographer in
Atlanta, Georgia. Yesterday I had
the best day just playing at my art table
with my art supplies, a few new supplies
that I'm obsessed with playing in some gold Mica ink and some graphite watercolors. Because I'm so in love with
the graphite watercolors, I just wanted to sit
and play and relax and let my mind just roam and just see what
can I end up with. I wasn't trying to create
a specific project, I didn't have any
specific goals in mind. I just wanted to fill the page, let it dry and then see if I can find some art
within the bigger piece. I love cutting up art. I think if you will
paint and cut art, you put a whole lot less
pressure on yourself. It's a lot less precious. You don't get upset
if you make a mistake because that's a part
you can just cut off. I've got a couple of
different projects that I'm revisiting
here in class today and a new little
bookmark project. I want to make some
bookmarks with maybe some little
surprises on the back. I want to make some
little abstracts which I already love to do. I wanted to revisit my heart art because I truly
love the heart art. I've got a little
pretty one back there that I just made yesterday. And I want you to
create with me, just have some fun, revisit some projects
and some color ways and some interesting
things that maybe you haven't revisited
in awhile and just see how much enjoyment you can
get at your art table. Just playing. Today's class is all about play. We're going to paint some pages, we're going to cut those
into nice projects and just see what we can get. I'm really excited to
have you in class today if you've taken a few
of my other classes with these projects in it, this is a revisit some
of those projects class. But I still think you're
going to have fun because I'm introducing you
to some new art supplies to do those projects with. I hope you have fun today. Let's get started.
2. Class Project: Your class project
today is to play. I want you to have
fun in your art room. Today's project was all about maybe revisiting some
techniques that I really loved, experimenting in some
new art supplies that are my favorite, that I am newly obsessed with, and to just sit, and
create, and wind up with something that you're
super-excited with at the end. Because the projects
that I came up with just from pushing
paint around the paper, letting it dry, and
cutting things up always gives me
super fun results. I want you to have some fun in your art room today,
paint, mark-make, and then come back and show us your
bookmarks, your heart art, your abstracts, whatever it is that you ended up cutting out and creating from your play. I'd love to see it in the
colors that you chose. If you played in the Mica ink and the graphite watercolors, I would love to know what
you thought about those. Tell me what you thought and I will see you in class.
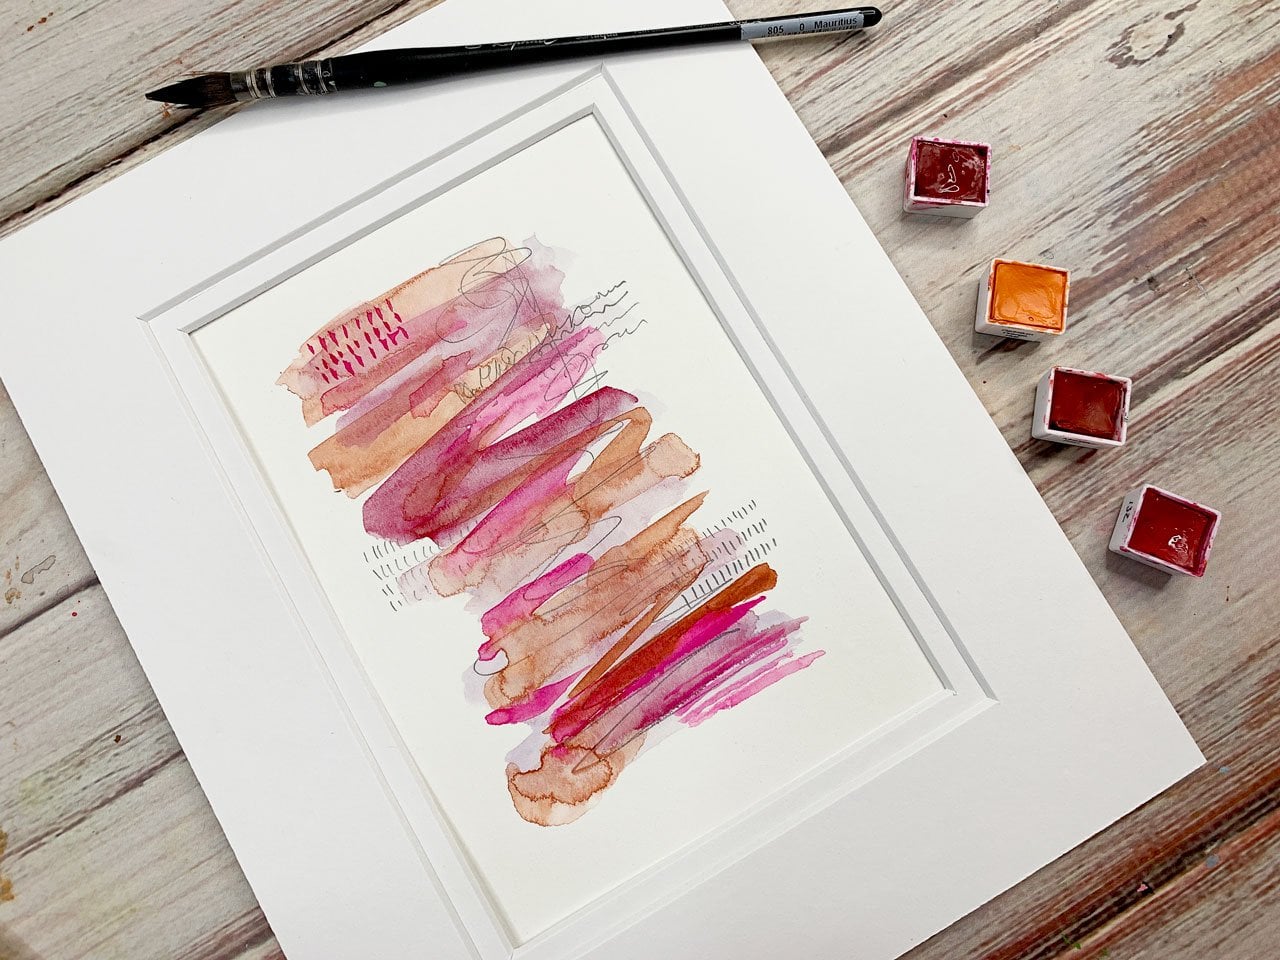
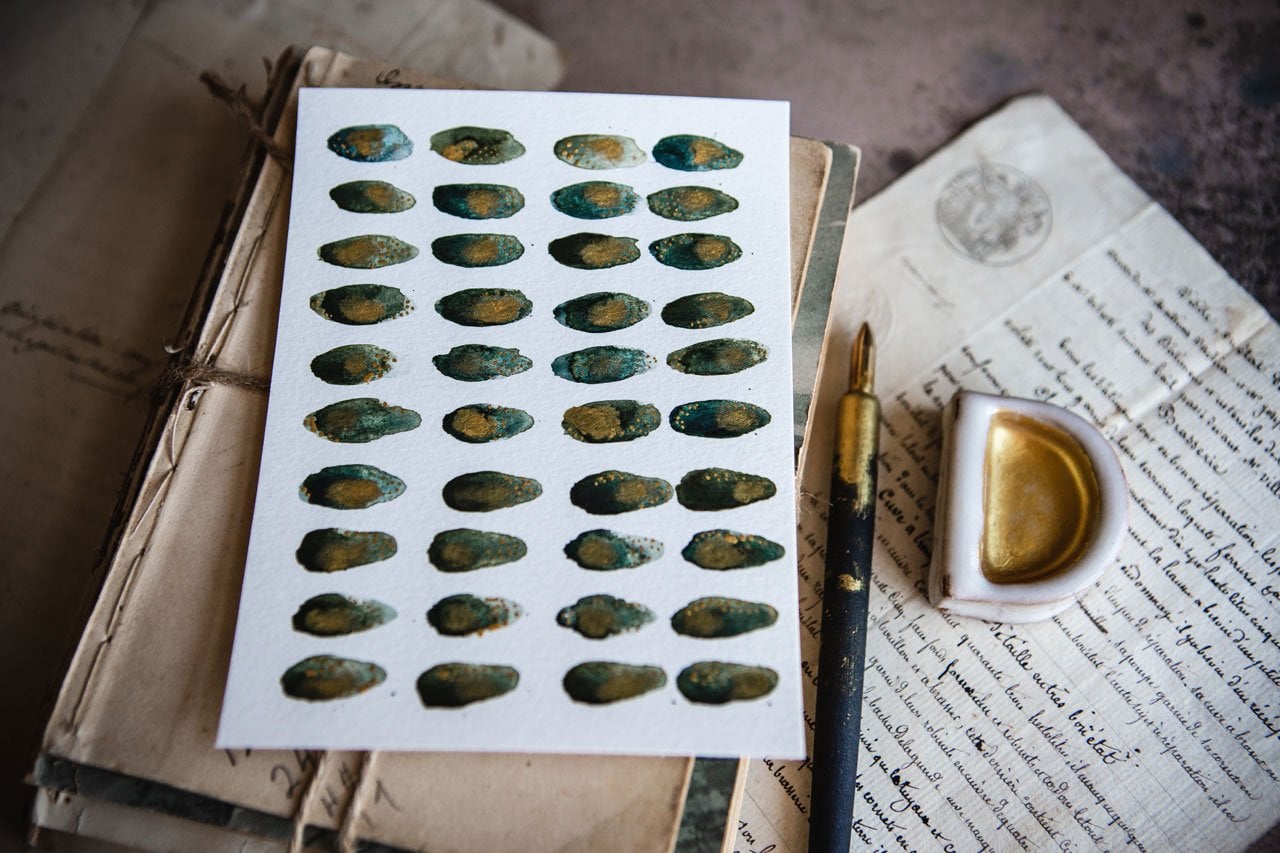
3. Supplies: Let's take a look
at the supplies that I'll be using in class. I'm going to be using one of these Canson XL 140-pound
cold press watercolor papers. This is just a watercolor pad, it's good for
projects like this, I like using that. This is a nine-inch
by 12-inch pad. I'm going to be using
some of this paper, and I'm going to be using some of my graphite watercolors. A few of these are the
Kuretake graphite pans, I've got five of those colors. It only comes in
five or six colors, so it's not like you've
got a lot of choices, but it comes in graphite
green, graphite yellow, graphite violet, graphite red, and graphite brown, I think there could be a
graphite blue out there, but I don't have the blue. Then, I'll also be using some of my homemade graphite
watercolors. I've got that little pan
of colors out here also from the make your own graphite watercolors
class that I did. I'm going to be
using a combination of mine and the Kuretakes. Then, I've also got a couple
of watercolor brushes here. I'm just using my
favorite brush, which is the Raphael
Soft Aqua size zero, and I've also got the Raphael
Soft Aqua size two here just in case I want to
have a choice in sizes. Then I'm also going to be using this Kuretake brilliant
gold ink, gold mica. This is the gold mica
ink that Kuretake makes. It is the same company
and color that makes my very favorite
Kuretake gold mica paste that I use in a lot of classes. It's the same color, same brilliance when you use it, but it's a ink consistency instead of a paste consistency. If you have some of the paste, you can use the paste, you can water it down to a liquidy consistency
and use it like the ink, that's the nice thing
about this paste. If you've got one of these, don't go buy the other, but I like having both because the gold ink is super
fun to play in also. I also have some dip pens, I want to be dipping my pen in the ink to
do mark making with. I actually have a regular
dip pen which you can just get those just
about any art store, and even like a pen
storage, just a dip. Here on the end it's like a little pin nub
and a pen holder. I've got a couple
of dip options, I've got this standard one which is a fairly
inexpensive route to go. I'll fit this back in a second. This is an old pen, I don't want to at
least use a lot. I've got a new nib to use also, this is an interesting nib. It looks like a
little claw almost. It's very interesting
and different than the traditional dip pen nib. It came up in a Facebook
ad from the St. Louis Art Company and I thought, super cool, I want to try it because it was actually
demonstrating it. What it does is you dip it in the pin like you
do your dip pen, but it holds a
whole lot more ink inside these little claw
pieces that are coming down, so it holds more ink and it
draws longer and I'm like, I think I would like that. Look how cool it is. We just dip in ink and we draw
with it, it's super cool. This is the Kakimori
brass nib, so really fun. I'm going to be playing
with that in class because it's my new
favorite dip pen. But I do have a regular
dip pen you can use something like that
just as easily so, whatever works out best for you, you can use either
anything like that. I'm also going to do some fun
little projects in class, I've got a couple of
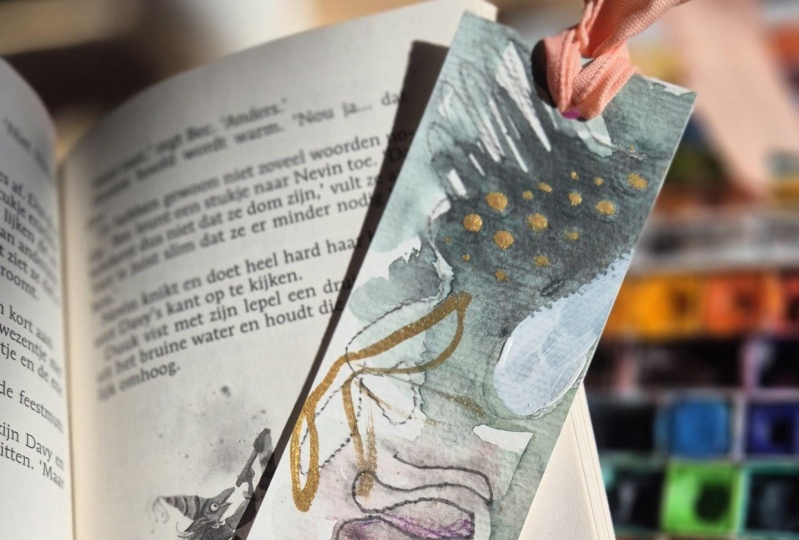
little just random things that help make the projects. I've got some book darts
that are super cool, I liked the book
darts because if you make a pretty bookmark out of your projects like I do, you can take these
little book darts, and if you're reading a book and you're like I need
to remember this page, you can keep moving your
bookmark wherever you want. These book darts fit
on the edge of a page, and maybe you want to have a couple of them
available and you're using that bookmark and you're thinking let me
remember this page, you could pull off a book dart and put it on the
edge of your page, then you can keep on reading and keeping up with what
you were doing. I love these brass book darts, and there I got them off Amazon. Just called book darts. I think they come in
silver and brass, you got some choices there. But it is a fun little
gadget that you could add to your project just
for fun, so have those. We are also going to
be using some ribbon because what bookmark is not complete without a
little bit of ribbon on it? You could use different
kinds of ribbon. You can even get little
tassels from the fabric store. I've got a little hole punch to punch my hole for my ribbon. Then I've got this super
fun Kate Spade stamp. This is not a current item. I got this off of eBay, they're really beautiful
and you can stamp something beautiful on the back
of your bookmark. Look at how beautiful
these phrases are, be an elegant thinker, how gorgeous is that? It's a fun little pop
of surprise on the back of something like a
gift tag or a bookmark, be an elegant
thinker, I love that. Then you've got refined print, don't mind if I do, light up the room, live colorfully, that would be a good one in the
back of my thing, be mused, fruit and veg out, start something new, call the shots, set the tone, escape the ordinary, that will be perfect
for a bookmark, escape the ordinary,
and spread the word, that would be perfect also. To be an elegant thinker
though is my very favorite. Now, you don't have to have
a little stamp like this or maybe you've got
a stamp that has other fun words that
you might like to try. You can simply
hand-write some of these fun phrase or
phrases that you think of on the back
of your projects. I just happen to love
this and since I have it, I thought how fun would that be on the back of my bookmark. I do have some just
fun kitschy things basically to use for
my projects later on, on the few that I was inspired
to make bookmarks out of. In this class, I'm
going to encourage you to do several different
things with your projects. Just to give you an
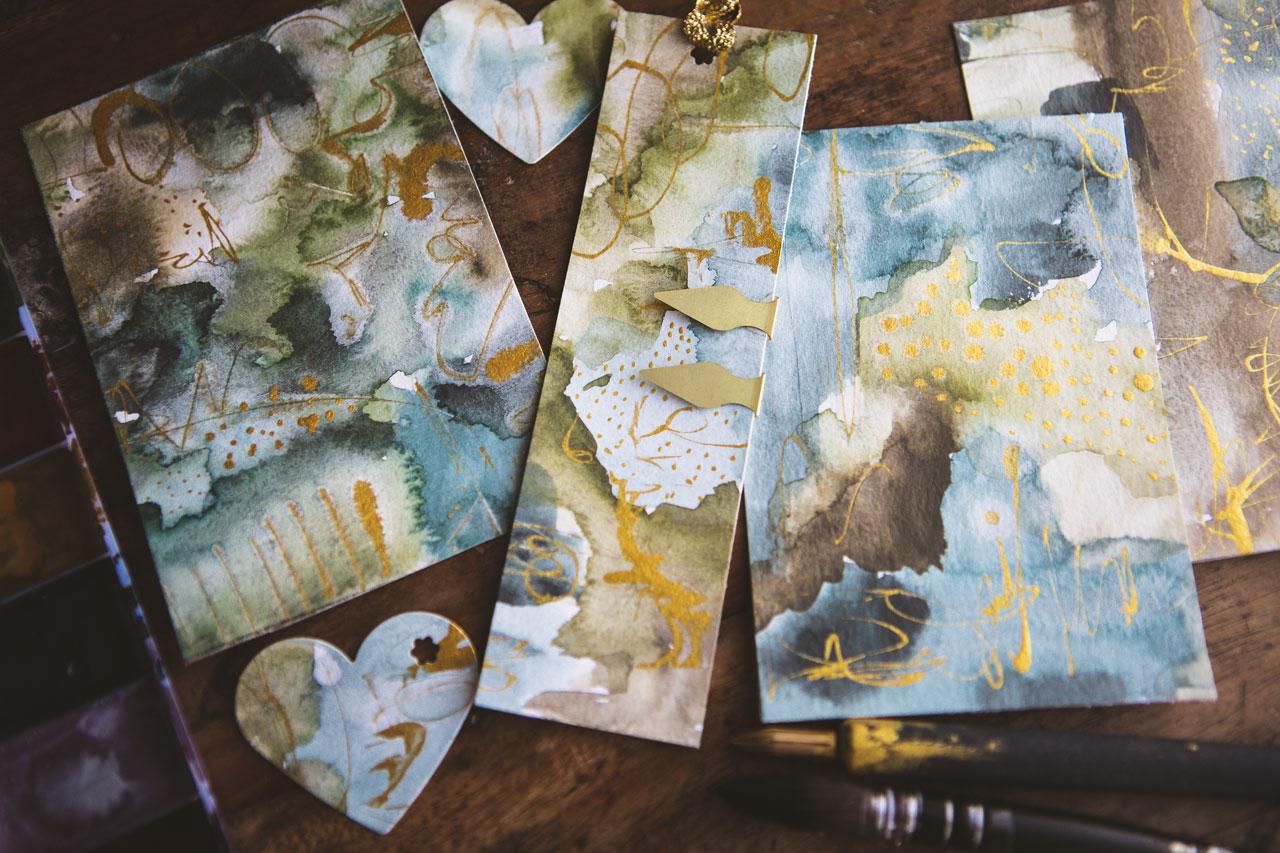
example of something that I was playing in my art
room making yesterday, I made beautiful bookmarks which is what inspired this class. But when you paint big pages like I like to paint, to cut up, then I also enjoy hunting out and seeing if there's
any little abstracts in my piece before I cut it into little strips and look
how beautiful these are. I also made a
beautiful colorway in this blue and green colorway,
they're so gorgeous. Then, I also did my sacred heart's project in here from that
sacred hearts class. Look how gorgeous these are
with that shiny mica ink. Lots of beautiful fun
things that we can do today and some ideas for you. Let's just get started. I wanted to do this class
because I'm a little bit obsessed with these
graphite watercolors. I love them because
they're a mixture of some pigment and
some graphite powder, and you know graphite powder is like pencils so it's metallic. What's really cool is in
the thicker areas of paint, you can actually see the
graphite metallic shine. These colors have a really beautiful
smoky quality to them. I love that smokiness
that you get with these. They're not like the traditional bright vibrant watercolor, they've got that little bit of a smoky undertone that I
think it's just beautiful. I was so obsessed with my new little
graphite watercolors because this is a new
product out on the market, it's not something that's
going to be found everywhere, which is why I did the make your own graphite
watercolor class. Because if you can't get these, then you can definitely
get graphite powder, some art pigment, and make
some colors of your own. I hope if you can't get
these from Kuretake, you definitely try to make a few of your own because
they're just as beautiful and they work
really great and I am excited to show you in class
how I'm using these today. Let's get started.
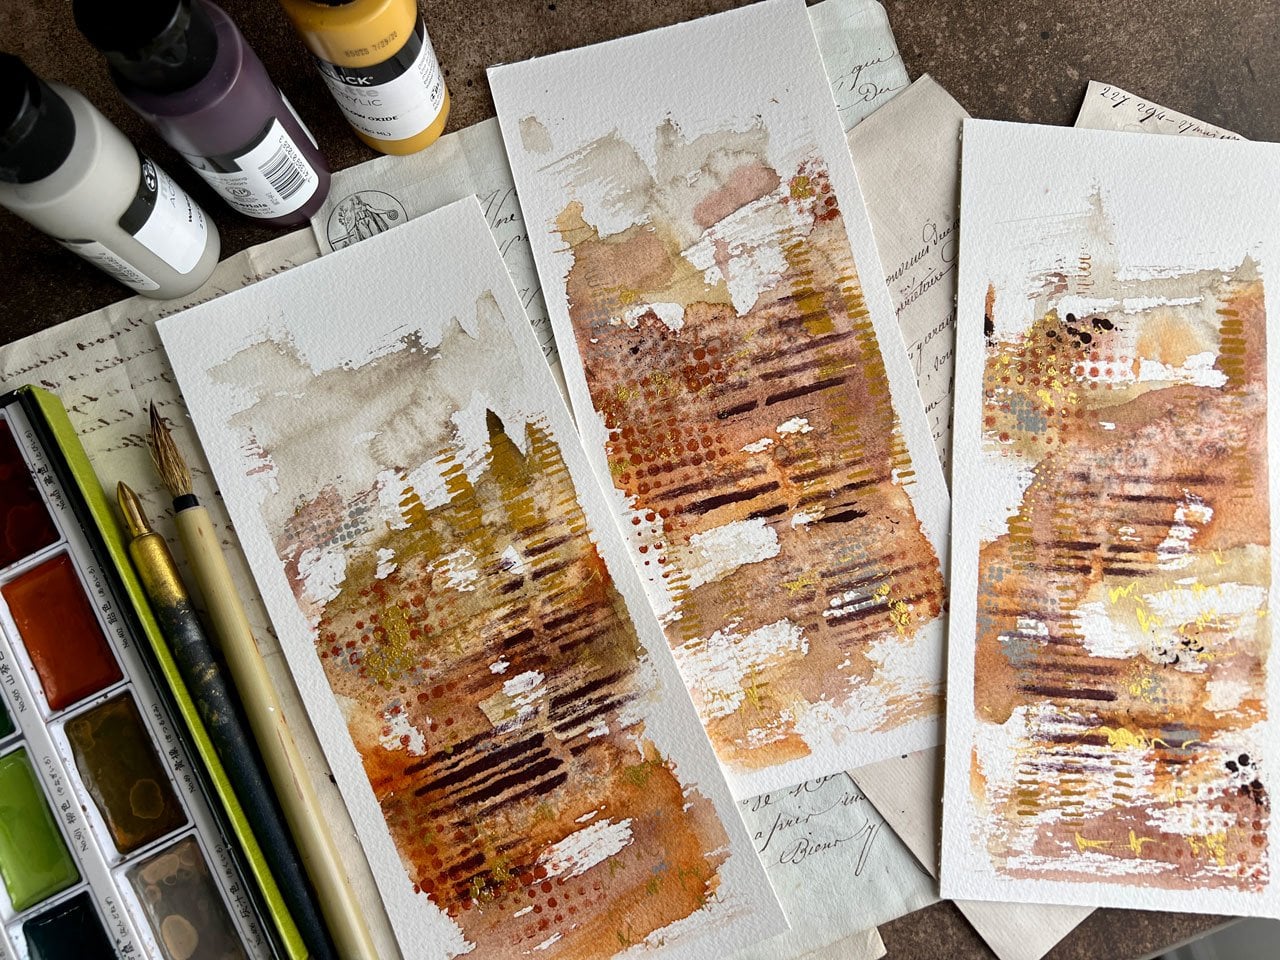
4. Paper Painting: I'm going to start off, I'm just taking a
little bit of water out of my spray bottle and activating my
colors a little bit. If you'll just spray a little water on your
colors to start with. You'll get them started
to reawaken back up. We're going to start
off with one of our cut up abstract techniques and just paint the whole
paper very haphazardly. I'm not trying for some
masterpiece at this point. I'm just putting
color down, thinking, I love this color,
I love that color, and just seeing what I created. When we're all done, we're going to get a piece
that we're thinking, I don't know about this. But that's going to give us the pretty stuff
when we're done. I have discovered I
like some light areas and some very dark areas. I'm going to just fill the page. I was doing some for myself yesterday where I was leaving a white
line at the edge. But because we're
cutting these up, I don't like the
white at the edge, so go edge to edge. You just waste that paper if you're not painting
edge to edge. Just paint edge to edge. Don't worry about composition. Don't worry about where you're
laying the colors stay on. You can see I'm talking to you
as I'm laying colors down. I don't want to think
too hard about this. I truly want to just enjoy
the moment, spread the color. I'm using some of mine and some of the cure talky
just mixed in there. I did discover too as I was playing on my own pieces
because a lot of times I will be playing just for the sake of my own well-being. Just having some fun. I discovered if I start doing some of this gold ink in
the middle of the colors and I'm just dipping my pen in and then look how
beautiful these draw. But I discovered if I do
some of this mark-making, while the watercolor is wet, the ink repels the watercolor in such an amazing
way that I was like, I love that I'm going
to paint some colors and then just draw through here and do some mark-making. I've really kept my supplies. I'm going to rinse the nib off because I don't want that
gold to dry up in my nib. I'm really going to try to not think too hard
about this and just see what do we get. Well, I did not mean to do that, so I need to move that where I'm not going
to do that again. Terrible about sticking my brush in places that I'm
thinking oops. See right in the water,
not where I'm meant to go. If you don't have a dip pen, you can use a Posca Pen
or anything like that. That's fine. This is what I was thinking,
I lost my train of thought. I've really tried to keep this super simplistic
with my supplies because you can tell from all the stuff I
tried to show you guys, I am an art supply
junkie to the point where really when you
have too many options, you paralyze yourself
from creating. I have so many options that
sometimes I have to say, let's take these three supplies. Let's create with these
and these only today. I try to say, I'm going to
create with the cure talky and my own graphite watercolors and this ink and that's it. That's what we're
playing in today. I don't want to
over-complicate this with 15 different
types of art supplies. Because I could also, on top of all of this stuff, I can very easily do my pastels and I could do Posca
marker with white dots and we can just keep on going. But my point on some of this is to practice with
specific supplies, not overthink everything
that I'm doing. I don't want to over-complicate
every single project and then get stuck and mired in decision paralysis, basically white page paralysis. With just all the stuff that gets in the way of our creating. My very favorite color is
this really light blue. Look at that. I want to almost try to
recreate some of that just real light with
the color in there with the real dark color
that we have going around. I want to see some
really light areas and really dark areas. At this point, I'm not
thinking super hard about any future plans for
this piece of paper other than what can we get down? What paper? What colors can we get
down on the paper? What marks can we be making? How can I get this ink to
repel this watercolor? I just love what the ink
does here on these colors. Super cool. One of my new favorite supplies, I need to do a new post. You'll see one of those
coming up I'm sure. Favorite supplies and we're
going to have that nib and these watercolors in
that list because truly, these little watercolors
really are so beautiful. It's crazy how
beautiful these are. If I have some real light
areas and real dark areas, I'm definitely going to have some spots that I want to
have as a piece of art and some bookmarks,
maybe some tags. These are beautiful
if you want to have little miniature
pieces of art, you cut pieces out
of things like this. I love mini art things. Look how beautiful. Let's go ahead. Now I've got paint everywhere. I could go back and add
some more if I want, but we're going to
just go for it. Now I use this dip
pen to draw lines. I also use it to do dots. The dots are some of
my favorite in some of these pieces of art so
that's really cool. Get creative with your marks. You could do dots,
you could do lines, you could do hashes,
you could do crosses. You could do any
type of circles, anything that you might
normally do with a paint pen or a pencil or something that you would
normally play with on your other abstract art
is free game for this. Maybe some windy things. You can of course, play with more
supplies if you want. But I truly wanted it just to
be the Mica ink, the gold. I love the shimmer of this gold. But in the end, this is your
project to make your own. Feel free if its something
grabs you or drives you to do a specific mark color
technique that you love. You're free to add that in. I'm going to go
ahead and continue marking and drawing
just as it inspires me. Saying what's neat with this
pen as you can go to the side and get really
thick areas of ink. Or you can go up on the tip
and get really fine lines. That's what I love about
the super fun nib. You can do different
things with it. If you don't have
to dip pen at all. You can do this
with a paintbrush and a metallic
paint if you want, or a white or black or whatever. Whatever grabs you. That's cool. I feel like I have definitely got some
gold in a lot of places. Look at that pretty shimmer. I'm going to let this dry. Hope I've got a dot up here. Let's put some dots here to
go with this one little dot. Then I'm going to let this dry. I've actually made
several of these pages, so I'm going to come back
with some of those pages and talk about what I do with
these after I create them. What I want you to do is
to make several of these, and you can obviously
do these with regular watercolor
or acrylic paint. Even you have your
choice of supplies that you could want to use. I just wanted to introduce
you to something that's like a new
favorite to me. Do it with your
whatever supplies that you like and get
your page filled. I want you to do a
couple of these pages. If you think you'd
love that colorway, do a couple in the same colorway and you can do a couple of
these projects with it. Otherwise, do a
couple of colorways and see if you don't discover
for yourself a new colorway that you might love. This is a perfect way to
experiment with color and say, this surprisingly
enough is really beautiful. I'll show you a
few that I've done that I thought were surprising and I really love and thought, I'm glad I tried that. I will see you in
the next video.
5. Painted Pieces And Inspiration: This stuff dries pretty fast. It didn't take very
long for me to get this almost completely dry. There may be a thick dot or
something that is not dry, but look how pretty that is. At the same time,
it's not really a finished piece
of art in my mind. Maybe it is in
somebody else's mind, but for me, it's really busy. It doesn't have a defined
composition or focal point. So for me, it's really not a complete piece of art that I'd frame and
hang just like it is. But wait until you see some of the options that I have for you. But I want to show you
really quickly some of the other ones I painted last night because like I said, I want you to paint
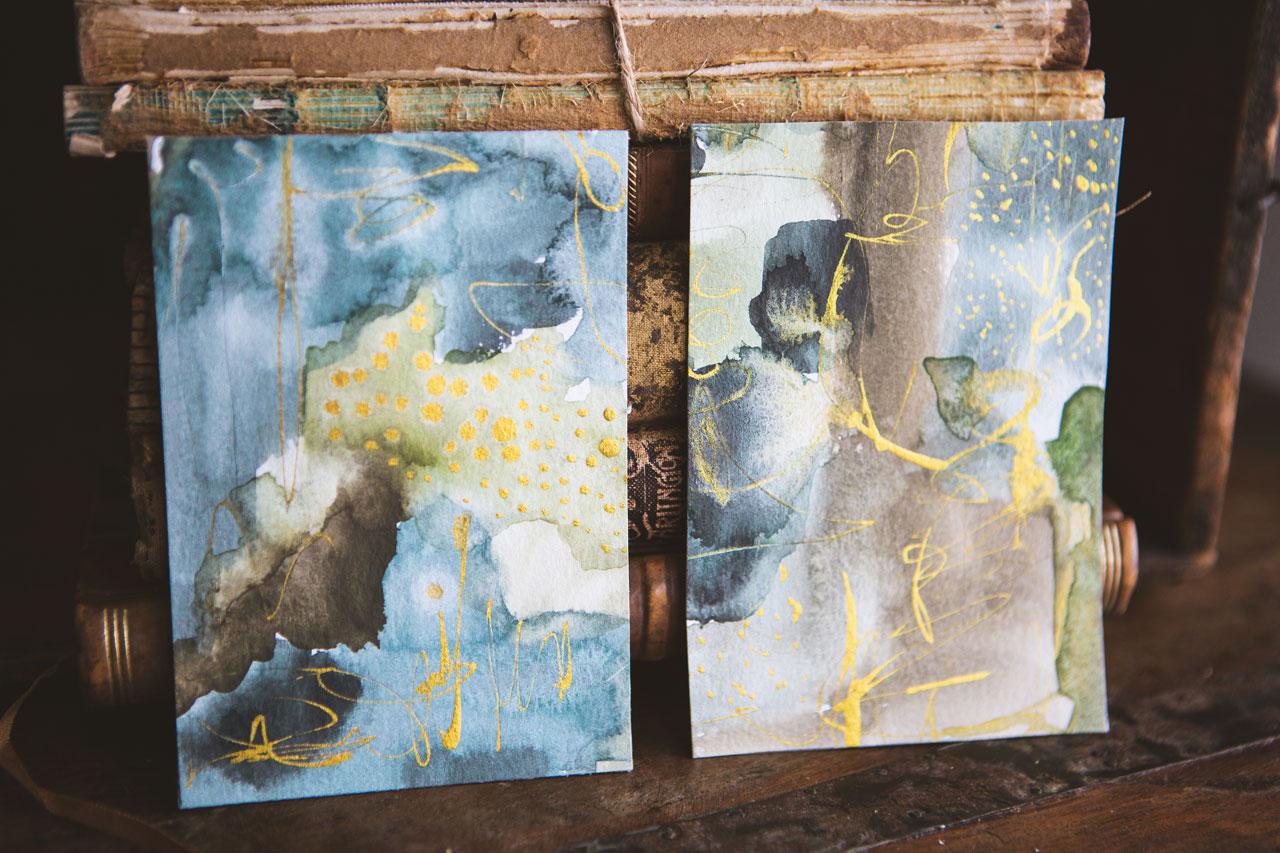
a bunch of these. You'll see this one's
darker and moodier than the pretty lighter
one that I did today. Look how smoky all
those colors are. They're just beautiful. I can definitely see in some of these darker colors
that graphite leaning. I can see the little
bit of graphite sheen. If I take my finger or
the back of a spoon, I can actually make that graphite metallic sheen
pop out quite a bit more. I can just burnish it a little bit with the
back of a spoon and then I can see all that metallic
graphite look in there. Let me see if I can
get that to show. You can just really tell that there's something
else in there. It's an extra element, another layer, and
dimension in our art. Man, I love that. I painted a couple of
these blue-green ones. You see this one's
got more green in it. This one is just random
all over the place. I also tried purple and orange. The orange was my own
orange and the purple was the graphite violet from the Kuretake one and then I mixed in some of my own
pink and violet there. Look how beautiful this is. Just to show you a comparison, here's some pieces
I was playing with yesterday just in my playtime. They're gorgeous. Look here. If we frame this one. Oh, yeah. I'm going
to frame that one. This one. Look at that as a
companion piece. Maybe it looks better. Oh, yes. See, that's the
way that one goes. I love the dark, and the light, and the marks. I just love this purple, whatever this happiness is going on right
there. I love that. You can see as we cut these
out and look at them, even though the
great big piece was rather chaotic and undefined, smaller pieces are
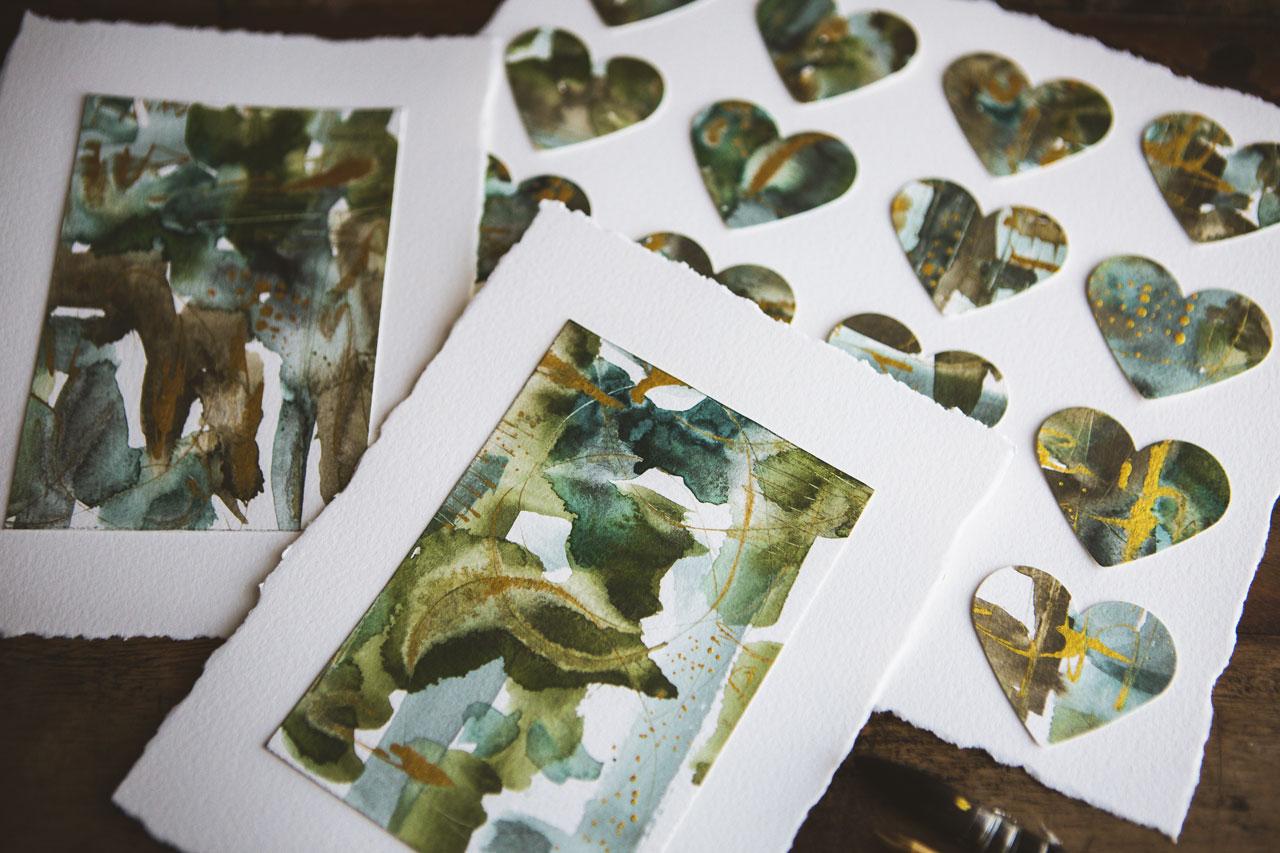
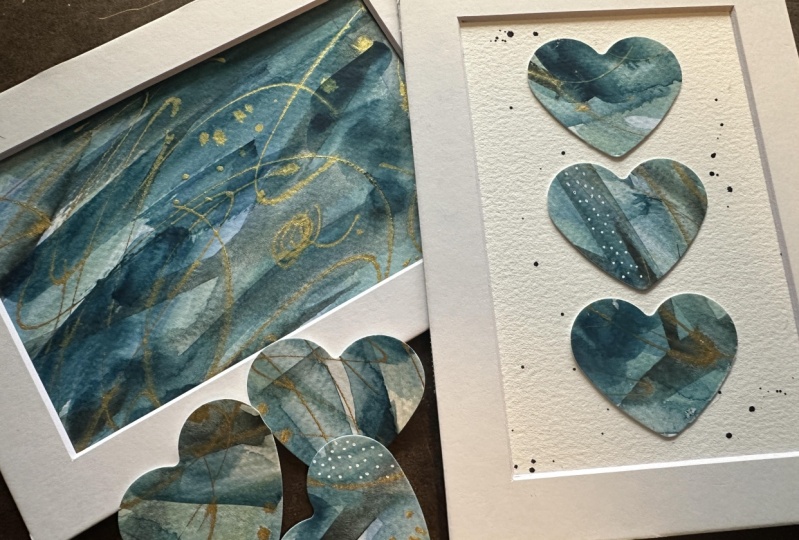
insanely gorgeous. Because if we go back to
this pretty blue-green, I actually took
these, cut them out, the ones that I liked, and then mounted them on a nicer piece of paper that
I ripped the edges on. Look at that
gorgeous collection. I'm like, oh my goodness. Then I also did these beautiful hearts
because I like the heart art. I like the shape of the heart. My last name's Love. How convenient is that? I love that you can see the shimmer in the light of the little bit of gold
adding to that excitement. This one I love so much. I will probably have it framed. Just to show you one of my favorite things
here on the wall behind me is this framed piece
with this aqua background. What if we did that right there, this dark aqua, the artwork mounted,
free-floating like that is? Then this yummy, luscious, coppery-looking frame,
insanely beautiful. I feel like this is what's
going to happen to this. I'm going to hang
it in my house. I got a friend that said, my heart art was very crafty. I was like, I don't care. She's a little bit
more of an art snob. I'm in whatever makes
you happy art snob. The hearts make me happy. Enough people say, "Oh, my gosh, I love the hearts," that I think the hearts are beautiful. Framed up, that is going
to be insanely gorgeous. Even if we just
took our abstract, pull this back out here, and
framed that right there, look how gorgeous that is. Just wanted to give you an idea there of some of
the things that I'm looking at and thinking of
when I'm doing some of this. Again, so beautiful. I think I'd like to have this one in some
little abstracts, heart art, and bookmarks. I did a couple of these. You see I've got some
different marks here. I've got some circles. I've got some lines. I did dots. I did different scribbly so
I've got a lot going on here. I love this right here. I also tried blue, and yellow, and green,
a yellow ocher. You can really see in a
lot of this right here, you can actually see the graphite separating
out in that color. Look how beautiful that
graphite is though. So you can tell there's
something else in here when that color
granulates. I love that. Then, I did one
with more purples. Super fun. What I want to do with
these projects is, I want to make my
initial thoughts. I want some bookmarks
out of these, or some little art, or some little tags, or something like that. I'm going to start with
the one that I just painted and decide what I'm
going to do with this piece. I'm going to get started in the next video with cutting this little beauty up.
6. Cutting Out Art: [MUSIC] My end goal for some of these people pieces
is to have a set of bookmarks and then I can use
them, give them as gifts. They can be included
in a card that I send to somebody for a
birthday, any of that. A bookmark in my mind is about one-and-a-half
by six inches. I didn't measure this yesterday, but it looks pretty close. That's exactly, it's
six inches [LAUGHTER] by one-and-a-half. [LAUGHTER] How crazy is that? [LAUGHTER] I was
eyeballing it, thinking, that's about the perfect size
bookmark, but there you go. One-and-a-half by
six is perfect. If you want to just cut
this in half and then cut one-and-a-half inch
strips out of your piece, then you would
have 12 bookmarks. One-and-a-half, three,
one-and-a-half, six, one-and-a-half nine. [LAUGHTER] Cut in half. You
got six and six. You can certainly do that but what I encourage you to
do is to take a viewfinder. My viewfinder is a pre-cut mat that I get from the art store. This size right here is
for a three by five, and then I also have
a five by seven. What I like to do with these, and I'm not going to use these for framing later. I'm specifically using
these to cut out pieces of art that I can then
frame in this size mat. If you want to
have some standard and then you can frame them later pretty easily and with
maybe a frame off the shelf, these are definitely
going to help you keep that size a
little more standard. If you don't care about size, then you could cut out some of your own little viewfinders with a piece of
watercolor paper. I like the watercolor paper
because it's nice and thick and holds up to me
using it 1,200 times. I just measure out
the size I want it, and cut that square out
of a piece of paper. Now I can search around and say, do I have anything amazing that I would
want to turn into a piece of art instead of
cut up into a bookmark. That's how I came up
with those lovely two that I then mounted on a little bit larger piece of really nice watercolor paper. If you're going to do
something like this, that's why I like having
multiple pieces of paper. Because then I can come up with a couple of like this and still have enough to do other
fun projects with. I really like, it's almost in a way look like nebulas. See, I really
love this right in here. Now I can look at
color and composition. I can say, there's
light, there's dark, there's movement, off
centering or rule of thirds, thinking about
stuff, and that right there. Gorgeous. I might not want to cut this
piece here into a bookmark. I might want to cut this into a piece like this that
I turn it into art. I do actually love that. This is a double frame. I'm going to go ahead
and use the outside of the frame to make it
a tiny bit bigger. I'm just going to go
ahead and cut this up. I'm just going to draw right on here and then cut
this right out. What you could do, because
I tend to not cut straight. Sometimes you could cut
it a tiny bit larger. Then that's why I have this
paper cutter over here. We can come back with
our paper cutter and cut this straight. I'd always lined it up with
the straightest edge here, which in this case would have
been the end of the paper. Just line it up. Now I know my edge is straight. I know that edge is straight
because I just cut it. I do try to get it as close to my pencil marks as I can because that's the layout that I liked but remember I cut
it slightly larger than the smaller
instead of that map. If I'm slightly off, it's not a gigantic
deal because it's still slightly bigger
than that one there. Look at that. Look how gorgeous that is. Now, aren't you glad that
you took a moment to say, is there a piece of art hiding in here
that's so gorgeous, I have to have it.
[LAUGHTER] Yes, I am. Is there a matching one
before I go to the bookmarks? If there's not, don't force it, but definitely keep
your mind open. That one's pretty, this
one looks like nebulous. [LAUGHTER] Then two,
if you find two, great, you have a pair. If you don't find a
second, that's okay. That one's really pretty too. Think I'm going to keep the one. I can mount that
too a nice piece of paper and basically the
nice piece of paper, all I do is I take the nicer
cotton, watercolor paper. I just tear the edges of that paper a little bit
bigger than my piece of art. Just cut those edges with a rip ruler or with your
ruler, and just tear them. Then I just mount
my little piece of art right here in the
center with some glue. Just glue that down. Then look how pretty that is because I like it
when the art has a finished edge and
that finished edge could be a mat board, it doesn't have to
be the white paper, but if you want to
float, frame it like that beautiful one in the
frame I showed you earlier. These pretty edges
make that finished and ready to frame like that.
Look how beautiful that is. It matches these. I have another one, I can have a little three pair, slightly different, but still
colors in that same range. I'm obsessed with these. Let's check this
out for bookmarks. Basically on the bookmarks, I just take these, it would have been easier if I went ahead and just cut
this paper in half. Let's just make some yummy
bookmarks out of this. Now look it here. Now that's pretty
actually like that. Ain't that pretty? We could maybe claim this
as a piece of art. Just be painting 15 of these, but look how pretty
that is right there. [LAUGHTER] I love these. See this is such a joyful thing when you come to your
art room and you're like oh, yeah.
[LAUGHTER] This is nine. Let's come back an
inch and a half. Let's just start slicing
us some bookmarks. Just paint like 15
of these papers. Then you can do all
these fun projects to your heart's desire. You can be even more specific. I'm doing just straight. Let's just chop it
and see what we get. Let's hunt out the
perfect design because on this like this is
really beautiful here. Do these whatever
grabs you there. I'm just using the
ruler here to try to get these all at the
what they ought to be. I'm just making them, it
was six inches long and I am just making them an
inch and a half wide. Look at that one. Look at these. These are so
pretty. Look at this one. It's got those little
almost little star rays coming down the way I did
that. That one's pretty. I actually wanted
one of these two. How big is this? Let me just use my ruler to get this
the size I want it. How about that? I want this piece here. If you cut these out and think, I love it, but the marks
aren't where I wanted it. Let me go do some
more mark-making. Definitely go do some
more mark-making if you need to because you can now fill these in to finish them off after
you've got them cut. Probably would have been
easier if I'd done it from this side since I'm
struggling here. Let me get my inch-and-a-half
right, hang on. Really let me just
cut this side here. Let's just leave it right there. Perfect. We have another piece right here, a
little bit shorter, but that can be a bookmark too, or we could just save these for other projects like,
let me show you. This is the heart art. I have this big heart. Cut out, little paper cutter. This is the larger heart. This is a probably Fiskars. Didn't have a brand name on it. Now see that's dumb.
Why wouldn't they put the name on the stamp
of who made it? But I got this at
the craft store. You can look for heart paper
cutter, stamp cut out. These are how I make
those heart art. Looking on the bottom,
I can line this right up to where I want
the heart to be like, I like this part right
there. Cut that right out. Look how pretty that is and the stuff shines
when you do that. Oh my goodness. Then I
just glue these two. Again, a very nice piece
of that watercolor paper. I just pick out how
many I want to do, how even edges all
around it, even spacing. I don't get too exact. I get them all placed and then stick them down but
those, they're so pretty. That's how I make those but that's that
Sacred Heart's class, if you want to watch that class. But in that class I'm using ink. In this class, I'm using
these cool watercolors. I liked the different of supplies that you
experiment with, look at that right there. I like this because
of the way that watercolor does right there but I liked this class because these are using
watercolors instead of ink. I just wanted you
to see that you can do something like that in just about any art supply you can
think of, they're so pretty. Let me tell you. Those
would be beautiful. Included in little gifts,
little birthday cards. This could be a gift tag. If you wanted to have a
different shape at Christmas, then you could punch a hole in it if you needed a hole in it to attach it to a gift
on the ribbon. You could put, to and
from on the back or I love you or stamps on cool,
being elegant thinker. [LAUGHTER] There's a lot
you could do with these. They're beautiful. This could
be leftover collage papers. They don't throw any of these
away because now look how beautiful these little
pieces are for collage. Once you get your
bookmarks out of here, and your art and your gift tags, [LAUGHTER] look at
all these things, oh my goodness,
these are so happy. This is my favorite right
here. Look at that. I love that. After you get
your things cut out of it, if you're going to
make a bookmark out of these, just cut a hole. This is the hole cutter that
I've had for a long time. This hole cutter is actually
like the shape of a flower. I don't even know why I have
one the shape of a flower, but it's also by Fiskars. Could also go ahead
and flip it over. Be an elegant
thinker on the back. Oh, I love it. [LAUGHTER]
Then look here. I've got some ribbons
so we could do a ribbon or like a ribbon like
this very easily. All I do is stick that
through my hole that I made, stick it back through
the hole that I made. I've got a loop on the front. Get your pieces even and you can make them any size
that you want. Then just thread your things back through the hole you
just created with that loop. Now you have your pretty tassel hanging off your
bookmark. There we go. You can also get
little tassels at the fabric store that look like little bookmark
tassels that are super cool. Look at that. Super pretty. Then top it off
with our little book darts. Because, why not be an elegant thinker and
have elegant page markers? I just put these right on the side and then
they are ready for me to use when I find something amazing that I need to mark in a page and I
want to keep on going. Now I have a book
dart that I can mark those with. Super fun. Then we got anything leftover
that's big enough for like a card or a gift card
or something like that. We can definitely use those if we've got any larger
pieces leftover. Like how many of these
sitting over here? Yes, I do. I had cut up one of these purple ones
into bookmarks and then I had some squares
about this size leftover. If you're not going to
do something with it, like cut hearts out of it, this is the perfect for
like a miniature piece of art on say like the
front of a card. It could be the front of a card. It could be a gift
tag on the back. It could be a thank you
for buying my art insert. I had several little pieces. Same thing. These can
be mini bookmarks. They can be gift tags, they could be heart cutouts. Get creative with that. I hope you have fun
with this project, making some bookmarks,
maybe some heart art, definitely some
little abstracts. I think what I'm
going to do is take all my other papers
that I painted and start hunting and
searching out some of these yummy
shapes and projects. Because I know on
some of these others, there's got to be some
other amazing piece of art that I need. I don't know. Let's see. I'm going to cut out some
of these and then I'll come back and show you
what I found. [MUSIC]
7. Cutting Up Other Color ways: [MUSIC] Let's take
a look at what we ended up with and I still
have more paper to cut up. But I just want to give you some fun ideas on
what we can do here. I definitely ended up
with enough hearts for more of these and
more than anything, I want some heart. I want a heart one in
this peach and purple, orange and purple colorway
and just to show you, I just use a bigger piece of nice watercolor paper and you can use the same
watercolor paper if you want. This Canson XL is fantastic. Just use your ruler to
create some deckled edges. I also have a real first
little deckled edge class where I show you
different ways to tear the edges of your paper
that you could check out. I basically do this right here, make it a little bit bigger than however many hearts I've got, put a little dab of
glue on the back of each heart and glue it down. Look how pretty this
one would be, oh, I love how when you tilt it, you can see the shiny gold. This is one of my
favorite projects, I do like making heart art. These you can make and take
to the gallery and sell, you could just sign it
down here at the bottom. You could give these as gifts
at a holiday or a birthday. It's something really cool
because it's handmade and it's beautiful enough to
actually frame and keep, so those are fun. Also, our little abstract art. Look at all these crazy amazing
pieces I cut out today. Again, I've just
cut a nice piece of paper and I'm going to
mount this to those. But look at that. I like that this looks like
nebulas in the sky. I like to have a pair if I can, or a triplet or something
like that because then I can have a
pair framed and hang, look how pretty that is. Each time I was just
looking at the composition. I was just running
that viewfinder around until I found
something that appealed to me and if
I found it appealing, I was trying to not put the focal point
in the direct center. Like with this piece, I loved this swash of this terracotta orangey
color with the dots. I felt like that was a beautiful focal point so I chose to offset that a little bit and have other things
coming into the frame. I wanted some light so that's offset this light part
is the lower third. This is on this middle
third going this way with two-thirds of
the paper over here. I'm trying to keep
some of those rules of composition in my mind. Look at this one, I dipped my paintbrush
in the gold box event, and this has got some
gold meshy stuff happening up here in this
part and I loved how that was light and this was dark and
we're moving our eye through the frame and we've
cut it off on an angle rather than straight. This one is so beautiful. I love that one. Then I've got more of the green and blue. Again, I was just looking at interesting compositions
and tell me if this one doesn't look like a tree to you with pretty leaves or
bushes all around. That is what
appealed to me here, I could in my mind, abstractly see that
maybe we're in the forest and this
was a tree and I had some yummy greenery
coming into the frame and that to me was a picture onto itself and I thought
that was beautiful. This would be the perfect
piece if you wanted to then draw botanicals on top of that as another
additional layer that would be nice
on this piece. That was a lot of abstract
art that we pulled out of here and several of these
pieces, I truly love. This one I truly love. Let's just see which
ones do I like the best? Love those. I love the little Nebula set. I'm going to call
this my Nebula set. This one looks like a
Nebula too with some stars. I love that. I love this one. I love the tree. I love those that are mounted so I'm having a really
good art day today. Then look at this, as I was making, I thought, wouldn't it be fun to
use some of these hearts maybe stuck on the back of
a bookmark as a surprise, look at that, be an
elegant thinker. Whatever you want to write
there, that would be fine. I could have flipped
the heart over or put the elegant
thinker on this side, but is what it is. But look how pretty that is. Offset my hole to the side with my ribbon off to the edge. That one's really cool. I've got lots of
pretty bookmarks. I wasn't on these thinking of so much the
composition or anything, I was just going with the
flow and seeing what I got. I like that this one
had pretty dots at the top and this dark
spot at the bottom. But these I was more of let's just chop it
up and see what we get. We got some super fun pieces. I can give these away in
cards that I send just as a pretty little
extra yummy handmade something that I've
included in my gifting. I can do these gifts
at Christmas also. This could be
something I attach to the outside of a present
as a yummy little bonus, I love that idea. Then look at all these hearts. Oh my God, I'm freaking
out with the hearts. Some of these are beautiful by themselves and if we
cut up some paper, like we cut this
up, but smaller, these could be
individual little pieces of art unto themselves. Get the right right in here
[LAUGHTER] We could make a smaller piece of art and I do like them smashed
up together. I don't like them super
spread out personally, but if you'd like to spread out, you could spread these out
to whatever grabs you. I think this could be a
little six heart thing. If you had somebody that had kids and they had
say, three kids, you could do like a little
stripe of three for each child or each child and its parents or however
you want it to do that. Look at this a
little nine-piece. Oh my gosh, these are so pretty. You could do this with any shape and look how pretty those
turnouts, super pretty. Just an idea on some of the different ways you
could use the hearts. You could find any
that were particularly amazing and just let them
be the center of say, a card or the art itself. Lots of things that
you can do with that. I hope you have fun with all these different little
ideas that we've come up with. The main reason why I do
some of these classes is to introduce you to
some fun new supplies. I hope if you liked
how fun these were, you check out the [inaudible]
her graphite watercolors or check out my make-your-own
graphite watercolors and make some colors of your
own and give these a go. I hope you had fun doing these. I can't wait to
see the different colors that you've come up with. Definitely come back
and share those with me and I'll see
you next time. [MUSIC]
8. Final Thoughts: Who's just obsessed with these graphite
watercolors as me? Now, I want every
pigment I can ever find and I want to make some graphite watercolors
with every pigment. What's funny is I ran out
of little watercolor trays, so I need to order myself
some new little half-pans. Because now I'm so
inspired that I like, I want to create these today I might spend the whole rest of the afternoon making some
more graphite watercolors. They're beautiful,
they're smoky. There are different than
all my other watercolors and finding new supplies
that are exciting to me, gets me really excited about creating and then unlike
what can I make with these? I get so happy and excited when I get inspired
by something new. I hope you enjoyed discovering
graphite watercolors with me over the last few
weeks where I've done some other classes
with the graphite. If you wanted to make
some of your own, you can check out
the make-your-own graphite watercolors
class that I posted. Super easy technique
to make these, I think you're going
to have some fun. I liked the extra
metallic element that the graphite gives our watercolor that
you don't find in normal watercolor. That's fun. I hope you love playing
in the mica ink. How fun is that? It's so
vibrant and easy to move around and make such
cool marks in our work? I love introducing you
to the new supplies, applying in new supplies with projects that I revisit or
techniques that I revisit. I hope you had fun just
playing today or after you've watched
this class go into your table and just play, allow yourself to create
without too much thought. Don't think about
the composition. Don't think about
the colors too hard. Just push paint around, make some marks, see what
you can end up with. Even if you look at the
big page and you're like, I don't know because I do that
a lot wait until you start searching out
little compositions or just cutting out
the little hearts, or just making the
beautiful bookmarks. Once you start cutting
those into slices, they just take on this
beautiful life of their own. They're gorgeous. I'm super excited with little abstracts that
I ended up with today, the heart art that I now have some favorite ones that I can take to the framework, and the little bookmarks, the fun little
surprises on the back. I hope you have fun just
sitting at your art table creating without expectation and seeing what you end up with. My favorite way to create. I loved having you in class and I'll
see you next time.
 DENISE LOVE, Artist & Creative Educator