Transcripts
1. Painting with One Brush Introduction: Welcome to my new class. Relax and enjoy painting with just one brush to improve your technique and
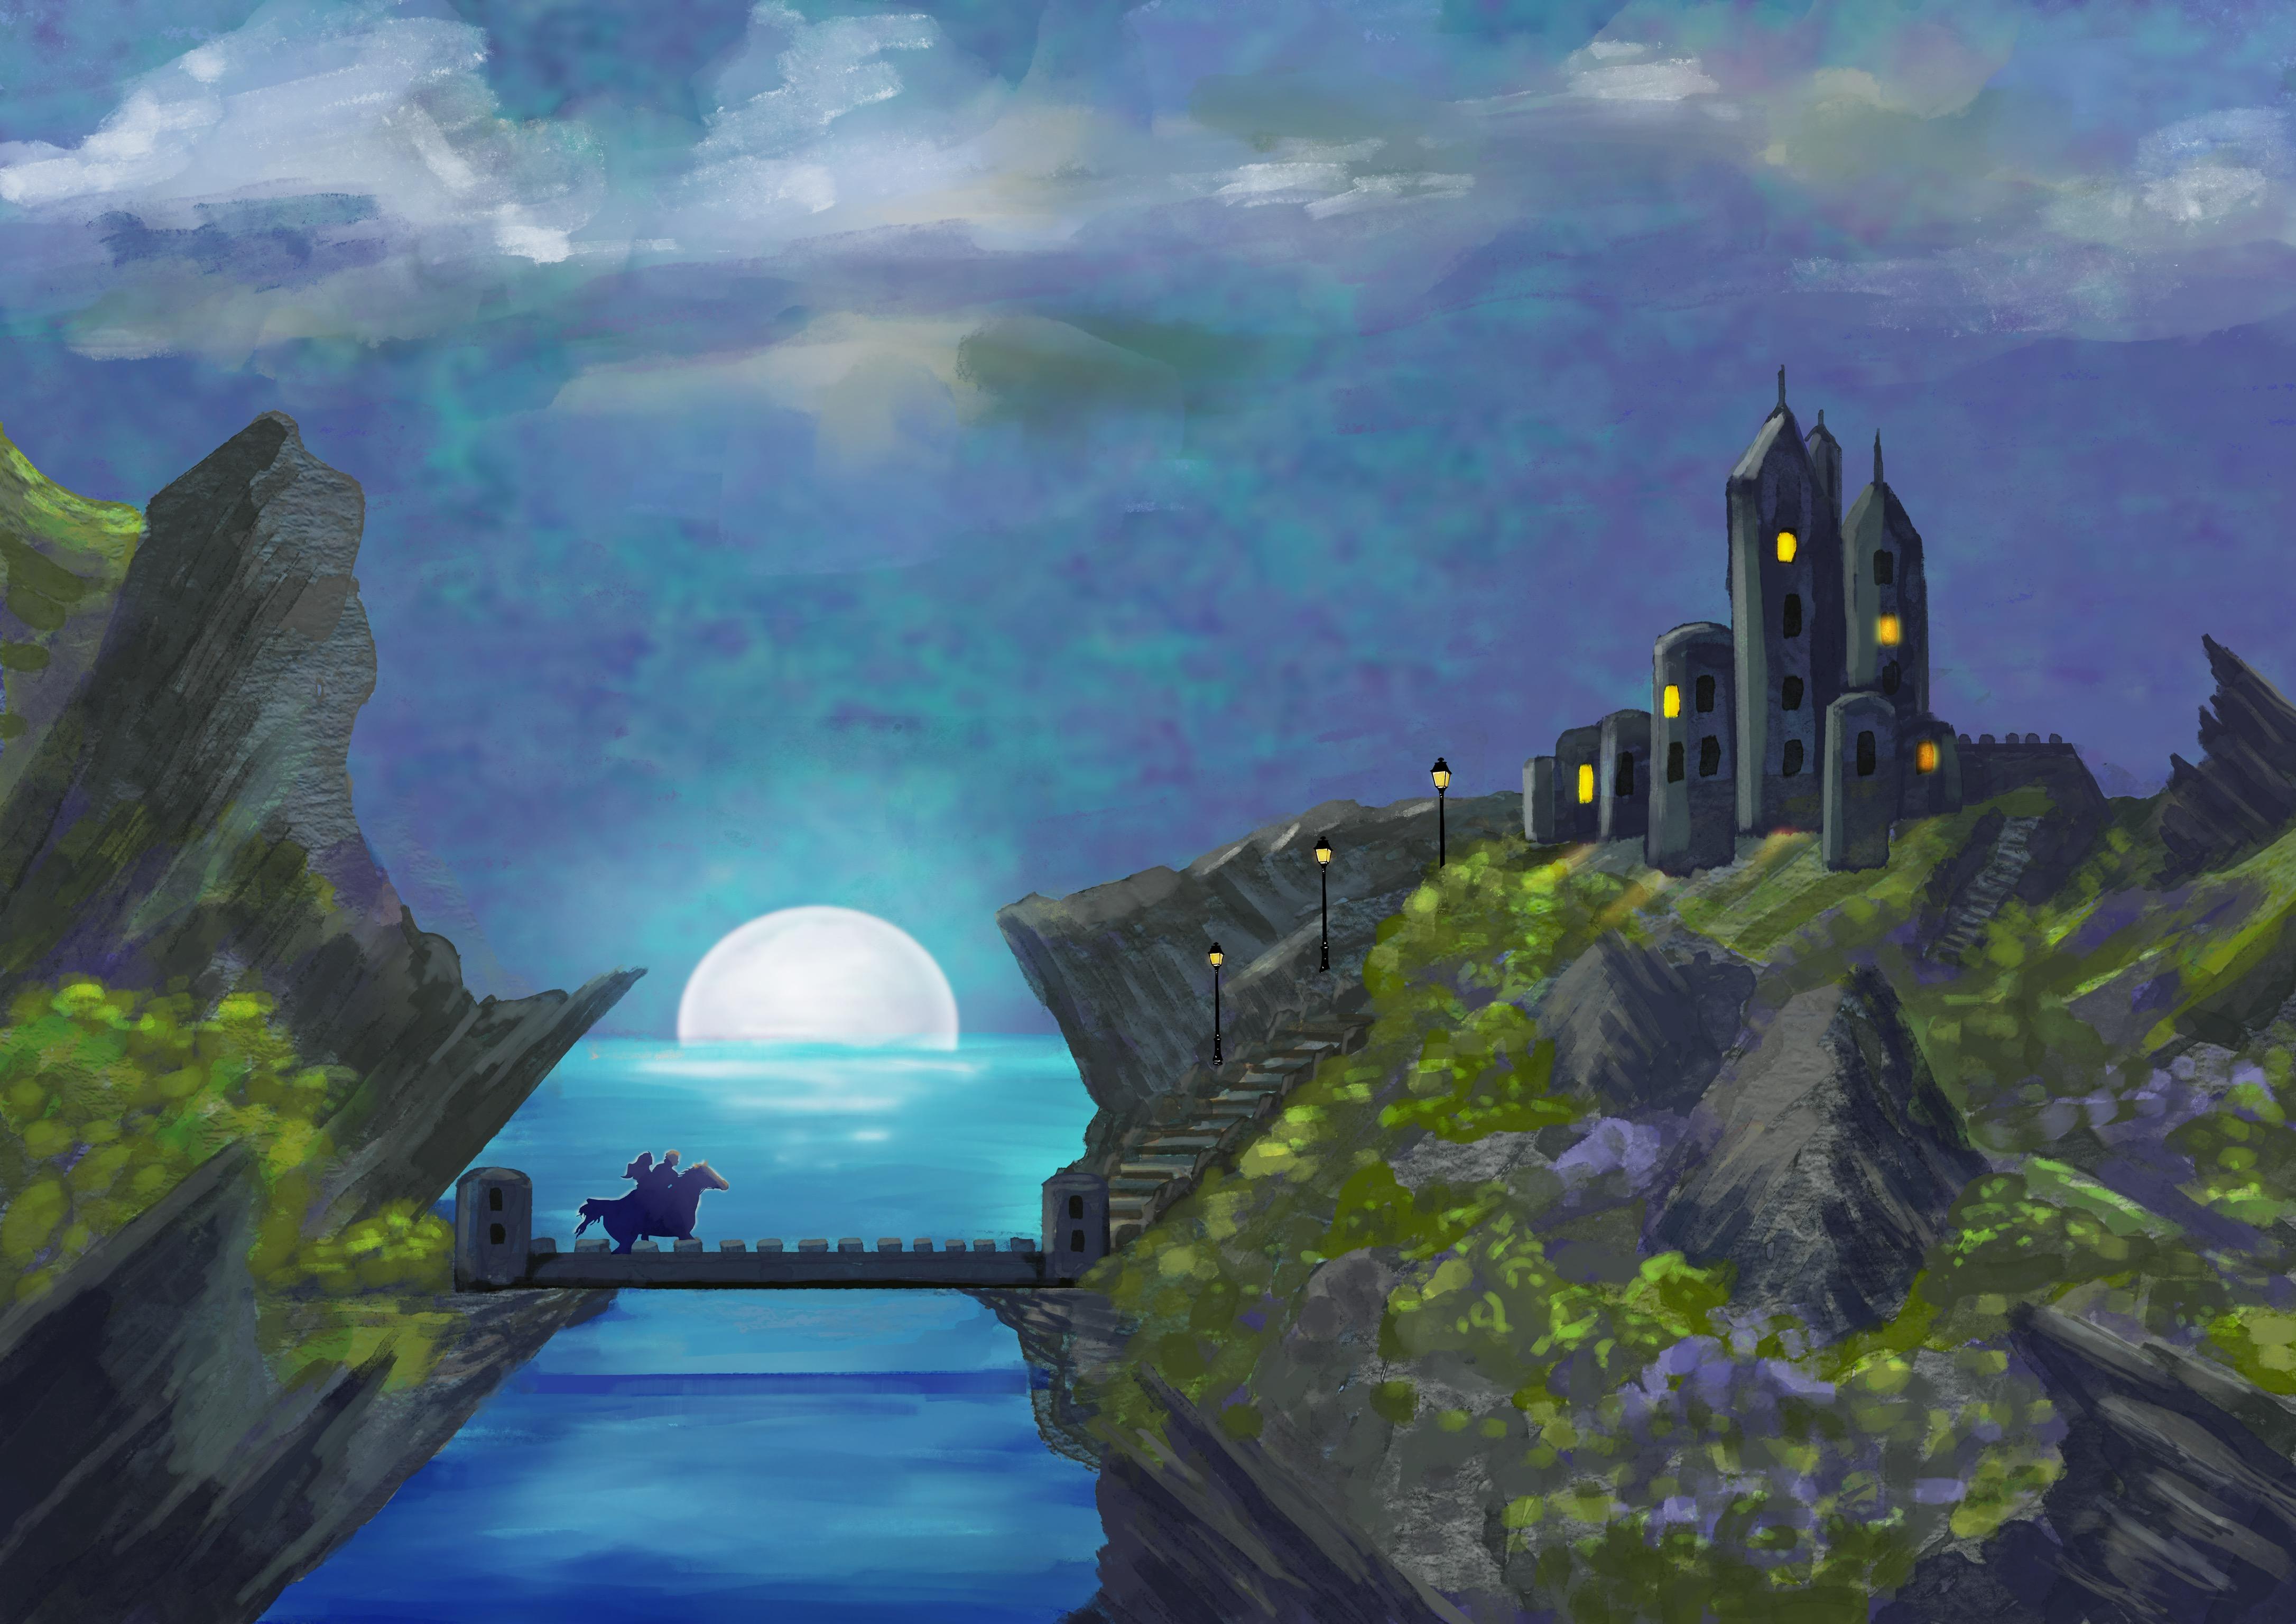
speed in Procreate. This entire concept, castle was painted using
a single brush. Why you may ask, use just one brush. When there are
thousands of brushes made for Procreate
to choose from, using lots of different
brushes takes up so much time searching for
the right one triangle. Then searching again in case
there's a better choice. Just think of the
time that takes many artists like to paint in the evening while
watching television, e.g. and find themselves constantly distracted in the brush search. Just think. Using one brush not only
saves time and frustration, but brings back relaxation
into the painting process. Remember when you first
started painting, before the flurry
of new brushes, you could relax doodle, and just enjoy making
a great picture. You miss the joy of creating the new art work effortlessly
from your imagination. How does it improve your art? Well, if you think about it, art is basically making marks
until a picture emerges. Using one brush forces you to experiment with line thickness, line opacity, line pressure,
and line direction. This process encourages
your brain to work to solve creative problems. Over time, the brush
techniques will carve a neural pathway in your brain
and becomes second nature. Try this technique and turn off your mental clutter and
free up your creativity. What brush you may
well be asking. That's all explained
in the next class. So let's move on.
2. Choosing the Right Brush: Many artists have
a favorite brush that they use more
often than any other. There's lots of choice. But here are some
features to bear in mind. That's the brush have texture. From the brush,
work successfully. In small and large formats. The Apple pencil gives
us the ability to adjust pressure to have more
or less opacity. Can your chosen brush
use this feature? Make sure that streamline. And in the stabilization part of brush creation is turned on. The brush I've chosen
to use is old beach. In the Procreate
artistic brush library. You can of course, create your own personal brush by adjusting the brush
properties in Procreate. There are many
similar brushes that also include the
properties I've listed. Have a look through your
brushes and Experiment. Choose the right one for you. All. Begin with the
old beach brush. To get started. I've included this brush
in the Student Resources. Yes. Warren brush will allow
you to do almost anything. Let's have a look at
a few techniques. I'm checking that my
brush is on old beach. Now. I'm going to
create a canvas using shapes and squiggles, doodles, and using
lots of colors. Relax and let your
imagination run free. He's lines in
different directions. And contrast those with circles. And ovals. Group
horizontal lines together to form one shape. To be easy on the eye. Move your marks towards
the middle of the picture. So the eye of the viewer is constantly moving
around the artwork. Not being led out of it. Change the size of your brush. Quite often. To
create more contrast. Use pressure to increase or
decrease texture. No idea. Doing all these marks
and shapes is to relax. And let your creativity flow and see what emerges. It gives you the opportunity to get used to the brush
that you're using. Also, always a good idea to make sure that all the
corners off filled in. This leaves the eye
into the picture. Now I'm just going
to continue to play and see what
emerges for me. As I continue to play
around with this. See, maybe the start of
a waterfall down here. Maybe put some rocks. As I work. I'm constantly
changing the size of the brush. I'm pressing lightly
to vary the opacity. So now I've got an idea of what I'm hoping
this picture will turn into or carry on
working. And we'll see. Mark the end result is. And you can see a picture
is starting to develop. At this stage. I could make another layer. Choose the blue color
and go over this. And then change the screen, screen or color dodge. Turn it down slightly. And you can see at this stage, you can begin to play about print different screens on
maybe different textures. Just have fun and let your imagination run wild
and most of all relax. Because painting is
really like a meditation. It helps us to relax, put the world's
worries behind us, and just live in the moment. So now we'll move on
to the concept castle.
3. Sketching and Blocking: Welcome to lesson two. Now you've warmed up and how to play with your chosen brush. We'll move on to painting
the concept castle. But first we'll open
up a new canvas. The size I've chosen
in landscape format is A2 in 300 DPI for
quality printing. First I'm going to go into
the background color. Make us a cream. I find it easier on the eye
than using a pure white. Now, tap that wrench icon. Tap, Add, and insert a photo, slide to the left. Now you can insert
a private photo. Choose the castle, or any
other picture that you are going to paint and
tap Fit to Canvas. By choosing a private photo. It won't show up on
the final video. Now make sure you're on your
chosen brush. My knees. Oh, Beach. Go into
the castle layer. Press the N and turn the opacity down to
about 50 per cent. Now, make a new layer. Rename that layer. Sketch with a dark color. And your chosen brush set to a size suitable for
sketching fairly small. And then just simply
sketch in the main shapes. And that's the main shapes sketched in which
he's all we need. And now we'll move on. Go back into layers, tap inserted image
and add a new layer. Now, we're going to leave the sketch layer
always on the top. Rename this new layer sky. Now choosing a sky color. It doesn't matter too much
exactly what the color is. Because we're going to put
a texture on the top layer, tap the selection tool, make sure it's on color
fill and the sky. We're going to have
it on rectangle. So he simply going
to make a rectangle. And there's the sky filled in. Now we'll make a new layer. We're going to rename this one. Ocean. Choose another blue. Go to select. And leaving his own rectangle. We'll put in the
blue of the ocean. Make a new layer. Rename this layer. Rocks. Now, choose a gray color to represent the rocks. Doses selection tool. Make sure it's on color
fill and free hand. And then just trace around until in the rock shapes. If you see on the bottom, on the left-hand side,
add is selected. So you can go on and put all the other rocks
in. Like this. And that's our rock selected. Now we're going to add another
layer and rename Green. I'm going to choose a green color that's going to represent the
green parts of the picture. Again, selection tool, freehand, and simply trace around the green parts that we'll do. They don't need to be exact because it's only
a guide for us. Now we'll add a new layer. Choose a wise pure
white double-tap on the top edge of
the color wheel. Rename the layer
Moon selection tool. And carefully trace
around the moon layer. A new layer. Rename castle. Choose a light gray. And we'll just define
going to Selection tool. And we'll just define
the castle layer. There we have our sketch and the base URL
for all our layers. Oh no, we haven't
got the bridge. So we'll go back in, add a new layer rename
bridge selection tool. I'm just going to use the same
light gray as the castle. There. There's also a path there, but I don't think we need to
put a base coloring on that.
4. Adding Textures: Now in lesson three, we're going to put
in the textures. In this lesson,
we'll look at adding base textures to speed up
our painting even more. Adding textures in
different layers gives artists a head start. Analyze the option to leave, bear some texture
to create interest. So go into layers, tap the sky layer, add a layer above it, and tap clipping mask. Insert a photo. Bringing the sky texture. And larger movies around. It's got the texture
just where you want it. That looks fine. Now, this layer can be duplicated and with
different screens with the opacity made less. But we'll do that
as a later date. So now tap the ocean, add a layer, clipping mask. Insert a photo. And I'm going to
bring in the texture I'd like for the water. Now that's going over
the path a little bit, but that's no problem. We'll just go into the eraser, make sure it's on the beach. And we'll just remove
lasts, see there. So that's our C layer. Tap rocks, add a new layer, make it into a clipping mask. Wrench key, insert a photo. And this is the texture
I've chosen for the rocks. I can almost put Fit to Canvas. And then free form. Bring the size down in. And there we have
a rock texture. Go into layers again, tap green, add a new
layer, clipping mask. Insert a green texture. This one, I want to rotate it. That's the texture there, but I don't want to
make the texture so large to fit the other side. So I'm going to make another layer, another
clipping mask, bringing the same texture, rotate it, and move
it over to this side. And then we can just
merge that layer down. We've just got one layer
with our green texture. Now I'm not going to
bring in a texture for the castle because
it's fairly small. And I think we can
paint the castle successfully just
using our brush. So there we have all
our textures inserted. Now you can find many
textures are available on the free photo sites such
as Unsplash and Pixabay. And all the textures
I'm using here are included in the class resources. So now we'll move
on to lesson four.
5. Painting the Rocks: Welcome. We're going
to paint the rocks. First, bringing your
reference picture. Go to the wrench icon, canvas and import reference. If you're painting a
different picture, decide which area you
would like to start with. Painting the concept castle. I've decided to start
with the rocks. So go to layers, find the rock texture layer, choose it, and add a new layer, and make this layer
into a clipping mask. Now we're going to work
on the rocks because it's a clipping mask is all
stay within the ROC area. But first let's make a palette. So go into the color
wheel, into palettes. Plus nu from photos and choose
your reference picture. And there you have your palette. We're going to start with
a dark color, a dark gray. We're going to paint the rocks
with three shades of gray. So I'm going to start down here and put the darker shades. The bottom of the rocks. And especially around the edges. You can see the stroke
is semi-transparent. So just paint several
times to get a dark gray. I'm just going to
paint this one rock. And I'm going to
choose a medium gray, something back to the dark gray. Going to shape the rock. Then I'll go to a lighter gray where the light shines
on the top of the rocks. And just make this a little bit lighter so you can see the
different layers in the rocks. I'm doing all three shades
of gray on one layer. Because later on we can always add more layers on
top to refine it. So now I'm going to carry on and paint the whole
of the ROC area. And I'll speed this up. And you can follow
along at your own pace. I think that will do
for the rocks tonight. But later, we'll put our
finishing touches to them. I can see here parts that
should have the green base. So we need to remove
the rock base. We can do this by going
into the green layer. Choose a green color. Go to the selection tool on
free hand, and color fill. And then we'll simply
go around those parts. It should be green. Now fill in. Doesn't matter if
it's not exact. We just want the majority
to be the green color. That's much better. I was just one more part here. And there we've finished the
rock layer and we'll move on to the green shrubs and bushes.
6. Painting Shrubs and Grass: Welcome to lesson five. Let's paint the shrubs and
the grassy areas in layers. Go to the green texture layer, add a new layer and make
that into a clipping mask. Back to the brushes. Going to use several
shades of green. And then we're going to add
in some purple brushes. I chose the purple
color as it's on the opposite side of the
color wheel to the green. And therefore complimentary. Now I'll carry on
completing this step. You will have seen, as I was painting, this tiny raise
some texture areas that needed to be smaller. There is still many
uneven edges and gaps. But don't worry as we
will clean this up and get them a finishing
touch as we progress. Now we'll move on
to the next class.
7. Painting the Castle and Bridge: Welcome to lesson six. Now we'll carry on
and we'll paint the castle and the
drawbridge and the steps. Maybe adding some extra
rocks amongst the greenery. So let's get started. So now I'm going to go into the sketch layer and
lower the opacity. So I can see what
I'm working on. We're going to go to the
castle layer after layer. But I'm not going to make
this a clipping mask because I want to go
outside the boundary. So I'm just going to
begin by outlining the towers and straightening
up the shapes. I'm going to do the same
thing with the drawbridge. Now we can go back into layers
and turn the sketch off. I'm going to carry on on the layer above the castle
and paint the castle. And then the drawbridge. After I've painted the
castle and the drawbridge, going to paint the steps and put a few extra rocks in the bushes and shrubs to
make it look more natural. So now we'll carry on speed
the process up to you. Not see rocks in the past
Stan and the drop branch. Now we're going to lie and
go above the green layer, add a new layer in. But we won't make
a clipping mask. Because what I want
to do now is tidy up the edges of the greenery. I'm just going to choose a green and start to
tidy up the edges. I can see that we're going
to have to move this layer. So go back into layers
and bring the layer above the castle so that we can go over the
rocks if we need to. That's better. So now I'm going to carry on and just go over the green parts again
and tidy them all up. And I'll speed this
process up for you. Now we've done all
our housekeeping, tidying up the greenery
and tidying up the rocks will move on
to the next lesson. And we'll work on the sky. The C and the moon.
8. Painting Sky, Ocean, and Moon: Welcome to lesson seven. Let's start with
working on the sky. Go to Layers. Go to the sky texture layer, and then go to the
Adjustment icon. And Gaussian blur. Slide along to about
nine per cent. Tap the screen and press Apply. Now we're going to go back
to layers, add a layer. And we'll rename
this one. Clouds. Still on our old beach brush. Will painting the clouds. But first let's bring our
reference picture back in. I'm going to start off with the darker bits
around the castle, the brush quite high. And then I'll carry
on and painting all the clouds and speed
that part up for you. Now I've painted in
the clouds and use the blend brush fairly sparingly to leave some of
the brush mark sharing. Now go into layers. Duplicate the cloud layer. Let's choose a screen
and we're going to go to overlay and reduce the
opacity to back 50 per cent. Now go to the moon layer, add a new layer. And we're going to bring
in, um, moon graphic. Movies over the moon. Reduces in size a little. Move it into position. Just move our reference
picture out of the way. That's about right. Now, go to the eraser brush and just erase the part that
goes over the ocean. So now we're going
to paint the ocean, go into layers and
we're just going to add a new layer
right at the top. You can rename that if you like. Ocean waves. So we're going to
start with the dark blue around the edge. And be careful to not go
over the rocks or if you do just to me,
erase those points. Now I'm going to paint
the whole of the ocean. And I'll speed this up for you. Now we're going to
reference photo at the way. Carrying two layers. Add a new layer at the top. And we're going to choose
a light blue color. The larger brush,
we're going to just paint in around the moon. Go to the eraser, erase the overlay, just
clean up the edges. That's it. Now. Go
into that layer and press the N. We're
going to go right the way down to the bottom
and choose luminosity. This is to give some
light around the moon. So going to the adjustment
tool to Gaussian blur, blurry, so round
about 20 per cent. And that gives us a
nice moonlight glow. Tap the picture and press Apply. Go into layers again, add a new layer. And we're going to bring
in the rider on the horse. It's quite small as you see. Just make it a
little bit bigger. I just put the rider into place. Crossing the bridge. He raised the tiny portion
of the horse's legs. That's all fitted in nicely. So add another new layer above. Make this into a
clipping mask layer. Choose a dark blue
and just brush over. The horse and rider. Thought was a good
idea not to use black to match or directly. Wants to be a dark blue. Towards the bottom. Then we're going to go to
a light blue just to show the light from the moon
shining on the horse's head. Maybe on top of
the rider's head. That will do for our
horse and rider. Will move our reference
photo out of the way. We're going to put in the lumps. So add a new layer. Bring in length picture. See the lamp is quite small. Let's just make it a
little bit bigger. There's our first lamp. Duplicate. Its place in a second lump. Duplicate again. Placing a third lamp. Now with the third lamp, we have to erase the part
that goes behind the bushes. So that's our lamps pudding. Now we're going to
make another layer. And this is going to be
the lights in the castle. A nice bright yellow. We're going to approach
it a little bit of that light in the lamps. And then in the castle. Just choose them randomly. But makes sure there's
an uneven number. Just always looks
better if it's uneven. So what we've got 567, just going over them again
to give them more density. Back into layers. Now we're going to duplicate that layer and
choose an overlay. Press the end. And it will probably be screen color dodge. I think I'll put
some color dodge. But I'm going to go back into the previous layer and make the color a little
bit more orange. That looks better. Now we're going to go to the adjustments and
choose Gaussian blur. Back to the upper layer. Gaussian Blur. And just move it up
about ten per cent. Just to give a little
bit more glow. Tap the screen, press Apply. And I think we've
finished this point. You can sign it if you
like. There we are. There's a concept castle
painted with one brush. Now I'll move on to the wrap-up.
9. Paint with One Brush Wrap Up: Thank you for taking
my one brush class. I hope you've enjoyed it and
found the process relaxing. By including textures. It's quite easy to use one brush only to build up your picture. I would love to see your results and
encourage you to upload your finished Creation
so the whole class can enjoy your work. Please take a moment
to review my class. This helps me to improve
and gives me encouragement. If you'd like to
know more about me, please visit my website, www. Color story.com. That's color spelled
the English way, including a U color story.com. Thank you, and I'll see
you in the next class. I started my creative journey
writing books and audios, as you can see here. Then I returned to
my first love art and created all kinds of art. Finally, I have 20
years of mind, body, and spirit articles to help my readers navigate
complex world. I think you'll find it
very interesting to visit my website, color story.com.
 Christine Sherborne, Artist and Author