Transcripts
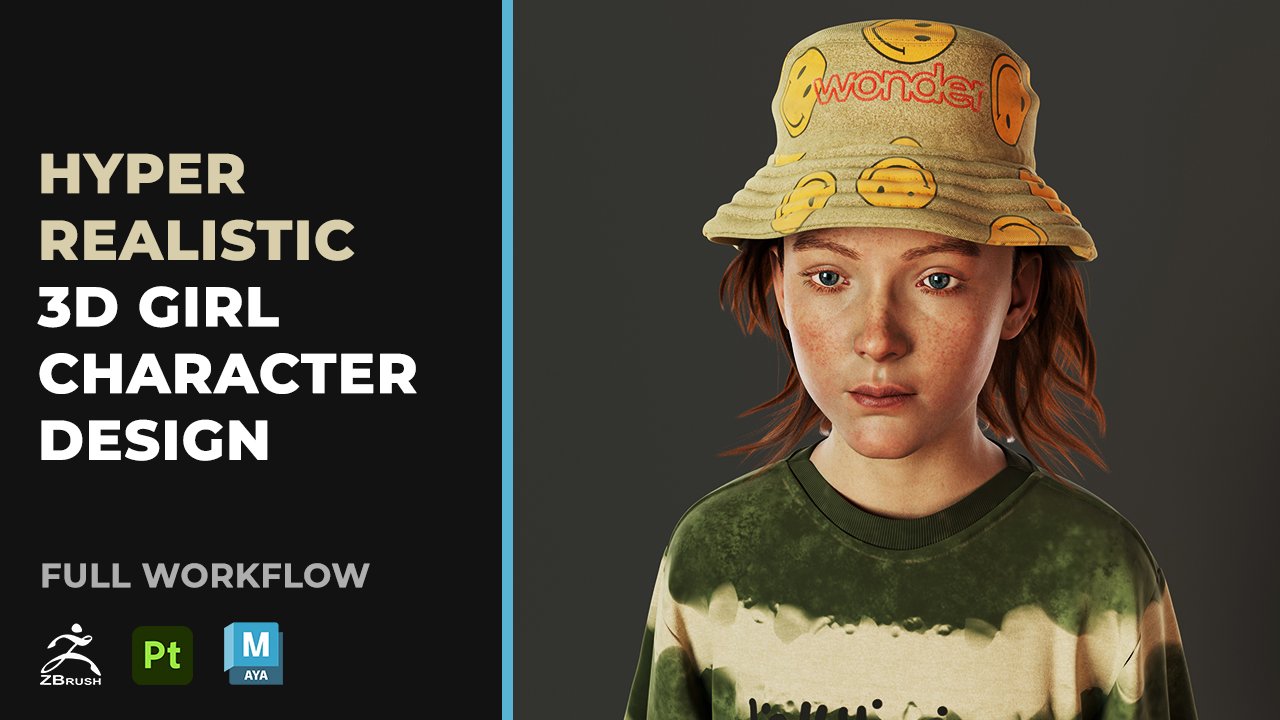
1. SNEAKER PROMO: Hi, I'm Clay he John, a TD character and
prop artist with over five years of experience in the VFX and gaming industry. In this class, you
learn how to create a realistic view of Nike
sneakers from start to finish. Using industry standard tools, we begin in Zbrush
where you sculpt the hue with
accurate proportions and fine surface
details such as laces, stitching and leather folds. And we move into
sbtanT D painter to build lifelike textures, apply materials, and
introduce color variations. Finally, we render the sneaker a Momosettbg using
lighting and shading to achieve a polish portfolio ready presentation,
what you learn. You learn how to
sculpt footwear forms and details in zebrush, how to create realistic leather, fabric and stitching
in subtanTPainter. To set up lighting materials
and rendering a MomosetTbg a complete workflow for three D product visualization
and prop design. Who is this class
for? The D artists interested in footwear design, dtascopors looking to expand
into product modeling, game artists and
pro creators who want to improve
realism in their work. Intermediate layers
familiar with basics of zebush subtansPnter,
and rendering software. This class is packed with professional tips,
practical workflows, and creative
guidance to help you build a portfolio
piece that stands out. Without further ado,
let's get started.
2. 01 Nike Base Form In Zbrush: Welcome by guys.
So in this lesson, we're going to be
working on creating this retro Nike Dlo retro, or the retro Nike
is niacin here, so I'm going to win
this entirely inside of entirely inside of Zbrush. Then I'll do a I'll do texture
inside of sbtnpina and then most likely final
rendering in MomosetTbg. Okay? So let's jump right in. So I'm going to open up Zbrush and I'll go
to my light box. So I need the base
to start with, like a human foot
base to start with. So I'm going to be
using default in here. Let's start with this
male default. Click No. Then we should have
this in here now. Okay. This is the base mash we are
going to be using both. We need to work on the feats. I think we have some
subdivision level in here. There's use a good
layout for this. I'm usually using
the default layer. I prefer working with the
default default layer inside of default workspace
inside of Zbrush. I don't have any specific or distinctive customized
workspace for Zbrush. I like working with the default. So let's carry on. I see that this should have some subdivision level in there. So I would like to remove that. Let's take this down to the
lowest subdivision level. The lowest subdivision level
should be fine for this. So I'm just going
to do Daily tires. I need to remove this floor.
I need to remove this floor. Let's work with this. Let's see if we have some UVs in here. There no UVs in there. Yeah, no UV is in there, but don't matter
that mode because I only need to kind of cot
out the part I need, which is the left foot. I only need to work with
the left foot in here. Let me do duplicate
of this first. Then I'll use let's just see the normal regular Mx AsO for this. Control W for that. That'll give that a
separate poly group, Control Shift click. Let's do Delete Eden. So delete ding here, let's go down to modified
topology, delete Eden. Yeah, I used to work just fine. You can see who's
in between that because we need to turn
on Dub side for this. Let's turn on Du side. Set up our camera also too. I think, let's just use 85 millimeter focal
length for this. That's fine. This
we can work with. Then let's do a two
group for this as well. I think I can delete the top
pattern and the top part, let's delete this top base. Okay. Then I'm
going to duplicate this let me put some
more space in here. I think we have a few cares
was just see something small. All right, then
I'm going to have done a duplicate
for this already? Yes, I have IDs duplicate. Let's work with this.
There's an auto group. To symmetry, I'm just
going to select this. Control W, give us a semi poly group,
control shift click. Let's do delete Eden
again, delete Eden. All right. I think this should be fine or do duplicate of this again. And I'll save my file.
Let me save my file. I'll just rename this to retro Nike Snickers. All right. That is fine. Moving on. It's not that we have a backup, I would like to slice
this up to begin with, but I would like to get some
more resolution to this, so let's subdivide
this to begin with. Okay, that should be fine. And the next now I'd like to do would be to delete Lowell. And then let's do close hole. Let's close hole. Close the hole we have in there. That is fine. Ship let's say the
poly group for this. Let's just visualize this, how we extend it some more, get up close. That is fine. Put some more space in here, which is this way. I think I extend it
out way too much. Let me squash this
down some more. That should be fine in
between, so it should be fine. I still want to see the number of polygons
we have in there. Another thing we need to
do will be pull this up control down control shift. Oh, I need to move
this up outside again. I'd like to use the trim cove. Okay? So I need to kind of trim the parts we need for this. So let me start by trimming
this somewhere around. Let's see, somewhere
around here. Okay. Then I'll trim this somewhere
around here as well. And do that. Let's see if
we can use from the top. Okay, something like
so should be fine. This will work just
fine. I just need a base to work with. Then let's go in and turn on the previous
one we had before. So we need to start making
adjustment to this. So I would like to
extend it out some more. Let's use the move brush and extend this out the
way we need it to be. Okay? Extend out here as well. S F CtW you give the entire t one single polygroup?
Yeah, they should be fine. Then we can start making some more corrections
to this who is up. In this part, I'd like to
get the general proportion of the sneakers in there. So let me max out
the lower parts, see if I can max out the
lower parts in here. Okay, maybe a little
bit a little bit more. Let's grab some of these parts. All right. Blow this one. I need to grab the back part also, some of the back parts. Blow this out. Ship. So now I can pull this out
the way I want without having been without
being too conscious of kind of pulling out the lower part of
the soil also, too. So let's just keep
moving this sale kind of capture the shape I'm going for the smooth smote as well. So I'll just keep
pulling things up. So for right now, I'm not really using I'm not really using the reference
inside of Zbrush. Mainly just doing this by
mainly just eyeballing this. I'm kind of eyeballing
it just to figure out the right height for this. Take down this most intensity. Okay. So I'm just going to
use this kind of capture the height I'm going
for and do that. Okay. I need to get the right amount, and then we should be good. So we're going to we're just
going to keep modifying this until we get the
right result for it. I think I can go
to my Clay Brush. Let me see if I can add
some more clay in here. Okay. Reduce the intensity of
the clay brush. All right. Okay, this is slightly
way too intense, though. Smooth the top parts
out, smooth this out. So this out. Let's look at our reference
from the top view. Let's get this on the same. This is the left side. Something pretty much like so. So we need to do some rotation. Obviously, you need to
do some rotation now. So I would like to undo that. Clear the max,
rotate it this way. Let's get something
straight on to work with. Let me see some corrections
we need to make now. Back to the more brush. Extend
this out out some more. I kind of tape out the back, so let me reduce the brush size. Okay? That should be fine. All of this going to
modify later on though. Let's just get the shape
we need in here first. Okay. Increase the bro size. Move this in. All right. Look at this from the top again just to be sure when
you write this. Okay, we're getting something. I'm going to smooth
this part down. Smooth this part down.
Alright. I'll need to fill up these parts,
smooth this down. I'm thinking to flatten the
lower part down, though. Let's just get something that looks somewhat
like that for now. We need to make some
modifications for the bag. So let's go to the bag view. Okay. So this one this fit
is still looking more like a natural fit, but once you kind of move any feature that makes it look like a natural fit and not features that makes it
look like a sneaker instead. So you still have some
modifications to do in there. Stand this out. Okay. I use the clay brush to
fill up these parts. Smooth. Okay. And I need to I
think at this point, I might need to sub I'm
need to kind of use some dynamic brush for this or dynam do some
dynamics for this instead. So let me make sure this
part is flattened out. Flatten this part down. Okay. You still have some
issues around this part, so we need to use
the move brush. Move this down, this flat down. Okay? Look for another view. Let's get this is a good view. That's fine. Okay. Let's find the same
similar view for this. So in this view, I know
definitely that it's supposed to be something around here. It's supposed to be
something around here. I think we might we need now
to add dynamite to this. Let's first get
this sharp angle in here first smooth this down.'s mom this down. Okay. So let's do
dynamis for this. Let's do dynamte for this
and then we'll carry on. So I'll go over to geometry,
I believe, Dynamsh. Let's use the folds there. Deford is there is
not looking too good. Flex need to make
some modifications to this with move brush, move this slightly higher. This replace, we need to
move higher some more. Okay. I have some more. It looks more like a boot, you need to fix that.
Extend this out. Extend this out. Get a good shape in her. Yeah, I think, so
it should be fine. This part sea feels like it's
not completely dear yet. We use the broad size, extend this out some more. I do be too much. I think I'll need to
fill this part up some more smooth that down. Fish a bit crooked. I don't
want it to look crooked, so let's go in. Shouldn't look too crooked.
We the move brush. Move in place some more. Okay. Yeah, that's that's
more like it. Smooth this down. Okay,
then let's do a dyna match. I'm going to increase
the values for this. Let's do something around 500. Oh yeah, totally forgot. The value is supposed
to be smaller. So let's go smaller. At 40 now. Da Something
doesn't feel right. Something doesn't feel right. Increase this. Okay, yes,
we're getting something now. Let's do a value
of 1,000 instead. Let's smooth the mash litu. Smooth the mash lit
to then dyna mash. Why do we keep having this
return back to the default? Okay? Increase a bit more. Smooth dyna mesh. Okay, we have this at polygons, 40 k polygons, nothing
that should be fine. Then we can keep making modifications to this
sSpi please do that. Let's look for another
angle to this. So just a matter of
switching between various angles until you kind of get what
you're looking for. I pull this in. I pull
this out some more. Okay. That should work. So
just top parts now, okay? That is fine. Let's smooth this down.
Increase myth intensity. Let's do some more
smooth across this. Okay. Smooth this out. Smooth this out. Smooth the
lower parts down also. Okay. So we're kind of working
on the silhouette of this. Let's get in close. So I'm looking at
this silhouette now. I'd like to extend
this out some more. Extend this out some more. So good to look
at the silhouette of this and kind
of merge this with our main reference just to see if we're on the right track. Okay, top part looks tilted
up a little bit more. I think we can tip
that up as well. But just look at the general
silhouette and just make sure we are doing this
accurately enough. Okay? That's fine. I'm going to
use the Max lasso now. Max asu. Max this front part, invite the max, blow
this out some more. Okay. And I'm just going to
lift this up this way. Play the max. Let's
max these parts, invite the max, blow
this out some more. Okay. Orient this to the center and then sew this up a bit more. Okay? Play the mark, go in and
then do some more smooth. All right. Use a trim dynamic. Polish this. Just get something
a bit flatter out of it. All right. I'll smooth
that down. Okay. Coming to the front,
smooth this out as well. Once we capture the
silhuett properly, then we cannot begin to do some separation codes in there. For now, let's get the shape as loosely as we possibly can. Move these down some more
to the opposite side, move this and get them
somewhat the same. Okay. Yeah, that should
be fine. Sm that down. Let's check the
silhouette again. Let's check the silhuette
from the top view. Let's check out the silhouette
looks from the top view. Then we can compare this with
our main reference also. Okay. I see some corrections
we need to make. For example, we need to rotate this a little
bit more this way. Let's zoom out. Okay. I think since this is
coming along quite nicely, I think we need to make some
adjustments in here as well. To start with, I'm going to
use the move brush bring this in increase the bro
size, get this well. Okay, put this out
out some more. Okay. That should be fine. Now let's look at this silhuette
on the front. Let's see how we can
make this better, can push this out some more. We can stand this out some more. General proportion
is looking fine. Then this part here,
we need to push in, to get that curve in there because that cove
needs to be in there. So let's do this from
the bottom view instead. Push this in. Okay. I
believe we should be there. You should be there and
now smooth this down. Okay. I think we're in a good
place. Just checking again. The silhouette needs to look good because from
the silhouette, we're going to start cutting
out the shapes we need. So let's make sure we can let's try perfect the silhouette.
This is a soil. It's a good one. Okay. It's not the foots
we need though. It's the left fits, but
this is the right fit. So but we can still
use this though. Wet regardless, we
can still use this. I was going to push
this in some more. I'll push this in
some more as well. All right. It's fine. You should work just fine. Bend this this way, also. So I see we can do is to add
more fleshiness in here. Make this pull this out. So more smooth brush,
smooth this out. Okay? Some more
smooth this down. Let's check this again. Hess in a good list. All right. Continue that also in reference. Like, so undo that, undo that. That's not properly done. Think something like
so should be fine. Okay, I need to get this angle
in here, very important. This angles to be a planar
change needs to be in there. Let's look for okay,
it should work. It's a very subtle
planar change in there. Subtle bot very much in there. Okay. And I'll smooth, use the
brush size, smooth this out. Smooth out as well.
Smooth, as well. Yeah, swell. The
back also. Okay. Smooth the top part also. Blend them down. Awesome. I think this is fine. So let's use our silhouette
again and just check. We need something for
the front though. We have, let's let's
see how this should be. Let's look at this from
the top view again. There's some unevenness
around here. Let that up some more. Let's look at this
from the top view. Let's get the same angle to it. Smooth this down, and
then we check again, get closed. Let's see. Try to make sure
if my silhouette is good enough to work with. Basically, just checking
this just to be sure. More brush moved
slightly out a bit more. Okay. Check this out again. I think I can use let's
use the DM standard brush, kind of mark out where
the soil should be. Trying to just add
some definition to it. Let make sure I'm doing
this accurately enough. Okay. Do rough, but that's fine. We just need something
that highlights that. So definitely just
know where it is. Okay. Move brush. All right. You should be fine.
Smooth them out. Okay. We still need to flatten
this part out, though. But for now, let's
just make sure the overall proportion
is spot on. And I think this should be fine. You doesn't need
to make any other corrections to this, we can. But I think for the most part, this should be fine.
Move to the side. We have already tilted the
lower parts. Get in close. Okay, I think we need to bend this down some
more down some more. Okay, that should be fine. We need to move the back piece. We need to leave this
up some more, like so. Let me do a quick save. I
think this should be fine. I think at this point
now we can start. We can start cutting this
apart and then figure out how to get most of these
panels out, right? So let me just save
this save this. So in the next
lesson, we're going to carry on and then start cutting the parts we need for this, and we'll
move along from there. So I'll see you guys in
next lesson, bye for now.
3. 02 Refining Base Form In Zbrush: Talk about guys. So now,
in the previous lesson, we created a base mesh. So I'm going to continue
from there and then keep working on a mesh and try
to get this to look good. Alright, so let's continue that. I think I like to make
some corrections in here by just pulling
this out some more. Okay? That should be fine. It's not looking
straight enough, though. Looks rather odd. So we need to let's get
this at a good angle first, and then I believe we
can fix that from there. Okay, they're not
completely straight. That will fix in
a bit. But let's make sure we have this
where it needs to be. Let's do a smooth. Let's try and get them
on the same level. He something like so
it should be fine. Then we go to Shift F. Let's
see the ply frame for this. Then we need to kind
of cut out the saw. We need to cut out
the saw for this. So let's make sure we are using the reference properly for this. But I think I will
still need to kind of tip to the front
a little bit more. Well, let me max the
front part a bit more. Blow this out. Blow it out
some more, blow out some more. Make sure this is centered. Tilt this up a little bit. Yeah, I think that
should be fine. Let's say a few
discrepancies in here, but we can just try and find
a common ground to them. Okay. So now I can do to get
this a bit more accurately, we need to paint this by hand, so I'm going to use the pen
to less paints out the soil. Okay. So I'm just going to
go around this this way. So in this partlar
part, precision is key. You want to be as precise as
you possibly can for this. This is going to serve
as a base for the soul. So make sure you are
as precise as you possibly can for it. All right? Don't do that I cannot be
bleed it out way too much. Okay. This should be fine. As well get close. I want to make sure this is
not bleeding out too much. Even though it bleeds out, it's not supposed to bleed
out way too much, so let's just flood
fill the inward parts. Make sure increase the blow
side a little bit more. All right. I believe
this should be fine. Okay, let's grab a
few more in front. All right. Awesome. Yeah, that
should be fine. Let's make sure we have a
duplicate of this base. Let's do duplicates. Okay? That's fine. Then Shift F, Control W to get a
separate poly group. Control Shift click on that. Okay. Let's make sure. Let's
I defeat for now. High dots, Mark
this inverting max. We need to We don't
need to mark this shift F. These are a
separate poly groups so we'll just do
a polish instead. Let's do a polish instead. Let's go in and we
do polish for this. Let's do a polish. Let's go in and do
tone of these dots. Let's do polish by group. A few times should
be fine. Okay? I think at this point, now we need here probably just fine. We need to separate this out. So country should click on that. Let's do delete Eden. Let's turn off isolate. Let's turn off
Isolate. Let's make sure the previous
plan is visible. Something like that
should be fine. Okay. Will this sold out,
I'm going to polige little bit more just to clean some of the sharp
edges for this. So deformation, make
sure you don't torn off. Let's poli little bit more. Let's get something
quite good out of this. Okay. Polige some more. Alright. Now let's do delete ding. So let's go over to modified
topology, delete ding. Okay. You should be fine. Let's bring everything back out. Let's see where it's
hidden in there. I'm trying to see if I need to extend this out a
little bit more. Let's extend it out a little
bit more center orients. Let's give this out some more. Yeah, that should be fine. So low these out. Okay. I think it should be fine. Deletes Eden. Why do we have a duplicate We have two parts, but only need one part. I think I accidentally
did mirror and weld, so let's grab the other piece and then delete that.
Different poly group. Conclusi click. Okay, the
delete Eden. Here that's fine. So now let's do a
Z match for this. But first, I will need to
make a duplicate of this. Let's make a duplicate. Let's work with the
duplicate instead. So let's do zero masher. I like to turn off adaptive. D down the adaptive size down. Let's do detected keep groups. Okay, that is fine. Then let's take this down. Let's do a value of two instead. Then I'm going to o out I do
zero, take down the smooth. Let's do a zero mash. Okay. This is fine. I'm just going to check if there's
any issue on the edges. So to check that, we
need to go back to the deformation and
let's just do a polish, a tiny polish and then
we check the edge. This is good. A good in
here. Go to the lower part. Let's see where we get. Okay. Yeah, this should be fine. This we can work with in here. By surf for one issue though, Sef for one issue, that
might be a problem. The lower part is
not completely flat. This part is supposed to be
completely completely flat. But at the same time, it
might not be a major issue. So let's see if we can
flatten that out first. So age polish. Yes, Sod try to flatten this
lower part down. Okay. Get some flat surface in there. Yes, I think that
should be fine. Let's polish for this,
polish some more. Okay, I should work. Now, get something
somewhat flat now. But we still need to do
some Z remsh for this. So let's see Z match this again. Let's go off Z mash. So we have this at 900
polygons, which is fine. Take down should work
just fine for this. So now we need to extrude this. So let's go out of isolate. Make some modifications
to this first. Let's use the move brush. Put this front part
out some more. Put the backside out
some more as well. Okay. Then I would need to create
a thickness for this. Let me get close. Let's create thickness for it. I like to isolate this. Let's use the reference
just to give us a good idea as to how
thick we want this to be. We'll just go to dynamic
sub div, turn that on. Take down the smooth, increase the thickness,
which is way too thick. Take this down. We're getting something now, take this down some more. I think this looks like a
favorable place to have this. This seems favorable. But we kind of check
just to be sure. Now, let's add some
segment to this. I would like to add
two segments to this. Let's go out to isolate. Let's see what we have, Shift F. Okay? Now, that's something that doesn't look good
enough in here, so we need to make
corrections to that. Because you can see
this front part is a bit slimmer
than the back side, so we need to make some
adjustments to that. To do that, we're not
going to use Control. Let's apply this on first. Make sure it's applied
first in there. Okay. If you do smooth for this, you should be getting
something somewhat like so we should be fine. Except we need to make
some corrections to it. Okay, so Control shift click on this max this inverting max,
bring everything back out. Then I will need to make
some adjustments to this. Let's blow this
some more. Center. This should be up this way. Bend this down. I should
be a bit flatter, bring this down some more. So you just kind of eyeball
how high this should be. I think it'll be
slightly higher as well. Okay. I think I might need
to scale it out also. Undo that. Supposed
to scale this in. I can say I kind of folds in. So I need to string
this in instead. Undo that. Oh, no, redo. Redoley the marks,
mark this out again. Blow the marks once
and string this in. I should kind of fold in
this way a little bit. Okay. I think we're in
a good place now. So if we should subdivide this, we should be getting
something somewhat like SO, we should work just fine. So let's bring
everything back out. So, what I want to be is
that anything of any block, we kind we need to kind of
start pushing things in. For one, we select this. Let make a duplicate
of this duplicates, how that duplicates and I can start pushing
things back in. So it should be where
they need to be. I think we have
something is kind of poking out. Oh, undo that. You still have the
marks in there, so you need to
remove a new mark, lay the mark that's in there. Then start pushing
things in place. Okay. Push this in place. Get those in in as well. Now, the front part might be tricky because you
need to do that right. And I think I folded
in way too much. So let's get in and then make some more
corrections to it. Two Control Shift click. Bing everything back
out in via the max. Blow. Let's give this out some more. Okay?
That should be fine. Bring everything back
out. I think I can just use the select H police
to just polish this in. Just polish this in
it should be fine. Maybe undo the entire
out sin actually. Let's get this back to
the way it was before. Then we'll just use
the polish instead. And if we're putting
this in on your front, we need to do this it's
a bit more accuracy. So let's get this click okay. Do this a bit more
some accuracy in mind. Or undo that. A maxing
we have in there. This one is quite tricky. We need to make sure we're
doing this correctly. Okay? Like, so Trim
dynamic, trim this. Trim this as well. Here, as well. Okay. Trim this as well. Trim this. Rduce a bros size. Trim here as well. Less smooth. Smooth this in. Smooth also as well. We still going to use the move brush and then
push some things in also. But I think we're kind
of getting there. We're getting there
slowly, slowly, but definitely getting
there with the move brush. Undo that. Use the
move brush now, and move some things in. Okay, I see the back partner
is actually way too high. We need to fix that. Let's
just get this in first. Y. Okay. Okay, as well. So this I'm not completely
satisfied with T yet. I just still make some
corrections to it. Doesn't look quite there yet. Front part looks rounded. There's something to keep notes. The top part not
toot not to rounded, then the light for it to stings can get some good
variation in there also. So it looks as close
enough as possible. So let's go back in there. The Ws can flatten this down. So let me slow this out first. Make sure. Let's
see. Let's grab. Okay. Let's see. So it's just a matter of just eyeballing it and then trying to figure out where
you need to fix. I need to push this down first. Okay this on the
floor here as well. Get this on the floor.
Okay? That is fine. Then the general
thickness for this still trying to capture
this as best as I can. I think we need to
go back in here, blow the max, scale
this back, undo that. Do we have subdution
levels in here? Take this down take down
the subdution level. Okay. Rotate, center this. Undo that, blow this
out one more time. Get this back in the center, scale this out some more. Okay. It's a bit more. I think this angle
should be fine. I'll bring this down some more. I think somewhere around here, bring this down, rotate,
rotate this way. Trying to get a very good
balance for this. Rotates. Okay. I think
somewhere around here, we push this up a little bit more. Not too extreme, though. I think something somewhere
around there should be fine. Something somewhere around
there should be fine. Okay, let's go back to this. Let's try and march that. Let's try make sure
we march that. All right. Take down the bro size, bring this in front. So more. Yes, I think I know where
we need to fix now. Let's extend this out. Push this in. Get this down. Okay, I know where
I need to fix now. So better just get this down first and push them
where it needs to be. Okay. Put this front part forward. So more, push this in. Okay. I need to do a very
aggressive smooth in here. So smooth this want to smooth this front part some
more here as well, smooth this down.
Keep smoothing. Okay. Keep smoothing this down. Push this forward.
Bend this down. Bend this down as well. I think I move the back
part way out way too much. In let's see if we have
this properly in the front. Let's push this forward. Okay. Then we get this down.
Let's push them down. Try and fill up
most of this gap, just a little int
of gap in between. Who is out, who is down. Okay? So when we see a bit
foul of the robots, getting somewhere,
we just need to make quite a lot of
manual adjustments. So this since I know it's
not actual reference to the blockout
instead of Zbrush. Basically just
doing this by high. So the idea just show
you guys the process. You can use whichever method
that works best for you. I need to reduce Zbrush size. Smooth this down. Okay, I
think this should work. This will work
just fine. Then we can grab another piece
out of this also. But let's just make
sure we silhouette, we have the silloutte
where it needs to be. So I'm checking the
silhuett now from this black and white view in there just to be sure if everything's
working correctly. I think for the most part, we
have something good enough. Except for the bag that
still looks quite old. So let's go to the back view. Try as much as possible to capture the essence
of this h bit more. Okay, I see where I
need to pull in now. I'll just use the brush size, polish this in some
more, smooth this down. Okay. Something somewhat,
so it should be fine. Let's check this full back view. Let's see. With the move
brush, center this. Okay. Yeah, not bad. Not bad for a bees. Not bad
for bees. Still some courage. Still a lot of work
to do in here, dougo. It we are coming
along quite nicely. Yeah, this is looking good. So let's see which other apiece
need to grab out of this. But before we do,
before we move on, I would like to see
where the edge is. So let's go into this, delete
our the duplicate of this. I kind of capture the essence
of this a little bit more. Okay, clay the max, select this. Invert the max. Blow some more. I'm going
to max out and do that. Let's use the Mx las Max lasso. I'm going to max
out these parts. Blow the mark some more. Okay. Max out these
top parts. A bit more. Blow the mark some more. Do that blow. I need to make
sure I capture all of this. Blow just once. Okay,
on this part now we need to do polish into
the polish for that. So let's go to our
deformation sub. There's the polish. Undo that. I want to mark this but I don't
want to polish this part, so let's mark that part out. Polish. Because I want this part to be a bit
rounded. Undo that. Polish a little bit more. Okay, clear this out. I think this should work now. Do we need to do the
same for the back? I think not Okay. I'm going to max out these
bits. Blow the marks. Let's do polish by,
that's way too extreme. The dots. Just a
little bit more, and we should be fine.
Bring everything back out. Yeah, I think that
should be fine. So now we need to cat
out another piece. We need to cot out
another piece for this. So I'm going to go back in here. I'm going to separate it out. There's the duplicate for this. Let's see which other piece
we need to get separated out. Yeah, a few number
of pieces in here, so we need to kind of make sure we're cutting
out the right one. But I would like to
quote a major one in here to begin with. Let me find the D view. You need to eyeball this part. I can't really see
anything in here, though, so I'm not
entirely sure. No entirely sure what
should be in there, but there's something
we can at lead you to actually I would like to get this as a
separate piece entirely. So I'm just looking I'm looking
at the white parts now. I'm basically just looking
at the white piece. I'm trying to figure out
which bits I need to cut off. Okay? Okay, I see it now, all of this, all of this as well. Okay? Yeah, I think I know
what we need to cut out now. I know what we need
to cut out now, so the issue I have is just on the top parts.
This part doesn't look. Okay, I see something now. Oh, it's just threading across. I just treading across. Now this exactly covering my view of where I feel
I need to cut out.
4. 03 Sole Form Extract In Zbrush: Covering my view, so
I'm not entirely sure now. I think I know what to do. We're just going to
quote out a good portion of that, and then
we should be good. So basically, what I'm going to do here now will be go in. Let's isolate this. Let's make sure this is back on. Then I need to use
the slice cove. Let's use the slice
cove for this. F slice Cove. Okay. All right. Let's go in and
visualize what we have. I think this bit is good. Control Shift click
to remove that. Okay, that is fine. Then for the top parts, we need to make some
corrections to this. I'll need to grab
the parts I need. Let me go in and
then check again. Okay? I'm trying to
figure out where it ends. All right, so I'm going
to use the MACS pen. Let's use the MAX sin for this. Increase the brow size. So let's do something
somewhat around here. Okay. I undo that. Reduce the bros size. Now
grab the inward parts. But we need to do make
this a bit cleaner. So let's grab all of this. N to make this cleaner, grab all of this as well. Fill up the inward parts. The tricky part is
this part, actually. This is where the
tricky part is. So let's grab something small. Okay. Check this. Let's see if
you're doing this correctly. More of this. It's going to figure out if this is in the right place or not. So let's go to the top view and let's visualize
this from the top view. Let's view it from
the same angle. Let's do it from a similar angle just to make sure I'm
doing this correctly. Okay? I think I'm going to
clear this part out. There's a straight
line around that bits. All right. Isolate this. Yeah, I think
we're in a good place. I believe we're in a good place. So I'm trying as
much as possible not to make this
look like a boot. It's isn't supposed
to look like a boots. But we need to lower
subdivision level to actually make some
modifications to it, but I think for
the most part, we are getting something
good in here. Okay, I think I will need
to use the move brush. Move this out slightly,
move this out slightly. Okay, that should be fine. Same here as well. Move
this part slightly. So Shift F, Control W
for that, control shift. Let's bring everything
back out, clear the marks. This is just the
bit I need. This is the bit I need for this. So let's do deletes Eden. Let's do geometry delete ding. Modified topology, deletes ding is the side to one for this? Do side is to one for this. Okay? So what we need to do
now will be to polish this. But I would like to make sure on both trying to push this
down on the other end. W move brush, get close, move these down, so we merge them completely
on both side. Okay? That's fine. So now we
need to polish this. We need to polish.
Let's polish this. Shift F. I feel like I should make some more modifications to this, move this out some more. Move this out some more. Okay. Yeah, I think we
can work with this. Let's check the back.
Let's check the back view. Let's see how this folds in. Push this a bit tighter
this way. Smoother down. Now, let's do polish for this. Let's do polish by
group, polish the edge. Alright. Here, this is looking good. This is clean enough. Then we're going to we're going to let me get enclose a bit
more. Yeah, that's fine. So now we need to make a
duplicate out of this again. Let's duplicates. Then let's z mach this. Et's Zoe's see what the
topologies Z give us for this. Ship F. I think the front bits, we need to push this
down some more. Okay? That is fine. We done as well. Get
this down straight. Let's get something
straight out of it. Okay. Let's do a polish by
group again for it. Polish by group. All
right, undo that. I need to mark this top part. I don't want to pull it by a group affecting these top parts. Blow the mark. I want you
to affect the lower parts. Clear this out. Now let's
do Z match for this. Let's get Z mash on here. Checking it just to
see I think it creates another layer on
top of that, okay? So let's remash if F. Let's
see if Zimash will do a very good job for
us before we start dising this up into
separate poly groups actually get good
topology out of this. Let's go back to geometry. Z mash, take down adaptive, drag this down,
detect HK groups, take down smooth,
su a value of two, unless you mash Okay. Right off the bat, we get
something interesting enough to work with. So let's do half. Let's go halfway. Get
something a bit smaller. Yeah, this is fine. Yeah,
this is actually quite fine. We can definitely
work with this. What do you march this again? Yeah, this is fine.
This is fine. I'm kind of questioning
how far out we need to have Let me go
through the top view. Trying to figure out how
far down this needs to be. I think it's in the right
spots, it's in the right spots. Still use the move brush.
Use the move brush. Move this in some more right. Yeah, this should be just fine. So we're in to add
sickness for this. I'll make some modifications
to it as well. So let's go out of isolates, heat F. So we need to start moving
things in place also for this before
adding sickness. So let's go back to
our main reference. I see some elevation in here. Okay? I think to begin
with, let's go back. Let me go back to
the sole. I think. Let me you from the sole. The front part is way too feel like it's way
too point test. Let's extend this out some more. Let's get something a bit
rounded in there to begin with. Then we come back to
this, we compensate for it by just extending
that out as well. Okay. So with this now, we can
move this a lot better why because we have loop topology to worry about in here so we can move things a bit
more accurately in here. All right. It's fine. Move this back, pull it
very tightly on the edge, tightly on the edge as well. The opposite side,
use the bro size, move this in in as well, compensate for it here on
the opposite side as well. Okay? Yeah, I think we're
in a good place. I think I went overboard, let's push this in some more. Okay. So in here now, we have a lower
topologist to work with, so we can do some more
precise work in there. So let's use standard
brushoO I'll just dig in. Dig in here a bit more.
Okay? That is fine. Take down this son's intensity, do genesis moons in there. Alright. So creates
a nice silhouettes in smooth this out some more. Okay. Let's look for another
reference on the side. Same standard brush,
we can elevate this front part a bit more, make this a bit more ungod
Make it a bit more angle, just a little smooth this down. With more brush, move
this back in place. Oops, do that. Smooth this down. Okay, I think I need to
move this down as well, squash this down a
little bit more. Can just smooth out the top
parts. We should be good. Yes. Awesome. I think this
isn't a good place. Smooth this down. So there's any correction
we need to make, we can just keep
doing this from this. So I'm just trying to
make sure the silhouette looks good before
adding sickness to it. Okay? I think I'm thinking
of moving this closer. Let me see if I need to get
this up some more. Let's see. I think the shape share for the most part is
actually in there. **** for the most part
is actually Okay, I I can see something now, so the move brush, we can I think we need to let's increase
this smooth intense. T smooth this down some more. Do that. I think generally, we need to move things down
some more, and push this in. Smooth this down. Okay. So looking at the
silhouette now, and I see a huge gap around there that I need
to push the pull down. So with the move brush, we can just squash this
down a bit more. Go to the opposite side, squath it down a little
bit more as well. Okay. Let's go underneath this. I think I feel like I need
to do something in here. Let me see. Let me squash this down to begin with,
then bring this out. Okay. Yeah, that feels
a lot better now, except you need to make
some modifications to it and do that. Okay. Nope. I think I need to use
the move brush for this. I'll move this up. Up, clear that out. Let's blow the mark
some more shift F. Okay. Drastic move bots I needed to make sure that
part looks good. I think we went a
little overboard. Might need to smooth
some things out here. Let's lay this out, let's
isolate this again. Since some smoothing
are in order, Md smooth this one again, but let's just do a
polish Okay, select this. Do that. Okay, bring
everything back out. All right. I think this is the part
we need to polish as well. We need to just do it
smooth, undo that. Undo that, take down
your brush size. Let's let that beat again. I think clear this out. Let's use the max lasso instead. Okay. Blood undo that. Blood is just once.
Let's do it polish. That was way too extreme. Maybe I should use my
let's do polish instead. An polish should be quite
better blow this out some more. Do polish instead. So we have some control over it. But there's a hole
lo part around here. I want to fill that up. So
let's use the clay brush. See if we can fill that up. Smooth this down. Okay.
Bring everything back out. Let's see. Okay, I think
we're in a good place now. I think we're in a good
place now, this should work. You use the brush instead and
put this down more brush. Put this down some more. Okay. Yeah, I think they
should be fine. Let's go back in leave
this up some more. So don't mind, I'm
trying to make sure this is as perfect as it should be. Trying to make this as
perfect as it should be. I still need to
go into the soul. Oh, great. Great. We have an
issue in here now. I need to undo that. That's where the light from. So get that fixed. Control Shift click.
Blow this out just once. Okay. We set this up a bit more. Okay, up some more. A little higher. I think this
should be fine. It the max. Get this down a little bit more. Yeah, I think
this is fine. This is fine. This is fine. Let's go back to this now and then compensate for it
on the edge and do that. Produce the bro size. Okay. Get in close. Compensate
for it around here as well. Let's use this blink
material instead. I think this is a
whole lot better. Come in, pull this out some more out some more. Yeah,
I think this is fine. I think we kinetic
ness to this now. Kineticness to this but let's just do a duplicate of this. So sub two, let's the duplicate.
Let's they duplicate. So let's go and duplicate this. I will duplicate this. I need to figure out how
thick we need to get this. Let's look for a
good angle for it. I think a good enough thickness would be something
fresh should be just fine. Move this down. Mod this down as well. That is fine. Then
a lesser thickness. I'm going to go
over to geometry, dynamic sub div dynamic sub div then we do dynamic take
down the smooth sub div. Trying to see if I need to
add an edge loop across this. I don't think
I will need to. I don't think I don't
think I will need to. I think I probably we have
a g loop here already, so we have something
close enough. Le let us add one there, so BZ. Let's add an loop across here, something tight there
should be fine. Not too tight. Let's
gray some more gap. Maybe some more gap in
between. So it should be fine. So let's do some
thickness for this. Add some thickness, not
thick enough, increase this. Way too much. Maybe a little bit
more should be fine. Just a little bit more. Let's increase the value. Let's go in and adjust
the values in there. Let's do four. This might just be
way too thick, maybe. Maybe. Let's go back. Let's do two instead. Two
is just way too slim. Let's do three instead. Let's do three instead. This should be fine. I
would add one segment. Two segment, let's
do two instead. Then click on Apply.
Let's subdivide this. Let's see what we
gets. Yeah, this will definitely work.
This will work just fine. Let's bring everything back
out. Yeah, this is fine. The only issue we're
having here is that it's extruding outward instead. Extruding outward instead. Let's put negative
value in front. Let's see if this is going
to extrude inward instead. Nope, it's not extruding
inward, unfortunately, so we need to let's
apply this again. So we need to move
things back in some more or we can do extrude
with Z modular instead. So we can do extrae
with Z modular instead. I kind of like the
way this is though. Let's start by pushing things in if we can't get this right. If it be too much of an so what else going to do it
somewhere else instead. It's not really too
much of an so though, we can just gently move things in place,
and we should be good. Get a good angle on this. Okay? In some more in some more
in some more here as well. Okay. Go to the opposite side. Let's find a good camera angle for this so we don't
mess things up. Okay. Move this in in a
sell here as well. All right, that should be fine. So if we should
subdivide and do that. We have this here apply. Let's get that applied. If we subdivide this, should be getting
something like so. Which is good enough
to work with. Okay. Awesome. So we already
building this piece by piece, we're going to build
this already have something interesting
enough to carry on with. So if we need to
make any adjustments to this, we can still do that. Let me go to the
top, see if there's something else you
need to adjust in. Okay, reduce the subdivision
level. Create the bros size. I think I will need to mark
this part out to begin with, load the marks, go
from the top you Okay. Let's see. I think I can
let me get some space in. Let's bring this closer closer, slightly closer as well. All right, I think
that should be fine. I don't need to go
extreme. This is fine. So next lesson I going to carry
on and then cut out some. What are the deep Net piece
you need to cut out would be what's this event called? Forgive my my lack
of knowledge of this should we call it go for something?potla piece that's supposed
to be in here. So I'm going to blog
that in so we get this space filled up so that space doesn't
look too empty. Okay, so let's carry
on the next lesson. Bye for now. But
5. 04 Foot Front Extract In Zbrush: Come about guys. So
in previous lesson, we were extracting and then making sure all the pieces all of these pieces
come in together. So let's carry on from
where we left off. So I would like to create a piece that goes into
the center of this hole. It tirely sure what
it's called, though, but I'm sure you guys kind
of understand what I mean, so to do that, I would use let's use
a plane or a cube. I think a cube should
make better sense, so create a cube. I need to I think I need to
increase the space in here, close it out a little bit more. Wout too much gap in there. All right, that's fine. So let's go to insert mesh. I'm going to using
the Q cube instead. We have subdution
level here, estier. This should be fine. We can definitely
work with this. So I'm going to go over
and then do under splits. Let's do split on Mark point. Let's go back to move. Select. I would like to extend this out first and get this roughly
where it needs to be. Let's get this way
it needs to be. Definitely extend
this out some more. Okay. That's be too much. I think roughly around there
should be fine. Let's cash this down some more. Okay. Yeah, I think this
will work just fine. Let's just duplicate of
it, so we have a backup. Then I need to subdivide
this a bit more. Before I do that,
let me get in max. Let's use the MAX last instead. So max these parts, inverts. I'm going to squash this
part down some more. Like so it should be fine. Okay, then I'll subdivide this. Let's bring the other
piece back out, subdivide. I need to extend
this out some more. Okay. You should be fine. I need to select this half. Also select this half. Let me subdivide this again? Let me select this half
and this half as well. The blow, invert the max
and I'll push this down. Yeah, this should be fine.
Get this down some more. Maybe that's way too much. Blow this out one more
time. Get this down. Okay? Now, that should be fine. Without the marks, extend
this out some more. We can clear the marks now. Let's bring this closer. Is the bro size. This needs to be
in the right last, so I need to move
this up some more up some more route to
the opposite side. Get this up some more. Out some more here as well. Okay. I think that should
be roughly fine. Okay. Yeah, that should be fine. Just trying to see
the length for this. I need to kind of check the length for
this to be sure if the length for this is all good. So let's use this instead. Okay. Okay. I think it's a
good angle for it. I would max out these bits. If I max, blow the mark, get it centered, rotate
this up some more. Pull this back down,
rotate out some more. Okay, that should be fine. So now we have
something here now. I think it also has
the right amount of thickness that we
can work with too. You just need to pull this down down a bit on
your opposite side. Yeah, that should be fine. And let's move on
to something else. We're still going
to circle back to this and then create
some more detail for it. But for now, I think
this should be fine. Let's check the to view. Let's see. I think
I might need to extend we do that I need
to extend the wings, extend the wings out a little
bit more. That's fine. Okay. Here, that should be fine. Play this out and select
this pict F. Let's do duplicate of this.
I need to extract. I need to extract something
else. Get enclosed. Let me see. Okay, yes, I need to extract
this black piece that comes across this way. So I need a duplicate of
this so let's duplicate. All right, isolates. So I only need this clay
max only need this front. I only need this polly frame
or this ply group rather. So I'm going to
do a delete ding. Okay. Before I do that, I need to subdivide this some more so I have enough
resolution to work with. So let me divide this 31
k. Let's do delete lower. Okay. Let's do one more, delete lower, it
should be fine now. Then I can shift F, select this poly group, and then do delete dent. Here's a delete Eden.
This will be fine now. Now we can just quite easily grab the portion we
need now for this. So I'm going to be using the Let me go over
the slice use. I think the slice curve
should be a good one. Slice curve should
be really good one for this slice curve. So we need to do this with
a lot of precision in mind. Okay? This needs to be as
accurate as possible. So let's make sure we do
this accurately enough. I'll start from somewhere around there to begin
with, around the. So I'll click Out,
click out again. All the should be fine. Nope, that is in the
wrong place now. That isn't the wrong place. I think I need to maybe I need to push this
down some more. I think I might need to
get this down some more. Let's go back to the original
Bing everything back out. I would hide this Okay, I'm thinking I need to
bring this down some more. Let's see. Yes, definitely
needs to come down some more, so I'll come back in
with more bro selected, increase the bros size. Just the brussed a
little bit more. Pull the down some more. Yeah, there will be some
issues around there, so we need to compensate for it. Brian bringing some things down. Okay. This down enough. Undo that smooth. Oh, Mo this down. Take down the smooth intensity, and then just smooth this down, push it down some
more. All right. I think somewhere around
there should be fine. They increase the blood size and generally push this down. Okay, let's bring everything back out to go out
of so low mold. Select this. This we need
to bring down some more. Okay. That should be fine. That should be fine.
Leave this up. Leave this up as well
on the opposite side. Get us with too
much. Undo, undo, reduce the blow size. Okay. This up. Not too much, though
because we're going to have some strap in between them. Is supposed to be
in between them, so that should be fine for now. So I'll need to delete this. This copy that's wrong one selected this one
instead. Not this. Not this. Yeah, this is the
one this is one I need. I need to delete this
we use the new one. Let's use the new
one. This we need to hide, select this piece, duplicates, isolate,
then subdivide Okay. Delete while. Get back in delete Eden. Yeah, that's fine. So now we can slice this up
the way we need to now. Make sure I'm doing this right. Don't do that. Let's
do this again. N to make sure I'm
doing this correctly. Nope. Undo that. Let's even use the Max lasso. Undo that. And I think the
co brush should be better. So I just need to
get these rights. Nope, wrong, please,
wrong please, let's move up a bit higher. Undo that's not correct enough. Okay. I think this should be
in the right spots. Let's see. Yeah, I think
this should be fine. You should be fine where it is. All right, so now let's move on. Let's see what we can
grab out of this also. You should be fine. So now let's separate
this part out now. Let's make another
coat from this. So who go over this week. Isn't the same curve brush also. I think this should be fine. We still need to make
some corrections in here, though, but I think
this should be fine. This one looks
good enough to me. So undo that. Let's
exclude that. Then we need to grab that out. We need to do a slice for this. Undo that's looking a bit odd. But I think I just
using the max No. Let's do this instead. I need to get this precisely. That's just the
maintenance to get this as precisely as I should. No, bring everything
back out. Let's see. No, so far out. Let's
bring everything back out. I think we exclude this. This is the bits we need. I'm just going to
slice here. Undo that. That starts from yes, let's
start from here instead. This should be fine. Okay. Yeah, something like
so it should be fine. Yeah, it should work this. Let's be everything back house. So the only piece I need is only piece I believe
I need is this piece. Alright. Yes. This is
all the piece I need. So let's do a delete ding. No, not delete ding. So I'm going to do a
duplicate of this actually. If I do deleted let's
do a duplicate. Let's hide the duplicates. Then now we can
do a delete eden. So delete ding That's
right. That's fine. So now let's add some let's
visualize this first. Okay. Yeah, that
is looking good. Let's check in this again just to be sure everything's
working correctly. Yeah, that seems fine. Everything seems to
be working correctly. Let's go back in here. Okay? Oh. Now, I see a mistake now. I see a mistake now. I think this one needs to
be a bit higher. This needs to be a bit
higher, so undo, undo. Can we bring everything
back out? Yes, we can. Undo Oh, we can't undo that. So I think I would leave
I need to redo this. Let's grab this grab this. I need to invert the marks. I need to invert the marks.
I need to go back to my selection selection. Come on. Selection su. So these past news kind
of go back and forth, just trying to make sure
you're doing it correctly. Okay. I need to group all of this
as one single piece now. I repeat this again, but good thing we
already have the mark. We already have the mark, where we need to kind
of code this out. So we undo that. Let's go back to slice Cove. Let's go back to our
slice cove, slice Cove. It's reptive process just to get this to look as accurately
as you possibly can. So I want to do this again. So I see where I'm
having issues. No, not looking good enough. Okay. I think we're in a good
place now, I believe. Let's bring everything back out. Let's see the difference we have compared to the
previous one, I think. I think this is in a
better place, I believe. Let's check from
a different view. Yeah I think most certainly
in a good place now. So let's go back in
there. Hide this. We still have a strip in
here that we need to erase. Okay. So this is everything
that we need. Then we can do delete ding. So let's do a slight
polish for this. Let's do slight polish
polish by group. Polish a little bit more as
well. That should be fine. Now let's zer marge this. Let's do Z match for this. So before we do Z
match for this, let's create another duplicate. All right. I should be fine. So let's do a duplicate. I don't want to
duplicate it right now so let's do zero mash for this. So geometry is mash adaptive. Turn this off. Keep group
detects edge, take down smooth. Okay, let's think fine. Let's say this to two. Zero mash. Okay. We have this at two, but we need something
lower than this. Let's go Alpha zero mash. So we have this at 900. I think now hundred should work just fine for what
you needed for. So I'm going to keep 900 for this. Bring everything back out. Then I'm going to do an extrude. So this time around, I will do. I'm going to extrude
this out instead. By default, we're extruding out. So let's just go back to
dynamic subdiv dynamic. Maybe way too thick. Way too thick. You
need to reduce the thickness for this shift F. I think it should be
thicker than it is right now. But before we do that,
let's make adjustments in here and move this in some more. So we're doing
this in real time, so there are no issues in here because we're
doing this in real time. Is going to very much
update this in Okay. I might need to
bring some things up a little bit more, though. I think should be fine.
They should be fine. Yeah, there should
be fine, as well. Yes. Oh a bit higher. Hop bit higher. So let's add some more
thickness to this. Slight thickness
should be fine. Okay. I think I can live with this. Yes, we can work with this. So shipped F, let's go in. We already have to segment in there already, which is fine. So we can keep this shipped F. Yeah, this we can
definitely keep. So if I subdivide this,
it should hold up. I should hold up quite nicely
without any major issue. Apply before I apply this, let me move this in some more. Take down the subdivision level. Move this in some more. That should be fine. Let's go on the opposite side as well. Since already pulling out with
toomch let's make sure we get that in and down in as well. Okay. I a little bit
more. That's fine. This we can work with.
Let's get in close. Let's see, I think, I
think, yeah, this is fine. This work just fine.
Let save my file. Yeah, I think we're
in a good place. Let's see something else we can. Let's look for something
else we can create. Okay, I see. I need to
extend this out a little bit more because the mark
so marks this part out. Invite the masblow the mark
some more with more brush. Gonna extend this out some more. Pull this up some more as well. Okay? That's fine. Extend this out as well. Put this out some more. Okay. I think that should
be up a little bit more. Pull it out. Yeah, I think
this is a good place. I think that should
be fine. All right. We need to get this flatten
out a little bit more. Shouldn't be poking
out that much. Okay, that's fine. Next, I would like to
create this piece on top, where the shoelace who
should be going in. I'd like to create that next. Let's look at this from
the top view. Okay. Interesting. Let's see. We know that weather
ends already so let's just grab that out. So I will just go back in, before I go back in there, this piece that
we're creating now, the piece we need,
let's shoot them down. So go down sheep,
shoot this down. Select, shoot this down, select, shoot this down. Let this so shoot this down as well. Yeah, awesome.
That's fine. Let's go back up to I think this is the one,
that's not the one I need. This is the one I need. I believe, no. Yeah, it is the one I think
that's the one we need. Or, this is the one we need. This is the one we
need. So everybody give this the same poly group. I'm just going to I think
the pattern for what we had before actually helps
to know where things are. So this will be fine? So
let's get that strap out. Let's see. Let me do a cut here first. Try to figure out as much as I think as much as
two should be fine. Do that. Actually,
let's do it duplicates. Let's do duplicates because
we're going to need a duplicate for this to
cut out some model part. So let's slice this somewhere around here like
this to begin with. Okay. Hide this. Now for the top parts, get some space in here. Let's see where we need
to grab this out from. I think we can do something somewhere around
here should be fine. Yeah, I think somewhere
around there should be fine. If we need to kind
of move things, we can easily move
things around. Okay, select this,
go to the top view. This should be sliced this way. This also sliced. Let's get something straight
on this way as well. Grab this, grab this, inGreate some more space. Let's go and invert
the selection. With this, let's do
delete ding now. So go over geometry. Let's do delete ding, modified topology, delete Eden. Okay. I think it should be
roughly fine where it is, but we need to make some little adjustment to this as well. So I'm going to move
this up some more. Do the same also in here. Okay. Yeah, that should be fine. And let's go over
to deformation. Though we don't
really need something that long all the
way to the end, though because we're
coming close up in a doesn't go all
the way to the end, so we need to cut
out some of this. Let's cut out some of this so
we can just do this in her. Let's go back to our
slice cove, slice cove. Let's just do tiny coat
there should be fine. Okay. So I'm just going to select
and select this as well. Then we'll do delete ding. M fact topology, deletes ding. So for this now we
need to go over apology this All right. I would like to mark south but I don't this
part to be affected. All right, grab your part. We need this to be applied on. Okay, grab this as well. Invert the mark, blow
this out some more. Then let's polish and get
those straightened out. Okay, lay that out. Yeah, this should be fine.
This will work just fine. So now next thing
we need to do would be to 00 match this. Let's go over to geometry. Over to geometry, extend
this out lead two. Then zero masher, Turn that off. Okay, it is fine. Let's just set the value to two. Zero mash. Okay. We can do half of this. Let's go off half. Verbs at one k. You can go
lower. Let's do half again. So 500, 500 seems like
a good value for this. 500 seems fine. 500 will work just fine. Okay, so let's bring
everything back out. So now we need to do an extrude, so let's go in and
do an extrude. But this one definitely
needs to be on top. Let's do. Before we do an extra, let's bring this out.
It needs to be out. Let me max this
part out for now. Let's work with
this on this side. Okay, out a bit more as well. Invite the max pull
this out out as well. Okay. Yeah, This should
be fine for now. No, don't do that.
Let's do this when we're afraid of de
ickness in there. Let's do this after det
iness. So clear that out. Let's do go dynamic
stop div dynamic. Obviously, too thick, so we need to take down the thickness. But thickness needs to
be a really good amount, a really good value.
This is fine. This value should be
fine. So in here now, we can manually pull things out. What are you going to
pull out what we need to pull out in here and
then we should be good. Awesome. This is
fine. Okay, Ship F. But this one needs to be
buried in. That is fine. Is buried in. But thickness for this for pulling this
out is way too much. Let's put this down some more. Should still be flat down, put this in, put this back in. Okay, I think it should be fine. Put this down, put this down. Put this down as well. I think I need to
select this instead. This is the one that needs
to go kind of flatten down. Almost invincible itself, it's supposed to make
it not even visible, so let's put this down. By lots, select this. Put this down some more, completely hide it if possible. Then we get this down. So more right, get this
also down some more. Down way too much. Select
this, push this down. Select this, bring this up
a little bit more. Okay. Bring this down, select
this, bring that down. Okay. Which piece is this? Oh, select this, leave this up. All right. I think we're in a good place. Yeah, certainly in a good place. This will work just fine. Probably llevate this
a little bit more. On the opposite side as well. V this up a little bit more. Yeah, that is fine.
So I think we also need to make some I don't know if I need
to extend this, let's extend this out
a little bit more. Let's tend we have some
bend in there also, so that's way too much. Okay, I think this
should work just fine. Yeah, that should
be fine. It's not supposed to be
completely straight on. You can see a curve
in here also. Let's try to simulate something
like that, also in here. Okay. The lens make sure the
lens is accurate enough. Let's put this in cover
most of those gap. On the opposite side as well, get the lens a bit
more accurately. Okay. Yeah, that's fine. That is fine. We
can work with this. So let's apply this on. All right. So the
next piece we need to create this one that goes
all the way to the back. So we'll do that in
the next lesson. By for now. Before we move on, let's shoot this down as well. So down shift shoot this down. Okay, so buy for now.
6. 05 Foot Side Extract In Zbrush: Come back, guys. In
the previous lesson, we worked on this
front leather piece. So I'm going to carry on and
then keep working on this. I'm looking at this, and I feel like I should extend the
length out a little bit more, make it a little bit longer
than it is right now, so let's do that. But first, you need to put
all of this into a folder. So let's create a
new folder for this. Name this to Nike. I just put sneakers in there. Snickers. All right. Then we drop the other
mesh in there as well. So let's just drop this in. Okay, that is fine. If you select a separate piece now and we turn this so you can see how we
completely hide everything. So let's go back in
the let's transform. Let's do transpose sets. Okay. I'm going
to center orient. Wh center at all. Extend this out a little
bit more. Undo that. Move the sod back. Extend
this out some more, a little bit more
should be fine. All right. Let's compare this. I think it's a bit too much. What we did before was
actually fine, should be fine. Yeah, this should
work just fine. We're going to do some
general adjustment to this buffer now,
this should be fine. Okay? One that I'd
like to do would be let's turn this off, okay? So Shift F, this is the
piece you need to select. I like to make a little
adjustment to this. So let's isolate. Co Shift click, Max this,
bring everything back out. Shift F, invert the max. Let's blow this, then leave this up a little
bit more this way. Do that actually. Let's do something like
so, then pull this up. Yeah I think it should be fine. Let's bring everything back out. Yeah, this seems
just about right. Thisul work. Let me get
close. Let's create. This part loan goes all
the way to the back. So we look at this
also on the back. So this is where we
get on the back. So let me just see if I can visualize this two
at the same time. Yes, I think that
should be fine. But there's one more
thing we need to do. There's one more thing
we need to do before getting this extra piece
extract this extra piece out. That would be to select this with the max lasso
selected max lasso. I'm going to grab
this chunk like so. Okay. We don't even know any
subdivision level in the less n or just escape should be fine. I think we might need
subdivision leveling. Need subdivision level
in less subdivide. I'm going to max these bits. Okay. No, I think
I grabbed it too much. Grab with too much. Let's do somewhere
around here, like so. Yeah, that should be fine. Invert the marks, blow this out. Okay. Then I'm going to
do an inflate balloon. I need to get the
right amount for this. Old out and sharpen hold
out and sharpen the max. Undo that canter
sharpening the spokes. Hold on control and
sharpen the max. Then I'm going to do an
inflate balloon again. I think that's a little
bit too extreme. Go to boarding, if
you do inflates, inflates is just weird. Inflate balloon is a good one. On do that. Okay. Just a little should be fine just to inflate that baby around it, leg so I think that
will work just fine. I work just fine. We need to
push some things back in. So this, for example, is coming out with too much,
let's get this back in. Let's use the move brush. Use the brush size
and get this back in. Okay. You know, I think I
pushed that way too much. See. We just need
to push it to where this band is so here
should be fine. Did you see on the other parts. Here also should be fine. All right. Put
this up some more. I think this should
work just fine. We can smooth in here do that, take down your brush size, take down the smooth intensity, Smoot in her Smoot
in here as well. Okay, I think we can work with
that. That should be fine. Yes, that's fine. Now we can
grab the piece we need now, so we need to duplicate this. The duplicates, I'll send that duplicate out
of that group. Isolate this. Then we need
to grab the piece we need. **** F, need to
subdivide this again. This dire subltionT
di subdivision, let's subdivide this one more. Subdivide again, delete
lower Control Shift click on this, delete Eden. Deleted. This is all we need to
bring everything back out. You just need to
mark out Shift F, let's use a slice cove now to grab the parts with
the portion we need for this. Let's use the slice cove. I'll put it somewhere
around here. So I know where exactly to cut. Let's start from here. Do that in bit of space. Okay. Tap out. Tap out again, tap out again, tap out again. Top out again. Let's see. I think we have
this where it needs to be. Let me leave this up some more. I think somewhere around
there should be fine. Checking to be sure. I think somewhere around
there should be fine. Here, we can work
with that. Okay. If we need to push this in, we can. Let me do that again. Let me do this from around here. Let's bring this down
some more forward. Yes, I think that's the
perfect list to have this. That's perfect
last to have this. Yeah, that's fine. Now let's go out another portion also too. I think I'll do this
around here instead. Okay. I think you should
be fine so now. We have this piece now. So
this is the piece we need. So we need this piece. I think we need to grab
a little bit more. Okay. Nope, nope. Let
me do this again. No. I think should be fine. Yes, somewhere around
there should be just fine. So this is the only piece
we need for this, okay, I need to do an auto grouping here. There's an auto group. There's another auto group. I need something with
completely different colors. Colors there are just too
volume here. This is fine. Alright, so this is what I need so I'm going
to select this. Is on both side now, which is precisly what we want. I'm going to do delete ding. Before I do deleting, let me
duplicate this entire out in first ID then we can
do delete ding now. So geometry deletes Eden. All right. Then let's
get this polished. So go out to deformation. Ton of these dots, polish, polish a little bit
more. That is fine. Let's do some zer mash for it. So Ngometry Z masher. All the settings we
have in there ton of this f set this to two. Okay, Z mash. I need to check the
poly count for it. Let's go for now Z mash. Much wants more 500. I think 500 would
absolutely just fine. Okay. This will work just fine. Let's get back in there. So now we need to add
thickness to this. Before we add thickness to it, I need to pull this back in. Just my brow size, so
get a curve in there. The same around here.
Let's get the curve in. Okay, that should be fine. Legs done extrude.
Doesn't extrude, so go over to
dynamic sub Divyam. This thickness is fine.
I think this thickness might be slightly too much, so I need to take this
down a little bit more. So more, this should be fine. Yeah, thickness should
work just fine. Yes, it should work just fine. So I'm going to before
I apply this on, let's shift F, we
still on the move to. I'm just going to
move this in on down and some more can get some more in the Okay, I see a major
difference in here now. This portion in
here is supposed to be going to push
this bit slimmer. So make modifications to that. But for now, let's just
get this in place first. So that should be fine.
That is why I wanted to. I would like to elongate
it a little bit more so. But these are those pieces we need to go back
and then just fix. So it's not going to be
a major issue fixing it, so long we have
the shaping there, long we have the shaping there
and it's low poly version. Pushing it and getting it in place is not going
to be a major issue. Back in some more. That should be fine to go up. Check what we have in here. For this top part, we
need to bring it out some more prezzi b size a
little bit more, get this up. That should be fine.
Somewhere around there Move this forward.
So more, select this. By this down a bit more. Get this in in as well, select. I think they should be fine. Let's do for the opposite side. Select the phase, buy this
in some more, select. Let's get this up.
Okay. Forward. All right. Select this
bears down some more. Select this, bring
this out some more. Okay. Select the
beds down even more. Bring this in. Okay. I think this should
be just about rights. Here, that feels
just about right. Pull this out out some
more. That's fine. Then let's go back
to this piece, and let's make some more
modifications to it. Just need to refine it a little bit more and then
we should be good. I think here as well, I would like to push
this back some more. Okay, here as well push
this back some more. That was way too much. Let's get it and get
this out some more. Yeah, fine. That's fine. That's
fine. Box or more. Chute F. Okay. Awesome. So now we
select this now. I need to make sure this
gap is quite visible. Even though we still
need to create some kind of this middle point, we need to stretch out
a little bit more. This selected, I'm going
to max out this portion, blow the mark because I don't
want it to be affected, so we can carefully move
this back, do that. Move this back. All right. But some more quite a lot of work to do in here just
to get this to look right. But it does necessary work to get this to make
it look right, so there just keep pushing, blow this out again, pushing and getting this to look well. Just push this in, smooth this part out.
It doesn't look odd. Okay. Set this back. Then we need to push
this back into the shoe. Because it's looking way
too thick on the edge. Edge looking way too thick. Okay. Move this down as well. Okay. I think that should
be fine for now. Let's do for the opposite side. Blow this out. Do a
very swift move. Okay. Put this in, selects, get this out some more, selects. Put this out some
more. Get this down. All right. Here, as well, put this down some more. Okay, hipvPlay the mark. Let's do he polish for this, just to polish
everything generally. On do that, let's
mark out this edge. He polish marks out
this edge as well. Marks out of this edge. Turn this off, blow this. Do that as way too extreme. Okay, should be fine. Clear max, hipef now get some considerable space in here now to
work with is fine. We're going to extend it
out generally later on, but it should be fine for now. I think we need to get this out. That that went in way too much, so extend that out. Yeah, awesome, that's fine. So moving along, let's
see what we can do in here we have an extra
bond extra bond here. Then we have an extra
bond here as well. Okay. So we have
this extra bond now. Let's do this later. Let's see if there's any piece. Okay, the piece needs to
as the Nike Nike sign. Before the Nike signed
let's add this bond. Let me see how far
that bond goes. The black bond, let's
go to the Torvi. I can't really see
it here, though. Even looking at this nice. I think I need to extend
this forward some more. This I need to bring
forward a bit more. This piece needs to
come forward some more. So let's extend them out. Extend them out. Let's see. That one
should end there. Let's extend this out some more. Okay, bring this out. Extend this out some more. A little bit more should
be fine. Bring this out. Okay, that is fine. Select the, bring this down. Yeah, that's fine. Yes. Okay, let me
I think it ends. Try to figure out where
it ends actually, okay? It goes all the way. Okay? It goes all the way in. It goes all the way in.
So it wraps around it. It's like under level under extra level of thickness in here, okay,
okay, that's fine. So we're going to
select this Ship turf. I need to make a
duplicate of this. Let's make it duplicate. I'll order and she send it out of the group. Let
me do a quick save. Okay. Yeah, that's fine. We
have this out now, out of we only need
the inner part. So let me just go to
lower subduction Shift D. Okay. Yeah, we need a
higher subduption level because we need it to be smooth all round to
go around perfectly. But let's try and figure out where we need to
have this though. Okay? I see. Yes. I think I know what
you need to do in here. So let's go to lower subduction level
control shift. Click. Hi this. Let's do
polygrouping here, poly group, poly group. Holy group. Yes, polygroup in control
sheet, click aswell. Is the only bits we
need. Delete higher. Is the only bits
we need. We just need to extrude this out. I need to get this extruded out. But the extrusion should not envelope these parts. Let's see. Let's first sta by making
a duplicate out of this so we don't mess things up. So I'm going to max out
then max out these bits. ControW Control ****
click to remove that. Then Let's do deleted. Et's do another deletes Eden, geometry, deletes modified
topology, deletes ding. Okay. Let's make sure we're
hiding what we don't need. Let me hide this for now. So this is the bits
we need back in, so we need to do an
extrude for this. So in this case, I will need to
extrude down instead. I see the inode part is dark. Okay. I can't really see a good
example of the inward parts. What we're having here
is just at the edge, okay, I think Z
material goes in. Okay, si material
that's actually inside, probably dark material,
so that is fine. Let's just create the thickness for this, but this time around, I'm going to be using I think I would like to use
the Z molar brush instead so I can
extrude downward. Okay, so BC, go to a phase, do an extrude. Okay. Then let's do all polygons. Okay. Undo that. Undo that to select the phase. The extrude is a bit weird. Bit of a weird extrude. No, this extrude is a bit odd. It's really ode's extrude out. Let's see. Okay, I think outward is way
better than inward. Let's see what we
have. All right. Yes, I think we can
work with this, but we need to make
some modifications to Control D on this, add a subdivision level N. Let's go in and look at our reference
just to get this right. Okay, do that. I need to add a I need to add a loop I think
flack actually won't delete this in a poly group. I'm not sure we need those. But let me add an edge
loop around here. Okay? All right, then I'll
need to move these down. Let's go back to move Brush. Let's center orient,
get this down. Now if we do add control D to this to add
this subdivision level, this is what we get, but we can make this a
whole lot better. Let's just do Yes, let's do let me next you know, extend this out some more. If I polish this, yes. Awesome. So I just
need a bit of polish. A bit of polish
would go a long way. So we have this in here
now the way we want. So we just need to make some modifications to
this by moving this down. Move all of these down actually. Down as well. Completely hide this. But it should still be
visible on this side. Let me see. Let's just
max the parts we need. Okay? Blow this out some
more invert the marks. So we can only push what we
need to push in instead. All right. Yeah,
that should be fine. But. Okay. Let me make sure this just shows picks around
there should be fine. Smooth that down. Do the
same for the opposite side. You should just pick
around here as well. Okay. Smooth this down.
Smooth this down. Undo that. Select this, I need
to push this down. Maybe out instead
out a little bit more out a little bit more around here
as well, select this. Get closes, smooth this
down. Bring this down. Select this. Fold this in on this side. Fool this in on
this side as well. I just need to get
this to look right. That's basically what
I'm trying to do here. I get it to look right. I think they should be
fine. He also looks fine. I think it should I should work. Ece we need to bring
it down some more. So let's bring this down. Bring this down as well. As well down here. Let's get the same height
range on both side. Okay. Yeah, I think
this is fine. So should rest at the back. Roughly around there
should be fine. I think I'm to lift this
up a little bit more. That's fine. This
work just fine. Okay? So let's just
do one more tin. This one also has taper in. There's a taper for this also. So we'll do that taper
in the next lesson, so I'll see you guys in
next lesson. Bye for now.
7. 06 Foot Hoof Extract In Zbrush: Welcome back, guys, we still
are still very much on this. So I'm going to carry
on because we still have a little bit of some more work to
doctor you on this. So I would like to create
this Dapertaper in here. Let's create a taper. I'm
going to select this Okay, we don't even that. We don't even have poly
groups that holds the edge. No poly group that
holds the edge in here. So let's see if we can
extract a poly group. So let's do group by normal. Let's turn this dot
off group by normal. Nope, still not working. Okay. Can we grow grow? There should be grow poly
group in here, grow mark Okay. Group change, poly group, groups by dynamic, group by Max. So group there's no
group, interesting. So anyways, let's see
what we can do in here. We just need one but, and then we can work with that's let's see what we
can do in here. So let's adjust
the angle for this a little bit more
group by normal again. Then take this down group
by normal, nothing. Let's see, turn this back on, set this to a different value. No, it's not giving us
anything realistic in there. So basically left in here, so what can we do? That's where is the
duplicate of this. There's the duplicate
of this duplicates. Oh, yes, we can go to lower, this is actually way too low. Let's use the duplicate
of this vessel duplicate, send that duplicate down. Shoot it down. Do selected now. Let's go to lower
subdivision level. Possibly we can get
something out of it. Okay. Let's go on
subdivision level higher. Okay. Let's go in to poly group. So this should be on 45 default is 45, then group by normal. Not much happening in your
less tone of this dot group. We get the bits. Oh,
no, no, not working. Let's increase this
again, not in as well. Okay. I think this
is a good one. Isn't a value of 23. Let's do an angle of 30
instead. Let's do 30. Let's do 20 instead. Group binomals. No,
tone of these dots. Group binomalUd I think the previous one we
had before was fine, which was this tone down
and the value was at 23. Let's do 25 instead, group binormal. Yeah,
yeah, this will work. So we need to grab this Whoa. Quite a lot of corrections
to do in here. Let's see. Let me say this have an idea. Let me say this to 45 group by normal. Okay? That is fine. Control Shift click on this. Control Shift click again. Let's do another group by
nomalGroup Bnmal. Okay? Group by normal. Nope. Okay, de do what I feel
should work just fine. That's do BZ. So we use qua Q mash instead. I only need this
edge. I don't need this edge edge and edge I need so let's go over space bar. Let's do Qsh. Let's see if we can do polyp Poly group Broder. We have poly group Broder. Let's try this poly group boder. Oh, we have subduction
levels in here, so let's delete let's bring
everything back out first, delete, delete lower,
delete higher. Interesting. Come on. Do that. I don't I don't
want this to extrude. I don't know why
it's extruding now. This should not extrude. So
it come slightly tricky. Let's just make sure
we get this right, so I don't want to extrude
this disabled triangle snap. Ton of alignments. Okay. Yeah, that's fine. He also. Okay, that's fine. I think turn off alignment
with what fixed it. I think, this is
fine. This is fine. Then Control Shift click
Control Shift click. Come on. Hi click as well. This is the only
usually piece I need. Generally the only piece I need, so I need to do let's go over to Let's go over to
what's it called again? Yes, delete ding. The deleting let's do duplicate of this. Let's create a backup.
Then let's do delete ding. Geometry deletes ding All right. So all we need to do now
is to extrude this inward. We just need to
extrude this in words. So let's do extrude. I need to extrude, I need
to do next to the edge. Let's just do general
extrude first. So I think we can
use all at once. Yes, we can use all
at once, like so. Et's see what we get. Yeah, I think this
should be roughly fine. Let's bring
everything back out. Let's see what we get out
of this. So transparency. Okay. This should work. To of transparency. Let's I mean, polygons doves quite low. Let's subdivide this. Then let's do an extrude. No no, let's down
in flits rather. So let's down in flits Inflate balloon.
No, no, that won't work. Let's do normal
regular in flits. Let's see how this regular
inflits completely messed up. I'm seeing some weird edges
around this also as well. Do that. What was the call f
something else I need to do. Let's go to display
a dub salt on. Let's see if we can
make this work. If we subdivide this. Now, this looks quite a lot of issue going on
here we subdivide, so I won't do that. I think I need to go
back to the previous one or we can just
extrude the edge. Let's go back to Extrude. Select space bar. Let's do extrude. Edge edge loop. Edge Bully loop. Let's do merge boda instead. Come on. Why not This not work? No. Let's try something else. Edge loop. Come on. Can see some extra as
that I don't need or some extra sun we don't
need. Can see a stretch. Let me just Control Shift
click Invert the max, Invert the selection instead. It the selection instead. Oh, you still have everything. My still have everything
as one single piece in. I need to isolate this
less D delete Eden. So before we do delete, then. Um, let's do this instead. Control give everything
one single pull group. No, undo that. Undo
that. Undo that. It's an extra A that
I don't need to be in the Is extra edge. I don't want to be in
there and do that. This extra edge in here that
I don't necessarily need. So let's grab this and CtWGive
them one single polygrap. I just make my
life a lot easier. I need to grab all this
loop also as well. Then all this loop also
at the back side also. So Control Shift click. Let's start with this, do that. I don't just snap keep snapping. Come on, come on. Can't you just get this be plyloop without it having
to snap in a weird way. No alignments whatsoever,
and then it keeps snapping. Let's just do
normal regular Que. Let's just do Let's
just polly loop. Why do this keep snapping? Let's do single loop instead. This one actually
works just fine. Let's hold down oats
and drag this out. Frank look for much
easier we bot seems like it's not giving us the option to make our life a lot easier, so let's just hold out and
turn these all whites around. Don't do that. Get a
better angle on this. Okay, it should be fine. Bring everything back
out. Let's do also. So grab all of this. Okay. Yeah, well, or so. Don't take many this
lower part though. Don't take many
these lower parts. Do we need let's bring everything back
out first. Let's see. Okay. Let's just
add that in there. Let's just add that in there. Design need to remove that. We can just easily remove that. Bring everything back out. Control Shift click,
Control Shift click, Control Shift click
this as well. Yes, I think this
should be fine. Control Shift click. Control W to give you
a separate polygroup. Let's do a delete Eden
now, delete Eden. Let's do dynamic sub dive, let's add thickness to this. Way too thick. We don't want
something too thick. But thick enough to hold
the shape, no doubt. Okay? Yes, I think this is pretty
much what we will need. This is pretty much what we will need except we
need to make some. I just maintain there just to push and pull and then
we should be good. But I'm realizing that I
don't need this bottom, I don't need this lower part,
so let's hide this for now. I don't need this
lower part, so I'm going to use the max las. Let's max this this way, Control W. Well, we
don't need this. I'm going to do delete ding. On ph topology, delete Eden. Then back to dynamic
Subdiv Okay, gets a good angle to this. Yes, we can work with this. Okay. Yes, we can. If you
go back and select, let's go back to move
brush, select this. Let's go on subdivision
level lower. I should actually fits.
I should actually fit accurately now since
we're kind of marching it. We'll do delete higher. Delete lower as well. Okay? So this fits nicely. So the only modification we need to do here
would just be to move to move this up
undo that move brush. Come on. Oh, selecting the wrong mesh. So this is the mesh I'm
supposed to select so. We can just move this up because the thickness we have in there
is a bit too much. It's a bit too
much. So let's just get this adjusted properly. Think somewhere roughly
around here should be fine. Let's adjust down here also. Do the same for
the opposite side. Okay. Ship. So if we should subdivide
this now and do that. Now, let's send this down. This one is actually
down now, so let's send this down as well. Go down, ship, send this down. Let's merge them as
one single piece. So go over to merge down. Click Okay. So these two
nice one single piece. Okay. So this out. I think there's some
discrepanc in here now. Which we can just easily fix. It's not going to be
a major issue to fix. There's the auto group
auto group auto group. Fully group auto
group. Select this. Move this down. Move this down. Shift F, move this
down, down some more. Okay, pull this in. I think this should do, okay. Movement in, get
this in in as well. All right. I think we can work
with this Control D, Okay. Yeah, I believe this
should work just fine. Control click inverting max. We can extend this out
a little bit more. Okay. That should be
fine. Extend this out. All right. I'm just
trying to make this as perfect as
I possibly can. Down some more down some more. This should be fine. Okay, so now under extra edge for
that, which is cool. Which other extra
edge do we have? I think we've covered
this so now we can go in and grab this shape here. A triangular shape in
there should be fine. We can just use Max lust
to do that, back, okay? This is the back. We go to the back.
Come on, select this. Do I think we have a
duplicate of that. Do we have a
duplicate duplicates? I think this would
be a duplicate. It's a good duplicates. Okay. ShitF use the maxlas Let me do this from
this side actually. Let's visualize
it from the side. It's a lot more easier to select it
from the side instead. We can also use I believe we can use a slice
cove for this as well. She the slice cove. Let's try using the slice cove. No, I should keep
seeing this on here. Okay, I believe somewhere
around here should be fine. Yes, perfect. This
should work perfectly. So let's duplicate
for this mesh. Hide the top piece. This is what we need
to grab this out. All right. That's fine. Then we need
to duplicate this as well. Do it delete ding, modified topology, geometry, modified topology, delete Eden. Let's polish just a
little bit small. So polish by group. Polish by group.
Geometry is zero mesh. Set this value to 20
mesh, zeros again. H zero mesh, zero mash again. As at 300 and I think 300
should work just fine. Okay, let's check the back. Let's see how it is
on the back side, if we need to extend, if we need to extend
this out in any way. Yeah, I think for the most part, this would be fine where it is. So let's do dynamic sub div,
adding thickness to it. How much thickness
you need for this? Solo this definitely
way too thick. Reduce the thickness.
Okay. We just need to use the
move brush and then compensate for the
thickness around here. With the move brush,
extend this out. Look, that's way too much. Let me get this do
this from the underps. Around this way,
it should be fine. I think our thickness is
even slightly even too much. Let's take this down again. Here, I think this amount
should be just fine. Amount should be just fine. Not the house edge out a bit more, something
should go around that. The logo should go around that. Logo would get itself in the But I think as far as this goes, this
should be just fine. Bring this down, food
down, down as well. Down as well. Awesome. Okay, just extend this down some more pretty much like,
so it should be fine. Alright. Okay. Move this out some more. That
should be fine. Once we add this logo
in here now and then we can easily pull can easily push this down
where it needs to be. But for now, I think this
should be fine for now. I think the gap is way too
much. Gap is way too much. I need to max out these bits, so I don't manipulate
them, blow this out, so I can just quite easily move this down where I want. Come on. Move this down down some
more down some more. Okay. I think that should be fine. Clear the marks.
That should be fine. All right. So we're
in a good place?
8. 07 Foot Sole Extract In Zbrush: Something else you
need to get right. So I'm not checking
around a lot to be sure there's something I need to do to get this a lot better. There's
something I'm missing. For the most part,
the writing I mean, at least for the padding. The fitting meaning
you want this logo. Logo for one, and then
we have this so piece. I think achieving
credit extra black. So detail in there or maybe
we can do that detail inside of should probably do
this detail inside. Let's do it inside here. Let's do it in here instead. This extra cortos. Let's do it inside
brush instead. Sort of soak down s pinter. So I'm going to select this. I'll make a duplicate out of this duplicates.
I'll send this down. Okay. Is there an issue around
there I need to be aware of. Take this down and
do that smooth. I feel like I need to
subdivide this some more. I'll definitely need
to subdivide this some more just to capture the
detail in there, though. But we need to do this
for both the duplicate and the original also. So let me delete this
duplicate for now. Dell this original, add some subdivision level
to it, subdivide again. Okay. Now I do duplicate of it. I'll send that duplicate down. Let's isolate. Then let's grab then let's grab what you
need out of this. Shift F. Control W, give this one single polygroup. Then I would go to geometry, delete lower Okay,
two k seems fine. Then we can use a slice
cove now to begin to capture or do what
we need to do in. Let me zoom out a little bit more so we see what
we need to do. So slice cove. Okay. No, undo that. Okay. Move down some more. Pull down, she lift
it up some more. Maybe not too much.
Well before was fine. Double click, get an edge. Okay. Double click. Get another edge. All right. Get this down here. Should be down some more. Double click. Get
this up some more. Okay. Around here. Then I will double click again. Just give me double click. It's not give me straight lines. It's not give me straight
enough lines to work with. I do that. I need
to do this again. I need to do this again. It's quite tricky though. Okay. Double click.
Double click. Double click. Double click. And this way I guess rick, just weird extend this out
a little bit more. Just bend in a really weird way. Double click. Guess weird around
here. Double click. I think we have one. Two. Let me come all the way down
first. Double click. Double click, go up. Nope. Okay, we have
these phase parts. We have these phase bits now. I think I'll just
continue from that parts. Well, let's do it.
Let's go through the opposite side instead. Let's continue from
the opposite side. Okay. Let's do double click. Double click. It's weirdness and it also
gets too close to an edge, begins to acts extremely weird. The sp ones. Tap ones as well. Okay? We have some symbols. Not
completely perfect yet, but we need to make it need to combine them
and then make it work. So I think the last bit
would be this double click. Move this this way. Move this around here instead. Double click, get this down. Okay. Yeah, complete
messing here, but if we can make it work, do that actually.
Let's do this again. Double click. Okay. Double click. Double click. This way. Oh, I see the mistake
I'm making now do that. I'm supposed to go up instead. Should be up instead.
Double click. Okay. Double click down here. I think, like so Control
Shift click. Okay. I think this is now is not the other part
is not looking good. The other part is
not looking good. So we need to do this again. Thinking the best
option right now would be to use our Max Larso instead. Let me subdivide this
one more. Delete lower. I think Max Larso still seems like a good
enough option for us. Let me use the Max
last one instead. Okay. Nope. Nope. Let's see. Maybe we
should use the rectangle. Let's use the rectangle instead. In the rectangle
should kind of give us though some
sharp result bolts. At least we should get something
good enough out of it. Let me hide hide the original to hide the original D. Okay, that's one first one
is a good place. We'll do another one
around around here. Okay, that's fine. They will do another one around that one knees
Let's do Mx las instead. Okay. Grab a bit more. All right. Is it working on
the opposite side. Yes, it is. We need to
grab more of this as well. Okay. I think we can work with this. We
can work with this. I need to grab this
part also as well. Let's use the rectangle two. Oh, this is a square
rectangle max rectangle. Let's do around here. Let's see if it goes all the
way to the opposite side. Not completely, so we need
to grab that as well. Okay? Some of this part undo that. So she lets you control W for that's I think we might end up doing most of
this detail by and actually. Let's do a duplicate of
this Control Shift click. So this is pretty much
everything we need. Now let's do polish.
Let's do polish. So deformation, let's do
Polish scripts edge instead. Files polish by group, we're going to lose a
lot of the detail. So let's do polish by group now. Okay. Polished by group. So more Eton of the dots. Okay. Yeah, I think
this we can work with. Yeah, this we can work with.
So let's do duplicate of this and then merge
the naticness to it. So over to delete Eden, I will also extend this out
a little bit more like so. All right, so let's do have you done delete already I've
done deleted already. So let's do Zero mesher. So Z marshal, let's modify, Okay, a ton of. Say this to two. Zero masher O down
to do Zero mesher. Let's give this a moment.
Let's see what we get. Okay. Okay. We have something, no doubt. Then let's go. Let's see what that gives
us when we do E. 900. Let's see if we still maintains some measure of the shape. Okay, it still does. Let's
bring everything back out. Let's co on the original. Let's make the original
visible again. Okay, I think it's actually in a good place. In a good place. With a few modifications,
we should be good. Let's add some thickness to it. So let's do some thickness, dynamic, dynamic sub div. T. Come on, turn that on. Obviously, way too thick. Way too thick, obviously. But just before we do
that, I think I'd like to add some cuts in between just to hold some
of this edge tightly. So let's do Bz. I will
duplicate this hide. So let's add red zebro size. Close. I need to go to inserts, add one segment here. Okay. Undo that going across Sync
Let's do should be fine. Then I need to hold this edge. So I'm going to do
one around here. Undo that here also. I need to hold that
edge here as well. Yeah, undo that get
close here also. Okay. Come in close. I'll do one year as well. Because I don't just to
kind of when I smooth that, I don't want to lose
that edge, also as well. Get in close, undo that. Yeah, that should be
fine. Here as well. No, that seems odd. Let's do. Okay. Here, as well to hold that edge. So we need to do for
the opposite side also. Oh, it's working on both
sides, so that should be fine. Now, let's add thickness in. Let's go back to our move brush. So let's do geometry, dynamic sub div
Obviously way too thick. Take this down, Shift F. Okay. I think you should still
be slimmer than this. Oh, that's way too slim. I think what we have in
here should be fine. Okay. Let's make this slightly
smaller I think that's way too small. I think this
should be fine. If we apply this now subdivide, you'll be getting
something like so. Which in highlights at least we have most of the shape we need in there
for the most part. I think we are good
except for here, we need to pull, I think this should be fine.
This should be just fine. Maybe, undo that more brush. Guys move bros,
not he's working. Yeah, it should be fine.
This should work just fine. Okay. Let's say like this. I feel like I should extend
this increasing intensity. Breezes out a little bit more. Okay, use the pross select. No, I think that should be
fine. That should be fine. So you should just
be roughly in there. Control shift click on this. You should isolate, Max
this out inve the max, bring Gatine back out, extend this down a little bit more. I think I pulled
that out way too much. That's way too much. Oh, you can see initially
here wound fix. So we remove brush, extend that out out a little a
little around here. Okay. Yeah, this should work. So in the next lesson,
we'll move on to creating or working
on another piece. I think I need to extend
this out some more on the inward parts. Red subluton level, select
this blow invite the max, grease the sublution level,
bring everything back out, Shift F, bring gizmo, orients up some more. A little bit more
should be fine. Yeah, so it should be fine. That will work just
fine. Awesome. So I need to bring this piece. I need to bring that
into the group. Let's bring that into the group. So this is it. I'll drag this into the group. This also drag that into
the group into the folder. And you create that piece, let's drag that into
the folder as well. Okay. Awesome. So we
select something else now and we go in and then Oh, one other thing is missing. Select this piece. You need to bring it
into the folder as well. Okay. Let's select this. If you hide this now, one more under piece also
you forgot to hide. Select this hoof, bring
this into the folder. Let me select this. And then
if we hide this folder, yes, everything is in here now. So I'm going to drag this
fold all the way down. Okay, so continue
on the next less. We're going to start
We're going to create create the let's see. Okay, I think I need
something else I need to do. This, I need to move
up closer this way. Yeah, as well. Closer this way. Okay? Pull this down. Saldic corresponding piece that good pull that down as well. Select down. In Salic corresponding piece, puts down as well. In. Okay, that is
fine. That is fine. That is fine. A lot going
on in your ready bow. I think we are we doing grids. We're doing your grids
in your do that. Alright, so I'll see you guys in the next lesson. Bye for now.
9. 08 Nike Logo Extract In Zbrush: Come about, guys. In
the previous lesson, we were still trying to extract necessary piece
we need for our model. So we're just going to carry on from there
as well and then continue blocking out those
extra piece that we need. So in this time around,
I'd like to get in the logo in. Let's get the logo. Not done the logo yet, so I'd like to get the logo in. I'm just going to making
some adjustments to this. We're just pushing
some of these down. Okay. So it doesn't look too
thick on the side. It's looking too
thick, get that down. All right. Okay,
that should be fine. Now, let's get the logo, the logo piece for this. So I'm going to select this. So I still have pieces of parts in here that
we can just reuse. So let's use. Let's Nike logo out of this I'm actually thinking of doing this with
the Max lasso. It's the ninth night with Mala it's going to appear on
the other side also, too. So I would like to do
this with the Maxa Soo. Oh. Let's on the marcas, select the MAs lasso. Okay. Let's make sure we're doing
this as accurately as we can. Can we do transparency. Okay. Yes, we can do
transparency here. Let's just set this up.
Start from the big points. Go this way, so it doesn't seem perfect yet, but we can make some
adjustment to it. I'm going to hold out and then clean this up just
to sharpen it more. I would like to add some
more shape to this. Nope. Go in here so Craze a few of these. Do some more around
here as well. L solo this let's
see what it gets. I think it should be
fine. Then we can do some manual modifications
to this as well. Et's go out of solo mode,
ton on transparency. No wrong one. Let's call this out. I believe. Throw this out. Then let's go to pin Max pen. I'm going to paint some
additional shapes to this. Okay. Some additional so around here. All right. That looks odd. I
think this should be better. All right. I think
this should work. Use the blow size. Okay. Now let's make a
duplicate of this piece. Control W for this to get
a poly group out of this. Control Shift click, then
we can do deletes Eden. Let's deleted in years. We go to geometry, modified
topology, delete Eden. Then under deformation,
polish by group, tone of the dots
polishes even well. Okay. Go out of solo mode. I think we need to make some modifications to
these no doubts. Get that sharp
logo detailing in. Most especially around the air. Make sure we get a sharp
detail at the tip. Polish by a group. Mark this part out
blow the marks. Mark this part out
also blow the marks. Okay. This up, polish,
that should be fine. Then let's do. I think we need to make some
modifications in here actually. Put this in pull
this in as well. Polish by group. Move this forward. Right. Let's just go to make
sure this looks right. Then I think it should be fine. On the dot polish
by group or more. So let's do a duplicate of this. Let's do Z marshal. No, not this geometry. Z mash. Let's say this to two. I get pulito two. Then let's z mah this.Hol out, select Z maach again, goo half half again. Let's do a one more. So this now we can adjust this by sharpening
this up some more. Okay? This on the opposite
side is not looking too good. Let's leave that
up, push this in. Move this in as well,
bring everything back out. Okay. We seem to make some
modifications to this, no doubt. Folk do that, let's
go in and add some thickness to the
dynamics of the dynamic. Obviously, we to take this down. Okay. Seems like we're
in a good place, we need to make some
more adjustments to this. Yeah, definitely. The bottom edge needs
to be up a bit higher. Opening a bit higher like so. Okay. Do the same for
the opposite side. Do that, increase the bro size. Give this up some more, pull this out, up some more. Move this in. Basically trying to do
something close enough. Okay. You should definitely work. I'll push this in here compensate for it
on the lower parts. That should be fine. You
should go in a swell. Okay. I think I need to leave the bottom
parts up some more. Okay. That should be fine. Here also as well. That should be roughly there. Put this down. Okay. Leave this up, let this in the pie. Yeah, it should be
just about right. It should be just about right. Create some height produce
around here here as well. Get close, dig this back in. Then we can apply. I should be fine if
we subdivide this. This is what we get. T
should work just fine. Okay. Make some little
adjustments to this. Yeah, that's fine. So moving on. The logo goes in, can stand and comes
around there as well. Let me see if I
can leave this up some more with a little
more thickness for it. All right. Here, as well. Okay? That should be fine. Let's go to the duplicates
we have in there already. Yeah, this is the one C
any marks we have in there the duplicate Let's do
transparency instead. Now we know where
they should be. I should fall in there so
let's cut it back this. Okay. See it now. So let's do Shift F. We can do, we can use the slice
cove actually for this slice cove should
work just fine for this. So slice cove. I would start from let me
solo these two invert grades. I need to go to select inverts. It's pretty much all I
need to slice cove Okay. No, that doesn't look right. I need to make sure this looks as accurate as it needs to be. Let me start from here instead. Yeah, it should be
fine the first bits. Does not looking right. Hold Hats. Look, doesn't looking
right either. Let's come from
the opposite side. Hosts all the way
should be fine. It's not against all the
way for the opposite side, so Let's do that
not looking good. O. No, not looking good enough. Nope, needs to be as perfect
as we can get it to be, no. Move back. Now, Why are we having something weird
this way, definitely not. I think this should work. Let's slow this out. Let's see, this will
definitely work. I need to grab
invited selection. This select this, select this. This is pretty much what we
need Control W for this. Okay. Then let's
do a delete den. So modified topology, let's
do delete ding, delete den. Delete ding. Let's do a polish by group. Polish some more I think we need to do a bit of
polish on the opposite side. Knows about this
particular parts to be particular. Don't be dots. Polish dots mark this region, blood is out, Polish, polish again. Lady marks. Let's do let's duplicate
of the sub to first, duplicate the sub
two and then go over to geometry, Z marcher off. Let's say this go two Zh let's go once more. D should be fine.
Go out of isolates. We need to make some
adjustment to this, no doubt. We can do transparency. Mood this back. Okay. Move to the opposite side. Mood this back. And one more thing I need
to set is to set this where the previous logo is Okay. Do the same for
the opposite side. Then let's polish this again. Let's polish by group. Don't do that, don't do
that polished by group. Let's turn on the dots. Like this This bitten
needs kind of fix. But before do that, let's
just go out of transparency. Let's add some thickness to it. To back in there, let's do dynamics of give, turn that on. Let's take down the
thickness for it. He is where it needs to be. Move this up, move
this up as well. Get this out out as well. Same for the opposite side. Us bro side some more. Let's put it back
closer to the skin. M closer to the strap itself
around there should be fine. This one suppose. Let me see if we can just
get this this way. I think somewhere around
there should be fine. Most fits, they just compensate
for it here as well. Getting clothes. Something that is a bit
straight on this way. Okay. Rotates. All right. Let's listen for
the opposite side. To the opposite side, get those straight
lines in All right. I solids. I think I will need to add loop codes this infers, let's do By Blick at
the loop cut here, the same for the
opposite side also. That should be fine. Out of solo mode. Move brush. Getting close. Let's apply this subdivide Okay. I think this should
work just fine. Do that. Getting a
better angle needed to uplift lift this up a little
bit more, should be good. All right. Let's check the back. Let's
see how the back looks. Okay, I think we have this
way we need it to be. That would work just fine. Come back in here. Compensate
for it down here as well. Okay? Still a lot
more work to do. Most especially
the shoe lace now. We need to work on the shoes. We have this also all
these calves that goes in. I believe we can just extract that from what
we already have in here. Now, let me go in. Something I like to do in the before I do that then
make a duplicate of this. Let's duplicate open that up. Duplicate his, let's
duplicate this. I'm going to do we have
never had the max, never had the max again. I'm just going to
more or less buy this in Make it quite closer. Basically I just need to
bury this in some more. Okay. Let's make it a bit
more tighter on the edge. All right, well. Okay. I believe the same also in here I down here swell,
down here swell. I think this should be fine. Let me everything back house. Something doesn't seem right. I push something up, so I'm
not supposed to pull out. This is what I'm
supposed turn off. So that's what I'm supposed turn off now, we should be good now. We should be good. I like to send this into
your group also. Bring this into your group. As well send that
into your group. I think we should
be fine. Here we should run this up by ing
this cover piece we have in. That's a logo in the tag. Let's do that tag. Let's do the tag. Believe I can extract
that tag from this piece. Let me select selected already. Let do the duplicate
of this low click. Let's go to the lower
subdivision level. Delete A let's also do delete Eden then we can grab
it all the way here. Let's do. Let's Mx
last one instead. A marks out these bits, ControlW do this again. W for this, this
is the only piece we actually need. Click. I think I grab more than I
need. Let's select this. Marko, ControW as well. Everything back out. Come
on, everything back out. Believe is the
only piece I need. Before I do delete
it I want to be sure if let's do transparency. Let me see where that is. Okay, I think some corrections
I know that lein pulls down down down here as well. Okay, so around there
should be fine. Then let's do delete den. Delete den. Delete Eden. I don't remember having sub sub
dynamic turn that off. That should be off for now. Let's so this. I don't think I need this p ControlW that as well
as the delete Eden. Delete Eden. I think
this is all we need. Okay. Let's on inflates deformation inflate balloon, way too much. Let's just do normal
regular inflates. T of transparency now have
this way we need it to be except if except we need to subdivide the delete
lower, use the blow size. The use my gizmo
less gizmo instead, Cenaens squash this
down some more. Lower part let's bring
this in in some more. We need to add
thickness to this. Let's get it in where
it needs to be first. Some of these out out as well. Pull out. I think I can mark
this lower part invert the max, move this down. Then it's over. I think this should
be just fine now. I want to be as
straight as possible. Trying to make sure I even
things out around here. Okay, Cho be fine. Then we can do a
dynamic sub div on this dynamic sub div
dig down the sickness. Let dug down with too much. So around there should be fine. Then we can continue
with the move brush. Let's subdivide this a bit more. Apply. So we have this now with thickness and
subdivision level in there. Good enough subdivision level in there should should
work just fine. Let me just put this in as well. Ole this, subdivide some more so arm, I should be just fine. Don't need to do so much. Compensate for it
around here as well. Bring this down here. Here, that should be fine. I will work just fine for now. There's that you need to do, we can always go back in and make the necessary
adjustment for it, but I think this should be
just fine where it is now. Okay, so in the next lesson, I'm going to move
on to something else and keep working on it. Feel like I should make
some corrections to this. Like I should pull
this down some more put this down also. Okay. That should be fine. I like this. Yeah, that's fine. So continue on your next lesson and then think this time around, we can work on the shoe list. I'll see you guys in the
next lesson bye for now.
10. 09 Merging Subtools In Zbrush: Pocumba guys. So we're still
on this Nike retro sneaker, so let's carry on. Kind of blocked out
most of the shaping. We just need to kind of get
the shoeless in and then do some more sculpted
detailing in here, and then it should be good to move on to the UV and
wrapping process. So let's get right into it. If I do that, I like to elongate
this a little bit more. So I would like to okay
I think we have all of this in the fold Okay. This duplicator, I'd like to shoot that out of the folder. Okay? Yeah, so this folder knife I should
select this ton off. Okay? That's fine. So I'm
going to that folder. Let's do merge folder,
duplicate instead. Look. Nope. Delete all. Lo okay. I would like to merge
what is inside actually, so we can do that. Let's duplicate first.
Let's duplicate first. I want to do a duplicate
folder duplicate. Then select the
one that is down. Let me hide this one
at the top first. Then let's merge folder. Well, this is it now. So after Imaging that food
and now, this is what we get. I think something is
on that we don't need. Okay. Let me take down the brightness for
this. We two brights. Shift F. Yeah, there's something
in there to do first. Let me delete this. Let me delete this first
because we're it's kind of merging down with some meets you there are subdivision level
in there that I don't want to want to be in the
lowest subdivision level possible before we merge
down. Let me start with this. Okay. Okay. I think for
this polar one, we need something a bit high. I don't think we need
something necessarily high, so let me delete higher. Okay. Move to the next 17k. I think we can use this
at the base level, so let's delete higher. Next. Okay. Shiff Let's go to lower sublution level
two k should be fine. Two k seems fine. Let's call subibution level, higher eight k because I need to create an indentation
in the middle so I need to keep this at
eight k two ket's get higher. Okay. The back piece, I think
this is fine the way it is. Okay. Without any subdivision
level for that, let's move to the next piece. Okay. Probably it's at 15 K
too high, deletes higher. Okay. Next piece. So that's 500, let's see if we need to increase this higher
than it is right now. Not necessarily. So think I live data itt, move to the next. Go subdivision level one. Yes, I m getting close. Yeah, let's do this
higher screw down. Okay, Shift F. This, let me say this down. When something feels off. Do you have another
one visible down? We don't Fe slow this You have sub
deletion levels in there. Take it down. Subltion level
doesn't even do much. I can't see anything happening. Oh, it's working now. There was no
updleting initially. So let's delete
lower, delete higher. Okay. Next piece. I think this is
fine where it is. This is fine where it is.
Move to the next one. The logo. I'll do delete lower for this. Let's do that first.
Let's undo that. We go to lower lower
subdivision level, I think it should be a
lower subdution level is higher, okay? I think this should also be
on the lower solution level, deletes higher. I
think the finer. This should be fine. Okay, so now we can merge
all of this nine as one single mod linear now. I think I'm going to delete
all the folder on top. Okay. I'm going to duplicate this folder instead
duplicate darts, then let's merge
folder, merge folder. Okay. I keep saying something. Something is speaking
through this. Is a gizmo. I move this down. Something is speaking
through which I don't need. I solo this. Something's awfully wrong. I've seen Ana ma speaking
through, which I don't want. She which is rather odd. Which is rather odd. Got of solo. This 11 actually lose good. Not entirely sure where the
second piece is coming from. The other inner piece
is coming from. I think I'll probably just
merge this down instead. Let's do isolate. Then let's do merge down in here instead. Just merge down piece by piece. Nope, something is wrong again. Okay. I kind of lost I
lost this again. I delete all okay. Let's go back in here,
do a duplicate of this. Something is merging which
I don't need to kind of get merged entirely
sure where that is. So let me do duplicate
of this again. Okay. Something oddly
wrong somewhere. Check any subdution
level here, there's no. Okay. And everything back on. S, everything looks good here. Looks good here. Go to the top. Okay, let's mess down.
Let's mess down on this. Let's see what happens. See,
Immediately I meas down, we have this extra weirdness
in here, which I'm not sure. Totally sure what
it's coming from. It maybe we have a meshing
that we're not sure of. So if I solo this Nope. Completely weird. Digital again. Let's go back to the original folder,
duplicate this again. So it up me under duplicates. Turn its own, go into it. This is where the dish is
coming from. We click out now. Let say lay this out. No.
Let's the orders down first. Let's measure your
order Let down. Let's measure your down, Mase down, mese down, Mase down. Okay. Come around
here, mess down. Messe down, messe down, messe down, messe down. Okay? When we mese down, something just keeps pulling out of where it's
supposed to be. We have some I would
call it like an offset. We get these weird offsets. Weird offset we're not
supposed to be having. I think the issue from damage. The issue is definitely
from damage. Some merging sins and we begin to see some issues
running out of this. So I think we might need to do might need to do some
adjustments in there. Sadly, see a complete
mess of our model. Okay. So we need to start
making adjustments to this now. Unfortunately, there's no way
there's no way around this, so just need to start
making adjustments. Well, let's try something.
I have another idea. I'll keep this go in here. Let me move this up
here up here as well. I'll make a duplicate
of this again. Okay. I open this up. So this
time I'm going to come on. Having to just delete the
fold out that having to delete delete fold out having to delete what
is inside the folder. Then this time around
merge them down instead. You still have the same issue. Sadly, we have the same issue. So it doesn't it
doesn't work anyway. Anyway, we try to do
this still doesn't work. Still doesn't work, sadly. Anyways, we just have to
make corrections to this. So I'm just going to go
over to probably a bug. Most definitely a bug. So now we need to make
some adjustment to this. But I say I want idea, I want
another idea. Let me see. Let me see if I can actually figure out
what's wrong with this. Do we have sub dividondo? Oh, I see this you know. I see this, you know. STDs now. I think we have dynamic
subdivision toned down for them, I think I can delete this and delete this
again, delete all. Delete all because I
don't spend extra time trying to get this to work, kind of adjusting them again. Then you do duplicate of this. Before I do duplicate, let's
go in individually and then any dynamic subdiving
there ton it off. Oh, I did not even apply it. It was not even applied. I apply. Let's apply it. Okay. So we just need to apply
it for each of them. But I thought I
actually removed that. This one doesn't have it.
Okay? Go to the next one. Does this one have it? It
doesn't move to the next one. We have in here. Which mesh
is this the back apply. I thought I turned this off already or I've already
applied this to it. Geometry, if nothing is in here. Let's check this as well. Make sure we apply this. Okay? Select the next piece, see if it's applied, it's not. I think if we measure now, we should have something
good enough to work with. Apply. Next geometry, no dynamic, subdiving next one, no
dynamic sub diving next one. Geometry, no sub div
in the last piece. Okay, we're good now.
Yeah, we're good now. So now we can safely
duplicate this folder. Okay, then we can
do a met folder. Okay. I should work now.
Yeah, awesome. So it's working
now. Good. So that you have been fixed
is working now. Then I like to do a
mirror weld for this. L get a mirror for this. Modify topology, mirror weld. Awesome. Bae I want two
fits to be in here, so it should be fine. So I think we can
move on and then subdivide, subdivide
subdivide again. Okay. Just before I do
that, delete aire. Let's do a few step. There's something I like
to do first, which is to extend extend it a bit more, should be slightly longer. I like to get this a bit
longer than it is right now, so let's use
rectangle rectangle, Let's do the rectangle,
rectangle will do a good job. Let's do Maka. Max out these bits. Okay. Blow the marks, invite the marks,
blow some more. Bans. You need to move this
forward a little bit more. Lo should be fine. Then we can make some
modifications on the overall look of
this if we need to. Okay? Then let's do poly group
for this auto group for this auto group. Okay. Invert the selection, marks out. Invert the mark, bring
everything back out. Alright W the move bro selected. Okay. It's quite a lot of corrections
to made here, though. I think. There's some gaps in
between that I need to fix. Okay. Move this down. Inverts. I Move this down. No. I see where the issue is. This is where the issue is. I think it's the hoof.
So let's select that. I need to move this out of
the way. Move that down. Move that down,
move that back in. Okay, that should be
fine. Much better. Select this. No, not this. Okay. Move this down some more. Okay. Down a swell. All right. You can bring this down. Okay, so. This way
should be fine. Move to the opposite side. Move this down down as well. Okay? Select this. Make modifications,
put that down. Okay. This should be fine. Put this down. Put this down. Okay. That should be fine. Now let's miror this to the
opposite side then first, do a quick sieve,
do a quick sieve. That's fine. Moving
on. Let's see. I'm just making corrections in regions where we need
to get corrections in. That should be fine. Okay. Move this down. Okay, that
should be fine. All right. You can work with this convert the marks, bring this down. Okay. Do the same for
the opposite side. I'm trying to be as trying to make this as neat
as I possibly can. Trying to make this
seems quite neat. Okay? As well. Okay. All right. Yes, I think this will work. Then let's do a
miroun well for this. Okay. Then let's subdivide
this by lot tactual. So enough to hold most of the detail.
Let's test this out. I'm going to use them
standard brush now. Lim standard. I'd
be on the keyable. I think I would like
to replace it here. Lam standard. Really brush size. Okay. I draw a line realistic, get in there see how
much of that we having. Okay, we need to see
subdivide this some more. But before we do, let's go
to lower subdivision level. Select this. Okay. I think
something is on here. Turn that off. Con shift click. Let's mark this out. Having the same polar
group use what we want. I think I need to extend
it out some more. I'm going to use
move brush for this. Symmetry turned on
turn on symmetry. Okay, symmetry is turned on. I'd like to extend it out some
more undo that. Get close. Okay. Maybe let's do the inverse. Let's do the inverse instead. Invert this, grab this
alongside, mark this out. Invert. I'll just push them in instead.
This is way better. Push them in. Okay?
That is fine. I need a little bit of an edge around there. I'll do that. Okay? Yeah, that should be fine. Get this in in as well. Is bleating out way
too much. Get them in. Okay. Alright. Okay. Let's see if it also did sms. It also affected
the opposite side. Yes, I believe it did. I believe it did.
Okay, gets close. Okay, that should be
fine. Play the max. Okay. Let's see if there's something
else, I'm missing here. Okay, this we can do. Let's see. Yeah, this we can do when
adding the shoelace. Okay. But we need to subdivide
this even more. Slightly more should be fine. Now, the dent we have
in here let me see if I can I can show you guys so
the dents we have in here, we can quite easily
do that inside of, we can safely add that inside of we can the Stan spinter. That we can Stan Spinter then we have stitches that
go around this. Okay? One thing I
like to do would be what's it even called? Let me get for 12 years. This of in here, we have we have some training
going in between. I see it's going to add
some line across them. But let's see if
there's something else you need to
do in here before, it's something definitely into doing here before moving on. I see should have done
this earlier, though. I think I need to make
this lower parts ticker. So let's grab this
Shift F. Let's see if we can do that poly group. Let's group a normal. Oh, great. I lost that completely lost that extra edge I
supposed to work for this. Completely lose that extra edge. Supposed to be able to pull this down group by normal again. Let's see if we
can get that back. I turn this off,
group by normal. Okay, T of the dots. I think this actually
works. Do that. Yeah, this actually works. What I need to do would be bring everything back
out, Control Shift click. Control Shift click Control
Shift click, invert this. Okay? Max this out, Shift E, bring everything
back out, invert the Max. I just need to extend
this down some more. I want to extend
this down some more. It'll be slightly longer
than it is right now. Okay. Increase the subdivision level. See there's still something
else we need to do in. Okay, clear the max. ****. Go to hit click. Mark this out, inv
max, invade the max. We need to move
this in in as well. You need to actually see the
edge coming out some more. Okay. Put this in. Okay. That should be fine. Move to the side. Move this in. Bring this down, bring
this down, down also. Okay. Put this in
us the pro size. Okay. Put this in
in as well. Okay. Push this in in as well. Okay. Yeah, I think this
should be fine. Clear the marks. I bring the max back
out. Let's see. Increase the subdivision level. Okay. Yeah, this is fine. Okay. I think undo that. Invite the max. Going
to push undo that. Let's go to lower
subdivision level. I would like to
do an auto group. No, don't do that. But
if you do an auto group, it's going to give
this is symmetrical, see after symmetrical,
that's fine. Recisly what I want. Max out, invert the max,
invite the max again. Increase our subsionl increase
subition level, do that. Move this in some
more. Pull down. Okay. Okay. That should be fine. Come up close. All right. And some more I think I'd like to get
some sharp edge to this. Feels way too rounded. Way too rounded. But
for this Butler one, we need to delete any subdivision
level we have in there. So let's delete IR for now. Let's get in. So
where do we add this? So BZ going to reduce
the blow size. Find where we can clamp this in. Why is not adding insets? Come on. Okay, around here
should be just fine. Let me reduce the blow
size even more. Come on. Tallsio why is not working
in between though. Let's do one more around here. I would do it symmetrically. Who, it's we're not doing
this symmetrically. I need to do the
symmetric calling. It's important to do
the symmetric curling. Symmetry is all now. Okay.
That should be fine. Did it also work on the
opposite side? I think not. Okay. You also should be fine. But I need one to be in here. I don't know why I
can't get one in there. Not sure why I can't get
one in here, though. Okay. Well, let's work now. Not
entirely sure, though. Get up close. Not working. Not sure. Okay, let's do one
year if that helps. Not sure why it doesn't
work on that edge, though. Okay. Come on now. Ah, great. In do that finally. Okay. Et's do one. It isn't quite
frustrating just to get to get edges across. This is quite problematic. No entirely sure why though. Great just great. Great. Wow. It works here, no doubt, but around here, it's a pain just to
get this to work here. And I'm not entirely sure why. Let's see if we can do
underneath this instead. Seems like Zip actually works when it wants to
play some specific area, I know I'm not doing
anything wrong in here. Don't think I am. I just need to add
an edge in here, and then we have kind of declinings
adding this edge there. Anyways, let's bring
everything back out and then subdivide. We should at least get
something that resembles an edging in Indian at
least at the very least. Okay? Subdivide ones. Me,
let's see. Okay, 89. That seems fine. Okay. Let me go to lower subdivision level. Then save. Then we'll
continue in the next lesson.
11. 10 Sole Padding In Zbrush: Talk about guys. So let's continue
on from left off. I'm just going to like to
make some correction before starting your wrapping or rather before we start adding
the hue lays on this. So is like this piece you
need to kind of work on. So I'll just need to go in. Right. Let's let's see if
we have new layers in here. Do you have new layers in here? Let's go into the high
subdivision level. Okay. Okay, no layers yet. So let's create a new layer in. All right. That's fine. So let's go to the lower
subdivision level. Okay. Get in there. Control shift click,
hit click again. Control Shift click again. Okay, invert those,
Max them out, shift F, bring everything
back out, invert the max. Let's go to higher
subdivision level. I think Might will need to
completely isolate this, let's just undo Let's go to the highest subion
level while we are in here. Going to use them standard
add this cut in between. So as to make it
look a bit inflated. All right, so let's get close. Close. Use the DM standard brush. Later them standard brush. Let's make sure we have
this working symmetrically. Symmetrical, that's fine. Okay. So we need to align this
where this label should be. I think to do that, let's go
some few subdivision level lower so we can bring
out this label as well. So select this as well. Oh Okay, invert the
selection. All right. So now, let me make sure that my subuon level is
visible some subduon level three come in close. Okay? So now we need to
add the code in the Jam standard was selected. Right? Needs to be as accurate
as we can get it to be. Let's start with this first. On this side as
well. Just trying to block things in for
now. So I block that in. So I'm going to hide
this undo this as well. I'm not going to get into one, and then since we
already working symmetrically, it
should be fine. It also affect the
opposite size. I'm going to increase brow size. Do something a
little bit deeper. Don't do that, reduce
the bros size actually, increase the subdivision level. Get enclosed. All right. I think this should
be fine. Let's go even deeper around
there as well. Let's go on subdivision
level higher. Let's go on that subdivision
level higher again. I'd like to refine this some more do that noting that
correctly smooths little bits. Yeah, this should be fine. Increase the process
a little bit more. Let's come down a little
bit add one year. We use the bros size. Getting the smooth out a little memt intensity
is way too high. I'm going to take
down as intensity. Let's go to lower
subdivision level. Go on subdivision level higher. Get a bit more depth in. Some more depth in there. All right. I think we
can work with this. I think I like to do the same
also too for these parts, get some more depth in there. I think we can do one more. Let's do one more
around here. Okay. I don't think there's
one there, though, but I also like I should
do just one more. All right. So I want to
increase the subdivision level. Let's see what it gets. Okay. I think this should work. Let's bring everything back out. Let's see what we get
with everything out. Yeah, this should be fine.
I should work just fine. Okay. Now I'm going to go to
a lower subdivision level. Let's go to lower
subdivision level. Let's see if there's something
else we can do in here. Go to a lower subdivision level. Okay. So I'm just going to
push this down now. So I'm going to select this label select
this label as well. Give them the same polygroup
shift F. Let's give them the same poly group so we can easily select them
together when we need to. Let's max them, invert
the max Shift F, invert the maxing here. I'm going to use the move
brush and then bring it down. Let's go to a lower
subdivision level. Go on subdiviution level higher. I'm just going to let's go
to lower subution level. Almost lower sublution level
than it should be fine. I'm going to push this down. Push this down as well. Let's go one subdiviution
level higher. So you get more precision with this needs to touch quite well, almost like entering
in if possible. Let's just put this
down some more. All right. Yeah, it should be
fine. This work just fine. She's on both side. I should work just fine. Okay. I think we should be fine. Let's see if there's
something else we need to do. Let me go to lower
subdivision level. I want to see if I have
this pattern in her. Do you have a pattern in here? No, really. We don't
have a pattern here. We need to kind of
create a pattern. We need to put it
under a cert level of padenO maybe not.
We can just use. Let me get that out again. Yeah, we need a pattern. So I'm going to put that in
a different sub sub tool. I want to be in a
different sub too so let's get a paten out. So let's go over to let
me hide this for now. Let make sure I
also kind of rename this also because
it'll be like a main. Let's just name
these two sneakers. All right. That's
fine. Need to grab. Let's go to this. Let
me hide this for now. Let's go into that
duplicate group. Let's look for the pad
and. Yeah, this is it. I is the exact one I need. So I'm going to make a little
bit of correction in here, I'm going to select
select this as well. Okay? I'm going to do a
delete there's the delete, we need to duplicate that
first, so we have a backup. I'm going to send
this down also, so Shift F, send it
out of the group. Let me close that group, group folder for
now. This is it. So I'm going to delete Eden. Let's go over to geometry, Modified topology, delete Eden. Okay? That's fine. Then I'll need to add some
thickness to this, so let's go to edge loop. No edge loop. Dynamic
sub div turn that on. It's way too thick. We need to make some
corrections to this. So I would before I continue on, let me turn on the sneakers. Go out of solo mode. Okay. I'll need to make a lot of corrections
in here, no doubt. But on the right track. So let's start by pushing it in. Let's push this in
very much first. It needs to be inward. Now, thickness we're adding for this is still in real time, so you won't have any issues. Let's just get this in. Get this in quite well. All right. In some more. Okay. I don't want it to
be visible outside. So make sure I push
this in quite well. Okay. Yeah, that should be fine. Now, I just need to
be concerned about the thickness thickness that I need to be concerned about. Let's slow this. This obviously way too thick. Obviously way to tick so. I'll go in back to the geometry. Then I mix up the thickness. I'll take down some more. Something like so
should be fine. I'm going to apply this right. And I'm going to do
a polish by group. Let's do polish by group. Deformation, polish by group, polge little bit more. Let's turn up these
dots. Polage some more. All right. I think
this should work just fine. Let's see where it is. Then we'll make some corrections by pushing things back in place. And then we should be good. Okay. Yeah, that's fine. Just checking this around
again. That's fine. All right. So I think I'll need to lift
it up a little bit more. Maybe let's do transparency. Let's see where it is.
In the right place. S we need to let it
rest down some more. Let's let this rest some
more bring this forward. Let this rest. Let this rest on more for a little bit more. Trying to perfectly fit this. Okay. Yeah, that's fine. Here, this, this
will work just fine. Let's go out of transparency. Let's see where we
get. Let's make sure we check this
out all around. Here, this is fine.
Okay. Now, we need to mirror this
to the opposite side. Let's just mirror this
to the opposite side. But before we do that, I think I feel like I should add another extra loop on this. So B ZM, let's add
some extra loop. Add one here as well,
that should be fine. Let's mirror this to
the opposite side. So geometry, modified
topology, mirror and weld. Okay. Yeah, that's fine.
We have that in here now. So the next thing to
do now would be to I think we can safely add
hue less to this now. I believe at this point, we can add hue less. Okay. So there are a few
ways to do this though. I'm thinking of using or
doing this inside of. I think we can Let's
do in Zbrush instead. So let's just get
this done in Zbrush. So we have crosses going
inside. I goes in. Let's see. Need to make sure we do this
as accurately as we can. This one actually goes in, then we have one that
goes across, okay? Yeah, it should be fine. So I would need to, I think, we can do that
in the next lesson, read the shoe less
in the next lesson.
12. 11 Shoe lace base in Zbrush: Okay, we come about, guys. So let's get the shoelace in. So I'm going to rename this
let's rename this two. So let's cups for this. So pardon. Alright. That is fine. So I'll
select our shoe sneakers. I'll increase the
subdivision level some more. So I like to use the
Curve tool for this, see if we can get one
shoeless going on in there. So I'm going to reduce
the brush size, but make sure the saw pattern is selected because
although I have subuton lay on the saw pattern. So you can use the curve
brush a little bit better. So it'd be on the keyboard. I'd see. So we have the
curve flats. Let's try this. Okay? Let's start by
doing something like se. Let's make it slightly longer. Be longer than it is right now, so let's extend
this out some more. It's extending Is not extending, so I'm going to do I repeat that he has better extended now. Maybe way more than I need do, but that is fine. Okay. I think we need to
reduce the brow size. Let's reduce the bro size. So more going on
tapping in there. I think I reduce
this way too much. Trying to figure out the
right size for the shoelace. I think this size
should be just fine. This star should work just fine. Okay. So I'm going
to go in and then do splits do splits
on marks points, and I'll go over to
Shrok let's cove. Let's do believe
Cv cove function, delete the curve, right. Then we select it, go
to the move brush. I'll just need to
move it in place. I think I got more than I
need so I'm going to use the maxing to mark this Control W. Tepid PL group
control Ships click. Then realize the delete Eden. Do delete ding, so go
over to if I do deleting, let me just do it duplicates.
Let me duplicate first. Hide this. Then we can
do delete ding now, delete delete ding right. So I need to kind
of move this down. Gear this up a little
bit. I should go down. To bury that inside already where it needs
to be, so that's fine. Okay. Something like so. So I'm going to do a duplicate of
this so let's go to our gizmo, center this old control drug
duplicates out, rotate it. Let's get in close. Okay down should be on top. Get close, rotate some more. Okay. I'll need to lift it up. Like so it should be fine. All right, bend this in, bury that in some more. Okay. Let's see how far
extended needs to be. I need to push this
down this way. All right. A but this needs to be a little bit better
than it is right now. So it's just to keep
making adjustments to it. Invert the selection. Hold this up some more. All right, that should be fine. Yeah, this should
work just fine. It the max Hold down control, drag this out
again, make a copy. I'll rotate this way. S the orientation
again, bring this down. Okay. Get this down. So we need to kind
of get this to look right, rotate it this way. All right. And I think I can
do a inch of polish to this. Maybe I went a bit overboard. I polished this, I complevery them could have no subdivisions
or loops around this. You can't keep keep
it as basic as I possibly can for now before making any additional
corson to it. Can I use smooth Smoothing
these out a little bit. Okay. Get this down. Let's make sure we
did this correctly. Think I'll need to extend
this out some more. At this point, it's all about getting the
right angle to it. We need to get it
the right angle. So you need to make a lot of movements and corrections to it. Okay? Yeah, I work just fine. But we need to move the
center points down some more. I think somewhere around
there should be fine. Okay? Can we do this
with transparency so we can work a
little bit faster? All right. So at this point, it's basically
repetitive process just to get it looking right. But I think we're on the
right track already. I need to push this down. This needs to go down, bury it in, Br it in as well. Okay? When we add more
subdivision label to this, then we would have more
control over the entire thing. So let's continue on. So you have done this piece, then we have done
this piece as well. Then we need to do the ones
that kind of goes across. So let's start let's
start with this. So I can just duplicate
this as well. So hold control, do that. Hold control and
extend this out, bring this up, rotate. Route it this way. All right. Yeah, that seems fine. Just a few corrections, and
then we should be good. Bury this in. Just make sure
you bring this in properly. Like, so get this flat as well. Okay, in some more. All right. Yeah, that seems
fine. So let's go. Let's do the opposites. Let's do it for
the opposite side. Okay. So I'm just going to
hold down Control. Okay, what, let's just
continue on with this person and fill up the gap. So I've done one. So I've
done one meaning meaning one, two, three, then four. Okay. Yes, okay. So I'm just going to pull
control, move this forward, pull this out,
rotate it this way, to make sure I'm
doing this correctly. Move this forward
a little bit more. That should be fine. Then we use a move brush, bury this in. Okay. Get this up a little. It's just a matter of news with utmost carefulness.
That's all. All right. That should be fine. Let's get another one up. Put on control,
extend these out. Okay, move this forward and up. Alright. Down some more. So you need to use
that move brush now to kind of move
things in place. Okay. Bury this in. Bar this down some more. Bring this down some more. We're kind of creating
this one you want on top. I kind of go on top. All right, bring
this up some more. B this down. I think that should be
fine. Let's do one more. Pull down control,
extend this out, pull this, bring this forward. Okay, rotates. Use more brush, move this in. Bar this in in some more. I
think that should be fine. I think we still have a few
more to go across this. Yes, we need one more. Okay, so let's extend these out. Pull these outs. Okay. Some more. I will need
to extend this out some more bring the
closer rotates down. I think at this point, I will need to use the
more brush to kind of compensate for it
and then complete this. This spoken out, so
let's get this out. Okay? A better angle for this,
bury this in, get enclosed, reduce this out rotate oh I think I'll need to
jot this down some more. Hold this out. I'm
not a thickness yet, so I just need to get the shape in f before adding thickness. So I need an edge
loop in here to hold hold this some more. So let's create an
edge loop. So be Z. Let's add a loop around
here should be fine. Around there should
be fine. Okay, let's go back to our move brush.
Let's bury this in. I need to find a good angle for this just to get this down. I feel like I'm selecting
the wrong parts, reduce the bro size.
Find a good angle. Okay. Vary this in. Okay. Increase the browse
size a little bit more. Bar this in. Look for
a good angle this up. Get back in and then push
this down some more. Rise the blow size, push
these down some more. Okay. I think this should work. I think I need to add another
extra edge loop in there. So let's Z. Let's add one quite close
around the edge should be fine. Okay, move brush. Rotates. Here something like
so should be fine. Here, this should work. I would just need to get the ones that will go on
the opposite side now. So let me just see if we can make slittb
modifications to this. Okay. I need to make some
more correction, but I think for now,
they should be fine. So now let's get the ones that should be facing
the opposite direction. So we have these
that comes across, you should go from under,
it should be under. So I'm going to do let's do a let's go to poly
group Auto group. So you can select them
individually now. So give us more select
this Wood control, get the duplicate
out of this rotates. Get this up this way. All right. So now we just need to use a move brush and then make
modifications to this. So this one going to be buried under buried under
here, like so. Alright. It the marks. Give this up a little bit. Invert the marks again. This one should be up a little, then bury down this way. Here, like two should be fine. Reduce the bro size, a little
bit more work in there. All right, this should
be fine for now. By this down. All right. So I can just use this
now and then go across. So I can just
duplicate this now. How control, I duplicates out. So just a method of moving this in place, and then
we should be good. The move this forward some more. I believe, yes. Sin should be fine. Okay? So now we need to
make corrections to this, and then
we should be good. Et's first get this pushed down. Get this out of the way. It sell this up some
more. All right. Invert the mark Sill
this up a little, bury this in Make sure you bring this in
properly. That is fine. Okay. Till this down. Reduce the bros size some more, leave this up some more. So I'm just making
individual corrections to this now to the points. Okay, I think that should work. Alright, now let's make sure this on the opposite
sides cannot properly buried in.O some more,
that should be fine. Pull down control,
pull this out. Up some more. I think this is ECC work. And move this out of
the way some more. Okay. Bury this in. I think I need to
move this out some more so should be fine. All right. Let's do
okay, saving out. We need to do another
Auto group just to modify some of
the other points. Fell us on auto
group. He's fine. Okay. More select move
this up some more. Just give it a bit more space. Okay. Here us the one Move this out some more. Get us fine. Let's do a
duplicate of this again. And to pull it down. Now, let's use a more brush to make significant corrections to this sib size. Get this down. Get this down. Then some more some more
invert the selection. Si this sib size, till this up some more
Resib size gets close. Et's use the Gizmo.
I select this. So you can do individual
movement suits. Okay. Let's go to the one
we created before and then get this in. By this in here. Look at it from a
different angle. Let's see what we have. Okay. I think we might need
extra loop in here. So let's do the ZM. Let's add an extra
edge loop here. Back to the more brush. We can move this now
without any issues. Okay. Yeah, I think we are good.
Here that's fine. Zoom out. Okay. So you need to
get it out again. Undo that auto group. This is what we need, down
control, get another one out. Let's see how this
is supposed to be. Okay, Kitchen should be
on the also as well. Are we have it in a
good place already, so I'm just going
to pull this out. I think I'm using move Brush
now to get things in place. Let me start by, let's extend extend this out
a little bit, like so. Bury this in. Think might need some extra
hedge as well for it. Lets just gets in place. Bar this down. Kind of
tined out on this part, so we need to reduce
the brows size and extend this out some more. Okay. So extra edge loop A. So be Z, let's add one
edge loop. Con do that. I think we already
have Ed loop already. Let's add one year. We use the back to the Mo
brush. Increase the brush size. Pull this up, use the brush
size compensate for it here. I need to bury this now. So let's bury this down. Bury this down. Okay. Extend this out. Alright. Trying to make some
adjustments to this. This fine here as well. Okay. Since something pretty
much like so should work, we for start adding
subdivision lay to it. Alright.
13. 12 Shoe Lace Refinement in Zbrush: Welcomba guys. So I'm
going to carry on with this there's something
I needed to do initially before
letting the shoe list. So let's do that to inflate
this a little bit more. I'm going to select this now. You have some interceptions and you're not entirely sure
what the ship is, though. Okay. I'm supposed to hide this. Let me drag this up and
temporarily hide that. Okay. So I need to grab this. No, this instead. This also as well inverts. Okay. Let me put this aside. Supposed to just inflate this a little bit more to shift F. Okay. All right. So let's do,
I think we can do that. Let's do a let's see
if this would work. PoroPlyGroup. Group a normal, not really, so. Anyway, it's too really
matter that mooch. Let's just I would like
to max this first. Then select this and invite
the selection again. This is precisely what I need. I'm going to invert the max. Okay. Then I'll go
over to deformation. I need to inflate
this udon flow. That's way too much. Let's use a small amount. That's
still too much. There's a value of 0.6. Zero point C looks
like a good one. Let's bring everything back out. Yeah, zero point seems
like a good one. But we need to make
some adjustment now. Start by pushing do that. This out. I need to select
this also, too. Come on. Select this. This
as well inverts, max invert and max. I think we symmetry
turned on for this. Get enclosed, push this down. I do that actually. I need to include this as well. Need to include that so we
can do this all at once. Okay. Like so. Then I can come on. Move the marks for this. Marks, this bring everything. Come on. It the marks, yes, this work just fine now. So I just need to push this in. In some more. That's fine. Do the same
for the opposite side. N to be quite careful with this, so I think it should be fine. Just trying to get it as
precise as as I possibly can. Okay? Alright. I think I need to
bend this down. Yeah, that should be fine. Cut the subdivision
level again one step. Get this buried down. Okay, that should be fine. Clay the max. Now
we can safely go to the shoes now. Lay this. Can see this booking out here, I need to bring this down. So you need to subdivide this. Let's subdivide this for now. I'm going to subdivide. We have this at
500 pulley counts. Little bit might need
a little bit more. Let's de duplicate of
the sub two first. So let's duplicate the
sub two, subdivide again. So now we'll see
where we need to kind of make corrections too. Let me undo this
Let's go to original. Let's go to the
original do this. Now, there's one I like
to do because I smooth the subdivision levels to kind of smoothing out the
edge way too much. So let's delete this
duplicate for now. Duplicate the original again. Then B M. I need to add I need to add segments on the part quite
close to the edge. The edge one more add
subduction level, so it's not going to completely
smooth out the edge. I'm going to do this
for the entire out sin. Okay? Well. Go up here as well. Yeah, so. Okay. I think we didn't do this,
but let's add one year. Let's even add to actually. Close the edge. We just
repeat the same here as well. We need one here down here. Okay, so Okay. Yeah, yeah, as well. Come down here at the same also. Yeah, as well. Okay, that
should, Steve a few more. Stay a few more. No. Just make sure we're doing
this not doing something else. Okay. Yeah, as well, get it in. I think we have one
day already here also. Make it duplicate again. Ming everything back out.
Now, if you subdivide this, it's going to hold the
edges properly now. Subdivide this again. Okay? Alright, I'm going
to delete lower now. It, let's work with
what we have here. Mm. Right. Yeah, I think work just fine. I work just fine. We can reconstruct
this if we need to. Okay, delete lower. Let's create some
thickness for it. Let's put the dynamic
sub di dynamic. Okay, reduce the thickness. Needs to have a good amount
of thickness for it. Segment segment will
need to be in her Okay. Let's reduce the thickness
a little bit more. Let's see. I think this
thickness should be fine. Ship let's C. No need a
little bit more thickness. Yeah, I think this
should be a good one. Signs should be a good one. So if you apply
this now and then we subdivide, undo that. Undo that again use
segments, just one. Apply, subdivide nope. We have extra edge. I don't want extra edge on this. There's extra edges around here. Actually quite tight
are quite tight. Okay, I think we
can work with this to apply this if we subdivide. So we need to do to make
this a little better just so far is looking good. I'm just going to
do a polish to it. There's a polish. Okay. Yeah, I think that
polish was fine. Okay, so now we need
to start moving. Let's polish this again. No, not yet. Four polish this. Let me take this down to lower
subution level and then. So I'm going to do auto group. Let's do AutoGroup also in here. AutoGroup. So I'm going to use the move topological brush
now, move topological brush. So I can move things a little
bit as an individual piece. Okay. F. So I kind
of do this properly. So I'm just trying to
push the edge down. Just basically trying
to push the edge down. Okay. Like so. Let's do for the
opposite side as well. Okay. Put this in. Pinch the edge a little bit. Let's use the pinch brush, BPI. We you pinch? Yes.
So I'm not going to pinch this pinch the
tip a little bit more, so it looks like
it's being put in. Let's see actual reference for this so we get a good idea. Okay. So it looks like
it's being pinched in. Okay. I think I might need to extend them out a little bit more. But the painting is
working just fine. One should be fine. I don't need to do too
much working here. Okay. I feel like I need to
pull them out some more. **** let's grab all
of these first. Okay. Okay, let's do this first. If I would like to
put a more brush, pull it out some more. Out some more, put it down. I'm asking to come back and
fix this later on, though. Why? Because trying to
get a good ideas to where it's supposed to be roughly close to
the middle point, close to the middle, somewhere
around here, like so. Thus I needed to get them
close to the middle. This one I need to push down. Okay. I think this is fine. All right. So I need to pinch this insults use the pinch brush again. Pinch brush. So pinch this down. All right. Yeah,
this should be fine. Okay. When this down, invert this put this
out, then down. Since ready in the midpoint,
that should be fine. So we need to extend
this down some more. Okay? It'll be in the
midpoint as well. All right. Stand this out again. Bring this in, up some more. Get this back close
to the medum. I have a good angle for this. By this down around here as well. All right. That should be fine.
Unless you ready, so that's what it's
supposed to be. Close enough. Let's just
get it down some more. Do that part extend
out some more. Okay? Mtend this out a
little, be it down. All right. Yeah, that's fine. I think this is fine. I think we can bring everything
back out now. So this will be
like a finish list. Then we need to mirror
it to the opposite side. So it higher and let's
do mirror and weld. Okay. So you have
list on both side. Yeah, this is fine. So now we start writing
an indentation in there. Don't know symmetry
to on for this. Just to be sure if symmetry
is symmetry to on. Okay, symmetry is on. Okay. So let's subdivide
this a little bit more. Yeah, this will work just fine. We can pull this down
some more. Okay. So now I'm just making minor
corrections on this now. Just to make it a little bit
tighter and close out to the close out to make
the strap a bit tighter. This will be fine. Okay. This we can definitely work with. All right. Select this Okay. I think that's fine, I need to pull this forward some more. All right. Yeah, that is fine. Clear that out. Yeah, I think for the most
part, it should be fine. So let's just go back
to the tones instead, and then let's make
some other corrections in here and then
we should be good. I need to get this to
the subdivision level. Okay. I need to smooth this out see there's an
issue or something. Let go to lower
subdivision level. Let me select this
smooth this out. Bring it back out, subdivide, include the subdivision
pre subtion level again, pre subdivision level. I feel like I might need
to exclude this out. It's not as smooth
as the others. Not as smooth as the others. Not entirely sure why though. But most likely the subdivision
levels are kind of low. We have lower subdivision
levels there, so that is why it's not
as smooth as the others. We need to make this as
neat as we possibly can. Okay. T is what I'm going
to do. I'm going to go to the higher
subdivision level. I'm going to separate out I
combine into something else. I will go over to layers. Let's do big O. Okay. All that's fine. Then I'm going to do Ship F. Let's go to lower
subdivision level. Let me first do a
quick save. Save this. So I'd like to
separate them out. Let's separate
this this as well. So I'm going to do splits. Let's split it out on the rest. Let's do a split ding. Let'll give you some moments
kind of run through. Okay. So we have
separated out now. Let's check. So the
sickness stickers itself, the other parts are still maintaining the
subdivision level we have in there, which is fine. Now the separated out piece now, we need to measure that to something else. Let
me take it down. Okay. Let's keep it
a little bit up. Then let's go in
there and select it. Separated piece, let's
go in and select that. Okay. So the highest subdiviution
level for that would be really 1 million and then it's still not as
smooth as it needs to be. That's rather odd. 1 million and then we still have
this weirdness in there. I'm not entirely
sure where we have some weirdness in
there. It's 1 million. Okay. So I'm going to delete let me start
by deleting higher. Let's delete Aya to begin with. Okay. Then let's
now subdivide this. Subdivide now we get something
smooth, subdivide again. Okay, subdivide one more. Now we have something
quite smooth. Which is fine, so I'm
going to go down. I'm going to delete Ai just want to kind of test this
out just to be sure. Alright, so we are good. Yeah, that's fine. I think I
was missing one more piece. I'm missing something so
I'm going to go in and select this delete tire. I need this white piece
supposed to be in there. So let's see what we can use. We can't steal this because it's kind of merge the entire body. So let's create
something new instead. So we can do let's see what
we can steal indian use. Here, we can use this.
I'll duplicate that again. I'll pull it out. This might
only take too much time, so let me just flip
this this way. Then I'm going to mark the bits. Mark this bit as well. Control W. Okay. Select those two. Let's do deleteden So they delete den for this delete
den geometry deletes den. So this I'm going to scratch
this down a little bit more. Okay. I believe the way extend
out this way instead, rotate this way where
it needs to be, needs to be put down. I think is down. So we just need to make
some modifications to it, and then we
should be good. This way, rotate this way. Want to subdivide undo that. Let's add B modify topology ZM. Let's add an edge
here here as well. So if we subdivide this now, you should hold delitle bits. Okay? So now we can delete lower. No, let me undo that. Okay, let's Busy again. Let's add something here also. Then one in the middle.
Let's subdivide Sd quite nicely now. Delete lower. Now, we just need to use the move brush and then just move
things in place, and then should be
good. Move brush. Okay. Bend this down needs to be in this way. Still make modifications to it, but let's just get it
where it needs to be. We need to look, check this
out from a better angle. Transparency. Okay. Okay. You blow size gets close. Don't know transparency.
All right. I don't need to be down with too much, something on the tip. Once we add thickness to this, then we can properly get
it close down even more. So let's just I
think this is fine. We cannot move this down
on it a little bit more. The thickness should be
working out instead. You made the points come on. Made the points I need to
move up some more zoom out Sled the shoes
bring this down. Okay. Back to this, we need to do
a smooth for this as well. So let's use the
polish by group. That was a bit too
extreme, turn on the dots. Smooths out a little bit more. Okay? All right. I think this
should be in a good place. Rotate this reduce
this, get in close. All right. Now let's add
some thickness to it. So dynamic sub div
way too thick. It is down to zero. Shift F. Let's see what we have compensate for
it on the side. Kind of maintain even
even width around it. Okay. Get close. Put out some more. I think we an extra bit
of thickness to it. I think this should work. Yeah, this should work.
Slightly too thick but. I think we can make it work. Let's reduce the value. Okay. Yeah, it should be fine.
So I will eat apply. Then I'm going to the
slight polish for it. There's a slight polish, so go over to deformation. Polish by group, polish
by group, a few times. Then polish. No, that's way too extreme. Turn on the dots, polish this. I like it too extreme. Okay, I think we need to go in there and type in vales in it. Let's go 0.4. I think
we can make this work. Going to reduce the brush size. I think that's
still way too much. I think, let's do
this a few times. Let's go back to dynamic. Still dynamic sub sub div. Yes I think sticks
should be fine. Trying to find the
perfect balance for this is not too thick. But at the same time thick enough for what we need it for. Okay. All right, so let's apply this. And I'll go over and then
put it by group a few times. Put it by future, put it by future work just fine. Put this up some more. Put this out some
more visible size. Let's get this squarish. Squares as well, o let's
see how this works zoomed. I think this is fine. I think we have looked at it too closely that it begins to feel
like it's not there yet, but I think this is fine.
This work just fine. I need to get this
to look perfect. I'm trying to find the
right balance for it. M Okay. Yeah, I think we
can live with this. This we can live with. So I'm going to do a mirror for
this. Let's do a mirror with. Okay. So on the
opposite side now. Symmetry turn on. Symmetry. All right. Then we need to merge this with
the shoe last itself. Let's merge this
with the shoe lace. I'll send this down. Let's select the shoe lace. So I need to rename this now shoe Let's use a cup for this. Shoelace. Okay. I'll send this down. So I'm going to merge this down. Let's merge this
let's release first. Make sure you want the lowest subdivision
level to begin with. That's lowest subdivision level. I'm going to merge down. So let's merge down. Select merge down. Okay, I also going to merge this down with the Nike logo as well. Let's merge that down in locus. Let me pull this down. Let's merge that
down the Nike logo. So merge down comes
this merge down. All right, this is fine. So
now if we subdivide this now, we subdivide this now, we should have everything
looking quite good. So let's subdivide. That's way too much on D. I think
this value should be fine. So the last we need to do
will be just to create this whole inside of this,
and then we should be good. We'll do that next
lesson. Bye for now,
14. 13 Shoe Lace Holes in Zbrush: Co comb, guys, so let's carry
on from where we left off. Before we continue,
I would like to make some correction I see
here that I need to make. Let me go to the lower
subdivision level. Okay. I would like to
select this as well. It the selection, given the same polygroup
mark invite the max. I'm not going to use the
move brush and then move this back slightly this way. Yeah, that should be fine. We're working we're not
working symmetrically, so I need to do that without the mark tonal
symmetry for this. Get closed. All right. Yeah, that should be fine.
I'm actually thinking of deleting this if I draw out my indention in here to be sure if I have enough
subdivision level to hold. I don't I don't go to delete this side. Let's see
what we have, though. Okay. So I'm going to
create a new Shift F. Create a new layer for this? So this indentation is
going to be on this layer. So we're working
symmetrically in here, so that should be fine. So I'm going to use
the max brush instead. Let's use the max
perfect circle. Getting close. Then I'm going to draw
a circle this way. Okay. Yeah, like
su should be fine. Draw another one,
as well. All right. Around there should be fine
as well. Draw another one. All right, that should be fine. Yeah, well. Here, also. Okay.
Move this along. We need one here. I was thinking to adjust this
a little bit more. Let just get the
circles in here first. We'll do one here. Let me get a good idea
the size of darts. Okay. I think that side should be fine. Lake
another one in. I think this one
might be too big. The right size. That should
be the right size. Okay. Go to the opposite side
and repeat the same thing. S, we need to kind
of clean this up. But we'll do that later
on later just kind of gets everything need
to be in there first. Getting close, I think I'll reduce the brows
size a little bit more. Okay. Well. He also. So what's going to make a lot of correction
in the blur just gets the blocking in there
and it should be good. Okay. I think we need to
extend this out even even more. Looks
a bit too thin. Stand this out. That so should be fine. Move this along here as well. Then we create these extras here also Okay. Zoom out. Shif Control Shift click
on this this again. Right as well. Etside this. I'm not going to clear
out clear out the maxing we have on the pass that we don't need the maxin to be on. Okay. Let's do for
the opposite side. Let's do for the opposite side. Okay. Come on. Okay. If I go to a lower subdivision, I'm going to just blow out entirely the maxim we created
and I don't want that, so beside this as well funnier, they have almost similar colors
but they are not similar. I think we have this now. Okay, so we can clear
the max in for this. So let's just dress circle lo. Then invert the max. It the selection instead. So you can actually
see the opposite of the selection that we made. Great. Lost everything. Nd that Great. Everything is lost. Let's bring everything back out. I think start to do this in
your opposite direction. Let's just bring
everything back out. Seems like it does not want to. Let's see. Um Okay. Let me feel this black. Do that first. Zoom out. I'm going to
use a different max too. Let's use the max
last zoom instead. Mark all of this. Okay. Bring the ship out. Undo that first. I would like to
invert selection. Let's invert the
selection instead first. Invert the selection now. Let's everything back
out. Yeah, perfect. This is what I
want. Okay. We have this in here what we don't need. So I'm going to
mark this part out. So I just need to kind of check this around
just to be sure. Mark this part out as well. Okay, I think I think
we are good now. Here, I believe we are good now. So let's get in close. Getting close. So we need
to use the inflates. Let's go to the formation. Let's use the inflates. Let's get this on the negative. That's way too much.
That's way too much. Do that. I think I want to
start using values in here. Let's use a value in here. Let's use the value
of minus one. Let's see what minus one gives
us. Let's getting close. Let's see. I think minus one is actually
too deep, do that. Then we need to blow
this out. Do that. Let's blow this out.
Let's get in close. Tap on the surface just to blow the edge out
a little bit more. Okay. Let's put the value in here. Let's do -0.3. Let's try it out. Let's see what we get. Okay. Maybe maybe just a
little more should help. Let's go in there again so -0.2. Yeah, I think I think
this will work just fine. Yeah, I think this
will work just fine. Yeah, this is the write on. So I'm going to I'm going
to play the mark out now. I need to go and then
begin to wait a minute. Great. That is just great.
Lost what was in there. Lost completely lost
what was in there. Let me do this a few times.
I'd like to get that back. We need to get that back. I'm guessing it
was when I kind of visit Mark's last kind of movie portion probably where that is where
that's coming from. Okay. I don't even have It's not even there. Okay, it's there now. It's there now. Okay? So let's grab this. Let's grab this. Okay?
I think we have it now. Just to make sure I'm
doing this correctly. So we still have the
max lasso selected. The mark last selected, I'm going to max all of this. Okay. Let's bring the
other one back out. No, not yet. Undo. Not yet. Invite the selection phase. Invite the marks. Cross check again to be sure everything
is in the right place. Autonomsymmetry for this now, Marks this marks this as well. Marks this. Marks this as well. Okay. I think we are indi now. Let's get everything back out. Okay. Yeah, it's there now. So the value we need
to use for this now be minus zero -0.5. So -0.5 Oh, yeah, I'm supposed to supposed
to blow this out first. I supposed to blow it
out first. So do that. Let's blow the edge. So I'm not going to control tab just
to blow the edge at once. This one should be
completely fine. Okay? Then we'll do
the value again, -0.5. All right, that's fine. Since we have this way
it needs to be now, I'm going to clear the max
and I can go in there and then make any adjustment
I need to make in there. So let's go to lower
subdivision level. One subdivision level higher. I'm just going to use
the move brush and then just try and compensate for it. Just making a little
adjustment in here, make this a little
bit tighter in there. Yeah, that's fine. I think at this point,
I'm supposed to be doing this symmetry to on, so I undo this is symmetry ton so I can
work a little bit faster. Okay. All right. Okay, this is fine. So back
to the original point. So symmetry on now, we can increase the subdivision
level once and then begin to adjust this is the way
we need it to be adjusted. So I'm going to get in
closer and then start moving this in Okay. So you need to symmetry
to on, which is fine. All right. I need to reduce the
bro size for this so I can move that down some more, move this down
some more as well. The opposite side.
I need to kind of move this back in like so. All right. Then you can
adjust this snap properly. Let's increase the subdivision
level one step higher. Okay. Make this a bit tighter
in place, select this. Go to the lowest
subdivision level. This the lowest subdivision
level for this. I need to extend this
out a little bit more looking too slim. Yeah, I think that should
be fine. Go back in here. Make this a little bit tighter in All right. Okay. Yeah, that should be fine. That should be fine. I'm
going to isolate this. I feel like I should go in
with a dam standard brush. A little bit little
more depth in there. Let's do it to lower
subdivision level instead. All right. Need it to have
some more depths, make it slightly
more interesting. This for the opposite side. All right. Almost done. Yeah, I think this
should be fine. Let's get everything back out. Increase the subdivision level. All right. Let's see if
there's anything else we want to do in here. I think for the
most part, this is fine, so I'm going
to do a quick si. This is good. I'm taking of adding
stitches inside of Zbrush. Let me see if I need to
do this in here or not. Someone to increase
the subdivision level. Create the subdivision level, and then we do one and
we see how that looks. If it comes out well,
then we can continue on. If not, what are you
going to leave it and do it inside of
sotan spina instead? So I'm going to
name this two Liz. Let's do Liz Ws, that's fine. I'll create a new layer.
Just stand out brush. Go to my light box. I think it should
be under brushes. I think I was going to find
those we have some sin brush. We're supposed to stitches. Stitch, not this one.
Let's see, okay? Yeah, this is it. So we have some
stitches in here, so let me start with this. Let's see what that gives us if we would have something interesting
enough to work with or not. I while, I mean, I think I like to make some
adjustment to this also. You can use the select this. Select the one on
the opposite side. Okay. L to extend it a little
bit more with more brush, increase the brush size mores are those minor corrections that we can just do just to
make it a little bit better. Okay. All right.
That should be fine. Let's do the same for
the opposite side. Because you want to
make sure you don't neglect the opposite
side as well. Okay, I think this should
be fine. Okay? That's fine. Okay, increase the
subdivision level. We still have this
mark, so this is fine. Gonna leave this as it is. Go to the higher
subdivision level for it. Okay. Let's go back and
repeat the same brush. The same the brush size. Let's just draw and let's
see what that gives us. If it's holding the
details well or not. It's actually holding
the details well. Holding the details quite well. So when we do that, let's get close so we can
actually use it. But we need to do this as
accurately as we possibly can, so we'll increase the brow
size a little bit more. Symmetry td on for this as well. Okay. Yeah, that is fine. Let me get in close. Let's see how close to the edge it is. I think should be more closer
to the edge, so do that. Let's repeat this again,
increase the blow size. But let's in next tutorial, so we know that the listen
we're supposed to do. I think that makes better sense. So we'll do this in next
tutorial, five for now.
15. 14 Shoe Stitches in Zbrush: Okay about guys. So in
the previous lesson, we really should let's go and make some little
adjustments to it. So in this lesson, we're going to carry on and then
work on these stitches. So let's name these
two stitches. All right. So right now, the stitch brush we
are going to use. So let's just go on
and then use them. This butlers supposed to
be very close to the edge. I also to kind of get the
right size for these ditches. Size for these ditches
also needs to be accurate. So I do that. I think I will reduce the broad
size the lead to. Yeah, I think this is
the perfect size for it and it will be very
close to the edge, right. And since we already
have this maxed out, so we shouldn't have
any issue in here. Okay. Let's see how this one goes,
this one goes this way. So we just need to pull this
quite close to the edge. Like so. Okay. I'll stop this here,
then move this along and continue
on and do that. To kind of get this as
accurately as we possibly can. We got trying to create
something quite neat. So it needs to be quite neat. Do that. Let's make sure
we're doing this. I'm ordering this well. So
you don't need to rush. Just take your time to actually make sure you're doing this as accurately as you can. I'm ordering symmetrically, so that's fine. Precisely
what we want. Okay. All right. All the way up should be fine. Awesome. We can do
that to do this again. This way, Okay. Move this along. Make sure we're on the edge. Fantastic. So that's fine. So I've kind of
completed the first one. Is looking quite good. So we need to do something else. Let's go and select
something else. So let's first do the one
that has like two stitches. So then we can go to the one
that has just one stitch. So I can go to the back now. This back two stitches. Yes, that's two stitches. Check this again, right? Yours is just one stitch. So clear the maxin.
Let's select this. Let's let the one on the
opposite side also as well. I think we need to go to
lower subdivision level. So can do this a
little bit faster. So like this inverts, increase the subdivision level. Max this, bring
everything back out. Invert Come on. Ivar the max, okay? Let's see. I would like to
exclude this for now, Exclude those for
now. All right. Let's continue
with the stitches. Let's get close. So you need to do this as slowly and carefully
as you possibly can. Close to the edge as well. You know, I think I'm
stealing off way too much. Itel like I'm stealing
off way too much. I think I need to do this again. I need to do this again. So I'm going to undo that. Let me repeat this again. Because you need
to be as close to the edge as you
possibly can stop here. Move this along. So be as slow as
you possibly can, so you can do this with
a bit more accuracy. Okay. Stop here. Move to
the opposite side. I Stop for now. Okay. I think I'm going to stop here. Let me come up instead
and close the gap. Like so should be fine. All right. Move this up. We need to close this down here, and then we should be good. All right. Awesome. Now, let's finalize this on
the opposite side as well. Okay. I think we can nail this
in one try. Yes, we did. Awesome. Let's see if there's something else that
still has two stitches. There's something else
that has two stitches. Okay, so this is
just one stitch. Let's see, there's one
stitch here as well. One stitch. I think this one should should also
have one stitch. Let's see. One stitch. Cam
stitch here though. No stitch there.
Okay? Yes. So it just one stitch now need now. So let's clear that let's
look for one stitch. Stitch, stitch, one
stitch, be fine. Don't tell me there's
no stitching here. Just one stitch. You just
need just one stitch. Okay. Sitting here
Is one stitch. I'm going to use I need
to do something. I think. Let me look for it. If
I can just find it. I go to create something
for. Let me get close. You can see this stitching here. You can see it depth in there, and then the stitch goes
in that it goes in there. So look for something
that kind of capture the essence of
it a bit more properly. I think this This one looks
like it. This is one. I think I saw another one also. This is also another one. So let's try this on
first. Let's see. So I'm going to go to
lower subdivision level. I'll select this first.
This is the piece we need. Invert the max. Okay. I think I need to increase
the intensity for this a little bit more
and getting close, increase the subdivision level. Increase subdivision
level a little bit more. Higher subdivision level, and then let's drag something in. Just getting close.
Let's see what we have. I think it's a little
bit too intense. Let's reduce intensity. Okay. This looks
like it to work. Let's try the opposite one. Let's figure out which
one works better. Before we do that, let's
draw this out. Let's see. Okay. Let's try the one, let's see what the
other one gives us. So let's try I believe
that's then, this instead. Let's see what that
gives us, do that. I think we need to out for this. Now, this is not what we need, so we're going to
visit the other one. The one we use initially, so where is it now. This is it? Okay? So, yes. So this one, I need to increase my lazy mouse radios for it a little bit more so
Lazy mouse radios, increase that some more. Just to be as precise as
I can get this to be. Okay. So let's get in there. Let's look for a good
reference point for this. All right. I think I might need to increase the
bros size a little bit more. Yes, something like
so should be fine. We increase the bros
size some more. Okay. I need to get this as do that. Let's do this again. Do that. What's
been the mid range? Do need a lot more carefulness
to get these rights? No. Let me start from
here instead. Okay. Think we're on the
right track. C do that. It needs to be
absolutely perfect. Okay. Okay. I think that
one is fine for now. Let's continue on. Undo that. That one looks a bit too deep. Undo that. This needs to be as accurate as
we need it to be. Okay. I think we're getting
something in here now. We can make this work. It's a very weird angle, though, but let's see how
far we can push this. Not the best angle, butting, but doing a really
good job in here. On doo that. This needs to be as clean
as possible undo that. Needed to get this to be
as clean as possible. Nd that No. Fine. I think we can quite
easily connect this. Yeah. Awesome. That's fine.
Take us one parts. I supposed to have two stitches. But we do more
than two stitches, like three stitches in there. But as I was using one sti, I go to create three
of that instead. Let's clear this out, go to
the lower sub dution level. Grab this. Grab this as well. Max this invert the max. Okay. Then we just need to hide ho that I'll
hide this. Come on. Getting close, select grades. Need to hide that Okay. So we just need to
continue on with the same stitch and then stitches in there, and
then we should be good. Please size a little bit more. All right. Let's figure out
where this needs to be. Let's bring everything
back out first. I'm going to use this one
to kind of get an idea of where the first one should be. Let's start. Con do that. I need to be on the highest subdivision
level for this so. Let's go to the highest
subdivision level. Okay. I think we need to undo that. We need different type
of stitches for this. It is the one we need. Okay?
This is just single stitch. Undo that, but it needs to kind of increase the
size a little bit more. Alright. We do that also as well. I think we can do start with
doing something like so. Then we'll do another one
that comes across this way. Then we do a final one that
comes across this way. Close enough. This lower part
is not entirely there yet. Not entirely there,
not accurate enough. Maybe we should start let's start from doing the
ones at the top first. Start from doing this
ones at the top. Okay? Then the next one that follows. All right. Then
we can undo that. Need to get this to
look just right. Yeah, I think that
should be fine. Symmetry on, I believe, yes. Yeah, fine. That
will work just fine. So move on in for the max. I think this one has
just one stitch. We can just quite easily
do this move this along. Like, so all the should be fine. That's fine. Symmetry
thunder that's fine. Okay. Clear the marks. Let's
select individual piece now. This one kind of got
in. That's fine. That's fine. I don't be visible, let's just ignore that for now. I need to do for the opposite
side also too as well. Let's go to lower
subdivision level. So can you see a bit faster? Select this as well. Okay. Select this. Select All right. I'll just selecting piece that are not too close to themselves. Okay. Okay. I think this
should be fine. So let's invert that, It max. You can start and just continue on adding those
single stitches in. Okay. I think this is way too big, so need to reduce the
broadst a little bit more. I not think I'm doing
that correctly enough. Let's find a good
angle for this. Yeah. Awesome. That's fine. Let's do for the lower parts. That do that. I'm not sure that is done
correctly enough, so do that. Let's do again. On do this. I need this to be as
accurate as I can get it to be Awesome. That's fine. Let's go
to the opposite side. Find a good angle for it. Get up close. To
tiny, getting close. That. Do this again. Almost there. Awesome. That's fine. Okay. Let's see what we
get. Now that's not looking good so
let's do this again. Yeah, that's fine.
This work just fine. Let's move this along. I know there's like
a stitch here. Let's get this properly angled. This way, getting close,
symmetry that's fine. Getting close. I believe you have this
across here this way can do that's Let's increase
the subdivision level. I think I didn't do this with on the IS subdivision level, but it actually still looks
good, so that's fine. I do that, it needs to be. Let's see what we have in there. I think we need to increase
the broad size some more. Here, that is fine.
Opposite side. Here, that is fine. Okay,
move this along. Okay. We continue from here. I think the size should
be fine. Move out. Let's see how this
comes comes across. Oh, there's kind of two
stitches on the opposite side. That looks interesting. So it's two stitches
on the opposite side. Let's tackle tackle one
stitch on the side first. Okay can't do that. Let's do this as accurately
as we possibly can close to the edge. All
right, that's fine. Let's go fn up piece
that a single stitch. Think of taco most of it. Okay, clear this out. Plan is one stitch box. It's not with the same sub too. So let's use the two stitch. Okay? To stitch now. Let's do undo. So you can get back the max. Then let's get those
two stitches in. I want to be sure if
it's kind of penetrating through on the back
side gets. That's fine. Okay. Awesome. That's fine. Let's do the same for the opposite side. All right. That is fine. Connect
this this way. Awesome. That's fine. Let's see. Okay, so just a stitch in here, and then
we should be good. So I can clear this out. Let's check it again if there's any other stitch you
need to create in. Now, this dense I'm
going to create that instead of
Subtanspnter instead. Written that subtanpnter
should be a better way to go. Let's select this now. Let's go reduce the
subdivision level some more. I will select this. So we need to crank this
up a little bit more. So let's see how we need
to do a little bit more, a little bit more subdivide
subdivide one more. I think that should be fine. Let's test this out
just to be sure. So we just need single stitch. This is what trying to
figure out with you and we need this is the
one single stitch. Get this at the better and let's test this on
here, let's see. I hold just nicely. I need to create
a layer in there. Let's create a layer in there. Use the brow size a little
bit more. Don't do that. Brow size is way too small. Let's increase the bro
size some more. Okay. That is fine. This one might be
slightly tricky. Now at this moment, I'm not even sure if I'm doing symmetrically. I just hope pad
symmetrically, honestly. Let's just hope perm doing
it symmetrically, Yes, I am. Let's go to the opposite side. Get in close. Okay. Go to the opposite
side, get close. Look for a good angle for this. This is fine. Con do that. That's not coming out
correctly enough. Almost there. Like,
so should be fine. Okay. Awesome. That should be fine. I think we're pretty much done with these
stitches for everything. Let's just cos menu one. Manu one the center. Okay, so let me just increase
the browsize some more. I think we just need to do
nope reduce the brush size. Reduce the brow size some more. Getting close, I think
that side should be fine. I think that should
be fine, as well. We need to symmetry ton do on. I believe Yeah, that's fine. I think we are basically
done with this now. Yeah, we're basically
done with you just kind of create let's create the UVs and then we can bake and then move this along
to the next stage. So this is fine. So I'll see you guys in next
lesson by for now.
16. 15 Shoe UV Unwrapping In Maya: Welcome back, guys. So next
thing we need to do now will be to arrange and set this up to export out of Zbrush
to Maya and then create some UVs for them and then continue with
the baking process. So let's let's get to it. So I'm going to let's
start on the main piece. Okay. Piece. I'm going to go to the lowest to the lower subdivision
level, actually. So we have subdivision
level two, we have this at 148 k. But on the lower
subdivision level, we have this art 37 k. So I'm trying to figure
out which one work best. Let's start exporting
this from the lower subdivision level first. So let's go to
important exports. Don't know group smooth normal. Okay. Let's see. Completely separate piece. Which is the soul. Okay. Then this should be
lets you name the two. Let's name this so
we know what it is. Shoes parts. All right. So I'm just going to
drag this up here. So everything that is down is what we
don't actually need, so that should be fine. So let's go to the Mint Nau pies and export this at lower
subdivision level. So let's do exports. Okay, with a new fold. I'm going to name
this to Z pots. Alright, open that up. So sneakers. I'm
going to save this. And I'll go to so pading Okay. So part and I'm going to
export this out as well. Then lastly, shoelace parts. Let's take down the subdivision
level to something low. I think 11 k should be fine. Should be like the lowest
for you. So this is fine. So I'm going to export this out. Maybe not. Let's just go one
subdivision level higher. Okay, I'm going to
export this out. Okay, so let's go to Maya, create the new
documents in here. So these documents we're
going to be using. We're going to be importing our exported maps,
exported models rather. So let's create rather open up a folder
and then go to it. Let's go back to Maya, take a folder and
import these three in. Okay. Great its way down. But that's fine. Don't matter that much, though. Or maybe we can move
it up a little bit. I think we can move
it up some more. But we need to do that inside of zebush instead. So this
is what I'm going to do. I'm going to I'm
just going to create a spare I'll leave this fare up. Then I'm going to
export this out. Okay. Let's export this
into the same folder. We'll just pin the directory
in a page that's in. HB has OBJ. No OBJ. Okay. Let's just them to spare. Okay. Then I'll go
back to Zbrush. Okay. That will save. Okay, yes. So now I'm going
to import this in. So let's just do unopened. So this is fair. Okay. And I'm going to
import and replace this fare with the one we selected one
we created instead of Maya. So let's just replace
this. That's fine. So nobody is supposed to be now. So I'm going to
put these three in a group or in a folders
let's put it in a folder. Min sneakers. Okay. All right. That's fine. So let's drag what is
necessary into that group. Into the folder. Folder group, whatever would you
prefer to use. Let us lit folder instead so. Then I'm going to
transpose sets. So I'm just going
to lift this up. So I want to be up this way. I think somewhere around the
base of this should be fine. Yeah, so around there
should be fine. Okay, so I'm going to export
all of this out again. So let's go back into the
sneakers, export this out. Okay, so I'm going
to export this out. I'm going to replace this. Yes. I think I still need to export a higher
subdivision level as well. On subdivision level
higher actually. So I'm going to export this out. Oh, I think I made a mistake. I really mistake. I'm supposed to kind of use the export
instead of imports. So I need to let's go on
subdivision level lower first. Then export this out
and replace yes. So let's go on solution
level higher now. Is why we didn't have any issues because it's still
the same model. It's not going to
give us any issue. We didn't really
actually do anything. We actually move
just the position. We still have the
wives still raw five spot out of Zeus
without modification to it. So that's why I won't
have any issues in here. Anyways let's carry on. So let's export this now. So I'm just going
to put I in front. Okay. I'm going to export
the one below parts. Exports. Okay,
there's less paths. Replace that. Then lastly, the soup adding exports. Okay, that's fine. So I would like to save this
as well. Let's save this. Okay, so we can import
put them in again. So I'm just going to
delete these three let's imports the new ones now. So select all of them. Minus is fair, drag and drop. So there should be should be
in the same position now. So we have two sneakers, we have the I, then
we have the low. So let's visualize
the low. Let's see. This is the low version. Low version actually looks good. Let's visualize
the high version. Okay. I think at this point, I think
I might be sticking with the they're almost
quite similar, most almost quite
similar to themselves. Almost quite similar to them. So let me just stick with it. I'm going to stick with
the low version instead. So I'm going to the
universe with low versions. Let me see if this Okay. So I'm gonna be saving
this as sneakers. She used Nike sneakers
at the beginning, so just to be a bit
more specific, okay? All right, so I'm going
to close this for now. I'm going to close this for now. I don't I don't need this now. So I just need to create my UVs first and then
we'll come back to it. So in here now, let's start
creating UVs for this, so make sure you're
on the U UVE diting. Okay? So I'm just going to
drag this on top. We are really weird naming
always comes from Zibos. Let's just give it a
more simplified name. Leave that extra
naming at the end. Okay. Save this, save notes. So the first thing I'd
like to do would be to unfold the main part. So let's just starlet
sneak up first. Let's give you and
wrap this first. Let's open this up,
open up and transform, create, cut, unfold,
arrange and layout. That's fine. Okay? Now, this is sit in here. Okay, close now. So now I can work a bit
faster in here now. If I go back in, I'm going
to select the isolates Okay. I'm going to start by using the creates and I'll just do
camera base to begin with. Now let's see if we can get symmetry in here, so object X. Let's see if we can get
this working symmetrically. Also, we can get this
working symmetrically, which is precisely what we want. Okay, so let's start
with the bigger piece. Isolate the bigger piece, and let's do UVs for this. I'm just going to come under this so I want to create a seam line where we don't want
it to be visible, so I think here is a good place. That's fine. He also around around there
is also a good place. Okay? Yes, I think around there
is also a good place. Let's look at our
reference just to be sure we're placing it
in the right place. Okay. Most of these parts
are going to be covered up. So I'm trying to make sure I put the same line where it's
going to be covered up. So this is fine. All right. I think you're working with
this symmetrically also, too. Yes, this is
symmetrical as well. So let's do it cuts. Okay. Let's select these two, and let's do fold. Select the two. Let's do Orient. And let's do layouts. Let's get the want
something we can do it. Okay. I think we're in
a good place. Whoa. Okay. Yes. The other parts
that we don't need for now but just focus on
the parts that we actually need. This
is what we need. Let me select this too. So I just going to select most of the parts we are
working on currently. So I'll select this and
I would like to rotate. Let's rotate it this way,
so it should be fine. Let's go out of isolates. Face mode. Double click on this, this selected on both side. This as well. So you
cannot stacle it at once. This also. This also isolates. Now let's create our UV SIMs. So I think this bottler
SIM should be underneath. I naturally goes across. Let's make sure
we hide our seam. I think this place
is actually fine. Just checking just to be sure. Let me use a more darker
material for this. Let's use a more
darker material. Let's go to attribute editor. Little bit issue. Let's just dark in this
a little bit more. So actually see where we
need to place our sim. Okay? Yeah, this one seems like
in this ne good place. Let's go to the next one. Come place this here. Yeah, that seems fine.
Come over to this piece. Let's find a good place
to lay this here as well, also. That should be fine. Okay. Let's come to this piece. Find a good spot
to drop our UVs. I think here should
be fine as well. Okay? I think that goes
across, that is fine. Let's go to our UV two kids. Okay, we still have this soul. So I'm going to do
this inward instead. Should be inside. No.
Let's go inside even more. All the way. Oh, no. Definitely not a good place. Let's do Let's do CT first. Let's do coat first. Okay, I think if you
select this again, it's going across
the entire out. I don't want to go across
the entire out and so we do instead. I think should be fine. Still very much
inside of the shape. Yeah, that should be
fine. So do coats. Okay. Yeah, that should be fine. Now let's select let's select
all the UVs do with that. I'll move them aside. I'll select all of this. I'll move this up. Okay. So let's work with this,
select all of this. Let's do an unfold. Okay, Koreans. So let's do layout all now let's give you Almost done. Okay. So now I'm just going
to go in and then make some modifications to it. So this time around, I'm
going to turn off symmetry. The inward parts. It has the
corresponding parts. Okay? That seems fine. Okay? This I'll need
to straighten up. I need to straighten this up. So let's just preen. This one doesn't seem like it doesn't seem like
it worked well. So you need to get in
there and then make modi whoa I wasn't selected properly. So I think we need to
come back to darts. I need to come back to d
and then fix that properly. I think I would like to rotate this way, this way, as well. Rotate this way
this way as well. I want it to be flowing
in a butler direction. Okay? Let me rotate this way as well. Rotate this way as well. This piece. Think I'll rotate this this
way, this way as well. Now this that we need to fix. Let's go out of isolates. Let's go in phase more double click the
entire outin isolates. Let's create a new
one camera base. Okay. Now let's go to the edge. This edge is the cats. Okay. So let these two
unfold Unfold. Okay. I think we are fine. Now, this means so I'm just going
to orient this way. Let's done orient again. Let's orient this way. Okay, select everything
inside of zero to one space, and let's do it layout. Let's give it a be done. Okay, so we have this
arrange now this way. But there are a
few things I would like to check just to be sure. Select this, see where it's
facing this direction, that's fine. Select this. All right, then the right
place, get that is fine. Now, let's select the other piece
that I didn't select before. Some of those objects, X. Then I think what we
didn't select before was this as well. Okay. Here also this as well. Let's take the opposite sides, see if they are selected. Okay? That is fine. Let's isolate. Okay. I'm going to select all of this. Move this to the side. Let's work on this. Okay. So I'm going
to create this let's see where this ends. So I'm going to
start by creating a cats around around here first. This part is not
going to be visible, so let's create a
cat here first. Let's see if it's the same
thing on the opposite side, it did. Let's do coats. Okay let's go under selects. Let's find where that is. This one to do creator,
let's find where that is. Okay? Select let me start with EFS, then I think we can select
on the opposite side. Should be this, am I correct? Yes, that's the one.
That's the one. Okay? I think it should be
selected on the opposite side, too, as well as fine
with the coats. Okay. I think we do this. Let's just do let's work on
the simpler piece. We can move this along, select this loop, select
this loop, or do cuts. I believe it should be
selected on the opposite side. Let's check. Okay? That is fine. Okay? Let's come in. We know where we're
supposed to place the UVs for this so. Let's select the cuts. Okay? Now we can find,
I think for this, we can do let's first start by selecting
the squash part out. So should be that the one. Let's see what we get
actually with this. Okay. Maybe we can calm
down a little bit more. Do we have a loop here? We don't have any loop there? This place we have a loop. So the idea is to kind
of hide the same. So I'm trying to see if look for a really good spot
hide or same Okay. Now, this part is
way too visible. Okay, I think so far. Let's even check. Let
me check this instead. Where does this stop? I think so far, this one seems
to be like the best one. This part seems to be
like the best one. We'll circle back
to that anyway. So let's just add that for now. Okay. Go out of isolates. I'll go over to UV shell. I'll select this shell, get enclosed and see
if I can find if my UVSm is quite obvious to see, it's not, so that's fine. We a good job, pretty
good job there. Now, these two I'm
going to isolate. This one shouldn't be a problem. We can add that on the bottom parts, and
then we should be good. Let's do instead. Let's add that day instead. So let's do cuts. Okay? Select all of its
let's do an unfold. Okay, let's do Rents and let's do layouts Okay. Let's say I set up. Okay, I think we need to make some
modifications to this. But before we do that,
let's just go and turn off this symmetry, let's turn off this symmetry and we can align this the way
we want it to be aligned. I'll say this way,
rotate that way. Okay. I think we have
parts that we don't need to be in here as well. But I don't really
matter, I just kind of set them up properly. Do you want them to be
arranged in a Okay. This one is arranged
properly. Let's see this. Let's see where we are for that. Let's find where that is. I'm going to use face mood
double click on this pace. Okay? With this butler
one, I will need to adjust the set up for you. I'm just going to
pull this up for now. This part lon, I
would like to get them in a more
vertical position. So let's get them
arranged vertically. Okay, that should be
fine. Okay? These two. Let's arrange them
vertically as well. Okay, let's see how we
have the others arranged. Okay, I think that
direction should be fine. Let's see where rotated this
wears get this horizontal. Get this horizontal as well. Okay? Yeah, that is fine. Maybe I shouldn't
get them horizontal get this horizontal also. I'm thinking, though,
maybe I need to get this. Let's get them horizontal. All of this as well. Let's
get them horizontal. Okay? Where is this
supposed to be? No, this battle,
we need to kind of get it vertical instead. I think vertical
should work just fine. Okay, vertical also, too. Let's see. I think
we should be good. Oh, yeah, missing I
have not done this yet. And this we have not done yet. Where is it supposed to
be? Let's find that. Okay. Entirely sure where
that's supposed to be, though. Let's just let's get this. And this Let's get them out. Let's see where they
are supposed to be. Oh. Okay, I know where the are now. Okay. So for now, let's just
go out of isolates. Let me select this. Let me select the entire face instead, select the entire face. Iulate I need to pull
this out this way. I don't want any
distractions for now. So back to face mode. Double click on Oh, it's not in the same position, so we need to do this
out of symmetry. Select ship select this as well. Okay. So this one shouldn't be
too much of an issue. We can just we will just
select an edge inside. This edge should be fine. Let me make sure
I'm selecting the same edge on both side. Okay. Yeah, this should be
fine. Let's do cuts. All right. Then down fold. Select the two down fold. Just do Orient Slet
this rotate this way. I think we have tackled
the entire outin now, so let me select it again. Let kind know where
my UV seems are. My V stems and seams are
not visible, that's fine. I think we are good
now. I think we can select the entire piece. Okay. Then we can just do
a layout for it. So let's do layouts.
In the right so. Let's reenter and then we're going to check for distortions, checker pattern just
to be sure ultimately. Okay, so we have this
layed out in here now. Okay, let's check for distortions in there
if there's any. C to check if there's any flips. There's any flips UV. We can check for distortion now. So so far, I don't see any
weird distortions in there. Okay, so now let's check
our pattern to this. Let's check if this
is working just fine. Yeah, for the most part, I
think this is just fine. Okay. So the next lesson
model is going to work on your piece. Let me just even
wrap this actually. I just don't even wrap
this as a final ton wrap because this is just a simple
piece don't wrap actually, so I don't take too long. Okay. I think it's
a logo in the c, it has a logo in the center, so I will just create
my SIM underneath it. Turn this off. So my SIM should be
somewhere around here. I won't do the mid
range part, actually. No issues. We do
mid range parts. Uh, probably not. Let's do this. We don't have weird stretching. So regions where we have 45 or 90 degree
angle should be fine. So a the cut there.
Okay, on food, orients need to make some
adjustment to this to select o, select the entire out scene out. Yeah, that's fine.
I'll save this. So the next lesson,
we'll just work on shoe less piece, right? And then we'll continue
on with baking. So you guys in next
lesson. By for now.
17. 16 Shoe Lace Parts UV Unwrapping In Maya: Come back, guys. Fist lessening, we kind of started creating
a UV sem for the main piece. So let's just finalize
by creating UVs for the shoeless parts. So I'm just going
to isolate this. It shouldn't be too
much of an issue. I believe this is symmetrical. Symmetrical, but I don't want
to risk it so let's just do this as manually as we can. Last we're creating
the seam lines. So camera Bs to begin
with, edge mode. I think a good edge should be this edge for the opposite side. We're trying to cut
our same line where it's not going to be that
visible so here as well. Cuts. Let's do the same for
the opposite side. Okay. Getting close. I believe, it should
be fine. Cuts. Okay. Let's go to the top.
I would like to do Let's work on
this piece instead. Let me kind of get at a
better angle for this. Okay. Let's see. I'm not sure
that I went round. But it's still the best
place to add this though. So let me just go and
make sure I get it right. Okay? This should
be the final piece. Let's do a cuts. Let's do the
same for the opposite side. Okay. Yeah, well, I believe at
the edge, that's correct. Find this at a good angle, select this as well with cots Now for this
particular itself, so slightly I would say
is slightly tricky one. Slightly tricky
one. Let's see if we can find a good
spot for this. Okay. Here, we can do
somewhere around here. We can do here as
well. Okay, better. I think we can let's cut out
let's cut out this first. Let's get this loop off. Then we can do this with
symmetry turned on, so let's just do this
symmet it's quieymetrical. You can do this with
symmetry ton off. Let's start with this. So is going to do this across. So you should work
symmetrically also. Okay. Here as well. Get in close. Okay? That is fine. Do this also. Here as well. Here, also. Here, also get this in as much as possible
not to skip any parts. No, wrong place. Here us the place here as well. Okay, that should be fine. Around there as well. I
think should be fine. Okay. Let's start
by doing the coats. Let's the coats. So let's
just check the opposite side. Let's check the opposite side. Let's see if we have
it in there as well. Is in there. That's fine. So let's carry on. Okay. So I'll grab this. Go down, grab the next one. Basically, you just
repeating the same thing. Okay. We're going to do this
as precise as we can. I think this should be
better? Okay. That's fine. That's fine. Grab this as well. Okay? I think this is
the one, that's the one. Almost there. Okay, this one seems like kind of
joining themselves. But I think this is
it that's the one. Let's grab this just as well. I think this should be it. Yeah, that's fine.
There's the coats. Yeah, I think that's fine. It's not nest you
need to be to start adding or creating I think
I prefer to do this inside. So I'm going to
let's select that. You just find it now. You just need to
find where that is. It's going to be
difficult one. Kind of ton of symmetry for this. So far you select this now. I can just Come on. Still a lot more harder to find. It's a lot more harder to find. It is gonna be
tricky one, but we kind of figure out way it's
going to get through it, so trying to avoid trying to avoid
selecting one edge and going all the way
to the other edge. So let's see how we
can make this work. Let me start by letting the entire out in and going to do one on fold to begin with. I think this will make
things slightly easier for us on fold and
then I'm doing layout. I think it's going to take
longer time to do that. I think I would like
to to this off first. I'm turn off symmetry first. It's a little of
this quick sieve. I think let's try
to unfold again. I think this should be faster. If it's not faster, then I
was going to count this and then figure out a way to just
it's taking too much time. So taking too much time. Kind of try and simplify
this a little bit more. Just trying to simplify
this a little bit small, so I'm just going to look
for good I good kind of add my sim So usually I'd on this edge but
I'm going to add my similar that's why I'm trying to add this in the
middle instead. So we just have to
Let's just do at. Let's select this edge. Let's just go back to
symmetry. Let's leg this edge. Go to the opposite side. Let's see if we can find
the exact same edge. Here that's the one.
I'll do coats Okay. So select. Let's find the midpoints.
Select this edge. All the way this way. Let's find the midpoints. I think it should be this. That's the one the cuts. Okay. Let's go down. But that means we're looking
for the midpoint for it. I think the midpoint
should be this as well. Do that didn't do
that correctly. Let's select that. Go
to the opposite side, try accurately,
find the midpoints. Gets not working
either. Select this. Let's just kind of
three seats out. We just have to kind
of trees this out. Okay. I was trying to
avoid doing this, but it seems like we don't have any other option,
but we just do this. The cuts. Let's see if this paler
maintains the midpoints. Yes, it does do coats
from around here, find the mid points. I believe here, move to the opposite side.
I believe here. He has the right one cots so maybe a little tricky, let's just see if we can get
it right on the first dry. Midpoint will be this, that's the one records. Okay. Select in to the opposite side. Let's find midpoints. Where's the one records. Okay? So might be tricky.
Let's select this. Get in close. Oh, great. We got
it right. So ts. Oh kind of skipped, we skip a few. Let's go back in. Midpoint midpoints
should be this. That's the right one. Okay. Almost done.
The midpoints. Midpoint should be here as well. The cuts. Almost done, I think, as far as this goes, I think
the midpoint should be this. Let's move to the
opposite side. Nope. I'm not sure we got that right. We didn't get that right, so
I was going to trace this along I'm just going to go through dos kind do
this almost at the end. Almost at the end of this
going to find, that's the one. I'm going to click Pods. I think this is fine
I want to correct. Let's just select the midpoint. We close to the opposite side, find where the mid range
point should be. But
18. 17 Shoe Baking in Zbrush: Okay. Welcome back,
guys. So let's continue from where we left off. So I kind of gone
in and then kind of added the final cuts
on the rest of this. So at next, we need
to do nest on food. I believe we have this
working symmetry as well. So I'm going to turn
off symmetry for now. Okay? I'll go and select all of these UVs and click Cfold. So you should unfold
relatively faster now. Turn off UVs symmetry for each rather less orient and less the lays to make some adjustments after we
have this layers 01 space. Okay, so let's go in and
then check this out, right? Unfolded, we need to make some corrections to
This, for example, this all I'll just get
them facing this way, rotate them this way
a little bit more. This is fine. This is also fine. This I need to rotate this way. Okay? This way.
Yeah, that's fine. Okay, I like to get this is more like
horizontal directions with Let's just get them
horizontal fashion. Okay. Almost done. Yeah, I think this
is pretty much it. I'm gonna select
everything again let's do a layout in there. So you shouldn't
post settings well. Okay? That is fine. Yeah, I think this would work. This work. There's I
like to check, though. This label, I like to make sure the orientation is
correct for it. So I think this is fine.
Let's go out of isolate. Let's do UV checker
Pat and let's see. I think we have this map
correctly, which is fine. Precisely what I want as well. Okay. So I'm going
to check this. I need to check this. Okay, so let's check the UV. Oh, it's quite small down here. I'll need to increase
that slightly. Let's increase that slightly. Let's see if we can put
this somewhere else we take a little more space and
put this up here instead. Okay. I think that
should be fine. So let me kind of check now. So I'm just going to select
edge, select this edge. Okay. That's the
edge at the back. If I say this edge,
it's the edge in front. So to rotate I need
to rotate this. So I'll like something more or less like, so
it should be fine. So if I should say
this mid edge. Okay. So I know it's facing
this direction this way. So this is precisly what I want. Okay? Let me rotate this a
little bit this way, select this find where that is. Okay, just inside of
that, that's fine. So we have this working
correctly and I think this should be fine. I'll rotate this a
little bit more, make it a little bit more
straightforward this way. Let's make sure it's
not intercepting. So getting clear, make
sure it's no intercepting. Yeah, I think for the most part, this will work just fine. Okay. Here we are
good. I'll save this. So you need to export all
of this back out again. So exports. So sneakers, this is the exports. So I'm just going to
it is the low version. So let's just paste
it in there and replace y shoelace parts. Lports shoes parts. Replace that as well. Okay. So pardon
replace that as well. All right, that should be fine. Now let me save this up. So now we need to open
up the Z brush file and then import them back in. Okay, so back to Zbrush. Now I'm noticing an issue in
here not really an issue, but something I
forgot to add seeing now that I'm supposed to add another treading on thehall
it hoof, let me call it hoof. It's supposed to add
a treading in there, so I need to do that first. I need to do that first
before bringing in, let's just bring in
our model in first, then we can do that. You can do it for days anyway. City days out bringing
it in or doing it first. Anyone will still because we
have all the detailing in a layer. That's the good part. We have the detailing layer, so it don't really matter
that much one we do first. Let me go to the
subdivision level so I can. So we can add this detail in. Let me first isolate it. Let's get it isolated. Okay? Isolated this way. Alright, so I would need to I need to make sure
that layer is active. That's one you need to do first. Let's make sure the layer is active before isolating it. Okay, so layer is stay active. Awesome. So layer
is stay active, so I need to go back
in and isolate them. Okay. Then you can go to the highest
subdivision level now. So as to treading. There's a single threading, or stitches in there and we have the double
stitches in there. We'll start with
the single stitch and then move to
the double stitch. Let's make sure symmetry
stand on for this. Put this to the side. We have symmetry activ
in there. That's fine. Let's go in and then look for This stitch is brush
and then reuse that again. So brush sm. Let's start with
the single stitch. This is the single
stitch getting close. I think we can also isolate this so we can work a little
bit better in here. Okay? Let me drag this. I need to reduce the brush size. Trying to figure out the
appropriate height for it. I is the highest possible
subdivision level on it, this will still work just fine. So I just need to
do just one there. Just one trading
comes across this. Okay. I think I I'll just kind
of redo that here as well. Undo that. We don't really have enough
resolution holding this. But it will still
work still undo that. No, we don't really have
enough resolution holding it. Let me do this on
top instead. Okay. We actually need some more
resolution to hold this, but at the same time, I think this will
work just fine. Or we can even do the
detail inside of, you know, we'll do the detail inside
of Softnspina instead. Since we don't have
enough resolution to actually hold this
in here for now, so it's best just this way. We can do the detail
inside of detection. That's the smarter way to do it. So let's just go back in. Let's go back to the
lower subdivision level. So on the lower
subdivision level, let's reimport back the mesh. Let's make sure that
no UVs on there. I believe that she did not be any UVs in there not
put any UV in there. Let's bring in. Let's import in the ones vis in the Z exports. Sneaker, it's in here now. So we have UVs in here Okay. But I would like to my normal
map from subdivision level. Instead, I like to bauble my normal map
on subduction level. Now we have vis in.
We go to vn map. You can see vis in here and that's why we have
this smooth heaving. I used to fork a
resolution, normal map, create make sure it's tangents, torn smooth UV and smooth normal should be
torn down then concrete. I shouldn't take too
long to actually create this so it's running through, so you can see it's
running through now. So let'll give you
the same moments. So it's done. So
we need to check. Let's check. Okay.
Seems to be fine. Let's do clone.
Texture philip V, you know, Zbleus
things upside down, so Let's export this out. I want to export C PNG. Normal. Okay. Save this. So now we need to go in and
then check just to be sure we exported it out
correctly without any issues. So we need to go
in and view this. Okay? I think for the most
part, this came out well. Yeah, this came out well. I don't see any major
issue in there. Alright. But I'd like to
create a new folder for it. Let's create a new
folder for it. Name this to Zim Z maps. Okay. Then I'm going to drag
that in there. All right. So I'm going to big I'm going to I think maybe I
shouldn't big this again. Let me big this at
eight k instead. Let's make the normal
map at eight k instead. So we can get the best
possible quality out of this. So create. So I'm making this at eight k. So it shouldn't take too much
time because actually it takes it bakes quite fast. So roughly less than a minute, so definitely less
than a minute. You should have a bake ready. Almost there. So done now. So let's
clone this again. One this again, flip pots. So this is going to
be the eight version. I'll put eight at eight
at the beginning. I'll save this Now, let's go in and then
check to be sure we have this bit correctly
without any issues. So far, bit correctly, without any issues,
precisely what we want. Okay. So now let's go in and then big displacement
for this as well. So Pip V smooth, ignore this adaptive for now. You don't want because
it chi is going to take so much time cannot
bro we turn that on. So let's just click on create
an expo displacement map. I put the ISPL for
displacements. I'll save this. I don't think this would take too
much time also as well. It's not supposed
to take too long. Okay, you want to
export the mesh? No, I don't want to export mesh. So if you go into
that folder now, we should have it
in there, so I'm just going to
double click on it. So we bake this at eight
k. So it's going to build up with a
Windows photo viewer. Yeah, so far, we are biting. We need no weird
issues in there. Great. That's fine. So let's go in and
import the others. But before that, I'm
going to export this out. We increase the
subdivision level, so I'm going to export this out. Look, let's make sure the export setting is
setup correctly. So spots. So I'm just going to
replace the sneakers eye. I'll replace that. Since this one has
vis in here now. That's fine. So let's
go to the next piece. Let's go to shoelace
parts. Okay? So I'm going to import
the new one hu spats. So as uv is on there. Now, let's just be. For this, we can just be out
Fok resolution. Fok resolution is
completely fine for this. I'm only going to be
backing out the normal map. So let's make out
normal map for this. Don't take too long. It's done. Then let's
conclude over to texture, flip V exports. Hues parts, normal Okay. Yeah, that's fine. Exported out correctly, then
remain for the soul parden. Do you have any
subdivision level? Let's just divide before let's divide this
a little bit more. Just have something a
lot more cleaner, right? Let's go back to lower
subdivision level imports. So so padding, select that. All right. Let's go over and
then make normal map for it. Let's create. We need to go OSs done, clone this texture,
flip the exports. So pading normal. Okay, so now we need to
go in and then check this newly created normal map, just to be sure there
are no issues in there. Okay, so far, no weird issues
in there. That's fine. Let's check the shoe padding. No issue as well. Biked out correctly.
That's fine. Okay? So this is fine. So
I'll need to save this. Let me just save and close this because we have everything
before we close this, let's go back to
Maya and then check. Going to ice stickers now because I like to
use the AR version, so that's important the
AIR version just to be sure we have good UVs in there, so I'm not going to
drag and drop this in. C, it's imported incorrectly
without any issues. Awesome. Awesome. This is fine. So
I'm going to save this. Great. So now we can go
in and close the ZbohFle. Let's close Cs. So now we have
everything we need. So the next step would be
just to go in and then yes, go in and then just start start exporting this out to Soutnspen and then begin
our texturing for it. So I see you guys in the
next lesson, bye for now.
20. 19 Sneakers Texturing in Substance Painter: Cucumber, guys, soon or let's dive in. Start
the texturing for this. A few things to
keep in mind though before texturing
is kind of analyze your reference and
be sure if you have close enough
reference to actually capture the detailing of
the texture, I bills. Things a good close up reference
in here that we can kind of capture the essence
of the texture in there. So let's go in and
then use that. I'm going to start with
the sneakers first. Let's start with the sneakers. Yes, we can start with that. I want to solo that out. I'll go to layers,
create a new few layers. I'd like to bring in the
normal map in here again. Let bring in normal map. So you have the eight key
sneakers in here, select that. I like to intensify the details we have in a little bit more, and I'll go over textual
say this to Fok resolution. Let's visualize this
at FokiRsolution, so you can see more of the
details a bit more accurately. Okay. Yeah, that's
fine. So now moving on. Now I'm going to use the
leather material for this. Let me rename this to normal. Less or caps, normal All right. That's fine. So let's go into Let's start
materials first. Let's type in leather. W is like an obvious
leather material. Let's see what we have in here. Let's see which one
we can actually use. Right of the battery,
you have something interesting to use
leather green, leather skin, leather
reptile skin, leather sweet. Let's use leather green. Leather greens
closest we can find. Basically it's time
to actually apply, so it's supposed to
be applied on here. Okay, we have something no
just all over the place. I'll drag this up.
So quite a lot of corrections we
need to do here. Let's start by taking
down the tying for this. Something quite tight. Still have this weird X
crossing across this as well. So let's see if we can find
that and then remove it. Is that the one. And do that. It's looking like some
kind of skin material. So we need to actually
find where that is. This is the one just to
figure out the where the pl texture is coming
from and remove its range. Okay, that's not it. Turn this off.
This is from this, but it's not supposed
to be affecting it. Not supposed to be affecting it, so I'm going to
delete this again. I'll create a new few layer. We only need this for
the normal instead. So let's turn on normal
and bring that in again. So it should be
good now. So that was where we having the issue. So I think something
close like this. So let's go and make
this even smaller. Let's tie this. Do you have
any tiilin option in here? No tian option in here,
so we just need to go back up here and
then do this done less is a value of 20.
Make it quite small. The small like so
should be fine. Okay, so we have majorly two
colours in white and black. We have the white and black. Let's start by changing this Let's start by
changing this to black. Let's type in black in there. Then we change to a full
black leather material. Let's just say this
to full black. I think it should be
quite darker than this. I think this black I think something a bit darker,
something a bit darker. Expose this two was
a more darker value. Okay, I think this
should be fine. All right. Now, just specify
want to be applied on. Let's add the black
marks to this. Let's use the mesh field, polygon field, whichever
you prefer to call it. So I'm going to be using
the mesh field instead. Let's select what is
black in select this. Okay, select this
do that actually. Let's make sure we
have symmetry tone down so it work on both side. Okay? So let's select X on the keyboard,
go to the whites. Let's see what you
need to select. Okay. I think this as well.
Yes, I think so. Yes. Or maybe not. Let's just select
what we need first. Okay? Let me grab the
entire out and then select what we don't
want to be selected. So let's see this as well. Okay. What else? I think spot lawn is
a different material. Yes, this is also
different material. So I'm going to
deselect this as well. Okay? Let's see, I think
this should be fine. So yes, we need to
deselect this too as well. The pot laws are actual
fabric material. So I think they should be fine. Okay. But I'd like
to make the material a little bit more shiny. Just a little bit
more reflective. So let's see whether we take
this down or take this up. I believe taking
this down should make it a little bit
more reflective. I want something
that kind of catches a lot more highlights in there. I think so something out the nature of this should be fine. Yeah, this should
be fine. This we can definitely work with. So I'm going to duplicate this, and I'm going to
name this to white. Let's say this to whites. Okay. Let's add a full
black marks in there. Se these two more
whites polyton. Okay. Let's go back in. Let's
select use the polygon field. I will select this mesh. This is the mesh
meaning selected, I'm going to select that Oh, sell it to white instead. Select it again selected now. I that's okay. Let's see, I think
we need to select. I think I need to
select this well. I want to be sure what
kind of material it is, so let's come in close. It's a completely different
material, actually. It's a completely
different material. So we need to kind of do
something different in there. Yes. I think we need to do
something different in there. So I'm going to let's
click out first. Let's see what we
have. I'm thinking this white we have
is way too white. Most likely way too white. So let's kind of do the
white a little bit more. Let's dough the white some more. Looking a bit too whitish. Okay. Let's see if we have
this colo tone right. I don't need to be too wide because what's it going to add? Is it going to use a different
light setup in here, so I don't want something
that's blown out. I think I might
even need to change my entire environmental
light instead. Let's change in environmental. Let's use something that
does not have blown out. White in this. Let's
use the Tomaco studio. Tomaco Studio seems to have a really good balance
for the white in, so let's use that instead. Okay. Yeah, this
will work just fine. Okay. So moving on. Now, we need to kind of
create this as well, but I'm going to
ignore that for now. Let's just tap to
other parts first. Okay? I think this
will work just fine. So the next now I'd like to
do would be come in here. Let's see if we can do
some adjustments in here. This one pot lawn very noisy, a noisy kind of
fabric material in. So it's going to play along
with this a little bit small, just to figure out
what to work best. I'm going to let's see, I'm going to duplicate. Let's duplicate
the black for now. Add a black mark again.
I'm going to select. I'm going to select the soul. With this, let's do
mesh few select. The sole the wrong
one is selected. I'm supposed to be black. Let me drag this all the
way up instead. It's fine. I need to exclude
this also, too from this. I don't be affecting
let's exclude that.Exclude that in
here also as well. Okay? So I just go to figure out the kind of material
that should be in here. So let's go to the black. I'll need to take down this. Is there an invert in here? Let's see if we
can see an invert? Let's randomize this seed first. Okay. And then I'm going to let's
go down un tipped color. Please antiped color. No, antip colour is what we have this tinted
colour in there. I'm going to go
back to the white and adjust that a
little bit more. Let's use some thin
towards the gray. We use towards the gray,
so it's kind of eliminate this kind of sin Wetining
there a little bit more. Okay. I just tow the
white a little bit more. So just a matter of going back
and forth and then making corrections to it until it looks good. Let's go
back to the black. For the black, I
think I will need to take down the height range. Take down the height range. I don't want it to
be too intense. Should just be barely in there. Height position
takes down as well. I can't see much happening
in there, though, so I would like to go in and then don't see much
happening in there at all. Let me just keep going
down, taking this down. I want it to be too intense. Okay, now we're
getting something. I shouldn't be too intense, so we should increase the normal intensity
a little bit more. We need it there, but not too intense, not too intense, yes. This should be just fine.
Here is a nice one. Okay. But it looks more like there's more noise in there actually, there's more noise in there. So I'm going to
maybe I'll just take this down completely
actually and take it down completely then. I'm going to create
a new new feel layer for this This few layer are just going to be
having information. Then I'm going to add
those type in noise noise. Okay. So you have to say
noise not the one we need. Yeah, this is definitely
the one we need. Undo that actually,
I need to add a black mark first and add a
few layer to the black mark. Then I can use the noise now. There's this noise,
select the noise. Let's go back in and increase
the intensity of the noise. Okay, now it's all
over the place. It's not what we
want, obviously, but we can just make some
adjustments to this. Once it looks good, let
me dow this down to 0.5. I do that as the wrong one. And to do this on
the noise itself. Okay? Now the bla. We don't even have tiling in
here we have tiling up here. Got to be a specific tiling
for the noise map itself. So saying this is too
small, let's put eight. Okay. So let me select
this to now this black, put this in a group or add the black marks to
it. The mesh field. Se this to white.
I'll select this. So now it's noise
is quite strong. So let's go to the
height information. Let's dow this down.
Shouldn't be that aggressive. Let's diw this down.
Okay, let's go back in. And let's set it to one. Okay, now we're
getting something in here now. So
let's go back in. This valuing needs
to be quite small. Let me use the channel instead. Let's go to the eight channel. Let's take down the I channel. So we use the channel to kind of take this down a
little bit more so it doesn't feel too
strong in the Okay. Look at this from a distance. It looks perfect
from a distance. This is what we want. So
I'm just type in black so. That should be fine. But we need to roughen
it up a little bit more, let's go back to the black
grain and then roughness, increase the roughness
a little bit more. Shouldn't be that shiny. So let's add some
more roughness to it. Okay. I think I went a bit overboard, so let's take this
down a little. Need to have a little bit
of shininess in there. Okay? Okay, that should be fine. So now I need to use
the same thing also for this soul that same thing for this so let's just
duplicate this. Name to white white green. Okay. Let's do white green instead. So I'll wear the
black marks to begin with and I'll go in and
change the colour to white. Is more whitish tone. Somewhere around
there should be fine. Close this let's
go in and apply. Let me make sure I say this
to Heights Heights green. So I know what it
is. Copy the name. Open this black, paz the
name in there. That's fine. V quick sieve. Okay. Now let's go back and
then select this piece. Let's do a mesh fill. This is a piece you
need to select. Selecting it now, we should
have that applied on there. That can apply now also. So now let's go in and then
work on some other paths. Now I'd like to get
some fabric going on. Let's get some fabric
going on around this. Let me look for close up
reference if we can find any. Okay. I think it seems like it's actually
this actual layer also. Looking as if an
actual actual layer. Let me just look for another
reference if we can. I'm not really showing
it properly, though. Let's see if we can find
something close enough to use. It's the same fabric with
the same fabric as this. So let's go in and then bring
in some fabric material in. Sometimes going to
type in fabric. So I'm reducing the material, so we didn't look for a good
fabric to actually use. This one seems like a good one. But let's just see check. Let's check if we can find
something better to use. Quite a lot of fabric here to be see this one
looks interesting. This one has an
interesting pattern to it. But let's look for that also. This one has an
interesting pattern to it. I'm going to drag and
drop this all the way up let drag all
the way down faces. Don't want apply on top. Then drag this up here. Okay. Then just
style this first. Let's style this
first. Let's see what we get when we tile this. Yes, we're getting good. We have good tiling
in here just to. I think this might
actually work. Let's have the
black marks first. Let's say the black marks. Specify what needs
to be applied too, so it should be applied to this. Let me start with undo that. Let's start with Come
on, select this. And this is supposed
to be black and let's set it to black and then
but the roughness in here, I'm not really
liking roughness and the roughness in here is not
looking accurate enough, so I need to adjust that. Is there a general
roughness for this in here? Metalness? Let's see
what we have in here. We have a rough lon. Let's try it, yes. This one seems like a good one. We just need to change
the color for this. So we need to use
black actually for it. S first black, let's
say it second black. Okay. But the roughness, let's
get this quite rough. Get this rough as well. Maybe we made it too
rough, actually. A too rough. And the black
seems too black also. So let's add some
lightness to it. Trying to figure this out and make sure this is the
right match for it. If not, I was going to try something on something
different on there. But let's just see if we
can somehow make this work. Fabric color variation. If you say this to one,
let's see what we get. S zero, what do we have? Okay, I think a little bit of value in there
should be fine. Okay. I think this I would like to
darken a little bit more. But the material notes not really giving me that
fabric vibes in there so. I might just have to change it. Oh. Oh, the IC DC the issue now. Fabric grading is
actually different. We have a grid pattern
actually in there. That's why it's nobody give me that actual accuracy of
fabric I need in there so. I think I might need
to recreate my own. I think I might just
need to create my own. Let's go in. Let's try this on first. It is at the top. Okay. Let's to this. No, this one be this one work. So I'll delete that. We
have to quit our one, so I'm just going to
delete this as well. Let's create a new material. This material should
be black black Bs, ton on roughness,
get quite rough. Okay. Then, yes, I'm going to create
a new few layer as well. Set these two heights,
increase the heights, add a black max, add a few layer in there. So I think I need type in dots. A grid. I obviously something that has some grid patterns.
Let's try this on. Let's see. I'm going
to go in and then. Do you have any
modifiers in there? Let's tile more.
Actually way more. Let's do 50. I think we need way more than we have tying
in here as well. Get close. Ty this even more should
be quite small in there. I think I need to adjust
this lesser back to 30. Tie this in some more. I think we are getting
something interesting in here. So I'm going to
select these two. Let me just name this to X Grid. Okay, select these two. I'm name this to fabric. These. This is even giving
me an idea. I think can use one of these
fabric acid Bs. We can start to use one of
these fabric acid Bs actually. Just go to give us
those roughness map that we need in there. We're not going to
using the eye so let's use this as a
fabric Baze instead. W is up here. Okay? I'm going to tao this quite well. Then you change the colour
to something black. But this is going to be
having those roughness that comes with the actual fabric. So this kind of darkness
is a little bit more. There is a variation in there. I think this one has
too many variations in the fabric colour are
Let's take this down. Want something more
of full black in. Fabric roughness, tension fibers let's
take this down as well. Sorry about density
take this down. Still not there yet. Still not there. Let's
set this to full black. Let's say full black.
Let's see what that gives us it's going to
darken this even more. Well, I think we can
actually work with this. I'm going to put
these two in a group. At the black marks. So I need to mesh
select this and this. Let's see what we have.
Yes, this is perfect. This will work just fine.
It will work just fine. But we need to make some corrections to
this because we need to just you need to make
some corrections to it. I need to go in. I think I need to make this
little be shiny. Let's take down the roughness. Let's introduce some
more shininess to it. Okay. So produce more shininess to it. Yeah, I think this
should be right, maybe too shiny, a little
bit roughness in, okay? I think I can increase
this fiber density, fiber tensions, tension as well. You need to use a little bit
more variation in there. I think this should be
fine. Okay? You need to apply I think its
applied on here as well. Okay. Let me apply this
to this label also. Apply this on here.
Let's see what it gets. Yeah, I'll do cool. I'll
do cool that would work. Okay. So we're getting all the essentials
in which is cool. This is working just fine. I'll do a quick save. Okay. So now this polar
fabric in here, I still trying to figure out, I think you can just
use the same scene and then, I think that works. Let's just rename
this to black fabric. I'll do play this. I'll
name this to white fabric. Okay. I'll add the black marks in there and I'm going to change this color to white
instead. More white ton. Okay. Then I'm going to use the mesh fill and select this. For this, I'll need to make some modifications
to it as well. And I think I would like
to make this quite white. Let's put it all the way
to full white instead. Then I'd like to make I'll need to make some adjustments to this Suwly on the eight channel, I think you need to take
down the eight channel. Oh. Okay, I need to
take all of this down, take this down, take this down. Open the channel, take this
down as well, takes down, takes down,
completely remove it. Okay. Then go back to the X grid and then
bring this back in. But this one shouldn't
be too intense. Should be quite quite faint
in there, not too intense. We have this broken up. We have this broken up on
evenness on the whites. This broken up on
evenness on your white. So let's see if we can make
some corrections to that. Let's see, I think I can just
create a new fill layer in there with full whites and
then just take it down. Let's take down the colors, and going to it's only
color been applied. We don't want any
roughness in there. So let's just so we can get a little bit
of white things in. So let me just name
this to white fill. White fill. I'm going
to copy this. Okay. Okay that I'll come down to the I believe is
the white green. I mean if I do this in here now, I need to put that in there. Let me just past this
in here first and then I'll add the black marks to it. I will specify where I want it to be applied on,
so I select it. Okay? So I'm just going to dow this down
a little bit more. Have a good blend in
between, this is fine. This will work just
fine. Okay. This is fine. I'll do a quick save. So this is coming along quite nicely, precisely what we want. So left nice to bring in our
logo and apply the logo in. Just to apply the logo in there and then we
should be good. Okay, so let's
apply the logo in. So I think we'll do
that in next lesson. Let's apply the logo in
the next lesson instead. So do that in next
lesson by for now.
21. 20 Sneaker Parts Texturing in Substance Painter: Come back, guys. So let's carry on from where we left off. So I'd like to add the shoe
labor in the Nike logo. So let's go in and
then import that in. Okay. I think we have two. Let's import two of them. I'm to drag and drop this in. So I'm going to import them as I think I can import
them as an Alpha instead, let's import them as an
Alpha Imports. That is fine. I'm going to create a new layer, a new white layer
on top of this. We already have
this white layer, so we can just duplicate
this or drag this so way up. Let me delete what I
don't need anymore. I don't need these two. I'm going to delete those.
So I'm going to name. Let's say this all the
way to full whites first. So I'm going to rename
this to Nike Lebel. Nike Logo instead. Let's use Logo instead. That'll be fine. I'll
add black marks again. Okay. Then I'm going to add a few Layer to it and then I'm going to drag and drop this logo in there. Now I'm going
introduce is specify where this logo
supposed to be in. Let's go to our two
D and three d view. Repeating, let's do none. Let's make sure three dv
is also visible in her. I need to start making
adjustments to this. I'm going to squath this down. I need to find where that is. So to do that, let's just
paint those little paint over. I'm just going to use
red are the black marks. I'm going to do
little paint over. To reduce the blows size,
I'm going to paint. Ti should affect the
opposite side also, too, because we're working
symmetrically in there. So we know where they are. So this is and the other
one is on the upside. So now we can go
back to the fill, the logo, and then let's start
with what we have in here. Going to take down the size
some more Let's go on. Trying to shame this without having to deform
it way too much. It's already down shift
instead Epos do that. Down shift again. Getting close. I think it's but is one
upside down actually, we need to make some
corrections on it. I'm going to rotate it this way and try and position
it where it needs to be. I'm going to ton
of this for now. Looking at it now, I
feel like I need to add a little bit of
information to it. Let's introduce some
It information to it. Okay. Now, the density is quite I'd like to take down the t information
for this black. So this black fabric,
let's go into the grid. Let's go to the It channel and let's take it down
a little bit more. Looks way too intense. I also need to go back
to the fabric field and take down this density, take down this tension. These are the ones were supposed to take down so we do that. P's go to the technical
perimeters instead. To take down the heights range
and the normal intensity. I believe those two should be
everything we need to take down so we can increase back. So those gonna find a
good value for this. Okay. I don't use to be too intense, so just should be fine. I'll go back to the logo. The IT information for the logo, I need to take down the IT
information for this logo. That's fine. Let me get a better close up. Let's see how this
is supposed to be. Then go back in there and then make adjustment
based on that. Okay. You've been
down some more. I think it seems fine. Let me just stretch it
out a little bit more. All right, this is fine. So
I'm going to duplicate this. I'm going to drag this duplicate piece to
the opposite side. Now, we still have the
other one at the top, so let's get that cop there. Quite far from our reach, but let's just let
me extend this. Let me make it a little
bit bigger first. I think a little bit bigger so I can easily drag it
where it needs to be. Bring it in there. I think this but now we need
to rotate this way. Scale it down. Scale
down some more. Scale down some more
pretty much like so, extend it down some more. This way should be
fine. Okay. We have this applied now on both sides. It's precisely what it
wants. I'll do it quick. Also have another one that's
supposed to be at the bag. So we have one at the bag
going to be different actually. Let's get it in. I'm going to delete
this for now. I'm going to put a new fill layer and then
go in and then type in embroidery embroid
this is on Broadway, so I'm just going to
drag and drop this. Here drag and Drob
this in there. All right. I don't know if I
need to think I would need to undo that. Let's add a black max. I think I need to drag that
into that max instead. Okay, let's bring in
our logo in there. So you're going to create
a chart where you can drop our logo in there. So if you scroll down,
you see image input. So let's use the
Nike Nike instead. Lead. Then you just need to find where
that's supposed to be. So I'm going to create
a new fill there. Say this to red, at
the black marks. I'm just geting
to pints in here. Okay. So this is one. The
second one should be, okay, this is the second
piece just beside it. So I'm going to go back to the embroidery, shing this down. Turn off repeating. Said
this to none. H this down. Now, let's put that
where it needs to be. Shing this down. Shing this down. D some more. I want to believe I'm
doing this correctly. So if I should go in
at It information. Yes, putting this correctly. I want to add
information in there, you should have this
list correctly in. Someone who said
roughness as well, so let's add made
this quite rough. We already have details
we need in there. I just want to make sure
we have the size correct. Copy this name. I set puts this tonight embroidery,
so we know where it is. So do need to figure
out the size for this. I need to shrink this
down a little bit more. Lacle should be fine. I'm going to do
duplicates effects. Move this out of the way, put this on the opposite side. Okay, let's see where
that is being placed. So we place this accurately
where it needs to be. All right. That should be fine. I'll turn this off. Okay. Awesome. So we have that
where it needs to be now, which is fine.
Pretty quick sieve. Now, let's go over
to the other parts. So I need to copy a few of this. Let's copy the black. Let's copy this
black black fabric, the black so the black
leather green, copy darts. Okay, and go to hue these
parts, select darts. Pace that in the the set this
to three degree only now. Set the black material again. So let's give you the black
marks, then mesh fill. Select this, select
this as well. Okay. Let me see what's this material supposed to be fabric I believe supposed
be fabric material, so we can just go and steal let's at least see if we can find
something close enough. Is the fabric material. So let's go back in and
grab this white one. So white fabric.
Let's copy that. Okay, paste that in here. So I want to say this to black. Then let's select we need this. Okay? Ii applied. We need to say this to
fog resolution as well. So you can see details a
lot properly in there. Resolution is quite
low, so you might really see the details
quite well in there. Okay. I need to make
some adjustment to it. Let's make some adjustment
to the grid itself. So let's say this to 20. This kind of match
with the one that's actually behind it
a little bit more. So I'm going to reduce
this a little bit more. Let's do ten. Okay? That's
too small. Let's do 15. Yeah, I think that
should be fine. Okay. That will work just fine. Oh, there's one thing we
kind of forgot to do. Supposed to have this thread.
Start from third in here. We go back to that.
Let's go back to that, so let's just carry on. Okay. So this black one, you need to kind of adjust
the tiling also as well. Let's go to the black. Let's adjust the
tilene for this. Let's say this to
15. S this to ten. So I'm just going to
merge the tylene in here, so that's matching
now. That's fine. Okay. I think this should be fine. Yes. So yes, now let's add I think gym fabric should
work for the shoelace. You can gym fabric should work for the shoelace just fine. Okay. There's this white fabric also the candle
is going to grab. Before we do that, let's
just one piece at the top. So let's use the Let's
type in fabric in here. So mix material. So this gin gen fabric
should work just fine, so let's drag and
dab this at the top. Great. Undo that. Undo that. Let's dragon dab
this at the bottom, so drab this at the top now. Okay. Pleas, let's just I
think you can put this down. Let's leave it up. Let's
add the black mark. A, let's add the white mark since let's add the white max. Okay, then we're
going to exclude it from affecting on the keyboard, affecting exclude this from
this.EleEclude this as well. I think we're working
symmetrically also. Yeah, so we are good. So we need to make some
modifications to this. So let's say this to supposed to be more full black instead. Let's say this to black. We have two variations
of color in there, so these are the light one. Let's do something towards
more lighter black. Then the one at the bottom, said it more darker
tone of black. Okay. I think I need to darken this
a little bit more as well. Okay, let's go in. Let's start by piling this I still want to kind of see pattern
in there some more, so let's do three. Let's do three. Three seems like a good one. Orientation for this, I like to rotate this
a little bit more. Rotate it this way, perfect. But it's going to darken
this material somewhat, it needs to be a lot more
darker than it is right now. Color variation,
let's take this down. So on the darkness actually
peeking through a lot more. I think we need to go in. Do you have black in there? We have dark, no dark blue. Let's Let's just kind of
adjust this sstead this to more darker shade.
More darker shade for it. Okay. Think of those creative
few layer on top of this. Say this to white black. Okay. Then add the black marks. Or rather, let's add the
white marks instead. Let's do white marks instead. I'm going to exclude this from affecting this also, and
then we should be good. Okay. But the black to
be through it too much. Let's go to the color
and then take this down. Let's compare. Let's
see what we have. Awesome. So this will
work fantastically fine. Okay, maybe a little bit of maybe darkness
a little bit more. Let's bring some shine to it. Let's introduce
some shine to it. So fabric roughness,
let's take this down. Let's introduce a little
bit of shine to it. Produce some more shine. Yeah, I think this
should be fine. You're awesome. This will
work just fine. Okay. Okay? This is fine. I think we can definitely
live with this. Let's go back in, before I did let's start the
tin as the last piece. Let's go to this instead. I'll select the white fabric. I think I need to use the fields instead, so fabric fails. I'm trying to see I'm
going to figure out, Okay, okay, I think
this white fabric should work just fine.
Let's copy that. Let's go to the sow saw
adding Was that in there. Okay. But you can't see it
properly because we need to set this
to fk resolution. You can see this a lot better. It's in there now. I would like to make the intensity
a little bit more obvious. Let's go in to the
Its channel instead. Increase a little bit
more. Eso should be fine. I'll add a few layer on top. Set this to Black
at a black max, at a few layer. On this few layer, I'm
just going to type in the Nike Nike logo. Okay. Then I'll go to my two DTD view. I just need to say
this to repeat none. All right. I think it
should be on this. Lets rotate this.
Shring this down. Let's see how this
is supposed to be. I think this is
supposed to be on the opposite direction this way. Shing this in some more, Shing this down some more. All right. I think somewhere roughly
around here should be fine. I'll duplicate it opposite side. Okay. I think this one kind of
stayed perfectly where it needs to be, so is fine. We can add a little
bit of te to it. A little bit of t
that's get close. That should be fine.
That should be fine. Okay. Save this. So now
let's add stitches in. Let's go select this. Let's add stitches in. Okay. So let's use this instead. Let's add t information to it. Let's add some heights. Then let's go over to pin to Let's make sure symmetry
is on, symmetry is done on. Okay? These are parts to know. I'm just going to
draw a part this way. Okay. That should be fine. We get close. Okay. Let's adjust the blow size. All right. Be this
is working symmetry. Symmetrical that's fine. Then for the Alpha in here, we need to use stitches in here. Let's type in Stitch. Stitch generator. I think
that's the one we select it. Okay. You need to make
some adjustments in increase the spacing, reduce the bros size. A needs to do some
rotation in here as well. Okay. Rotation. I think I think they should not
fouling is properly, though. No fully properly. Let's see, you need to delete this. Let's draw this
out again instead. We can't make correctional
adjustment to it instead. You can make adjustments to
it instead. A black max. Let's do this
properly instead now. Let's do this as accurately
as we possibly can. Okay. So let's make some adjustment to this increase the spacing. I think that should be fine.
We'll create another one. Let's create another one.
I'll go back to depend too. The bottom one supposed
to have two stitches. Let's create another one
that comes across this way. Okay. That should be fine. I just the rotation. Fu. Let's create
another one at the top. Get close. Okay. Yeah, that's fine. Let's adjust the rotation. I think it should be fine. Let's work just fine. We can
just set this to whites. Set this to full whites. Introduce some more roughness in there. It is quite rough. Reduce the height intensity between tens roughly in
there should be fine. Okay. I think that
should be fine. So I'm going to save this Let's try some different
lights set up in here. Ice meaning just to create
something for the soul. Now we need a little
bit of an extra work to do in Photoshopping, yes. Still have some dots
to add in here. So all of this we're going to kind of work on in photoshop instead to get a little bit more accurate and then
bring it back in. Let's just kind of test this with different
lighting first. Let's test different lighting in here and let's
see what we have. Okay. So, this is fine. Let's try different light setup. Let's use this.
This is also fine. Try something different. Let's try more outdoor scene. Okay. Yeah, this is
working just fine. Okay. And it's good lighting
contrast in here as well. So next lesson, what is going
to go on and then work on other parts of this and
get it to look good. I'll see you guys in next
lesson. Bye for now.
22. 21 Dots With Path Tool in Substance Painter: Come about, guys.
So let's create this dotted pattern
we have in here. Okay? So, so the 50s I kind of mint in and the name just show you
guys what I did in. So I painted full black. I created a new few layer
and then added black marks. And I'm painting full black
in here for these holes, painting full black in. Okay. So that's
basically what I did. I painted full black in there, and I went back to
the blood drain. Later the mark said
this to black, and I erased some portion of off it in there
especially in the middle. So go in and then you erase some of this
a little bit small, you can see difference in there, then go back to
the black and then undo that X. Paint
black in there. So nothing too complicated. That's basically what I did.
Let's go and create this, so let me just please rename
this to black cool pins. I'm going to
duplicate this layer. See black marks.
I'm going to change this to a red to now. This is red for now. Then I'll go over
to my path two. Let's create a part for this. Let me first start by
creating something in the middle middle
part should be fine. Let's see if it's in
the middle points. I don't think so. You need to get something
directly on the middle. Okay. I think that should be fine. So these for the alpha is just a normal shaped
circle in there. And then initially,
we came in like so skills so just increase
out all the way up. But let just list again, if
I close that and I go back in and I just type in
circle, select the circle. And then we should be good,
actually. Nothing too fancy. Created that in there now and I'm going to increase
the spacing. Any browse we have in
there should be fine. Spacing so should be fine. Okay, that's fine. I'll go and click
back to my brush too. So we have the fair ship, I'll go and click the pen again. The next shape I would like
to create would be let's see. There's the shape that
comes in across this way. Do that. Select that again. I'd like to reduce as
accurately as I possibly can. Let's do a shape that comes
in from here all the way up. Here should be fine
then all the way down. This way, let's do
something this way. Let's start with one dot here. Here you can create a
straight line this way. Okay. That should be fine. That should be fine. We
need to add extra one. We can do that manually. So I'll go back in. I need to symmetry tone down, which is fine,
precisly what we want. Go back to the pens again. We do another one that poms across from the opposite side. No, undo that. So starting. Let me click that again. Paints brush should go back in. Should starting from around let's see, roughly around her, all the way to this
point at a ton, all they should be fine. Okay. Let's go back
to the paint brush. Then go back to the
path brush again. Let's create one that
comes across this way. Let's do one here. But the
paint brush, Pat two again. Undo that paint brush, pat two. Do one that comes
across this way. Okay. Pas two again, one that comes across this way. P two, let's do same for the
opposite side. Part two. Let's do one that
comes across from here all the way down
here should be fine. Paint brush, part two, we don't know that one that
comes across this way. Paint brush, part two. Then we just do one
that comes across this way, paint brush. That's fine. You need one around here. Part two, we can
get this this way. Come all the way down.
Okay? Paint brush. I think I'd like to add another extra one just for the sake of having another
extra one in there. But two D one. No, do that. Paint
brush, part two. All the way down here. A two. Down here, should be fine. All right, should be fine. What we need to do now
will be to change this up. Let's is black instead. Then we need to add
some its to it. Let's create an eight channel. Then push this down instead. Okay. Let's see if I turn up the colo, let's see what happens
when I turn of the colo. I think we need some coloring
India at the very least. Colos India should be fine. Okay. Let's go back to the path two. Let's see if there's
something else we can do. Select this part two, reduce
the brow size some more. Use the bro size some more. I don't need to be
too big. I think we need to do the same
for the entire ten. Do you have it applied on
opposite side as well? Yes, it is. Part two, select this path, do that. H. Paint brush, select these parts. Could you the size of this. Let's stick with
the value of 0.5. Stick with the value
of 0.5, paint, part two again, select this 0.5. Okay. I think this
will work across the entire actin
paint brush again, Part two, zero point. I have not copied it yet,
so 0.5. Let's copy it now. Okay. But two select it. Was that in the but we can select this
phase a value in. But two play the center parts. Pase a value in Select the part as well.
Phase the value in. Back to part two,
select these parts. Phase the value in part
two select these parts. Phase the value in. P two
again, select these parts. Past the value in part
again, select these parts. Okay. I think down to the last one, I believe. All right. Okay. So I think the I
information shouldn't that deep. That's something should be fine. Save this. Now I want to rename this to
parts, fronts, point, dots. That is fine. That is cool. The next thing
we need to do will be just to finalize by creating
the soul detail. I want to do next. I'm going
to save this in next lesson, I'm going to work on
creating this soul detail. I'll see you guys in next
lesson. Bye for now.
23. 22 Sole Pattern in Substance Painter: Talk about guys. So previously I see we kind of decorated
these dots in here. So I'm using mod iqation to it. So I went in, okay, selected it, and then adjusted the d a little bit more.
So was a negative. Then I went to the It channel, and then I took down the eights,
channel to around eight. Then I set up a different
camera for this. So I'm using a focal
lens of 85 millimeters. It does go to display settings
and then you scroll down, and then you find the
camera set up in there. Set down to 85, and
then we should be good. So now we need to kind of
create a suit for this now, so to do that, I would need to let's
grab this sot out first. So let's make sure we select it. So then I'm going to
create a new fill layer. Create a new fill
layer. This fill layer. I'm going to set this to red. Okay. I'm going to
have the black marks. I will go to fully fill. X set this to white
and select these two. And I'm going to export
out the export texture. I'm only exporting out
the sneakers texture. Am I exporting Let me export
this out for a resolution? Cooperation should be fine. Okay, I'm only exporting
the Connor channel alone. Let's specify what wants
to export this two. Let's export can
just open this up, so open output directory. Okay. This is it in. And this is looking rather old. This texture looks rather
old. Like, really old. We don't want this, so we need
to export this out again. Looking rather old supposed to have let me close this first. Let's see. We go
to two D and three D. So this is what we're supposed to
have basically in here. Okay. I was thinking to do
something also in there just do we have shadows in here? Let me change our lights. Let's change our lights. Let's use this. She's going to fill up the
lower part also as well. Okay. So I'm going to create
a new fill here again. I'll say this to let's say
blue at the black marks. I'm not going to paint
where it's supposed to be. Let's paint in here.
So not painting here. I know this is I know
where the solar, so we can actually apply
the material in here, so we need to.This in there. That's fine. So we need to
export this texture again. Let's change this to
no padding passthrough instead. Export this out again. Open out with directory. It's better. This
is way better now. Now you can see it's precisely
the way we want it to be. I'm going to close
this. I'm going to drive this into Photoshop. Let's drag this into Photoshop. So close this Photoshop is open at the
background the radio. So going to drag this
into new documents. Drag this into new documents. This is a part I'm going to be using something
to save this out. Let's save this out. I'm
just going to save out. Let's got this
from the Internet. Let's save this out as a JPEG. Senna this to SOL. All right. Then I'm going to open
up the Illustritor. I'll do the Illustritor. Okay. And I'm going
to create a new file. Okay? This is what we're
going to be using. Open this up, and I'm going to drag and drop my
image in there now. Let's drag and dbimaging. So I'm just going to
use the sneakers. Going to sew rather. It's supposed to be sold, so I'm not going to drag
and Dobie sing here. So I'm going to convert
this into a vector image, so it's a vector five. So to do that images, okay. I'm going to convert this into a vector shape and give
it straight lines. So do expand. On group, select the deletes. Select all of this,
bring this to the side. Like all of this. I need to be on the move brush first. Bring it to the side. I see a lot of stuff, I need
to delete also as well, delete this deletes,
this as well. This also, okay. So I think I need to
bring in that image in bring that image in here. Okay, so I think we
need to bring it in. Then we go back to Photoshop. You can grab this from here. A, Control C. Okay. I'll go to Losito, CtVPas this in here. Okay. Shing this down. Just trying to align this
in here as much as I can. Maybe we should do this Anyway, just trying to use a guide just to place things
where they need to be. So there's going to be a
guide fight to just use. So I'll go into my layers
and then I'm going to log this image,
log the image. Select all of this. Let's group it.
Make it duplicates. I'll shring these duplicates. I try and place it
where it needs to be. It's all the way
to the back, you need to bring it to the front. So I arrange, bring to fronts. Let's get close. Okay. I'll extend this out. I need to make quite a lot of modification in here
just to make it look good. Let's try and get this
where we need it to be. Okay. Then we can start adjusting
it where we want. Okay. Not so much. So in those needs to be
a bit more precise in. So I'm going to ungroup this. I'm going to ungroup. So can select
individual shapes and then extend them out however we want this to
be extended out too. Okay. Do a little bit more. Okay. We can go in. I'm not really
trying to make this as accurate as possible, though. I just need something that looks good enough to work with. Something good enough to
work with will be just fine. Okay. I think this should work. Stand this down some more. Let's get some close.
Stand this down. Down some more. Some more. Okay? I'll select this. Extend this out some more. Have we skewed this?
I think we can. Let's see. Let's do
share instead. Look. Send this out some more. I think I think this
we can work with. Bring the closer. These three, I'll bring them closer. As let put them
back in some more. Yeah, I think we can work with. I'll select the entire outing. I'll copy this, and I'll
go back to Photoshop. And I'll just piece this in. P as a smart object instead. Get close. Extend this out. Extend this out. At some more I just want
these two kind of fits. I think this we can work with. I'm going to duplicate it. All right. Move the
duplicate down. I'm going to mirror.
Let's rotate this. Let's que horizontal instead. Okay. Since somewhere around
should be fine. Move it forward a
little bit more. Okay, I think we
can live with this. Okay, so I'll go back to
let's use the magic wand, I led this red and do
that SLD Image instead. Latest red. Go down
ship lets red. Okay? I need to deselect what
is in there and do that. Let's use sub trate selection, subtrt this undo that. Noting this correctly enough. Control D. Let me create a new few layer
first. Got a new layer. Let's create a new layer,
and then I'm going to let me hide the two
at the top for now. We're going to
select this color. Then just use that to fill the inward parts.
Let's use a brush to. Fell this part up. Fell this part up as well. Select this to merge them down, Control A to merge them down. Magic selects Whip
select this Control J. Select these two, Control J. Make them visible Control
E to measure them down. Wow control select
the thumbnails. Just let everything ins
that thumbnail then. Make sure the last
layer I selected is the part layer you
working on then. Let's do Control J to
get a copy out of that. If you hide all of this
now, this is what we have. I think I need to make some
corrections to this actually. You can see a whole
lot better now. I'm going to let me tell this I think is the one we
need is what we need to tilt. Let's just move this down I'm going to move this
down some more. Let's move this down some more. So I'm going to take down
the opacity for now. It's possible on
this top of face. Let's take down the
opacity and let's see how much you need. So I'm going to
tilt this down some more. Yeah, that should be fine. I do that older shifts, squash this in
more older shifts, squeege this in some more. That should be fine. I'll do the same
for the lower part. Let's use the opacity. Hold shift, scratch
this down some more. This way should be fine. Begin with it's not
even properly sets. Just go to set this this way. Older shifts, squirtch
this down down this way. This way as well. I think
they should be fine. Make them visible again. Okay. Then go down
Control select this. Then put these two in a group,
let's put this in a group. These two at the top, I'm
going to delete them. I don't need them anymore. So make a duplicate out of this. Control A, select this group. Control J, cut out of it. Something pretty much
like so should be fine. Okay. I think I need to undo this. I see something I need to fix. Something I need
to fix in there. Just a matter of getting
this to look right. I want this to look
right, so I need to extend this out a little
bit more. No, do that. Undo that. Let me scale
this out some more. Hold on shifts. Extend
out this bit more. A little bit more
this way as well. I'll do the same also in here. Up this bit more. Okay. Move this up some more. Okay. I think this
should be fine. Let's duplicate that group
again. Measure this. Here, I think I can work
with this I can work with. I'm going to hide this now, create a white
background, invert this. I'm not going to
create an invert. Let's do inverts, do that. Inverse supposed to be on top. Something modest like so. I'm going to save this
out as an image file. Let's save it as an image file. I'm going to drop this in here. Let's just do so let's
just soul pattern. Okay? You can speech able so you
can find online though. Anyone who work just fine.
Let me use this instead. Let's go back in all of this. So I'm just going to select the soap pattern drag
and drop this in here. I'm going to import
this as a texture file. Inputs. Then I think we can
use any of this. So let's start with this
let's use this read instead. I'm just going to Opd for now, then I'm going to
add eight channel, increase the channel,
add a field, drop that inside
of the gray scale. Okay. So should begin to have
some kind of texture now, we need to make some
modifications on it, though. Skin modify some more bots were think good enough
now to work with. So to modify this, I will turn off
the color for now. Let's turn of the color for now. You can see what we
have in there now. I need to go into filter
at the filter at the Bvul. So the Bvul now, we can kind of intensify this a
little bit more. Let's figure out
what works best. Not too much sons is in there. This is looking good. Let's do ang good. Les gives us round. Bevo work. I don't see any much
difference in there though. Uniform. Let's do uniform. We take this down this
way, pull this up. Don't do that. Let's
take this back the way it was before it
before that fine. Okay. So if I should duplicate this, just make it a bit more intense. Let's say we invert this. But before I do that, let me turn over
this bubble for now. So you should get this on
the opposite direction now, mainly just kind of
moving around this, just to figure out
what works best. I think around here works
best to work just fine. Okay. This we can actually keep. So you can actually
play with this and figure out which
one works best for you, but I think this should be fine. Maybe let's go back in and then tighten this bevel
a little bit more. Let's you want to
tighten the bell some more just to find a very
good tight value for it. Okay, probably
something like so, something like this
will work just fine. I'm going to save this.
You can even push this further even let me take this
down by duplicating this. Before we duplicate this,
let's just name this to soul Soul pattern. Let me just copy this pace this in here,
duplicate this again. Then this time around
I'll do invert, so let's invert max. Okay. So let's turn
on the bevel as well. So you should be
getting something a little bit more interesting
in here as well. So if you turn this off, you can see slight edge
difference in there. Make it a little bit
more interesting. Okay, turn this off. So this is going to give it a little bit of an
interesting look to it. Okay. So this we can work with. So let me go and close. S this only three D alone. Okay. Do a quick sieve. Then let's do some actual
renders out of this. But let me bring in, let's
use this studio black. Ton on shadows for it. Okay. Get up close. And let's go to we render. Let's do some renders. Let's see what we
can get out of this. Okay, interesting. We have some testing here. Let me go and change
the a little bit more. Okay. This is way
too dark, actually. We see some shadows in there. We need to actually see
some shadows going on here. Maybe down some more
a little bit more. Okay. I think we can work
with Asia a little bit more. I don't think I'm pushing
this too far out. Getting glass should be fine. Let's getting close. Okay. Glass should be fine.
Unless renders out of this. Let's go to render setting. I'm going to set this to n just allow this run
through for a little bit. Okay, so it's done rendering, at least basic render. Let's save this out. Save this great new
folder for it. Render. Let's do sneakers. 01. That's fine. I'm gonna do some
other render view, but it just give you
guys a good idea what this final result looks like. So I'll see you guys in the
next lesson, bye for now.
24. 23 Look Dev In Marmoset Toolbag: Okay. Talk about guys.
In previous lesson, we kind of did test strand
that's inside of irony. Let's do some model work I
would like to do in here. So I'd like to export
out the texture. Let's turn of the
shadows for now. I'm going to export
out textures for this. Okay? So let's go over
to file export textures. So let's turn these three on. Let's specify where you want
to export our textures too. So I want to export it to
the retro Nike sneakers. You can export it
anyway, actually. Anyway, it seems best to
export this out, you can. So I'm not going to create
a new folder in here. I'll name this to XP textures. Okay? Lay that fold out. Food spotting out
for key resolution, no padding pass through. I don't have any
metal properties in let's just leave it on. Turn off normal leave
normal open GL, to off Auebot seclusion. Calm down. Ambiente Turn ambient seclusion off of this normal off wants
keep our normal open GT. Let's turn these two off off as well. Let's
export this out. You should have this
exported out correctly. Based on exporting. Okay? I think we're done with
this. I'm going to close this, S with this yes. All right, let's go
back to Maya in here, I'll put all of
this in your name these two sneakers and
I'll duplicate this group, how high you want at the top. Select all of this. Let's
go to modeling standard. I would like to bring it closer. Manton on face more. Select all this face then let's bring it closer.
Select this as well. Bring those closer. I think axo should be fine. Maybe quick little
bit more space in between them, I think
you should be fine. Okay. I work just
fine. I'll save this. Then we need to. We go
set up a studio for it. So I have a studio mesh
I can actually use. So no, no edge. Let me drag this in here. All right. So we're off. I think I have
something better than I was just properly positioned. I think I have something
properly positioned. He should be fine. This is properly positioned. I'm not going to pretty
much drag this and drop this to be. Let's
go to what you. Let's do this in position. It on the keyboard, I'm going to drag this all the
way to the edge, hit the again, bring this down. We need to align this properly. I'm going to use this as
a guys touching the soul. Somewhere around there should
be fine. Getting close now. Maybe move this a little
down a little bit more slightly touching it Let's get in there. Think a little bit
more. All right. I think they should
be more or less fine. Quite big though, but
this work just fine. All right, do a quick sie Okay. Now I need to explore this out. Let me do this weird
name and by the end. I'm going to select these two, and I'm going to explore
this out as an FBX. Let us pull this
out as a new BX. Put to the front. So you go to bring
this because I want to render this out
in Mama set two bag. I'm going to render out
in Mama set two bags. So let's go in to
Mama set two bag. A? So we have Mom set
two bag open up in here. So I'm using the Momo
set two back four. I'm using the classic
layout for this. So let's drag and
drop in a file. So let's go back
in studio sneaker, SLB x. I'm just going to. I'm not sure this
exported out correctly. Dad did not spot out correctly, so we need to export out again. Did not spot out correctly, because the five size is smaller than what
it needs to be, so let's now spot again. Like spots, yes. Let's give you some moments. Go back in there,
spot it up now, 11 gives precisely
what you want. So let's go and drag
and drop this in here. I drag and drop this
into almost set two bag. I think we need to
subdivide the studio. It's not looking smooth enough. Let's subdivide this one,
stay on the keyboard. Then we go to modify, convert math preview to oolgons. So they should hold
up quite nicely now. Let's expot this out again. Just replace. All right. I cannot update
itself automatically, which is one of the
cool things about most two ba cannot update
the model immediately. So now that we have
this in here now, I'm going to for the bab drop, I believe this is the babrop. So I would like to use
the same colo tone we did for the rendering. It's era. Open the
co minimize this. I believe we should
be able to pick. Should be able to pick the
colour for mits let's go into the colo. Let's see if we
can pick colours outside. So we have a color picker? I think you can only
pick colos from inside. Only pick colours
from inside instead. But that's fine. It's going to go around roughly
where it needs to be. I think we have something
roughly around let's do somewhere around
here for now. Okay. The need to make
this quite rough. It needs to be
quite rough. Okay. We don't want any metallic
property to this. So we need to change this
from food quality to okay, no, yeah, we need to go
to rendering settings. I believe that rendre settings, let's use re tracing. Then that digi we have a material in here
for the sky, though. We have a texture in
there for the sky. Not entirely sure if I want
to use this though box. I would preferably like to use so I'm reuting my light now. I'll preferably like to
use the one I kind of use instead of top and spinter. But let's just try
this on, let's see if this will give
us good results. Okay, so I'm going to now start
bringing in the textures. Let's start with the sneakers. Min body itself, so normal map. So not in here, I
need to go Okay, let's go over to when
we have textures put it out in B textures. So let's have the normal map for the sneakers, so sneakers. This is it to select
that to begin with. You should have our
normal map in here now, Bd Let's select bed
bed that's metallic. Sneakers mat, here is B color. That's the one we need. Okay. Looking at this now, I already
know I will need to use the GI from SubtansPena instead. So just carry on. The roughness, let's bring
in the roughness map. The roughness map, metala. Let's bring something in there. We actually expected
that metal in there. Though won't be seeing much
of it happening there though. I believe so set up now. Let's go to the
shoes normal map. Shoeies be shoes parts. It's like a normal map. Get closes being affected
Abdo bed shoeless parts. That's one roughness
roughness map for it. Metallic, I don't see you having a metallic material in
the blood just select the map that is so pattern. Know map for the sow pattern
should be one at the bottom. So this is it Bdo
PDPs color roughness. Roughness. I'd like
to save this file. Let me save this file. Let me just name this more more sets. Sneakers. Let us find metallic. Let's go back to textures
metallic for this select. I know evidently now
that I will need to use the lights from stans pinta I'm not going to
duplicate this light. I'm not to duplicate this
light so conclude to duplicate this. We put these lights. Lights I go into image. So we need to go and find need to find where that is
Dube sotanspinter. I believe the resources
for starter assets. Environment Studio believes studio Studio Black Studio
Black softs one like that. Okay. Yeah, that's
the one. All right. So this gives us a nice
shadow in there as well. So I'd like to change
the background also. Change the eye video
for the background. Something that's more
dark bluish tints to it. Okay, maybe done some more
around there should be fine. But now we have kind
of generalized speck across the entire outing, brightness is kind of
all over the place. I would like to get
something a bit darker in. Let's just let's just
get a good balance, then we can introduce some
other lights in here as well. Let's get a good
balance, so Okay. Then I'm going to can
temporarily hide these lights. We can take down the brightness. General brightness
for it. I'm going to introduce new lights in. Let's introduce new lights. Let's use the rational light doesn't really do much though. I think we can change
too many lights. Let's see if we can change the shape of this
to a rectangle. Not sure getting the Let's
change this light a bit more. Let's use spotlight.
Let's try spotlight. Spotlight gives us probably better contrast to it instead. I'm going to rotate it this way, drag the sp Nothing about working with
small set to bags that to get good results, there's not, I would say, not too much
controlling here for some specific setup
you want to do, but either way to
get good results, just kind of play with
the light and then figure out the right angles
for it and it should be good. Let move this up some
more He just facing down. Complete turn of our skylights. You can just see just the
nil lights a bit more. Brightness more. Let's get in there. I'd like to soften out the edges
of the shadows also. Let's see spot angle, all that. Cast shadows. We don't have cast shadow, we definitely need this
cast shadow, obviously. Let's adjust the let me
take this off first. Let's see. Okay.
That's looking good. I'd like to soften
the shadow some more. Let's see if we have a setup
soften the shadow in here. One of the supposed
soften the shadows but. It's not really softening those
shadows for us that much. Okay. Now this diminute
soften the shadow. It's not giving me
that desired result, let's see if we can think how to play with this setup little bit just to soften the
shadows on the edge. I'd like to change the lights. So more warm for this. I'm not sure I'm seeing the color picking
through this though. Okay, now we're
getting something. Okay. I I don't want
it to be too warm. Let's get in there. Let's
see what it gets in. Okay, slightly warmer tone. Yeah, I think we can
leave this for now. Let's turn back on
the sky light so we can actually get some good
balancing between them. Okay, that's fine. So I'm going to duplicate these lights. I'm going to duplicate
these lights, and I need to move it
to the opposite side. So I'll move it to
the opposite side. I'd like to change this let's
use an omnlight instead. The om light is quite big, maybe I'll go back to
the spot lights instead. I would rotate rotating
inside of Momos too, but anyways, let's get this
at a good angle as well. This way, move this forward this way instead of a tricky when working
with the rotation and the navigation zines
inside of Monsebg. But I think somewhere around
there should be fine. All right? I was a
way we can exclude the background
from being lit off with this extra light
we're adding in here. Anyways, let's just change
this to a more bluish tins. Let's use a more darker
blue darker bluish tins, okay? That should be fine. So this is basically what
I want to do in here just to get a more interesting
light set up to this. I'm going to darken the
backdrop a little bit more. Maybe even you something
completely black. This is completely black. I see. All right. Now I'm going to move my
skylight a little bit more. I'm just going to
rotate this one more. Let me kind of look for a
more better angle for this. Let's find a good angle. This is way too bright.
Don't look cool though. Actually looks cool. I think I would like
to turn off the shadow for these blue lights as well, keep keep this let's
see lame bit on. Let's just find a
proper angle for these lights. Way too dark. This looks like an
interesting one, but we're losing
those color contrast coming from those
other lights we added. We just need
something that leaves the environment a
bit smoke what's in Asia most like a skylight
rather like a key light. Kind of leaves the ambience of the entire light across
the entire mesh. I'll go back to the
orange warm light. I kind of make it a
little bit maybe bit too warm adds a little
bit more warm to it. Okay. I think something should
be fine, rotates. Skylight a little bit more. Yeah, I think somewhere
around there should be fine. I'll do a quick save for this. I think this should work. I think there should be, we
can look for the t table. You found the turn
tab around here. I want to do renders for this, we can just go into render. The main cameras
where I think we set this to 85
millimeter lens as well. So let's do 85. You get good camera
angle in there. Even when you close off shot, you can see most of your
details quite well. So I think this is looking good. This will work just
fine, save again. Okay. So we can do some editing in
here as well if we need to. I doubt. But let's
just play with this. Let's see if we bring in some saturations in,
maybe not too much. Just a little should be fine. Okay. Contrast, let's
increase the contrast. Not as too much contrast. Let's say this back to one. All right, we have the bloom. I don't think we need
that much bloom, though. Maybe a tiny bit should be fine. Okay? I don't think we
need to netting in early that we do that is fine. Let's go to render, scroll down. I'm not sure if we need
to learn I don't think we need ambience collision
in here actually. Let's go down to render setup here let's do some
renders out of this. The default will be just fine. Default will work just fine. I think this size arranging
out also should be fine. Let's increase this
to something around two k. Let's do two
k render for this. I believe there should be
a show frame somewhere. So you can actually see
where we're rendering out. Show somewhere. It's the main camera, set the main camera and
just see frame. So give us an idea what kind
of render view for this, know how we're rending. What's going to brand
that out actually. Let's go back to render
and specify our output, specified output for this. I'm going to put this in I
retro nike sneakers food. So let's get this in here. I'll give it a name. Let's just do snake sneakers. Okay, so rendering out as a PNG. I'll save this and then I'll
just hit render for it. So let's go down too
render image down. Let's do render image. So this shouldn't take too long. Shouldn't take too long. So
let's just give the moments. I'll come back when
it's Okay, almost done. So it's done rendering. De rendering. So if
you go back in here so this is a final renders in here. It's looking quite good,
quite neat as well. Some good neat renders
out of this is fine. I like to try some
turn table in here, so I need to open up this food. I'm going to drag
out the backdrop. I'll select the hues now. I'll go to not seeing
art objects. Let's do. Let's do it let's do tm table. Okay, this should be fine. Okay, so let's go to animate sub unless it's play on this. Alright kind of turn
in the sneakers on. That was why I kind of
removed the backdrop out of this. So this
is looking good. So we can render viusly
render this out. We're going to steal
this a little bit more. So I want everything to
catch actually be in view. I think this is looking good. I'm going to stop this for now. I'll stop this.
Let's pause this, go c to the end. I'm going to render this out
now. Let's go to render. I want to render
this out as a video. I want to render, come
down to Video stab. You want to render this. I
think the default to be fine. This one is sing
it should be fine. I don't need to go
too crazy on this. Maybe we can go even
maybe even lower for this. We can go lower. Let's use. Let's leave
it as it is actually. Just let's give it a little bit of time
just to render out. So just to specify the foold I want to
render out this in. Let's just do sneakers. T table that is fine. See this. Then all we
need to do just to click on render. Click on render. So I'll come back
when this is done. I'll show you guys that's good to be our conclusion
video for this. So see you guys in next
lesson. Bye for now.
25. 24 CONCLUSION: Welcome to the final
conclusion of this tutorial. So I've gone through
quite a lot, actually. So first of all, let me congratulate
you for getting to the final part of this,
which is the conclusion. So we used Zbrush
to kind of modify, create extras and sculpt quite a lot of most of
these detail actually, most of the sneakering
years at we done in Zbrush. So it's been an amazing
journey just to show you guys my technique in tackling a retro Nike snickers instead of Zbrush and
then showing you guys my technique in bringing it into sbtanpnter
baking in ze brush, doing the uv wrapping in Maya, and then texturing
the entire tin instead of sbtanspnter and some test render and then
bringing it back out to Maya and setting it up
for Marmo set bag, and then we have a
final renders in here. So if you kind of follow through the entire us step by step, you should definitely be having a final result
looking as good as this that you can actually
use as a portfolio piece. So with that in mind, I want to congratulate you guys once
again and then buy for now.
 Kelechi John, 3D CHARACTER ARTIST