Transcripts
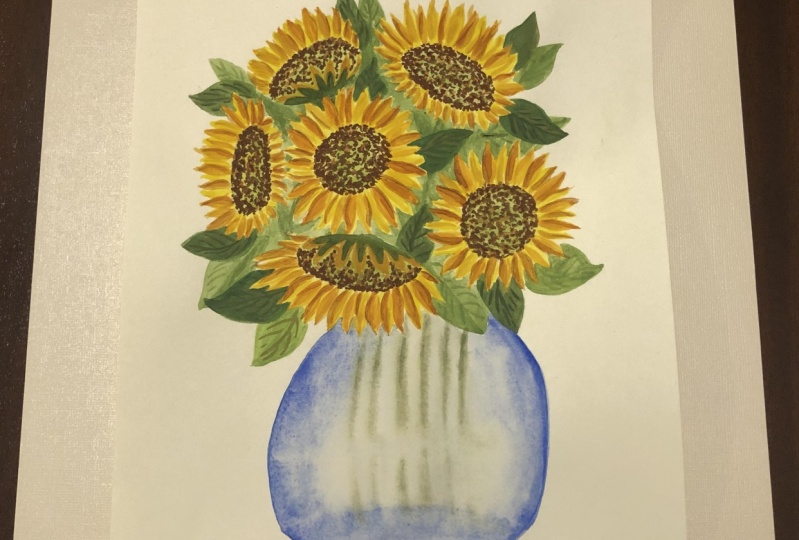
1. Hello!: Hi there. My name is Michelle. And in the watercolor artists from Anita fill a piece in this class. I'm going to share with you my process for painting this bright and beautiful watercolor painting showing a bouquet of sunflowers in Vegas. This class is designed for all Legos, and even beginners can easily follow along because I'm going to show you the most basic brushstrokes that you'll be needing for you to be able to create this project. So without further ado, let's start with a press. Uh huh.
2. Things you’ll need : in this class, I'm using a 100% cotton watercolor paper. This one is 300. She's which is ideal for heavy washes. Um, this one is a bit rough on the surface, and it's actually perfect for florals. I'm using a size seven round brush girl mix. Um, if you don't have this one, a natural hair brush would be ideal. But if you only have sympathy, that's fine. A water bottle and, of course, water. This is lemon yellow and cabinet. The other huge yellow joker sap green, burnt Sienna Brent number and ultra Marine. Okay, so these will be the materials that I'll be using for the Mass as well as a regular pencil and an eraser for doing the outline later for our floral arrangement. And okay, I'll see you in the next video for the practice brushstrokes
3. Basic brush strokes : before we began painting. Let me just start by showing you the basic breast strokes that we'll be using for this project. Um, as you can see, I'm just grabbing some water color, putting it on my palette and adding water to this is called a milk consistency, where in the water is just enough. It's not to think, and it's not to debut did P and I'm holding the brush near the tip. This will allow for greater movement from the wrist. No, As my brush contacts the paper, I press it full to the belly and then lift it as I glide the brush upward. Okay? No, you can do this upward stroke, or you can also do this downward. You can also do the breaststroke sideways for in a slanted menu such as this one, depending on where you're painting the pedal. No, At this point, I'm going to a subset green onto my palate again. This would be in a mill consistency, so I'm adding just a right amount of water so that it's fluid enough, but it's not too diluted. Now we're going to start painting the leaves. Okay, so again, the same diamond restaurant for this, But this time there's going to be two strokes for every leave. Okay? Yeah, When you're painting the leaves, just be sure that whenever you're painting the second diamond stroke, it's tip touches the tip of the 1st 1 And if that doesn't happen, you can just fix it by rushing over it, just like what I did next. I'm going to show you how to paint the middle part of the sunflower. And I'm going to use sap green for this. With my size seven brush, I'm going to sketch a circular form. But if you're not comfortable doing this, go ahead and grab your pencil and any circular object so that you can sketch a circular shape first. Okay, Now, after this, I'm going to grab burnt Sienna directly from the pan. I'm not going to dilute it with water and you'll see here that I'm holding my brush near the tip, okay. And in an upright position, I'm going to dab very tiny dots onto the whole parts of this circular shape that I just painted a while ago. Now you'll notice that the tiny dots that I'm currently painting are bleeding through the sap green part. That's because the circle is actually still a bit damp as I'm painting over it. Now you can do this, or you may choose to paint over this when it's 100% dry, so that the dots are clear. Later on. As I'm going to paint the project, you'll notice that I'm going to be the circular part to dry first, so that when they do paint over it, the dots will not bleed through this time with Brent number. I'm adding some more dots to the middle part of her sunflower, just random places within the circle, making sure that there's enough gap so that some of the burnt sienna and some of the sap green color are still visible. - And that's it. So now we're done with the breastroke practice for all of the parts of her sunflower. We're now ready to move on to the next video
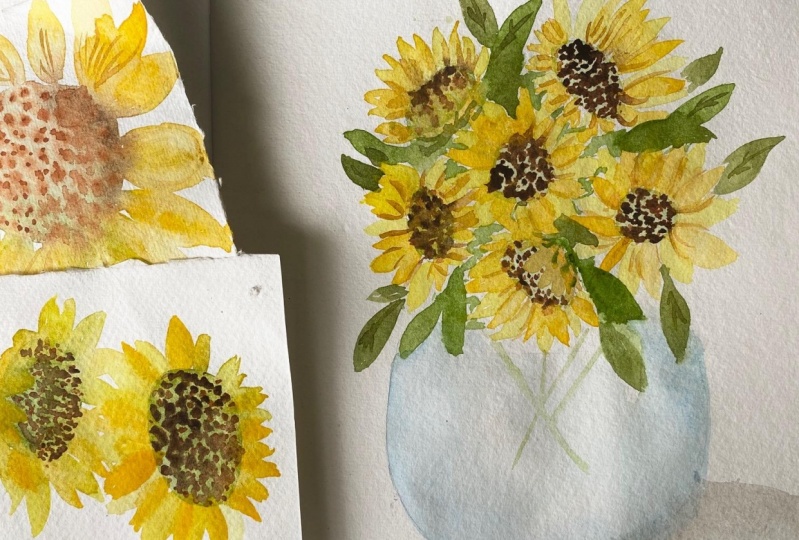
4. Sunflower practice #1: in this lesson, I'm going to show you how to paint a front facing some flour. So I'm starting with a circular shape right at the middle of the paper. Okay? Again, If you're not comfortable doing this directly with your brush, you can actually go grab a pencil in any circular shaped object to outline the circle first . Next, we're going to paint the pedals on. We're going to leave the middle part to dry first before we add the thoughts here. So I'm going to I used lemon yellow Andi. As you can see, I'm holding my brush towards the end of the brush. So with a dying man's truth, I, um fainting the pedals onto this flower and leaving a few gaps in between. This is because later on, we will be adding another set of battles in between these, um, pedals on. They will be in a different shade, which is cadmium yellow. You? Yeah. So, as he can see, I am doing this strokes in different directions so that the flower looks more natural. The paddles don't have to look the same. The strokes don't have to be done in a straight manner from the middle. You can do variations of this stroke from outward going in or from the middle part going out. And also, as you can see, some of the pedals are slightly slanted. Some are swinging in, some are straight. Now we're done. Good first set of our pedals. We're now going to continue adding more pedals to this. This time, the color that we're going to use is cadmium yellow. You okay? So we're going to paint the pedals in between the first set that we painted a while ago. Thanks. Thanks. Thanks. - Next , we're going to add a dots into the middle part of the sunflower. And unlike our practice earlier, I'm now adding bird Sana onto my palettes and adding some water to it. Since this time the middle part is already dry. So again and go, I'm going to hold my brush in an upright position and I'm going to add a tiny dots onto the middle part using very light that being motion thanks. - After we've added the dots using burn Santa people now at somewhere dots using burnt umber. No, we want the's thoughts to be darker. Then the first set that we've painted so I'm adding this color straight from the pan. So it's very and I'm concentrating most of my dots towards the outer part of this circle. Thanks. - Okay , at this point, we're done adding the dots in burnt number and a second. See, most of the thoughts are concentrated towards the outline or the utter portion of the circle. Now, at this point, the pet does part. Try and we're going to add details to these pedals using yellow. So I'm putting some yellow joker onto my palettes and adding just a few drops of water to it so that we have milk milk consistency similar to the consistency that we've used for painting these pedals. So now I'm loading my brush with the other poker and just taking out some of the excess water color. And no, maybe kid, adding the details onto H pedal. So basically, these air just very thin lines concentrated in the middle of the pedals so that we see some shadows onto the flower and this makes the pedals pop. - Now , using the same color, we're going to add more solid shadows in the first set of pedals that we painted to create an illusion that the photos are overlapping. So as you can see, before, you barely seen the the difference between the pedals. But now you can see them more clearly because of the shadows that now that we're done with the shadows for the pedals, I'm looking at the sunflower, and the middle part seems to lack the details that I want. So we're going to go back in and add some more dots using burnt number. Okay, Because normally, when you look at the sunflower, the middle part is actually, um, a bit darker on the outline. Okay, So straight from the pan, I'm going to add burnt umber to the outer part of this circle. It's okay now this and flowers finally complete. Next, I'm going to show you how to paint some flowers facing sideways in the next video. I'll see you there
5. Sunflower practice #2: in this lesson, I'm going to show you how to paint some flowers that are slightly facing sideways. The process will pretty much be the same as the one that I showed you in the previous video . But the difference is for one, the center will not be a perfect circle, but more of an oblong shape. Okay, so again, if you're not comfortable painting this shape directly with your brush, you can go and use a pencil for this. Now that's add in the pedals again, we're going to start with lemon yellow You. Now the pedals that we're going to paint on this side will be slightly shorter. That compared to the ones that will be painting on the other side. This is to give an illusion that this particular flower is actually facing side plays. Thanks things. Thanks. - All right. So we're done with the first set of pedals for this particular flower. Now, let's go ahead and start with the other sunflower. This one is also going to be, um, facing slightly side believes, but it's a bit different compared to the flower on the left, because we're going to have, um, the pedals swaying towards one side of this particular flower. So here you can see that I've painted the oblong shape, which is the middle part over flower. And while we're waiting for that to dry, I'm going to add in the pedals on the left side of the flower. Now, at this point, we're supposed to add shorter pedals to the right side. But since the middle part is still wet, I'm going to leave this for now and go back to the flower on the left and will be adding in the second set of pedals using cadmium yellow you this time. Thanks. - Now let's go back to the flower on the right and add in the second set of pedals for this one, we're still going to use the same color, which is cabinet yellow hue. Now, at this point, the middle part is already dry, so we can add in the shorter pedals. And since this one is, um, already with color, we would use the darker shade of yellow which is cadmium yellow, you to add in the pedals for this particular part of valor. At this point, you can see that the sunflowers are already beginning to take shape, and you can also see that they're not facing forward. Instead, their precinct a bit sideways. And this form, it's actually very versatile. So you can use this. If you want to add flowers at the top or the bottom part of your bouquet. We're now ready to add in the dots in the middle part of the sunflower. So the first caller that we're going to use is burnt Sienna. - Thanks . - Thanks . Next, we're going to add in some more dots to thes middle parts using burnt number. Thanks. Thanks. Thanks. Thanks. It's at this point. I'm using yellow over to add in the details to the pedals. - Thanks . Thanks. Thanks. Thanks. All right. Now we're all set to start eating our flower bouquet in the next video. I'll see you there.
6. Pencil outline and first layer: in this lesson. I'm going to show you how to outline the basic shape of our floral bouquet as well as the base. And I'm also going to show you how to do the first layer of our flowers. I'm just using a regular pencil to draw a big circle. And this would be the outline for our flora Booky. Now, if you're not comfortable doing this freehand, you can go ahead and grab any any circular object that you can use a PSA guide. As for me, since I'm trying to develop my skills in scotching, I try as much as possible to do everything we hand next. I'm going to draw the shape of the base of our base and it's going to be an oval shape, almost flat oval shape. And then from here, I'm going to draw the sides of the base. At this point, I'd like you to take note that I'm only drawing this way so that you're able to see clearly the outline that I'm creating. Okay, but on your end, when you're sketching, it would be best if you keep your pencil lines very soft or light, because once you're already painting and you've painted over these lines, they will be hard to erase. Okay, So, um, again, I'm just doing this so that you're able to see the outline clearly, but from your end, it would be best if you can keep your pencil lines very light. Next, let's plot where the flowers would go. Okay, So I'm going to draw a few circles within this, um, large circular shape. OK, now it's important to take note of the dimensions. So, as you can see, this is the center of the flower. Um is almost the same, uh, size in terms of they mention to the length of the pedals. Okay, so let's try to keep that in mind s sweet. Outline the flowers that go into the floor. Oh, okay. The 1st 2 flowers that I'm plotting here will be facing front. And then from there I'll be adding other flowers that are either facing upward or sideways . Thanks. Now, I'm just going to add the flowers surrounding these two flowers, and I'm going to do one that's facing down bird next. Okay, so this flower would be below the 1st 2 flowers that we've just sketched. - Then the next one would be right here at the site. And again, this sunflower would be one that is facing sideways to the left. So I'm using this one as a guide. Thanks. Thanks for the last two flowers in this bouquet. I'm using the same, um, die. Okay. Before sketching these last year flowers, which are both facing upward. Thanks. Thanks. Things. Okay, Now we're done with all of the lines for the flowers that go into the okay and just going Teoh, raise some of the lines that form the general outline of the cocaine. Because we don't really need that, um, at this point anymore. Okay? So I'm starting with this one and a few more lines, okay? Because, as I have said earlier, because I've drawn thes lines a bit too dark so that you can see them later on when I'm done painting the full piece, you actually be seeing some of these lines if you zoom in on the artwork so I'm removing the ones that they're no longer necessary. Okay, Now we're ready to start painting the first layer of the flowers. I'm just arranging, um, the pieces that we've painted a weather go. I'll be using them a PSA guide, as I paint. All right, um, And now with my site seven round bush going to bet my brush up it, grabbing some sap green and adding some water. So we have a milk consistency. Okay, So I'm just painting the middle parts of all the flowers at this point. - Thanks . - No , I'm just rinsing my brush so we could start painting the pedals using them and yellow. You okay? Now, if you don't have this particular color in your palate, you can just use any, um, cool shade of yellow for any lighter shade of yellow so that you have two shades, um, for painting your pedals. Okay. So again, I'm using, um, Diamond Strokes for the pedals. And I'm also leaving a small gap in between them to make way for the pedals that we're going to add later on. Thanks. Thanks. Thanks. - Now we're done with the first layer of our pedals and middle part of the sunflower. Let's move on to the next video to start with the second layer. I'll see you there
7. Second layer: in this lesson, we're going to proceed with adding the second layer of our pedals and the middle part of the sunflowers. So, for the pet does the color that we're going to use ISS cadmium yellow You. Thanks. Similar to, um, lemon yellow color that we used for the first set of pedals. If you don't have this particular color, we can just go ahead and use a darker shade of yellow that you have. You can also use the lights, the letters shade of yellow that used for the first layer and then just a some orange to it so that it's a bit darker. You can use orange or burn Sana, even if you want. - Thanks . Things. Thanks. Thanks. Thanks. Thanks. Thanks. Thanks. At this point, we're not going to proceed with adding the tiny dogs in the middle of those sunflowers. And we're going to use burnt sienna for this. Thanks. Thanks. - Thanks . - Okay , so we're not done with the second layer onto the next video for more dots in the middle part of this sunflower
8. More dots! : in this part of our class and just going to demonstrate how I add the second set of that's onto the middle parts of the sunflowers. So feel free to skip this section all together or speed up the video. But for me, I'm going to keep this in the normal pace. In case you would like to paint with me as I go along. Now, for the second set of thoughts I'm using burns number Thanks. Things. Thanks. Thanks. Thanks. Thanks. Thanks. Thanks. Uh huh. Things. - Uh huh.
9. Petal details: in this part of her class. We're now going to add details on the pedals and we're going to use yellow Joker for this. Thanks. Things. Thanks. Thanks. Thanks. Thanks. Thanks. Thanks. Thanks. - Now that our pedals look more defiant, we're not going to move on to the center, part of the flowers. And we're going to add more dots to this part using burnt umber. Thanks. - Thanks . - Just a few more gods. And then after this will move on to painting. Believes in the next video.
10. Leaves: in this lesson. We're going to add leaves to the okay and we're going to use sap green for this. Now I'm going to make some water to the pigment similar to the pedals. We're going to use enough consistency for the leaves. Now, as that demonstrated earlier in this class, the leaves and made of two diamond strokes joined together at the tip. I'm just painting the leaves in between the flowers, and I make sure that they are of different lengths and sizes. Now here I'm going to add the supple, which is the leap, like bees of sunflowers and simulator. In these, they are going to be made of diamond strokes. But they're just going to be a bit small thing. No, I'm going to load my brush with more water color again. The color here, it's sap green, and I'm going to continue working on the leaves around the flowers. Things thanks. - At this point, I'm going to fill in the space between the flowers within the bouquet. So I'm just going to make sure that I paint within the white spaces between the flowers, carefully painting on the outline of the pedal so that the pedals maintained their shape. Thanks. Thanks. Thanks. Now, that's add more leaves to locate, um, starting at the bottom and then a few more at the top. - No , I'm going to make sap green with some birth number so that I come up with a darker shade of green and I'm going to use this color to add more leaves to arable que thanks. Thanks. - Thanks are sunflower. Bookie is almost done. But before we add the finishing touches, let's paint the base first, and that will be in the next video. I'll see you there.
11. The vase: in this part of the class, I'm going to show you how you can easily paint a translucent base for your sunflower book. So with the clean brush and clean water, I'm just brushing water all over the shape of her face. Make sure that the amount of water that you add onto this entire shape is equal in every part of it. So there should be an even amount of water all throughout the base. I'm going to spread water onto this entire base and making sure that there's enough water so that later on this part does not try up so quickly. Okay, Now I'm going to lift my paper and continue to see if all parts of this face is shining, meaning there's enough water. And that entire portion is Dan, and I'm reading my brush and grabbing some ultra Marine straight from the pan. No, I'm going to outline the base using this loaded brush, and as you can see, the pain is able to spread and blend ever so nicely into the inside of the base because it's damp. Now, without loading my brush, I am going to continue outlining the bottom part of the base all the way to the other side . Thanks. Now, at this point, I'm going to load my brush with some water and I'm going to use this wet brush. She spread the pigment all over the base. Notice that I'm just lightly brushing over the sides of the base so that I'm not really taking the pigment off or erasing it off from the sides. But I'm merely spreading it. No, I'm getting more pigments from the pan and using this to add some shadow to the bottom of the base. Thanks. Thanks. I'm getting more pigments, and this time I'm going to add ultra Marine to the rest of the bottom part of the space. You'll notice that this time the color does not lead us much. That's because this portion now is not a sweat as it waas when you first added water to also because the pigment that we're adding this much thicker I'm also going to add some pigment onto the upper portion of the vase to create some shadow from the flowers above it . No, I'm going to rinse my brush and loaded with sap green mixed with a little bit of burnt number and we're going to use this color to paint the stems before I add the stems into the base. I'm carefully looking at the flowers and imagining where there's stems are coming from. Now. You see that the stems don't have hard edges because their base is still a bit them. And that's actually good because we want to create a soft look for the stems, since there inside the base. No, I may be adding more lines to this, but that's fine, because I wouldn't really want the base to be there. Next. We're going to create an illusion of water inside the base, and we're going to do that by rinsing er brush and with a clean, damp brush, we're going to do a quick stroke from one side of the face to the other. Now the water will start to push the pigment away from it and asset dries. It will be a bit clearer, giving us an illusion that this is the line where the water is now. From this water line, I'm going to do some quick downward strokes using a clean them brush so that the portion here it's a big lighter than the portion above it, and now we're done with the base. Now let's move on to the next video, where we'll be adding some finishing touches to our floral bouquet. I'll see you there.
12. Finishing touches: in this last portion of our class, we're going to add some finishing touches to make our flowers look more vibrant and also will be adding some details to the leads. So for the 1st 1 we're going to use yellow joker to add some more details to the pedals, similar to what we did earlier in this class. When you're painting with water colored, it's very important that you go back to your artwork and add some more layers to create more depth to your piece. - Thanks , things. Thanks. Thanks. Thanks. Thanks, Thanks. - And I'm going to rinse my brush in this time I'm going to load it with sap green and burnt number. And I'm going to use this color to add fine details to the leaves. When painting the details on the leaves. Just start from wanted to the other, making sure that this middle line is curved. And then we ate shortest strokes from this middle line going outward or vice versa. Thanks. Thanks. Now, with the same combination of sap green and burnt number, we're going to create darker tones onto the stems of the flowers inside the base. Again, we're just going to do very quick downward strokes for the stems. No, I'm going to rinse my brush again. And this time I'm going to load it with burnt Sienna. And I'm going to use this color to add further details to the pedals and a few more shadows to create depth to the flowers. Thanks. Thanks. Just a couple more strokes on this piece is finally done. I hope that you enjoyed this class, and I'm looking forward to seeing your projects very soon.
 Michelle Gonzalez, Water Color Painting Made Easy