Transcripts
1. Introduction : happy holidays. My name is Michelle, and in this class I'm going to show you four Christmas themed floral silhouettes that you can use when making the white greeting cards and gift cards, and even that's trinkets on your Christmas tree. It's always nice to receive a gift card that someone made with love. And so I hope if you not only enjoy learning from my painting process but also share your creation to someone special this holiday season, I'm so excited to share with you my designs so that start with the class, see you in the next video.
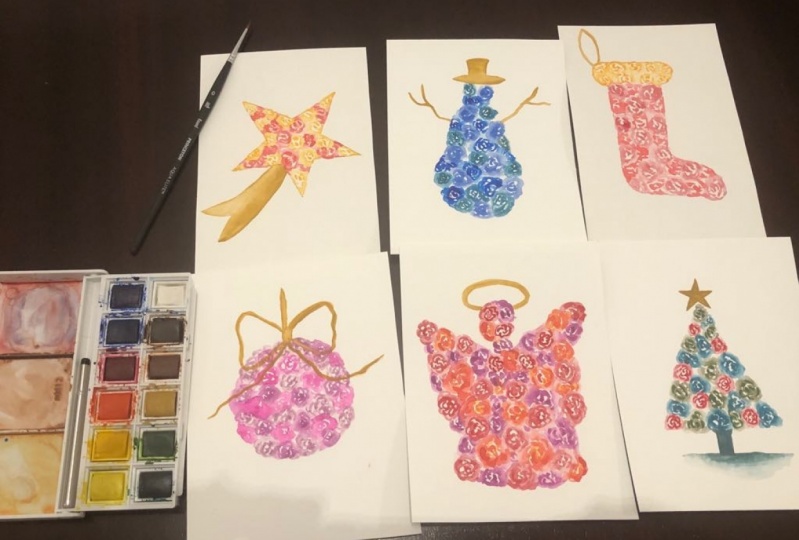
2. Materials: for this glass, we're going to need the following a bottle of clean water for rinsing your brush. Pennsy a size zero round brush. But if you don't have a small brush like this, he can also use a size two Ron brush. Of course. Your favorite watercolors. Some metallic watercolors for accent, 100% cotton 300 GSM watercolor paper. I've cut these two smaller pieces and to help you choose your colors, we're going to need also your color swatch. Now that we have all the materials ready, let's go ahead and practice the brush strokes for the rose.
3. Practice Strokes: Before we start painting, let me just quickly show you how to do the brush strokes using the size zero and the size to round brush. So I'm just going to load my brush with pigments. This is mineral violet, and I'm starting by doing too small, See strokes facing each other and adding two more layers of alternate pet does. Then I quickly prince my brush and take off the excess water and add 2 to 3 more layers, using just a damp brush for this nice, fading effects. No, I'm going to do the same thing with my size to round brush. So after loading my brush with pigments, I'm going to do the to see strokes that are facing each other and then adding alternate pedals and making sure that there's enough white space in between the layers. Now I'm going to rinse my brush, take out the excess water and with slightly damp brush, I'm going to add a few more layers to this grows. And as you can see, these pedals look softer than the ones in the middle part, and that sits as he concede. It's very easy to do the roses for this project, so let's go ahead and start with the first design
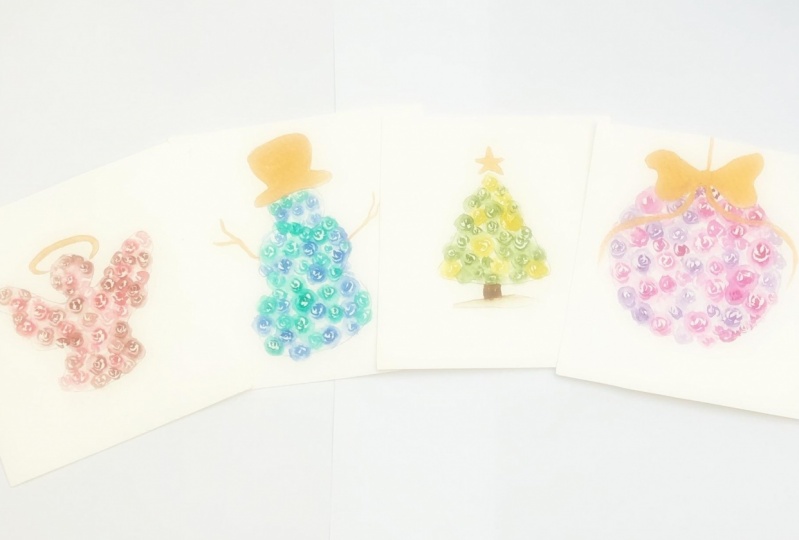
4. Floral Trinket: for first design, we will be painting a floral Christmas trinkets, so let's start by sketching a circle. And instead of getting something circular, I've decided to scotch this freehand and a recommended. You do the same so that you can develop. You're sketching skills. This may be very simple, but it's one step closer to sketching better, um, figures in the future. Next, I'm going to draw a straight line from the top, charge the circle and then a very thin bowl, and we're going to paint this one gold a theater on. You want to make a very light sketch author out because you don't want the pencil marks to stand out from your piece. Now we're done sketching, and we can start with painting the roses. You can use whatever color you want for this, but if you want to know the colors that I'm using for this particular demonstration and using lilac as my first color, and then later on, I will also add permanent magenta and mineral violet. When painting the roses, I stick to the first color first before I move on to add the rest of the flowers, you want to make sure that the flowers of the same color are evenly distributed all throughout this, um, circular shape so that it looks solid and well balanced when you're done with a full peace - and since replying the same brush strokes on all of the roses. I decided to speed up the video obits, but we'll get back to the normal pacing once we're at the parts where we're applying the metallic gold watercolor to the bow and the string. Now that we're done painting all of the roses, let's now move on to paint the string in the boat at the top of this Christmas trinkets. The color that I choose is red cool. And while you can use any metallic color, this one is actually very nice because it stands out even if I'm just painting a very thin line. And at the same time it adds a lot of elegance to the peace. No. - All right, this drink of this now done, and we can move on to the next class
5. Snowman : in this video, we're going to paint a floral Sloman in various shades of blue. We're going to start by sketching using a pencil. And again, we would like to sketch very lightly so that the pencil does not look so evident from your peace. Once you're done with it, we're basically going to draw three circles, the smallest being the head of the Snowman and then the middle part would be slightly bigger than the head, and then the biggest circle will be at the bottom. Next, we're going to draw the snowman's hat, starting with the bottom, which is going to be an over this like shape for the top part of the hat. It's going to be a square with rounded edges. Then we'll finish off by adding two branches at this side of the snowman before I start painting the roses. I'm just going to raise the overlapping part in this no man's hat so that it doesn't show when a leader on eat this with Metallica and just like the previous video. Since we're applying the same brush strokes to all of the roses, I'm speeding up this part of its and that's for the colors. You can choose whatever color you want, but in case you're interested to do the same colors like I'm painting with right now, I'm using turquoise blue at the moment. And then later on, I'll be adding ultra Marine and cobalt, believe you. - You No. - Now that we're done with the roses, we're now going to proceed with painting hat and the branches at the sides of the snowman with the same metallic gold color, which is red cool.
6. Floral Christmas Tree: and for the last design over holiday collection, we're going to paint a Christmas tree. I'd like to keep the shape of the silhouette very simple. So I'm just going to draw a triangle for the main body of the tree. Add a trunk at the bottom and east heart the top. - Now let's start painting the roses. I'm starting off with colored peacock blue and similar to what I did in the previews videos . I'm speeding this section up a bit since we're applying the same brush drugs to all of the roses. Now, after I'm done with painting peacock blue roses, I'm going to add roses entail and then in indigo. - Now we're ready to add the trunk of the tree at the bottom, and this is going to be in nd go. Then I'll quickly add a base to this by just dipping my brush in water, taking up some of the excess water and then just gliding my brush across the bottom part of the trunk. Now we're ready to paint the star, and we're going to use the same color red gold for this one
7. Christmas Angel: for our third design, we're going to paint a Christmas angel. And like the previous videos, I'm going to show you how I sketch this particular piece before I moved on to painting the roses. So I'm going to start by sketching something that looks like a bell, and this would be the body of the angel. Next, we're going to draw the neck and the head of the angel Now for the wings. We're going to do something that's similar to the butterflies, so it's going to be a bits. It's going to be a bit triangular with curved parts on the side again. When you're sketching, make sure that the pencil marks are not too dark so that they won't be too overwhelming once you're done with peace. And lastly, I'm going to add the halo at the top of the head. Now I'm ready to paint the roses, and I'm going to start with Potter's Pink and later on I'm going to add Nap fell maroon and raw number violet to this particular piece. Feel free to use whatever watercolor shady wants as long as it's something that you read a Nike or the person that you're going to give to would really love you. You, - You . Now we move on to the last step which is supplying the metallic gold color, which is red gold to the halo.
8. Final Thoughts: Thank you so much for joining my class. I hope that you enjoyed learning my process. And I hope that you get to share these the science with people that you love this holiday season from Manila. This is Michelle wishing you a very merry Christmas and a prosperous New Year.
 Michelle Gonzalez, Water Color Painting Made Easy