Transcripts
1. Introduction: Hello everyone. In this class, I'm going to teach you how to graphically encode your goals or wishes into a radiant Mandala with just lines and circles. Before we begin the class, you need to know some basics, which includes how to draw neuro lines, draw circles and triangles in neuro graphic style. And neurographica coloring rules. Do not fret if you don't know how to do any of this, because you can just take my neural therapeutic art foundations class, which is also available in my skillshare list of classes. This is a simple two-tier Mandela using lines and geometric shapes. And I will teach you what each of the layer means and how to write your statements. That will be the basis for your Mandala. And I will show you the entire encoding procedure to turn your wall of text into a Mandala. In short. To summarize everything I've just said, I'm going to teach you how to turn this in to this.
2. Materials: Hello. So in this segment, I will be sharing with you what are the materials that I will be using for this project? First, start this. You're going to need paper that is best suitable for your coloring materials, which I will get into in a little bit. And then you will need a pencil. Whether it wouldn't pencil or mechanical pencil, It's up to you. It's only for drawing and you want a really light pencil, so nothing has really soft and heavy because you don't want dark lines, you want to be able to erase them later. So a light pencil likely to H pencil or HP or with mechanical pencil that's like HB. With each B, that is or below that, would do fine. As long as you don't press too hard. You're going to need a laser. And you will need a compass, and you will need a fine marker. You can use any fine marker that you like. This is a uni-ball air marker pen. Well, rollerball actually. So you can use this if you like. Otherwise you can use any one of the fine alcohol or oil-based marker, like the zebra ones that I've introduced. Trying not to use the super fine liners, like the 0.05 MM fine liners, They're just to find. But if you still like them and you want to use them, it's up to you as long as it's fine and it's not too fat. Thick markers are not very good for this. Okay? And then you're going to need a really long ruler. The longest one you can find. This ruler I have here is a 50 cm ruler. Okay? It is enough to go cross the diagonal edges of the paper from edge to edge, from corner to corner. Because I'm using an A4 size drawing paper. Now with coloring materials. You can use any coloring materials you want or you like. But the paper that you use has to be able to take on the coloring material that you're using. So for this project, I will be using pastels and pastel pencils. You can use any brand of pastels and pastel pencils that you'd like. Okay. There's no restriction. These are hard pastels. You can use the soft pastels one if you'd like to, or any other coloring material, just make sure that the paper that you will be using can accommodate pastels. And so the paper there, It's very important that the paper you are using is able to accommodate the coloring materials that you will be using. And if you're using pastels or to sell pencils or even soft pastels. You want to keep a wet rag by your side and a dry one to dry your hands. And maybe some Q-tip or tissue paper or fingers that you can do that you will need to use for blending. So you can use your fingers for blending. You can walk your fingers on the wet rag and then dry it off with a piece on on a dry rag or a piece of paper towel. That's your choice. But if you use a Q-tip mixture, you have quite a few of them around because they tend to wear out really fast. And you only use them for maybe one or two colors because you don't want to mix them. And if you're using pastels, you will also need fixative or hairspray. The difference between fixative and hairspray as most off-the-shelf fixated that you can buy is archival quality. And you do need to protect services that you will spring on, that it doesn't stain it permanently. Bellevue using hairspray, you could just go to the bathroom and spray your artwork in your shower bathroom shower area, or your path area. Because they wash off. They're not waterproof and they wash off. And that also goes with your painting. They are not waterproof, but with most of the fixative that you can buy on the market, the spray fixative, most of them are quite waterproof or water resistance at the very least. And they hold up very well. The difference is that hair sprays are not archival. Fixatives are most of them are. So that's the difference. But has spray is a little bit easier to manage for cleaner and less setup time because you don't have to protect the surface that you don't have to protect the surfaces that you'd be laying your artwork down for spring because you could just, it washes off fairly quickly. Remember has praised for your hair and they need to wash off. So they're not waterproof. And if you're getting hairspray as a former fixated or your pastel paintings. Get the cheapest one you can find, because it's the pastels you are fixing your hair. So try to find those that has the least additives and the cheapest one you can find. You are going to need a new book for your definitions of each layer after Mandela.
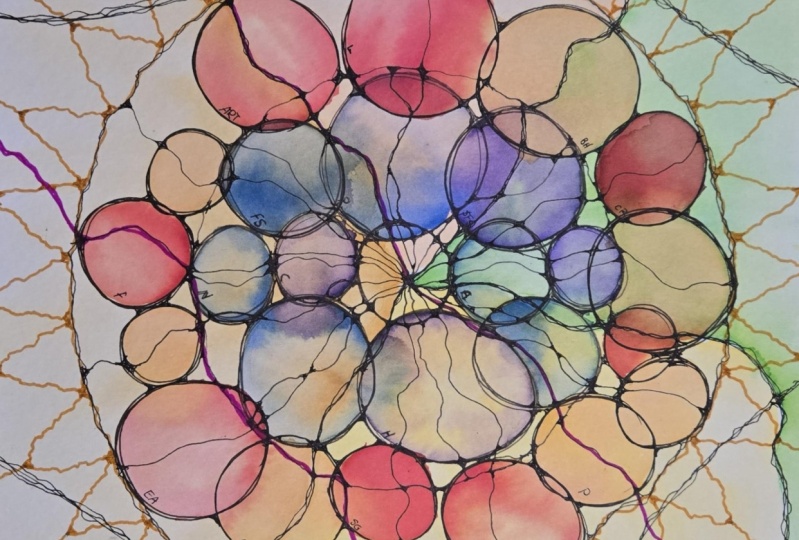
3. Explanation on the Mandala: Hello everyone. So before we get into starting to draw this radian Mandela, I just wanted to explain a little bit of how this goes. So we start from the center, which is red color at this point. It doesn't have to be red, could be any color that you want. This is very simple. Mandela doesn't have any coloring rules. Like what a seven-layer Mandela or the three layer Mandela would have. This Mandela does not have a lot of coloring rules except the normal neural graphical coloring rules apply. Okay, which means as no coloring it like a mosaic. Other than that, it's free coloring up to you as long as it doesn't look like a mosaic. So we start from the inner most layer, which is u, one single circle. That means you or me, the person who's drawing. And you expand that circle to cover Whatever you feel. Grateful for. Everything that you can be thankful for that you have right now, that you can be thankful for. So you're surrounding yourself in this sense. When you're drawing this Mandela, you are surrounding yourself with all the things in life that you are great PUC or you thankful for that if you are a blessing in your life, that you could not do without my surrounding yourself with gratitude. You are using this power of gratitude to empower your wishes. In the outermost layer. In this case, I colored this outer layer purple. Again, it is not a colored you need to follow. It is just for purposes of this presentation that I have it colored purple. Alright. So consider this narrative that you are giving yourself as you are drawing this Mandela. Okay? You expanding with your grid partners and thank corners into what you will become in the future with all your wishes. So you see how yourself is growing in this Mengele. From the smallest circle that is you into the bigger circle is your gratefulness. And eventually in the outermost largest circle, which is your wishes, that will be your growth. In this Mandela.
4. Descriptive statement: So we're going to start this out with a statement. So we are going to write a statement for drawing our neural Mandela or our radian Mandela. Okay, so we start off with a topic. So what is the topic? So my topic, I'm going to make a Mandela of my wishes. Now. Your Mandela can be about anything that you want, your help, blessings, prosperity, luck, money, hurried, whatever you want. So I am going to make a Mandela of my wishes, k. So this is the topic. And then the second thing is I need to list down what my wishes are. Hey, and then I also need another section, which is going to be the things I have that I can be thankful for. This is very important. Okay? So how many wishes and how many gratitude things should I list of us? Depends on the size of your Mandela. If you are drawing a Mandela on a paper that's this size of pestle. You can probably have, maybe if you as I am this fishing things that are on my top of my head, probably four or five if you're drawing, splitting for this size, for this section. And maybe about six or seven or less. In this section. I've never drawn a Mandela using a page sizes more this small. Okay. You can try. I'm not going to because I think it's a waste of time. But on the other hand, if we are going to be drawing a Mandela, that is the size of A4 size, which is probably about double the size. This big or even bigger A3, a2 size. Then you can list up more, especially this part. You can have many, many, many, many, many more than what you can draw on here. I'll show you how to draw. So it's okay if you don't have a lot of either of this, you can add as you go and you're drawing. All right, so you do one, a few to start off. So to start this icon, I'm going to list one year so that I can show you what to do. And then another here. Okay. And then I'm going to list the rest off camera. And then you probably won't get to see this list until I start drawing and even then, not the entire list. All right? So you may not even get this you and I write down. All right, so first we start off my wishes. So the wish that is at the top of my mind is financial freedom. Now, this is really long. So I don't want to have to write this down. So I can actually create a short form for this. Or I can create a symbol. For example, I can do financial freedom as is. Or I can go with just 20 F's facing, both facing the same direction. And so doing this way, the way that, the reason why I'm doing it this way is because it looks like a pair of willingness, right? So that's one. Now, you don't have to do it this way. You can do whatever we want. Like, okay, let me, let me list. And another one. Say, I haven't actually thought this over. So. Okay. My own home. So for this, I could just go with M H like that. All right, and when I'm drawing it, I'll just use this instead of writing this whole thing down. All right. So things I have that I can be thankful for. So it's going to be the same thing. So one thing I'm going to put down things I can be u4 is supportive. We're off relatives. So I'm going to do SR and then I'm going to write the rest off camera. All right. So I wouldn't have to sit down here and watch me do this, take as much time as you want. But like I said, for this, my including is it's probably safe to say if you have a list of about maybe six to eight apiece would be fine. Okay. And then for this top part, I would say, because this is, this is going to be the inner circle and this is going to be the outer circle, k. So the outer circle is bigger. So for this part, you maybe can pair up to 25 percent more than what you have here. If you have, say, a list of eight here, you could have maybe 10 or 12 or even more. And if you can write more, and if you can't draw enough the air, then you can just leave them out there. You can pick and choose leader. This is how you plan for it, I guess. Right? So that is how we're going to do. Now. Let me say quickly something because I'm writing wishes and NSAID, things that I have there can be thankful for. I'm going to give you another example. Say I'm going to do something about Pell. So what I have here is what do I mean when I say, I want help? So you're going to list out the things here that you're talking about that you want for your help. Whatever you want. Hey, and then you're going to list down here, health-related. What do you have now that you can be thankful for? Of course, you can also list down your friends and family and relatives. You know, high would suggest you leave out any resources. Okay. In any case, leave out any resources that you have here. They can be thankful. You are going to be including that in during the drawing stage for right now, leap, leap those things out. But write down what you have now in your life that you can be thankful for, for whatever topic that you have. Super wishes is a bit easier because open. So we have something like health, which is a smaller topic. Then you have to spend a bit more time thinking what are the things that you have that you can be thankful for that's related to your health, is health related. Okay? And if you are saying that you want abundance, again, if you're drawing a neural, neural Mandela for a radian Mandela for abundance, then it's about the same as wishes because it's really open. Okay? The other thing is a career, okay? If you want a career ready and Mandela, then again, in your, in this area, you're going to be putting down what are the, what is your ideal thing of Victoria? What is, what is it that you're thinking about that is going to make it your ideal per year. Okay, what, what are the properties that meet this an ideal career maybe like example, pipe, Hey, boss, whatever. Supportive colleagues, friendly, nice working must be, etcetera, etcetera. And then over here you're going to have to list down what are the things that you have now that is part of your life right now, that you can be thankful for. You can say that it can be thankful that you gain fully employee, may not be happy at your job, but this you have an income. So that's something that you can be thankful for or that you still have your hands on your legs and you can move around freely. You're not locked down at home, you know, lying on a bed bit written and all that stuff. You still have your health. These are the things that you can detect that would help you support you to get a new career. All right. So I am going to stop recording here and I'm going to write down, I'm going to complete these two lists off camera. So I will talk to you again during the drawing session.
5. Drawing the Mandala: Hello and welcome to the drawing part of this course. So first, we want to find the center of the paper. So you want to get a long ruler. Draw very lightly using a pencil. Across some way you suspect with the middle of the page is going to be a very lightly. Then you want to, from corner to corner, you want to do the same thing. Now you just want to draw the line with crisscrossed. So with the line crosses is the center of the page. Take very good because you are going to require this center dot for a lot of the drawing. Then you can erase the rest of the line. Now. Pick the compass. The compass. Draw the biggest circle you can write up to, almost to the edge of the paper. You don't have to draw it right up to the edge, but almost to the edge. First big circle. Lightly again. Now you want to cool it. And then draw a smaller circle. How much up to you? How big you want the circle to be? He obviously don't draw this. I mean, don't draw that circle this big because let me tell you why. Because this outer circle is going to read that guide called the points of your spokes. We are radiant Mandela. So you don't want it to be too small. Thing like that might be enough. You know, it slightly smaller so you have longer spokes. Hey, if you want to. But then you remember you have three circles, okay. So you want another one? Something like this. All right. Okay. Before you draw anything else, mark out points on the outermost circle, like a clock. So you can use the ruler to do this. Remember this way we have the Center for K. So what I'm going to, is I'm marking out part of the circle. Doesn't have to be exact. Have to be exact. Now you just can approximately say the 45 degrees. Now we're now going by clocks. Now. The reason I say Cox middle ears, because he went to 12 o'clock position, the three o'clock position, 6 o'clock position. Nine o'clock position. Then after that, you're going to do somewhere between half this approximate. Now you want to make sure your dots visible later. So this middle dots, very important. You can use the marks later. So I mark a dot here between the 12th and the three o'clock. But now you want to muck another dot in between the 12th and the nine o'clock dot, approximately halfway in between the two. And then this dot going through the middle here and make another dot on the opposite side of this circle. Right? And then you do the same thing for this dot over here that you've made. So now we do the same thing. To go halfway between these two. Make a dot here. Hey, we're going to make a series of dots, and then we're going to transfer it over to this quadrant here. So halfway between these two, same thing, halfway between these two dots here. Halfway between these two. And so on and so forth. Now we met all these dots across this sector here. Now, we're not done yet. We still have these ones to transfer over. So now we do the same for this part and this part. Okay? So another optional step is draw the spokes out now. All right, so, well, you don't want to draw it very hard. So you just draw it very lightly. This is a bit too hard or something like that. Before coloring. Once you put color over it, That's, it becomes very difficult. Too small, it doesn't really matter. So the longer ones are the ones that really matter because you're going to trace those lines leader. Okay? So we can draw all the guidelines. These guidelines will become part of the Mandela, but you won't see any of these. So this part of the line, because we are only interested in the dot. All right, remember the statement list that you may pay these. I will be using it to draw the Mandela with. Okay. So now you still want to be able to erase this dark. But leave it for now because you're going to be using this data log. So you won't see too in case you can't see later, you can erase it. But first, before we go, we need to draw a circle. K is small sized circle, not too small, not too big. So you go around like this until you feel that you're ready and draw the circle. So Cave it's off center. Doesn't have to be perfect. Now, around this circle, this circle represents you. In this case, do not label this, okay? Because I will explain what, what happens later. So this circle represents the artist who's drawing this Mandela. So now around this circle, within this inner circle, you draw the things that you've written down, the list of things that you've written down that you can be thankful for, right? And the circles can overlap. They can go out of the circles little bit, that's fine. The thing go outside this circle guide a little bit, It's fine. Okay. So they can overlap this circle, they can touch this circle anyway, you want them. So let me show you what I remember. The first one I was drawing was supportive father, then we supportive network of relatives. The first one is a supportive network of relatives, okay? So the size of the circle is decided by you. So they can also be like that. Not matching at all. All right. And this time you would have to label it. And then for the next one, I can draw it like that also. And then label it. And that's why you use a marker. So this one I draw, especially be going outside the guideline just to show you. So I'm going to use your intuition to decide on the size and where to draw. You can draw. You can draw it this way too. And they all become connected later. You will see draw it like that. Draw. All right. So we want to draw a line around this circle a few rounds over it. Now, from this center here, you need to draw neural graphic lines out to here across each and every circle. A new graphic line out each and every circle and rounded as you go. So it's less taxing the round later. In fact, I'm going to round it around most of the intersection now, so I don't have to round it later. It's always a good idea to round as you go. So it's later on. Okay, so now we continue drawing. Now that I rounded everything well. So one good thing, circles is that quite a few of them. That's a good thing. All right, so I want you to think about what this is telling. The narrative that it's telling your brain. Hey, youtube yourself. And then you surround yourself with pigs issued, you are thankful for. Then you draw a circle around that. What this is saying is, this was you. Now this is new. And the next step up, you're growing into another bigger you. And that's why I told you not to label this inner circle because you are growing in this Mandela. This is a Mandela representation. Representation of yourself. Okay, So this circle here, we are doing the things that you want in the future. So for my case is because I have wishes. So I'm going to surround this circle here with my wishes. All right? So start off. I have financial freedom. Remember k, This is how I label it. So really come from anywhere. I have 13 zone might want to add one more, don't like 13. So in any case. So when I draw another circle here, that is this one. So I'm going to put a couple of mysterious wishes. I don't know what they are yet. Put them down. So now we do the same thing. Trace the circle again. A couple of times. Draw lines to connect. Okay, so now we do the same thing. We draw from the center across all the circles who touched the outer circle. Round them as we go. Now you find that the line tier 2, how do I say come on or to come compact? Then see if you can trace the lines before calling out. So for example, I, what I'm doing here now, we can do that. We won't have to round any of those lines there. So it's kinda like you're doing a few lines. Now. It doesn't have to be a 100 percent rounded because we're not doing the algorithm for removing limitations here. So I still is around 70 percent rounded. It's good. It's an estimated figures who you don't actually have to go to. So I'm being lazy. So it just join one of the lines that were down here to this too. You can do that too. All right, So now we're done with this. We don't wanna do this outer circle yet. Because we are going to do this light fixation for this outer circle. Okay, if you know what I mean. Redrawing the spokes, like we're doing it for fixation. That we get the radius, the radius. So we're going to now gonna do the spokes here. So we're gonna do the resources now. So we're going to draw those sources. So now you can think about what you can tap on as resources, okay? So I have two main ones that I usually draw with genes. My spiritual side, spiritual resource. Up the Buddha's embodies. The blue one, which is the universal energy of the universal wealth. So I'm already design symbols for them. This is going to be the universe. Family, relatives. Threats. Here is the Internet. I don't know what this is. So I'm going to leave it like this. You will see why. I think that's good. It feels good. All right, so now you're going to activate the resources by tracing. Drawing, new graphic lines. Around. The resources were thrown 70, 70% percent rounded up. My recommendation is at least twice his activating the resources. To take. Some of my earlier classes. I would have talked about activating resources. So remember this, I'm leaving it this way because when I do this with double lines may just disappear. So what did I do? Now you go to your resources, connect from the center of this circle. So let's do that. You can double and triple over. I am probably going to have enough lines. Few like I didn't have enough lines here connecting to their resources. Okay. I think this looks good enough. I'm just going to round it. Not all of it. You can do 100% rounding if you want to stop necessary. So after we do this spokes and everything. Good. So the next step, coloring. So yeah. When you get into coloring, you just said the mixture that you can still see all these things that you're drawn here, core guides when you're doing your coloring. Alright, so I would say put a layer down and we'll see what happens. Okay? I don't know what's going to happen either after putting little bit, putting the colors down. So we'll see.
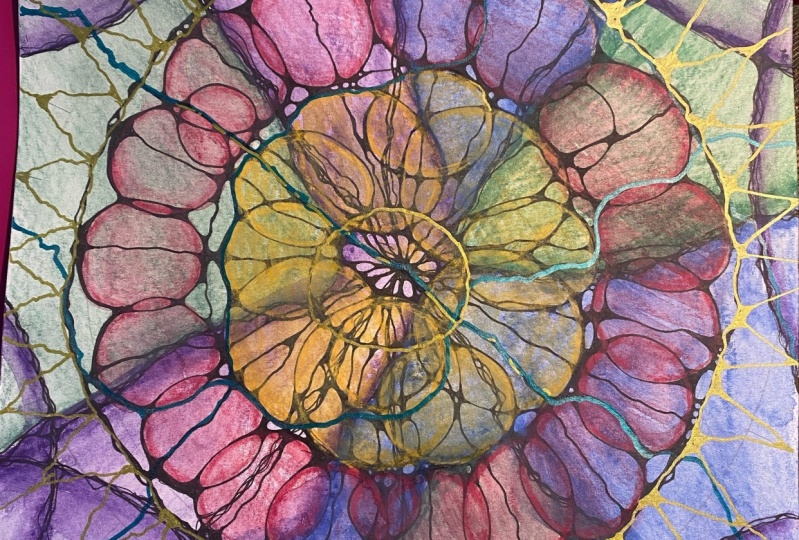
6. Colouring the Mandala: This hello. Oh yes, I forgot to talk about the rules for the coloring. For this Mandelian. There really isn't really much hard and fast rules about coloring. The usual neural graph coloring rules apply. The main ones are that you should not make it look like a mosaic of powers. So one way to make it look like it's in a graded, a whole picture. So for this case, you can either choose to cover the shapes or the four. So Shakespeare, oh, oh, oh, hello. Hello. Oh, oh, oh, yes. Oh. So field lines.
7. Fixation and Field lines: Okay, So now we're gonna do the field lines first and we'll use green for my field lines. If you can do fixation or few line first part for this case, we're going to do field lines because we wanted the fixation, the stand now. So three line, That's enough this time. Because I follow some of the lines, I follow some of the lines of I don't have to do the connection. So finally, we come to the fixation part. Cleaner, some dust. All right. So remember all these dots we draw. Hey, they're supposed to be the spokes. So how do you draw the spokes? You kind of have to kinda draw an imaginary line down. And that's going to be the straight one. And that's going to be in between these two lines like here. Okay, For this case they, I wouldn't join it to here. So you draw in your graphic line like that. And the same thing here in-between these two lines. Now, it doesn't matter if it's not straight. Now you see a triangle, okay? So actually before we do that, let me draw the fixation for this circle. So we want to draw your graphic line again around the largest circle. So because this is a triangle, you do need to round it. Now, we continue drawing from this part to this spot. And we're supposed to connect it to the end of the page. Again in between this two line, in-between these two dots here. This one I think dot here. So in between these two dots rounded around this area, these two dots. Not sure which one. So I'm just kind of guessing. So I hope you like this. I'll see you in the next lesson.
 Charles Lai, Counsellor. Therapeutic Coach. Artist.