Transcripts
1. Quick & Easy Half-Drop Repeat Patterns Using Smart Actions in Adobe Illustrator: [MUSIC] Hello. My name is Carrie Cantwell and I'm a
surface designer and educator. I have a BFA in
graphic design and I've been using Adobe
products for over 20 years. I became a surface
designer in 2020. When I started
creating patterns, I devised a system that helps me make the most of my time. I want to help you
work smarter when creating patterns in
Adobe Illustrator. By the end of this class, you'll be able to optimize your pattern creation
workflow so you can focus on the fun part,
creating the art. Tell me if this sounds familiar. You're scrolling through
Instagram and catch on that the coastal grandmother
trend is huge right now. You think to
yourself, hey, self, I want to create a coastal
grandmother pattern. You need to be able to
work quickly enough so that by the time you've
finished your pattern, the trend hasn't
already gone stale. This is why efficiency is key. In this class, I'll show
you my quadrant system, actions, and keyboard shortcuts, which will help you create half drop patterns quickly while ensuring they work seamlessly
for a variety of mediums. This class is valuable for
beginner to intermediate surface pattern designers who want to work more efficiently. For this class, you'll
need a computer with a copy of Adobe Illustrator
and Photoshop installed. If you've never used Illustrator
or Photoshop before, this class may not be for
you because what I teach requires a basic understanding
of those programs. Are you ready to jump in? Let's do this.
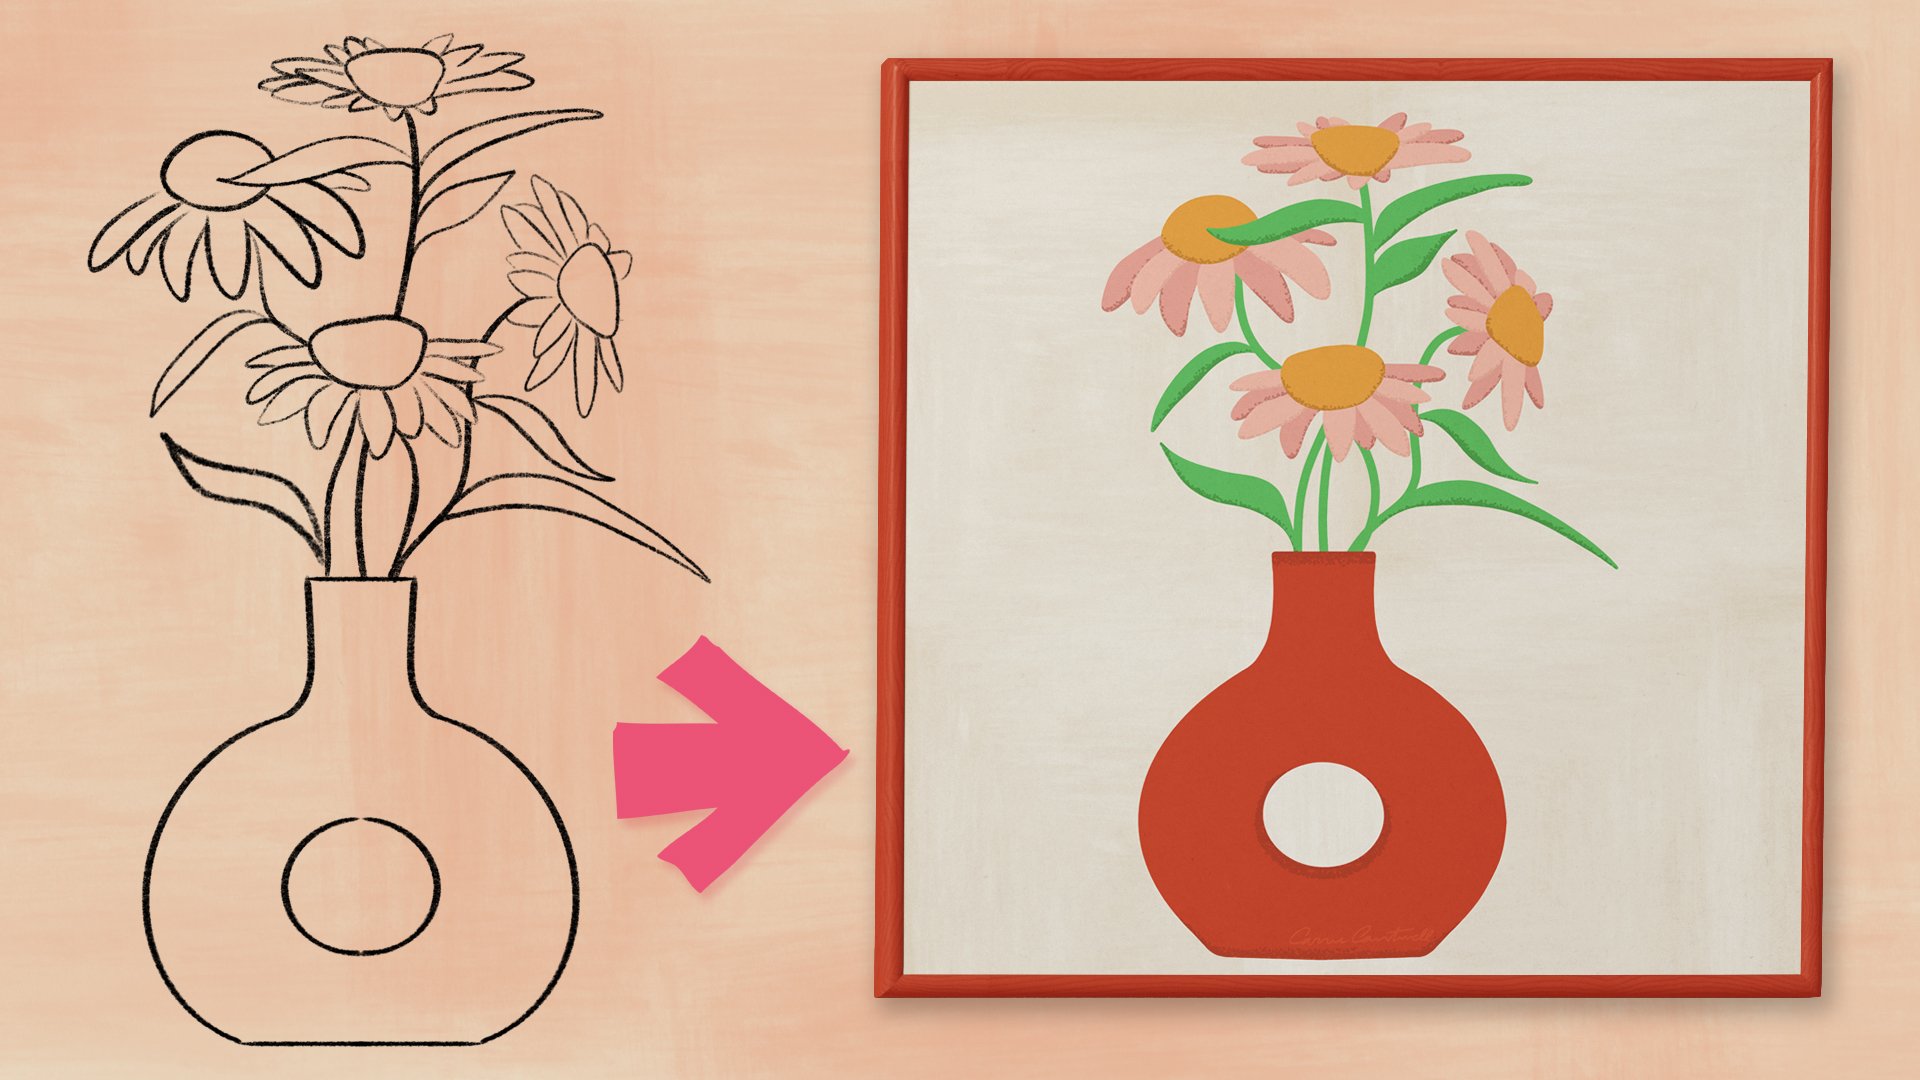
2. Project: Create a Half-Drop Pattern Block Using Adobe Illustrator: There are a lot of
other wonderful surface pattern design
classes out there, but my class is unique because I'm going to teach you
the workflow I use that helps me save time when creating patterns in
Adobe Illustrator. In basic repeat patterns, the design elements repeat
horizontally and vertically. You may have created
patterns like this. They're often square blocks that repeat right
next to each other. But half-drop patterns
are different. In half-drop patterns,
the design elements are horizontally repeated and
then dropped down halfway. The end result is a more sophisticated-looking
pattern because it hides the
seams a lot better. If you're just getting
into pattern design, this project is a
great place to start, especially if you've ever created patterns and looked
at them and thought, these look a little
blocky or choppy. If you really want to
create sophisticated, elevated patterns, you will want to learn the
half-drop method. I've made hundreds
of patterns using the quadrant system
I'm going to show you. I sell them on print-on-demand
websites like Spoonflower. Once I started creating
half-drop patterns, I saw my sales
increase dramatically and I make a pretty decent
living from royalties. I'm going to teach you how to create actions so you can save time by automating processes
like repeating motifs. Now, once I've drawn the art, I can create half-drop
patterns in minutes instead of hours because I use the streamlined workflow
I'm going to teach you. In this class I'm creating
half-drop patterns, but you can use the actions and keyboard shortcuts
I'll show you with basic repeat patterns as well. To set yourself up for
a successful project, make sure you have your
computer ready with the latest versions of Adobe Photoshop and
Illustrator installed. You can download free
trials for both using my links included in the
PDF file called Links, which is located in the Projects
and Resources tab below. You don't even have to create any new art for this project. I am giving you the design
elements so you can focus on pattern structure
and implementing my workflow. My Links file includes
a link to get the free class design assets and color palette
for this class. This is the artwork and colors we'll be using
for this project. Please keep in mind, I own the copyright to these
design elements, so you're not allowed
to sell them. But you are more than welcome to use them for your
project and share them in the project gallery as well as on your social media. You're also welcome to use
your own art for this project. I just want you in
the future to be able to quickly
create beautiful, sophisticated half-drop
pattern blocks that you can upload to print on-demand websites like Spoonflower and license
with companies. My Links file also
includes links to other Skillshare
teachers who have taught me so much
along my journey. I use a Mac, so the user interface you'll
be seeing is the Mac. But Illustrator behaves
similarly on both Macs and PCs. You should be able
to follow along. Both Macs and PCs do use
actions and keyboard shortcuts. The setup process may just
be a little different. I've uploaded a
sample project to the project gallery so
you can follow along. Of course, this is one of a million ways to lay out
these elements into a pattern. Feel free to make this
pattern block your own. Change colors, rotate elements. Just have fun with it. You will also see in the
Projects and Resources tab below a file regarding
keyboard shortcuts. You can download that
now or wait until later. I will be covering
that in a few lessons. Are you ready to get started? I'll see you in the next lesson.
3. Basic Repeat Patterns Versus Half Drop Patterns: [MUSIC] Let me tell you why
I love half-drop patterns. Half-drop patterns
hide the seams between each pattern block better than
basic repeat patterns do. When you look at a half-drop
pattern as a whole, it flows more smoothly because the motifs
are more staggered. In basic repeat patterns, the motifs aren't as staggered. They repeat immediately
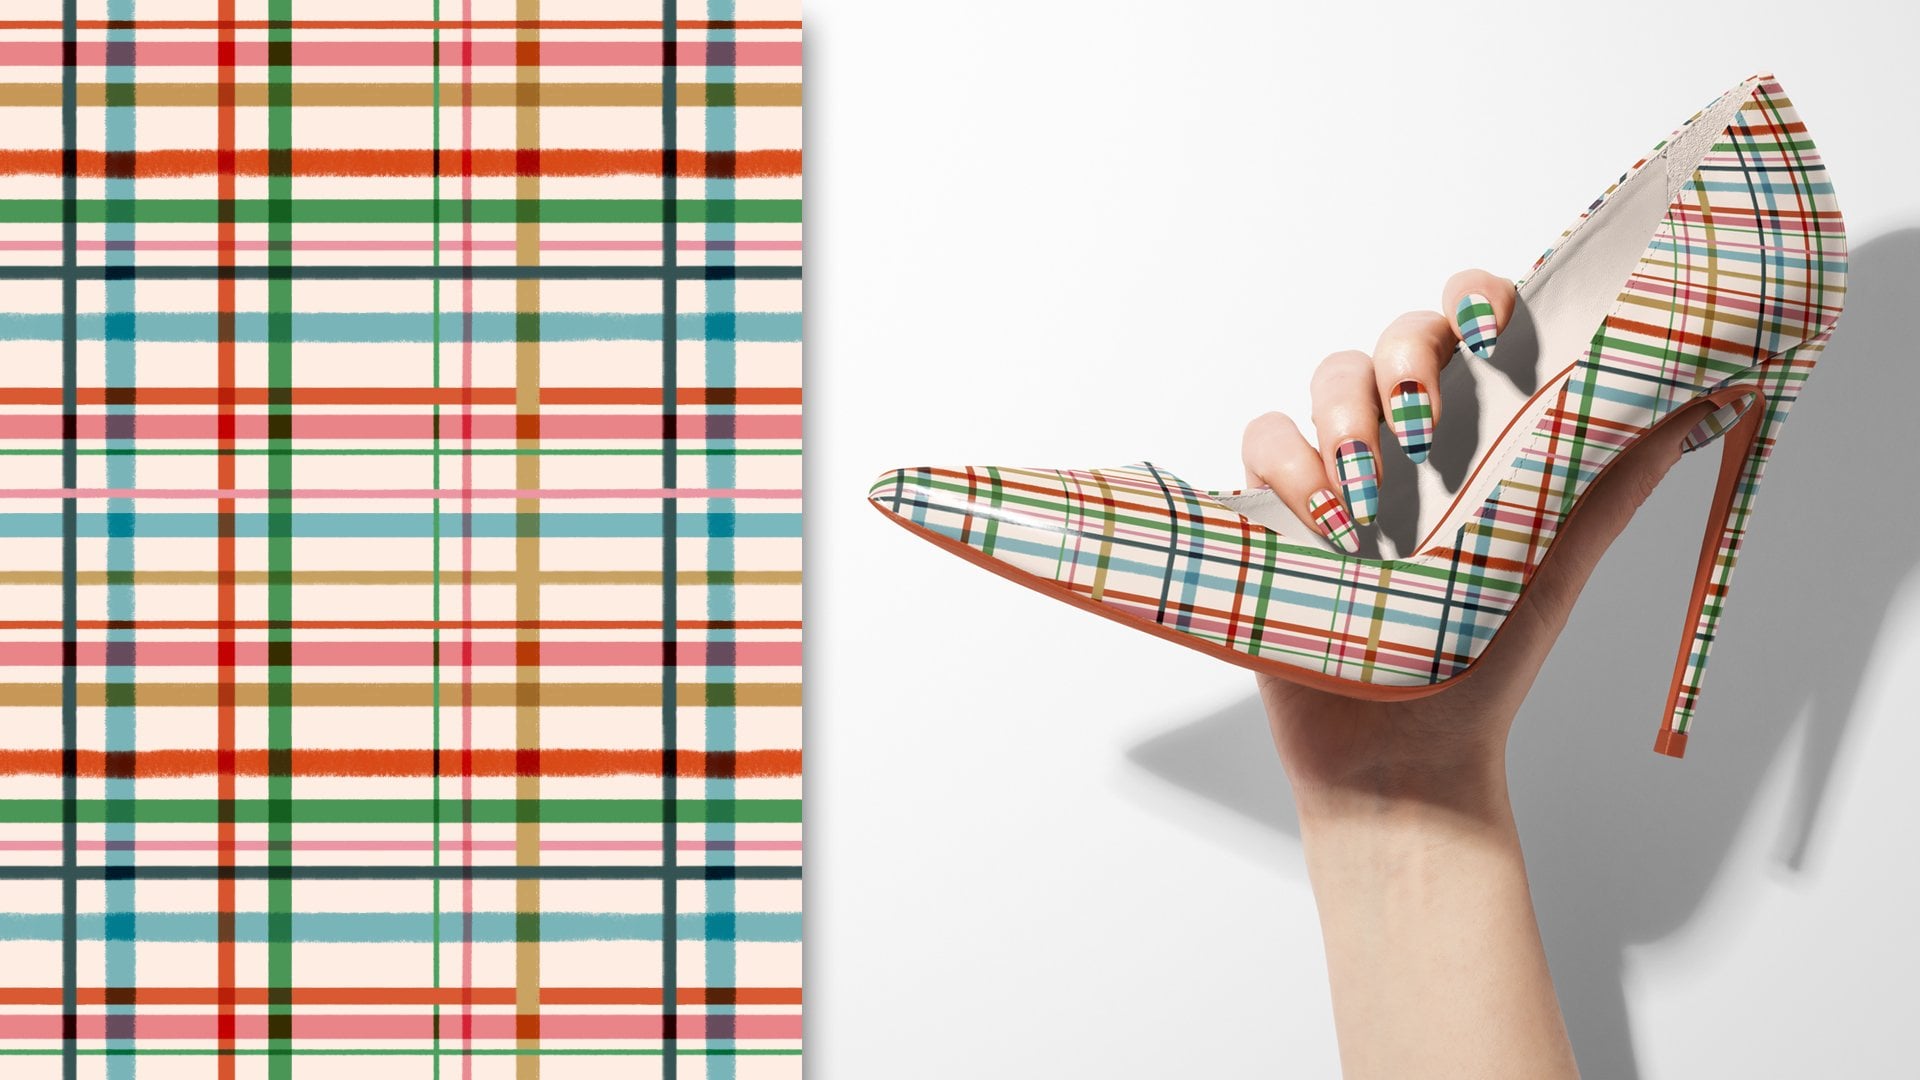
right next to each other across a horizontal axis. Here are a few examples of my basic repeat patterns and here are some of
my half-drop patterns. Can you see how the half-drop
patterns just flow better? Half-drop patterns
just look more professional when
they're applied to products in the real world. The best part about
half-drop patterns is they only look complicated. They're actually
really easy to create. When I first started designing
patterns a few years ago, I was only doing basic repeats. I didn't even know
what half-drop meant, but I was always jealous
looking at all these elaborate, beautiful patterns that
other people were designing. I thought I'll never be able to create something that complex. But half-drop patterns aren't complicated if you can
visualize how they're built. Whenever you create a pattern, your end result needs to be a seamless pattern
block. You can tile it. That pattern block is what
you upload to websites like Spoonflower to create
seamless repeating patterns. When I first started
designing patterns, I was making square
pattern blocks to create basic repeat patterns. This example shows one
of my old patterns, which is a square
block that is 1,000 pixels wide by
1,000 pixels high. In this example, you're looking
at four pattern blocks. Then I started learning
half-drop patterns and I was copying my motifs then moving
them over to the right, then dropping them down halfway. Then I would do the same thing, but I would drag the
motifs up halfway. Then one day I
noticed that what's inside this black
rectangle you're seeing is my seamless
half-drop pattern block that I can tile. This example shows one of my half-drop pattern structures and this shows four of
my rectangle blocks. Now, I create my half-drop
pattern blocks as rectangles. If you start thinking about your half-drop pattern blocks as rectangles instead of squares, you can start understanding
how they work. It's that simple. I want you to learn how
to work smarter so you don't need to overcomplicate
half-drop patterns. Just design them
with rectangles and your half-drop patterns will
be so much easier to create.
4. The Quadrant System: How Motifs Repeat in Half Drop Patterns Versus Basic Repeat Patterns: [MUSIC]. In basic
repeat patterns, everything that
touches the left side needs to be mirrored
on the right side, and everything that
touches the top needs to be repeated or
mirrored on the bottom. This square box you see is
the Illustrator art board, which is the edges
of my pattern block. This example shows one of my basic repeat square
pattern blocks. When I tile all
the pattern block, those partial flowers you
saw on the left and right, top and bottom of the art board will line up to form
a whole flower. The edges just
line up perfectly. But half-drop patterns
are slightly different. In half-drop patterns,
the elements not only need to be repeated
on the left and right, top and bottom, just
like a basic repeat, but they also need to be
repeated in a quadrant system. Everything on the top-left needs to repeat on
the bottom-right, and everything on
the bottom-left needs to repeat
on the top-right. If you visualize a plus
sign and four quadrants, then you can see
where the elements need to repeat and
you've got it. Even when elements are in the
center of your art board, they still need to be
repeated to the bottom-right, the top-right, the
bottom-left, and the top-left. Every time you have a motif
that needs to repeat, it repeats everywhere it
would touch the art board. You'll also notice that when I repeated this center rabbit, it coincidentally was repeated on the top and bottom,
left and right. This may seem complicated,
but remember, instead of a square you
have with a basic repeat, you're working in
a rectangle with a plus sign and four quadrants. This is where
visualizing that plus sign, that quadrant is going
to really come in handy. If you look at this
center rabbit, look at where the lines run through the
rabbit dividing it. You can see when you start
looking at the edges of the art board that
this bottom left here, this corner, mirrors
what's up here. This line is echoing this line. If you look at the bottom of right section of this rabbit, you can see that that
mirrors this top-left. Again, this horizontal line is echoing this middle
horizontal line, which is what divides
your quadrant. The same thing here, the top-right of this rabbit mirrors the bottom-left
portion of this rabbit, and the same thing, top-left here mirrors down
here on the bottom-right. If you start looking at the horizontal and vertical
lines of your plus sign, which is what
creates the quadrant within your rectangle art board, you can start seeing where
these lines are and where they intersect with each element so you know where they
need to be repeated. Once we start creating our
half-drop pattern block, you'll see it in action and
it will start to click. This may all seem a
bit overwhelming, but you can and will get
the hang of it, I promise. If I can learn this, anyone can. I'm also going to
teach you how to automate this entire
repeating process. So you won't even need to
think about any of this. You'll just hit a few
keys on your keyboard and everything will fall
perfectly into place. I'll even show you how to group elements so you can easily move them around when it's time to fine-tune your
pattern. [MUSIC]
5. Set Up the File: Size, Colors & Layers: [MUSIC] Let's get started. If you haven't already, go ahead and open
Adobe Illustrator, and we are going to
create a new file. I'm just going go to File, New, and I am going to, first of all, change the measurements to
pixels instead of inches, and I am going to
do 2,000 pixels wide by 1,000 pixels high
for my document size. I choose pixels
instead of inches because when Illustrator
renders vector graphics, it often guesses to
the nearest pixel, and when you have your
file setup using inches, and that has caused me some
headaches in the past. I just speak the language that
Illustrator natively uses, which is pixels, and that helps me avoid a
lot of problems. I also design my
files using RGB, that is because I
often export them and upload my files to
websites like Spoonflower. Spoonflower prints using red, green, blue RGB, they
print digitally. But really this depends on your final application
as to whether or not you want to use RGB or CMYK. Also, I always create
my files at 300 PPI, Pixels Per Inch, which is the same
essentially as DPI, or Dots Per Inch. That way, I ensure that I have the absolute highest
quality file that I can possibly use. Go ahead and click on "Create". Let's go ahead and save this file before we
do anything else. I'm just going to go
up to File, and Save. I'm going to save
it to my computer. I have Creative Cloud, so often I have this
dialog box pop up. But I will just save
it to my computer, and I'm going to call it
Skillshare_Halfdrop_Block. I will just save it to my
desktop and click "Okay". Really quickly, let me go
over something with you guys. I'm zooming out right now, but if you see, this rectangle here
is my art board. If you go over to your toolbar, if you go about 90
percent of the way down there is this little
icon right here, which is your Artboard tool. Go ahead and
double-click on that, and it's going to pull up
your Artboard dialog box. It's giving you
some information. This is the width
and height that we set when we created our file. It's also giving us the
X and Y coordinates of where this art board is
located in this file. One other thing that
Illustrator tends to do is guess to the nearest pixel where the art board is located with the X
and Y coordinates. I have also run into
some problems in the past with that when
I export pattern files, so just to be on the safe side, I always set my art board, X and Y coordinates
at zero pixels. That way, there are some hairline issues you can get with not only specifying
things like inches, but also art board locations, so I just tried to cover
all my bases here. That way, I always make
sure my files are perfect, and I don't have to worry
about any future headaches. Go ahead and click on "Okay", and I'm going to zoom
out a little further, and we can see that our
art board has jumped. I'm just going to click
on my Selection tool to deselect that. Let's go ahead and
name our layers, that's one of the first
steps I like to do. I'm going to have a
background color, so I'm going to go ahead and
double-click on this word, "Layer 1" here, and I'm going to create
my background layer. Let me go ahead and click
on the "Plus" sign, and I'm going to
double-click on this word, the word's "Layer 2", and I'm going to name
this next layer graphics. This is where I
tend to put all of my main graphics
for my patterns. Then you may not want to do this in the future, but for me, I like to do this and you
will probably want to go ahead and do this for
the sake of this project. Go ahead and click on "Create
Layer" one more time. Double-click on the
words "Layer 3", and let's call this top
layer here accents. When I create patterns, I have a background color, which is this layer, I have a main layer, which is where I put all
of my main graphics, and then sometimes
I like to fill in blank spaces with little
details like accents, like dots, and things like that. I like to keep everything
separated and named. It helps me when I want
to move things around, hide them and show them, see what I think about
the pattern visually, and it just makes
things a lot easier when you keep
everything separated. If you haven't already, download the Links file from the Projects and
Resources tab below. On the first page, you'll see a link to get the free design assets and
color palette for this class. You are welcome to use your own art and color
palette for this class, but if you want to save time, I'm giving you the free
design assets you'll need so you can focus on
learning this workflow. I have my Design
Assets file open, and go ahead and
rubber band around the color boxes that are here. I'm just going to hit
"Command C" and copy them, and then hop on back to the file that we
were just creating, and you can just drop
those in by pasting them. I'm going to go ahead
and move them out here. Let's go ahead and set up
our colors for this project. One thing that I like to do is, if I'm not using all of these colors that are default
populated by Illustrator, and I have a color palette, I like to just delete them. I'm just going to
go through really quickly and delete all of the color swatches that I am not going to be
using for this project. Now, I've got just the
colors that I want to use. Let's go ahead and set
up our background color. First of all, let's click
on this dark blue color that I gave you as part
of your color palette, that has set our fill color
here to this dark blue. Now, let's create a rectangle. If you go over to your toolbar, you'll see your Rectangle Tool. Instead of just drawing a box, which I don't want to do, I want to create
an exact size box that fits this art board. I'm just going to
select the "Rectangle Tool" while I'm on the background layer
here, and tap. Now, I can set the actual exact size in pixels
of our background color, which is going to be the exact same size as our art board. Click "Okay". Now, I'm going to go to
the Selection tool, and I want to make
sure this is aligned perfectly to the center
of my art board, so I make sure that my align to art board here is selected, and then I just click
on "Horizontal Align Center" and "Vertical
Align Center", and it is now my background color on my
background layer perfectly aligned to the center of the art board at the
size of the art board. We can move on to the
next step. [MUSIC]
6. Set Up the Quadrant & Drop in Design Assets: [MUSIC] Let's go ahead
and create our quadrant. Right now we have
our background layer and if you look in the
center of this rectangle, you'll see there's a little
dot there that is showing us the exact center
of this rectangle, which also happens to be the exact center
of our artboards. Go ahead and click on Command R, which is for rulers. Now we can see our rulers here. These guides that
we're about to create, are really just guides for us. They don't have to
be perfectly exact. I do like to try to make sure
they're perfectly exact, but this is just
a guide for us to keep an eye on where
our quadrants are. Actually, if you
select your box, now you can see
that center point. Go ahead and hold
down your mouse and drag down a ruler guide. If you drag it down
to the center, it'll stop and snap
to the center here. You can see it's showing us that this is the center
of our background, our box, and it is exactly 1,000 pixels x-axis and 500
pixels y, perfect. Let go. Now, we're going to do the same
thing on the left-hand side. Go ahead and hold
down your mouse, drag your ruler guide all the
way over to the center of this box until it snaps to the center like that,
and you can let go. Now, we have our
quadrant system. This is so helpful for me when I'm creating
half-drop patterns. You may remember from
a previous video, everything that is in
the top-left needs to be mirrored or repeated
in the bottom right, and everything in the
bottom left needs to be mirrored or repeated
in the top right. Now that we've created this, I'm going to go ahead and
delete our color palette. Here's something that I do with every pattern that
is really important. I suggest you do the same. I am going to click
on my rectangle, my background color, and now that we have
our guides set, I'm going to make
this box larger than the artboard so it's hanging over the edges of the artboard. Just for the sake
of being organized, I'm going to align
it to the center. Let me tell you why I do this. I have had issues where if
your background color or your art does not hang over the edge of
your artboard here, I have had patterns that
have one hair lines, in the seams between where the pattern
blocks meet each other. That is because Illustrator
renders vector graphics as rasters when you export
them as something like a PNG file or a JPEG, which is what you need to upload to websites like Spoonflower. If you don't hang your art or your background color
over the edge like this, you can end up with hair
lines that are so small, you really can't see them unless you zoom in really close, but when you're
printing something, that can cause major issues. I have had to go back
and redo a lot of patterns in my past because
of those hairlines. Just remember with your art
and your background color, I never suggest creating a clipping mask or clipping
or stopping any of your art at this artboard edge because you will end
up with hair lines. It's just bound to happen. Let's go ahead and hop on back over to the design assets file. Let's drop in our elements. You can lock the layer that has the information on
it that was just your color palette and the text. Let's lock the accents layer and now we just have our
elements layer selected. You can either rubber
band around everything or I'm going to hit
Command-A to select all. I have copied it and now I'm going to lock the
background layer on our file. Now that I'm back on our file, I'm selecting the
graphics layer and I'm just going to drop
our elements right in. Now let's go ahead and grab those accents from the
design assets file. I'm locking the elements file layer here and
unlocking accents. Those are these
little dots here. These are going to be our
little fill-in accents. I'm just going to copy them, go back to our other file, and I am going to paste
them. Yeah, that's it. We have all of our
elements dropped in, we have our quadrant set up
here with our plus sign, and now our background color is hanging over our art board, so so we will not have
any hairline issues. Let's move on to the
next step. [MUSIC]
7. Set Up Actions & Keyboard Shortcuts: Part 1: [MUSIC] All right. Let's
go ahead and set up our first three actions
and keyboard shortcuts. I'm going to go ahead and
lock all of my layers, and I'm going to hide the
accents and the graphics layers and I'm going to actually
for now hide my quadrant. Let's click on the plus sign. I'm just going to be
creating a new layer here. You can do this
with your own art. You can do this with anything. I am just going to draw a shape. It doesn't matter what it is. The reason I'm doing this
is because I want to be able to see what I'm doing when we are creating
these actions so I can make sure that
it's working properly. Now let's go ahead and go
to the Illustrator menu. Go to window at the top, and drop down and go to Actions. Now we're going to be
creating our actions and our keyboard shortcuts
for this class. What we want to do first
is I'm going to create a set for these actions. Go ahead and click on
the folder icon here, and let's just call
it half-drop set. Now because we're going
to have six of these, we can just put them all
together in one folder. Now we have our folder setup. Let's go ahead and
create our first action. I'm just going to
click on this square. It can be any shape, doesn't really
matter what it is. I just want to have
something that I can click on so I can
see what I'm doing. In the Actions panel, you're going to click
on this plus sign here to create a new action. I want to name this action
what I am going to be doing. I don't want to just call
it action 1 because I need to remember what
this action is doing. I'm going to type in here
x equals plus 2000 pixels, which means I'm going
to be moving at 2000 pixels to the
right along the x-axis. Now where the function
key drop-down is, I'm going to select F1, and I'm going to click on
this box that says command. The reason that I do this is, right now what we're doing is creating a keyboard shortcut. Which means when we hold
down the command key on our keyboard and click on
the F1 key at the same time, then that will perform the action that we're
about to record. The reason that I click on this command box here is because sometimes
when I'm working, I accidentally will
tap on the keyboard, and I don't want to
accidentally tap on the F1 key and move something
or duplicate something. The chances of me holding
down the command key and clicking on the
F1 key accidentally at the same time are
much lower than me just accidentally
tapping the F12 key. Go ahead and click
on "Record" and what we're going to do
now is illustrator is going to record
everything we're doing until we hit "Stop" so it
can be replayed later. Click on "Record." Now you'll see it's
recording because there's this little
red dot here. Go ahead with the object, whatever it is selected, go up to your Illustrator menu, click on "Object,"
"Transform" and "Move". Now what we want to do is
in the horizontal axis, we want to add 2000 pixel, so I'm going to type in
plus 2000 pixels here. In the vertical axis, we wanted to type zero pixels. I'm just going to
type the number 0. Now you can see that along
the horizontal axis, the shape is going to be moving 2000 pixels to the right, and it is not going to move
along the vertical axis. That's how you do that
and I have it set to preview so we can see
it as it's happening. Also, you want to make
sure you click on "Copy" here because we
are duplicating this. We're not just moving
the original element, we want to make sure
we have a duplicate. Click on "Copy" and now you can see that your square or
whatever object you're using to do this has been duplicated 2000
pixels to the right. You can click now on
this square stop button, which is at the bottom of your actions panel because
we're done recording. That is our first action. We have now created
our first action. Let's move on to create
action number 2. I'm going to go ahead and
delete that additional shape. With our shapes selected, you want to go ahead and
click on the plus sign. I'm going to name
this what it is, which is y equals plus 1000 pixels and I'm going
to choose the command F2, keyboard shortcut for this. Now I'm going to click on
"Record" and I'm going to go to object transform and move. Now, it is keeping it along the horizontal axis where it is so it's going
to be zero pixels. But what we want to do is
make sure that it moves down 1000 pixels along
the vertical axis. If we click back onto the
horizontal axis here, we're seeing it's
still at zero pixels. Now, right now if
we don't click on "Copy" it is not going
to be duplicating it, as you can see, it's moving it. Click on "Copy" and now it has moved 1000 pixels
down the y-axis, which is the
vertical axis so you can click on the Stop button. Now we have created
our second action. Let's go ahead and
delete this square. Let's go ahead and
create our third action. With our square selected, I'm going to click
on the plus sign at the bottom of the actions panel, and I'm going to name
this what it is, which is x equals plus 1,000 pixels and y equals
plus 500 pixels. I am going to choose the
command F3 function for this, my keyboard shortcut, and I'm
going to click on "Record". Now we're going to go to
object transform and move. In the horizontal box, we are going to click
Plus 1,000 pixels. We're going to move it
along the horizontal axis, 1,000 pixels and along the vertical axis we're going
to move it plus 500 pixels. Again, we are going to click
"Copy" and now it has been, as you can see, duplicated from the top
left to the bottom right. I'm going to click on stop here. Let me show you
something really quick. When I was creating
the action for this, it actually recorded
me showing the guides, and I'm going to keep this in the video so you can fix this
in the future if you want. You can actually tweak and
fine tune your actions. Do you see how in our actions here we
have our first action, our second action in
our third action. In the third action, we just did one thing, we moved it and it
tells you right here the details of
what we were doing. It also shows that
we show the guides. If you're like,
Oh wait a minute, I don't want to always
show the guides there, all you have to do is click
on this one little row here and click on the trash
can and you can delete that. You can actually
tweak your actions. If you ever accidentally do something while
you're recording, you can take each step out manually with that
little trash can. Before we move on, I want to make one point here. A lot of the times when
you're creating patterns and you have a shape and you
want to duplicate it, or you want to repeat
it somewhere, you will, if you're not creating actions and you just want to do it once, you'll probably be used to
using this transform tool. This may seem familiar where you can see in this
transform tool you have the coordinates of
where the shape is via your x and y axis. You may be used to going
to the end of your x coordinates and typing in something like
plus 1,000 pixels, and then going to
your y coordinates and typing in something
like plus 500 pixels. Then if you click on "Return", you have moved it. Now that is an absolutely
valid way to move something, but when you're
creating actions, you do not want to use
this transform tool. It does not behave
correctly with actions when you're
duplicating elements. This here, this
transform tool is your relative position on
your art board of an object. The object Transform Move tool
is actually a command that tells your Illustrator file
to the absolute position, not the relative position. If you want to move your objects in the
absolute position, not the relative position, you want to use object transform and move and not just transform, because this is just moving your object in the
relative position. It's not really that important that you know the difference, but just remember that
anytime you create actions, don't use the transform tool. Go to Object,
Transform and Move. That way you will always
make sure you do not have run into any problems
with your actions. That is it for our lesson, we have created our first three actions
and keyboard shortcuts. Let's go ahead and
create the final three and I will see you in
the next lesson. [MUSIC]
8. Set Up Actions & Keyboard Shortcuts: Part 2: [MUSIC] Let's go ahead and create our final three actions. I'm going to delete this duplicated shape here and I'm going to hide my guides. If you look at the
cheat sheet I gave you, the fourth action
we're going to create is the command F for
keyboard shortcut. With our objects selected, go to the plus sign at the
bottom of your actions menu, and I am going to name
this one x equals plus 1,000 pixels and y equals
negative 500 pixels. That is the fourth one down in the cheat sheet I gave you. For this, we're going
to use command F4. Go ahead and click
on ''Record''. Now, we're going to
do the same thing, object, transform and move. Now we are going to move it
along the horizontal axis, which is the x-axis, plus 1,000 pixels, and along the vertical
axis, minus 500 pixels. Now we're going to click on
''Copy'' and now you can see it has moved into the
position that it needs to be. Before I do anything else, I'm going to click on
that ''Stop'' button, and that is our fourth action. Let me go ahead and
delete this square here. Let's move on. Let's
create our fifth actions. With the objects selected, I'm going to click the
''Plus'' sign here, and this is going to
be our fifth action. This one is going to be x
equals minus 1,000 pixels and y equals minus 500 pixels. This one is going
to be command F5. This one is the fifth one
down in our cheat sheet, the fifth one down in that row, negative 1,000 pixels along
the x-axis, horizontal axis, and negative 500 pixels
along the vertical axis, which is the y-axis. Click on ''Record''. Same thing, object, transform, and move. Now what we're going to do is, we're going to do x equals
negative 1,000 pixels, and that is moving it 1,000 pixels to the left
along the x-axis, and then negative
500 pixels along the vertical axis here and we're going to
click on ''Copy''. Now, as you can see, it has moved negative
1,000 pixels to our left and negative 500
pixels up on the y-axis. Let's go ahead. Let's move on. Let's create our final action. I hit ''Clear''
there. You know what? Let's hit ''Stop''. Sometimes I do that. I'm just going to
go to the trash can here and delete that. Now I have my action
nice and clean. Let's do our final action. With our objects selected, click on the ''Plus'' sign. We're going to call this
one x equals negative 1,000 pixels and y equals
plus 500 pixels. For our final one, we're going to do command F6. Click on ''Record''. Now, we're going
to go to object, transform and move and we are going to have the x axis
be negative 1,000 pixels, that's already populated
from our last action, but on the vertical axis, we want to move it
down 500 pixels, so I'll just change
that to a plus sign. I'm going to click out of it and make sure it worked. It did. Make sure to click on ''Copy'', and that is it. I'm going to click the
''Stop'' button here. In the next lesson, we are going to be testing these actions to
make sure they work. I will see you in
the next lesson. I've just showed you how
to create actions to automate your workflow
for half-drop patterns. But remember, you can
also create actions for repeating motifs in basic
repeat patterns as well. Feel free to come back and
re-watch this class at anytime if you need a refresher on creating
actions. [MUSIC]
9. Test the Actions: One thing you will see me
do a lot in this class is show and hide my quadrant, which is setup using guides. There are two ways
you can do that. You can go to View Guides and Show Guides but I like to
use the keyboard shortcut, which is holding down
the command key, and also at the same
time clicking on the colon or semicolon
key on my keyboard. That is a really quick way to
show and hide the quadrant. In this lesson, we're going
to be testing these actions. Now remember, I created these
actions using a square, but you can use any shape. It doesn't matter where the square is when
you're testing them, what matters is that you do
go through and test them. We're going to test these
actions to make sure they work. First of all, let me show you
something really important. I'm on a Mac, I'm on a laptop, and I use an external keyboard. You need to turn on your F keys. Right now my F keys are set
up so that for instance, F11 and F12 are my volume
up and volume down buttons. I don't want to use those
volume buttons right now, I want to use those F keys, which are the alternate
commands under those keys. I originally had a
different segment for this, but there has been an update and I want to make sure you guys have the latest information. MacOS Ventura just came out. If you're using Ventura, which you probably are, it is December of 2022, my computer
automatically updated me to the latest
operating system. Originally with a Mac in order to turn on
those F keys to make your pattern and use
those keyboard shortcuts, you would have needed to
go to your Apple menu up here and then go to
system preferences. But because I am
using Ventura now, you'll notice if I
go to my Apple menu, there is no more
system preferences. But never fear, let me show you guys, it's super easy,
but it's a little hard to find but once you
find it you won't forget. But it is a little buried where you turn on
your F keys now. If you want to turn on those F keys and use
those keyboard shortcuts, what you want to do is go to your Apple menu at
the top left of your computer and go to what's now called
system settings, that's like your
system preferences. When you go to your
system settings, you'll see a very
different interface but if you go on
the left-hand side, if you scroll to the bottom,
you'll see a few things. You'll see keyboard, mouse, trackpad and printers
and scanners, these are your input devices. The keyboard right here, near the bottom on the left, and I just scroll down
there to get there, is what you want
to click on now. If you click on keyboard, then it will open another little menu here
with even more options. But you'll still see
in here that there is not a little toggle for turning
those F keys off and on. So what you then need
to do is click on this button here
in the middle on the right called
Keyboard Shortcuts. If you click on
that, there's more, then you'll notice that
it's still not showing up. The first time I did this, I got a little confused. So you then also after that, have to go to your left again. You'll see a little menu or
a little list on your left, right near the bottom, you'll see this thing
called Function Keys, it has an FN, click on that. Now that's where your
F1 keys are located, your ability to turn
them off and on, this is the button
that we were using in old versions of the
MacOS up until now. This button was just
under Keyboard. In order to start
building your pattern and actually using these F
keys and testing them out, you want to go into this menu here and
turn this toggle on. What that does is it tells
your computer use those F keys as standard function keys instead of what they
are by default, which is things
like your volume, you have some play
and record and pause, or play and rewind and pause buttons if you're playing music. In order to use the command F6 for instance, if you do that, if you're building a
pattern and nothing happens when you hit Command F6, that's because you
need to turn this on. Now when you're done
building your pattern, if you want to use
those buttons again, those keys on your keyboard for things like volume, which I do. Also, I think F7 is
my rewind button. But if you want to
use those later, when you're not
building your pattern, you're going to want to go
in and turn this backoff. Again, let me show you guys
real quick one more time. If you're on your computer
and you want to build your pattern and you want to use those keyboard shortcuts, which are your F keys and you're trying them and
nothing's working, go to your Apple menu, go to System Settings,
then scroll down, click on "Keyboard", then click on
"keyboard shortcuts", and then click on
"Function Keys", and that is your on-off toggle. I hope that helps. I'm
going to try to keep you guys updated if
anything else changes. But so far that is the only thing that
I have seen that has changed that will affect your ability to make your
pattern for this class. Let's go ahead and
test these actions. The first thing
I'm going to do is delete this additional square. I want to expand my
actions so I can see all the details
under my half-drop set. If you click on the little
arrow or caret here, where we have
commands like move, you can inspect each action. You can do this with
each one of them and that way you can go back and make sure
that they're working, but I'm just going to
test them visually. Let's test the first action
which is Command F1. Command F1 on the cheat
sheet is this square or anything needs to repeat from the left side 2,000
pixels to the right. This is a 2,000 pixel art board, right now our square is
positioned right where the center of the square is touching the left edge
of our art board. Now that I have that selected, I'm just going to go ahead
and hold down Command F1. Now, you can see
that it has been repeated exactly 2,000
pixels to the right, and it has been duplicated. That is our first
action, that is working. I'm going to delete
this second square here and then let's
test the second action. Let's move the square
up to the top of our artboard here where
the center point of the square is touching the
top edge of our artboard. Now remember, Command F2 is going to duplicate
it and drop it down 1,000 pixels on the
y-axis, which is vertically. If I hold down Command and F2, now you can see that
the bottom square is touching the bottom edge of the artboard where
the center point is. That means our second
action is working. Let's test our third action. I'm going to delete this square. You know what? I'm going
to put the center point of the square right
where the center of the square touches the top
left corner of our artboard. What should happen with Command
F3 is this square should be duplicated exactly
1,000 pixels to the right. That's half of our artboard. It should hit right
here in the middle and then 500 pixels down, which is half the
height of our artboard. Our artboard is 1,000 pixels, we want it to come
down here, 500 pixels. I'm going to hold down
Command and hit F3. Low and behold, there it is. Awesome. That means our first three actions
are working great. Let's go ahead and test
the next three actions. I'm going to take the
square and I'm going to go ahead and move it now to
the bottom left corner. I'm going to use the
Align tool here. You don't have to do this and that's going
to align the edge. I'm just going to
snap it. There we go. If you can see it here, there's a little dialog that pops up that says
intersect, it's pink. That basically is telling
you that center point, let's see where it says center, that center point
is intersecting with the bottom left corner. What should happen
with Command F4 is this square should be duplicated right back to where we were duplicating
that other square. It should just be
perfectly centered where the center point touches
the center of our artboard. I'm going to hold down
the Command button and click on F4. Yes, it's working. This is awesome.
I'm super excited. If you ever realize that you
created an action wrong, it's really easy to fix. All you have to do and I
like to do it this way, is I'll shrink it
down with the carrot here and you can just hit the
trash can and recreate it. See how the action right
here has this Command F3. That's the overall action, and then the details
are down here. You can always just delete an action and go back and
re-add it if you need to. Like I said, feel free to watch this as many times
as you need to. Command F5 should then
take this square here. Now, I can align it
to the center because the center point is aligned to the center of the artboard. Command F5 should duplicate
this square up here on the top left where the
center point of our square touches the corner top
left of our artboard. I'm going to hold down
Command and hit F5. Yes, it works. Awesome. Okay, perfect. Now, I'm going to
delete this square. The final command we created, which is Command F6, should duplicate this
square down here to the bottom left
where the center point of the square root this
bottom left corner, so I'm going to hold
down Command and hit F6. Awesome. It has all
worked and we have successfully created six actions
with keyboard shortcuts. Now remember, when
you're doing this class, you don't have to use a square, you don't have to use my art, you can follow along with your own shape and your own art. The main thing is that when you're
creating these actions, you just double-check
your horizontal and vertical coordinates. Horizontal being x,
vertical being y. Just double-check, triple check. If you ever get further into a project and you
start realizing once you test your pattern and things and stuff
is not lining up, just go back and
check your actions. It is entirely possible these are a lot of numbers that something may have
been missed, but it's okay. You have your action name here, you have your commands, you know you're copying it. Again, if you're not sure, you can just go ahead and
delete it and re-add it. It really is a quick process. You only have to
do this one time. If you're doing the
same half-drop set I'm doing in the future, you don't ever have
to do this again. If you want to create your own, you still only have
to do it one time. I'm going to tell
you one more thing here that can be really helpful. See how we're in
our Actions panel here and we have
our half-drop set. If you go to the top right of your Actions panel and there's that little three-lined menu, if you click on that, you can drop down and do you see where it says Save Actions? You can actually save your
actions and export them. It's going to save
as an aia.aia file, but if you ever are going
to be updating Illustrator, which is highly likely, go ahead and save
this as a backup. If you ever are worried
about losing these, you can import them. You can import them
in the same manner. You would just go
up here and then you would go to Load Actions. You would go to
the Actions panel, the top right where the
three-line menu is, and then drop down
to Load Actions. That way, you can keep
them between versions. Illustrator does tend to keep your preferences if you tell it to when you're updating to a new version of Illustrator, but it can never hurt to
have an extra backup. I always like to save. I have a folder on my computer called Backups which is little
preferences like swatches and things like that. I have my actions
saved in there. That is it. Let's move on to
the next lesson.
10. Start Building Your Pattern: It is now time for the super fun part so now that
we know our actions work, I am going to close
the actions panel. I am also going to delete this layer that we were
using to create and test our actions so
I will just click the trash can at the
bottom of my layers panel. Now I'm also going to hold down Command and hit
the semicolon key and hide my quadrant for
the moment and finally, I'm going to hit the eyeball
next to my graphics layer so I can turn on my graphics and start building
out this pattern. Let me remind you that these graphics are the
ones that I've given you, but you can follow along with
your own art so please feel free to use your
own art for any of the pattern stuff
that we're doing. I'm going to go ahead and unlock the graphics layer and the first thing that I
like to do when I design patterns is I start with the largest elements first and then go down to
the smaller ones. I'm going to take
these smaller elements and move them off of the art board and
I'm just going to start with the larger elements. Again, this is a
matter of taste. I'm just going to
lay them out into a formation that I find
visually pleasing. This is all a matter of taste, so feel free to do this
however you would like. This is just me eyeballing stuff and looking at what
I think should go where color-wise and
what might look nice in one place versus another so use your own creative
instinct here. This is a rough overall
layout where all of my elements are
and I like to keep different colors
separated from each other so I have these reds
separated, these yellows. The leaves are spread out and then these
pinks are over here. This is the way I like to design patterns now you don't
have to do it this way, but with my half drops, I have a process that
works like this. I'm going to take all of
these elements actually and you know what I'm
going to move this leaf. Let's see, I'm just going
to leave it right there. I'm going to take all of these elements and I'm
going to group them. I'm holding down
command and the letter G and now I'm going
to shrink them a tiny bit so that they're
all inside my art board here and I'm going to align
them all to the center. Now, this is just a
very loose overview, pattern creation, as you know, is just a lot of playing around and looking at how things look. They're centered, I'm going
to actually shrink them a tiny bit more and I'm going
to center them again. Now, this is what I like to do. If I take these objects
and click on them, I'm going to repeat
these objects in all four corners, so that is going to be F3 down
here to the right, F4 up here to the right, F5 up to the left, and F6 down to the left. Now, I have these keyboard
shortcuts memorized, these actions memorized but that may seem a
little weird to you, but if you do this enough, you're going to
memorize them too. I'm just going to hit
"Command F3" so now these have been duplicated as a group right down
here to the right. I'm going to do the same
thing and hit "Command F4" and now they have been duplicated up here
to the right on the top so I'm going
to hit "Command F5" and now they have
been duplicated to the top left and I'm going
to hit "Command F6." Now you can start seeing
how this system works. I'm going to hold down
the Command key and hit the semicolon and now you can see this is where
our quadrant is. Do you see how for instance, with this leaf here, it hangs over the bottom edge, and then this yellow flower is positioned where the
quadrant is around here, and then these
pink flowers here, and then this leaf is down here? If you look and imagine
where these lines are, see how they match up with these lines and see
how the bottom, where the leaf has this space
down here is the same as the space here; it's also
the same as this space here. This is what I was saying
in a previous video, once you start visualizing
how this quadrant works, and you start getting used to it you can really just
look at the pattern as you're designing
it and just really instinctively know
what goes with what. Now you also with these elements because
they are also large, you can see this
flower, this flower, this yellow flower here
is all the same one, same thing with this
leaf really just because they are so distinctive
from each other too. Now, this is the way I like to start designing my patterns, and let me show you another
cool trick that I like to use, so I'm going to go
back and ungroup these. The way I'm doing that is
holding down the Command key, hitting the Shift key, and then hitting
the letter G for group that ungroups them. You can also go to, for instance, if you have
an ungrouped set here, you can go to Object and Ungroup so if you go to the Illustrator
menu and drop down, click on Object and drop down to Ungroup, that will
also ungroup them, and here's a little hint, that's your keyboard shortcut
that's what we just did. That is the Shift Command G. I'm going to go through and ungroup all of these sets that I have and now, this is where I have
a trick for you that is going to make
everything a lot simpler. Do you see how
this Monstera here is the same as all
these other ones? Go ahead and click on that top-right Monstera or
whatever you are using. Then hold down Shift and
click on the other one, and hold down Shift and
click on all of them. Now, hold down the
Command key on your keyboard or a
Control key on your PC, Command key on the Mac, and hit the letter G again. Now, they're all grouped
so I'm going to undo that, let's do that really
quickly with all of our objects so you can tell what goes with
what these are oops, I moved it let me undo that, that was Command Z;
don't want to do that. We want to make sure
we don't move any of these and before we
do anything else, we just regroup each
individual element, each individual piece of art, so that they're all
connected to each other and so that's
what I'm doing now. I'm going to go do this
yellow flower really quick here and I'm just
selecting all of them and grouping
the like objects so you can see how
this pink flower here, this is repeated in
the same position. Let's see what else do I have left that I haven't grouped? This leaf here and this is where grouping things
really becomes your friend. Now, if you're like,
I'm going to move that, you don't have to move
all four of them you only have to move one. Like this yellow
flower you're like, well, I want it up there. Now, it's going
to be completely, perfectly repeated in the exact
spot that it needs to be. I forgot this flower here. You don't have to repeat
or you don't have to go through and move each one
and then duplicate it again. Now sometimes I will do that
depending on what's going on and I forgot this flower. I'm just going through and clicking on them
and grouping them. This is what I like to
do and then when I start fine tuning my pattern, now, I can just move things around and I only have to
move one thing so I focus on the main motif and as I start filling
in this space here, it's really helpful
because then I just put an element here
and then repeat it and then group it and then it's just a matter of
quick fine tuning. In the next lesson,
we're going to be fine tuning this pattern. Let me give you one
more little tip. If you've ever seen
the demasque patterns, I think that's how you
pronounce it, those are similar to this layout
where it's like a motif, not exactly like
this, but usually it's symmetrical and you'll
see where demasque motif, that's usually symmetrical and often I like to center
them in the middle. They're repeated
like this and then there's usually some
smaller elements filled in so this method that I'm doing is a great way to create
demasque patterns. Now you don't have to use
it for that; that's not what we're doing in
this class but if you ever want to create one of those cool symmetrical
patterns that has a main really big motif
that's symmetrical and then has some other little
symmetrical elements that are just repeated like this way, this process
really lends itself to that. Let's go on and in the next lesson we're going to be fine tuning this pattern, filling in these
spaces. I'll show you some tips and tricks
that I like to use to make my patterns
visually interesting and we'll just keep doing
this fun design part. [MUSIC]
11. Fine Tune Your Pattern: In this lesson, we are going to start fine-tuning our pattern. I'm going to turn off the
quadrant by hiding the guides. This is the way I like to do it. Again, you don't have
to do it this way. I am going to move over
here to the right. I'm going to rubber band
around these graphics. I am going to hold down the Option key and
I am just going to drag them down as I'm
holding the Option key, which is duplicating
all of them. I'm just going to drag them down with my mouse and
they're all still grouped. Now, I'm going to go through and ungroup all
of these because I was grouping them just to show you how I like to make things a
little easier for myself. Right now, I'm just going
through really quickly. Let me make sure they're all
ungrouped from each other. Now I'm going through and
just deleting everything except for one set of these. Great. Now, one thing I also
want to do is I'm going to go ahead and lock all of
these elements for now. I've just rubber-banded
around all of them in the main pattern. I'm going to hold down
command and I'm going to hit the number
2 on my keyboard, so now, you can't move them. If you like where these are, this is a great way
to be like, okay, I don't want to move those, so I'm locking them and then they just stay
where they are. Now, this is the way I like
to design my patterns. It's all aesthetic. I'm definitely going
to want to use some more of these elements, but I don't want to necessarily
take the same flower, like this yellow flower, and just put it there, it's of the same size, it's the same angle
as the existing one. I'm going to take
that flower and I'm just going to
rotate it a little bit. Let's resize it. I'm just going to hold down
the Shift key and resize it, and I'm going to rotate
it a little more here. There we go. Now, I'm just going to
start playing around. You can watch me do this. I'm probably going to speed
up this video a little bit. What I'm doing right now is just playing around
and resizing. Here's another thing
I'd like to do. Let's take this flower here. I'm going to make
this red flower bigger because
there isn't enough red in this pattern for me. I'm going to make that bigger. Here's another thing
I'd like to do. If you have your
object selected, you can go to Object in
your Illustrator menu. Go to Transform, and then go to Reflect. You can reflect things
horizontally or vertically and you can just click these options and
see what you like. I like the horizontal. Now, I'm going to click on Okay. Not only have I changed
the size of this flower, but it's completely in a different position
it's reflected. Obviously, it is the same flower as this little red
one, but it really, to the eye, it visually is different enough that
it's interesting. I have taken this
yellow flower here, and I'm going to put this
red flower about here. Cool. Now, you may remember from before that everything that's on the top needs to be mirrored or repeated
on the bottom. It also has to be, of course, and I'm going to turn
on my quadrant again, anything in the
top-left needs to be mirrored or repeated
in the bottom right. Actually, I'm going to move
this off the art board. Let's start repeating
these elements. The keyboard shortcut for this, to repeat this in
the right place, and there's two places
we need to repeat this. To duplicate this flower down to the bottom here
is Command F2. Now, I'm going to click back
on that flower and it's Command F3 to mirror it
or repeat it over here. There. Now, let me group these. I'm not going to
move them at all. I'm not going to resize them. I clicked on all of them. Hold down Command and
the letter G. Now, these are all grouped. Let's do the same thing
with this red flower. This red flower, do you
see how the red flower is not touching the quadrant? It's not touching the art board. We only have to repeat
this flower for now. Unless we do move it and
it touches an art board, we only have to repeat it once, up here to the right. The reason we repeated this yellow flower
twice is because not only does it need to be
repeated from the top border, where it touches a border of your art board down
to the bottom, but it also always
needs to be repeated from the top left to
the bottom right. Let's hit Command F4 and now we have our red flower repeated right where it needs to be. I've clicked on both hold down Command and the letter G. Great. Let's see. I resized my
Monstera. Let's see. Where's a good place where there aren't a lot of Monsteras? This will be a good example. Let's say I put my
Monstera up here, and I'm like, yeah,
that looks okay. Maybe I'll just rotate
it a little bit. Now, if I hit Command F2, look what just happened. It is now on top of an existing graphic that I've already placed and
I like where it is, so I'm going to delete that. Another thing that I like to do, and you really can just do this your own way and
play around with it. Let me move this Monstera away. I am going to unlock all. I'm going to go to Object in my Illustrator menu
and unlock all. Now, you see how this leaf down here is really close
to the border, it doesn't need to
be repeated up here because it's not touching
the edge of our art board. However, in the pattern, even though it's
not showing here, it will be up here somewhere because this
is a repeating pattern. Sometimes, you see
all of these elements are outside the art board, you're not going to see those, but I like to be
able to visually see where things are
going to be any way. I'm going to ungroup these. If I click on this leaf here and I hit Command F5 for the
sake of your design, you can see that it is
going to end up there. Now you know how
much space you have in your pattern to
place another object. Just to make things easy, I'm going to go ahead and group all four of these, I've
clicked on all of them and I'm going to hold
down command and hit G. Now, we can put that Monstera somewhere that we think
makes sense and let's see. You know what? I'm going
to come back to that. I may not repeat that
Monstera because it's really big and it's really
distinctive and that's okay. We really have a lot of
space filled in already. We have this leaf here. I'm going to make it
a little smaller and I'm going to object, transform, and reflect it and I am not going to reflect
it horizontally, but I am going to
reflect it vertically. Again, this is all aesthetics. It might be cool to
have it here because it's reflecting and
stuff like that. This is just me playing
around, so let's do this. No. I'm going to leave it there my first instinct was good. If we want to repeat this, I'm gong to hit Command F5 and you'll see that it's not touching the art
board down here, so you only have
to repeat it once. But you know what I
am going to do anyway is I'm going to click on
this leaf here on the left, and I'm going to hit Command F4. Now, you can see, if you
start putting something here, that that leaf is going
to end up there anyway. I'm going to click
on all three of these and I am going
to group them. I think we're good
on leaves for now. This pink flower, I love this pink, I think it's cool, I want
to make it bigger. Let's make it larger. I'm going to reflect this and I'm just going to look and see what I think
might look good. Actually, I like the
vertical reflect, this is an amoeba
like flower here. Let's see. I'm going to start
filling in this space here. You can see that flower
is a little bit too big. That is the same space as
here so I'm going to zoom in. In order to zoom in, I hold down command and hit the plus
sign on my keyboard. Now, I'm fine tuning, I'm just going to shrink
it a little bit more, it's still bigger than it was. What's cool is when you start doing organic shapes like this, you can really just
eyeball things and play around and see what you think about the way things look. Let's see. There we go. That works for me. I'm going to zoom out,
which is a command, and then the minus
sign or the dash. Here we go. Let's go
ahead and hit Command F3. Now, you see that it has
been repeated from the top left to the bottom
right but notice how it's touching this
art board right here. That means, because this is
the edge of our pattern, this edge of this art board, see how that little
piece of the flower and that little tiny piece
is hanging off the edge, that means it has to be
repeated up here too. Anytime it touches an art board, you can just duplicate it
down here and be done. Click on the original
flower and hit Command F4. Now, where this flower
stops down here, it gets repeated again up here. Let me group these. I'm just going to go through now and play around with the layout. This is just fine tuning, do whatever you
think looks nice, I cannot wait to see what
you end up creating. Everyone is different and I love seeing how everyone
approaches art. I'm going to speed up this
video a little bit and fill in the space and I cannot wait to see
your version of this. Real quick. Before I
speed up this video, do you see how this red flower is in the top center
of the pattern? I have to not only repeat this flower at the
top and the bottom, I also have to repeat it
at the left and the right. You'll see now
that I'm repeating this flower on the top
center, the bottom center, but it also has to be
repeated on the far-right, touching the right side of the art board and the far-left. You'll have to play
around with it but sometimes you need to make sure that not only are things repeated on the top-left
to the bottom-right, the bottom-left
to the top-right, but everything that touches
the top of the art board has to touch the bottom and be repeated in the same place. Everything that
touches the left side of the art board has to be repeated on the right side of the art board in the same place. I feel like this pattern, let me turn off the quadrant, is looking pretty good. I liked the way it looks. It's got a lot of
varied shape and color. In the next lesson, we're going to start adding our accents and really filling in this space
a little bit more. I really like to fill in a lot of blank space
with my patterns. This is totally up
to you and I will see you in the next lesson.
12. Add Accents & Finish Your Pattern: [MUSIC] Our pattern overall, I think, looks pretty cool, yours probably looks
different from mine, but that's okay. [LAUGHTER] Let's go ahead and fill in
some of of these spaces. I like to fill in blank spaces in my patterns, that's just me. I'm going to go ahead and
lock this graphics layer because I'm done with
it and I'm going to hit the eyeball next
to the accents layer and I'm going to unlock it. I'm just going to
go ahead and rubber band around all these. If you want to make sure
you get all of them, you can hit Command A, and I'm just going to move them down here off the artboard. Now, I have these little
dots grouped already for you so you don't have to group each dot
with the other ones, but you can play around. I'm going to turn my
quadrant back on, and now I am just going
to do one of these and show you it's
the same process. I'm moving these dots. Actually, I'm going to
move them over here, and I'm going to turn
the quadrant off again and see how I feel about
what that looks like. Yeah, that looks pretty good. Now, I'm going to turn
the quadrant back on so I can make sure I see where
these are being repeated. This little set of dots here
is over here on the right, do you see how it's touching the horizontal line
of my quadrant guide? Let me go ahead and repeat this. If I click on these dots
and I hit Command F5, see how they were repeated
up here to the top left, but they're also touching
this top of the artboard, which means they also have to be repeated down here at the
bottom of the artboard. I can click on these
and hit Command F2, and now they're repeated, that set of dots. Let me go ahead and
do one more set. Let me take this set of dots and I'm going to drop it
over here on the left. Now, these are touching
the left side of the artboard and our Command, I'm going to click on those, F1 key will repeat those
over there on the right. But remember just
because they're repeated on the left and right, these are on the bottom
left so they also need to be repeated on the
top right, up here. Let me go ahead, actually that's going
to be right here, and click on those
and hit Command F4. Now, they're repeated left and right and then also from the bottom-left
to the top-right, it's kind of the top-right, it's the center of the quadrant. Let me group these. I group things as I go. So as soon as I
duplicate things, I immediately group them. I'm going to go through in a second and do this
a little faster, but I think you get the idea. You're going to do
the same thing, you're going to fill in space, and everywhere you see something
touching the artboard, of course, it always has to be repeated top-left
to bottom-right, bottom-left to top-right, but every time it
touches an artboard, it also always has to repeat
because this is the same of your pattern from the
top to the bottom and the left to the right. Let's say you're
like, you know what? I want to move these over here. You can just drag things
around and move them. But keep in mind.
Here's a great example. See how I just move
these dots up here. Let's say I'm like,
you know what? I'm going to put them here. Now, you have to ungroup these, so I'm going to ungroup them, and you have to repeat
them again because they were grouped in
the old formation. But that does not
mean that they're just going to magically
repeat wherever. Now that these dots are here, the other ones are
way off the artboard, we need to repeat them. Here we are at the top, now you want to hit Command F2, and Command F2 will duplicate
these dots on the bottom. This set of dots was repeated
from the top to the bottom and from the top-left
to the bottom-right. When I first started
designing like this, I wasn't super fast. But once I created two
or three patterns using this quadrant system method with actions and
keyboard shortcuts, I got a lot faster. Now, once I have my art ready, I can literally create a half-drop pattern
in a few minutes, and I can also tweak patterns in minutes because my
objects are grouped. This workflow will end up saving you so much
time in the future. Now, I'm going to speed
up this video and finish filling in space
with these accents. I cannot wait to see how your half-drop
patterns turn out. [MUSIC] I'm liking the way
this pattern looks, I think it looks pretty cool. The next lesson is going to
be where we test this pattern in Photoshop and see what we think about the
overall look of it. So I'll see you in
the next lesson. [MUSIC]
13. Save & Test Your Pattern: [MUSIC] I like the way
this pattern looks. Now what we want do is
save our pattern block. I'm going to go to File and
I'm going to go to Export. We are going to go to Export As. I'm going to export
this file as a PNG. You can export it as a JPEG. I just prefer using PNG files, and I am just going to
export it to my desktop. What you always want to make
sure you do is you want to click on the box that
says Use Artboards. What that's doing is it's
taking the information from this artboard and it's going to export just what's
on the artboard. Now remember, we have not
done a clipping mask. Our background color
is hanging over our artboard and so is all of our art and we want to
leave it like that. There's no hair lines
in between our scenes. You want to click
on, Use Artboards. We only have one artboard, so I'm going to click on All and then I'm going
to hit "Export". Now the next dialog
box that pops up is your resolution and
I always export at 300 pixels per inch
because that is the highest quality
and that way you ensure that you're going to get the highest quality image. Also, I use my background
color as transparent because I have my blue background
color in this file. Go ahead and click on, "Okay, " then it'll take a second and then we
should be good to go. Now what we want to
do is go to Photoshop and open Photoshop and we're going to open that
file that we just saved. I'm going to click "Command
O" and it is on my desktop. I have my PNG file here, and that is what I named it. You'll also notice, see
where it has that dash O1. That means that's artboard 1. You can rename that. I often do because that can
get a little confusing. But for right now, I'm just going to leave it at that and I'm going
to click on Open. Now we can see this is our
half-drop pattern block. Now what we want to do
is test this pattern. The first thing we
need to do is define this block as our pattern block. If you go to Edit and then you drop down to Define Pattern, what will happen is you have this pop-up box and
this is actually defining in Photoshop this
block as your pattern block. You'll see in a minute
why we're doing this. Go ahead and click on Okay. It doesn't look like
anything happened, but what we want to do is let's create a new Photoshop file. You can either go to File
New or hit "Command N" for new and I learned this from another Skillshare
teacher who I adore. I create a new file that
is 12,000 pixels wide by 12,000 pixels high and I
set my resolution at 300. We're testing this right now. The color mode is RGB because I designed my file in RGB and the resolution matches
the resolution that I outputted my pattern block as. Go ahead and click
on "Create" and now we have a new
file and it is blank. What we want to do is we want to fill this 12,000 pixel by 12,000 pixel square with that defined pattern
block so we can see it repeating in action. If you go to Layer and then you drop down to New
Fill Layer here, you'll see at the
bottom it has pattern. Click on that and
you'll get this pop up that is just asking you
if you want to fill this layer with a pattern and it doesn't matter
what you name it, just click on "Okay". This is just the default pattern that Photoshop gives you. You'll probably recognize this
if you're following along. Don't worry about that. In this pop-up box, see where this little down
arrow is on the right. Click on that and we're
going to pick our pattern. I have a lot of
patterns in here. But if you go to
the very bottom, you'll see that our pattern that we defined is right here. Actually, if you hover over it, that's our file name. Click on that and look, magically, our
pattern has appeared. Isn't it cool to
see it in action? [LAUGHTER] First of all, I always keep my angle at zero. What would happen if
you didn't do it at zero is it would literally
rotate your pattern, but I'm going to
leave that at zero. But you can start
playing with scale here. But before we do that, I'm going to click on
"Okay" and let's zoom in and make sure that all of those actions and keyboard
shortcuts we set up worked. Everything should line up
perfectly and we should not see any hairlines
of any kind at all. We shouldn't see any
partial graphics. We shouldn't see
any partial dots. If you ever do go
in and inspect it, I'm just going around
and looking with my eyes at how everything looks. But if you ever at this step
and you're like, uh-oh, there's half a yellow
flower there or something looks weird just
go back to your file, especially if you see a
partial element like a split, like this flower is
only half of it is showing that means you
didn't repeat it somewhere. But it's very easy to fix. Just go back and
examine everything, look at what you have, and make sure that it
looks like everything is repeating in the right place as many times as it needs to. This looks really good. I'm really happy with this. Now let me show you another
cool trick that I love doing. Let me zoom out so you
can see the whole block. Go to your layer here where your pattern is and
double-click on that layer thumbnail
and it pulls back up that box we were
looking at previously. Do you see this scale here? What happens if we type 50 in? What it does is now we can see this pattern at a distance, at a really far distance,
and see what we think maybe as what is this going to look
like really small? What if you have this on fabric and somebody wants
it really tiny? You can even go all the
way down as far as you want and really look
at this and see, okay, how does that flow? Do you like the way the
rhythm of this pattern? Do you feel like
it's varied enough? Do you feel like there's
anything that's really standing out that feels weird. This is a great way to just quickly look at your
pattern and see what you think and get an
overall impression of what it look going to
like when it's repeated. I'm just going to ahead
and click on "Okay". See how these Monstera
leaves are at a diagonal. See how these red flowers are at a diagonal
and more staggered. If this had been a basic repeat, which is a completely
great way to do patterns, these red flowers, for instance, would just be right
next to each other. But they repeat, they drop
down every other flower here. It just really flows better. It gives you a better rhythm in your pattern, in my opinion. I just want to say
congratulations, you have accomplished so
many things in this class. You've learned a workflow
that's going to save you time. You've created a
half-drop pattern block and you've tested it. So you know it
repeats seamlessly. In the future when you
use my workflow to create pattern blocks
with your own art, you can upload your file like the PNG file we saved earlier to websites like
Spoonflower and sell your own patterns
online. [MUSIC]
14. Thank You! Final Thoughts...: [MUSIC] Congratulations. You just created a
half-drop pattern using a system that is going to
save you time in the future. Now, you can focus on the fun
part of creating patterns, which is creating the artwork. Now you can automate tedious processes like
repeating design elements. You're one step
closer to earning income from your surface
pattern designs. Don't forget, you can
set up actions and keyboard shortcuts for repeating elements in basic
repeat patterns too. I know this was a lot of information but don't let
overwhelm steal your joy. Pattern design can be a
bit of a learning curve, but I have given you
the tools to help you save time when creating
half-drop patterns in Adobe Illustrator so in the future you can work
smarter, not harder. Now you have the power to
make sure that your patterns work perfectly for a
variety of mediums. You can always come back and
watch portions of this class or the entire class anytime
you need a refresher. It will always be here for you. I would love to see
what you have created. Please share your projects in the project gallery
and on social media. Please tag me
@CarrieCantwellArt so I can see and comment on
your beautiful creations. I cannot wait to see
how you interpret half-drop patterns for the
project in this class. I want to sincerely thank
you for watching this class. This was my first
Skillshare class and I was driven to teach
it because had I had all of this information at my fingertips when I first started surface pattern design, it would have saved me so
much time and headache. Please follow me
using the follow link next to my profile
and stay tuned. I plan to teach more Skillshare
classes in the future. Thank you again and I will
see you next time. Bye-bye.
 Carrie Cantwell, Illustrator | Surface Designer | Teacher