Transcripts
1. Perfect Plaid: Design Easy, Fun Plaid Patterns in Procreate, Adobe Photoshop and Illustrator: Hi there. My name
is Carrie Cantwell, and I'm an illustrator and a surface pattern designer.
What does that mean? Well, I draw pictures
and I design patterns, and then I sell
them on products. I license my art with
companies like Target, Wayfaer, and Bed
Bath and Beyond. As far as patterns
go, I love plaid. Plaid is so cool. It is timeless and yet
universally on trend. Plaid can be made really
fun and whimsical, or it can be traditional, depending on what
colors you use. There are all kinds of
different types of plaid, like gham plaid
and tartan plaid, just to name a few. It seems like the possibilities
with plaid are endless. By the end of this class, you will have your own
plaid repeat pattern block that you can sell anywhere. I'm going to show
you in this class, how to create a plaid pattern
with different software. I'm going to show you how to use Procreate an Adobe
Photoshop to create a really cool textured plaid that is interesting and has
some really cool effects. I'm also going to show
you how to create plaid in Adobe Illustrator. If you don't have an iPad, that is okay because
I will also show you how to create plaid using
just Adobe Photoshop. One thing that I have noticed is Plaid is universally
a good seller for me. I want to show you
in this class how you can create your
own plaid pattern. So you can add some potentially best
selling plaid designs to your pattern tool kit. So, are you ready to create some cool plaid
patterns with me? Let's do this.
2. Plaid: A Brief History: Plaid is often associated
with Scottish culture, and it has a rich
and varied history that dates back centuries. The pattern composed of intersecting lines
in various colors, actually originated
as a fabric design known as Parton in Scotland. Tartan was used to distinguish different
clans in Scotland. Each clan had its
own unique pattern that symbolized
identity and heritage. The term plaid in Scotland originally referred
to a piece of clothing, specifically, a large blanket or cloak worn over the shoulder, often made from tartan fabric. It wasn't until later, particularly outside
of Scotland that the term plaid became synonymous with the
tartan pattern itself. By the 20th century, plaid had become a
global fashion staple. In the United States, it was popularized
through workwear, especially with brands like
Pendleton and Woolrich, producing plaid shirts for lumberjacks and outdoor workers. During the mid 20th century, Plad found its way into sub cultures like
punk and grunge, and that further solidified
its place in popular culture. Today, plat is used in various forms of fashion
and interior design, symbolizing both tradition
and modern style. Clads history reflects
a journey from a regional marker of identity to a universal
fashion statement.
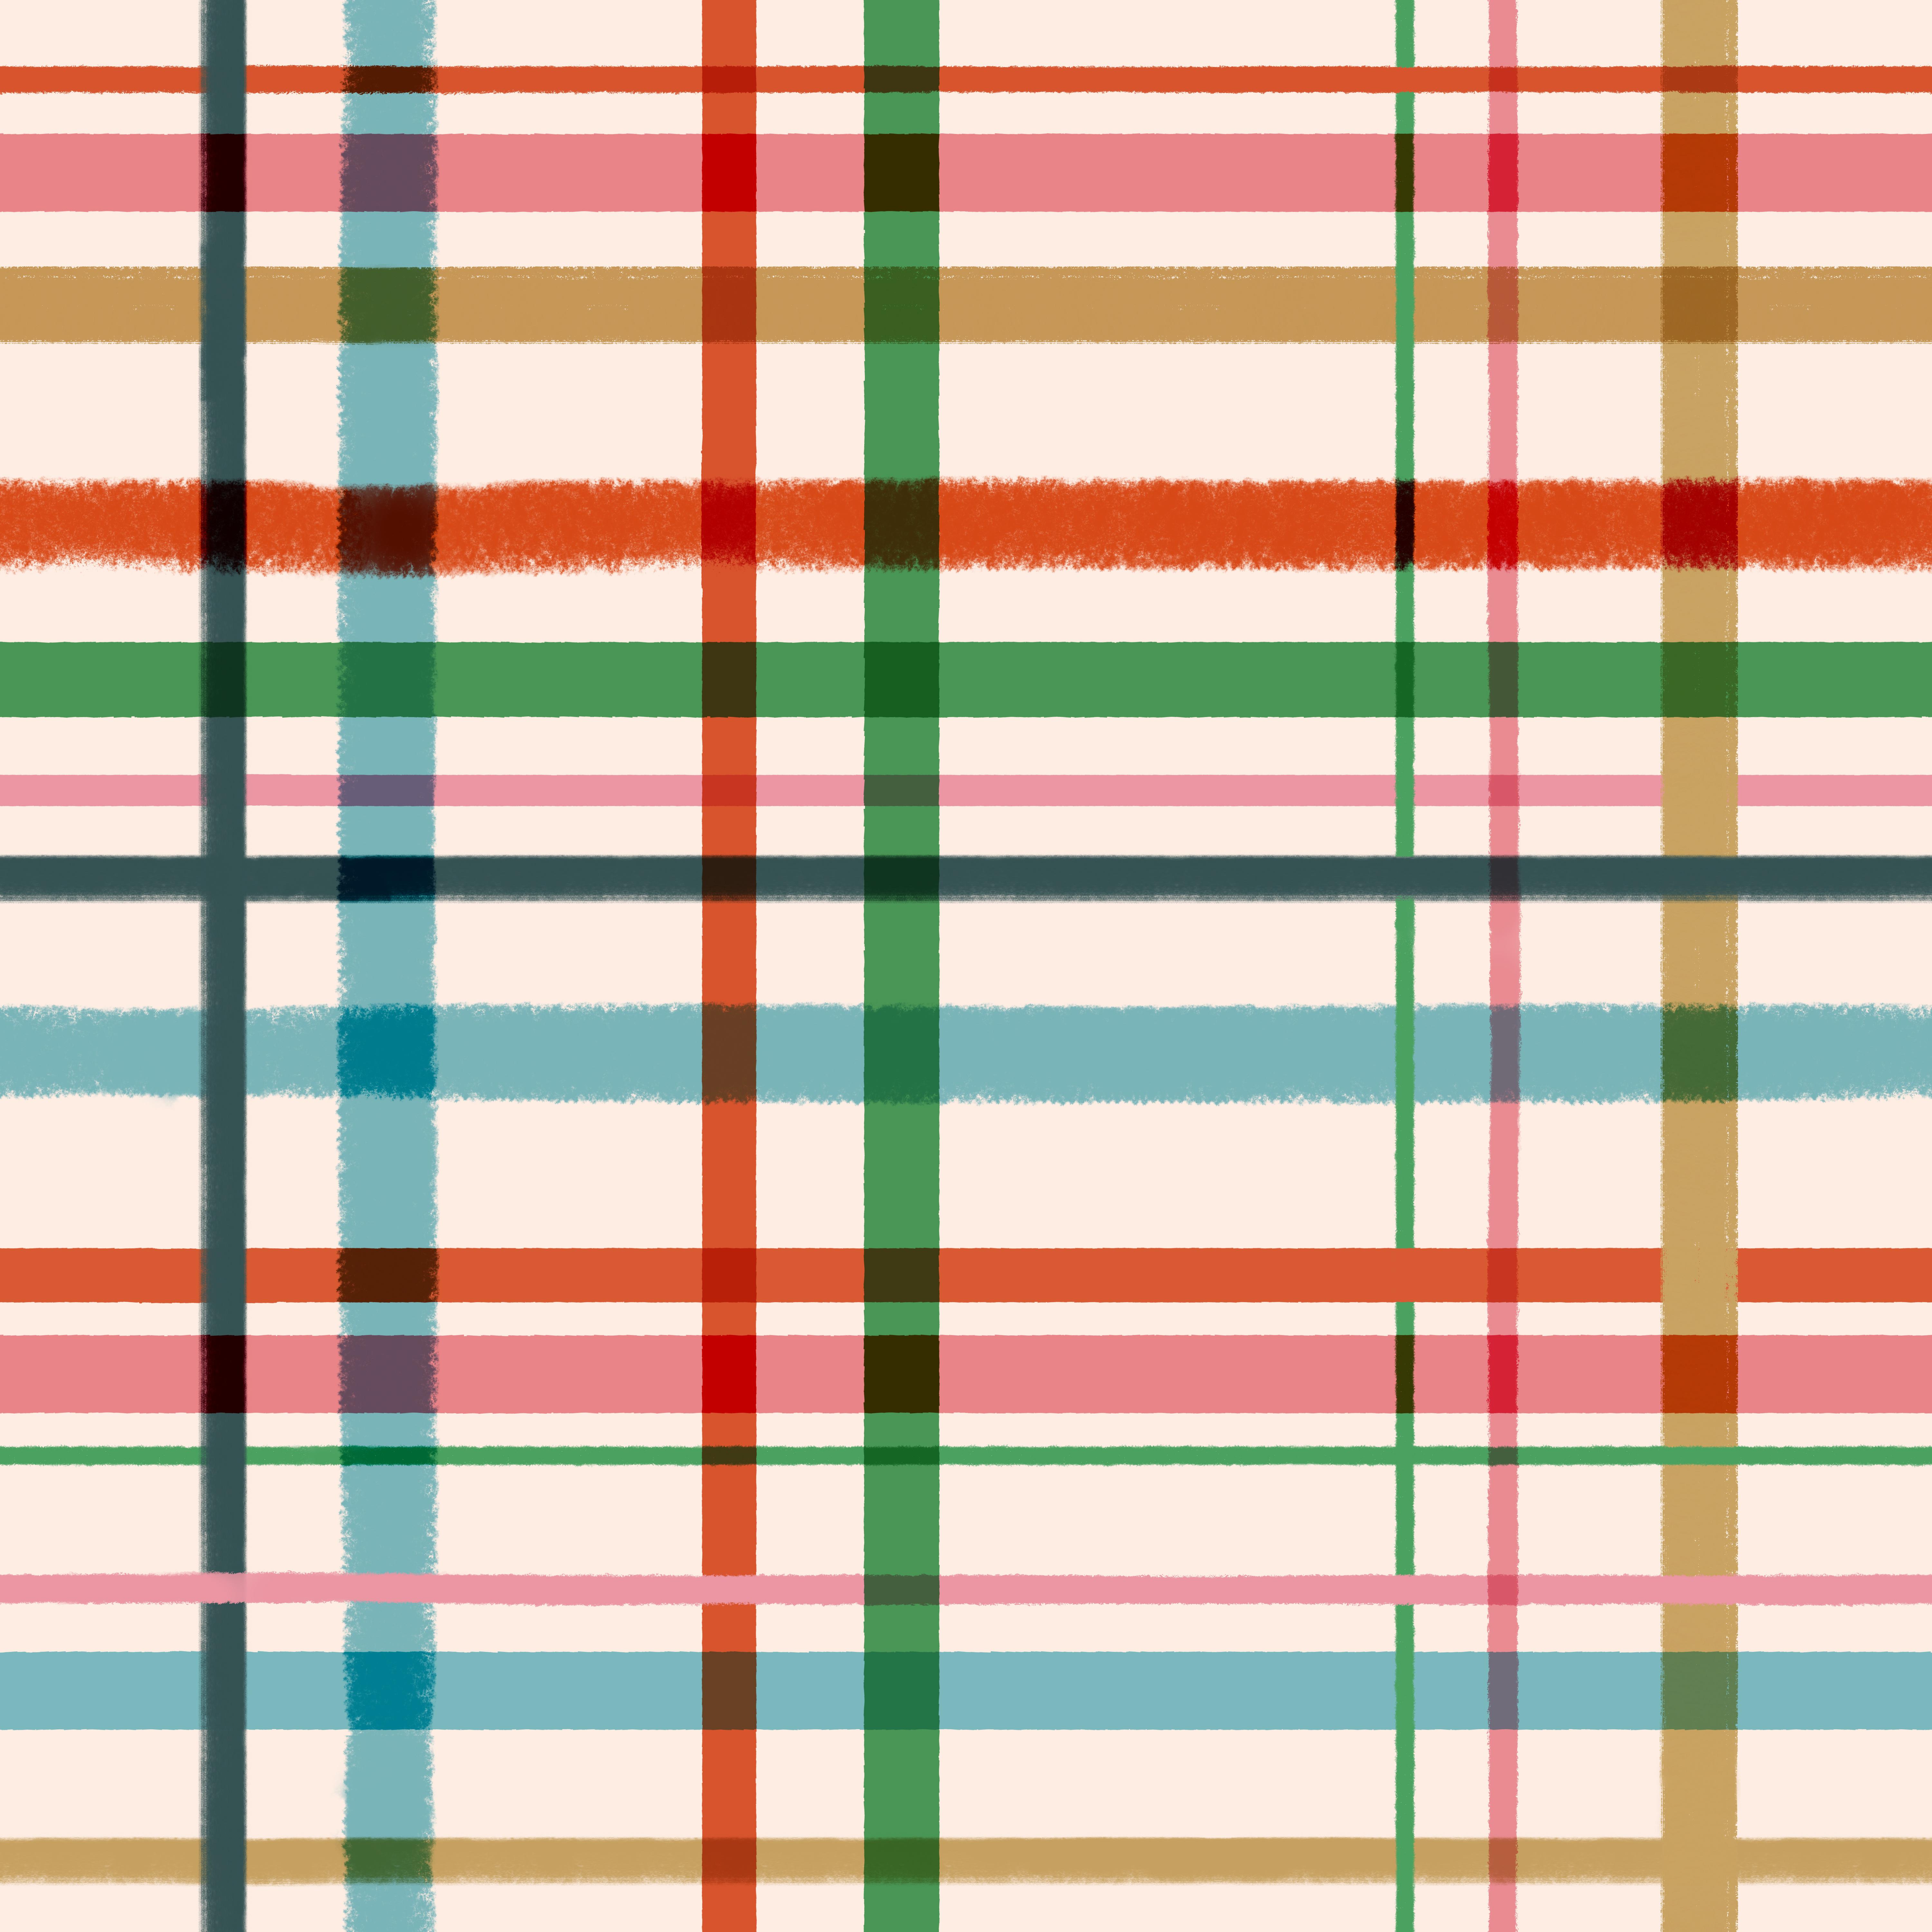
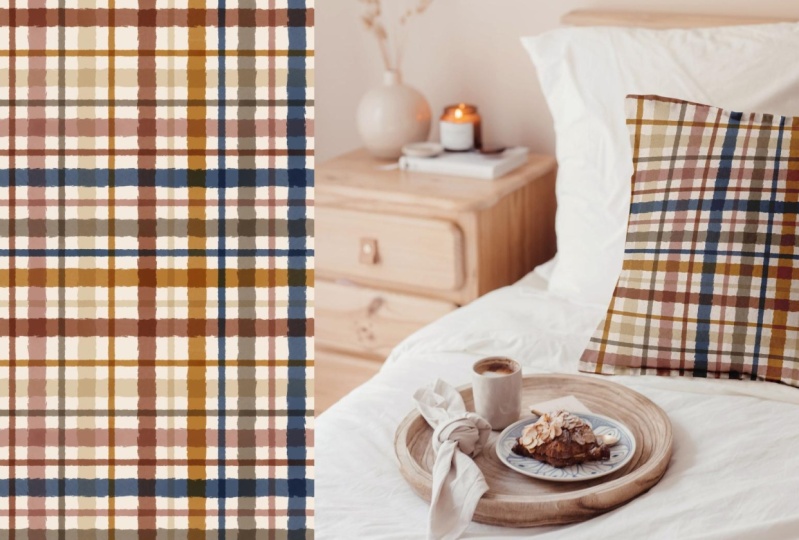
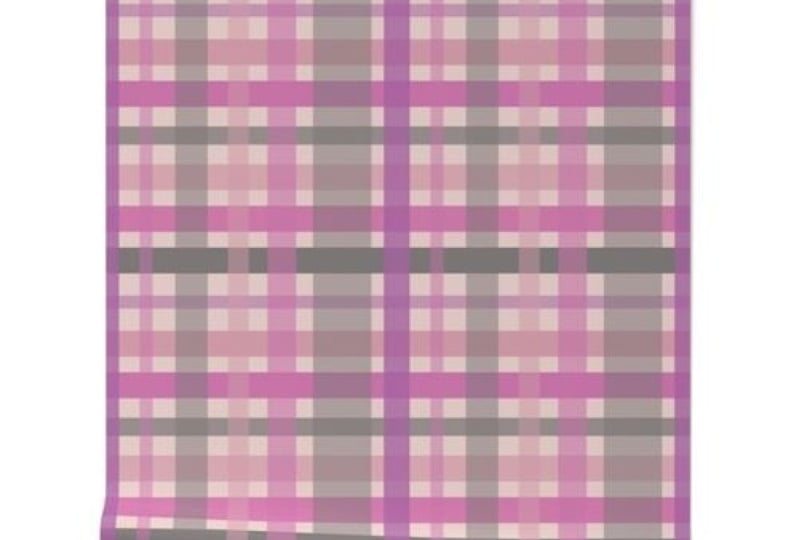
3. Create a Plaid Pattern in Adobe Illustrator: These are some examples of some plaid patterns that I
created in Adobe Illustrator, and they do really well
in my spoon flower shop. So let's create a plaid
pattern in Adobe Illustrator. I am in Adobe
Illustrator right now, and I'm just going to
create a new file. I'm going to do 1,000 pixels
wide by 1,000 pixels high. And then I'm going to make
sure my color mode is set to RGB because my intention, what I'm doing with this is I'm going to be putting
it on spoon flour. So, RGB is how they print with their di sublimation
printing, RGB is perfect. And then I'm going to
have it at 300 DPI, PPI DPI, same thing. So I'm going to click on Create. The first thing
that I want to do is create my background. That's always the
first thing that I do. I'm going to double
click this layer here, and I'm just going
to name it BG. For me, that's my code that
just means background. And I do not need to worry about in my other
half drop class, I talk about how we're
going to use this as a guide, the background square. You don't have to worry about
that with a basic repeat. It's just not as important. So I'm just going to create a background here and make
sure that my stroke is not on. I just drew a square, and it really doesn't matter what size it is as long
as it's a perfect square, or at least hangs over the
edges of this perfect square. You want to make sure that
you have an art board that is exactly the same
width as it is height. It's 1,000 pixels
by 1,000 pixels. I held down the shift key
when I drew this square. It drew a perfect square. I'm going to do a little pull
up a color palette here. I'm just going to
load this into here, and then I'm actually
going to click on this last purple here and then hold down shift, click
on this white thing. I'm deleting all
the other colors in this document because
I don't need them. It's a really
interesting palette. It's like some earthy tones, and I think this would make
for a pretty trendy plaid. So I'm going to make
my background color. I'm going to use this off white, I think, and it did my strokes. Let me make sure I have
my fill selected here, and then I'm just
going to select that as my background.
It's like a beige. I'm going to create a new layer here in my multi plaid here. Do you see how, I
have everything separated out onto layers. So I have all my backgrounds on one layer, and
I did a lot of, they're all pretty
light colored, and then I have all my
horizontal stripes on one layer, and then I have all my
vertical stripes on one layer. So it's just easier that way, especially when you're doing
something like stripes. You have a lot of similar
elements or the same elements, or when you're repeating colors, it's just going to help you
keep better track of things. Let's go ahead and
name this layer. I'm going to double click on it. Let's name it horizontal. Stripes. Perfect. Now, we just want to create some horizontal
stripes with some of these colors that
are not obviously the background color because if we use that, it'll disappear. You can use the line
tool if you want. But what you'll have to do
is go to your stroke here, and if you don't see that, you can also go down
to window and stroke. But you're going to
have to make it py thick because you
want it to show up. I am actually going to
grab the rectangle tool though and I am just
going to draw a box. The most important thing is that your box is wider than the
width of your artboard. My box is going to need to
be wider than 1,000 pixels. So I'm just going to
drag this up here. And you should get
some helpful guides. Do you see when I
drag it up here, the center of my rectangle is snapping to the
edge of my artboard? That's what you want.
That's why I'm doing actual shapes
rectangles instead of the line tool because you're
just going to get you're going to have more
controls because right now we have this
little center mark, we have a center mark there. It's just a little bit easier, and I'm going to center
it on the artboard. Perfect. So this is the top
edge of our artboard here. What we're going to want to
do is everything that touches the top of our artboard has
to be repeated at the bottom. That's what's going
to make it seamless, and it has to be duplicated in the exact same way in
the exact same position. The easiest way to do
this is if you click on the object and then
you go up to object, and then you go to transform, and then you go down to move. We're moving it. What we're really
doing is moving and duplicating it. Click on that. Now, horizontally, we do not want to move this because
if we move it horizontally, it's going to jump to the side. We don't want to do that because what we're
doing is going down right here.
We're going to leave. We're going to make sure
the horizontal axis is at zero we're
going top to bottom, and then the vertical
is going to be 1,000 pixels because that's
how big our artboard is. That's our height. If your
artboard is 2000 pixels, you want this to be 2000. If your artboard is 500, you want it to be 500. And then what we're
going to do and you can leave these
the way they are. What we really
just want to focus on is horizontal and vertical. Then you want to click on copy. What we just did was we
duplicated this rectangle, exactly 1,000 pixels down from
where the original one is. That should work perfectly. Now, we want to create
another stripe here. So I'm just going to click
on this top rectangle. I'm going to hold
down the option key, and I'm going to hold
down the shift key at the same time and I'm
going to drag it down. I'm not going to
worry right now about the distance and when we
start positioning these, if they're all equal
distances from each other, I can show you how to do that. Let's do another color. I'm going to do this
Navy blue here. I'm going to make sure
that I'm on my fill, which is the one right here, that is not the stroke, but it is the fill. I'm just
going to click on that. Go back to my swatches and then I'm going to click
on this Navy blue. These look so good together. Right now, what we want to
focus on is right here, this stripe does not need
to move down at all. It does not need to be duplicated because
it's not touching the top of this
artboard right here. So the important thing that
we have to focus on is, see how it's hanging over the side of our
artboard right here. What we want to do is make
sure that what is over here, what is touching this artboard, which is this blue shape that's this height is the same as this. This is where if you're doing
something with texture, it's going to be a
little trickier. Because what you want to do
is make sure that whatever is literally touching this line is duplicated over here exactly. Because this is the same
height all the way across, I did not draw something
where it's like this. So because that's the case, see how this over
here, this blue does not match that blue height. So as long as your
height is the same, and you're using something
like the rectangle tool, then we are okay. Now I'm just going to do
the same thing again, and I'm going to draw
more stripes with the rectangle tool and play
around with some cool colors. See that space right there, it's so much bigger
than like that space. So there's a really
cool trick that I love, that's really easy to
do with the Align tool. So I I grab all these, I'm just going to
rubber band around them and they're all selected. If you go to your aligned tool, I'm going to pull this out. There's a little part a little section called
distribute objects. If you click the middle one, what it does is it's going to vertically distribute
all of the objects. They're all going
to be the exact same distance from each other. But the objects on the very end are going to stay in their original position, which is definitely
what you want. So you want to
make sure that you don't select just these, like this one and
everything below it, and you want to make sure also that you don't
select just these. You want to select
either all of them, or if you just want these to be equally distant,
you just select these. But remember, this top rectangle here at the top and
this one at the bottom, need to be in exactly
the same position that they're in now
because they're completely they're perfectly duplicated
where they will repeat. So I'm going to select all these and then I'm going to click on the vertical
Distribute center. Do you see what that just did? It made all of them the same
distance from each other, but it did not move the
top and the bottom. If you want all of these
to be the same thickness, that means that this brown rectangle here you do not want it up
here like this. You do not want it
right to the edge, also because you
would get hair lines, you want it right at the center where see where it says
intersect right there. Basically, what is
happening is you have half of this thickness
here up here. You have half of the thickness,
it's half of the height, and then the other half of it is down here so that
when you repeat it, these come together to
form a whole stripe. Which is the same
thickness as these. Now, we want to go ahead and create our
vertical stripe layer. I'm going to go ahead
and create a new layer, and I'm just going to name it. I'm going to double
click on this. Vertical stripes. I'm going to just
grab any one of these stripes from
the other layer. I'm going to hit
command C for copy. I'm going to go ahead and lock the horizontal stripe layer, and then I'm going to click on vertical stripes and paste, which is command V the stripe
into the vertical stripes. Layer. We want to rotate this. All I'm going to do is selected, I'm going to hover my mouse over it to the right,
see the little arrows. Hold down the shift key, so it does a perfect
90 degree rotate, and I'm just going to
turn it if I could get my mouse to actually respond. There we go. Perfect. All right. Now we have a vertical stripe on our vertical stripe layer. We're going to do the
same thing again, and I'm going to start
with a not brown color. I I don't want it
to be Let's see. What is the color I
use the least of? I guess I used
three of the blue, three of the brown, but I only used two of the black
and two of the top. I'm going to do the tope. I'm going to change
this to the tope color, and then I'm going to
do the same thing. I'm going to drag it
until it is centered. See where if you guys can see the little center
mark right there. See where that is right here. If I just drag
this until that is over top of the edge
of my artboard, it's snapping in place for me. It's saying intersect right
there and it's giving me a nice little pink guide
basically saying, that's okay. You got it. So there we go. But now, you see how it's just disappearing over this tope. Don't worry about
that yet because we're going to play
around with transparency. Now I have this tope here. What I'm going to want to
do is I'm going to want to duplicate this over here
on the right hand side, so we're going to do
the same thing we did. And we only have to do this twice because this
is a basic repeat. All we have to do
because we're doing stripes is just do
these two edges, and then everything else is
going to fall into place as long as these are
all the same thickness. So I'm going to click
on this tope here. I'm going to go to object, I'm going to go to transform, and then I'm going
to go to move, and we're going to do the
same thing we did last time, but now we're going to move
it horizontally 1,000 pixels. We're moving it along
the horizontal axis, which is this right here. And we're going to duplicate it. So we're going to do
plus 1,000 pixels, and we want the vertical
to stay at zero pixels, and then make sure you click
on copy, and there we go. So now it's perfectly repeated over here on
the right hand side. Now I'm just going to
duplicate these rectangles, and I'm going to play around
with some cool colors, and all I want to
make sure of is that my thicknesses are the
same on either side. This is the, I guess,
beginnings of our plat. But this is not plaid at all. So what I did at least
in like these patterns. See how in this example, I did different opacities. That is what really makes
this turn into a plaid. Let's start with our
horizontal stripes. I'm going to hide and lock
the vertical stripe layer. I think what I'm going to
do, I'm going to change this blue here to be maybe 75%. I don't know. I'm
going to go to window, and I'm going to go
down to transparency, and then now I can actually
change my opacity here. I'm just going to change
it 100-75 perfect. It doesn't really
change that much, but once we start
layering these, it's going to be really cool. I'm going to go ahead and change this black and I'm
going to make it 50%. Yeah. It's a little
more dramatic. And then I'm going to
take this black and I'm going to make it 75 there. See how it's just
variations of gray. I'm going to take this
brown and make it 25. Actually I'm going to
make it 50. There we go. Then I'm going to make
this 75. Let's see. Actually, I'm going to leave
that at 100 and I'm going to make this 75. Now, it's the same as above,
so I want it different. I'm going to do 50. Then
I'm going to really, I'm just playing around with it right now and just
seeing what I think. I feel like that, that's fine. But we don't want
to We can change the opacity of this
brown on the edges, but if we do, we
have to change both. I'm going to change this
to 75. There we go. And now let me lock
this layer and put the other layer on top of it and we're going to
do the same thing. I'm just going
through both layers, and I'm just clicking on each of these rectangles and just adjusting the opacity to something that I
think looks good, and I can do all kinds of
different percentages, just whatever works with what I think will look
good in the moment. You can also play around with different widths of
these rectangles. So as long as they are the
same thickness on both sides, either the top and bottom
or the left and right, where they repeat,
touching the artboard, You can play around and have in stripes and thick stripes. And now I'm going to export this to my desktop
so I can test it. I'm going to go to
File Export As, and I'm just going to export it as plaid test, that's
the file name. I think I already have one, and I'm going to make sure that I click Ue Art boards because we want to have our
artboard selected. I'm going to export it
as a PNG hit Export. I'm replacing an existing file, leave it at 300 and
click Okay. All right. Let's test this bad boy. I'm in Photoshop, and
I am going to open the file that I just exported
from Adobe Illustrator. I want to define
this as a pattern, so I'm just going to go to
edit and define pattern. Then I can close this file, and then I'm going to
create a new file, 12,000 by 12,000
pixels and 300 DPI. Then you can go to Layer and
New Fill layer and pattern. Let's test this. All right. So let me go down here
and see what I think. I'm going to make this a There we go, a little bit smaller. This is technically a plaid. Now, I feel like it
needs a lot of work. I feel like for instance, these two right here
are way too dark. This is just a matter of playing around with
different colors, different opacities,
but technically, this is a plaid pattern. If you feel like your plaid is looking a little bit boring, try playing around
with opacity, color, and even varying the
thickness of your stripes, that can really make it look
a lot more interesting. I'm going to save this.
I'm going to export it. I'm going to go to
file export Export As, and then I'm going to
save it as plaid test two just because and
save it as a PNG, click Ue Artboards Export. Then I'm going to
leave this here, but I'm going to open
the new plaid test. I'm going to define the pattern, which is Edit defined
pattern. Close that. Then I'm actually going
to do another layer. I'm going to leave
that one alone, and then I'm going to
do a new fill layer, and I'm going to
plop this in here. Then I'm going to check what
is my percentage on this? 40. I'm going to change
this one to 40 because what I'm doing is comparing
the two. There we go. That was my original. This is where everything
is equally spaced. See, it's all the same
thickness, space, the same. Technically, that is a plaid, but if you want it to
look more interesting, try playing around with
thicknesses, opacities, colors, and then you're going to start getting into some
really interesting territory. These are all the
same thickness, even. I was just not even
being that interesting, but I played around with fun color palettes and color combinations,
and just opacity. That's it. I ended up with
some really fun patterns.
4. Create Plaid in Procreate + Photoshop - Part 1 - Drawing in Procreate: So I have a procreate
Canvas here. It's a new file and my Canvas
is 20 " wide by 20 " high. What I'm going to
want to do is go to my little wrench icon
in procreate here, and where it says drawing guide, I'm going to toggle that on. Underneath drawing guide,
when you toggle it on, you're going to get
this little menu option here that says edit
drawing guide. You want to click on that. Then down here at the bottom, you're going to see a
little bar that says two D grid isometric
perspective and symmetry. Click on symmetry. Then now if you go down
to the very bottom right, you'll see where
it says options. Click on that. What we're
going to want to do is I'm going to do
vertical drawing assist. Rotational symmetry is off, and assisted drawing at the
very bottom is toggled on. Now I'm going to
go all the way up to the top right
where it says done. There's a little orange button. I'm just going to click on that. I am in my drawing
brush box here. You guys may recognize this and I have a brush
called Flat writing. I use this for a lot
of my hand lettering, but you know what
else it's really good for is drawing stripes. This has a little bit
of texture to it. It's going to look a little more interesting than if
you were doing this in Adobe Illustrator
and you had these really flat, smooth,
perfect lines. This is going to look a
little bit more hand done. Currently, I have a bright
blue color selected. I'm going to stick
with that for now. I'm going to start at
the left hand side, and I am just going to pull my apple pencil over here to the right until it
meets in the middle. And now you can see it's helping me and it's actually
connecting in the middle here. Now, if I want to
completely straight line, all I have to do
is hold my finger down and anywhere on the canvas, and now you can see it's not really letting
me move it anymore. So that's what I want to do. Now, if I zoom in, you can see, see this lovely little
edge texture here, so it just has a little
bit more interest to it. That's one of my stripes. Now I know that it lines
up and it's connecting. If I turn the drawing guide off, you can see that this is basically a seamless
stripe there. I'm going to turn the
drawing guide back on a little trick is, if you go to your layer
where you're drawing, You'll see a layer
name right there, it says Layer one,
but underneath it you're going to see
where it says assisted. That's like your little hint that you know you're drawing, you're using the assisted
drawing helper, I guess. Tool. Let's draw another stripe. I'm going to change my color. I have this little palette I
made for some swimming dogs. I'm going to change
the thickness and I'm just going to
do another stripe here, I'm going to hold down my finger and then I'm going
to connect them. Perfect. That's a
little bit not as long, but that's okay because
I'm going to be doing some adjusting
in photoshop. Let's do another color. I'm going to do this pink, and I'm going to go
down even further here, actually, I'm going
to do it up here. I'm just drawing stripes right
now and connecting them, and then I'm making
them straight by holding down my finger. But the cool thing
about procreate is see we're getting
these little rough edges. You just get a little
bit more texture. You can use any brush for this. If I switch to Let's see. What other brush
do I want to use? Let's try. There's 1 million. I have so many brushes. I love these pencil brushes. Let's see what happens
if let's do a gold, stripe and let's do this. See the thickness
is different there. One thing that you want
to pay attention to, is if you want all of
these even thickness, that's why I like that
flat writing brush tool. You're going to have
to be really careful about holding everything down and not increasing or
decreasing your pressure. Also, if you're using
something like a pencil brush, you're going to have
some overlap here. Let's try maybe a smoother
brush in terms of a pencil, but I'm going to hold it down or try to hold it down equally. This one is way too thin. But you see where I
tried a different brush. Now I'm just getting some
interesting textures. Go ahead and play around with making some stripes
in procreate, and what you want to do is just make sure
that you don't have too much weird overlap
where you have some areas that are opaque and some
areas that are transparent, you want it to be even
all the way across. Now, go ahead and
play around with some interesting colors and some different
brushes and textures. Just make sure that you have these stripes going
all the way across where they are the
same thickness is all the way across the page. Right now I'm using dry ink. If I'm on that dry ink
as my drawing brush, but I want to change
it to my dry ink. I'm just going to hold down
the eraser button there, and now I have a dry ink eraser. It's the same tool that I'm using to draw
with, but it's the eraser. Can you guys see where
it goes out right there? I'm just going to try to draw across here and just smooth
it out a little bit. And make it a little
less obvious. This is where they
meet. I'm just going to draw some
more stripes until I have some cool textures and different colors and
thicknesses. All right. Now I have these
fun stripes here that are all different textures and they're different colors, I have different thicknesses, and they're pretty well
matched up and straight. Now I'm going to hop
over to photoshop. I'm going to import this
procreate file as a PSD, that's a photoshop file. I'm going to drop it
over onto my computer, and then I'm going to
continue from there.
5. Create Plaid in Procreate + Photoshop - Part 2 - Create in Photoshop: Okay, so I am now
on my computer, and I am in photoshop, and I have opened the procreate file
that we just created. This is the 20 inch by 20
inch file with our stripes. And now what we're
going to want to do is turn these into a
repeating pattern. So with this file open,
I have two layers. I have a background layer, and then I have my stripes
on a separate layer. This is just the same thing
I created in Procreate. What I want to do is create
a new photoshop file, so I'm going to
go up to file and new I'm going to do inches and I'm just going to choose 20 by 20 " resolution
300 pixels per inch. Color mode is RGB. That's what I'm using. You
can use CMYK if you want. Now what we're going
to want to do first is create our background
color and lock it. This is going to be
our background layer. I'm going to go over to
my foreground color here and I'm just going to
choose like an off white. That looks good, and
then I'm going to go to my paint bucket and I'm just
going to drop it in there. Cool. Now I'm going
to name the layer. I'm going to double
click on the layer name, and I'm going to name it BG. That's my code for background. If you don't see
your layers panel, you can just go up to window and then drop down to layers, and then you'll be
able to see it. Now I want to lock this layer. While I have this
layer selected, I'm going to go up to layer, and then I'm going to
drop down to lock layers, and then I'm just going
to choose all and click. Now I have my background
and it's not going to get moved around or
messed up or changed at all. But now I want to
start creating each one of these stripes that
I drew in procreate, and I'm going to have
it on its own layer. Each one of these stripes is going to be on its own layer. That way we can layer them on top of each other
or closer together, further apart, et cetera. I'm just going to go to my
rectangular Marquee tool, and I'm going to rubber band
around one of these stripes, and I am going to hit
command C for copy, and then I'm going to go
back over to this document. Here, this is going to
be my pattern block, and I'm going to hit
command V for paste. I'm realizing now that
we haven't named this, I'm just going to go
ahead and name it. Pre Let's do block. Pro create Plad. That's fine. And it save. One thing that I've noticed
my photo shop doing lately, it's not actually saving the
one that I'm working in. I'm going to close this. I'm
going to click, Don't Save. And now I'm going to go ahead and open the one that
we were just doing. I don't know why it does that, but that's my work around. Okay, so now we have
our pink stripe there. I'm going to go
ahead and go through each one of these stripes. With my rectangular Marquee
tool selected in photoshop, I'm going to rubber band around each one of these
stripes individually. If I go outside of it
as long as I don't grab any other part
of another stripe, and I'm just going to do copy, and then I'm going
to drop back over here to my document and hit paste that's command V. I'm going to go ahead
and do this really fast. All right, so now
that I've got all of my stripes plopped into this
new document that I created, and I can see each of them
on its own layer here. I am good. I'm going
to go ahead and close this procreate file. Each one of these
stripes on its own layer is going to need to
be a smart object. And that is so when we
do pattern preview, we can see where this repeats. You just want to go up to
layer and then go down to smart objects and with whatever layer selected that you want to turn
into a smart object, just do convert to smart object. Now over here in
our layers panel, we can see that the on, the little layer
icon has changed, and if you hover over it, it even says Smart
object thumb mail. I'm going to go through each
of these layers now and turn each one of these
layers into a smart object. Now you will notice
that each one of these stripes is its own layer, it's on its own layer, and each one of these
stripes is a smart object. I did not name these
layers. Often, I will. If I have something like
dogs and beach balls and I have one dog breed on one layer and another dog
breed on another layer, I will name the layer so
that I can keep track of it. But the thing is each
one of these are stripes and they're
some are green, and there's other ones that are green that are
different texture. I'm not going to
bother doing that because these are all
really similar. So What I am going to do though is if I go up to my move tool, which is at the very
top of my toolbar, At the very top of my Adobe Photoshop menu
here in this top bar. You'll see where it
says auto select. There's an option for that. And then you can have
this check mark, this little box here
toggled on or off. I'm going to make
sure that is on and then next to it where
it says Auto select, I have it at layer. If for some reason, you're
in photoshop and you're not seeing that top
options bar there, where the auto select is, you can just go to window and drop down to where
it says Options. And then it will show
your top tool bar there, which is your options, and that is where auto select is located. If I hover over a layer
and I want to move it, it's auto selecting it
with the move tool, so then I'm going to
hover over whatever the layer is now and I
can just move it around. I don't have to sit here on the right hand side
and figure out, k, which layer is that
because these are really tiny little visual aids. So I'm just going to Yeah. Basically, I can just
go around and move these as I need to with
just the move tool, and it's just going to hover
over that layer for me. It's going to show me where
I'm about to select it. I went ahead and
pulled each one of these stripes away from the
ones that were below it. So each one of these
stripes is now visible. Basically, there isn't one that's on top of the other one. I'm just going to
move them around into a layout that looks good to me. Now what we're going
to want to do, now that each one of
these is a smart object. Now we can do the
pattern preview, and this is how we're actually
going to be able to see where these stripes are
going to repeat and what they're going to look
like in a seamless pattern. I'm going to go
ahead and save this. And now what I want to
do is go up to view, and I'm going to drop
down to pattern preview. This is how we're
going to preview how this is going to look
as a repeat pattern. Now, this is our pattern block, this is our repeat block, but pattern preview
is going to let us see what this looks
like as a pattern. I'm going to click
on that, and I'm going to get a little
warning message that's okay. It says, Pattern preview works
best with smart objects. The thing is, we all
each one of these, we have smart objects. We are good. I'm
going to click Okay. And now we are seeing what this would look like as a pattern.
I'm going to zoom out. Right now, what we have is a pattern where we have
these big spaces and everything is broken up where the edges of
these stripes are. But that's okay. We are going to continue those
stripes and fix this. I'm going to zoom back in and I want to show
you a little trick. So the first thing
that I want to do, let's start with our
top stripe here. What I want to do is with
my move tool selected, I'm going to zoom
in and I'm going to take the very top stripe
and I'm going to move it over so that the space where the stripe begins and ends is
inside this artboard here. This blue thin line here, that is our artboard edge. What you want to do
is make sure and I'm going to move it over
even more and up here. You want to make
sure that the break between your stripes is
inside this blue box. I'm going to zoom in. I'm going to go to my Zoom
tool and I'm just going to drag my mouse to the right while
holding it down. Now you can see here, see where this breaks, and that is going to show
up in our repeat pattern. But I love using the clone
stamp tool to replicate and duplicate things and really just make them connect or
repeat where I want them to. So right now, I am on the layer where this red
stripe is, that's good. And what I want to do is go
over to my clone stamp tool. That is over here in my menu. It looks like a little
ink stamp pad thing. I'm going to click on that, and now I have my clone
stamp tool selected. The way I have it set up
and it should be default, if I hold down the
option key on my MC, Then I click anywhere in this stripe while I'm
holding down the option key. It's basically recording or copying this texture here
right exactly as I had it. See now when I move
my mouse around, I'm not doing anything
other than moving my mouse. It's showing me a preview of how it's going
to be duplicated. Now, do you guys see where it's blurry and
soft on the edges? That's because I have
my softness turned up. All I have to do is
hold down the shift key and I'm going to type
on the keyboard, I'm going to hit the
closed bracket key. If I do that, that
thickens it up. That makes it more solid. If I hold the shift
key and I type or click on the key on my keyboard
that is the open bracket, see how it goes back
down to this soft. That's if you want stuff
like soft edges or you want a really
subtle duplication. But this is a pretty
thick, solid line here, and I don't want
any weird spaces or blurs or anything,
weird opacity. I'm going to turn it all the
way up until it stops. Okay. So now you can see where this
is going to be repeated. So I'm going to go ahead
and just click my mouse once there and now
you're going to notice that this
smart object here, you get a little
warning, it has to be rasterized before proceeding. Because what we're doing is now we are duplicating pixels, and it can only happen if your object is
rasterized. That is okay. I'm going to click on k. And now when I do
this, check it out. It's actually
repeating this stripe and it's connecting it. So, isn't that cool? And now, if I zoom out, I'm not going to
do anything other than zoom out, check it out. Now I have a connected stripe that goes all the way across. So now I have a solid stripe. It still has texture, which is what's great
about procreate. But it is continuing. Now, before we move any further, before you do anything else, we want to convert this
back to a smart object. I am going to go to layer, and then I'm going
to go back down to smart objects and then
convert to smart object. Now we can see here
that our layer is back again to
being a smart object. It has that icon again. The reason I had us go
through and convert each of these to smart objects before doing the Clontmp tool, and then I know we have to
turn the smart object off. But that way, I want to have
these already ready to go, and then we just rasterize one
at a time and then move it around and then we can go back to it
being a smart object. Let's do the pink layer now. I'm going to go back
to my move tool here and I'm going to hover over the pink layer and I'm going to figure
out where I want that. Let's do it maybe right here. Again, what we want to do is move the place
where the break is between the beginning
and end of our stripe inside this blue box here,
that's our artboard. The reason is because when we
rasterize this and we start messing around with
it a whole bunch and we start using the clone stamp. We want all of that to
be on our artboard. We don't want it off the
artboard because what's off of the artboard is
the repeated part. But the main motif
needs to be inside this artboard so that
we can mess with it in there and then turn it
into a smart object again. I'm going to do the
same thing I did. I'm going to make sure this
is pretty far inside here. I'm going to zoom in Then
this is pretty forgiving. You see how this is
all really solid. I should have no trouble
just duplicating this. Let's go back to our
clone stamp tool. I'm going to hover over a part of this that
I want to duplicate. I'm going to just without
holding down the shift key, I'm just tapping on the open and closed
brackets on my keyboard so that it's changing the size because you want this to
capture the whole thing. If you want to just
capture the edge, you can make it smaller
and just do the edges. Just know that you're going
to want to connect it. But I'm going to just
capture the whole thing. And I'm going to hold down the Shift key and
click on the or type the closed bracket and make sure that I'm as
solid as possible. Now I'm going to go ahead and
hold down the option key. I'm going to click
somewhere inside this area here and now you can see that it's
going to repeat. But we're going to have the
same thing happen again. When I click my mouse in here, It's saying that we
have to rasterize it. Again, that's okay. I know it's a little bit of
an extra step, but that way, we're not accidentally having some things that
are smart objects, some things that aren't,
some things are rasterized, some things aren't I can
just get really confusing. So we're just doing
one at a time. I'm just going to click here
and that connected the two. It looks completely
reasonable, natural And now you can see that
stripe is continuing on. Isn't that cool? That
was it. That's so easy. Again, I am going to want
to do layer and I'm going to go to smart objects
and I'm going to turn it back into
a smart object. Now we know that that
layer is a smart object. I can show and hide the
layer with the eyeball. And I see the smart
object thumbnail. If you have a
stripe that is semi opaque or has a really
unique texture, you may need to do a little
bit of fine tuning with the clone stamp tool to make sure that it
continues seamlessly, and you can't see
where the brake is. If you're struggling,
especially with a stripe that is semi opaque, you can just duplicate
the layer to thicken it up by
hitting command J. I hit command J just
now about three times. We still have our texture, but we don't have that
problematic semi opacity. But what you will want to do. See how we have all
these duplicated layers that are adding to the opacity. They're doing a good job of hiding that difference
in opacity, but you're going to want to merge these all onto one layer, which is totally doable. If I go to the very top layer, I'm going to hold down
the shift key and then I'm going to click on
the very bottom layer, that is all of the layers
I just duplicated. It's just this stripe,
and then I'm going to hit command E for Elizabeth. That is on a MAC or
control E on a PC, and now we can see here
that it's all on one layer. Now I want to turn this
into a smart object again. I'm going to go to layer, smart objects and
convert to smart object. Now if I zoom out, we can see that this is being
repeated seamlessly. Now going to go through and do the same thing with each
one of these stripes, and I will meet you right back here in a
moment. All right. Now I have gone through
each one of these layers, each one of these stripes, and they are all connecting and they are all converted
back to smart objects. Now they are repeating. They're all connected across
the pattern and you can see that if you zoom out and
they all look pretty good. I'm going to go ahead and
duplicate this stripe. I'm just going to hit Command J. What that did was create another identical green stripe
right on top of this one, and I can tell because if I
grab it with my move tool, I can move it around, and it is a smart object still. When I duplicated it, it
kept it as a smart object, but I want this to be going vertically
instead of horizontally. Okay now with this
layer selected, I hit command T, and that is for transform. And now I want to
rotate this 90 degrees. So we can see here where the repeating piece is and it is outside the
artboard, but that's okay. While I have the
transform tool on. I am just going to hold down
my shift key on my keyboard. I'm going to go over
here to the edge, and you'll see this
little black arrow here that kind of looks
like a little curved arrow. I'm going to hold
down the shift key. I'm going to grab the end of it, and I am just going to rotate
it until it is 90 degrees. It is connected still, and it is still a smart object. So that's all we have to do. I'm going to go and repeat
another one of these stripes, and I'm going to
make it vertical. So let me click on
my move tool here, and I'm going to hover
over the gold one. Make sure that that's the one
that I have selected, cool. And I'm going to hit Command J, and I just duplicated
that layer. Now I'm going to hold
down the command key and hit the letter T, and we're going to
do the same thing. I'm going to hold
down the shift key, grab the edge of it, pull my mouse down
until I get it rotated. Now, you can see it's
being hidden under here. I want to go ahead and
move that somewhere else. I'm going to move it over here, and I'm just going to click on the rectangular Marquee
tool and deselect it. So isn't that cool? And now you'll notice too, do you see how the one
green stripe that we duplicated is in front
of this red stripe, but the gold stripe is actually
behind the red stripe. So you can just adjust that with your layers if you
just go through and drag your layers above and below what else
you're looking at. If I move this down, now you
see it's behind the blue. I'm going to duplicate and
rotate another stripe. Go ahead and duplicate and
rotate some more stripes in your pattern so that
they are going vertically. You can see here that we just duplicated this teal stripe
and we made it vertical, and it's in front of this
red stripe right here. What if I want some of the
red stripe to peek through? All I have to do is with this vertical teal
stripe selected, I'm going to go in my
layers panel to opacity. I can change the
opacity, for instance, maybe 50% or even 75%. Then we can start getting
into some fun opacity here, and then we can see part of that red stripe
from behind there. You can also play around a
lot with your blending mode. Right next to opacity here, I'm going to go ahead and
turn this back up to 100, but next to opacity
where it says normal, this is our layer blending mode. We can try and play around with some of
these blending modes here and really some
interesting effects. This is hard light, vivid light. It really again, it just depends on what look
you're going for. But the blending mode is so much fun to play around
with. Look at this one. How interesting is that? Now it's almost like
this orange color, but it's making these other ones that it's in front of darker. You can really get some
fun effects this way. I want to save this as a J peg. I have a JPEg pattern block. So if I just go down
to File and Save As, I'm just going to leave
the name where it was. I'm going to go to save a copy, and then I'm just going to
choose from the Dropdown JPEG, and I'm going to click
on Save and click Okay, I can click Save again, and I'm going to close this. And then let's test it. So let me go ahead
and open that. And that is the Block
Procreate plaid JPEG, and that is my pattern block. I'm going to click on Open, and then I'm going
to go to edit, and I'm going to drop down to define pattern because
now what we want to do is define this pattern block as a repeat tile
so we can test it. I'm just going to do that. It doesn't matter
what the name is, and I'm going to click on k
and then I can close that. T test it, I am going to
create a new 12,000 by 12,000 pixel document in
Photoshop and click on Create. Now if I go to layer
and new fill layer, I can drop down to the third
option, which is pattern. It doesn't matter what your layer name is called right here, and then it will pop up my
pattern fill little box here. All I have to do is click on that arrow and go
to the very bottom. This is really huge, so it's hard to tell how it
would look as a pattern, but I'm going to lower
it down to about 50%. So check it out. That is our plaid. Now, I didn't get too
crazy with duplicating a lot of these stripes or playing too much
with blending mode. But hopefully, now
you get the gist of how to create a lovely, textured plaid using P
create and photoshop.
6. Create Plaid in Photoshop - No iPad Required!: If you don't have procreate, or you just feel like using
Adobe photoshop by itself. You can also do that. There are so many cool
photoshop brushes out there. You can find some really
awesome ones that look like paint
brushes or oil paint. You can find all
kinds of textures. Basically, what you want to do is the same thing
we did before. You're going to create a
background layer and lock it. And then create a new layer and you can just start drawing, and you just want
to make sure you have one stripe per layer. Then if you get your
paint brush tool and find a color that you
enjoy, Grab a brush. You can use any brush you want, a smooth or a textured one, and then just draw
a horizontal line. If you hold down your shift key, it is going to help you. Basically, see how I'm pulling my mouse down and up right now. If I hold down my shift
key while I draw this, it is keeping a
straight line for me, and everything is pretty
much uniform and level. Then, you just want to do the
same thing we did before. We will convert this
into a smart object. Make sure you keep each of
your stripes on its own layer and then convert each layer or stripe into a smart object. Then you're going to go
to view pattern preview, click Okay, and we're going to do the exact same
thing we did before. All you have to do is
grab your move tool, hover over your stripe. Make sure auto select is on, and it is set to layer. And then just move it
over until the break between the stripes is right
here inside your artboard. I'm going to do the same
thing I did before. I'm going to go to
my clone stamp tool, and I am going to sample a piece of this stripe here
somewhere over here. Hold down my option key. And then I am going to move over between
where this break is, and I'm going to
start filling it in. But remember, when
we click on this, we are going to get
this warning that it needs to be rasterized.
That's okay. We're going to continue, and we are just going to
connect these two pieces. So you may want to play
around with it and adjust the height and just make sure that everything lines up
the way you want it to. That may mean sampling
from different parts and moving your sample moving
your brush up and down. But basically, you can create a solid long stripe here that just continues
on and on and on, and now we just want to turn
it back into a smart object. All we have to do is go to layer Go down to smart objects and
convert to smart object. And now we have a smart object. We have our st, and
that is continuing on. So you can do the exact
same thing that we did previously with
Procreate and Photoshop. You can do the same thing
again with just photoshop. So you can skip
the procreate part altogether if you would like to.
7. Class Project: For the class project, create a plaid pattern in
any software you choose. You can use Procreate and Photoshop or you can use
photoshop by itself, or you can also use
Adobe Illustrator. Go ahead and create
your plaid pattern, and you can share
your pattern block or the repeat pattern itself or a with your plaid on it and share it in
the class gallery. I cannot wait to see what you come up with
with your plaid. Okay.
8. Thank You - Final Thoughts + a FREEBIE!: Thank you for taking
this plaid journey with me in this class. I hope you had fun and also learned some really cool
tips and techniques, so you can go forth and create
many more plaid patterns. It really seems like the
possibilities are limitless. Please be sure to follow me
on skill share so you can stay up to date every time
I publish a new class. Just click the follow
button on my profile page. I would love a class review. Class reviews are a great way for other students to find me, and I always love reading
all of your reviews. A special thank you gift
for completing this class. I'm giving you six free
color palettes that are perfect for fall
and perfect for Plaid. Just visit Carrie camwell.com
Forward Slash Plaid, or scan this QR code
with your phones camera. You'll be taken to my
Super secret website sign up form where you will subscribe
to my e mail newsletter. And within a few minutes, you'll get a high
resolution JPEG with the color palettes
sent to your e mail. You can download
it directly from your e mail and then sample
the colors and procreate, Photoshop, Illustrator, or
any software you choose. You can unsubscribe from my
e mail newsletter anytime. No hard feelings. Thank you again for
taking this class. I can't wait to see
what you create, and I will see you
next time. Bye.
 Carrie Cantwell, Illustrator | Surface Designer | Teacher