Transcripts
1. Introduction - Dark to Light: Welcome to pulling the puddle
Part two. I'm Chris Carter. I'm giving you a little
bite size lessons and a technique that I
call pulling the puddle. In part one, I showed you the basic technique
of pulling a puddle, a technique that I find the most useful in watercolor
if any technique. I use it in almost
every painting I do. In part one, we learned
how to lay down a wash or pull a puddle in a given
closed shape area. We started at one
end and we moved through the whole shape
without going back over. And if you haven't
done part one, I highly suggest
it because there are some things I'm not going
to mention in this one. We're moving right along.
That's why this is part two. So, in part one, what we did was we put
down a wash without any streaks that was one
color and one value. So we didn't really
change the wash at all. We didn't make it lighter,
we didn't make it darker. So in part two, what
I'm going to teach you is how to again
pull the puddle, lay down a wash or glaze
and change it from being a dark to a dark value to
a light to or light value. Okay. And we're going to
keep the same color. I'm not going to be
changing the color that will be the next
bite size piece. So in this part, I'm
going to show you how to go from dark to light, and then possibly back to dark. We'll see how it goes.
Okay. Let's get started. Okay.
2. Materials: First, we'll go over
the materials you need. Materials are basically the
same that you had part one. You need paper,
watercolor paper. It doesn't really
matter what size. If you want to make a whole collection of
these pair paintings, you might want to stick
with the same size. But that's up to you. I'm using a half a sheet of arches one 40 pound watercolor
block that's about 10:14. I'm also using Reves paper. So I'm going to demonstrate
it on both kinds of paper. Also, in part one, I showed you two different ways of
making your border. This is a third way. I've got a piece of paper. I cut this is a file folder, and I cut that out to be just the right size so that I can easily just
do a lot of these. And on this, I'm going
to draw my border. So you need a pencil. If you want to do it this way, you need a file
folder, otherwise, you need either a compass or a half inch strip of
stiff paper. Okay. I have these brushes. I may or may not need
these smaller ones, but I do need either a six or
an eight inch round brush. I'm going to use
my travel palette that I often use at home two. You can use whatever
you want, but you do need wells just as you did in part one to mix up large
quantities of paint. You need a water bucket?
I like using three. I really only need two, but
when I'm using a dip pen, using ink, then I
always need three. But I have one for
washing my brush, one for clean, and then
I have one for it. I use one of these
pipes in order to dampen My water colors, especially because
I squeeze them out into these pans
and let them dry. These are tube paints that I've squeezed into empty
half pans and pans. I like the consistency better because they soften up nicely, and I don't have to add
too much water which would dilute my intensity. I'm also going to use this. You probably don't have one. Maybe you do, this
is the template from my color scheme came. You don't really need this. You can use any colors you want. I like to have this
so that I know my colors are going
to work out nicely, and it's just fun. And I think I'm going to use a fountain pen
filled with permanent ink. In the demo, I'm going to show you having
used a fountain pen and also just with pencil because you can do
this technique, even if you haven't drawn
the lines in Ink but I'm using this because
it's really hard in the video for you to
see my pencil lines. Instead of a pipe, you
can use an eye dropper. And you need a paper towel, definitely for when you get
to the end of your puddle, you're going to want to
w You're first of all, dry your brush off and
you're going to want to wick up the rest of the puddle. So you have to have
a paper towel. Okay. I think that that's it. Let's get started
with the drawing. And we're doing all of these in pairs because it's so
simple to draw a pair. And it can be funky and uky and weird, and
it doesn't matter. It still is a pair. You don't have to worry about
your drawing skis.
3. Drawing the Pear: I'd like to warm up first
just to get the kinks out. And I'm going to play
around with drawing pears. That one looks more like a
god fat pear tall thin pear. Okay. I know that I'm going to be using a taller pair than my last one because I'm
using a taller narrow piece. So I'm just playing with pair. All right. Then we'll
move on to our paper. Now, just review this with this method of
drawing my border. I want to border
because I want to know where to begin
and end my washes. I'm just going to
draw around that. I'm going to draw it
in ink on this one, and I'll do it in
pencil on the other. So they'll be a
little different. Okay. That's pretty wonky. I'm going to put pretend table. And my shadow. Okay. And
because this one is in Inc. I'm also going to draw
my outline in ink. I'm going to do the
same thing in pencil. I'm going to change it
out just a little bit because I don't like to do the same thing twice. I are. Now we have the drawing. The next thing we're going to
do is to mix up our poles.
4. Choosing Colors and Basic Technique: Ready to mix up my puddles. The first thing I need to decide is what pigments
I'm going to use. I'm going to use a color scheme that I call color scheme number
two double complements. For this color scheme, I'm going to be
using red violet, blue violet, yellow
orange and yellow green. It does not mean that they are going to look like these colors. This is just my guideline. My yellow green might be
much closer to yellow, it might be greener than this. I may be using different
pigments that I used when I made this color wheel. Okay. I'm not trying to
match the color wheel. I'm just using it as a
guideline in my head. Okay. I'm using red violet. I'm using blue violet, yellow, orange and yellow green, and from there, I can just play. You don't have to
do it on the slant, but it makes life
so much easier. So I'm going to take stretcher, doesn't have to be
much of a slant. Okay. Okay. For this part, I like to stand
up when I'm doing a wash. It just allows me to
view my paper a little bit more easily and
also to move smoothly. I stand up. Okay. I start really with a full brush of paint. And I'm going over making
sure that my puddle, I have enough of a puddle, and it's very hard to know if the camera
will capture this, but I really want the
puddle to be there. And then I'm going to use another brush to add some
water into that puddle. Mix it up. Okay. Again, I want to make sure
that there's plenty of puddle there and I'm going
to add more water, mix it up with each time
that I'm adding it, I'm diluting it and
making it lighter. I'm trying to do it by the same amount so that
it's nice and gradual. So important to keep the puddle that line on the edge
consistent and flowing. Otherwise, it's
going to be streaky. Okay. Sometimes I'm doing it twice. I'm going across by paper twice. That's just if I think
at all that the puddle is not enough and that
it won't bleed down, meaning going down
this way into the more diluted to really graduate that wash. Now I'm going to be hard to get
too much lighter. I'm going to give
that three shots. Okay. And another three shots of the water shake so that I can get to
a lighter one before. I reached the end of the paper. Okay. Okay. And I'm going to wake
up put and it try. So you can see, I believe, how it goes from dark to
light very gradually. I'm going to show you
another sample where I go to much lighter
in a shorter distance. I mean, in the same distance, but a little more quickly. Then we'll look at this
one again when it's dry. Okay. This time, instead
of two shakes, I'm going to dilute
it a little faster. Start with it fairly dark again. Plenty of paint up there. Have that puddle nice
and then I'm going to dip right into that and there right into that and
there right into that. It's getting really wet now. I can just go water. And since there's so much water, you'll continue to wake up
until it stops running down. If you don't, it will
move back up into your wash. As long as you
keep seeing it flow down, you want to keep up. Now that's a nice started really and went
quite light. Okay.
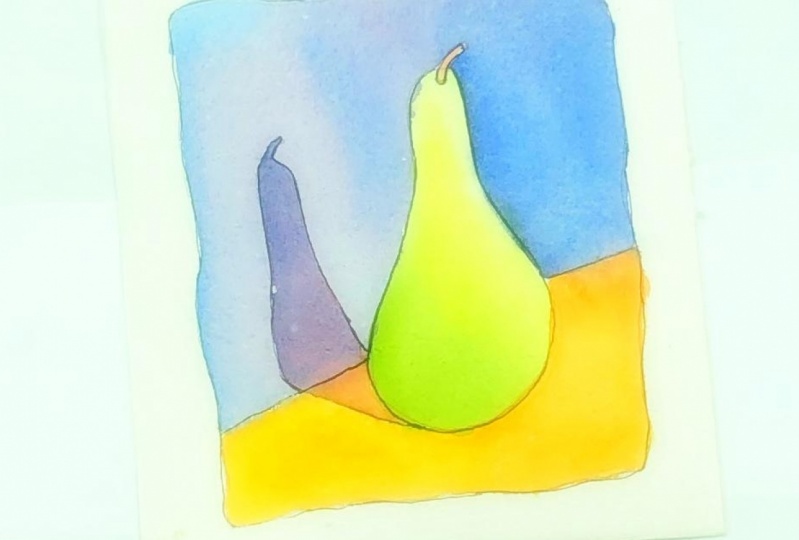
5. Painting the Pear: Now we're going to
paint in our pair. I've decided rather than
start with the background, I'm going to start
with the pair. That way, I can judge the light and dark changes in the background a
little bit easier. And with the dark
going over the light, it's easier than painting
the pair afterwards. And I'm using smaller brush than what I did for the sample
that I showed you before. Cleaning my brush off, I've started with
clean water. Okay. So I'll clean my brush
off and also dry it off. Now, so it's damp and it will
easily pick up the paint, but it's not filled with
water to dilute it. Since the shadow is over here, the lights coming here, so this is going to
be my light side. So I'm going to
start over here with dark and make it lighter. Notice I'm pulling the
puddle down this now. Because that was so narrow I
needed to keep that light. I'm going back into my dark
there to keep this part. I want to keep it a little bit. And the light isn't hitting the bottom of the pair as much. So what I'm doing is I'm adding pigment by going back
into the darker puddle. That's where you change
it from dark to light and then back to dark again. And wicking up without
really rubbing the paper. Okay. And not going back over
it, just letting it dry. So I'm going to let
that dry completely, absolutely completely before I put my background
in or my table. We're just going
to let this dry.
6. Painting the Background: All right. Now I'm going
to move to the background. It's a bit nerve racking. I'm going to start on the dark side because
this is light, I want my dark against my light and my lighter
against my dark. I'm going to start here, work my way painting around this little stem and go over the shadow and
work my way to light. I'm going to use this brush in number ten round. Okay. Keeping the puddle
going. I'm not going to start to graduate it till I get up near the top and pulling the puddle just
like I did in part one. Not changing it at all, but I'm keeping the
puddle flowing. And I'm going to start
to dilute it right now. I'm going to dip in full brush, mix it in with this well. Notice that I put it down here and then I'm going
to meet up with it. It's a way to test that I don't have too
much water in it. I don't want to dilute
this left side very much. I'm going to dilute it again. Keeping that puddle going. I'm going to dilute
it more brushwor and I'm meeting into the puddle. Okay. This is almost not
enough of a puddle. Okay. Then wake up. And we're going to let that dry before I put in the table.
7. Bonus Lesson: I absolutely love
teaching because it gives me an
opportunity to be real about some things and I can show techniques that I edit
and make look perfect. But none of these
things are really easy. They're simple, but they're not easy and I'm not totally happy with what I just showed you because it's ark and then it stumps and
then it gets light. I am going to take this
opportunity to give you a bonus using
the same technique. To show you how I can make myself a little
bit happier with this. By putting another glaze of the same color in the
reverse on the back of this. This is what I do in real life. I do something that I think
is going to work and I didn't make the decisions that I would have been
the happiest with. Then I have to adjust. That's what is so exciting
about creating art is because you're always solving new problems and creating
new problems for yourself. I mean, I love problem solving and art just gives me that
opportunity all the time. Here we go. I'm going
to do a reverse. I'm going to
8. Painting the Table: I'm starting with clean water, and I'm going to use a big
brush to mix up the puddle. I'm going to work
with yellow orange. I'm going to keep it fairly dark because yellow is not a
very dark value anyway. So I don't want to
dilute it too much or it's just going to be
two to pale. Okay. That's good, Lauren. Now. I'm going to
start with a darker, the darkest orange over there. I'll use my I think
it's number six, number eight,
something like that. Brush and then I'll graduate
it going around this way. Starting my petal
again on the slant, pretty important that
it's on the slant. I'm not diluting it yet. Okay. Now I'll start to dilute it. I don't want to get any
more dilute than that, or it's just going
to look wimpy. And I'll let it dry. So it's
there and lighter there. And I do want to paint in This is awfully
wet mixture now. I have to be careful. Because once the fibers
of the paper have been dampened as they have been when I've been
putting the washes on, it's much easier for them to whic other pigment
into those fibers. There are no barriers anymore. So I have to be careful
when I paint into it. Okay. I'll let that dry and we
have one more wash to go. We have now, this looks more blue violet than the red
violet that I had intended. So I'm going to end up going
with the red violet for the shadow instead of the
blue violet. Not a problem.
9. 2nd Painting and Shadow: I am so sorry you
missed the beauty of that because I forgot to turn the camera on the camera
that's showing down here. So I will show this bit with the next one and that I'm going to speed
up the whole next one, do all the steps, but
when I get to this step, I'll slow it down again and I'll actually flip it around
so that you can see. I'm going to go dark to light
because this is my dark, I want light against dark and
I want dark against light. Now my green isn't going to be really dark
no matter what it is. And I'm going to start down
here and have more darks, work up into there, lighten
it and come back down, all while the edges of
the puddle are still wet. I got to keep the puddle strong. But I can't let it get too
wet close to the blue. It's a little tricky
on this part. Now, starting to dt. I'd like it to be darker here. I'm going to mix up a darker
puddle, just in there. I'll do what I did
before with applying a second clase I'll
take advantage of it by making it a
slightly different mix. I'm going to have to let
that dry before I apply it. Before I go ahead and put
another wash on here, I'm going to put the
shadow in because I'm thinking I may not
need that other wash. I really like what's
happening there. It has character. That's what
I like about watercolor. T sometimes it's recognizing when you think
something went wrong, and it really was the best possible thing that
could have happened. It's about not
passing judgment and just looking and seeing what's going on and letting
watercolor do its thing and being the guide
for the watercolor, but not the controlling agent. Because the magic
happens when you work together with your
medium and your tools. Now, I'm going to put the glaze of the shadow in and you'll see the
magic that happens. I'm going to start below
it because as I said, the fibers are going to want
to suck the paint into them. Switch already. Here we go. This is great. I love this part. Here we go. That's the magic. See how it makes a
perfect transition. It might be a little
shiny for you. I don't know about
the c. I can't pay attention to the camera
angle when I'm doing this. You will never interrupt anything or you can
never interrupt a wash. Don't stop for anything in the middle
of it. Of your house. Because you don't want to
wet a wash when you go into that tiny little tiny
little shadow of the stem. Remember the fibers. Tip it a little bit.
Can you see that? I just think that that's divine. I am going to put another wash on here so that you can see it without having done it because that's
the way it is now, and also the difference in getting this value
to be a to that one. I think the transition
there will be nicer but I'm going to let that completely
before I do that. Okay. Now I'm going to darken this and then bring this out with very
clean clear water. We'll see how it works. Dampen my brush. A bit
of water out of it. Totally saturate it with
this more tense paint. Remember, this is
about the puddle. Know it and need it. We're really
blending that puddle in to the very, very light area. And while I've wet this. Another thing, just
in terms of form, is the lightest light is
not right against the edge. There's usually
just a little bit of change as it goes around. So I'm going to
take advantage of having wet it by giving
it that extra feature. Just a little bit
of change of value. And this is really
charging the wash. But we're building on the graduated wash.
As I turn the paper, I can see some areas
that weren't damp. I'll just dampen them again so that the transitions are smooth.
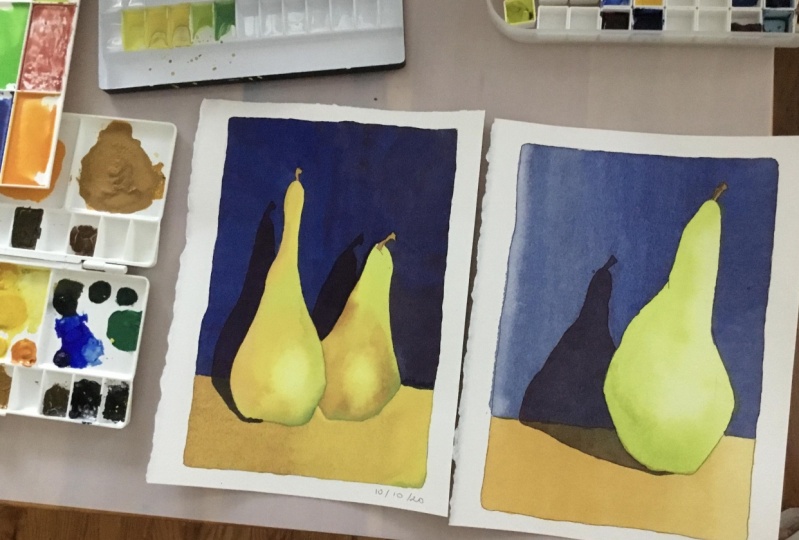
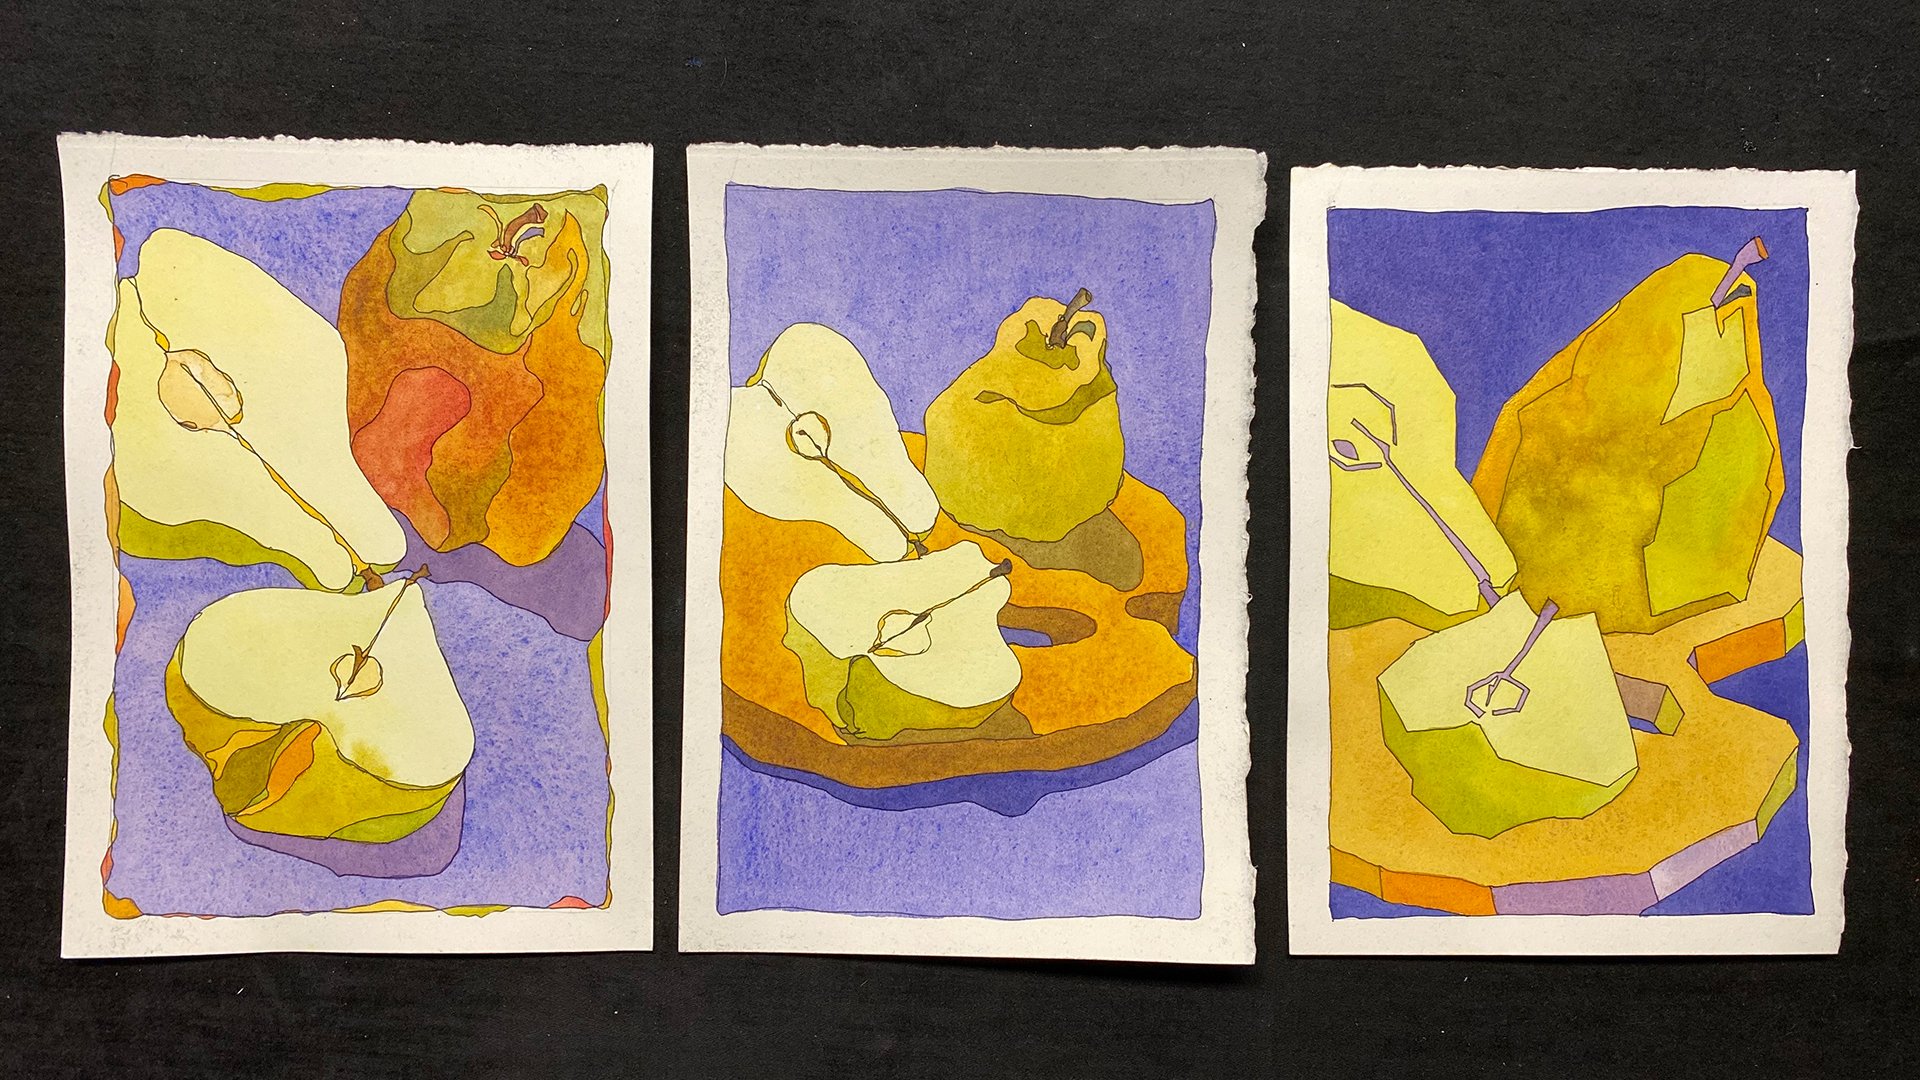
10. Conclusion: Now we can compare two. This is on the Arches cold
press watercolor paper. This is on the Reeves
BFK printmaking paper. This one was just in pencil
with watercolor wash and this one had an ink line
and then a watercolor wash. Okay. In this painting, I started first with
a pair dark to light. Then I put the background
in dark to light. There was too much of
a separation here. So I put let it dry, put another glaze on where I started with
the dark over here, filled in the dark a
bit and then pulled it back with clean water
over the whole thing, so there's still no streaks,
which works beautifully. You can overlay as many
of those as you want. Then on this, I did the
orange from dark to light, and then I put the shadow in. With the reefs. I started with the
background first, I went dark to light, and then I did the
table dark to light, and then I did the pair dark to light and it tried very
pale on this side too. I was going to put another
layer on my decided weight. I'll put the shadow in first
and see what it looks like. Then I did that, it
makes the red violet. Put the shadow in and then
you saw the magic happen as I did an even glaze across the whole thing and it
automatically changed color just because water color is
transparent and it does that. And when that was dry, I did go back in here and I
did more of a charged wash, where I started doing
it as a graduated wash, and then I really didn't
want to lose this light. So I dampened this and I
met the puddle halfway. I brought the clean water
into the puddle and then I more or less wicked
up in the middle of it. These are things that as
you practice this more, you're going to work
with your puddle. There are basics to it, but then you tweak it
according to this situation. Okay. And I I added pigment
into the wet water, which is kind of wet
and wet technique. You know all these techniques
overlap a little bit. So, in the first class,
just a little recap. In the first class,
we learned how to pull a puddle, basic technique. In this part two
pulling the puddle. We learned how to
do the same thing, but start with a darker value, a less diluted mixture and
how to dilute how to add the water to dilute it and keep the puddle going and
get a nice transition. As a refresher there, these two examples where we went from a very dark to
a moderate dark, this one, we went from a
moderate dark to a very light. To compare, we also did
this or I did this, you can see that this is
a little more streaky. You're still transitioning,
but it's looking a little bit more like a sky where there's some clouds going on in here. You don't really see the clouds, but it's doing something or maybe it's starting
to rain here. But you can see
the possibility of doing this beautiful
graduated transition. Okay. That's the point
of this second class. It was to show you how to
make a graduated wash. In part three, I will be showing you how to charge the puddle with different pigments
so that you get wet and wet technique going on at the same time that
you're pulling the puddle. So that you can transition
from green to a yellow or from a blue to a yellow through
a green and you can do that all in one
pulling of the puddle. That's what we're
doing in part three. We're going to be transitioning from colors within the puddle. This is Chris Carter,
thank you for watching. Hope to see you in
part three. Okay.
11. Examples and Encouragement: a quick reminder about these classes on still share and the option to share your project on the class itself. In just moment, I'm gonna share some examples of paintings in which I've used that fully. The problem is that, and it may not be obvious where I've used it. I hope that you can. Chairman or gas Word's been used, but often techniques are really the best went when you don't notice them when you can't say Oh, you know, they used a lot of salt there or I know that technique. It's surrender. So, um, I like to leave my techniques together and keep people puzzling over G. How did you do? And you can do that so well with pulling apart. Applying glazes, washes. Pulling the puzzle is one wet and wet technique. You can call it when wet, because you're either pulling the same wash or you're charging it with other colors or you're adding water to it to make it lighter or darker. These were cold, wet and wet. They're not dry techniques, but pulling the pedal is only one off many wedding march, so I don't want you to think it's one of the same. It's just one one of many, many varieties of techniques you can use weapon with and in other classes on skill share, I will be sharing many more wedding with techniques. Along with experiment. Try all kinds of things. Be limitless. Pull your puddle in every direction and see what happens when it dries in some areas and you re soak it in others. It may be just the perfect technique. If you expand on and change, please remember poster projects. I'd love to see what you're doing and even in the future, come back and post a project. If you think that was it, I pulled the puddle just now. Who would have imagined thanks for joining?
12. Bonus: Closed Shapes & Layered Puddle Pulling - Collards and Kale Dala: Go ahead and create the Dala. On top of this unfinished painting. These lines were already in here. Not sure why that was probably from something else. And I use this compass to draw this circle. So this is the dinosaur kale, and this is the color green. Now it's time for the swooping line. And just swoop it like that. I'm starting off directly in ink. I'm not going to be drawing this in pencil first. See this line. I don't know if you can see it in the video because it's very light pencil. It's curving this way. And it appears that all of my dinosaur kale or going this way, but my collared shirts are going that way. So I'm going to start with the colored. And I'm going to rip this off so that I can more easily see what's happening over there. Right? Okay. I've provided like the one I've found a word over here, it'll be of one guy. Although we have a goal related to. Okay, these are also the dinosaur kale. I think I might just paint that in before I do anything else, just, just see what's happening. Because up here, I might want to leave that empty and then draw something over there. Let's see, That's it for the drawing part of this color is more of a warm green than the dinosaur kale. This is such a diluted mixture. I'm going to paint the whole thing in and then dark and the leaves. Pure red sable brush that I'm using peers to be as floppy as squirrel hair, which I've grown to lie. Having to handle this brush a little differently because it doesn't spring back. So it's good to try something now. Right? Like what I've found a word over, you know, in the chat about someone die. Although world was better than in a garden. In the retina me like roaches instrumental to them. How may miss the ramp up problems? No true. And although we're far apart, still, I know I left my home in our garden. And I'm making sure that I'm pulling the puddle. There's not much of a petal here, but there we go. It's better petal so that I don't end up with this streak. And I'll tip pay for just a little bit to make sure that my puddle is running down and not running back into the wash. Normally. I'm turning the book around and around, but because I'm filming this. I don't want to move the book too much, so it's a little bit harder for me to pay down along the angles. Instead of pulling all the time. I'm going in a different direction, but I'm working quickly so that it won't dry. And I'm applying this a little bit thinner so that you can see the ink lines through it. There's some little bit heavy handed with the paint in the bottom section down here. But I also wanted it to be a good, strong dark. When you're laying a wash down in a continuous area. You really don't want to have to stop to mix up new paint. That's where you end up with streaks in places that don't really want them to be. So even even though the veining is lighter on the colored green, I'd like to play back and forth with it. So I'm going to make the veining here darker so that it can play with the patterns over here. Now here, right here. This is where our swooping line was different. And now that I see that, I think I'm just going to change that. I'm going to change that with pin. I was gonna make that a different color, but I don't think I will. Now I'm not going to make the veining quite as blue-green as it is over here. Once the paper is wet, you can charge that wetness with paint and it will easily spread to the other areas. Okay, I think now on an ADU is this outer circle. And for this, I do have to turn the book. Okay? I think that that's done.
 Chris Carter, artist, illustrator and explorer