Transcripts
1. Introduction: Hello, I am Victoria
Misko and this is my very experienced
assistant, Toby. I am a portrait artists
specializing in pastel medium. In this class, I will
show you how to create a very beautiful and
easy portrait of lemons. This class is best suited for beginner artists using
simple techniques, we will create a very professional and
realistic portrait. I have provided a sketch
ready to print a trace. So you may even approach this class as a
coloring exercise. We will go for older stages necessary to complete
this drawing. We will begin by
creating a sketch. I will show you in
a very simple steps how to create this. We will continue by
drawing the lemons. We will create a
smooth base layer and learn how to create texture. Next we will approach the
branch and leaves where we will practice more
shadowing and blending. Finally, we will draw two beautiful flowers to
complement the lemons. We will be going over the entire drawing process from the very first pencil mark
down to the very last. So it would be
amazing if he could join in and draw the
portrait with me Asda, we are working on it together. I am confident that after this class you will not
only be able to draw these beautiful
lemons bulk create many other fruit
pastel drawings. I hope you find this class
very informative and learn a lot about the
magical pastel technique. But I also wish she
find it enjoyable and relaxing and have
fun while learning. I am truly delighted to
present this class to you. So let's begin. See you in the first lesson.
2. Materials: Hi everyone, welcome
to the class. I'm very excited
for you to be here. Before drawing, we'll
begin by looking at the tools and materials
we're going to be using. First, let's take a look at
the surface for drawing on. I use clef on time pastel mat. You can get birth the board
and the card version of this. I always prefer the board
but birth what perfectly. I also like this paper for pastels because
it's very grainy, almost like soft sand paper. This holds the pesto
very well and makes sure that the drawing
lasts a lifetime. This isn't a kind I like, but you can use
any paper that has enough tooth to hold
the best style. The size I'm using
today is seven by 9.5 " or 18 by 24 cm. I usually put out like as the size range of this
paper is quite limited, I like to tape this paper
to my drawing board to give it a clean
professional look at the end. Next we have the blending tool. I use this to blend the soft
pastels into the paper. This allows me to create
a very smooth layer. There are various
shapes and sizes, but this is the one that I use. It's great for blending
both small and large areas. Finally, we have the pencils. This is the most important tool for creating pastel portraits. In this class, we
will only be using the stubby low carb
Othello pencils. The individual pencils that
are being used will be labeled in the top-right corner throughout the entire class. So you will be able to follow
the tutorial exactly all of the materials and their links below it in the projects
and resources tab. These all the materials I use. Next we will be moving
onto the drawing. Can't wait to begin to see that.
3. Prepare & Sketch: Hi artists, welcome
to the class. In this class we'll be
drawing a beautiful lemon. So let's begin with
creating the outlines. I am using a regular HB pencil for this because it
rubs off very easily. So let's begin by
drawing the lemon. We are starting by
just drawing a curve. Lemon is very round, so this is the shape
we're going to create. Okay, So this is
the shape you are going for is essentially like an elongated oval shape. And now we're just drawing the bottom of the
lemon over here. So little curve. And now let's do another
lemon hanging down here. And why don't we draw it so that it's in front
of this lemon? Just slightly have them
overlapping over here. Following the same. We want it to be roughly
the same size as this one. Also just didn't know. If you have a lemon handy. What you can easily do is
outline the shape of it, follow around very
basic reference lines. And again, we're going to do to the bottom of the lemon here. Then worry about
these lines too much. We will rub them out and the pastel pencils
will cover them. So don't worry, but
it's better to use a very February hand because
if these lines are too dark, sometimes they can
be a little bit difficult to erase completely. So yes, just use a
very gentle hand. Now what we will
do is we will draw a branch that will
connect these two lemons. Why don't we make this
a little bit more interesting by
adding some leaves. I'm going to do a
pretty big one here. Because we have this leaf here. We weren't actually being
able to see these lines. Let's take our robot
and get rid of them. Let's draw one more leaf. Sticking out for autumn. I'm just drawing a line that
runs along the very middle. It's not a straight line, it has a very
slight curve to it. And this one here, we're drawing this leaf so that it's going to be behind this lemon. And we will also draw one
more little branch here, just so that we can add
some flowers to the branch. The lemon tree, it has these really beautiful
little white flowers. So let's try to capture those. So essentially they have
these very long petals. Why don't we add
some more plants. One that comes up and
overlaps this lemon. We can draw some flowers that
haven't quite bloomed yet. So let's draw a little branches
coming out of this one. And then just these
little pink flowers that are still closed. And the same thing
on this plant here. I really like this composition. I feel like we have a
really nice balance. We don't want the graphite
to show for it too much. We don't want to see
it over the pastel. So I'm actually just
taking it flat like this. And I'm just pulling it down just so it picks up
the excess graphite. Now let's move on to doing the best for this beautiful drawing.
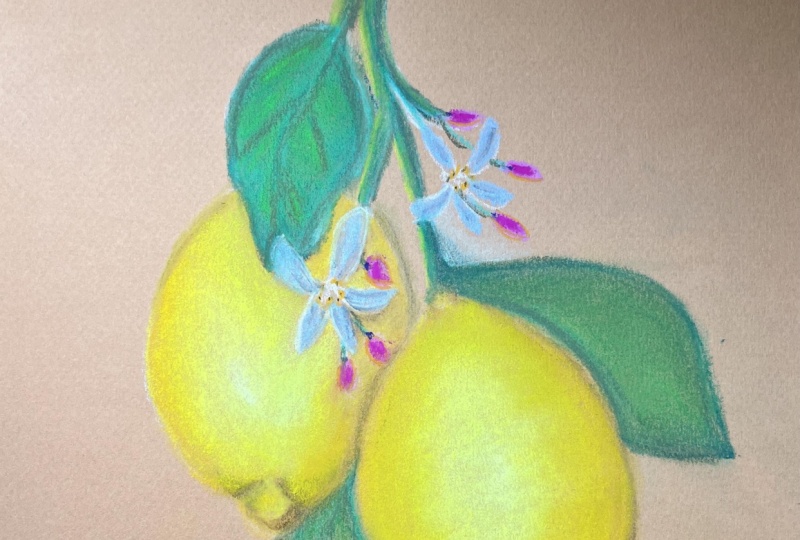
4. Lemons: Hi artists, welcome
to the lesson. In this lesson we will
be drawing the Romans. These are the only
colors I will be using. I'm using a brown,
a dark yellow, a regular yellow,
and a white pencil. And I will also be using my blending stump to blend
everything together. So I am going to begin by
taking this yellow color and I'm just going to
walk around the outlines. I'm using a very curved hand
to really get the shape. And then being extremely careful not to go
outside of the lines because pesto can be quite difficult to
remove with a ribbon. You don't want it to
outside of the lines. I'm going to go under
the leaf as well. Now I'm just going to bring this color
closer to the center. Essentially what we
are doing is we are building the dimension
of the lemon. So we want the outside of the lemon to be darker
than the inside. So in a moment we will add
a lighter shade of yellow here in the middle so
that it looks rounded. So now I am going to pick up a lighter shade of
yellow. For comparison. This is the one we were using
and this is the new one. We will just cover the
remaining parts of the lemon. I'm kind of overlapping the darker yellow areas
because we want them to blend. Now, what we are
going to do is take a white pencil and just focus it right in
the very center. Essentially we are just drawing a very big circle right
here in the center. The next step is to
blend this altogether. So we aren't taking any
blending tool we have. I am using a blending stump, but you can use your
finger or you can use a blending sponge,
anything that works. So we're going to take this and literally just blend
everything together. There will be quite a lot of pastel dust fooling around here. But don't worry about that, we can blow it away in a moment. Next, we are going to grab a
brown color and we are just going to draw a
little shadow here so that this little pots
pans out some more. We just going to draw
a shape like this. On each side. Just a tiny, tiny, tiny amount of this. We're not pressing too
hard because we just want it to be a smooth shadow. And I will draw a little curve over here like that to bring out the shape. Again, we will take
our blending stump and blend this in
very, very gently. So this part of the lemon here will be
underneath the leaves. So I'm also going to use this brown to build a
shadow over here. Again, just adding a
very small amount. I'm not pressing the
pencil hard at all. Why don't we also add some
underneath the flower. And over this side, over here. Essentially, we
are trying to form this shape to make it look like the sunlight is coming
from this side. If light is hitting over here, this leaf would cast
a shadow over here. So we are trying to
essentially draw the shadows on the right-hand side to
make the shape look cohesive. Do this shadow one
more time because I feel like I want it to be just a little bit more life to really make a shape
with three dimensional, really, really gently
bending the Sen. And I'm also going to
add a highlight to this little area here because it's also
reflecting some sunlight. Alright, I'm very
happy with this. Now, let's try to draw
the texture of the lemon. I'm going to use this pencil. This is the first
one that we used. And essentially I
will just use it over the dark areas to draw
very, very tiny scribbles. I'm using a very
light hand here. I'm not too worried about
the shape of the scribbles. I just want to
draw some texture. Now. I'm going to use the yellow
color and I'm going to repeat the same thing over the
areas that are mid turned. So I used the dark yellow
for the darkest areas, then this yellow, this medium yellow for
the medium areas. And in the moment
I will use white to go over the very
lightest areas. So again, I'm just drawing
the little scribbles. I'm barely even
touching the paper. I'm literally just trying
to create some texture but not make the pencil
marks a parent. And finally we take some white and we will just do
the very same thing, right in the
highlight over here. We're almost done. I'm just considering making this shadow over here
slightly darker. So I'm going to take my brown pencil and just
draw these scribbles. Again. We'll take the
blending stump and gently work this with
the rest of the lemon. I'm just going to use my finger to blend this a little bit. This is pretty much done, and now we will draw
the second lemon. So we start with the
same dark yellow pencil. And again, we will just
draw the outlines. Notice how I'm changing
the position of my hand to draw
this round shape. It's easy to carve
your hand this way. So when I was drawing this side, I put my hand over here
and I can just move my fingers gently
to draw this shape. And when I'm doing this upside, Hey, I moved my hand down. And again I'm moving
my fingers this way. It's much easier to achieve a round perfect shape like that. Oh sorry, I'm not trying to
draw the circle in one go. I'm favoring this line, drawing it little by little until I achieve
the perfect shape. It's much easier to
do this and draw a very nice circle
than one motion. So now again, we will blend
is towards the center. We remember that the light
is coming from this side. So this side over here will
be a little bit darker. So we try to focus this
color in this corner. Now we will take the
medium yellow color and we will fill in
the rest of the lemon. Again, we are overlapping
the dark yellow color. I'm just feeling this
all in so there's no white of the paper
showing through. And finally we take
our white pen, so we're just going to focus it right in the center where
the light would hit. Now, my favorite part, we're going to blend
this together. I'm just going to
go over it with my finger to smooth out. This lemon over here has this little shape at the top that connects
it to the branch. So I'm just going
to fill this in. Again. I'll also take
this white pencil just to make the highlight a
little bit more apparent. With my finger. You've
done this and now I'm going to take my
brown pencil and we're just going to
draw the shadows. I'm just adding very, very faint lines over here. I feel that the highlight
and the shadow, they make them in the
query free dimensional. So now we are going
to draw the details. I'm taking my darkest
yellow color. I'm going to use this to go over the darkest
areas of the lemon. Again, I'm essentially just scribbling to draw some kind
of texture on the lemon. And now we're going to use the white pencil and draw the
texture over the highlight. Just going to add some detail to this top of the lemon here. This is pretty much all
we're doing for the lemons. So we've done the base layer, we brought out the highlights
and draw the shadows, and then we drew some
texture under them and that's pretty much it. In the next lesson, we will draw the branches and the
leaves of the lemons. See that.
5. Branch & Leaves: Hi artists, welcome back. In this lesson we'll be drawing the leaves
and the branch. So these are the
early pencils I had used for drawing in this lesson. I'm using a brown column, a dark green, a medium gray, and a light green, light yellow, and a white pencil. Let's start with
this leaf over here. I'm going to be using a dark green color and I will
use it to outline the leaf. Let's make the
leaf darkest here, at the bottom and
at the very top to make it look like it's
three-dimensional. So we're going to focus
this dark color here. And also here. Petal is going to be
showing three here. So it's covering a small
section of the leaf. So we're going to
walk around that. So let's bring
this color towards the middle and reinforce
the dark edges over here. And also we are going
to make the line that runs straight through
the middle of the leaf. We're going to make it darker. Again, remember I'm not
pressing the pencil too hard. I'm just trying to very
softly build the column. So now let's take a
medium green pencil. So e.g. we were just
working with this one here. As you can see,
it's just a little bit darker than this one. So this is the medium
pencil and I'm just going to fill in the
rest of the leaf. Amazing. And we're also bringing it towards the
edge because we want it to overlap the two colors slightly so that
they blend together. Now, we're going to pick
up our very light green. So we'd use the darkest
than the medium, and now we're using
the light green. And we're just going to focus it right in the center of the leaf. So this is how you
build dimensionality. You have an object
that's darker towards the edges and the lighter
towards the middle. And that makes it appear as though it's coming
off the paper. Now we are taking our blending stump or whatever else you're
using to blend. And we will just blend
all of this together. I'm just going to use
the very dark green again to go over the airlines. I want them to appear very even. Again. Notice how I'm changing
the position of my hand constantly to get
the best angle. I'm just using this
medium green to go over it again slightly because I want the base layer
to look very smooth. I'm going to use the
lightest green again, just to reinforce the
highlight one more time. Essentially, I'm just repeating the first three steps
that we had done. I first use the dark
green to do the outlines, then the medium green to kind
of cover everything else. And now I'm using a very light green to build
the highlight. Now does it looks like a very beautiful basically,
as you can see, it's dark over here and he, and it's light towards
the very middle. The leaf looks kind
of curved as though this part over here
is coming out at us. Now what I'm going to
do is use a bit of white to make the highlights
come out a bit more. I'm just using my finger
to blend this very gently. I'm just adding some white over here to build up a highlight. I'm going to take the same dark green and I'm just going to draw the little lines within the leaf that connect
this pot to the edges. Again, I'm not just
drawing one straight line, I'm very slowly
building it up. Again. I'm taking the white pencil and I'm just going to
highlight some of them. I'm just going to use my
finger to gently blend this. And I'm going to take my
brown color and I'm just going to reinforce this
line in the middle. This is the same brown
color that I had used for the shadows
on the lemon. Amazing. Now we are
going to use the very light green just
to build some texture. I'm going to do exactly
the same thing as I did. The lemon. I'm essentially destroying
very small scribbles because right now the leaf looks just a little bit too smooth. I'm going to take the
dark color and do the same thing around the edges. Now we're going to draw this, the two leaf here that's peeking out from behind the lemons. So again, I'm taking
my dark green and I'm going to work
around the outlines. Now I'm taking my medium green and I'm filling in
the rest of the leaf. I'm just using the green
pencil to build the highlights and a small bit of the white pencil to exaggerate
the highlights some more. Now we're going to draw the line that cuts straight
through the middle. At the smaller connecting lines, I'm using a bit of
the white pencil to add some highlights. And a small bit of the green pencil just
to add some texture. And this little
leaf is now done. Now we're moving onto
drawing this one. Again, we're starting with the dark green pencil and we
are drawing the outlines. Now we take the medium
green pencil and again, we're going to fill in
the rest of the leaf. Now we are just using the dark green pencil to draw
the line along the middle. And we can't see the full leaf, so it kind of cuts off here. Now we're going to
add some highlights. Finally, we're going to finish off by building some texture. So essentially we are just
doing very small scribbles. They are quite hard to see, but they help in making the
leaf appear less smooth. So it's good to add this just to that small layer of realism. And we're taking the very
light green pencil and also adding a few scribbles
to build the texture. And now we're moving on
to drawing the branch. So we are starting with
the dark green pencil. We established that
the light is going to come from the top
left side like this. Because on the lemons you
can see that the reflection is towards the left side and there are shadows
towards the right side. All the branch will be darker on the right side than
it is on the left side. We're going to focus this dark green on the very right-hand
side of the branch. These two little branches are just connecting the flowers. So let's not forget about those. I'm just going to
make this main branch a little bit more thick. Now, let's pick up
a medium green and focus it right in the
center of the bunch. And finally, we are
using the light green to draw the left
side of the branch. Okay, this looks very good. Now what I'm going to do is I'm picking up the brown color, the same ones that we
used for the leaves and for the lemon shadows to draw these little lines that separate the
branches from each other. So this little branches
coming out of this one. So we're just going to draw
a little curve like this. And we'll do the same
thing over here and here. And we will use
our blending stump to integrate this line. And I'm also going to use
this brown just to outline the very right-hand side to
make it even more dark half. Next one I'm going to do is I'll take this very
light yellow color. And I'm just going to do lines right here on the
left side to add some texture to the branch. I'm literally just
drawing lines. That's it. Very thin how the visible lines, but they just help in building
the texture of the branch. The only thing I also want
to add, as in the tool, top of the leaf over here, peeking out from
behind the lemon. So I'm just taking
a dark green color. I'm just adding this shape. I'm not adding any shadow and because it's in the back anyway, so I'm literally just drawing the shape and I'm blending
it with the rest. And that is done. Thank you for
watching the lesson. In the next lesson, we will draw these very
pretty little flowers over here. See you there.
6. Flowers: Hi artists, welcome
to the lesson. In this lesson we'll be drawing the lovely two
flowers over here. For this lesson, I was
using quite a few colors, but here they will. Sir. I am just picking
up a dark yellow and we are just drawing
little circles like this. And we will do this
on both flowers. And now we will take a
very light yellow color and we will draw the highlights
over the dark yellow. So essentially I'm drawing a lighter yellow dot
over the dark yellow. Next we're going to draw the beautiful pink flowers
that haven't bloomed yet. So I'm picking up a new pencil and I'm just going to
draw an oval shape. I'm just drawing a very solid
color in pink in a minute. We will use white to go over it and make it a
little bit lighter. So I'm going to repeat this
over here because we have another little
flower and we have 1 mol peeking out from
behind the flower over here. Perfect, So we have
three pink flowers. We're also going to add
some purple flowers, true, behind this petal. So it's kind of cutoff. We can hardly see it, but it's just peeking
out just a tiny bit. Why don't we add one more onto this flower
perhaps over here. Perfect, So now let's
pick up a white pencil and lighten all of
those little flowers. Sorry, I'm just going
to essentially draw rounded lines coming
from the very top and the drag them
towards the bottom. And now we will take a dark green pencil because
they also have these small, tiny branches that all
connecting them to the flowers. So that's just draw this. And let's also take a light green pencil
to add some dimension. So now I'm taking this and
I'm just drawing along the left side to make it look a bit more
three-dimensional. I had also missed out one
little flower over here. So I'm quickly
going to add this. I'm also just going to add a little yellow spot over
here to fill in this area. And now all we have
left to do is to draw these main
flowers over here. So I'm using a very
light gray color and I'm the tree just going to fill in every petal with a
solid, light gray color. It's a curved shape, so it's just like a
very long oval petal. Let's just do the same
thing to the second flower. Next, we're going to take
a slightly darker gray. This is very similar to the previous pencil,
but it's darker. We are just going to add the details to the petals to separate them
from each other. And we're also going to
use this color to draw one long line along the
middle of each petal. And of course we're repeating the process for this flower. And finally, we are taking a white pencil to add
highlights to the petals. I'm drawing around the line
that runs through the middle. And we will also use
the same white pencil to connect these yellow
dots to the flower. So I'm just drawing
very straight lines. And as a very last step, I am also going to
take a very dark gray to add some final details. So I essentially you just
want to build depth over here and add some very dark areas because the petals are
blending into one. I really would like
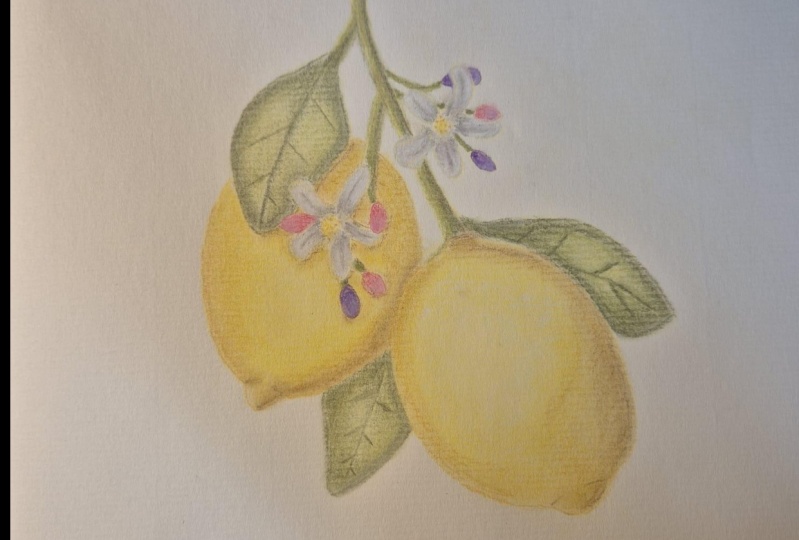
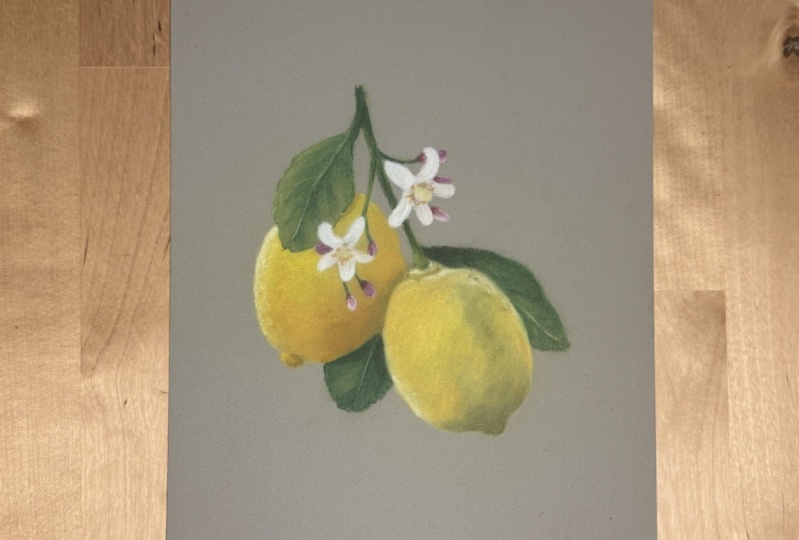
to separate them. Okay, So this is the
finished portrait. In the next lesson, we will review all
of the steps that we went through to draw
this beautiful portrait. And we will also talk
about the class project. I will see you then.
7. Class Project & Final Thoughts : We made it to the end. Congratulations for
completing the class. This was not a simple portrait, so I would really
like to praise you for finishing all the lessons. To summarize, we began
by creating a sketch. After that we drew the lemons. We started with a smooth basically and create
a texture on top. Next we draw the
branch and leaves where we focused on
shadowing techniques. Finally, we drew two
beautiful flowers to complement the drawing. I hope that by breaking them, the drawing into
these four sections, we managed to
simplify the drawing and give you more confidence
to create it on your own. That being said, for
the class project, I would be delighted if you attempted this drawing with me, the portrait would be
beautiful to hang up, to decorate your
house or give it as a gift to a
family or a friend. So follow the class
along and the draw with me as though we are
working on it together. You will find all of the
project details onto the drawing references in the projects and
resources tab below. I welcome any questions
you may have. If you would like me to clarify something or explain something, father, I wouldn't be
truly delighted to help. I would like to thank you
again for joining me. I had so much fun
creating this beer. I found the drawing very
relaxing and hope you did too. I really loved drawing,
especially with pastels. And I have a question teaching. So truly thank you
for being here. Here is my Instagram
account on my website if you'd like to see more
of my work and support me. I also create
portraits of people, animals, and other landscapes. So if you are curious
to see those, that's where you'll find them. I also have more pastel
classes here on Skillshare. So if you enjoyed this
course, please have a look. That is all I am
very excited to see your project and answer any
questions you may have. Thank you again
for being here and a big congratulations for
completing the class. Bye.
 Wiktoria, Professional portrait artist