Transcripts
1. Intro: B. Say, Wow. Wow, that go. Are you also tired of having
like 6 million photos on your camera roll and not having anything on your wall
reminding you your memories? I've got you. In this class, we are going to design a
ticket or a pass where you can include some images and drawings of yours or
photos that you wish to, you know, mark and remember
a display on your wall. I got this idea from collecting festival tickets when
I was a teenager. And right now I'm
traveling a lot, but I'm not keeping the tickets, and I have those millions
of photos on my phone. So what we are going to do in this class is that we are
going to choose our topic. For example, festivals
you visited this summer or the places you
traveled to this year, and we are going to design
a very simple ticket. I will guide you through the whole process
of creating it, and you will have
the artistic freedom to customize it and
make it your own. And I will, of course, show
you some pretty cool tips and tricks in procreate that will help you
during this process. And by the end of the class, you will have your pass in your ticket that you can display on your wall or give
it away as a present. Designing this pass
could be very, very nice when you are gifting someone an experience,
for example, a trip or wellness treatment
or anything, you know, and you are not giving digital
tickets or I don't know, printed ones, but one
that you illustrated. And it will not
take a lot of time. It will be like the
30 minutes Max. And hi, if you don't know me, my name is Alexandra, A K&D art Mother. I'm an artist, illustrator,
online educator, and a professional
art teacher with a master's degree
in art education. And my superpower is making
complicated art topics, easy for beginners and coming up with random creative
ideas from nowhere. Okay, so if you are ready, what you will need is
your iPad, 30 minutes. And yeah, let's
just get started.
2. The idea: Alright, so welcome
to the class. In this video, I would love
to talk to you about how you can use this illustration and
what is the purpose of it? So as you can see, this is a ticket design, and you might ask, why should I design a ticket? And where I thought of two different things when it can be very appropriate
to create such a design. So, for example, when
you want to capture moments of your life or
when you want to gift. And let's give an example. So maybe you attend a
wedding or an event at a festival or concert
or concert at serum. You, you know, have your
camera full of images, and they get sometimes
lost, et cetera. I think designing such a ticket, remembering, you know, the date, where the festival
or the event was, and adding some core images that you've taken
at that place and putting this onto your wall
and maybe even collecting this because this is such
a very quick project, you know, I will take you like half an hour to create
a pass like this and I think it can have a very human touch that we are
missing lightly, you know? With all the AI
generated things, you can just put in effort
to your own memories. I think that's beautiful. And when gifting, um, Again, we have everything digitally in emails with QR
codes, et cetera. You can include a Qre code
or whatever is needed for that ticket that
you are gifting to someone to an event or to, you know, wellness experience
or a retreat or whatever. You can just add a QR code
into the design itself, and it can be such a beautiful, you know, act or just you know, the effort that you put into it, it can be so beautiful. So I think the
design of a pass or a ticket like this
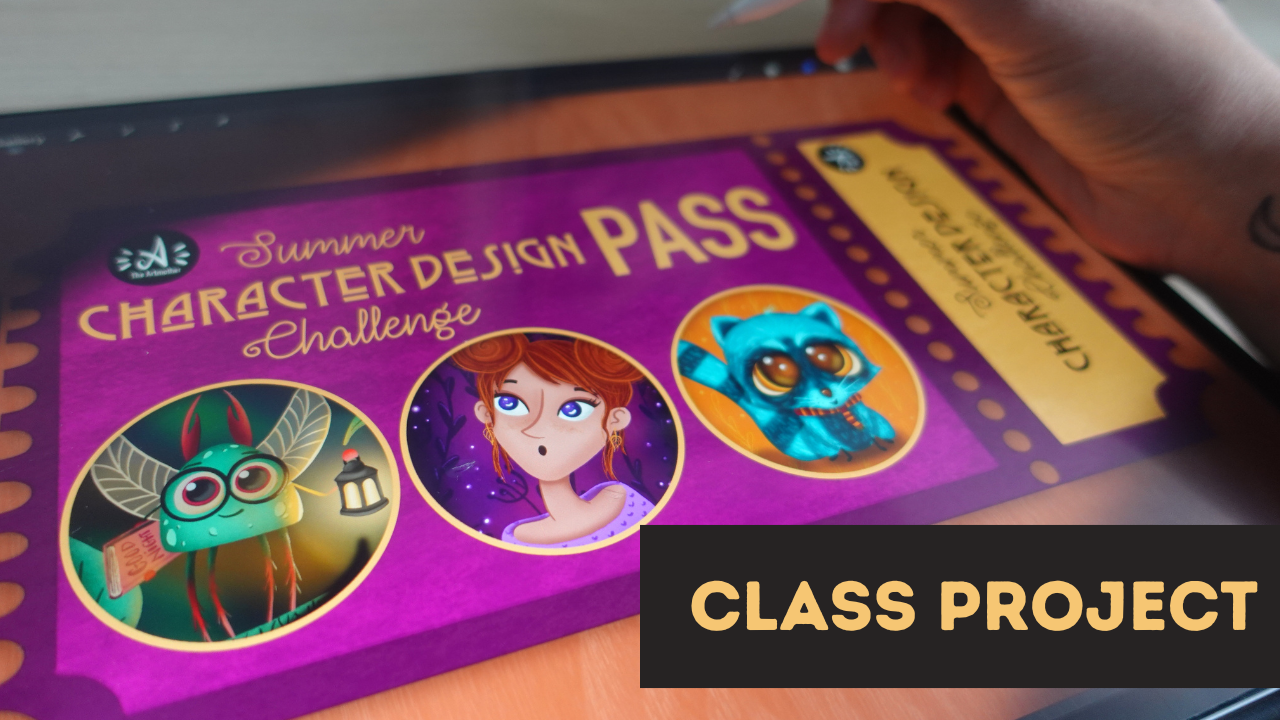
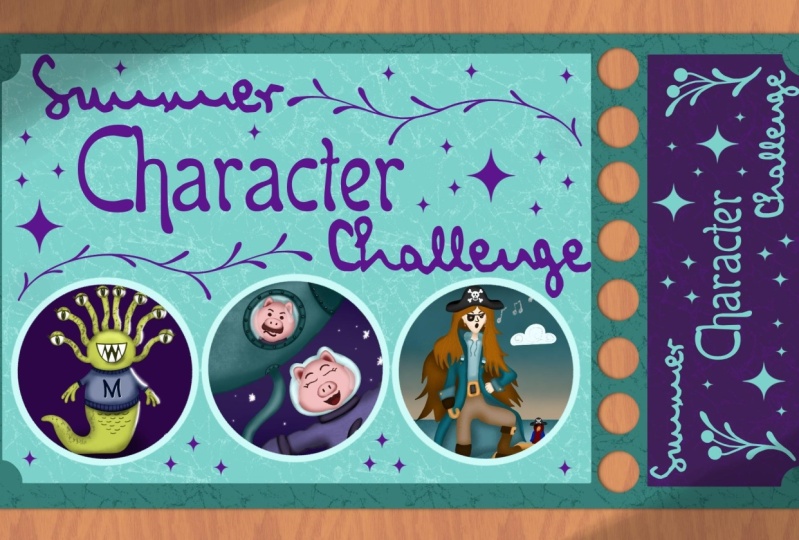
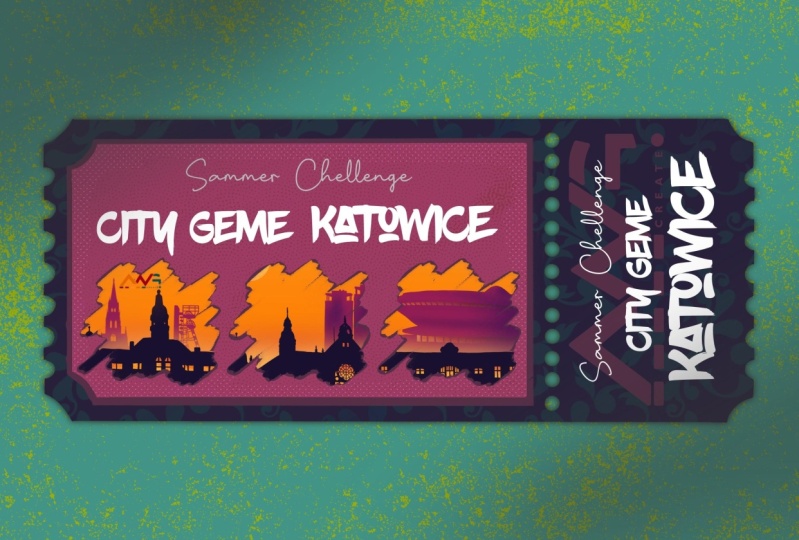
is just incredible. So this is a pass for my
character design challenge, but it can be very
much customizable. We are going to work
with this base design, but you can do it in
whatever way, okay? This class focuses on
giving the experience of beginners to design a ticket
like this themselves. But if you are a pro or if
you have more experience, take the shapes and
the arrangements of everything to your, you know, like, your way. And we are going to have
free different circles in the middle where you
can put your images into. Like, you can draw
something into them about the event
that you are remembering or you can put photos into that if you are comfortable
with sharing them, or, I don't know, um maybe if you visited a city, you can just put photos
of that city there. So let this be flexible. So your job now is to think about an event that you want
to create this ticket for. Is it an event or a
trip from last summer, a boat trip that you went into that was
on your bucket list, or is it a gift for your parents wellness retreat
or is it going to be, I don't know, a collection of the children's drawings that
your kid did this year? Whatever it might be, choose one thing that you are illustrating for before
you move forward. And now let's see you
in the next video where we are going to create the
base for our illustration.
3. The Base: Okay, so let's start
with the base design, and let's just create
a screen sized canvas. Okay. This is the format that we
are going to work with. The way that I designed this
ticket is that it, you know, fits horizonal I don't know, format, for example, if I'm putting it up on
YouTube or Facebook. But if I wish to share
it, for example, on Instagram or as a story,
I can just, you know, I have the main text
in this direction, and I can just turn around
the images in these circles, and it can fit that
dimension as well. So let's just start by
creating a rectangle. So I'm choosing black. I'm choosing sketching pencil from the brush set
that I have here, and that you will also
get in the resources. But if you are looking
for a pencil brush, go to sketching and the six
B pencil is totally perfect. Now, I will use the
Canvas guide to help me. If I click on the
Range button and hit Canvas and turn on
Canvas or drawing guide, it will put up this thing that will help me to
create a rectangle. So I will start
approximately here. And draw a line here and I can just move it around
to have it in the middle. I will just select it and approximately put
it into the middle. I'm counting the squares, one, two, three, four,
five, one, two, three, four, five squares from
the top and the bottom, two squares from the side. This is where I'm going to
draw the other end as well. Yeah. Now I can
just connect Okay. This is the base. I
want this part to be the part that
can be teared down. So I guess one,
two, three, four, five, six, seven squares in. This can be drawn here. And basically, this is
the base for the ticket, and I can already turn the drawing guide off because
I don't really need that. I want this to have kind
of like a hand drawn, feeling to it as well, so I don't really want to be too precise, if
that makes sense. And the first thing
that I'm going to do is to cut these edges off, and I will just draw them in. These quarters to the
edges. All four, okay? And they don't need
to be perfect. As you can see,
I'm holding down, so I'm drawing the curve
and I'm holding down. And now I'm getting
the eraser and I will just erase these
things from here. Okay. Cool. Now, these
parts, these sides, we'll have this little di
let me show you these ones. This is what we are
going to put up there. I will just turn it around
and I'm going to draw again. I will kind try to leave
out evenly spaced parts. Kind try to make these
things the same size. The evenly sized. Okay. And to the other
part this way as well. Okay. And now I'm
getting the eraser, and I'm going to erase
the stings in the middle. Okay. Now I want to add
circles to this line. I'm going to use
this as a guide, and I will create another
layer so that I can place these circles over and I can
erase this line behind it. The first thing I'm going to
do is to draw a circle here, hold down, and make it a
circle so that it is even. I will just duplicate that and put it next to
it. Just like that. Now I'm going to merge these two together and again duplicate. I will place it again here. As I have snapping
turned on here, in this menu, the
moving menu, move menu. It is snapping it together. Now I can merge these two layers together
again and again duplicate. And well I'm almost done. So I will not merge these now. I have it enough right
here to duplicate and I have it all like this. I will merge all of
them together right now and place them kind of
evenly from the sides. I will erase this last one
and go to the layer below, and I'm just erasing
this line here. And I already have this
nice tearing down thing. Okay. Now let's play
some rectangles again, and now I'm going to turn
on the drawing guide again, and I will go to a new
layer just in case. And I want one big shape
here and one shape here. You can go more
complicated if you wish. But let's just keep
that simple here. I will just draw one rectangle here where I will have my
circles in and one here. Okay. Now, I'm going to do the exact same thing
I did the first time. So I'm going to just create
a smaller curve here. Okay? Kind of following the
curve that is up there. I'm in here. But it will just
soften the shape so much. I don't need to do that here
because it is in the middle, but at this edge. Oops. I'll draw it at first. Okay. Cool. And now I will
create another layer. Draw one big circle here. And if you don't want it to
be a circle where, you know, you put the images into, they can be squares again
or triangles or rectangles, whatever you wish, okay? I think you will understand the base composition
of this ticket, and you are totally free to
follow along as you wish. Okay, so I have a
circle that I edited, you know, to have it a circle,
and I'm going to again, duplicate it and you
can place whatever, you know, number
of images into it. I'm keeping it free. And as you can see, I again duplicated and I try to keep the same distance
between them, and I'm going to
select all three, place them kind to the
middle and merge them. Alright. Now let's move on
to the illustration part. No.
4. The Illustration: And Alright, so it is my turn to think about what I'm going to illustrate
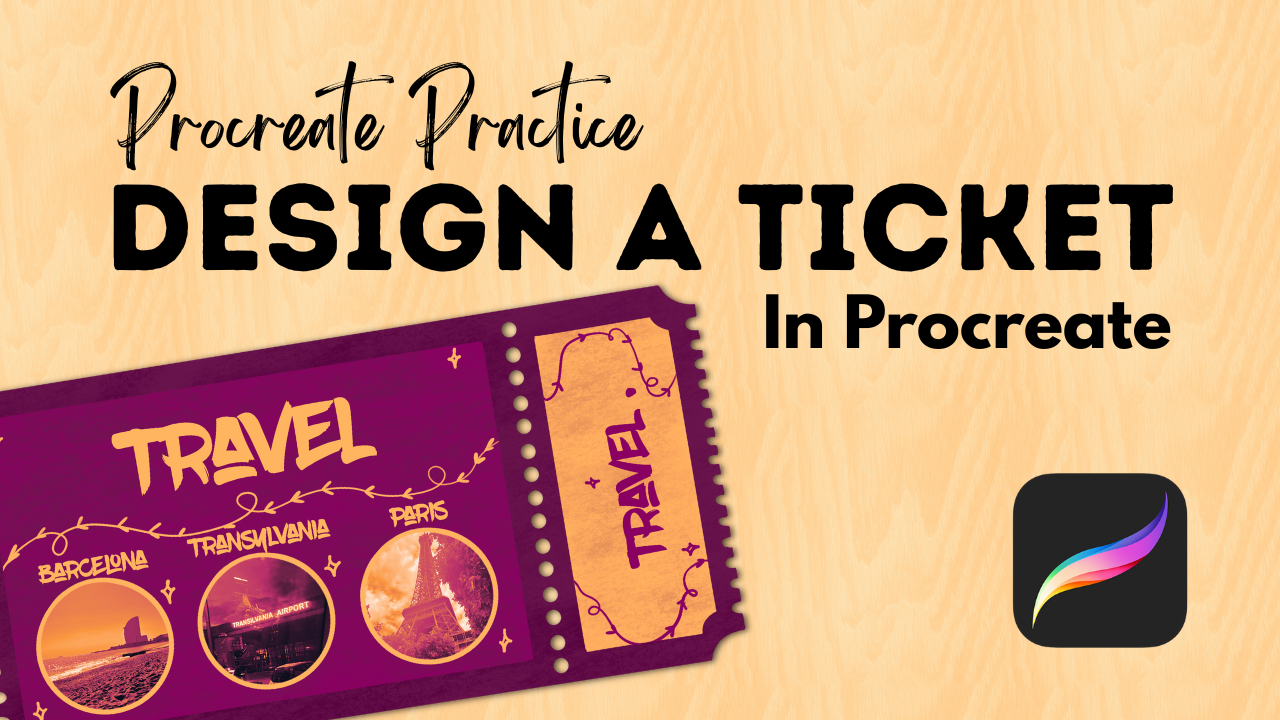
this ticket for. And I thought that I have been on a plane
this year three times, and I've been to Barcelona
to Romania and to Paris. And I'm going to just
include some photos there and I don't know,
say travels 2025. And yeah, so let me just create another layer and I
will just write here. Barcelona. Mm Transylvania and Paris. Yeah. Yeah, I know these are cities, and this is a part of a country. But yeah, I was traveling around in an area
there, and, yeah. So let's just call it that. So I will write Travel 2025, I will maybe at a plane here
with some This looks weird. This is a fish. Okay, time
to draw a plane. I'm sorry. So maybe, like this? Yeah. So elements I will add. Yeah, and Oops. I don't know. What to Write here,
maybe I will just write. Yeah. Travel. Okay. Cool. So let's get into it. I'm going to continue using this color palette
that I've used before. I'm going to share this
in the class resources. And what I want to do
now is to, you know, just connect all these layers so that I have it as a
one layer sketch. I will create a new
layer below it, and I will lower its opacity. I will choose the base
color for my ticket, and it is going to
be this dark purple. And I'm going to choose
from my brush set M the clean shaper. I'm going to just really quickly fill in all the shapes and then move on from that. So let's get into it. I will turn off
the drawing guide because it is bottering me. So I have the base shape. I will create another layer
and add the inner shapes, and those will be lighter
pink for filling them in. Okay. And I think that I will choose the slighter
color and fill this one, this shape with it or
maybe the slighter yellow. Yeah, the slighter
yellow looks better. And what I think is, I will erase these circles. So the way that I'm going
to do that is actually, I will just go here. I will create another layer, choose white and
the clean shaper. Because if I just erase,
let me just show you. If I just erase, it might not be even
in every segment. I need to spend a lot of time to erase these circles evenly. If you wish to do so,
you can just simply erase these circles
or from the ticket. But there is another way. If you create another layer and choose the clean shaper
and just draw a circle. Me. I will you need to
just draw a circle once. Sd down and the
circle, fill it in. It is pretty cool. I
will adjust the edge a little bit from the bats. I can do the exact same thing
I did with these circles. I will just put it here. I will duplicate.
Now, I have four. And when we have four, we can just duplicate those. And as you can see already, it is not that even. But whatever. Okay, I
will duplicate it again. Okay, and duplicate it again. Like this, I will
just erase it from the side and I will merge this all together and find
a better place for it. Now hit select for the layer
of these white circles. Choose the layer behind
free finger swipe and cut. Now you've cut these shapes from this shape, if
that makes sense. Now I can just delete
these circles and I have now it cut from the original
shape of the ticket. I can see that it
is not that even. If I'm right, something's
weird about these circles, but it will be okay for now. I can do the same with
these bigger ones. I will create another layer, choose the clean shaper, and just, you know, draw a big shape, hold down, make it a circle. I will make it fit. I will bit by these edges
because it can be very much, you know, not even. Okay. I will make it a bit
smaller and again duplicate. And again, duplicate. All right. Merge them together,
select and now I need to cut it from this top layer. Basically, I can place
the photos behind it. I will just select that, three finger swipe and cut. Now I can just delete this. We have the free
circles. All right. We have the base for
the illustration. Let's move on and add a
little background before we work on the
details. S you there.
5. The Background: All right, so let's just
work on the background. And for the background, I'm going to choose this
darker brown color. And I will choose
this light yellow. And from the brush set
that you will get, you will get the brush that
has this tree texture. Choose a tree texture, brush, a lighter color, create another layer over
the background color, make the brush big and add a
tree texture over this dusk. And yeah, maybe
it is too yellow, so I will just lower the
opacity of this layer. I will create another layer over it because we are going
to add a drop shadow. And for that, I will duplicate the layer of the
overall shape of the ticket, select the lower one
and choose black color. Select the layer that is below, hit Select and hit fill layer. And now you fill the
layer below with black, and now I'm going to move it. I will move it a
bit to the side, as you can see that.
Can you see that? I moved a bit to the side. Now I'm going to go to
Adjustments Gauchenbler, and I will gauchmblur
this layer a bit. This will create the
effect of a shadow, but now it is a bit as if the ticket was floating
just about the dusk, because it is very harsh. So I will just push it a little
bit back like this. Okay. And maybe I can just
lower its opacity. So it is more natural, just like this.
Can you see that? So the ticket is on the desk. And the other thing
that I've done with this pass if you
take a look at it, and you can see that I have a different color in
the background, but that one just works fine. I added this shadow as if it was lit from the side.
So let's just do that. So I create a layer on top, keep the black, and
now I will choose the drop shadow
and make that big. And I will just add that to these sides just a little bit so that
it is still lit. We can just do it right now. If I just go and blur this
layer, it will look fine. But we can do that
a bit later as but when we have the details,
but I just wanted to, you know, put these
things together now so that we work on
something nice. I always love to
prepare these things in advance so that it makes
me feel just better. Okay, so let's move
on to the next video. Now we have the background. We have the light. And let's just add the text
and the images. Okay? So my first thing
will be adding the images. Yeah. Okay. Let's see. Seeing the next video. Mm.
6. Adding The Images: Uh All right. So first things
first, I will import the images that I
want to include here. So I will create another
layer between the two layers. The base layer and the top layer and hit
add and insert a photo. So here is Barcelona I just cut it part that it
makes sense and looks good, and I will just erase
everything that goes out of the circle and shows Cool. I'm at the Transylvania. I love this airport, how it looked like, and how it, you
know, writes there. So I'm going to erase
this part as well. And the Eiffel Tower, as well, like this. You know what I'm going to
put them onto layer and go to adjustments and hit color balance and play
a bit with colors. Or what I can do is to
click on that layer, hit adjustments and
hit gradient map. And it will create like these incredible
color variations from these photos that
you can choose from. So it is gradient
library, it is mystic. It is breeze, it is instant
Venice. It looks good. I love the blaze one,
so I will go for that, but you can just explore different variations so that your images are cohesive,
as you can see. It looks super amazing. Can you see that?
I love it. Okay. Now I will create
another layer on top to create an edge
for the circles. So I will choose this slide, yellow, the clean shaper, and I will just create a circle. Okay. And I will duplicate
that and just place it next. So that it fits. Okay,
and again, duplicate. And place it here. Cool. I love what it looks like. All right, so now
we have the photos. Let's move on to the next
video and add the text.
7. Adding Text: Now, let's add the text. So I'm going to hit at at text, and I will just write Travel. And, you know, you
can download fonts. From the Internet. I already downloaded
several ones. So I have my favorite ones. For example, this one, and I will just show you in a second how you can
download a phone. All right. So if you go
to 1,000 onefons dot, come and go to the search
and hit commercial free. I will give you thousands of
amazing fonts that you can import into your iPad and into Procreate so that
you can you know just create amazing things. You can just choose hand freedm from the keywords
up there and you will have some really cool
commercial free fonts. What I love here, let's say this blow brush, I will just download and I will hit Download
and it's downloading. So if I click up here
and click on the brush, I will unzip it by
clicking on it. I will open and here
defines the OTF or TTF. If I click on OTF, I will just import that one. A. I'm back at my illustration. I will create another
layer just in case. I hit Add and I hit Add Text. Now when I'm here, I will hit this AA and
I can import font. And I can just, you know, here is the recently used. I will just hit blow Brush, and I can just import that. And it is importing. So if it is imported, I can just find it here. Here is the blow Brush, and I can start writing. And I have text here. I can just hit at the text and select
and just write Travel. Travel. And I will
write here 2025. Oh, this is a cool font
that I found here. I would just write it here. Cool. And I will again, add in at text. I will just write
show keyboards. I will just write bar
Salona I will put it here. I can just duplicate the text, so it is the same size. I will place it here. Place in here and addit text, and I will just write tren sill minia Sonia. And the third one added text, and I will write
perps. But it is here. And well, it looks cool. I can duplicate the text
of the travel 2025, and I will select the text. I mean, Mm. And I will change the color. Make it smaller and oops
and place it there. Okay. Okay. And what's left
is adding some details, and let's do that
in the next video.
8. Adding Details: Alright, so at first,
I will just turn off this sketch because
I don't need that. I love to add texture. So I will just go to the base shape I will alpha lock these
two base shapes, okay. And now I will choose
this darker version of that color overaly and
choose the texture brush. Make it big, and I will just go through the whole base shape. I will just show you
what it does. Like this. So that is not that
digital. Can you see that? It added kind of
this coloring here? I will go to the
stop one and choose this middle color and just go through that as
well, this shape. And for this shape, I will choose this
darker one and yeah, just really lightly go through it and we have some textures. You can play with the phones, you know, you can add
a drop shadow to them. Only thing I'm going to do
is to create another layer, choose this light yellow and
the clean shaper and I will just play a bit add this line here a little bit
of floral elements that I love to add to my
ofix it represents, you know, this journey that I had basically
where this stops here. And I'm not drawing a plane. I can't even sketch
a plane right now. But whatever so you can
just add whatever you like to decorate
this amazing ticket. I love to add these little
stars here and there. I have a stamp brush for them, but it is just cool if we
just have it like this. You can add your
logo if you wish. And I will just choose this one and add some fun stuff here and there. I will, like, erase some
things that are overlapping. Yeah. It looks super
cool. I love it. What do you say? I love how
the colors work together. I love these free pictures. I just remember
when I took them. And this when I was
sitting on the beach. This was when we arrived
to Transylvania, and this was when we were, like, walking through the city. And this little thing
just means so much to me. And I just added, I don't know, like 30 minutes of art into it, and I can just really, you know, save it, share it. I can put it into my story. You know, you can just turn
it around and turn around the pictures or just share
it like this, like whatever. I hope that you like this project and I can't
wait to see what you create and yeah,
happy creating.
9. Final Thoughts: Oh There I go. Wow. Congratulations. You
finished the class. I'm really proud
of you and I can't wait to see what you created. So make sure to upload your
pass into the project gallery so that it is
displayed and we can see whatever cool
stuff you created. If you want to stay up to date, follow me on social media, on Instagram or Facebook, and also here on Skillshare. Alright? It was a pleasure
to have you here, and I hope to see you in
my other classes as well. I wish you all the best
and happy creating
 The Artmother, Professional Art Teacher and Artist