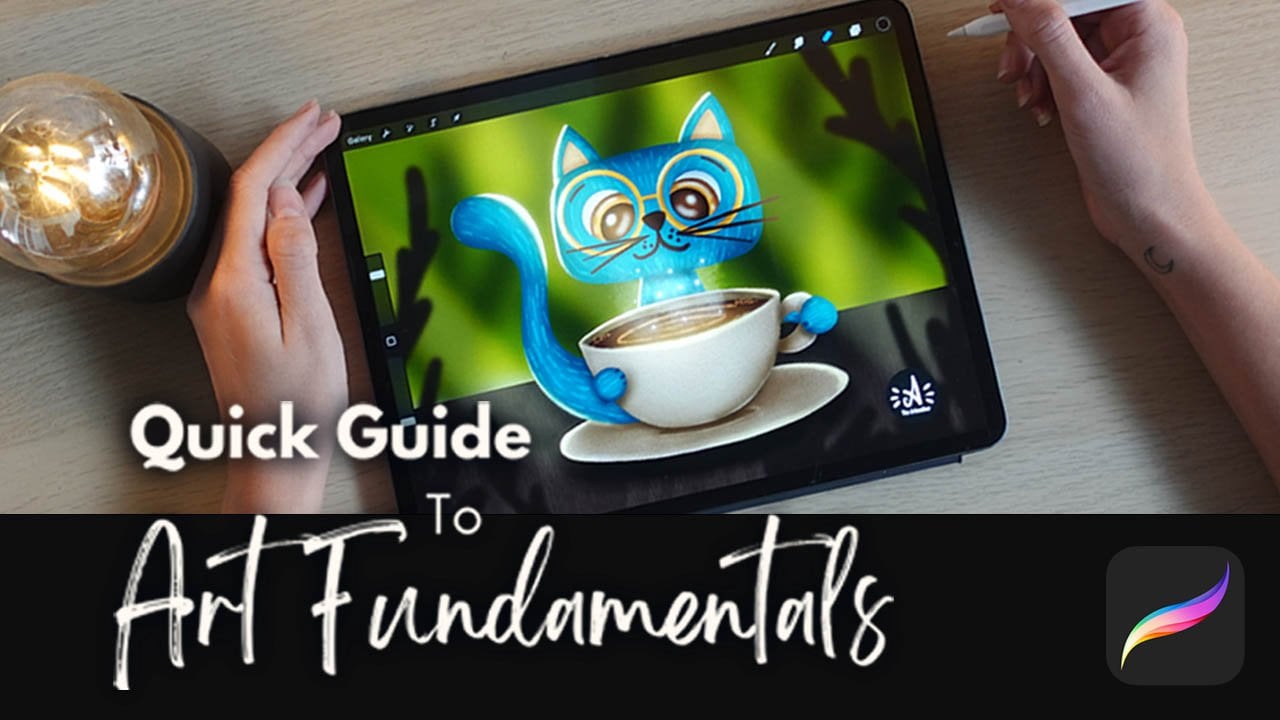
Transcripts
1. Introduction: [MUSIC] What makes things cute? Well, this is the
question that we are going to answer in this class. Hi, my name is Alexandra, a.k.a. the art mother, I'm an artist and illustrator
and an online educator. In my illustration work, I create tons of cute stuff, but mostly cute characters. I have lots of classes on all
different kinds of topics from shading to even character
design but this time, I decided to focus on
the cuteness factor. In this class, we
are going to choose an animal, illustrate it, and apply this cuteness
factor so that you learn how to create the most adorable
character illustrations. As my superpower is making
complex topics easy, I made sure that this class is perfect fit for a beginner. If you are a person
who stops to say, "oh" to an illustration
like this, you are at the right place. You will only need your
ipad and Procreate to take your illustration
skills to the next level. After learning how
to stylize animals, apply the right proportions, you will also learn my personal illustration process that will allow you to create cute illustrations
like this with all the dabbed texture and character design
elements.So are you ready to make the world a
adore your illustrations, if yes, see you
inside the class.
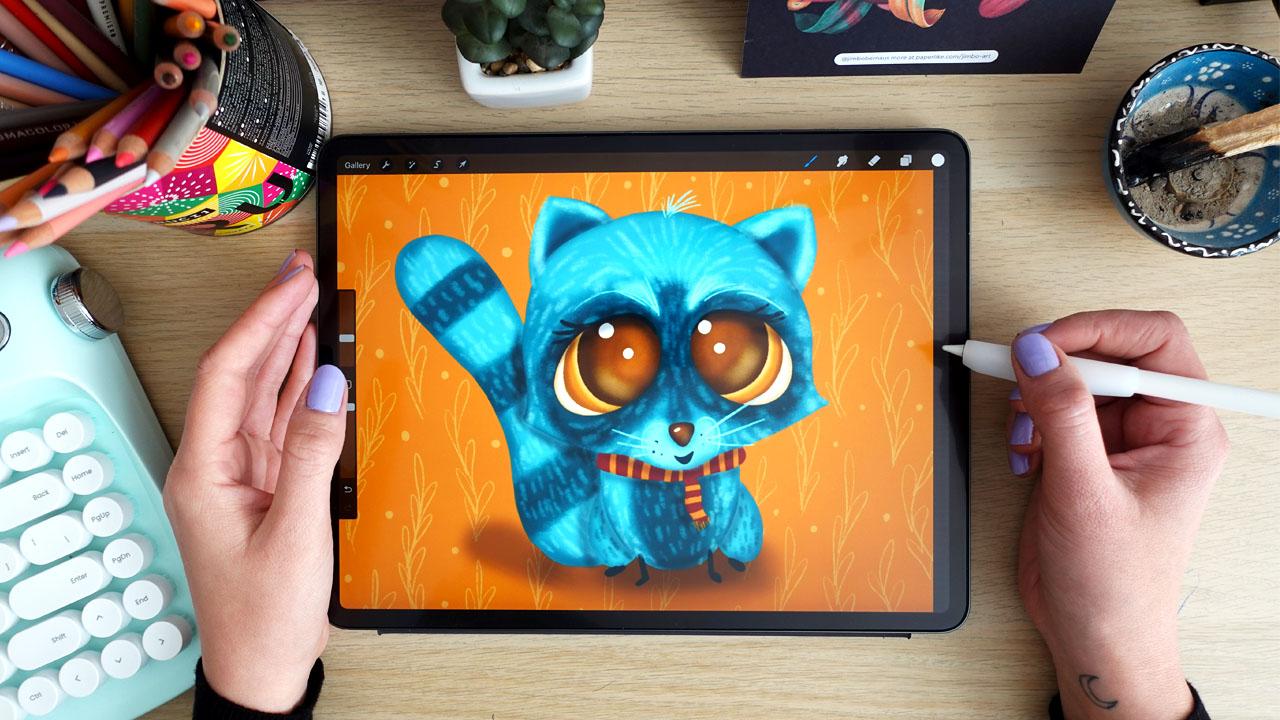
2. The Class Project: [MUSIC] Hello and
welcome to the class, I'm so happy to have you here. In this video, I'm going to talk to you about the class project, the class resources, and a little bit about the
structure of the class. Let's start with
the class project. We are going to create a
cute illustration like this. Yes, this is a raccoon, a blue raccoon [LAUGHTER] We're going to choose an animal, create an illustration from it by applying this
cuteness factor. Following the video
guidance and instructions, it will be really
easy don't worry. In the resources you will find the art matters
ultimate brush set that I have personally designed and has my favorite
brushes in it. There are six different brushes for six different
functions that we are going to explore during
the painting process. There are so many
amazing brushes that come with Procreate, so feel free to
use them as well. I'm not providing a
color palette right now because I'm
going to comment on my color choices during the
process and I want you to use your favorite colors and explore the color palettes that
are yours if you have. As you can see, I use a really unexpected
color combination like having a blue raccoon, if you don't like that stuff, you are totally free to use traditional colors for
your illustration. It doesn't influence
your class project, you are totally free to create a class project in your
illustration style, but follow along with me
because I'm sharing tons of important information even
during the painting process. Now, about the class structure, we're going to start by
choosing your reference photo and then we're going to stylize that photo into a rough sketch, we are going to apply the
cuteness factor to it, create a clean sketch
and illustrate it. As you can see, it is a very easy and
straightforward process that can be done in a few hours, so if you have a
few hours dedicated to it and go through
the whole process, because that will ensure that
you complete the class and I thought that you will be proud of your little cute
character at the end. At first, make sure to
download the brushes and prepare your iPad
and your Apple pencil. If you don't have
iPad and Procreate, you are free to
follow the class with any software or media but you will need to adjust
the steps for yourself. Basically in a design process, a sketching part can be done in a simple pencil
on a paper as well. If you have that courage, [LAUGHTER] you can
just come with us, so I'm super excited to
see what you create. See you in the next video
and let's dive deep into creating the cutest,
most adorable character.
3. What Makes Things Cute?: [MUSIC] We all know cute
things when we see them, but what makes things cute? The answer lies in biology. Babies are cute so that
we take care of them. I can say this from my
experience, this is true. My kids are cute and that's
very lucky for them. The physical traits of babies are features that we find cute, even when they show up on other
things like baby animals, cartoon characters,
or even cars. This is what the full Pixar
and Disney movies and animation movies are
built on, the cuteness. These features are
called Kindchenschema by the ethologist Konrad
Lorenz in 1949. What do we find cute? Big head relative to body size. Larger forehead, large eyes, round cheeks, small
chin, and small nose. Now let's take a
look on this cat. The baby features are in it. There is this proportional thing that the head is giant
and the body is small. There are the large eyes. The big forehead is
not applying here, but it would make
it cute if the eyes were a bit smaller or in
a different composition. Then the nose is small. It doesn't have a chin, but you don't need to
apply all these features. It is also good if you
have some of them, and that will automatically
make your art very cute. Now let's get to
drawing cute things. Generally in drawing, we have shape language that helps us
to communicate our ideas. When drawing cute things, we use lots of round
shapes and curves. Let's just take a look
on the shape language in this cute cat. If you want to break down to basic geometric shapes,
you have rectangle, you have triangles here, you have circles, but
everything is curved. If you take a look on the ears, it is not pointy, it is curved. If you take a look at
this rectangular head, it is also curved. Maybe this tail is a
little bit pointy, but if I zoom in, it is curved, so there are no edges,
no pointy parts. It makes it really cute. Even the nose, as you can
see it as a triangle. What do we need to do? Let's just do a little recap
on what do we need to do. We need to add baby
features to our animals. Big head and small body, large eyes, small nose. In shape language, we need to make everything
rounded, every shape. Now that we have an idea, what makes things cute and how to communicate this
through drawing, let's see some real cuteness in the reference photos
in the next video.
4. Observing Reference Photos: In this video, we are going to go through some reference photos and choose an animal we
are going to illustrate. The website I like to use
for this is Unsplash. Go to unsplash.com, write animal to
the search bar and let's look for the
perfect photo. First, let me explain what photos are
really looking for. As we are doing this
for the first time, we want it to be easy. Think in 2D, we
are going to make our little animal 3D
with shading later. But now, think about basic geometric shapes and
look for front-facing photos, and also look for mammals, birds and fish can be
interesting subjects too. But now we are looking
for fluffy, cute animals. In short, front-facing furry animals and let's
see the circles, triangles and
rectangles in them. I just see a front-facing
photo right away. Here is this tiger.
It is really cute. Lets just talk about the
shapes we see in it. We can see the
circle for the head. There are triangles, and also see this triangle in the middle that can
be really rounded. Also see the features that you can make this animal
recognizable. Because we will really
need that animal to be the animal it is
if that makes sense. Also take a look on the eyes. What color are they and
what shape are they. Try to find animals that
are attractive to you. They're cute for you. Let's just go
further [LAUGHTER]. This raccoon is so
cute. Oh my God. Just look at it. Again we can see
the circle here. We can see curves,
triangles here, and also this feature of the
nose is like totally cool. What I'm going to
do is to continue. Oh yes and also
check out the body. If you can make it smaller, I think it would work really
well with this raccoon. This giraffe is funny, but it's not facing front. Oh, this puppy is cute. Oh these fox is cute as well. Just check out the basic shape of his head is a triangle, there are lots of
triangles because the fox is not the cute animal. How funny nature is [LAUGHTER]. But it can be done to be
cute or made to be cute. Here is a tiger again. Oh, this monkey. Oh my God. [LAUGHTER] This shape
is so fun and ears and this shape and feature in the
front it's all really cool. And the eyes are already giant. What do I see? Oh, this red panda. Oh my God. [LAUGHTER]
This is super super cool. It has an oval shaped head, the round little nose
and the eyes and ears. This would be really easy
to make to a cute animal. What your task is now to go for images like see this cuteness and think in 2D and find
features that you like, like grab an animal. I think I will go
for the raccoon. Because this is really
cute [LAUGHTER]. What you can do is
to screenshot it [NOISE] or download
it to your iPad. This is free to use under
the Unsplash license. Using reference photos
is not cheating. If you don't have the
experience of lot of drawing of animals or objects
or still lives, it is very recommended to
use reference photos and use those to create your artworks
and series here with us. [LAUGHTER] See you in the
next video where we are going to stylize and draw these basic geometric
shapes that we have just observed and create a base for
our sketch. See you there.
5. Stylizing The Animal: [MUSIC] In this video, we're
going to do the stylization. Create a new screen
sized Canvas, and what I'm going
to do is to hit the orange button and in the Canvas menu you
have the reference, hit that, and you
can import an image. Now, I have this in my reference
photo we place it here, and I will zoom in a little bit. Make sure to choose
from the brush set the sketching pencil. Choose black or any color
that you like and let's just stylize the whole animal. The head is an oval, and I will just draw an
oval shape approximately. What I'm going to do is to basically just place in at first the main geometric shapes. I have an ear here, I have an ear here like this. We have the nose down here and the lips here and we
will have the eyes, I will just roughly place them. Here is one eye, here is one eye, here is nose down here
and here is the shape of the nose, and it comes up here. I have a shape
here for the eyes, like this, I have a shape here. Approximately where
the ear starts, I'll erase this line here. I just roughly
placed the shapes. Now, let's see the body. I will make the body like this, what Taylor raccoon
has, I don't know. Like this, I will
research the tail. I will go to Google, He has a philosophy body with these little [LAUGHTER]
hands or legs. I will keep that in mind. I will make this like this, and maybe add this little hands and add tail maybe like this. It doesn't really look
good right now, right? [LAUGHTER] But now
we have a base. What I want from you
now is to import your reference photo
and just place these basic geometric
shapes and curves and create a very rough
sketch of your animal. [MUSIC] In the next video, we're going to see how we can draw and illustrate
features that are cute. I'll see you there [MUSIC].
6. Drawing Cute Features: [MUSIC] There are so
many ways to draw eyes. In this class, I'm showing
you how I am doing it, but if you have your way, feel free to implement
it into your artwork. I already started
to draw in here, so it can be this
small, this eye. But as we talked about, making these eyes big, let just erase them. But as you can see, the angle is also important. So let's try to make eyes big. But in the similar shape that
the animal has its size. It will be something like this. I will add an eye iris here. It will be the inner shape
and the pupil as well. Let's see if it has a pupil. It doesn't really have one, but we can definitely
add the pupil. We have free shapes
in the eyes now. Now we also talked about
making the nose small. I will just maybe go with the selection tool and just grab this one
and make it small. So this nose is small. Maybe we can make the
whole shape small. This allows me to add
even bigger eyes. So let me try that. Okay, maybe this is just tubing. Let's continue this like this. This is the continuation of
that shape below the eyes. I mean, this shape here. Okay, I will add some white. I also add a little
reflection down here, and approximately place
these reflections in the eyes just
to the same part. I usually add just
little shape down here to add a little
reflection to it. Now let's see the body parts. The proportions of the
body is smaller, right? I will just grab this body
and make it small like this. Okay, it starts to
look cute and detail. It doesn't necessarily
have to be smaller. But let's try to add it into it. What I miss is the back legs. I will add the shape here to include them. There is this darker
part in the middle. I will just add as well. I have kind of recoup. All right, cute. So we stylized the artwork. We now added cute
features like big eyes, small nose, and the
body proportion. Now let's move to
the next video where we're going to create
a clean sketch.
7. Creating a Clean Sketch: [MUSIC] It's time to
create a clean sketch. What I'm going to do is to
dismiss the reference photo. I will just turn it off. Place my little
sketch to the middle. Don't worry, I know it now
it looks a little scary. But what I'm going to
do is to create a layer above and lower the opacity of this layer that
I had just drawn. I will try to create
a clean sketch. I will proceed with small, short lines to find
the best angles. I will maybe try to add some other details that will make the artwork
look really cute. I am going to speed this up
so that I don't bore you. But keep your eye
on what I'm doing, maybe you will get some
tips from that [MUSIC] [LAUGHTER] I think
it is so cute. I will turn off
the sketch below, and as you can see, I am almost finished. I will just adjust
this head part. What I've done is that I have
found while I was drawing, this had too much of an ellipse I added this as if
it was like fur so I will implement fur into it. I have decided to
add a little mouth. We haven't talked about mouth. Mouth because usually you just
can't see it on an animal. You can add little
mouth like this. When I need to do here
as well as to simplify this shape that comes from the nose so that the
eyes don't touch it. It was a little bit
too complicated. I'm just adjusting
it a little bit. I think it's really cute. Let me show you the cat again. Here what I've done with
the mouth part as just simply drawing these two
lines here and that's all. The reason I'm not paying
too much attention to the mouth is that I don't want to grab the viewer's
attention from the animal and the other
features like the big eyes from. It is good if it's
just a little line or even if it doesn't
even have a mouth. You can even draw a little bit more
complicated mouth like this. It is totally okay. Let me just try it
[MUSIC] Really nice. See you in the next
video where we can make this cute little
illustration even cuter with some little character
design elements.
8. Painting The Shapes: [MUSIC] Now, something very
exciting is going to happen. We're going to start
painting the shapes. Now, when the
illustration technique that I'm going to show you, I'm working in layers. Not everyone works in layers, but I love to use layers
because it allows me so much and what I love to
do is to divide my illustration into
different parts. Now, this little guy is
going to have four layers. One layer for the hat, one layer for the ears, one for the front body, maybe the legs behind will be in the same layer as the
ears, and then details. These are the four main layers, and I will add more layers
to these basic shapes. In this video, I'm
just going to fill in these shapes and I will
just show you how. The first thing
I'm going to do is to set my background
color to gray. This allows me to see
my colors better and it already sets a starting
point for my values. Then the next thing is to lower the opacity of this sketch and create a new layer below it. Now, you have my
favorite brush set with the most important
brushes that I use in my illustrations and I will
work with the clean shaper. I will just show you, I can choose a color here. It has very, very little
texture at the edges and it is just enough to have
a clean shape, but still have this
little painterly look. I will choose the color
for my little guy. If we go back to the cat, [LAUGHTER] it is a pink cat. For this base shapes, I need to choose a base color
that I'm going to go with. I think this raccoon will
look good with a teal color. I'm just going to choose that. You are free to
choose any color. Make sure that it is at this
area of the color wheel. It is not too saturated,
not too dark, but somewhere here and it
can be any hue that you wish to create your
little animal in. I want this really to be an illustrative
artwork so you don't necessarily need to follow the real colors of the
animal that you have chosen. I will go back to this teal. I have my clean shaper, I have the midtones, so the middle range color
and I have my layer, then I'm going to draw one. I will paste it
below the sketch, and I will just start
with the first shape, and that is the
shape of the hat. Now, I can see that I cannot
see too much this midtone. As I set the background
color to a midtone. This is my mistake because usually I set it a
little bit lighter. Now set it either lighter
or a little bit darker. I will set it a little
bit lighter now. Now I can see my shapes. I love art, so pass
it a little bit more. [MUSIC] Now I will create a layer below it and
just do the front body. [MUSIC] I will create
a layer again below, and now I will add the
ears and the two legs. [MUSIC] Now the tail. [MUSIC] Super cool. Now, we are going to continue
with the shading and I'm going to show you that
under shading technique. [MUSIC] See you
in the next video where you can learn
all about that.
9. The "Undershading" Method: [MUSIC] In this video, we are
going to shade our shapes and we're going to talk about the under-shading
technique. Now the other shading
technique is very easy. It will give basic dimension to our shapes and it will
be covered with texture. You will not need to shade
the texture itself because this under-shading will create the effect that it
is in shadow too. Let me just show you this
little cat again as an example. I have shaded right into the shapes but if you
see individual shapes, let me show you they
are shaded below the texture and the
texture adds variations. The layer of the texture will
create the texture itself. That's a logical. It will add light because it
will be in a lighter color. Shading will add color variation and adds dimension
at the same time. I will show you what I'm
talking about just in a second. I will need color for shading. The easiest way is to choose the darker value
of the same color. I will just grab
it to this part or this area of this color wheel. Simply just choose a darker
version of the color and choose the shader
brush from my brush set. Any brush, mainly
airbrushes will work well. Any brush that is
textured and a pressure sensitive and has transparency
will work very well. I will choose the
layer of the head and actually Alpha
Lock all these layers. As you can see, let me
show you at this part. If I'm adding shading here
to the sides of this shape, it will add dimension
already but keep in mind, we will need to add a little gradation to it
to create dimensions. Everything is rounded
in this illustration. When we are shading
rounded shapes, we are shading with gradation. If we have a sphere, for example, or a circle, we made a sphere from it if
we add shadows to the edges. In this illustration, we
are not setting light. If you wish to set
light so that for example the light direction
is from this part, you need to keep this
part of the hat, the original color, and just place these shadows
to the other side but you need to keep in mind to
do that in every body part. That is a little
bit more advanced. If you are a very beginner, just do what I'm doing. I will just push it a little
bit at the outside of the shape to add this
smooth gradation. As these brushes pressure sensitive if you push
a little harder, it forgets a little bit darker. But if you are doing
this really smoothly, you can create this
smooth gradation. To enhance it, you can get
back the original color and very smoothly at the
edges of this shading, just got back from it. It immediately added some
texture into the shape. Now what I love to do is to add shadows to the shape of the eye. I will make it a
little bit smaller. The reason is because it is another element in the head and it will have a
little bit of shadow. It will help me with the
placement of the eye as well. It will look more natural if
you add it into these holes. Think of it as if
we were building up this little guy here. Now, I just tried to imagine the colors the raccoon
had in his head. Now I will just get back
this reference photo. This part at the eyes is darker. This hole is a
little bit darker. This shape about the
head is lighter. We are going to work on
it in with the texture, but we can help to it
with shading already. I'm going to just shade a little bit this part of
the head around the eyes. This shape here. Maybe this as well. I can see the shapes that I
have drawn here like this. Get back this original color and just make this part a
little bit lighter. Maybe I will lower the opacity
and already paint into it, I will make this middle
part a little bit darker. I will work on it with
the textures later. This is lighter,
this is lighter, and this part up here
will be lighter here. Can you see how much of
variation we already have in this illustration? Pretty nice. Let's move on to the body. I will go with
this dark version. I will just shade around. I will darken this inside part
of the body a little bit. Then I will go to the ears. I will shade the outside
part of the shape and add this dark shadow inside
the ear and here as well. At the legs, I will
just shade around it. I will go to the tail
and do the same. Just go around with this shadow. If you don't want to
add these darker parts, you are free to do
so that will maybe make your artwork a
little bit more easier. Just do the basic shading
thing as I've done a detail. I'll just shade
around the shape. Just simply. I will turn
off the reference again. Now in the next video, [MUSIC] I'm just going
to add the eyes so that it is not that scary. Then we're going to add texture. I'll see you in the next video.
10. Painting the Eyes: Let's just create the eyes. There will be the most important part
of this illustration. I will grab a little yellowish
light color like this. I will create a color
palette for you so that you have these colors. We'll just place it in here, and I'll just add this into it. I have this light yellowish
color and for the eyes, I will use the texture shaper. That texture shaper is
similar to the clean shaper, but it has a little bit
more texture in it. I am on a new layer and I will just make the base
shape of the eye. [MUSIC] This already looks really nice. I will just adjust it
a little bit more. When you are doing like
grabbing back from the shape that you are
actually creating, make sure that your
eraser is set to the same brush that
you are using. Oh my God. [LAUGHTER]
This is so cute. What I'm going to
do is to create another layer and make
it a clipping mask. What a clipping mask does, is that it clips the layer
into the shape below it. I'm going to be able to
draw only in today's eyes. I think that his eyes will
be this brownish color. Again, I will choose this
orangey-brown color. Maybe a little bit more orangey, yes, and shade with
the darker version. I will choose a texture
brush and I will fill in this second shape
within this first shape. I will make it a
little bit bigger. [MUSIC] Oh my God,
this is so cute. Let's just add a little
shading to these too as well. What I'm going to do is to keep this color and go
to the main shape and choose the shader and
make it a little bit smaller. Just again, oops, I will need to alpha lock desk and just add a little bit of shading around this
yellowish color. But maybe it darker. I will make it a
little bit darker. Alpha lock I said. Just a little bit, it
will add a little bit of variation into the color. It will not seem flat. To the iris as well, I will go even darker. Go to the iris and
alpha-lock it, and add a little bit
of shading around. Now what I want to show you is that with
the shader brush, we can not just shade, but add light as well. I will go to the
very light color, but maybe a little bit
more saturated here. By following this inner pupil, just add a little bit of light. Like this. It will again add to
the color variation. Cute. I will adjust
the shading here a little, really nice. Now, create another
layer, again, make it a clipping mask, and choose the very, very dark brown and
that will be the pupil. I will go back to the
texture shaper again. [MUSIC] [LAUGHTER]
This is beautiful. Let's just add the light. I will choose the white
and the clean shaper add this little light
onto a new layer. Cute. Going back to this shader, and to this light color and I will make it a little
bit bigger and just add this reflection into it. Like this. You can create variations within the eye
color till to the pupil, you can add some cool stuff, like maybe a little bit of this hazel color into the
middle [inaudible] like, again, has more variation
and reflections. Now I'm in the layer
of the pupil and just adding a little
bit of color inside it. But can you see this? This is super cute. Now we have the eyes ready. See you in the next video
where we're going to play with the texture.
11. Adding Texture: [MUSIC] In this video,
we're going to add textures to our illustration. Now, what we need at first is the texturizer brush that you can find in the brush set. We will need to create a new layer below the eyes
because we are not going to add texture to the
eyes but below them. Now I'm going to call my
reference photo for help again. What I'm going to
do is to choose these all lightest parts and the darkest parts and add them in the face with
the texturizer here. I have the texturizer and I
choose a really dark color, a little bit darker
than the shading was. I will make it a
little bit bigger I will enhance this shape around the eyes with this dark color. Make it even darker. [MUSIC] A little bit enhancing the shading
that we already done. Now I will choose a lighter
version of the main color. I'll add this shape
around the nose. Don't worry we will
add the nose soon. I will add this shape here. I will add a bit of this here. Now what I'm going to do
is to create the fur. Now, this texturizer brush
can function in two ways. If you push harder, you get a big texture. I will put this side. If I want to add
texture to the whole, I can just do this but
if I want small lines, I can just not
push it that much. What I'm going to do is
to speed this up now. I will just add little fur lines like this
to these lighter parts, and choose a darker
version of the color. A little bit as the
original color was, but maybe just a
little bit darker and add lines where I
have these shadows. I will just show you the cat again to show you how
I've done it here. I've just chosen a
really light color and done this to
the whole image. This is what I'm
going to do here, but add a little variation by playing with these
light and dark parts. I will turn off this
reference photo again and just continue
adding these lines. [MUSIC] When it
comes to the tail, we have to add the
stripes at it. I will just go into the tail, choose this darker version, and actually with the
texturizer we can just add these stripes. It is good that it is textured. It has a little bit
of transparency. If you can see it already
has that shading, the under-shading
that we have done. Above that, I will go back to the textures and
just again exchange it and add this little fur
with one color then another. [MUSIC] Cool. How nice it is. In the next video, I'm
going to add some details; the nose and the mouth, the legs, and the
scarf. See you there.
12. Crafting Details: [MUSIC] This is going
to be another fun part. We are going to
add the props and details to it to
make it even nicer. I will create a new layer and
I will start with the nose. What color the nose will be? I thought it would be
good to have it brown, so that there is something
brown as well in the nose. I will choose this
darker brown for it, and I will choose
the clean shaper. I will just add this
little shape here, and I will try to make it
as perfect as possible. Nice rounded triangle. It can be an oval,
anything you like. If you have noticed, I'm not exactly
following the sketch. I'm just trying to little
bit get it loser and adjust things as I feel and not strictly follow this
sketch This is cute. I will Alpha Lock it actually, I will go even darker, grab the shader
and make it small, and shade around this
shape a little bit bigger. With this lighter one, I will add a little bit of a light and with this
even lighter one, I will make it small, and add this cute
little light here. Maybe here as well. This is really nice, and I will choose the sketching pencil and I
will add some details with it. I can create a new layer, and I will add the
mouth, like this. I can even add lines to enhance things so maybe this
shape. Let me see. No. Maybe I should
add it with a light. Let me see. Yeah, it looks good. I will enhance this shape of
the nose with this light. I will add few lines here
at the eyebrow, like this. I don't like this line, so I will adjust it, like this. I can add dots there. Let me erase a little
bit like this. I will add with this dark blue, some dots here and there. I will add eyelashes, and let me see if it works. What is really dark or
if I should go with this really light? Let me see. This light works better
because it can be seen. Maybe adding these eyelashes, [LAUGHTER] will make it
even cuter, really nice. I can add little fur to the top, whiskers, are really cute. I will actually turn off
the sketch so that I can see better what I've done here. I am not very satisfied
with the nose, so I will adjust its
shape a little bit and actually turn it a
little bit like this. Very cute, oh my God, [LAUGHTER] this is beautiful. I think I need to darken
this in the middle to add a little bit more
contrast to it. Let me just do that. [MUSIC] Let's add the scarf. I will create a new layer, and I will choose a reddish burgundy
color, like this. Maybe a bit more saturated one, and I will just go
with a texture shaper. Turn back on this sketch
and just add to it. I will place it below the head, so it is easier to work with it. [MUSIC] I will Alpha Lock it and choose
this orangey color, and with the texture shaper, I will add some stripes. This looks like a Harry Potter colored
scarf. It doesn't matter. I will Alpha Lock it and
with the sketching pencil, I will just add these
little parts of the scarf. Really cute, oh my God, and what is missing are the legs so I will
create another layer. Choose this very dark. With the texture shaper, I will adjust add the legs. I will change the color of
these eyelashes to this very dark blue because it looks better to me now. Everyone can make mistakes. [LAUGHTER] See you in the next video where
we're going to talk about the mystery of drop shadows.
13. The Mystery Of Dropshadows: [MUSIC] What are drop
shadows good for? Now drop shadows are everywhere. If I just place my two
fingers like this, you can see this line
it is a drop shadow. It is called inclusion. It is basically everywhere, I have a wonderful brush, the drop shadow brush
here that you can choose. Now, choose black, now go up to the top
and create a top layer. Now we're going to add
shadows everywhere. Makes sure that the opacity
is at the half approximately, and it is approximately
the size eight. We are going to place a drop
shadow where things touch. For example, at these ears, then to the eyeballs like this, I'm placing two layers to make it a little bit darker as this brush works like this, it gets darker the more
layers to put on each other. Now, I will add a little
shadow below the nose, maybe below the cheek, little bit below
the eye like this. Then below the head, I will place two of them here. Below the scarf, appoximately follow the
shape of this curve. I will add below the whole body. Then where these legs
are, maybe here, don't worry we will blur
these shadows together, so it will be not
that distracting. Then add a little
shadow behind the head, where there is the
head and the tail, and the body and the legs. Like this. Now I will go to adjustments
and gaussian blur. These are not sharp, these are really nicely
blended little shadows, as you can see, it already added such a nice free
dimension to our artwork. Now I'm going to create
another layer below, with all here, I will turn off the sketch, don't need it anymore. I will make the brush
a little bit bigger. I will make circles
below my Leila raccoon. Maybe a little bit here
where the tail is, and I will again,
gaussian blur it. I have a totally cool drop
shadow below my record. Now he is in space, I love it so much. Maybe I will blur this
part of the shadow. So it's not that harsh. gaussian blur a little
bit again wonderful. This is what is incredible
about drop shadows. They are totally simple, you only need a
transparent brush and transparent layer of black, and you just go some
blurry and you have a smooth gradation, nice brush. You have dimension,
extra dimension, and you have already
space in your character. It is like a few seconds step, this is really a pro tip [MUSIC] to see you
in the next video, where we're going to add
a little background and then we are going to be
finished so see you.
14. An Easy-Peasy Background: [MUSIC] In this video
we are going to add a little background
to our character. What I'm going to
do is to select all the layers that I have here. Make sure you have all
layers and then group them. This way you can
just turn it on and off and select and make it smaller and maybe place into the middle of your Canvas. Now, think about what you
are illustrating for. If it is for Instagram,
for example, you can just take this into another Canvas and place it into it and add a
background to it. Let me just show you
how I would do that. I will create a
square-sized Canvas. I will go back and just
duplicate this new group. Now I flatten it. This means I have a simple
single layer that I'm just going to grab
and place it here. Wow, [LAUGHTER] so nice. I will make it a
little bit bigger. Now we can play with
the background color. We had it gray, but you can have a
different color. Think about what would fit
your illustration the best. Would it be this orange color? For me, it is an
absolute yes because it fits my illustration
for pretty well. I will make my
raccoon a bit bigger. Wonderful. What I love to implement to my artworks
are little patterns. I will create a layer
below this character, choose a lighter
version of this color, and grab my sketching pencil, and I will think about pattern
that I can add into it. If you have some stamp brushes, you can use those. I love to add random
patterns to my background, so it is really a
handmade things. I'm going to speed this up. I'm going to experiment
a little later. [MUSIC] Last thing I love to create as adding my
logo to my artworks. I will just go to my
previous artwork and just hold down and just
insert my logo here. It's there. Finished.
It is finished, so what do you think? I am super excited to see what
you create in this class, and see you in the last
video where we're going to do a little recap on
what you have learned. I just can't wait
to see how cute is. I'll see you in the last video.
15. Final Thoughts: [MUSIC] Congratulations, if
you are watching this video, it means that you have gone
through all the process. Now, you are ready to upload your class project into
the project gallery. I really want you to do so
because I am so excited to see what you create and you
get feedback from me. I also invite you to check out what others done in the class. Give each other
feedback as well. It would be really great to have a little conversation
on what was easy, what was hard, etc. Feel free to share your thoughts also in
your class project. If you are sharing your
artwork on social media, make sure to tag me
as the artmother. Also follow me on social media, on Instagram and Facebook, and also here on
Skillshare so that you get notified about
the latest classes, challenges and announcements, and also leave a review
for the class so that I know what you think about
it and so that others can see if the class is
a good fit for them. Now, let's just do a little recap on what we
have learned in this class. In this class you have learned
how to stylize an animal, how to apply the
cuteness factor to the proportions to
make a character cute. You have learned an
illustration process with the other
shading technique and applying textures and creating light reflections in the eye, we solve the mystery of
drop shadows and created a full illustration of a
character on a background. [LAUGHTER] I hope
that you enjoyed the class and you are welcome
in my other classes too. I'm always so happy to
see a student in more of my classes as I can
see their progress. You guys are so amazing. I love that you do this class
projects and oh my God, you are so creative. See you in my other
classes and I wish you all the best and
happy creating. [MUSIC]
 The Artmother, Professional Art Teacher and Artist