Transcripts
1. Introduction to the Class: Well, hi there. I'm
Stacey Bloomfield, and I'm so glad
that you're here. If you're a traditional artist or someone who likes to doodle, even if you've never made art before, well, you're
in the right place. Let me ask you a few questions. Have you ever wished
your creative process could be a little bit
faster or more forgiving? Do you get frustrated
when your materials don't cooperate like that one time your paint splashed on your
nearly finished piece of art? Ugh. Don't you wish that you had a magic wand that would
make it all disappear? Maybe you've seen
people using apps like Procreate online and you
thought, Well, that looks cool. But is it digital art
kind of complicated? Well, I've got the
solution for you. In this mini course, I will share with you all
that you need to know to get started with my favorite current
art creation tool, which is Procreate.
Hi, everybody. I'm Stacy Bloomfield,
and I'm an artist, an illustrator, the owner of gingerber. I've written books. I teach people about art and
making money with their art, and I'm here today because I want to help you create
art that you love. 16 years ago, I was fresh out
of college. I had a baby. I was newly married, and I
wasn't working as an artist, but I desperately wanted to. I opened an Etsy
store on a whim, I side hustled in
the margins of life, and little by little, I started making artwork that I loved and other
people loved, too. Little afterwor side
hustle Gingerber has grown from something I worked on 5 hours a week
into my full time career. I get to work with
other companies and collaborate putting my art on their products through
art licensing, and I sometimes
wonder where I would have been if I hadn't
just started drawing. But the truth is, it was
really hard to make that art. For years, I worked exclusively
with traditional tools, pens and pencils and sketching. Sometimes I would
have to scan my artwork into my computer. I would upload it into
Adobe Illustrator. I wish my digital
illustrations had more of a natural hand drawn
with Illustrator, everything felt really flat. And when I began gingerber, I started selling my artwork
on products like Te towel, stationery, even pillows, and I realized I
would love a faster, more flexible way to create. That's why I was
so thrilled when years later, Procreate came out. I was so excited to have a new way to create
the vision in my head. Procreate has everything
I ever needed. It's intuitive
enough so that I can learn quickly how to
use it. It's efficient. Features like layers or the
undo button mean you can experiment fearlessly and work faster than ever before.
And the best part? Well, it's all on your iPad. So why should you
consider Procreate? Procreate is
incredibly intuitive. Even if you've never
worked digitally, you'll find it easy
to dive in and use, and I'll give you a step
by step starter guide. It's super versatile. Whether you're sketching, you
want to replicate painting. It works for fine artists, surface pattern designers, hand letterers and even
illustrators like me. Procreate is accessible
and efficient. It's like a full
studio condensed into one little
portable, intuitive app. If you have an iPad, you can sketch, you can paint, you can draw, you
can illustrate. You can even create
repeat patterns, write and procreate and easily upload that artwork directly into platforms like Spoonflower, Redbubble, or any other
Print on Demand platform, it eliminates so many steps. I've created tons of
illustrations and patterns, write in Procret and some of
my most successful artwork. Well, it's in my iPad. And the best part, it still
feels like I'm drawing by hand and my old style and new style have
merged seamlessly. You can create from
anywhere on your couch at a coffee shop or even sitting in the damp
grass in Scotland. True story. What's more? Procreate gives you
access to a range of tools that cost you hundreds of dollars
in traditional media. You have countless brushes, a variety of textures. You can even create time lapse
recordings of your work. It's like having a whole art
supply store in your lap. You can correct those
little boo boos. The back button is
what artists love. Your artwork is already in a digital format when you
create and Procreate. Even if you do have
traditional art, you can scan it
into Procreate and the Procreate will help you to clean up the artwork
super easily. It's efficient. Procreate
saves you time. You can sketch out your
ideas, refine your details, and create professional
quality artwork that's ready to produce
all in one place. No more juggling, paper and paints and scanners,
all the things. Do it all in Procreate. In this mini course,
I want to share this process with you so that
at the end of Lesson three, you feel comfortable with using the Procreate app for your
own artwork. Are you ready? Now let's skip to the
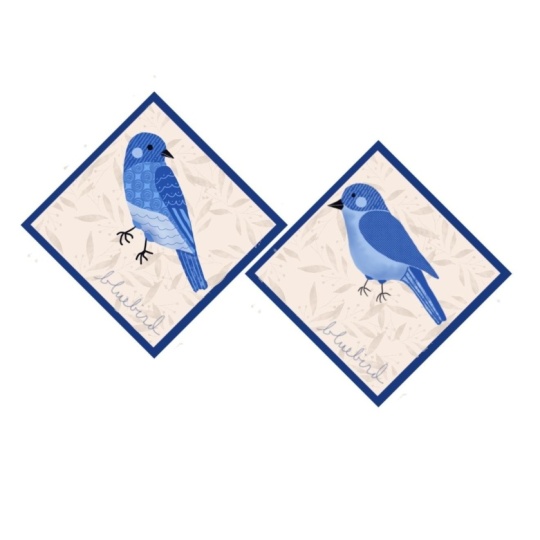
fun part making art. By the end of this class, you'll have created a cute
bluebird illustration. As a part of this draw in
your own style project. D and
2. Lesson 1: Getting Started in Procreate: Canvas Setup & Reference Photos: Today, we'll start by setting up your Procreate Canvas and
adding in a reference photo. Two foundational
skills that will make your digital art Start
journey so much smoother. Why use reference photos? Well, using reference photos
is one of the best ways to inspire your artwork and ensure your illustrations feel
grounded in reality, especially when you're drawing something specific
like a bluebird. But here's an important tip. Make sure. I mean, make sure your reference images
are legal to use. Avoid just grabbing
a picture off of Google as they're
often copywritten. Instead, here are a few places
where you can find free, high quality reference photos. Unsplash, Pixaba and Pexels. For our Bluebird project, I've chosen a reference
photo for you, but please feel free to find one that speaks
more to your style. Once you have your image,
here's how you're going to set up your canvas and bring
it all into Procreate. This is a crucial step if you want your artwork
to look great, whether you're sharing it
online with your friends and family or you're going to print it out and put
it on a product. Open your Procreate and
start a new canvas. I recommend starting
with a 3,000 by 3,000 pixels Canvas at 300 DPI. This canvas size gives you
plenty of space and layers and flexibility for maybe printing that artwork later
or resizing it smaller. Just a reminder,
you're working in pixels whenever you're
creating a Procreate, so you can make your
artwork smaller, but you cannot make it larger. That's why we start with
a big old Canvas size. Color profile. Use RGB for digital art or CMYK if you plan to
print your artwork. If your Procreate screen looks a little
different from mine, don't worry. That's
totally normal. Sometimes it depends on
the version of Procreate, your iPad model, or even the settings you've used
before. Here's what to do. For now, follow
along with what I'm doing and look for
a similar option. If you can't find something exactly to where
I'm pointing to, take a moment and
explore your app. And if you're ever stuck, just comment in the
discussion section. This is important. You cannot adjust your
Canvas resolution or color profile after your
Canvas has been created. So take your time
setting up your Canvas. There are two ways that you can add a reference
photo to Procreate. First, what you're
going to do is go to a source for your
reference image. In this example, Pixabay, and we're going to click
download to your iPad. I'm going to do the same thing for a second reference photo. I like to use multiple
reference photos so that my finished illustration doesn't look exactly like just
one specific photo. Find these two
reference photos to download in the
resources section. Back to your iPad. If you've downloaded your own
reference photo, it's time to go search
for that photo. So go to your iPad and
search for downloads, and I save the images
to my iPad directly. To do that, I tap on the image, click the Download button in
the upper right hand corner, and click Save Image. Now, my image is
saved to my iPad. I'm going to do
the same thing for my second downloaded
reference image. Once they're saved to my iPad, I'm going to go back to
my Procreate Canvas. And there are two ways
that I'm going to show you on how to bring in
your reference photos. First, I'm going to go to the Layers panel located in
the upper right hand corner. I'm going to click the text, and I'm going to rename
it reference Photo layer. Now, tap the wrench icon in
the upper left hand corner, select insert a photo and
choose your reference image. And you can put your
Apple pencil on top of that image and move it
around like I am here. But whenever you
place your image, just note that if you were to drag it off of your canvas like I've done here and then try to pull it back
to your canvas, you'll notice that the
image is now cropped. So if you're going to place
a reference photo like this, make sure that the part of
your photo reference that you want to use stays
visible on your canvas. The second way to bring in a reference photo is to tap
that wrench icon again. Click the Canvas button,
and if you look down, you'll see a little reference toggle that you can toggle on. And when you do that, you'll
see a pop up come up. You can either take a
photo right there or select an image that's
already on your iPad. So in this case,
I'm going to click the second reference
image that we downloaded, and I'm
going to bring it in. The reference image is in
a little separate window, and using the reference tool, I can move my
reference image off of my Canvas so I have
more space to create. Now, you have your inspiration
right in your canvas. Let's start sketching. I find it helpful in a
sketching stage to have a grid to look at whenever
I am drawing my bird. So I'm going to show you how
to turn on your own grid. Click that wrench button again. It's the tool icon located in the upper left hand
corner of your screen, and look for drawing
guide and toggle it on. And by default, it
will turn on a grid. If you want to change
the color of your grid, click the edit drawing guide, and you can drag
your Apple pencil to select a different color. To change the color of your grid whenever
you're satisfied, click the Done button in the upper right hand
corner. Let's keep going. My favorite pencil brush
to sketch with is in the sketching brush library
called the six B pencil. This brush comes with Procreate. So now I'm drawing with
my six B pencil selected. Now it's time to
sketch the bird. What we focus on when
sketching anything is finding shapes and angles that we can recreate
on our grid. Keep these lines loose and
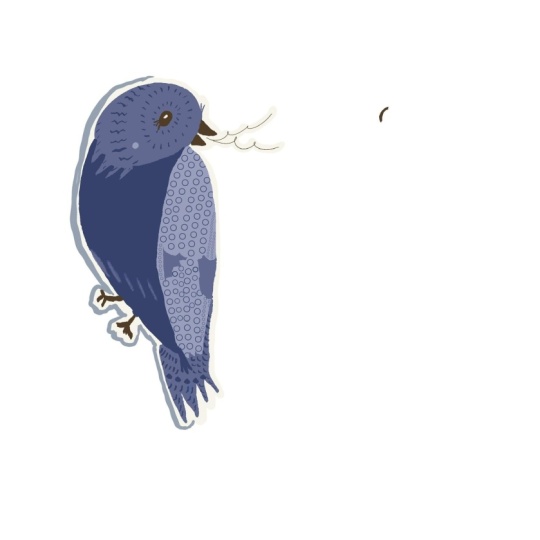
a little bit scribbly. I'm going to sketch my bird with my little birdie looking
over its shoulder. I have overlapping shapes for where I see the
chest of the bird. I'm not trying to recreate
a photographic drawing. I'm just trying to capture the essence and the
proportion of the bird, but don't worry if it
looks a little off. You're still going to
create something beautiful. Now I'm sketching the
wing, and below that, I'm going to try to sketch
some tail feathers, and they're a little bit short. I'm happy with this sketch, so I'm going to
create another layer to draw my other
reference photo. I'm going to go back
to the layers panel, and I'm going to create
a brand new layer and I'm going to label it. To rename it, I'm going
to tap layer three, and at the top, you'll
see the rename button. A little keypad will show up and I will type in
the name of my layer. I like to keep all of my
drawings on different layers until I feel comfortable
moving forward with my design. So now you should have
two pencil sketch layers. So I'm going to work with
the other reference photo. And this birdie also has its head looking
over its shoulder. I'm going to start by
drawing its chest. This bird's head is
angled a little bit down. He's looking over the
corner of his shoulder. I kind of feel like his chest implies a little
heart in the middle. So I'm going to draw a heart, and I have to imagine where his legs are since they're
covered up by the branch. I drew my tail feathers, but they look quite long, so I want to resize just that part of my
drawing without erasing it. So to do this, I'm going to
use the handy Lasso tool, look at the top of your toolbar and find the S shaped selection. It looks like a
curved S or a rope. Tap it to open up that tool. Now draw a circle
around the area of your tail feathers
that you want to move. Now, to resize and move
that part of your tail, select the cursor button. It looks like a mouse pointer located next to your Lasso tool. Choose uniform at the bottom
of your screen and use your Apple pencil to tap inside your highlighted
lassoed area. And you can drag and move the part of your tail
feathers around. You can also resize your tail
feathers by grabbing one of the corner anchors on
the selected Lasot area. Now I'm going to hide one
of my reference images from the Layers panel by
clicking the checkbox off. It's important whenever
you're creating to hide your reference images often so that you're not
copying too closely. I like to hide my
reference images after these first sketches. This will allow you
to draw freely, and your illustration style
will begin to come out. Your assignment
for this lesson is to download or choose
your reference photo. You can use mind or on your own, and set up your canvas with a recommended size
and color profile. Then I want you to create a rough sketch of your
little bluebird. And the next lesson we'll dive deeper into
Procreate tools, explore brushes, and start
building on your sketch. I can't wait to see your
unique take on this project, and feel free to share your progress or ask questions
in the comments below. You've got this. Digital art doesn't have to be intimidating. It can be playful, exciting, and yes, even relaxing. I'll see you in Lesson too.
3. Lesson 2: Procreate Basics: Brushes, Layers & Color: Well, welcome back. I'm Stacey Bloomfield, and I'm so thrilled to have you here with
me for Lesson two. In today's lesson, we will
build on what you started in Lesson one by diving into
Procreate's core tools. When I first heard about
Procreate, I was skeptical. I wondered if I
would ever use it, but now it's my favorite
tool for creating art that's fun and to
put on products. If you've ever thought,
Can I really do this, then the answer is yes, and I'm here to show you how. By the end of this
lesson, you'll be familiar with brushes, layers, and color palettes. Plus, we'll even begin our
simple illustration together. Ready? Let's get started. Procreate tools you'll use for your Bluebird illustration. Layers panel. Layers let you
keep your work organized. We'll use separate layers for your sketch, for your outlines, for your colors so that you
can easily edit as needed. Layers let you work in
a non destructive way, meaning you can experiment. When you work in layers,
you're not going to put all of your colors
one on top of the other. Colors are going to go
on different layers. It allows you to easily edit each of the layers
without worrying about if you're going to mess
up an element that you've already drawn or something you don't
want to change. It also comes in super handy whenever you're trying
to, like I said, have separate color layers
and here's the brush library. Procreate comes with
amazing brushes from pencils to inks to
watercolors and textures. Plus, you can create or download custom brushes
that will fit your style. Platforms like Creative
Market or Etsy are filled with tons of different
Procreate brush options. The important thing, however, is that you don't need
to buy any new brushes. Procreate has so many
of them built in. You'll be just fine. I use the default brushes
in Procreate. Plus, all these brushes can be used for
commercial work, too. Last but not least,
the color tools. We have a color wheel a palette, and the ability to grab colors
directly from an image. It's a lifesaver when I'm
building cohesive collections of art or working within a certain color
palette for a client. Now, let's take your
sketch and move forward. If at any point you need to
pause this video, no problem. Click the button
in the lower left hand corner of the video player. Open up your drawing
from Lesson one, and let's get started. The first thing we're going
to do is turn off those grids in the back because
they distract me whenever I'm drawing. So click the wrench bar and the upper left hand corner
and go to Drawing Guide, and then toggle it off. And that will turn off our grid. Next, let's make
our color palette. Go to the palettes panel and tap the color wheel icon in the top right
corner of the screen. Switch to the palettes tab at the bottom of the color menu. Tap the plus icon at the
top of the palettes menu, select New from photos. This allows you to import an image from your
photo library. Procrit will automatically
analyze the photo and generate a custom color palette based on the colors
in this photo. Then you can tap the
untitled palette at the top of the new
palette area and rename it. Enter a name that represents your photo or the theme
for easy identification. If you'd like to
adjust the palette, you can manually add, delete, or rearrange colors. To use your palette, select your new palette as the active
palette by tapping on it. Now, whenever you draw, the colors in your
custom color palette will be available for easy use. Next, we're going to refine our sketches and create
a new ink layer. So I went ahead and
created a brand new layer above my pencil sketches
called Inking Outline Layer. Now I'm going to
select my brush. So tap on the brush
library icon. It's a paint brush symbol
at the top right corner. In the brush library, scroll down to the categories
on the left and tap inking. Choose a smooth inking brush, such as the studio pen, which is ideal for
clean outlines. Then before you start drawing, you can always adjust your brush size to make it bigger or smaller
to suit your style. So tap the size slider
on the left side of the screen to make the
brush tip larger or smaller. And if you don't like the
size that you've drawn, simply click the undo button, and you can erase what you've
just drawn and start again, adjust your slider
and keep drawing. I'm going to draw in black. So select the black
color from your palette. Now you're going to trace over your pencil sketch on your
inking outline layer. And sure you're working
on the new layer by checking to see that it's highlighted and
the layer's panel. Now we're going to start
drawing our bird's head. Start by redrawing a circle on your canvas and keep
your pen tip held down. Once you've completed
your circle, don't lift your Apple
pencil or stylus. Keep holding it
down on the canvas, and Procreate will
automatically smooth and adjust your free hand
circle into a quick shape, creating a more
polished, even shape. Now we're going to use
a cool little feature called the color
fill and procreate. Draw a new circle for your eyeball inside
the head of your bird. Then go find your color black in the upper right hand corner, tap and hold it and drag
it into your eye circle. Then release your finger or stylus inside that closed shape, and the shape will instantly
fill with a selected color. Now I'm going to
outline my beak. I like my bird
beaks to look like they are open and singing. Next, I want to rotate the
shape of my bird's head. So I'm going to tap the
move Transform tool. It looks like the arrow icon
at the top of your screen. I'm going to touch and
hold the blue rotation handle near the edge of
the shape's bounding box. Then while holding it down, I'm going to drag
my Apple pencil in a circular motion towards the
left to rotate the shape. The shape will
follow the movement of my pencil for
precise control. And now it's time to draw
the rest of your bird. For this, I want you to let
loose and have a little fun. We're not looking for
photographic perfection here. What I want you
to do is look for the common shapes in
your reference bird, and I want you to
try to recreate them just as fun and
loosely as you can. Well, now I want
to erase some of those lines that are in
the middle of my wing, so I'm going to go
to my eraser panel and select a new eraser brush. And just like with
the brush library, you could select different
brushes for your erasers, some that are bigger, smaller, smoother, rougher, whatever
your preference is. Now that I've shown you the
basics of inking and erasing, selecting your brush, how
to change your brush size, the undo button rotating, I'm focusing on the
outlines and the shapes, kind of like a coloring
page at this point. At the end, I'm going to
add some little feet. They don't need to be perfect. They just need to be gestural. And now that I've
outlined this bird, I'm going to do the
exact same thing for my other bird on a
different inking layer. And remember how we have
two reference photos? Well, I'm going to change
out my reference photos. So I'm going to go out over to my layers panel and unhide the other reference
photo that we placed. I'll do this by checking
the box on that layer. I'm going to use this image
to sketch my bird from. Then I'm going to hide
the reference photo that I placed using
my reference tool. Time to ink Birdie number two. Be sure you've selected
the right inking layer. Watch me do this real fast before we move on
to color layers. I like to keep everything
on separate layers, especially in the beginning
of my illustrations, while I'm still figuring out
the form of my illustration so that things can
be easily hidden if I don't want them
anymore or edited. All right. Now that I have some rough inking outlines
for both of my birds, I'm going to hide
my reference photo and not look at it for a while, because it's time to
let your imagination and intuition take over. With the layers panel open, I'm going to select
the two inking layers, and I'm going to use my Apple
pencil to swipe right for each additional layer until all selected layers are
highlighted in blue. Then I can use the select arrow icon at the
top of my screen to move all of my
layers together and re center my birds on my canvas. Now it's time to hide and
toggle off those pencil layers. There's a little check box
icon on each of those layers. I want you to uncheck it. And Gila, those pencil layers are hidden from your canvas. And let's keep going. Because we've been keeping
our layers tidy and titled, it's easy to go into
the layers panel and to create three
brand new layers. And these are going
to be used for color. Ya, rename each of
these layers color and put these layers behind
your inking outline layers. Now it's time to color. So select one of
the color layers and make sure it's highlighted blue before we get to work. Now open the color panel by clicking the upper
right hand circle and switch to the palettes tab and tap the color
that you want to use. The color should appear in the upper right hand
corner of your screen. Tap the brush library and select your studio
pen just like before, and let's start coloring. Whenever I want to try out a new color of blue
on a different layer, I select that new layer
and the layers panel. So I'm making sure
I'm not putting two different colors
on the same layer, and I start coloring in as well. Now, I like to open
my layers panel and toggle back and forth between my layers as I'm
filling in my bird. I also like to hide
my outline layer and toggle it on and off so I
can kind of see my progress. And sometimes I use the
color fill tool like I showed you how I filled in the eyeball of my bird earlier. To save time when coloring. Now, I've roughly filled in
all three colors of my bird, so I'm going to make
one final layer behind my inking outline, but above my three blue layers. I'll open up my color palette, and I'll select a dark color. I've chosen a dark brown, so it's slightly different
from my inking outline layer. I'll use this for
drawing my beak, my cheek, my eyes,
and my birdie feet. And then I'm going to trace
behind my bird's beak, eyes, cheek, and feet. And now I'm going to toggle
off the outline layer for this bird for the rest of the
bird illustration process. And with that layer hidden, you can now just see the color
layers and work with them. And I can see gaps in my illustration where
white is showing, so I can decide where I want to fill in more colors of blue. You're watching me
do this a little faster than normal
for the sake of time, but you can take your
time in this process. I'm going to fill in
the beak, and at times, I'm actually going to use my eraser tool to kind
of carve away parts of the shape of the
bird so the shapes feel a little looser,
smoother and organic. Many times, when people
are illustrating, they focus so much
on trying to make the animal or the object look so much like
their reference photo. They fail to have fun
with imperfections and lines and curves and just building shapes
with their colors. This is the foundational process for every illustration I make. I keep my colors on
separate layers, use my eraser tool
to carve away, use my pen tool to add back in until I just like
what I've created. And now that I'm fairly happy with my three
blue color layers, I'm going to make the feet
a little bit thicker by selecting the brush tool and adjusting the
size of my brush up. Well, ya, that's a perky bird. And now you can watch me do the entire process all over again on the
bird, on the right. Watch me do it from
start to finish, and of course, I've sped up the speed for
the sake of time, but you take as much time
as you need on your bird and see if you can better learn the steps by
watching me do it. Remember with Procreate, you're never going to mess
up a piece of paper. Your color library is limitless. You can try things, make mistakes, and
use the undo button. You can rotate your
drawing, move it simply. You can use the Lasso
tool like I showed you in Lesson one to move
parts of your art. You can use any brush and
any texture that you'd like. And then you can draw anything
that you'd ever want to. As always, art should be fun. So let yourself have fun
because at the end of the day, creating art that you
love starts out with the same building blocks
for every single artist. In this case, we
are working with a limited color palette
so that you can just get to creating and not be overwhelmed by too
many color choices. You're primarily working
by recreating shapes that you can see from the sketch that you made of your
reference photo. And then by putting your
reference image away, it doesn't even
matter what it looks like now. Can turn
into anything. You get to create your
version of the bird and make it look like a way that
you think is fun or cute. And this is where
we will stop today. We went from a pencil sketch to a four color bird
illustration that in the next lesson is ready to have details and texture added to it. Your bluebird is really
starting to take shape, huh? Here's your assignment that I'd like you to do
before Lesson three. Spend some time refining
your sketch and cleaning up those outlines and experiment
with your base colors. Don't be afraid to play
with different palettes. Remember, progress is more
important than perfection. You're building the skills
that will help you create an amazing piece of
art. What's next? I Lesson three will
bring your bluebird to life with textures and
final prep for your art. You'll also learn how to prepare your artwork to share
or use on products. Thank you so much for
joining me today. See you in the next lesson.
4. Lesson 3: Adding Details, Texture & Exporting Your Artwork: Lesson three, finishing
your Bluebird illustration. What Stacey. That's me. So today, we are going to finish recreating one of my
Bluebird illustrations. You draw it in your own style. And while it's totally okay, if your work ends up
looking similar to mine, I mean, this is how
we learn right. I encourage you to create your illustration
in your own style, tweak it in a way that
really suits you. And the more you make
art on Procreate, the more you're going to find the brushes
you like to use, the colors you love, and
your style will emerge. Let's finish up your
Bluebird illustration picking up from where
we left off yesterday. Today, we're going to focus
on creating a little details, and we're going to go
a little above and beyond and add some textures. So first, go to the Layers panel located in the upper right
hand corner of your screen. You will see where I've
created two new layers, Detail layer number one and
detail layer number two. I'm going to use this
handy tool to grab the color on my screen rather than using
my color palette. So I'm going to go to the color on my bird that I want to use, and I'm going to
hold my finger down. And that is going to grab the color and with the
detail layer selected, I now can start creating
details all over my bird. I really love this part of my illustration style because this is where I get to just make a lot of lines and dots
and scribbles and be playful so that my
illustration goes from feeling flat to feeling like it has some interest
and dimension. This is one of my
signature styles, so I invite you to play
around trying this, but also try to express yourself in your own unique way as you're decorating your bird. I like to use, again, the studio pen for this process, and I like to make my
pen size rather small. You may have noticed me using
my fingers a lot to move in and out on the screen.
This is called a gesture. So whenever I use my two fingers and I pinch in on my screen, it's going to bring me
in closer. To my bird. And whenever I use
those two fingers and I push them
out on the screen, you'll see that
my screen becomes bigger and I can see more
of my canvas all at once. And I'm going to select
my other detail layer because I like to keep
my birdie separate. And I made sure that the
studio pen was still selected, and I'm going to start
drawing on this bird, too, little bitty lines
and circular motions. Now I'm going to move
to the wing of my bird, and I'm going to use a
thicker line weight to create some little e. Kind
of implied feather texture. And I'm going to fill
up my birdie wing with all these little implied
feather doodles. If you ever can't remember
what brush you last used, Procreate has your back. Simply, click on
the brush library, scroll to the top, and you'll
see a star recent button. Click that, and it will show you exactly the last brushes, and it will resize
it to the same size. That way, I can switch back
to a smaller version of the studio pen that will match the doodles I made
on my bird's space. Going to draw some
straight lines, and you'll notice that I start by putting my
pencil on my screen, and then I draw a line
and I hold it down, and that line becomes perfectly straight. It snaps into place. And now I'm going
to use my eraser tool because I want to add some different details at the bottom of my bird
to decorate him. I am switching to a thicker
brush of the studio pan, and I'm just creating
some circles. And I'm going to use
that handy lasso tool to move and resize my
circle ever so slightly. Oh, I'm just going to start over and erase it and
fill it in again. And that's the
beauty of Procreate. Now I'm going to add
some little details to the bottom of those circles. And I'm going to add some
kind of movement to the tail, and I'm going to make
it look like my birdie is singing a la now moving back to the
other detail layer. MPS, you can have as many
detail layers as you want. The big goal is to keep
the same colors together. I'm going to do a
different type of implied feather gesture here a little bit more
pointy and longer, and I'm going to fill
the bird's chest. With that same color, I'm
going to move down and create some different textures for visual interest kind of scallops going up
the birds sides. And precision is not the
most important thing it's being uniform
and having fun. You don't have to
fill up your bird with a ton of
different textures. This is just what I'm known
for with my gingerber style. And again, your style will
emerge the more you draw. We're about done filling
up this little birdie. Now because I'm going to
go to a lighter color, I have a different detail layer, and I'm adding
some fine lines to the bird's wings and touching
up with the eraser tool. And now I'll go down to
the tail feathers and just create some repeating lines until I filled up my birdie. I decided I'm going to
erase that extra line, but guys, that is a cute bird. We could actually stop
right here if you wanted, and you would have two
beautiful bird illustrations, but we're not going
to stop here. The next part is a little
bit more advanced, so feel free to wait to do any of these parts of the
tutorial until you're ready. I'm going to click on the Gallery button next
to my toolbar. And that's going to take
me back to where I can see all of the canvases
I've ever drawn on. I'm going to use my Apple pencil to click on the drawing
that we just created, and I'm going to give it a name Bird Stickers Version one. Now, here's something
that is very important. Whenever I have something
with tons of layers, before I make any major changes, I duplicate that entire Canvas and Procreate and
work from a new version. That way, if I delete
something I didn't mean to, I will always have my
last draft to work from. So in order to duplicate this, here's what
you're going to do. You're going to click the little circle button below your canvas, and you're going to in the upper right hand
corner, click Duplicate. Now you will have the
exact same illustration that you made on a new canvas, and all the layers
will be there too. And we're going to work
from the new version. So this is where we're
going to begin to simplify all of these layers. Sometimes having
this many layers can be overwhelming. I
totally understand. But because we have a backup of our illustration on Procreate, we can begin to remove some layers that we
don't need anymore. I'm going to select a layer that I want to create
a textron top of, and I will create a
brand new layer with the plus sign above that layer. So right now you see where it says layer 11.
That's a new layer. I'm going to click on it,
so it's selected blue, and then I'm going to click
the clipping mask button. And you'll see that it now
is highlighted with a little arrow button pointing down
to the layer below it, because that is the layer
that is going to be impacted. Now I'm going to go
to the brush library, and we're going to explore some texture brushes that
come with Procreate. For this first
example, I'm going to try out the soft pastel, and I'm going to start
drawing on my clipping mask, and you will see a
lovely pastel texture, and I'm going to open
up a layers panel so that you can see
what's happening here. So we have our original shape
that remains untouched, and above it, we have
the clipping mask where only the
texture is available. Whenever I hide the shape, everything hides because
that clipping mask is connected to my lower layer. But I can also just
hide the texture and be back to working with
only my blue shape. So I'm going to
pick a dark blue, and I'm going to go grab
this painterly texture. Oh, that's pretty. You know, I think it's too dark, though. In the lower left hand side, you will see an opacity bar, and you can use that
bar to make your layer completely transparent
or non transparent, depending on how high
or low you swipe it. Now, I decided I don't
want to be subtle. I'm not really a
subtle illustrator. So I've gone back to
my brush library, and I'm going to
go find something very bold and textual
that's easy to see. So I'm going to go ahead
and play around with the size of that
texture on my mask. Another way to change
the opacity of your clipping mask layer is to click the button on your layer, and you'll see the opacity
bar that you can drag to the left or right to also change
the opacity of your layer. Now I'm going to create
a new clipping mask and click the charcoal brush. And I'm gonna go
to my other bird, and I'm going to just
start drawing with it. I'm holding my pencil
just like I would, like, a charcoal pencil.
Isn't that nifty? It creates such a
lovely texture. I will lower the opacity so it blends in a
little bit more. I'm going to clear
that and start over. I'm going to go to the
artistic brush library, and I'm going to grab
the quill brush. And again, I'm going
to kind of hold it to the side and create
some lovely texture. You're going to do this over and over again playing with brushes until you find something that is just right for you,
just like I'm doing. I'm almost done adding
texture to my bird. I've created a new Clippy mask on top of my dark blue layer, and I have decided to add
just little wisps of color. To create some contrast, and I will lower the
opacity a little bit. And I'm creating one
more clipping mask. Alright, we're done
with our textures, and now it's time to prep our birds for using as
digital stickers to print as regular stickers or to even create an iPhone
background for your phone. I'm going to create
one more new layer and I'm going to
grab it, hold it, and drag it to the very
bottom of my layers, and I'm going to call
it background stickers. I'm going to duplicate it. So now I have two
background layers. So right now you have
a background layer on your canvas that's white, so we are going to hide it. So now we just see our birds
on a transparent background. I'm going to make a
sticker background for each individual bird. We're going to go back to our
handy dandy favorite brush, the studio pen, and we're
going to make it nice and big. Because I've placed the
sticker background layer at the very bottom of
the layer's panel, I'm going to be able to
draw behind this bird. So I'm going to give
it about an eighth of an inch border all the
way around my birdie. Then I'm going to select the other sticker
background layer, and I'm going to
do the same thing. Now, what I've realized is
my little singing songbird looks a little funny with
that white background layer, so I'm going to erase
his little sing song, but he's still gonna
be cute. Don't worry. And the final touch is that
we are going to create an implied drop shadow underneath each one
of our bird stickers. So I've created a new layer
called a drop shadow, go to duplicate it, and
this is going to go behind our white sticker
background layer. I would recommend using a light gray color to
create this drop shadow, and we're going to
just stick with our studio pin yet again, and we're going to draw this
slightly low into the left. So just follow my gesture for creating your
own drop shadow. We're implying that the light is shining in a
certain direction so that our drop shadow is to the left and lower
than the bird. So we have gone so far in this lesson from two
very cute little birds. Nothing wrong with
them to artwork that's worthy of
becoming a sticker. So now we're going to
go back to the gallery. And I'm going to
duplicate this yet again because anytime
I make a major change, I like to make sure that I have the old
version to work from. And for the sake of time, you've watched me
create two birds. You didn't need to
make two birds. I just decided to do it. And so, going forward, I'm just going to
work with one bird. So I'm gonna hide all the layers from my right bird that
I don't need anymore. So I'm just gonna be working
with the bird on my left. Now that all those layers
are hidden and deleted, I'm going to grab all
the remaining layers in the layers panel so I can grab my bird and resize him and put him in the
middle of my canvas. Now we're gonna
click the toolbar, click the Share button, highlighted in blue,
and scroll down, and we're going to
share this as a PNG. Because it has no background,
it's transparent. And you will see an option to either air drop
this or email it, but we're going to just save
this image to our iPad. And now that we have
this saved to your iPad, we can use the digital sticker. I like to use an app
like God notes to have a digital monthly calendar
to keep track of my life. So we're going to open good notes that I've
already downloaded. At the top of your iPad,
you'll see three dots. Click the split view. Now we're going to open your
photo library, and we're going to click on
the downloaded PNG sticker, and you're going to hold it down until it pops up a little menu. Click Copy. Now swipe to the right on your screen so that Good Notes takes
up the entire screen. Select the date
on your calendar. Hold down your pencil. And
click Paste and Walla. There is an adorable
cute digital sticker. It looks like it
always belonged there. Resize it, move it around, and decorate your calendar. You can make your own
iPhone background and procreate by making a new canvas sized
1080 by 1920 pixels. Copy and paste
your bluebird from your previous canvas and add some texture and
color to the background. Export is a JPEG and
airdropersen to your phone. Can take your Bluebird PNG and upload it to a website like sticker app and print out your own stickers to
put on water bottles. I hope for many of
you if this was your first time creating art
that you feel empowered, that it's not so scary. The first step is the
biggest most scary step. We make it harder in our heads than it
really needs to be. But, truly, if you
have a good guide who can show you how
to get started simply, not overwhelming you with every single detail of
everything this program can do, but just help you
start making art, the rest can grow as your skill grows and as
your interest grows. And that's the main
way I create art. You don't have to know
every little bit of how Procreate works in order to make gorgeous art that you love. You so much for joining
me and creating alongside me. That
was so fun, right? And most of all, I hope that you're proud of
your illustration. I can't wait to help
you. Make your art. Bye.
 Stacie Bloomfield, Creative Powerhouse