Transcripts
1. What's in This Class?: Welcome to my sketching
designer shoes in Procreate class. My name is Thomas,
and we are here to learn and
practice how to draw your subject with loose
and dynamic lines that will make your sketches
visually more appealing. This is one of the most
important drawing skills. This drawing session will be a great practice activity if you are a beginner at drawing or relatively new
to procreate to popular digital drawing and
painting gap on the iPad. If you are not a beginner, it will be a great exercise to refresh some of the
foundational drawing skills. Loosening can be a challenge wherever you are in
your artist's journey. You will learn to sketch
designer shoes expressively. No previous drawing
knowledge is necessary. Similarly, you can be an
absolute beginner and procreate because I'll explain every single step on the way. We'll be using the Procreate app on the iPad with
the Apple Pencil. Alternatively, you can also
use traditional tools like a graphite pencil for draft sketches and color
markers for the painting parts. However, this session is primarily focusing on
digital art creation. Now I hope you are
excited to dive into my designer shoes drawing
and painting session. You see that what you
will learn and practice here won't just help you
with sketching shoes, but your overall drawing
skills will improve. I'll see you in the first video.
2. Preparation: First things first, let's do some preparation for
our practice session. So we are in the Procreate
tap on the iPad, tap on the plus sign at
the top right corner, and let's create a
new empty canvas. This first option, the
screen size, we'll just do. Wonderful. Nice Procreate is a relatively complex software. It has a bunch of
settings that affect how this popular drawing
and painting app behaves. This is especially true for hand gestures that you use to control many things
within the app. I'd like to make sure that
whatever I do on screen, you can follow along easily. Now, I usually like to
use the default settings. So it's likely that
everything will work for you just fine without making
any change on your iPad. But if at any point you find that something is not
working as expected, I'll show you what you
can possibly do about it. In the actions menu, tap on preferences, find
gesture controls menu item. And in the general section, you will find the reset
to defaults button. Now, you don't have to
tap on it because this would override your current
gesture control settings. Come back here and do
this reset only if some gesture that I do doesn't
work on your iPad. Okay? As I don't have
any special settings, I can reset just to make
sure I have the defaults. However, I will put this
option enable painting with finger into ofstate because with the Apple Pencil in place, I find it disturbing. Hit the T button at
the top right to quit. And tap once more
to hide the panel. Good. Now let's open
the color panel. Procreate offers plenty of interface options
to set your color. Make sure that the
disc panel is active. Drag the small white
circle on the inner disc. By the way, this is called the saturation disc and make sure it's placed somewhere
at the bottom left. So we have a black
set as active color. The outer ring is the hue ring. In this case, it doesn't
matter where it stands. We still have black
as the active color. Good. Now, tap on
the brush icon. We'll be using one
single standard brush from the classic brush library. Make sure the inking
brush set is active. And here you will
find this studio pen, which will perfectly
serve our needs. You may need to scroll down. In case you prefer the
newer brush library that Procreate has just
introduced recently, You can use this
sanderling brush inside the pens brush set. But I go back to the
classic library, and we'll be using
this studio pen. This brush is perfect
for sketching. It's pressure sensitive,
so the line width or weight depends on the
pressure you make on the screen. It's a great brush to make
dynamic strokes on the canvas. Tap with two fingers
on the screen to undo. Use whichever two
fingers you like. To redo, tap with three fingers instead
of two. All right. That's it. We are ready to make our first designer shoe
sketch in the first lesson. See you in the next video.
3. Mule: Welcome back. In this lesson, we are going to draw a so
called mule type of shoe. It will be a
relatively simple one. It's inside view, so there are no difficult
tricky curves in here. Nonetheless, I'll explain
the process step by step on how to approach
a subject like this, this will be a
perfect intro session for those of you who
are new to procreate, just to get on board with
the app on a basic level. Now, let's step on the
layer cycle real quick and check if we have an
empty layer selected. Good. Now the next step is optional. I will import a reference
image into my Canvas. It's a simple JPEG
file that you can find in resources right
next to the video. If you are a beginner,
I suggest you download it at least
for the first shot. Later, you can just watch my screen and do the
sketch on your iPad. Here is how you can import
an image into Procreate. Let's go to the actions menu. Tap on Ed and tap
on insert a file. I have my resource files
in the Downloads folder. This is the place
where your browser downloads files by default, and I tap on the first shoe, number one, to import. Now, notice that the transform
tool has been activated. Make sure that uniform is selected on the transform
tool bar below. By dragging one of
the corner nodes, I can resize the image
I just imported. We can also move the image
with a dragon drop gesture. I touch and hold on the screen, move my Apple pencil, then release,
something like that. We can see that the imported
image is on layer one. Procreate uses layers
just like Photoshop. You can have several layers, but you have always
one active layer, which is marked by
blue background. That's the layer we can be working on with
our Apple pencil. Now I tap on this layer
with two fingers. This way, I can change the
opacity of this layer. I drag my pencil on the
screen to reduce the opacity. The actual level of opacity can be seen at the
top of the canvas. Somewhere at around
50%, we'll just do. Now let's add the new
layer on the top of the existing one by tapping
on the plus sign. I will set a bright blue color, but feel free to use
any color you like. To hide the color panel, tap anywhere else on the screen. Let me check if our new
empty layer is active. Let's check the line width. It's kind of thick, so I turn it down a bit with this
slider on the left. That's good.
Remember, two fingers tap on the screen to undo
your previous action. Now let's see how we can draw a seemingly complex
shape like this shoe. It's full of all sorts of curls. It may seem difficult at first glance, but
actually, it's not. Every complex objects can be breakdown into simple elements. In this case, we can break
down the outline of the shoe into sections containing only one simple
line type for each. Now, even if you chose not to
import the reference image, it's time to leave some
marks on the canvas. So make sure you follow along, even if you don't have this
shoe in the background. I notice a straight
line over here. And we have more straight
lines over there. Here we can see slightly
bend straight line curving this direction and another one curving the opposite direction. We can look at these bend
straight lines as C curves. Another one over here, a small one over here, a pointed one over here, and the last one over here. Now let's hide our
reference image by unchecking the box on the layer and this is a
rough sketch about the shoe. Does it look like a
shoe? I think so. Let me set another color just
to summarize what we see. In drawing, there are three basic line types that
any shape is built from. The straight line, practice to draw some quick and
loose straight lines. The S curve, practice
some S curves too. And if you notice two
opposing S curves, make an S curve. This is an ascurve mirrored.
It looks like this. Being able to draw
these three types of lines is a fundamental
drawing skill. One of the main goals of this practice exercise is to deepen this
skill in your hand. Now, it's much easier to draw nice curves if your muscles in your hand are loose and the motion you do is
relatively quick. So remember these
three types of lines. Awesome. That's the
theoretical background. Now we can practice. Let me undo these red lines real quick. I'm tapping with two fingers. Now, let's at black color for our brush and create
a new empty layer. I tap with two fingers on the previous one to turn down the opacity on
our rough sketch. Something like this. Let's make sure we have the new empty layer active
so we can draw on that one. And let's set a
proper line with. Now, let's try to draw an S curve that follows the
outline of our rough sketch. Notice that it starts
as a thin line, gradually gets thicker and
gets thinner again at the end. This is how a nice dynamic
S curve looks like. Undo with two fingertaps
as many times as you want. We are here to practice. You don't need to
stress yourself to create a perfect line. We just want to have
a proper line, okay? What you might want to aim by
the end of not this lesson, but the entire drawing session is to be able to draw loose, dynamic, but at the same
time accurate lines. Anyway, let's draw this C curve and this small one at the front. Now, having a run through like this is perfectly
fine on a sketch. Actually, it makes the
subject more interesting. But in case you want to erase, touch and hold on the Eras icon. This way, it will have the same brush set that
we are drawing with, and you can remove
this part if you like. Next time, it's enough to
simply just tap on the as icon. No need to touch and hold. Anyway, let's
reactivate our brush. I move on to this section. Now notice that I play
with the line weight by applying less pressure on
the other side of the shoe. Having thinner lines in the back can make your
sketch look more appealing. Just a little drawing trick. Sometimes you can create better curves if you
rotate the canvas. Touch and hold with
two fingers on the screen and rotate
the canvas like that. Then you can rotate it back or watch this pinch
gesture with two fingers. It will set the view
into its difault state. Good. Finally, let's drew
the lines for the heel. Notice the quick
and dynamic motion. That's it. We have
our final sketch. We can hide the
rough sketch now. And this is how our line
drawing looks on its own. It's a good practice
to name our layers. So tap on the layer
you want to rename, just to make it active. Tap again on its name, choose rename and
type in the new name. Good. Now, let's
create another layer, track it and drop it under
the line drawing layer. This will be the layer
that we'll be painting on. Let's make sure our brush
is active and go to colors. Now, I drag the color
panel somewhere here and drop it like that. This way, it'll be easier to
choose colors for our shoe. Let me set a nice
purple light shade. Kind of flounder. Let's test the line weight. And filling the shape
with this color. If you go outside the outline a bit, that's perfectly fine. Also, you can leave some
white gaps here and there. They can serve as highlights
on the final sketch. Now, let's darken our color, something like this and add
some shadows here and there. Now, I set the color to white and add some highlights to make the look
more interesting. You know, these
are the places on the subject surface
where light from the main light source like the sun is reflected
towards the viewer. Now, let's set a
middle gray color. And drew a cast shadow for our
shoe. Something like this. I guess we can close
the color panel now and we have our
first sketch ready. As a final step, let's
make some notes on the colors we used and
create a frame for our shoe. With one finger, I touch and hold on the
light purple area. Now I have this color as active. Let's put a sample over here. Touch and hold on
the darker shade and let's put this
one right next to it. All right. Now, let's
create a nice frame around. I consider my sketch ready so we can merge
these two layers. You can do that by doing a
two finger pinch like that. The two layers have been merged. We don't need this rough
sketch layer anymore, so I swipe to the left
and tap on the lead. We don't need the
reference image either, so I swipe left on this
one too and delete. It's a good practice to keep your layers organized
in procreate. Depending on the
memory size your iPad has and the size of
the canvas you use, there is a maximum number
of layers you can have. So I like to keep them in order. Anyway, we have one layer
left which is active. Now I tap on the transform icon and arrange my shoe
somewhere in the middle. So I can draw a
frame in a minute. But first, let's practice
creating a nice frame. So I create a new layer, and let's hide our shoe
layer for a moment. Now we can draw a
frame like this, which is totally fine. It has a dynamic shape. It has very well aligned with, but we can make it
more interesting. We can create a vertical interruption somewhere
in the middle or a horizontal interruption
or we can include a loop. As far as the corner concerns, we can also add some
motive to that. You can also break
the line as you move, leaving some gaps. Now try to create some
interesting frames. Make sure your motion
is quick and loose. You can draw the entire
frame in one row, or you can draw it in pieces. If you are ready to
draw your frame, let's go back to layers. Make the shoe layer visible
and create the frame. If you don't like it,
feel free to undo and try something else. I'm
fine with this one. So I go to layers and merge these two layers with
a two finger pinch. Now let's go to the transform to make sure the
uniform option is set and resize the layer
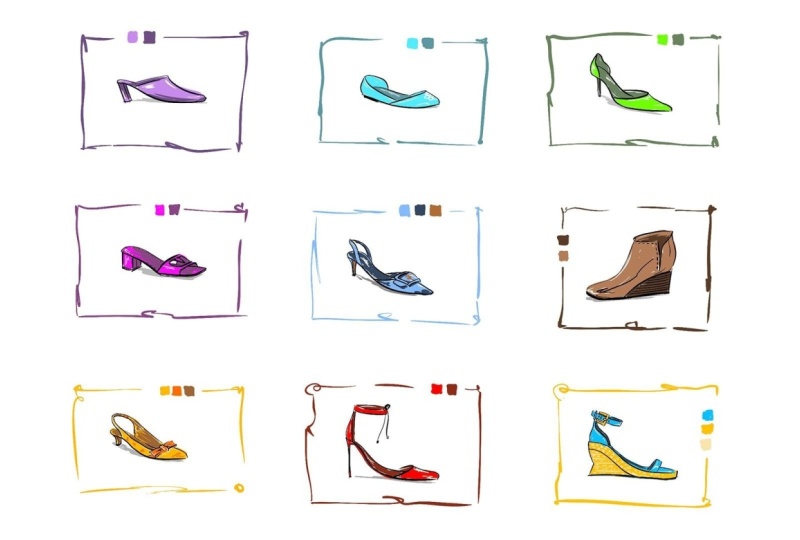
to something like this. We will have nine
shoes together, three of them in each row. Awesome. This lesson may
have been a little detailed, but my intention was
to get you on board with the sketching process
and with the Procreate app. The point is that we have
our first shoe in a frame, so we can move on
to the next one. See you there.
4. d'Orsay Flat: Welcome back. In this lesson, we are going to
draw Dorsey flat. As a first step, let's
hide our previous drawing. Now let's insert our
next reference photo. I go to the actions menu, choose Add, and tap
on insert a file. Making sure we are
in the downloads folder and tap on
shoe number two. Let's resize the image. Something like this and
move it into the corner. I'm setting a bright red color for analyzing this shoe shape. I set a thinner brush line
weight and see what we have. A straight line over here, a slight C curve at the front. Similarly, a slight C
curve here and here, let's see the back
to another C curves. An S curve over here. And finally, a s curve
on the other side. So together, eight simple lines build up this complex shape. We just need to position these lines correctly
relative to each other. Let me undo two fingertaps. Actually, I take
the reference photo even smaller with
the transform too. I'm choosing a bright blue
for the rough sketch. In the previous lesson, we actually traced our
reference photo. In other words, it was
in the background, so it was easy to follow
its contour lines. Now, let's make things
a bit challenging and try to lay down the
structure on its own. Just look at the reference
photo occasionally. I'm trying to keep these
lines proportionate. This separator is
somewhere in the middle. I'm trying to follow the
tilt angle of this curve. It's something like 30 degree
compared to the horizontal. We are making a
very rough sketch. Don't worry about how it looks. Here, I'm trying to imagine the sole part of the
shoe in the sty space. We can see only a
little portion of it, but it has to be coherent
with the other curves. Something like this.
And the last one. Undo and repeat until
you are satisfied. I guess I'm fine with
my rough sketch. Now, let's turn
down the opacity on this by tapping
with two fingers on the layer and moving the
slider to around 40%. Oops, I forgot to make my rough sketch on
a separate layer. Let's fix that real quick. I undo a few times I go
to the selection too. Let's make sure we have the free hand option selected below. I mark the area with the sketch, tap on the transform to, three fingers wipe
down on the screen, so we get the copy and paste panel and tap on cut and paste. Now if we go to layers, we can see that we have our
sketch on a separate layer. There is a small white section cut from the reference
image, but that's okay. Now we can turn
down the opacity. Remember you activate
this feature by tapping with two
fingers on the layer. 20% will be just fine. With the transform to, I relocate the sketch
a little bit. Now let's go to colors, set black as the active color. Let's add the new empty layer
and make our final sketch. Remember, when you are
making these brush strokes, you want to peel
loose and quick. Also, you want to pay attention
to dynamic line weight, as I explained in
the previous lesson. Oops, that's too thick. I want a light line
in the background. There is a little gap
there, but that's okay. Very good. If you struggle
with these curves, don't forget that we are
here to practice them. Is there something
you don't like? Undo and repeat over and over, even ten times if you need to. Believe me, it will get
better with each trial. The reason we draw nine shoes
in the entire session is to develop the skill in your hand or sharpen that skill if
you are not a beginner. Actually, these sketches are great practice for myself, too. I sometimes tend to
draw too tensely. Anyway, let's get rid of
the layer we don't need. Swipe left, delete. Let's create a new layer for the painting and move it
below our line drawing layer. I simply drag and drop it. I guess we don't need the
reference image either. Now I make the
line drawing layer active and with
the transform to, let's move it to the center. Good. Now let's activate
the empty layer and detach the color
panel from the menu bar. I plan to use a light
blue color for this shoe. Okay, let's go with this. We can change it later anyway. I'll show you in a minute. Let's fill in the shoe. Now, I take it a bit
darker and less saturated, and I'm painting the
remaining part with it. Nice. Let's use black for
the here section. Maybe it's too
intense, so I erase. Oh, okay. The line drawing
is on another layer, so I need to make
that one active. Now I can erase some
of those lines. Okay, let's get back
to our painting layer. Wait a minute. I lost into details. This section is not
that important. Instead, let's set white as the active color and
draw some decoration, like a flower at the front. Something like this. We don't
need this panel anymore. Finally, let's add some
highlights here and there. Something like that, to create some extra
visual interest. Now, let's set a mid gray color and add a little cast shadow
right below the shoe. Let's go back to
white for a moment. I guess I'm fine
with the result. Or I mentioned earlier
that we can change the light blue color later.
Let me show you how. Let's go to the
adjustments menu, tap on hue saturation
and brightness. With this slider on the left, we can change the hue
on the active layer. I. This shade looks nice. So I go with this one. We can now merge
these two layers with the transform tool. Let me take it a bit smaller
and adjust its position. Now with one finger, I touch and hold on the screen in
the light blue area. This way, I can sample a new color directly
from my canvas. This tool is called the
eyedropper Improcriate. Let's mark the colors we used. I drop her two with one
finger on the darker tone. And with a slightly
thinner line weight, I'm drawing a frame. Maybe I need to
reposition my things. Perfect. I have a nice
dynamic frame for my shoe. Now, let's make
the previous shoe visible and resize the second
one to its final size. Make sure that the uniform
option is active below. Otherwise, your shoe
will be distorted. Awesome. We have our second shoe ready. Just to keep our
things organized, let's name our layers, tap on the layer, choose rename, and let's enter the shoe type. Similarly with the other one. Sorry for the typo. It's
bad with an A at the end. Brilliant. We can move
on to the next one.
5. d'Orsay Pump: Welcome back. In this lesson, we are going to
draw Dorsey Pump. To make things easier, let's group our existing layers. The top one is active. I swipe to the right
on the one below. This way, both layers are
selected and tap on group. Now I tap on the group
header to make it active, tap again, and choose rename. Let's call this group as shoes. Now we can hide
all the layers in the group with one single
tap on this checkbox. Just as usual. Let's import
our reference image. Let's move it into the corner. This time, we are going to try to make our sketch in one row. So I choose black from
my color history. If you don't see this section, tap on these three dots, and here you can
choose color history. But you know what? I
have changed my mind. The shape of the shoe
is kind of complex, so let's make that
rough sketch first. So I said that
bright blue colour. Let's set a proper line
weight and see what we have. I'm drawing the planes first
that make up the shoe. Of course, there is
an S curve in that. The front section
is kind of spiky. We have a long heel
somewhere over here. And this part in the
back is a little tricky. Oh, no, I forgot to
create a new layer again. Never mind. Selection
to transform to, three fingers wipe
down, cut and paste. And there it is. We have a rough sketch on
a separate layer, two finger tap on the layer, turning down the opacity. You know what? Because this initial
sketch is quite messy, let's row another one we red. I forgot to create a new
layer, so let's do so. Okay, I need to rotate the
canvas for this curve. Remember, you can
rotate the canvas or zoom in and out with
the two finger gesture, and with a two finger pinch, you can get back to
the default view. I guess this will be
a better curve here. I'm using the eraser to
remove the previous one. Back to the brush tool, and the heel also needs some correction. Something like that. All right. Let's delete
the blue sketch, and here is my last messy draft. Let's turn down the
opacity on this one. Create a new layer
for the final sketch. Set black as the active colour, and try to make
those nice curves. Looks good. Yeah, I need to
rotate the canvas. Very good. No, I need to rotate here as well. And the heel. I guess I'm okay with this. So ideally the red sketch and the reference image as well. Small alignment. A
little correction. And we can create a new
layer for the painting. Don't forget to move it
below the sketch layer. Let me move things
further to the left, so I will have space
for the color panel. Good. Now, this shoe will have
a bright green base color. Oops, I'm painting on the
wrong layer again. So let's make the
other one active. This looks good. Now let's add some highlights with white. Something like that. With the eyedropper
to, I set the green. Remember, just touch and hold on the green area and choose
darker, less saturated shade. Okay, this one will work. Let's add some highlights
to the dark as well. Try not to overdo that, though. Setting a mid gray
for the cast shadow. And let's close the color panel. You can adjust the hue
if you want to yes. I'm fine with this one. We can merge the two layers
now, set its name. Sorry for the typo again. Center the shoe and create
the frame as usual. Like so. Let's show the group. And let's move our new
sketch into position. Very good. I hope
you keep up with me and each requires a little bit less
effort from your side. See you in the next video.
6. Cutout Slide Sandal: Welcome back. In this lesson, we are going to draw a
Cutout Slide Sandal. Let's move the top
layer inside our group. And hide the group. Let's import our next reference
image. Shoe number four. Let's create a new layer
and choose a blue colour. This part will be
a bit difficult, but we are going
to cope with that. Now, let's create the bishop. Maybe this part is a bit wider. We have a V letter on the vamp. The curve has a small visible
part through the hole. Let me erase some
unnecessary lines. The front may be a bit shorter. With a round corner. Let me do some amendments. And I guess this will
do as a rough sketch. Turn down the opacity
on this layer. Let's add a new layer, set our color to black. Alter the line weight and
start making our line drawing. I regularly look at the reference image to make sure we maintain
some similarity. Remember, lines in the
background are thinner. I guess we are good. So I delete the
rough sketch layer. Let's add some
stitches on the edge. Less prominent ones in the back. A little bit of adjustments
here and there. And we have the sketch
layer finished. Let's create a new
one. Move it under. And this time, I'm going
to go with the violet. Good. Now, let's darken this color. This part is inside. Let's add some highlights. Mid gray for the case shadow. And we are done.
Let's make the frame. Let's move this piece
into the group. Give a name. And move it into position with
the transform to. Great. We can move
on to the next.
7. Buckle Halter Pump: Welcome back. In this lesson, we are going to draw
a buco halter pump. As a first step,
let's hide the group, and let's import our
next reference image. Move it into the corner. Add the new layer,
add the blue colour. Set a light weight,
and we are good to go. Let me mark where the anchor
strap meets the sole. This is always the
challenging part for me, but we can use a trick to
achieve a better similarity. Instead of focusing on
the shape of the strap, I focus on this hole it creates. This is called negative
space in drawing, which is basically a slice
cut from the background. Mostly, it's an incomprehensible
shape for our brain, which is good because it's
always easier to copy something that has
no previous symbols attached to in our brain. So if you focus on
this background shape and try to copy that one, there is a better
chance that you draw something similar
to your reference. This is the shape of
that negative space. And now I'm dealing
with the strap itself. This draft is kind of
messy, but that's okay. We have the finer curves
somewhere in the sketch, and we will find them
in the second round. I have no doubt about that. So let's create a new layer. Let's not forget to turn down the opacite on the rough sketch. Let's get back to our new layer. Choose black and find
those ideal curves. You see, I repeat
patiently as many times as I need to until
I find the right curve. After each trial, I'm
checking the reference. No good, undo and repeat. Mmm. That's too thick. Let's rotate the canvas. Now, it looks good to me. Well, this curve is not ideal, but I can live with it. There is a small section
here we need to erase. Let's delete the rough sketch. I choose a blue
shade for the shoe. Oops, I forgot the
new layer again. Now we can paint. Let's choose a dark shed. The I leave a lighter
stripe at the edge. So shadows here and there. Highlights. You know what? Let's add
another color to this shoe. Let's not forget the cash doo. And move on to the frame. I delete the reference layer. I merge the other layers, center the shoe, sample the light blue and
draw the frame. I think it's too tight, so I separate the
shoe from the frame. Remember, selection tool, select the area, transform tool, three fingers wipe down, cut and paste, select the other layer with the
frame, transform tool. I switch to free form, grab this node, set back to
uniform just for the future, and finally merge
the two layers. Let's move it into the group. Show the group give
a name to this shoe. With the transom
to set its size, and move it into position. And we are done. We can
move on to next shoe.
8. Wedge Bootie: Welcome back. In this lesson, we are going to
draw a wedge booty. Okay, make sure
that the group is selected and uncheck the
box to hide the group. Let's import our next
reference image. Let's create a new layer. By now, hopefully you have a
certain level of confidence. So let's skip the
rough sketch and set a black color for
the final sketch. I test the line width
and give it a try. I start with the bottom line. Now, this one will
be an S curve. Another S curve over here. Now, we don't see this
curve on the reference, but we can imagine. Another S curve in here. Let's see this stop curve. Well, something is not
right with the shoe shape. And the reason, I guess, is that the top curve
is not wide enough. It should basically stretch tear the half of
the shoe length. This is a good example how
important proportion is. So let's erase the top curve and try to make a better one. Something like that. Right, this care would be
okay, but it's too thick. So let's try another one. Maybe with a smaller brush size. I think I'm fine with this
one. With the eraser. Let me fix this section. The line is just too thick here. Okay, it's much better now. In case you are struggling with creating the right curves, we can take advantage
of some features of a digital drawing
tool like Procreate. Let's say I'm still not satisfied with the overall
look of this sketch. So let's activate
the Transform tool and choose the warp panel. Now, if you grab
one of the nodes, you can alter the
shape of your subject. Actually, you can grab
any of the crossings. So I can change
the curves easily. And if you want
some finer control, you can activate the
advanced mesh feature. Wonderful. I'm fine
with its current shape, so I go back to uniform and
out from the transform, too. Now, let's continue with the sketch by adding
some details to it. Some extra lines here and there, just to increase
visual interest. Let's add the outer,
so some thickness. This section seems too thick, so let's take it back
with the eraser. Okay, now let's
create a new layer. Move it under, and
start painting on that. I go with a light brown colour. Good. Now let's set a darker tone. I sample the light brown. Samper the dark brown. Let's create some highlights. Brown again. A cas shadow. And I guess we are done. Let's delete the
reference layer. We don't need the color panel. We can merge these two layers,
move it to the center. And let's create
the frame as usual. It looks good to me. Now, let's move the
shoe into its place. Just a bit of adjustment here. Let's not forget to maintain
the layer hierarchy. Give a name to the shoe. And we are ready to move
on to the next one.
9. Slingback Pump: Welcome back. In this lesson, we are going to draw
a slingback pump. That's the group. Import the next reference image. Show number seven. Let's create a new layer. I'm testing the line weight. Now, we have this decorative
bow at the front, which can be
challenging to draw. So I think we should make a
rough sketch as a first step. So I set the blue
colour on my brush, and let's start building our
shape from simple elements. I'm trying to be very loose. The bow will be located
somewhere here. Ease if you need to. Here, it can be helpful to watch the negative space and try to form that one rather than
focusing on the strap. We have a relatively short heel. My draft seems a bit
messy, but that's okay. Let's create a new layer
for the final sketch. I'm turning the opacity
down on the draft layer, setting black color
for my brush. And let's not forget to make
the empty layer active, so we can draw on that one. As usual, I'm starting
with the biggest curve. There is some slight
curvature on this section. Well, it's not perfect,
but let's go with that. For this part, I need
canvas rotation. This curve looks good. This one as well. Now,
let's see the bull. Just a few dynamic
brush strokes. I guess the back part
needs some fix here. Something like that. I think I'm okay
with this sketch, so I delete the rough one. And we can start painting
on a new layer, of course. The base color for this shoe will be some kind
of yellow orange. We can fill in the entire shape
with that except the bow. Now, I set a darker shade and shift the hue
towards the orange. Maybe it's too dark. That's good. Let's paint the inner surfaces
with this one. I'm lightening this color to get an orange and painting
the bow itself. Something like that. I'm adding a little bit
of detail to the strap. Some extra decoration
with the orange. A little bit of
highlights with white. Slight amendment with
light yellow orange. Let's not forget the cash Dow. And I think we are done. We can get rid of the reference, merge two layers and
draw the frame as usual. Very good. Let's make the group visible, move our latest layer
inside the group. Add the name. And place the shoe
into its final place. Awesome. We are
making progress here. Only two shoes left to go.
10. Ankle-Tie Pump: Welcome back. In this lesson, we are going to draw
an ankle tie pump. Let's hide the group and import our next
reference image real quick. Shoe number eight. Let's set the blue
for our draft. Create a new empty layer and start making
our initial sketch. This shoe has a very
attractive look. I'm not sure it's
comfortable to wear, but it will be definitely
a joy to draw. Actually, this one
is quite easy. There is no difficult
curving there. We don't need reference anymore. Let's turn down the opacity. And on the new layer, we are going to draw the final sketch with black, of course. I need to turn down
the brush size a bit. Remember, this curve in
the back is a bit thinner. This helps to create
the illusion of depth. It's further away
from the viewer. I love to draw these curves. Look how delicate they are. Once you have enough practice, it really takes just a minute to draw something like this. Let's delete the blue draft, create a new layer under. And this time, I'll be choosing a truly vivid red color.
This shoe deserves that. As I recall, there was a
thickness to the sole. So let me draw that real quick with black on the drawing layer. I sample the red and go
back to my painting layer. All right. Now, let's find a darker shade
for the remaining parts. Good. Now, let's add some highlights. I'm using the eye
dropper to sample previous colors and make
some changes here and there. Let's just a cast shadow. And we are done. It was
relatively easy, right? So You can always redraw a section
that you don't like. But now I'm using the
selection and transom tools to shift this frame
section a bit upwards. Et's merge our layers. Give it a name. Move it inside the group, show the group, and
put it into place. Oops, I have the distort option selected in the transform tool, so I need to undo and
select the uniform option. Now I can resize while
keeping proportions. Very good. We have one
designer shoe left. See you in the next with you.
11. Wedge Sandal: Welcome back. In this lesson, we are going to draw
a wedge handle. Let's import our
reference image. Shoe number nine. Let's move this layer outside the
group and hide the group. For this one, we are going
to create a rough sketch first because it has some
level of complexity. So with a blue brush, let's find the building
curves for this shoe. I curves and see curves
all the way around. I'm using the selection
and transform tools again for changing the
shape of the strap. With the freeform option, you can change the width and height independently
from each other. And by dragging the green dot, you can rotate your
selection as you like. All right. Now, let's make our final sketch
on a new layer. Not again. I forgot to draw the rough on
a separate layer. So let me separate it from
the fence image first. Selection tool,
select the object, swipe down with three
fingers, cut and paste. Turn down opacity on this layer, choose black on the color wheel, activate the empty layer,
and we are good to go. Let's find the right
curves for the soul. Rotate the canvas with two
fingers if you need two. A little bit of complexity
here with the strap. And Just throw the curves and don't worry about which
one overlaps the other. We are going to erase the
unnecessary parts in a minute. Now, let's zoom in and erase. In the meantime, I'm
deleting the blue sketch. I'd rather focus on the reference image while
I'm adding these details. Actually, we don't
need this line either. Looks good to me. Two more S curves here. All right. Now, let's create
our painting layer. I'm starting with the
yellow orange again. A small fix on the
drawing layer. Let's go back to
the painting layer. Now let's choose a blue colour. I'm still not sure that
this is the one I want. Let me change this.
Maybe that's it. Sorry for messing
with this blue. Choose whatever blue you like. Now, let's take a darker shade
to paint the inner parts. Let's give a thickness
to the outer sole. Some highlights
on the blue area. Now, let's sample the
yellow orange area, shift it towards the light side and draw some patterns here. I'm drawing some kind of shapes. Good. We can hide
the color panel. I'm adding some
further highlights with very gentle touches. We can delete the reference. Let's merge our layers. Center our shoe, and we
can go with the frame. Let's give a name to our layer. Move it inside the group, show the group, transom
tool, and place it. Awesome. We are done with
our designer shoe study. Only one step has left. Let's export our artwork as a JPEG file so you can share
it with anyone you like. Let's go to the actions menu, tap on a share and choose JPEG. Here you have several options. You can save it into
your photo library with the save image option, but I choose Save to files, and I will save this into
my downloads folder. Let's give the file a name. Hit Return and don't forget to tap on save
at the top right. My work has been saved as a JPEC file in the
Downloads folder. All right. I hope you enjoyed
this drawing session. Now I encourage you
to take some of your favorite shoes and make colorful
sketches about them. It would be a pleasure
to see what shoes you like or how you implemented
this practice exercise. So don't forget to
upload your sketches in the project section
right below the video. I'll be happy to give you some
feedback on your artwork.
12. Final Thoughts: If you got to the
end of this class, you really have the stamina. I hope you enjoyed making
sketches about designers shoes. The skills you
learned and practiced here won't just help
you with shoes you see. Now, it would be extremely
valuable for me if you gave some feedback on my class in the form of review or rating. For you, it just takes a minute. For me, it will mean a lot. And if you like my
teaching style, I definitely have some
more classes for you. Make sure you check them
on my profile page. I hope you had a
good time with me. See you in another drawing
or painting session.
 Tamas Benko, Drawing & Painting Classes