Transcripts
1. Intro: Welcome, welcome, everybody. Danny here from Skill Share, and I'm so excited
to be joined here by Marie Noel Worm all
the way out in France. How you doing Marie Noel? Really good. I'm really happy to be here and excited to do this. Yes, we are so excited for you to share all you've learned
about Procreate Dreams, too. And to everyone out there, we're so happy to have you here and grateful
that you could make it today for this session. So today, you are here for find your animation style in Procreate
Dreams with Marin Worm, an amazing illustrator,
analog, visual artist. I've followed your
work for so long, and I'm just so excited
to see how you're translating it into the
Procreate Dreams app. Um, and what to expect
in today's session. So Marina is going to
do a little bit of introduction and lay the
land and procreate dreams, um and she's going to cover
things like sketching and animating using all three animation modes in
Procreate dreams, as well as integrating your personal style and
inspiration into your work. And Marie Noelle, I know personally from
having seen a lot of your incredible work that you're coming at this from
an illustration angle, not like a full on
freelance animator. So for anyone out
there who is more of an illustrator working
in still images, you're going to learn
a lot, is that right? Yeah, absolutely. I'm definitely an artist and illustrator, first and foremost,
and then I've brought animation as a tool
into my workflow. So that's kind of what I
hope to talk about today. So yes, with that, I'll go
ahead and pass it over to you. Hi, everyone. Welcome.
I'm just so happy to be here and really excited to dive into the Procreate Dreams app, which has been so fun for me to dive into
these past few months. I'm an artist and illustrator, also top teacher on skill share today I wanted also us
to talk about finding your animation style
and just give you a few thoughts on that subject before we
dive into the project.
2. Choosing a Visual Identity: So when we think of finding
our animation style, there are really two poles
in my mind, and one of them, the first one is
the visual identity of the animation that you're
going to be creating. What does it look like? What illustration style
are you going to be using to make that come to
life in animation form. And then the second part is
the actual animation part, and I'll get into
that a little bit. But just to start us off on
this idea of visual identity, I'm going to show you some of my work that I've done
and kind of talk you through at least the things that I think about
when I think of style. So I'm going to dive into
Procreate where I have a few of my illustrations that I'm going to kind of
flip through but one of the things
that I want you to know is that Danny
said it already. I'm an analog,
illustrator, an artist. First and foremost, I love
everything that's like guash, watercolor, colored
pencils, pastels. But since 2019, I've really
been integrating procreate, most of all, into my workflow as another tool that I
also really love. And as I've integrated the
digital into my workflow, I've tried to kind of keep
the things that I love about the analog into the digital. So the image on the left
is made in Procreate, and then the two on
the right were made with soft pastels and
analog materials. So you can really
kind of see that there's no real I mean, there's a lot of differences, but that's what I think
is really fun with Procreate and with
Procreate dreams is that I can bring in that sort of analog gritty feel that
I love into my work. But the thing that I want
you to notice the most, I think is the fact that
as I flow through these, they're all of very
different style. Also because of the
mediums that I'm using, there's a different goal for
each one of these images. As we talk about style,
that's really important. What I find fascinating
is this connection between what it is that I'm drawing and how it is
that I'm representing it. How is it that I'm drawing that? And the way that I make those
choices is going to maybe enhance or add to the message that my drawing
or illustration is conveying. And so I really want
you to not be afraid to explore many different
ways of expressing yourself and
expressing your ideas and to not feel boxed in by a single style and rather
to really lead with a spirit of Inquiry
and exploration, what is it that you
are interested in? What what colors,
what materials, what textures, what compositions and
what subject matters? This is something that's
constantly in flux in our life. It's constantly evolving and starting to build that
habit of asking yourself, what is it that speaks to me and to my personal
creativity is really, really essential as
you move forward in illustration and also
in your animation.
3. Choosing an Animation Style: That being said, as we move
into Procreate dreams, which I'm going to
open up here and I'll show you how I've done it. But you're going to maybe
find other discoveries, find other ways of working, and that's what's really fun
and interesting as well. I'll show you this one, which
is an illustration that I made and that I then turned into an animation and
there's some sound, so hopefully you'll hear that. So you can see it's a very it's I would call this more
of like a micro story. Um, there's not a
huge story unfolding, but there is a sense of place, there's a sense of character, and I just wanted to have fun coming up with
an idea that I found exciting that I
thought was cute and funny and hopefully
that transmits itself. That's what is really essential as you move into animation
is asking yourself, what is it that speaks to you? What do I want to explore in
my animations when I do so. I'm going to show you one more. This one also has sound, but I'm going to
turn it off so I can keep chatting to you. And because I'm an artist and illustrator
first and foremost, my way in to animation is
through the illustration first. Oh, wait, you can hear
the sound, can't you? Through the illustration first, and then I build the
animation usually second. I screwed that up
right at the end, but um and you can start off in that way with illustrations or drawings
that you've already created, but you can also
work in other ways. You can start with a sketch. You can start with a story and then think of what it
is that you're going to animate and then build the visual identity of that
animation as a second step. I also want you to just
be aware that there's this variation within
the process that is something to explore and that you can try
different methods of approaching the
animation process in order to really find
what works for you. Then there are two
other I guess, themes that I would think are important when we're talking about animation style, and one of them is the
animation style specifically. For example, you can go from animation styles that are
very smooth and complex, very intricate Disney
style animations where everything really
flows very beautifully. You can also have
animation styles where you have a lot
of exaggeration, and then you can also have animations where things
are very hand drawn, very frame by frame, and the animation itself
has this glitchiness, a texture to it that the smooth types of animation
maybe don't have as much. All of those different types of animation have their
place and again, will either contribute, enhance your message
or contrast it. It's also interesting to
play within those realms. And then finally,
subject matter. So what it is that we choose to animate is going to have a huge impact in our
artistic journey. And the two animations that
I showed you at first, I would call those kind
of like micro stories. And so they're more on the
story end of the spectrum. And, of course, you can have full fledged feature animations that are even more
elaborate stories, and that's also really fun. But you can also do
animations that are more of a contemplative,
poetic nature. That's something that I
chose to do with this one. Poetry and contemplation is something that I'm
very drawn to, and so that's going to
show up in my animation. And that being said, you could even go more
abstract and more conceptual. If you know anything
about motion design, sometimes it's about shapes and lines and
colors in movement, and it can be about that
and there's a lot of richness and beauty that can be found within
that, as well. So that's kind of the idea that I want us to keep in mind as we move into our project. The project is going
to be a follow along. So, the subject matter is
kind of decided for you. The process is also
decided for you. But I want you to still take this opportunity to find
ways to personalize it. And so to start building this dialogue with your
personal creativity. So your colors might look very
different from my colors. I might choose a blue
and you'll choose, a pale green. I don't know. These are the kinds
of ways that we start practicing that connection to the self and the connection to our creativity and that
we allow ourselves to lead with that spirit of inquisitiveness and self inquiry that I think is really essential when you're trying to figure
out what you want to do.
4. Procreate Dreams Interface, Background & First Drawing: So let's start in
on the project. Right now, we're in
the theater where all the different projects live, and we're going to create
a new one from scratch. So I'm going to ask you to click this little plus
on the top right. And obviously, if you've used Procreate
dreams a little bit, then you know that
you're faced with a lot of different
options here for size. And we're going
to just work with the regular four K screen size. I want you to click on the three little
dots on the top right, and here is where we can choose the number of frames per
second and the duration. So this is where you already have that
kind of choice that I was telling you about
something that looks a little bit more hand
drawn frame by frame. That's often more of like
a 12 frames per second. We're going to choose a
cinema 24 frames per second, and that is a little
bit smoother. But please play around with that when you have the chance
after this class or whenever, because it's very fun to
try the different types. The duration, we're going to
start out with 30 seconds. You can go ahead and pick 30 seconds once
you're done with that. We are going to click on Empty. Just one note for people who don't know Procreate dreams yet, there is no real difference
between these two. The only difference is that
when you click on draw, then you can immediately
start drawing, but it's not like you're
actually choosing between something that you can't get if you click on Empty. We're going to start
with empty so that it's easier for everyone to
start off in the same way. Here we have our stage, which is where you can see
what it is that you're animating and your timeline at the bottom that is
now currently empty. We are going to click on this little plus
sign on the right, and you can see that you
can add tons of stuff, track photos, video text files. If you add photos,
video text or files, it's going to automatically
create a track for you and tracks really the building
block of our animation. We're going to go
ahead and click on one of these and you'll see the playhead that has
appeared with a gray track. The playhead is
something that you can move with your pencil, and you have the
time that kind of shows you the duration
of your animation. We're going to start off
by drawing a background. I'm going to actually show
you two ways to do that. I'm going to put my play
head right at the start, and I'm going to click
this little squiggly line, which means that I want to draw, which is pretty self explanatory and it's a good icon for that. I'm going to choose a background that's going to be light pink, but again, personalize this. This is already one of the
instances in which you can choose how to make this
a little bit more yours. So I'm going to click on the top right here to pick my
color. I pick my color. Once I'm done and I see
that my color is in there, I can simply long hold it. And drag it and drop it. So just like in Procreate, if you're familiar with the
color drop in Procreate, that's one way that
you can do it. And what you'll see is that
there's a tiny little track here tiny little frame that got created here
when I pulled my color. So what I would do is I
would then long hold on that and click on fill duration. And this allows me
if I zoom out with two fingers or quick zoom out
to see the entire project, I can see that it's filled
the entirety of my animation. However, I'm going to
show you second way to do this background. We're going to tap
with two fingers to undo once and twice. Now I have keyframe, no frame, sorry,
it's empty again. I'm going to now click on this little it's like a time
stamp kind and in that, you're going to
see stage options. It has stuff about onion skins that we're going
to get into later. But then at the bottom, it
also says background color. So we're going to click
that. And here we can also choose our background
color in another way. You can also make
it transparent, but right now we're
going to have a color in the background. And you can see it's not
on any sort of track. It's just on its own within the project
as the background, and I can change
that at any moment. However, I do want
to do some drawing, and so I'm going to actually
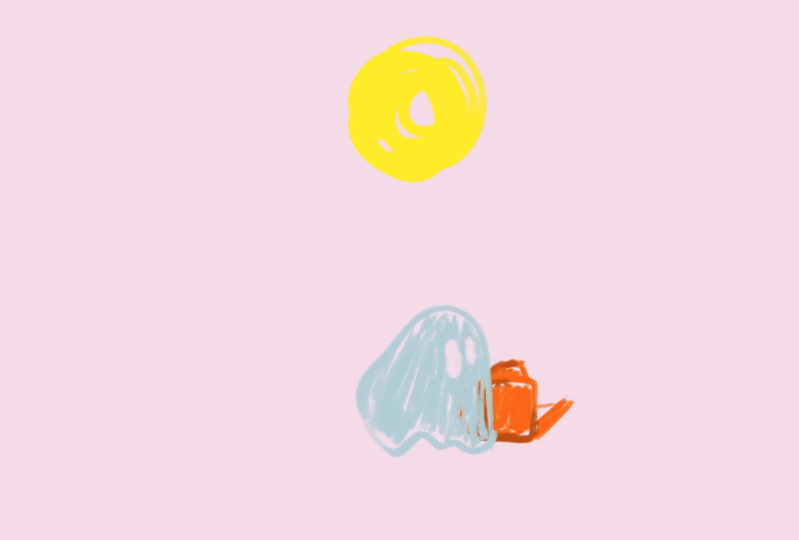
draw a sun or a moon, and I'm going to
make mine a sun. I'm going to make it
yellow, but, you know, you could make a green
sun if you wanted. That could also be
really fun or a blue sun or something like that. So I'm going to go into
my colors here again, and I'm going to pick
my color for the sun. And of course, you want to
make sure that you're in the drawing mode right over here with the squiggly
line activated. Here I want to show
you how you can gain a little bit more
space when you're drawing because it can sometimes feel a little constrained when you're just working
with half of the screen. You can see
underneath the stage, there's this little
horizontal line, and I'm going to either
push it down or pull it up. I can do it with my
pencil or with my finger. Then that brings me into a full screen view with
a little flip book, which is really useful for when we want to do frame
by frame drawing. We'll get into that
a little bit later. For now, I just want you to draw a sun and my brush
is a little bit big, so I'm going to make it
a little bit smaller. You can actually pick your brush here by
clicking on the brush. There are so many
different options. Here's another one of
those opportunities where you can personalize it and you can choose a different brush than the one that I'm using. You can use the same as
well if you prefer that. I'm using the Inca brush. So I'm going to go
in and just make my son and I like there to
be a little bit of texture, but you could fill
the whole thing in as well. That's fine. All right. Once I'm
done with that, I'm going to click on Done. I'm going to long hold on
my track and click on fill duration so that my son
takes up the whole space.
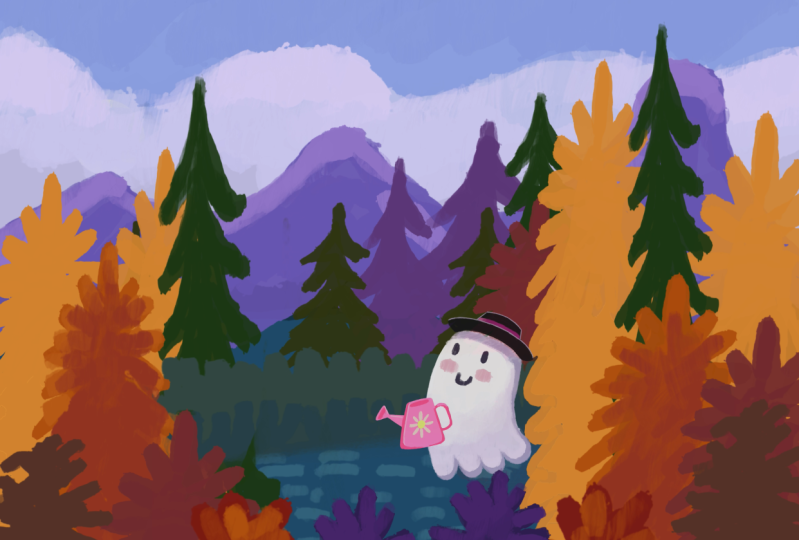
5. Drawing & Organizing Tracks: Ghost & Can: But now I want to
add another element. I'm going to yet
again click this plus and I'm going
to add a track. I'm going to activate the drawing mode again
and I'm going to go back into my full screen mode by dragging up that little
horizontal line. This time, what I
want us to make is a little ghost because I
think ghosts are very fun. I'm going to use a color
it looks like white, but it has a slight
bluish tinge. Again, it doesn't need
to be a white ghost. It can be a different color. So once I have that, I'm going to just draw
a little ghost over here in the kind of
bottom left corner. And, ghosts come in all
sorts of shapes that are kind of roundish,
circular amorphous blobs. So I really encourage you
to just have fun with creating a shape that
seems fun for you. You could also color drop here. Since I'm a sucker for
drawing and texture, I like to just do it by hand. I'm going to leave
just a little bit of texture there because
I think that's fun. Of course, we need little
eyes for character, and you could just draw them in. But I'm actually going to use the eraser as a
drawing tool here. That just feels fitting
for my little ghost. So when you click on the eraser, you can also select the type of brush
that your eraser is. And I think I'm going to go with maybe more of a sketching brush, the 60 pencil I quite like. So I'm going to use
that one as my brush. And here again is another opportunity
for personalization. I'm making eyes that
are kind of oval, but you can make your circular. You can make them rectangular. You can put them close together, far apart, vary the size. I think that's going
to be a little fun. And I'm also going to just a bit of a pointy
head. All right. Once we're done with that, I want us to click on Done, and now we can come back
to our main animation. I'm going to talk
to you here about the importance of organizing your tracks because even though
as artists and creatives, we have a tendency to shy
away from organization, it's really, really important, and it will save you a lot
of headaches down the line. So color coding your tracks, I find is really, really
helpful in order to do that. So what I want to do
is I'm going to long hold on my son I'm going
to click on Highlight. The way I like to do it
is to pick a color that's similar to the item
that is on the track. I'm going to make
that one yellow. Then I'm going to make
my ghost white or gray. You might not see the
importance of that right now because I
don't have many tracks, but as soon as you
have a few tracks and it can very quickly
become a lot of tracks, it'll be very, very
useful to have this. All right. Third thing, we're going to add
one more element. I'm going to click
this plus again. I'm going to click Track and I'm going to
enter drawing mode. Come back into this
flip book to make sure that you're at the beginning of the playhead is all
the way to the left, you can also use the flipbook
and just be like, Oh, yeah, I can't go any
further, so I'm at the beginning of my animation. We're going to make a
little watering can. I'm going to make mine a
slightly orangish color. And I think everyone pretty much knows what a watering
can looks like. So kind of has a square,
maybe rectangular shape. You'll have a handle on
the side or on the top. So again, these are
all opportunities for you to personalize it. Where are you going
to put your handle? Which shape are
you going to make? Then it's going to have a spout. That one, I think is a bit big. I'm going to just reduce
the size of that a little I just want to give it a little
bit more depth here. So what I'm going to do
is I'm going to click on these two little
squares at the top right, and that brings me into
my drawing layers, which is not the same thing
as my tracks on my timeline. This is really just
like Procreate. If you know Procreate, it's just a layer that you're going
to have on this drawing. And so I'm going to long
hold the new layer. And activate clipping mask on that because I want to
add a little bit of shadow, so I'm going to go for a darker color, something more brown. I'm just going to
add a little bit of this shadow color at the base, maybe and then at the bottom of things somehow I
switched to my eraser. But I think the contrast is a little too strong here
and what I'm going to do is I'm going to re click those drawing layers,
little squares, and I'm going to click on the N here on this layer
that I just made, and I'm going to
reduce the opacity of this layer to
something that I like. I think that's not
too bad. All right. I'm going to zoom
in a little bit because sometimes it can
activate something else. I just want to make sure the
whole frame is activated. I'm going to long hold on it and then click Fill duration. I'm also going to long hold, highlight, and make it orange, just so that we're all good. I haven't done that
with the ghost, you'll have noticed,
and that's okay. It's not really
necessary right now, but I just wanted to have it
set up for the other two. Something else I just wanted
to mention is that my track got created in between
the sun and the ghost. That's actually
good because I want my ghost to be in front
of my watering can. But if it just so happens that your track got built
on top of the ghost, then it's good to hold
it and move it so that it's underneath the
ghost, just to make sure.
6. Performing Warp + Keyframing Opacity: Alright. So now we're going to have a little bit of fun
with our ghost, and I'm going to be able
to introduce you to one of my favorite types of animation
modes in Procreate Dreams, which I'm sure you've heard
about and which I think is really unique
and very powerful, and that is the perform mode. So the perform mode, the way that you activate
it is by clicking on this circle over here. What happens is that you see on the top left a little
it's written ready, and then there's a little
blinking red light as though you're in front of
a camera camera action. That's kind of the idea here. And whatever layer it is
that you've selected, there's going to be a little
bounding box that appears around the element that
you're going to be animating, that you're going
to be performing. You want to make you want to
place your Apple pencil a little bit further away
from the bounding box because sometimes it'll
get confused with scaling. But the important thing is to know that the movement of
your Apple pencil is going to be translated into the movement of your element that
you're animating. And you can see here that
it's getting recorded and that my little ghost and my little movement is also getting recorded
at the same time. And this can be really fun, if you have a ghost,
a little bird, or a bee or a leaf, there are a lot of different
ways that you can use this. As soon as I lift my
Apple pencil, it stops. You've noticed that you've also noticed maybe that there's
this new track that appeared underneath
and that's where all these automatic
key frames have been created as you've been
moving your Apple pencil. Here's something else
that's really important. You can modify the
motion filtering. And so if your movement is too shaky or your hands
shake a little bit, you might want to increase the motion filtering so that your movement is a
little smoother, and that can definitely help. But that's not what
we're going to do right now with our ghost. So I'm going to
come out of there, and I'm going to tap
with two fingers to undo I'm going to bring my play head all the
way back to the beginning. Just as a quick little aside, if you want to redo, you tap with three fingers, which is the same
thing as in Procreate. I only learned about this
maybe four months ago, which is embarrassing
considering I've used Procreate for so long. But it's very useful. We are going to use the perform mode with our little ghost, but in a slightly different way. I want to make sure that
we have this little circle activated and we're going to click on the playhead,
just a short click. You get this little menu with
action move filter edit. We are going to go
into move and warp. What you'll see Sorry, I'm just going to
show you that again. You'll see that a little
grid popped up on the object on the
Little ghost and you can change the number of
nodes that are on that, but we're going to keep it at
four, that's not a problem. This is, I think, one of the most fun ways of
using the perform mode. I just love this so much
and I hope you'll see why. What we're going to do is we're going to simply grab one of these nodes I'm just going to zoom in by just increasing
that a little bit. I'm going to grab
one of these nodes and I'm going to add a breath, a little bit of life
into my little ghost. The way I'm going
to do that is just by moving around this node. You can see the time
is ticking by here and we're just going to continue giving a
little bit of breath, a little bit of movement,
something smooth. There's something
really meditative about this way of using
the perform mode, which I really, really love. We're going to stay until
the end of our animation. We've done that. If you pinch really quickly,
you can zoom out. You can see your playhead
is all the way at the end, but we're going to bring
it back to the beginning. You can see the keyframes, the automatic keyframes
have been added. You don't need to
worry about that, but it's just good to
know what those are. We're going to do
it a second time. So I'm going to take
a different node and add a little bit more life. And the cool thing
is that you can see the first node
that was animated, and you can try to
see if you contrast the movement or if you move
with it or against it. But we're just increasing
the sense of movement and life in our
little character. I'm going to keep going
until the end of the time. There we go. We had a quick
question which is, can you warp multiple
nodes together? Oh, that's a good question. I actually am not sure. I've only ever used
them separately, but the thing is that
they're connected. So they do kind of maybe I can just show you just with a third one
because it doesn't matter, you can do as many as you want. If I choose one of these ones that are
more in the middle, it moves more than
just that thing. It's like a net. It's
like a connected net. Everything moves a little bit. But other than that,
I'm not sure if, you know, I don't know if you can select multiple
nodes simultaneously. I will look that
up. Now, I want to introduce you to a
second way of animating, which is keyframe animation. And you've seen that a little bit because of
these automatic keyframes, but we're going to do
it manually rather than have them do it automatically through
this perform mode. I want to make sure that I
am out of the perform mode. I don't want that
to be selected. I want to just be in this regular interface
with nothing selected. I'm going to do it
with my little ghost, and what I think would
be really fun is to make my ghost appear out of nowhere. So what I'm going to
do, I'm going to put my playhead all the
way at the beginning. I'm going to tap it. This time, I'm going to click on Filter. And then I'm going
to click on opacity. And you can see a
new track was added with a new keyframe, which is an opacity keyframe, and I can see that it's 100%. So that one I want
to put a zero, and then we're going
to put another one. Here at 100. You can see it now appearing out of nowhere my
little ghost appears. That's also cool is
that when you zoom in, you can zoom in on a section of your animation rather than
seeing the entire thing. Then if I just want
to zoom out again, then I can just pinch in order to come back
to the general view.
7. Performing Movement & Grouping: All right. So what I want
to do here is I want my ghost to he's checking
out this watering can. There's a watering
can, and he's going to come and pick it up the
watering can and pour it out. So we're going to go back to the beginning of our animation, and we're going to again click the perform mode
button, so the record. This time we're
going to do it more like that first thing that I showed you where we're going to animate just the
movement of the ghost. But I want you to
stop at the moment that it arrives at
the watering can. That means to lift
up your Apple pencil as soon as we arrive
at the watering can. He's just going to be floating
around just a little bit here and then coming down
onto the watering can. If you want to
practice that motion before doing it,
you can do that. Then once you're ready, I'm just going to be
floating a little bit. And then coming to
the watering can. What we want to do is
we want the goes to end up pouring the watering can and he's going to
pick it up and pour it. But I'll tell you already, we're going to do the pouring first because it's easier
to do that in that order, and that's something
that's going to be fun to experiment with as
you experiment with your animations is the order in which you do
things and that there are ways in which you do it that make it easier down
the line for you. We're going to also
use the perform mode, but in a slightly different way. What we're going to
do is we're going to click on one of the corners, you'll see there's this
little gray arc that appears. I'm also going to click
on the three dots at the top right and
click on Edit Anchor. And this is the place. Oh, sorry. I just realized I have forgotten
one important element. This gives me the opportunity
to talk to you about groups because I don't want to it's not just my ghost
that's going to move. I want my ghost plus my
watering can to move. Groups, the way that
I like to think about it is that
they're like boxes. It's like you put your ghost in a box and then you put the
watering can in a box and then you move the box
around and that allows you to move everything together. That's what a group is and
you activate that by clicking on the little boxes in
the middle, on the right. When you're in this
mode, your Apple pencil becomes kind of shiny, like a neon magic wand, and you can select
the tracks that you want in your boxes or
deselect them just by, you know, writing on
them or circling them, whichever works best for you. So once you have your ghost and your watering can selected, we're going to long hold
on any one of the tracks, and we're going to click Group. And so now here we have our nested box with our
ghost and our watering can. I'm going to also
highlight this one, and I'll just make
it like orange, just for ease of use and to get into the habit of
organizing things. So let's go back
to where we were. So our little ghost moves. He comes in to hear. He comes in to grab
the watering can. And this is when we're going
to use the perform mode. So. I want to deselect the group and I want to make
sure that I'm placed at the right moment about here and I'm going
to click Record. But first, I want
to edit the anchor. I'm going to click
then I'm going to click the three little
dots, edit the anchor, and I'm going to bring the
anchor down in the top third, middle of my watering can that
feels like it makes sense. Then I'll click Done
on the top right. Alright. So one of these things with these motions is you want to think about what motion exactly do I do when I'm pouring
a watering can. And this is also what I find really fun about
this perform mode, is that it really
allows you to kind of integrate your body and
your body memories and to think about movement and
to think about how that happens and to bring
that into your drawing, which is just I don't know, I find it really, really fun. So maybe think a
little bit about, Okay, well, how would I pour? You know, I'm going to have, like, a little bit
of a movement. I'm going to wait right at the end so the water can drop and then I'm
going to come back. All right. Once you're ready, and sometimes it'll take you multiple takes in
order to do it right, it probably won't be perfect
this time and that's okay. It's really just for you to understand the
principles of this. In order to rotate, you want to be placing
your apple pencil on that little gray curve. If you go a little bit too far, then sometimes it'll think
that you're scaling or moving, you really need to be quite
precise with how you touch it with how you place
your apple pencil on it. Let's just try I'm going to pour and then come back
pretty much to straight. However, it's not exactly
straight. What do I do? I can come in here, zoom in, and I find the last
frame that I had, the last keyframe
that was placed. If I click on it, I can see
the amount of the rotation. I'm going to go ahead
and click that and put zero because
I want to be back to my perfect vertical
initial position. That makes sure that my ghost and my watering can
are in the right position. Quick question, Marin Noel. Yes. Somebody asked if you are not satisfied with the movements
that you performed, is it possible to erase all the key frames instead
of deleting them one by one, so you can just quickly restart and try to
repeat the movements. Yeah, what I would do what
I would do is I would use my two fingers and tap, and that'll just allow
you to completely just erase the movement
itself that you just did. And that's the easiest
way to really very quickly do retakes of the
same perform movement. I hope that answered
the question. So we're going to do
the same thing again. We're going to get a
second shot at this. I want us to start
at 11 seconds. Bring your play head maybe 11.5. We're going to again click the corner and then
we're going to pour. You see, there I just did it. I wasn't placed well
enough on the arc. I'm going to double tap and
I'm going to try again. I'm Okay. I'm going to come and change the last keyframe, like I did. And now I want us
to zoom out again. And you can actually
actually, no, you can zoom in and just
check your movement. Yeah. I'm pretty
happy with mine. It could be better, but, you know, I'm reasonably
happy with it. And we're going to come back to, um, this moment when the ghost
lands on the watering can. So what I'm going to want to do, so it's around 6 seconds, six and s. He's going to
pick up the watering can, kind of float around until
the moment where he pours, which is at 11 seconds. After he pours, he's just going
to come back over here in this area and kind of just
float at float around a bit. So that's the movement that
we're going to be doing now. So I'm going to click
on the perform mode. And we're picking
up Little Ghost. And I want him to start pouring. And then once he's done, he comes back and
floats and hangs out all the way to the end. This looks amazing. Lots of love in the chat
for how cool it. Awesome. I'm glad.
8. Frame-by-Frame Animation: Water Drips: So we want to, of course, add in the water that's going to be dripping out
of the watering can. So what we're going to do
is we're going to find the moment where you know, kind of in between the moment where it starts pouring and then the moment where
it finishes pouring. We want to just go a little bit earlier and we're going
to draw in this section. We're going to drag up into flipbook mode because
now we're going to do the third type of
animation process which is frame by frame
hand drawn animation, which is very fun. I'm going to choose blue as my color maybe something
like this blue. And we are going to click on this little bottom
left time stamp, and we're going to
make sure that we have onion skins activated. So you want to click
Show onion skin, and you can edit
the onion skins. And this is just the
frames that go before and after each frame
that you make. I like to keep my
opacity, you know, not 100%, but I still want
to be able to see it. So, you know, we can
just leave it at two, three frames. That's all good. And we're going to
zoom in and just have a little tiny little dot. I'm going to reduce
my brush size first, little dot of water
that's coming out, and then maybe it gets bigger. Oh, yeah. And so
you can see here what I did is I did my
drawing on this one, and then I went
to the next frame on my little flip book so that I could add
my new drawings. So I'm going to do that again. You can also simply
if you tap on it, you can add a plus
over there as well. So I'm going to make this
one a little bigger. And then it's maybe going
to start stretching. But even as it stretches, I want to keep it
the same volume as the initial big drop. Then there's the moment of
disconnect where it squashes. Obviously, it's not perfect, but you just want to
keep eyeball it kind of. Then as it falls, I'm going to keep
it a little bit closer on this first one, and it's going to stretch again. And then as it hits the ground, I want it to squash a little bit again and then make
a little puddle. With a little drop that comes up and two that
come to the sides. And then my little line
is going to continue. These ones are going to
hit the ground maybe, and then this one comes back. And my little blue
line becomes thinner and smaller and smaller
and it disappears. Now I want to click Done. We're going to add just one little more element
if we have the time. I'm going to ask
you to add a track. This one, I want us to
go back to where you can see the drip
that you just made. I want you to draw
and we're going to it doesn't really matter
here because this is something that you're
going to erase, but it's just a visual
marker for where you're at. This is another time saving thing that you'll do if you're making and I'm going to long hold on that,
click Fill duration. This is just going to
help me for afterwards. If I zoom out and I look
at what I'm doing here. If I use three fingers, then I can shorten the
timeline by the way. I want to come to this
moment so he's poured his water and then comes
back and is watching. At 21 seconds. Then I'm going to come back
and draw again on this track. And I'm going to use blue,
but you can use green. We're going to make a
little flour that pops up. So we're going to zoom in. And the first one
is just going to be one little dot that
you won't even see because it'll be
underneath your marker. And then maybe one leaf, then a tiny little
leaf next to it, and then that'll be
bigger and bigger. And one really big one. A second really big one. And this time, we're
going to add the sock. Oh, I'm actually
going to go back to the previous frame and add
a tiny bit of a stock. I forgot that. And then I'm
going to add a little bud. With a tiny flower. Maybe I'll do the same
color as my Ghost, but you can make
it like neon pink or something like that, and make it even bigger
on this last one. Alright. One final step left. So I'm going to click on Done, and then I'm going to click on this last frame fill duration. I'm going to also go back to that little
marker that I made, and I'm just going to
long hold that and delete content so that I no
longer need that anymore. I'm going to hit groups
and I'm going to group my entire blue little flower together by long holding
and hitting group. I'm then going to long hold this again and click Duplicate. And I'm going to zoom out,
and I'm going to see that there's a duplication of
my little flower here. There might be some track
that got added or you might have room on some track
underneath like I do or above. And so we're just going
to add it down there, and I'm going to do
it one more time, duplicating then I'll put this
on my third one over here. Alright. We should be all set.
So if you zoom out, you bring your playhead
to the beginning. Oh, I didn't mention
that actually, but you can also play by shoving your playhead by just
throwing it to the left. That's another way of doing
that, it'll start playing. But let's do it in
the right mode, which would be, not the right
mode, the biggest mode, and you use four of your
fingers in order to do that, so we're going to
tap four fingers and then we're going to
hit play on our animation. Oh, I just realized I forgot
to move the little flower, but this is where you can check. So I had actually we made
three little flowers, but I forgot to show you how to move them. So
we're going to do that. The second one I'm going to untap the group thing so I
can tap on the second flower. And the way that I like
to make it appear is I'll use the perform
mode just to make the bounding
box kind of appear, and then I'll deactivate it, and then I see the bounding box. So now that I have it, I can actually just tap here, and that would probably
be the easiest. I've just gotten
into the habit of doing that kind of every time, but it's not the
most time efficient. So if you just tap,
it will appear. And I can move my little flour, and I can also scale
it because I'm sorry, I'm struggling to do that here. I need to zoom in. Because
I'm not in perform mode, it's not going to why it's
not working right now. Oh, I know why because my
anchor isn't the right place. So if I where is the anchor? The anchor is all
the way up here, I'm going to bring it
all the way down here, and that's going to
allow me to scale it. So I click Done, and then now I can scale
my little flour. I'm just going to make
it, kind of there. I'm going to do the
same thing with the other one, third one. So I'm going to move
it out of the way, and I'm going to also
make it a little smaller, so I'm going to edit the anchor, take it from the middle here, bring it back into my
flour. Click done. Zoom in and then scale
this just so it's a little smaller. There we go. Now we should be
actually completely set, and we're going to
start over and see our full animation in action. So there's our little ghost with his three little happy flowers. Looks amazing. You're getting lots of positive
comments in a chat. Super cute. Super
sweet. People love it.
9. Takeaways and Q&A: So I've done other iterations that we don't have the time
to get into, but, you know, where the ghost just puts
his watering can down, and then he floats away
on some new adventure. Amazing. Yeah, I did want to
just show people that it's totally possible to create an animation from
scratch in the app. It's a really, really fun way of understanding
how it works, and it doesn't need
to be complicated. And that's, I think, also
something else that, you know, I think animation kind of
scares a lot of people, but that's what I love about
this app is it's not scary. Once you understand the way that all the little elements
work where they are, you can really just have fun playing with your
creativity, your ideas. You know, you might see
something in your day that you find kind of cute
or kind of surprising. And then you can
try and experiment with it in the animation app. And so I also hope from what I was talking about
in the beginning is that you really start
to understand or start to experience
that drawing and animation are just
windows into you connecting with
the outside world and with yourself
simultaneously, and how can you bring
those together in ways that are exciting
and fun for you? One question was, if you wanted to animate the
sun with spirals, how could you animate
the nodes at the edge? I don't know if you
have a thought on that. If I wanted to animate the sun, I would probably use
the rotate animation because I think that especially if you have a sun
that's a spiral, then if you use the rotate, then you'll have the rotation
of those spirals going on. I don't know, that would be my first way of thinking of it. For sure with the warp nodes, it's really more of
that breathing effect. But I could still see
you maybe pulling, maybe pulling some of the
swirls in one direction. So that could be really
fun to experiment with. Actually, I'm very curious
and would love to see what comes from your
experiments on that note. Yeah. So it sounds like
experiment with rotate. You could also
experiment with nodes, but rotate might be easier. And then someone else
recommended trying to group a glowy track and then perform the opacity on the globe track. That sounds very fun, too. Which sounds cool. So, I
try to experiment a bunch, but it sounds like there's a few different ways
to approach it. A more general
question, which is hmm. Have you tried combining
your analog art with dynamic animations
in Procreate dreams? Or do you intend to and
how might that look? Yeah, I've wanted to. I have not really yet, but it's on my kind of bucket list of things that
I want to experiment with. I've often had more a tendency to work with analog media or with just Procreate
and then bringing in my illustration
from Procreate into Procreate dreams, and
then animating that. But I've definitely been itching to try more of those
analog and digital mixes. There have been a few times
for several commissions, including a school say
commission that I did, I don't know, two years ago, where I did do both. I did first an analog thing, then I brought it
into Procreate. So I could definitely see
myself exploring that, and I'm sure that that
would be really fun. So yeah, that would
be super cool. Wow. For everyone here, you can stay tuned actually, I'll share my screen now. You can stay tuned with Marino
Worms Art on Instagram. So highly recommend
checking that out if you do want
to see some of her progress in maybe integrating the analog world
with Procreate Dreams. Also, we'd love to see what
you create in the app. Skillshare loves to repost what people in the
community are creating, and I'm sure Mariell
would love to see. Yeah. I would love to see what you guys
made from this session. So if you want to share
and you want to tag me, that'd be awesome
to see what it is that you made and
how you personalized it because I think that's also really important
and really fun. Yeah. Yeah, I would love
to see what you create. So yeah, definitely share
with us as you are ready to. And then another fun and
exciting offering we have is that Marie Noel is
offering one on one sessions on Procreate
dreams, tips and techniques. So if you're someone who wants to have a little bit more of that kind of hands on support
mentorship, coaching, work through an
actual project you want to work on
together with someone, Marie Noel is offering that, so there's a QR
code there that you can take if you're interested
in checking that out. Love my One on One session. So if you want to join, it would be a true honor because I just think it's
really fascinating to get into what your
specific issues are or ways in which we can help you reconnect or connect more
with your creativity. So in these Procreate
dream specific sessions, I was also thinking about this notion of style and of
connecting more deeply with your creativity and
yourself and how can you bring more of you into the
stuff that you create. So I'm going to be doing a
class about Procreate dreams, and I'm going to be
able to kind of delve a little bit deeper into
some of the techniques, a lot of these little
quick shortcuts and tips that'll help
make your workflow a little smoother and hopefully do a lot of creative
exercises as well. I think with that, we'd love to just give you a
round of applause, Marina Well, a round of applause to everyone out there for joining and sticking
with us and creating. I see all the fun
emojis popping up. Thank you for the love. And we wish you, yeah, beautiful
rest of your day, hope you keep on
creating and hope to see you at the next Skill
Share live session. And thank you so
much, Marina Well. Thank you so much to everyone
for joining. It was so fun.
 Marie-Noëlle Wurm, Artist, illustrator, HSP