Transcripts
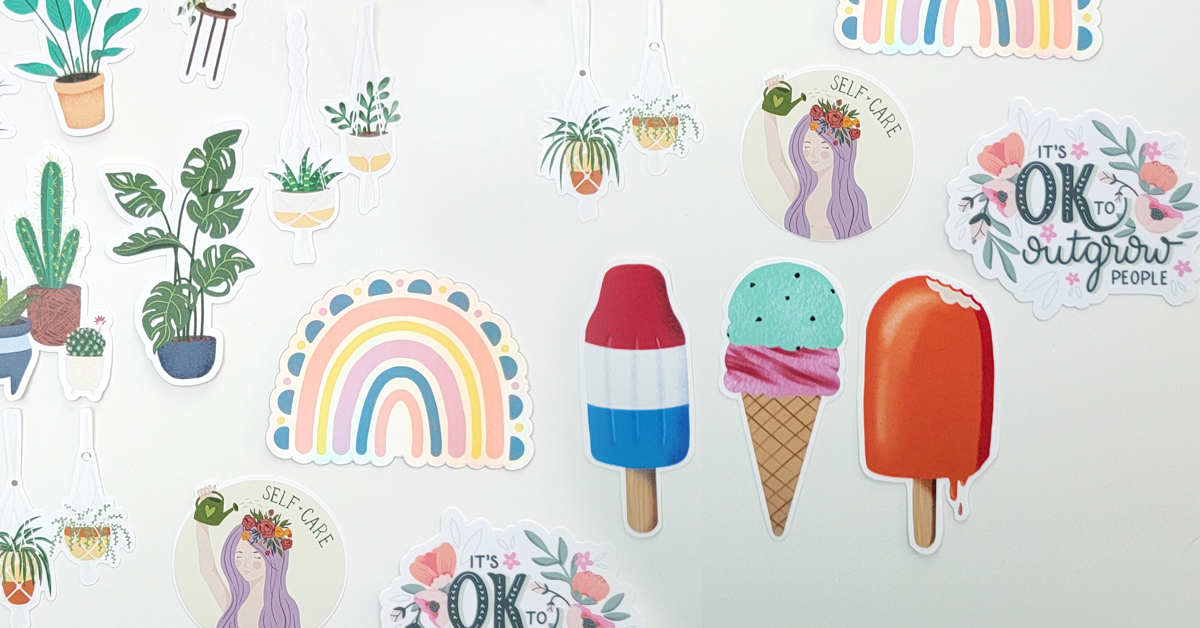
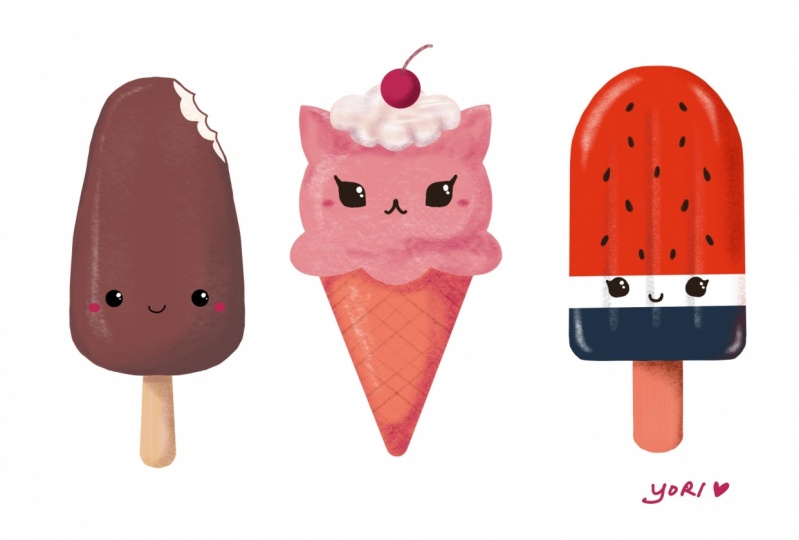
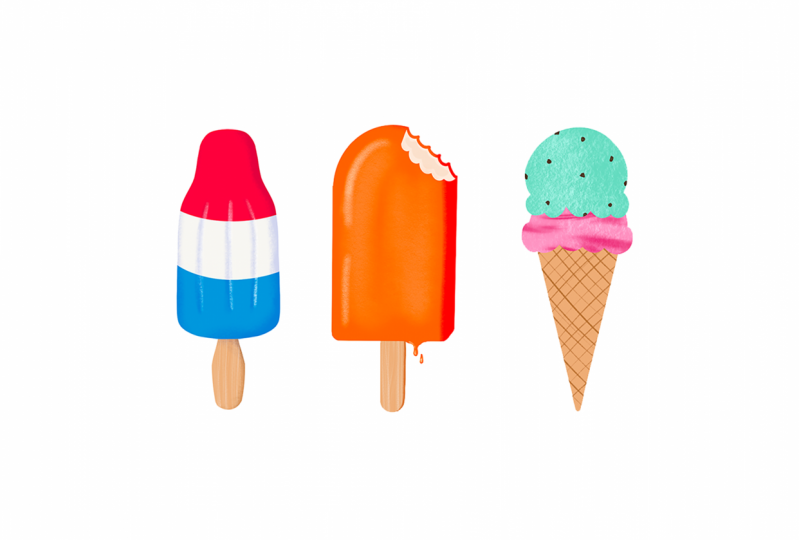
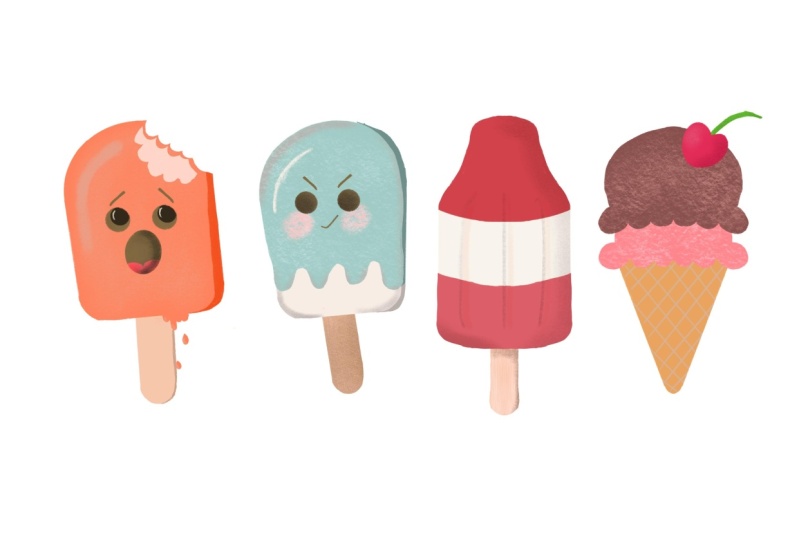
1. Introduction: Have you ever looked through social media and see print-on-demand sites and seen all those super fun, cute stickers out there, and thought, "Could I do that with my art?" Well, it's actually a lot easier than you might think so stick around and I'll show you how to create simple illustrative art on your iPad using Procreate, and then we'll turn that into stickers. Hi, my name is Isabelle. I'm a graphic designer, illustrator, surface designer. Basically, I'm a jack of all trades when it comes to anything artistic. For the past few years, I've been mostly doing digital art, and I love using the Procreate app, mostly for the ease of being able to undo or change something. For me, it really removes some of that stress of trying to make the perfect piece of art on the first try. In fact, I use the two-finger tap Undo functions so much that when I go back to drawing in a sketchbook, I'm actually double tapping on the paper more than once in one sitting. This class is for anyone wanting a fun and stress-free way to learn how to use Procreate while creating illustrative stickers. It's always fun to see your art on a physical product, and in my opinion, stickers are the easiest to make yourself at home. In this class, we will cover how to create a custom-sized canvas, how to organize your brushes for a better workflow, how to create custom color palettes to fit your project. We will create from our imaginations using Quick Shapes and the Drawing Assist. I'll share with you my process to create simple and illustrative images. I'll be making a set of three summer cool treats, a couple popsicles and an ice cream cone, but you can make anything you want. I will also show you how to use layers and masks to add shadows and texture and what I think is the most important is how to work in a non-destructive manner. Now don't let that scare you. I know it sounds scary. All that means really is working in a way that you can always go back and make and easily change things. Of course, I'll show you the simplest way to make your stickers yourself at home without the use of an expensive die cut machine. By the end of this class, you will have some beautiful stickers that you can use anywhere. But most importantly, I hope that you will also have a simple workflow that you can apply to any form of illustration on Procreate. Are you ready to get started? Let's go.
2. Project Overview: There are many types of stickers out there, not only in material but also in the format. You can have sticker sheets, stickers on a roll, die-cut stickers, and many more options. Today we'll be making die-cut stickers. This is when the sticker is cut out around the shape of your artwork. But first, we need to make the art. I'll show you in my process if we're working in a non-destructive way using layers and masks in Procreate. We will create a theme set of three illustrative images. I'll be making summer Some treats so I'm going to be making two popsicles and an ice cream cone. I encourage you to create your own illustrations using the techniques that we won't be covering in today's class. Once you've completed your project, upload it to the project gallery so that we can all see your wonderful work. I would love to see the illustration along with the finished sticker. You can also let us know if you decided to make the stickers yourself or if you decided to get them printed online. Next, we'll cover the materials that we need.
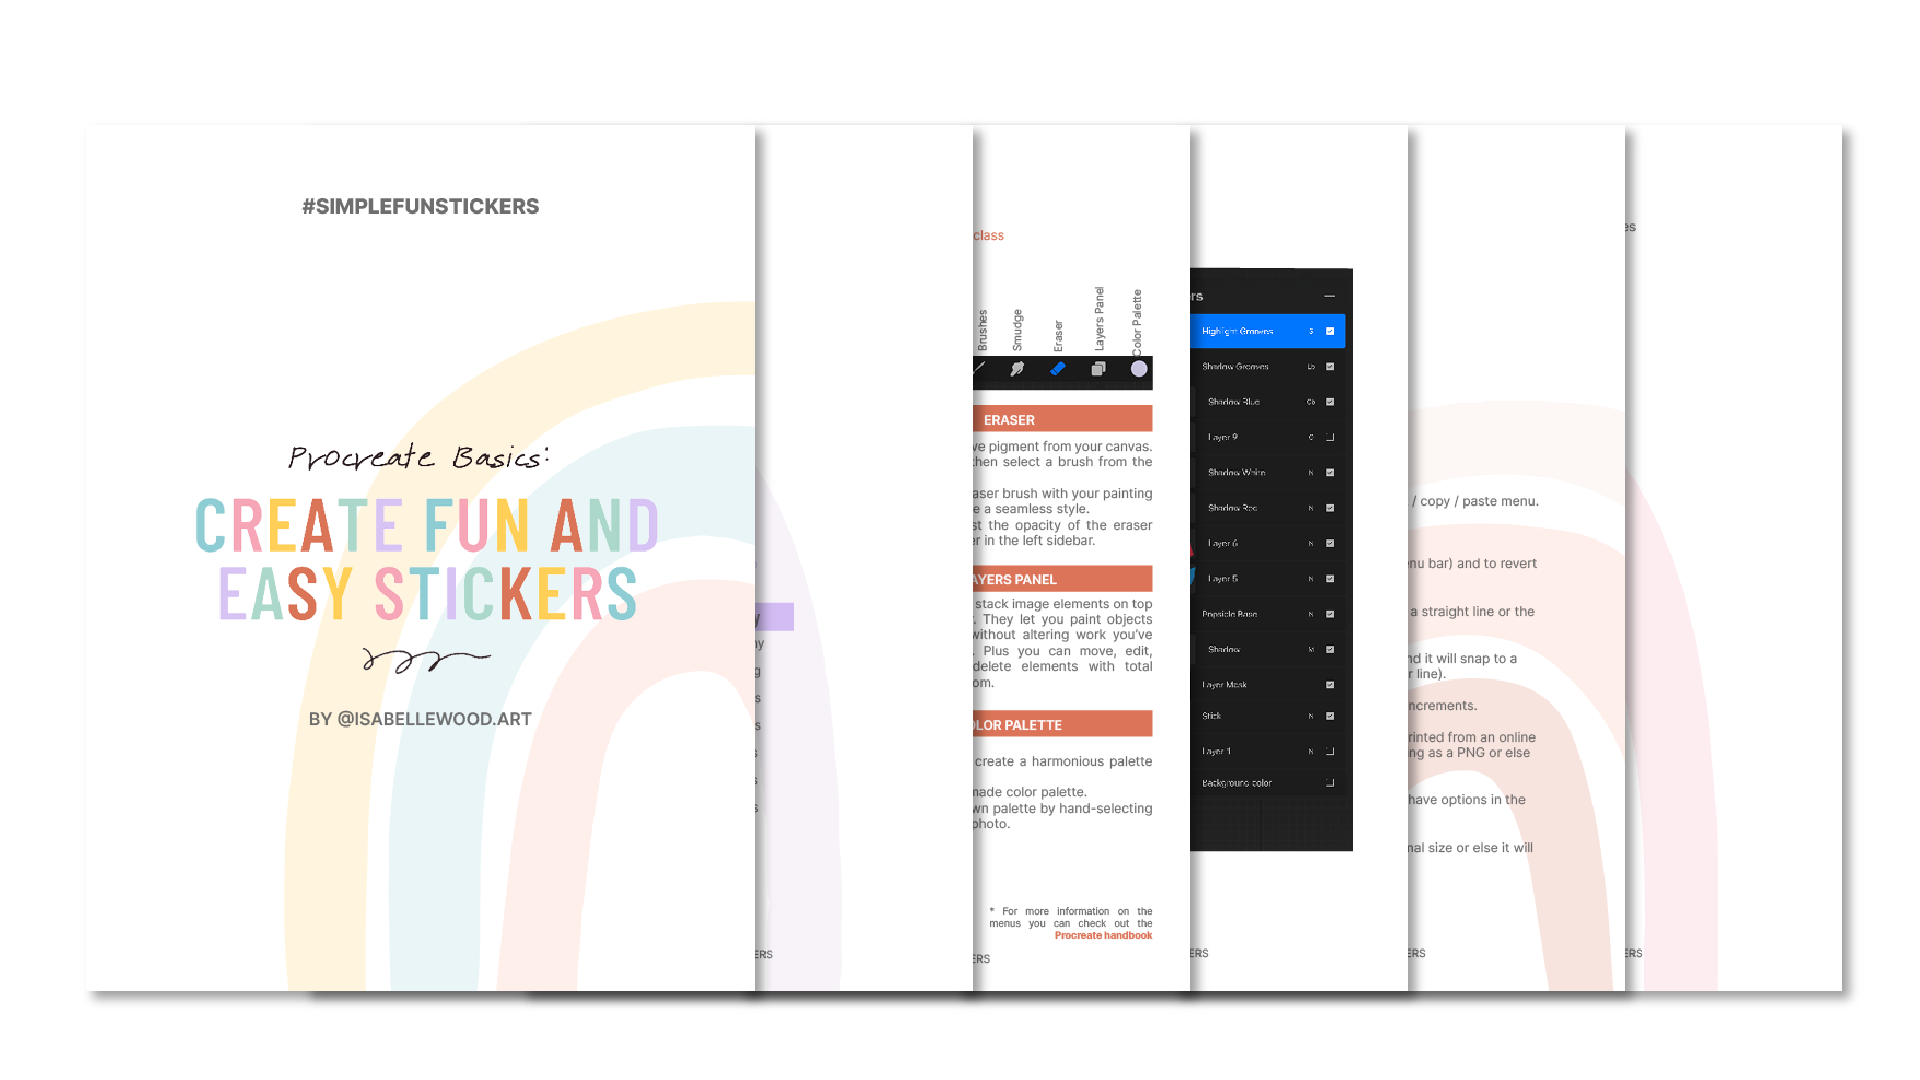
3. Materials and Resources: For this class, you'll need an iPad, the Procreate app, the Apple Pencil, or a compatible stylus, sticker paper, matte, glossy vinyl, that's up to you, scissors, and of course, a printer. In the class description, you'll find a link to the class resources I've created for you. I'm sharing with you the color palette that I'll be using today, but feel free to create your own if this one doesn't suit your project. There is also a PDF loaded with information like the list of materials, the brushes we'll be using today, reminders of what we covered and a list of some of my favorite things like Procreate brush creators, sites to print your stickers, sites to get sticker paper, and so on. Next, let's create our canvas.
4. Creating Your Canvas: In this lesson, we'll be creating a custom size canvas for our project. First step, open up the Procreate app. When you open procreate, the first thing that you'll see is your gallery. Every image is a separate project. But you can also decide to group them together in order to clean it up or just keep same projects but the same things together. I'm going to show you how to do this. The first way to do this is to click, "Select" up here in the top right-hand corner and you go select the projects that you want to group together. I selected my three popsicles that we're going to be working on today. All you have to do is click, "Stack." We're going to X out. Now we can name that stack. You just tap on it and change the name. We are going to call them cool treats for the summer. That's the first way that you can create a stack. The second way to create a stack is to hold one of your canvases and just drag onto the other one until it turns blue and then you release and it creates a stack. Now to add another one, wait until it turns blue, it'll open up and then you can drag it into that folder. Then you go out and then you can rename it, Cool Treats, there you go. Now if you made a mistake and you put stuff in a stack that you didn't want there, this is how you would undo it. If you want to remove everything, you can again select everything or if you just want to remove one, you hold it and just drag it out. You would do the same thing If you select all of them, you would select all three, hold and drag it out until the little arrow turns blue and it brings you back to the main screen and then release your pencil. Let's create a canvas for today's project. We're going to click the plus sign here in the upper right-hand corner and Procreate comes with some pre-made canvas sizes. But we're going to create a custom canvas for today's project. So tap the little black box with a plus and the first thing you see is the dimension. I'm going to change it to inches because I like to work in inches. I'm going to make it 12 by 12 inches. I'm going to leave it at 300 DPI. So DPI stands for Dots Per Inch. It's the number of ink dots that are sprayed on your paper on a one inch surface. The higher the DPI, the better the quality of the print. Then you have your maximum number of layers. One thing you need to keep in mind when you create your custom canvas is the bigger the canvas, the fewer number of layers you're going to have to work with. Now, we have 37 layers on a 12 by 12 inch canvas. For me, that is more than enough for what I need to do today. I'm going to tap, "Create" up here in the top right-hand corner and it creates my canvas. Now, a little side note on this on, why I'm making such a big canvas for such a small sticker? Personally, I think it's important to create your canvas bigger than your initial need. The reason for that is, I don't know if next summer I might want to use that same illustration of a popsicle on something else for example, like a tote bag. Now the difference in size between a three-inch sticker and a tote bag is quite significant. If I created my sticker, my illustration on a three by three inch canvas and then next summer I want to put it on a tote bag, let's say. The tote bag has an area of, let's say, 10-inch by 10-inch. Well, I can always take that three-inch image and blow it up. But what will happen is that it will be pixelated and it will lose a lot of that quality. But if you create your image larger than your initial need then you can have more options down the line of how to use your illustration. There's always the option of redrawing it. For simple illustrations like what we'll be doing today, it wouldn't be too much of a time suck. But if you are creating something that is very complex then you might not want to have to recreate it every time you have a new project. It's always smart to create it on a bigger canvas than your initial need. You can always shrink it down and not lose quality. But if you blow it up too much more than 110 percent of its original size, you will start losing quality. Up next, let's create the color palette for our project.
5. Let's Make a Color Palette: In this lesson, we will cover how to create a custom color palette to suit your project. I will also show you how to upload a pre-made color palette and how to use one of Procreate's newer functions which automatically creates a color palette from an image. Now that we're in our Canvas, let's start with the color palette. Up here in the top right-hand corner, you have a colored circle. This is your color palette options. Here on the far right, you have all the palettes. Now Procreate comes with palettes already pre-made, and you can always create your own palettes. Let's create a palette from a photo. I'm going to go on one of my favorite websites that has free images to use for you and for commercial purposes, it's called Unsplash.com and I'm just going to write, summer, I want something fun. Let's just go with this first one. No, lets go with this one. This one's fun. Save your image to your camera roll, and go back to Procreate. We're going to open our palettes, and we're going to click the plus in the upper right-hand corner and we're going to do create new palette. Now, we are going to import the photo that we just downloaded. We're going to go in the top left-hand corner on that little wrench, which is your actions panel. We're going to click on the plus, which is Add, and we're going to insert a photo. We're going to go choose a photo that we downloaded. Make it bigger and click the little blue arrow to deselect the photo. Now we're going to go back to our palette. This is fun. We're going to use our finger. We're going to hold on the image and we're going to just drag it around until we come to the color that we like. Now the color that we are changing to will be on the top half of the circle. The color that is in our color picker right now in a little circle is the bottom half. Once we find a color that we like, we release, and the color has now changed. Now to put it in your palette, you just need to tap on one of the squares. Then you can go around and select a few colors here and there. Oh, that's a nice one. It's going to get some coral. That's too close. See this one here I wasn't sure if it was the same as my first darker green that I picked. There's a little bit more yellow in it, but not enough for me to want to keep it. I want to delete that. I tap and hold and release, and then I have the choice to delete the swatch. That's it. You can also come and rename your palette. You double-tap on the name that's there, which is now untitled and we'll call it flamingo. Done. When you create a new palette or when you import a palette, it automatically sets as default. If you want to work on a different color palette, let's say one here at the bottom, just click the set Default button. It is now default and now when we go back out, draw, come back, it will then be in your window range. We're going to go into the Layers panel. The two overlapping squares next to the color circle. In order to delete a layer, we are going to swipe to the left and delete. Swipe to the left and the last layer says clear because you can actually delete all the layers and the background color does not count as one of the layers. The other way to create a color palette, we are going to do the plus and we're going to do it new from photo. We're going to use that same photo and see what happens. New from photo, we're going to select our flamingo image and see how Procreate generated a color palette from that image. But it generated all the colors. Now you have a bigger color palette with a lot of different tones, which you can also do by hand. But if you want it done quickly then you can use this new function. Create a color palette new from photo. Now let's import the color palette that I created for you guys for this class. We're going to click the plus. We are going to do new from file, go to the folder where you downloaded the class resources and all you have to do is tap on it once. Cool Treats, and there it is. It automatically pops in, and it's set to default. Perfect. I have it a duplicate of the Cool Treats here. I want to get rid of it. On the whole pallet, you swipe left and you have a delete button. We're going to remove this one, but I actually like the one that I created by hand. I'm actually going to keep that. We're going to delete this note. Next, let's explore brushes.
6. Exploring Brushes: In this lesson, I'll show you how to create a custom brush folder so that you can streamline your workflow by picking out the brushes you want to use for this project and assembling them all in the same place. Now, let's quickly look at the brushes. That's the first tool here on the right-hand side. You see that it's a brush and you have a finger which is the Smudge tool, which we will not be using today, and the Eraser tool, which we will probably be using today because I make mistakes and you probably will too, and you'll need to erase something. Let's open the brush panel. That's a little paint brush up here. At the bottom completely, you'll see collections that have a little icon. Those are all the brushes that come with Procreate. I've picked some brushes from these categories that we will work with today. In order to create a brush folder, you scroll all the way up to the top and press the little plus. I'm going to call this brush folder, cool treats. I'm going to drag it down because I have so many brushes that I've purchased from artists, I actually want to bring my cool treats folder down closer to where the brushes I'm going to be picking today. I'm going to hold it, drag it down. I'm going to put it right above the Procreate folders here. On the screen you're going to see the name of the brush and the name of the category. It's also in your resource PDF that I've created for you. The first brush that we're going to use today is the monoline brush and we can find it in the calligraphy category. Tap on "Calligraphy" and you have the monoline brush. Now, I never want to use the original brush. I never want to move that one out of its folder, so I'm going to duplicate it. You go swipe to the left and tap "Duplicate". Now, you know it's not the original brush because there's the little Procreate swash up here in the corner. I know that that one's okay to move out. I'm going to tap and hold and I'm going to drag it to my cool treats. As soon as the cool treats turns dark and I don't know if you saw that, it's really tricky. We're going to let it go and it goes into the folder. The second brush that we're going to use is in the charcoal section. We're going to actually use two brushes from this section. We're going to actually drag both of them at the same time. We're going to tap on a "6B Compressed", swipe left, duplicate it. Then we're also going to use the carbon stick. Tap on it, swipe left, duplicate. In order to select two things at the same time, you select one and with the other one, you just do a quick swipe to the right and it turns a dark blue. Now, we have two selected, so I can just hold down one and pull them both out and hover above my cool treats and drop them in. There we go. You get just how to do this. It's a little tricky, so take your time. I'm going to finish up mine and I'll meet you back here. Up next, sketching out our illustration.
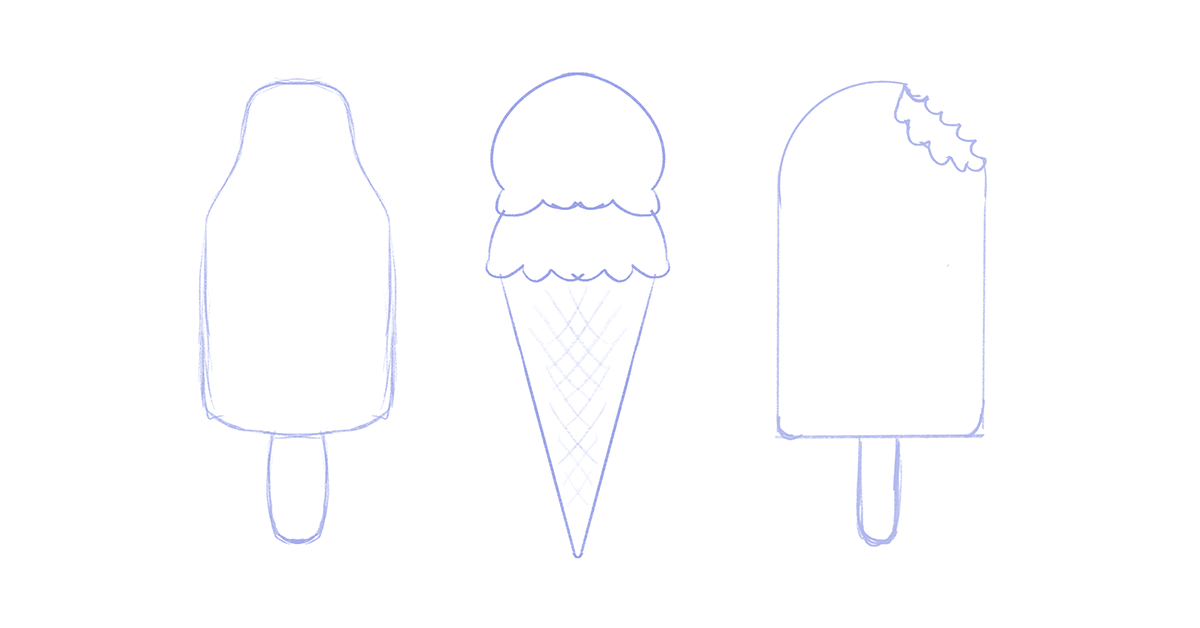
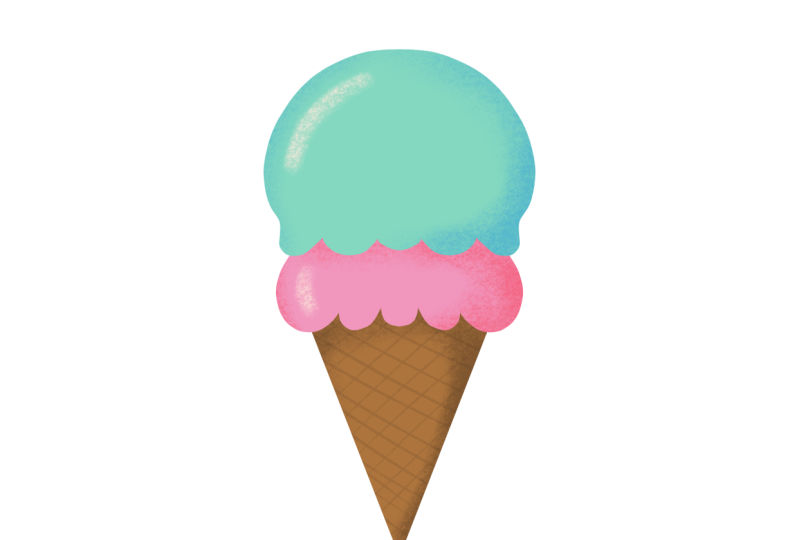
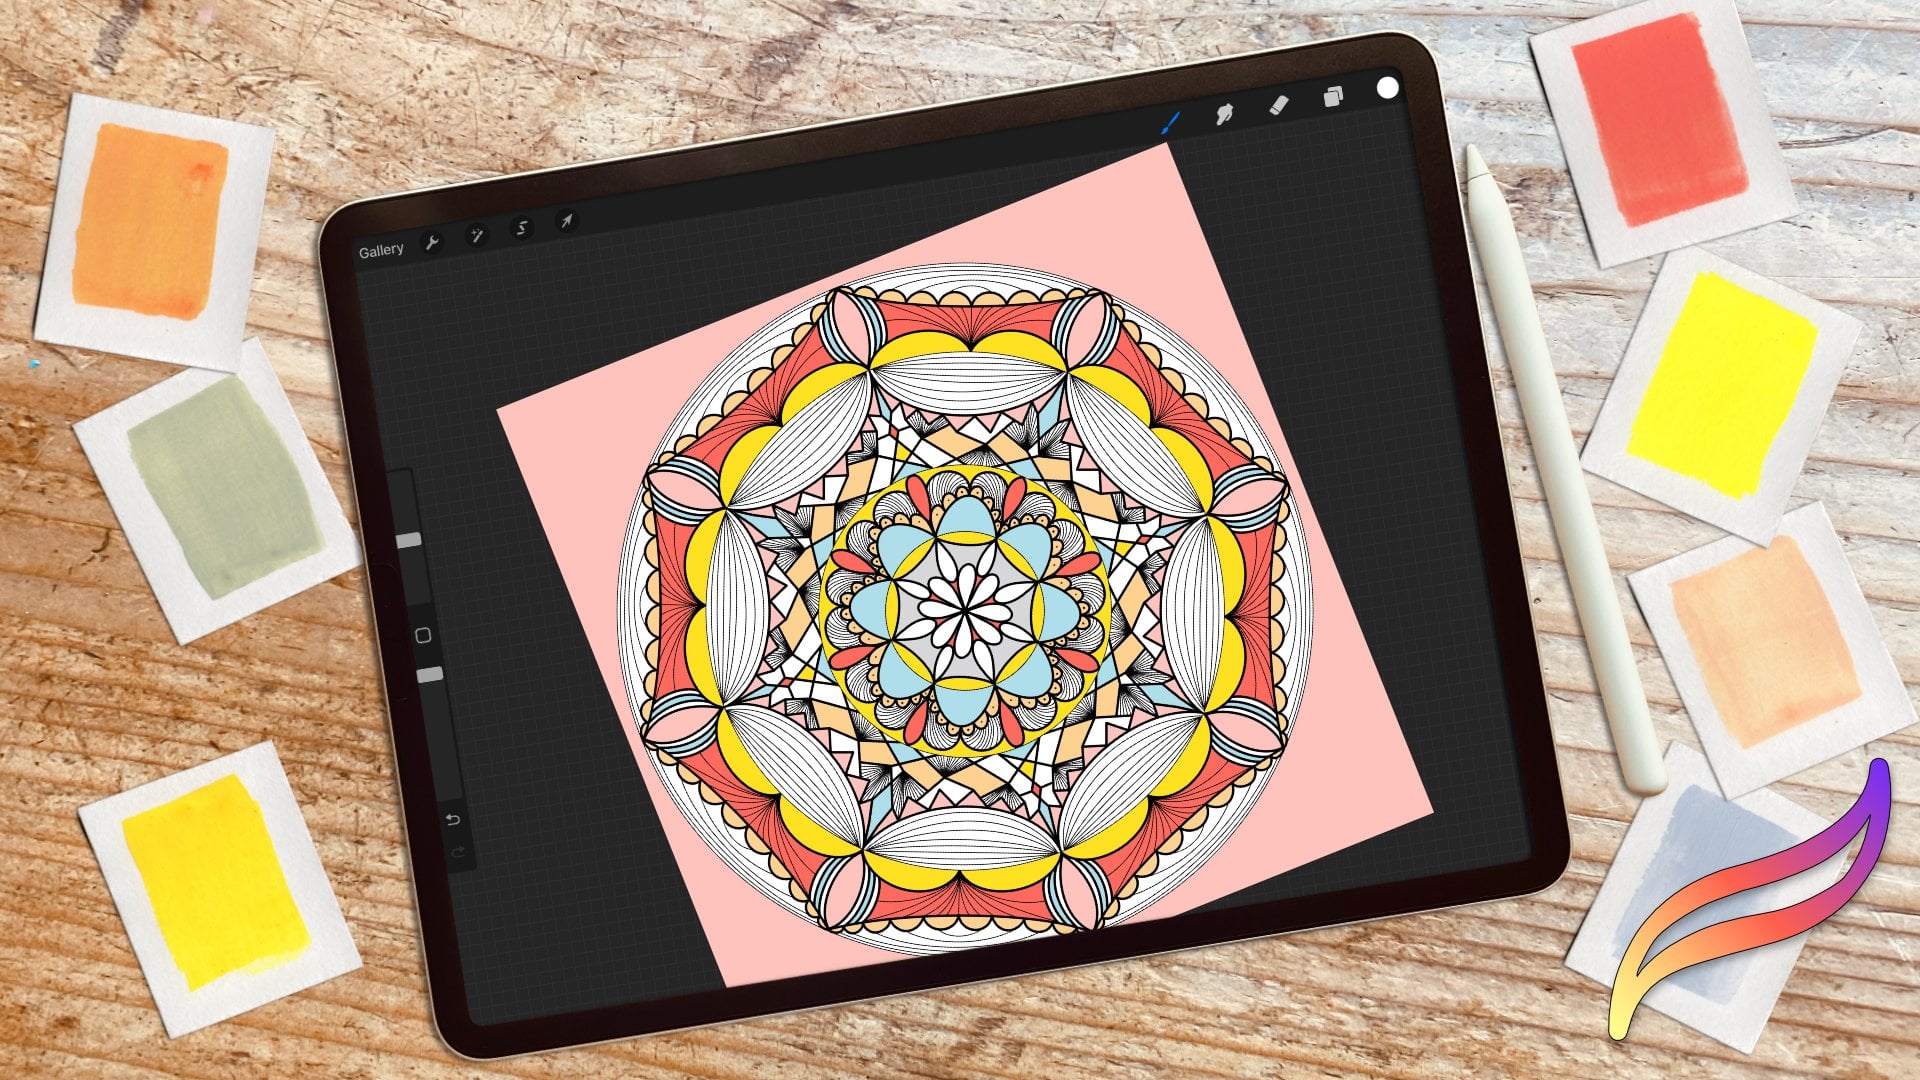
7. Let's Sketch: In this lesson, we'll be creating simple illustrations from our imagination. We'll be building off simple shapes using the quick shape tool and the Drawing Assist. I want you guys to feel comfortable to experiment with these drawing tools to really make it easier to draw without a reference. So let's get started with our sketching. We're going to tap our Brush and we're going to go choose the 6B pencil. I'm going to choose the medium purple color. We're going to start sketching the first popsicle, which is going to be the Orange Creamsicle. We are going to use a quick shape to start. So the quick shape is you draw, let's say you draw your circle and don't lift your pen. So you're going to draw your circle and keep holding it. Then you'll see that it creates an ellipse because I can't draw a circle to save my life. But you hold down one finger, tap on your screen and automatically, it turns into a perfect circle that you can make smaller or bigger just by dragging your brush. Before really [inaudible] it. Once you're happy with it, you can release your pencil and now your shape is there. Let's say you made it too big. You can always transform it. So you tap the arrow up here in the left-hand corner. This is the Transform Tool. If you are on Uniform, then you can go ahead and make it bigger or smaller as you wish. If you are on free form, however, this is when it gets a little funky because you can't keep it as a nice even circle. So let's say you made a mistake and you don't want this and you want to undo it, all you have to do is take two fingers and tap once, and that will undo the last thing that you did. You can do that. You can go back like that for a few things. We really went back too far. On the left-hand corner here you have the slider which will adjust your brush size, the opacity, and it has two arrows, one going back, one going forward. So that is also undo and redo. So we can go ahead and redo until we get to the circle, Uniform. I'm going to make it about this big. I like the size, so we're going to deselect by tapping the arrow. If I'm drawing on paper, I'll probably move my notebook around. But for purposes here, I won't move my iPad, but I will move my canvas. So you take two fingers and you can zoom out and zoom in, zoom out, but you can also rotate your canvas. I'm just going to rotate it. What we're going to do, we're going to draw a straight line from the side of our circle. I'm going to tap and hold it so that I know that my two points are now aligned. I'm going to do the same thing on the other side. Try to eyeball where the other one ends. So if you're drawing a straight line and you tap and hold, you can now move it in 15-degree increments. So we're going to select our eraser and we're going to tap again. We're going to choose the Monoline Brush because I don't need to have texture in my eraser for my sketching purposes. Then I'm just going to erase my edges. We can even erase our circle if you actually want to visually see what it would look like. I think maybe I'm going to end up rounding out my corners. I don't have a lot of room for my stick, so I'm going to go tap on the transform tool. I'm going to make sure that I am in Uniform because I don't want it to be all skewed. We'll make it a little bit smaller. I'm going to deselect. Then I'm going to sketch out my popsicle stick. I think I'm also going to create a bite. There you go. So now we have our first sketch. We're going to go back to our gallery. Go to Gallery. We're going to duplicate this. So swipe to the left, duplicate it. We are going to, how about we rename these? So we're going to name the first one, Orange Creamsicle. We're going to name the second one, Ice Cream Cone. Let's just duplicate it again, just so that it's done. We're going to name this one, 3 Colored Popsicle. Obviously, now we have the same sketch, but we're going to go change that. So we're going to tap on, which one are we at? We are in Ice Cream Cone. We're going to tap on it. We're going to go into it. Now we're going to clear this layer. So you can do it two ways. You can swipe to the left and do clear, or you can tap on the layer and this brings up your layer menu. There's a clear. So we're going to clear this layer. Now we are going to create our popsicle. For this, I'm going to use the Drawing Assist. So tap on your actions panel, which is the little wrench in the top left-hand corner. We're going to go on Canvas. We're going to toggle the Drawing Guide to turn them on. Then we're going to edit the Drawing Guide. So tap on, Edit Drawing Guide and the grid is fine. But I want the Symmetry right now. The symmetry, what it does is that whatever I draw on one one will actually automatically repeat on the other. So we're going to just click Options and make sure that we have it set on the Vertical. This is what I need for today, but there's also Horizontal, Quadrants, and Radial, which can be really fun to create mandalas. So we're going to click Vertical and then Assisted Drawing. Just tap on Options and click Done. So now let's go ahead and start sketching our ice cream cone. We're going to start with the cone. I'm still on the eraser. So select your Brush and we should be on the 6B pencil. We're going to close the brush panel, and we're going to sketch out our ice cream cone. So I'm going to sketch it out, see how it holds line. Then I'm just going to close that up. The eraser works the same way. You erase on one side, it will erase on the other side. So now I have a very symmetrical cone, which is what I was looking for. Actually, you know what? I keep making this mistake, but I don't need the top line for this ice cream cone. We're going to go create our first ice cream scoop. Then the second one will be the same. You can erase that if you want. It'll be better when we're doing it, the clean version. So I'm also going to add some little crosshatch there because I want it to be a waffle cone. So yummy. Now we're going to do our third sketch. So go back to your Gallery, select your 3 Colored Popsicle. We're going to tap on the Layers and we're going to clear this layer. So I'll tap once and tap clear. We're going to tap the actions panel, Canvas, Drawing Guide. We're going to turn on the drawing guide. We're going to edit. Select Symmetry, make sure it's on Vertical, and click Done. There we go. I need to draw on the side. I'm going to create the shape of my popsicle. This one is very much sketched out. I'm going to move it up a little bit. Undo, I'm not happy with that. There we go. So now we have our third popsicle. We're actually going to start coloring this one in. So I'll see you in the next video. Up next, we'll be using layers and masks to add some colors to our images.
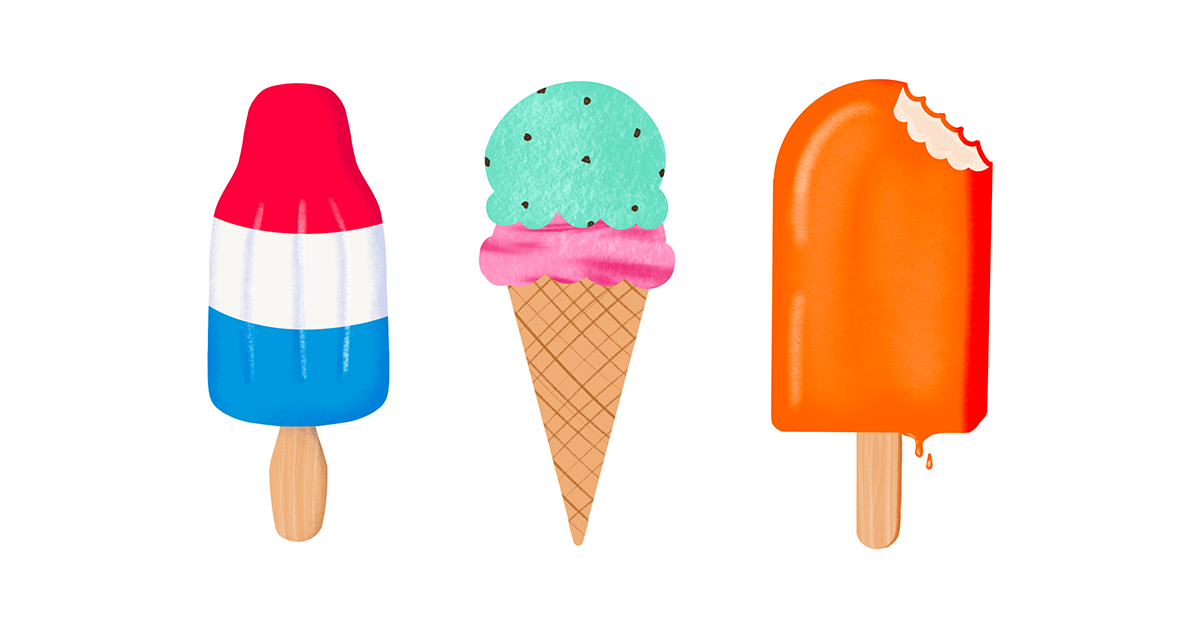
8. Adding a Base Color: In this lesson, we'll be using layers, quick shapes, and clipping masks to add the base color to our images. I'm going to start by doing by three colored Popsicle. I'm going to select that "Canvas". I'm going to open the layers and select my "Sketch Layer." I'm going to change the blend mode to multiply. I'm going to put down the opacity to about 50 percent. I'm going to add a new layer and move my sketch layer above the new layer. Next, I'm going to turn the drawing assist on the new layer. So tap on the "Layer" and select "Drawing Assist". We're going to select the white color from our color palette. We're going to draw in our main shape. Now I can't see white on white. I'm going to uncheck the box for the background in the layers. In order to fill my color, I'm going to drag and drop the color from the color palette into my shape. Fix any lines that need to be fixed. We're going to add a new layer. Select the blue from our color palette, and draw our blue shape. I'm going to fill it in. Then I am going to tap on "My Layer" and select "Clipping Mask". I'm going to do the same thing for the reds. I'm going to add a layer, select "My Red", draw my shape in order to fill that section with red. Once my shape is close, I'm going to drag and drop that. We're using the color fill tool and then select "My Layer" and select "Clipping Mask". I'm going to add a new layer. I'm going to select the lightest tan color, and I'm going to draw my stake. Here I'm using the quick shape in order to draw smooth curves to create my Popsicle stick, and I'm going to use the color drop in order to fill that shape. Just make sure that your shape is closed completely. Use the eraser to fix any lines that you don't like. We're going to do the same thing for our ice cream cone and the orange cream [inaudible]. We're going to set our sketch layer to multiply and with an opacity of 40-50 percent, we're going to move it above our new layer, the layer that we're going to be adding color to. Then we're going to draw each element on a separate layer using simple shapes and we're going to use the color fill option to quickly fill in the shapes. Don't put any stress on yourself, try to get the perfect image. Stickers are supposed to be fun and they're supposed to be simple, bright-colored images. Use simple shapes to draw your images, and then you can use the eraser to modify your shapes to create a new shape. Don't forget to add a touch of whimsy. That's what's going to make your stickers special. Like I'm doing here with the melting Popsicle drops. Up next, we'll be adding some interest to our images by adding some shading and highlights.
9. Shading and Highlights: In order to make our images a little more dynamic, less flat, we're going to be adding some shadows and highlights using layers and clipping masks. Now let's add some shadows and highlights to a three-colored popsicle. We're going to add a layer. We're going to set it to clipping mask. We're going to select the light mauve color, and we're going to put our layer to the multiply blend mode. I'm going to use the 6B compressed brush and make my brush as big as I can. I'm just going to use a circular motion working on the edge of the popsicle to create a shadow. I'm also going to add a very, very tiny shadow on the other side. I decided to play with the opacity of the shadow, bring it down a little bit. Then I'm going to use the eraser with the same brush, the eraser using the 6B compress. In order to keep the texture of that brush, I'm going to erase some shadow out. I find that it's a little too wide. Again, play with the opacity. A lot of this is trial and error and it's visually figuring out what you like. I'm going to bring down the brush size to about four or five percent and I'm going to bring the opacity of the brush a little bit lower. On the slider to the left, on the upper slider, that's the size of the brush and on the lower slider, that is the opacity. I'm going to draw three lines in the popsicle, and it's to mimic the grooves in these types of popsicles. You can draw three or four grooves depending on what popsicle you're drawing, if you're drawing a popsicle. I'm also going to add another layer and change the blend mode to screen. This is going to be my highlights layer. I'm going to bring the brush size down even more because I just want to add a very light line to the right edge of those shadow lines, and that's it for the popsicle. I'm going to add a shadow underneath my popsicle stick. I'm going to select my popsicle stick layer, add a layer, select it to multiply. Then I'm going to use the darker purple and draw a shadow underneath. I'm going to reduce the opacity. Next, I'm going to add another layer above my popsicle stick, set it to clipping mask, and select the medium brown. Again with the 6B compressed, I'm going to add a shadow to the side of that popsicle stick. You could play with the opacity of the brush directly. But because I like to work in layers, I prefer doing it at the brush opacity at 100 and then just playing with my layer opacity to get the result that I want. Next, add some highlights and shadows to your other images. For me, I've only got some shadowing to do on my orange creamsicle. For this popsicle, I really wanted to get a three-dimensional look. So on my base layer, to the shape that was already there, I added a side to my popsicle to give it that dimension. I did the same thing for the popsicle stick. On a new layer, I am adding the medium orange to a highlight, just surface of my orange creamsicle as if it's wet. Then with the lightest orange, I'm going to add a second highlight. Of course, don't forget those little details like the drops that are melting off of the popsicle. Up next, we'll be adding some texture.
10. Adding Texture: In this lesson, in order to add some interest to our images, we'll be adding some texture using brushes and blending modes. In order to create a wood grain texture on my popsicle stick, I am going to take my layer and turn on the Alpha Lock. There's two ways that you can do this. You can tap on the layer and select "Alpha Lock" or I prefer to use two fingers and a quick swipe to the right on the layer. You know that it's on Alpha Lock when the background of the layer is a black and gray checkered. I'm going to use a white or I recolor and I'm going to use the Twig brush, set the opacity to 50 percent, and I'm just going to drag up and down very lightly on my stick to create some grain light texture. What the Alpha Lock does is it creates the same thing as the clipping mask, meaning that whatever you draw on that layer will stay within that shape. The only thing is it's not on a separate layer so you can't change the color down the line or you can't modify that without erasing your base color. That's something to think about. If it's something really small like the popsicle stick, I don't mind doing it. It's not complicated to just redo the whole thing. But for something that I want more creative freedom with, I prefer doing it on a separate layer. I'm going to add a layer above my pink ice cream and turn that to screen mode and I'm going to select the Clay brush, and I have the pink color selected. I'm just going to turn off the green ice cream so that I can have better visibility. I'm going to add some texture to my ice cream scoop. Next, I'm going to do the same thing with the green ice cream. Add a new layer above the mint ice cream, and on screen mode, add some of your texture in the same color as your ice cream, and there you go. That's it for that one. Up next, let's add some finishing touches.
11. Finishing Touches: In this lesson, we'll be adding some finishing touches to make those images really special. I'll show you how you can make some quick modifications to the shape of your image without having to commit to it right away. We'll do this by using a layer mask. On my three colored popsicle, I'm going to modify the shape of the popsicle stick. I'm going to tap on the Layer and select Mask. What that does is it creates a layer mask. I'm going to select all my layers that have to do with the popsicle part of the image and I'm going to group them together and uncheck that group so that I only have my popsicle stick on the canvas. I'm going to use a brush with the color black and I'm going to draw on the mask. Anything in black will hide the image underneath and anything in white will bring it back. I like that shape, so I'm going to select it and I'm going to click on the arrow for the transform tool and I'm going to stretch it out a little bit. Well, I'm playing around with the eraser and I'm just removing some of that shadow. Now on the ice cream cone, what we're going do is we're going to add a strawberry swirl to that strawberry ice cream. We're going to add a layer above the strawberry and we are going to set it to clipping mask. We're going to choose a pink that is a little darker and the ocean brush. I'm going to put it to the maximum and just drag my color over my ice cream. Now, I don't want the texture on my swirl, so I just brought the texture layer below. I'm going to set my swirl layer to multiply. I'm going to do the same thing with my mint ice cream, but this one, I'm going to draw in some chocolate chips using the darker brown and the 6B pencil. I'm going to add a layer above my ice cream, scoop and just draw in some of those chocolate chips. That's it for that one and we're going to go add a finishing touch onto the orange creamiscle. Remember that sketch where I took the bite out of it, so now we're going to go take a bite out of the artwork. I'm going to turn my sketch back on. On the base color layer, I'm going to add a Layer Mask and with my brush, I'm using the monoline brush with a black color. I am hiding everything that I want to take away from the image. Then using the white color, I'm just going to bring back the edge of the other side of the popsicle. I like that, so I'm going to squeeze the two layers together and merge them. Now I can't go change that, but for me it's final. I could have left it, but I decided to merge them together. I'm going to add a layer underneath my base color, and I'm going to select the ivory color and I'm going to draw in my vanilla ice cream using the monoline brush. I'm going just draw it in and again, color drop for a quick fill. I'm going to select the medium. There's an ivory that's just a little darker and I'm adding just a little bit of depth to the middle of the vanilla ice cream. You can't really see it on the screen because of my lighting, but it's actually there. Next, we'll be exporting our images.
12. Exporting Your Artwork: In this lesson, I'll show you how to export your images. Exporting your images is really simple. All you have to do is select the wrench icon and then you select "Share," and "PNG." Now, if you leave the background there, you're going to end up with a square, so you want to turn off the background by unchecking the layer. Then you can go into the wrench icon, Share, PNG, and save it to your iPad or to the Cloud. You're going to do that with all your images. Up next, let's make our stickers.
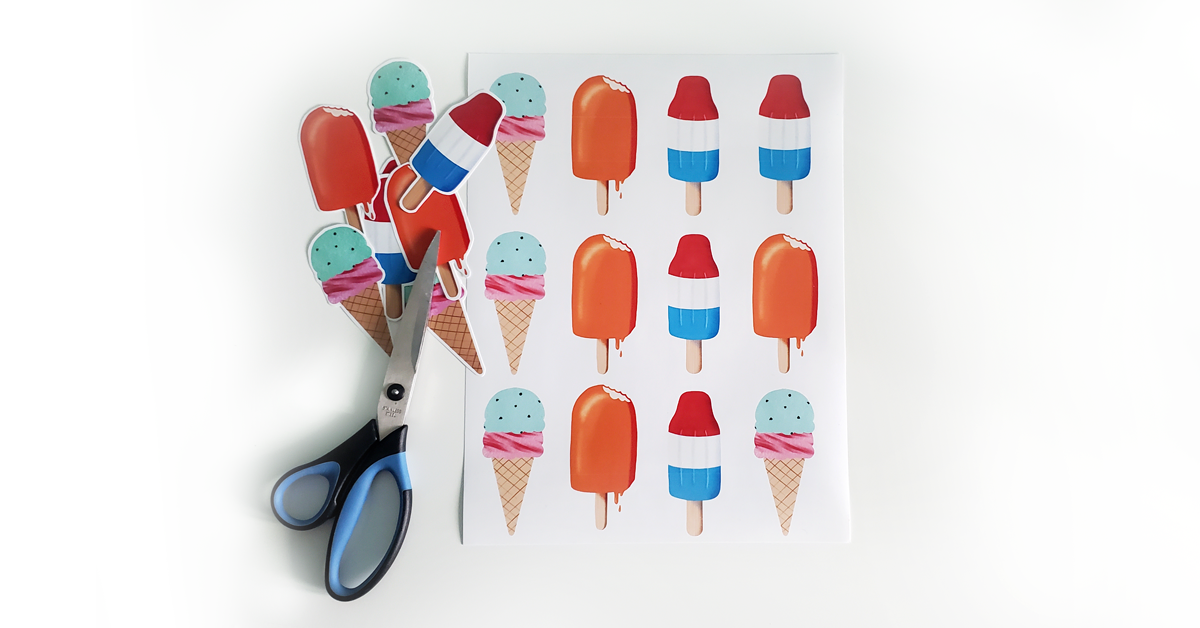
13. Making the Stickers: In this lesson, we'll be covering the simplest way to make stickers at home without an expensive dye cutting machine. But first let me show you how simple it is to outsource your stickers to an online company. Let's use Sticker Mule as an example. You can also buy a sample pack from these companies if you're not sure of the quality of the stickers and you want to see what they're like before placing an order. Most companies will offer a sample pack. So all you got to do is go on the sticker selection and select die cut because that's what we're making today, and then you upload your artwork, make sure you remove the background or else you'll end up with a square sticker or a rectangle sticker. That's all you need to do. Sticker Mule will send you a proof to approve before they actually send your stickers into production. Then all you got to do is check and wait for the happy mail to come in. In order to create your stickers at home, all you need is sticker paper, a printer and a pair of scissors. You can get your sticker paper at your local office supply store. You can get full sheets of mailing labels, which this is the Staples brand, its store here in Canada. There's also Avery brand, which is I think pretty known in a lot of places. These are mailing labels, so they're automatically flat white paper. I also ordered online some of vinyl paper, which I have not had a chance to try myself yet, so I can't wait to try that. The vinyl paper I got off Amazon. These ones, big packs of 100 sheets each, these are from an online store called Online Labels, and the link is in the resource document in the class resources. For this one, I have actually matte white paper, and I also have a glossy paper. So it's not the same as the vinyl. It's more of a glossy photo finish. So it's not waterproof, but the vinyl paper is waterproof, so I can't wait to try this one. Before we actually print and cut our stickers, we need to make a montage so that we can just print out one full sheet of paper and it's covered with all the stickers. So my sticker paper is letter size. So I'm going to create a new canvas that will be 8.5 by 11 inches. Create. What we're going to do is that we're going to import those PNGs that we export it earlier. So we're going to tap the little wrench icon and we're going to do Add, insert a photo. So my first one, I'm going to resize it. We'll add our second one. Insert a photo of the ice cream cone. We'll resize it. If you move it around and you have the snapping selected. I don't know if you can see that little blue line. So it'll have the indication when they're lined up at the top. Now they're lined up at the bottom. So now we're going to add our next, which is the popsicle. We'll just go line that up on the top. Line it up in the bottom. Whoops. Cut. I'm just going to leave a little bit more space in between here, just so that I have actual space to cut. So what we're going to do is we're going to select all our layers by selecting one and then swiping right on the other two, and we're going to hit Group. So now with these three, our group, we're going to swipe left on our group and we're going to duplicate our group. We're going to hit the arrow and weren't going to move our group down. Now, we want to do that again, however, you never want to duplicate an image that has already been duplicated because the more you duplicate it, the more quality that you're going to lose. So you always duplicate or copy and paste from your original. So we're going to go back to our original group and we're going to swipe left and duplicate, and we're going to take that one and we're going to move it down. I'm going to take my original group and I'm just going to move it up. Now the thing with Procreate is that if you move something off the canvas, it'll get cut off. So in order to avoid that, I didn't move the last group all the way down. Now I have room here for three more. So I am going to take my original group again and I'm going to duplicate it. Now from that group, I'm going to take them individually. So I'm going to take the first one, slide it over, take the ice cream cone and slide it over and down, and the same with the orange cream, nope, all the same with the orange cream popsicle. There we go. So now I'm ready to print, so the little wrench icon, share. I like to print from a PDF. So I'm going to hit PDF, then I'm going to choose the best quality and I'm going to save it to my files. I'm going to rename it and call it Sticker sheet to print. Done. I'm going to save it on my iPad. Procreate. There we go. Now, I'm going to go ahead and print it, and then we'll come back and cut the stickers. So I have some here that I've already cut out. I have some here that have not yet been cut out. So we're going to cut them out. In order to make it look pretty, make sure that you try to keep a white edge around it and try to keep it as smooth as you can. As you can see, this one's a little jagged, it's not that pretty. But this one which was in some of my first ones, was actually a lot better, actually it's this one, this one here is a lot better. Nice smooth edge. Let's get started. In order to keep my line as smooth as possible. I'm trying to make long cuts, so trying to not chop many times. It's not always easy. You might want to use smaller scissors, but I find when I use smaller scissors like these ones, I have to do a lot of chop, chop, chop. So that sometimes can create an edge. So let's make another one. There you go. This is a nice smooth cut like that one. Up next, bonus lesson number 1. Let's talk more about stickers.
14. Bonus One: Sticker Info: Let me quickly show you different types of materials that you can get. I already mentioned that the sticker paper that I have, I have the glossy. It's got a nice finish. That's a little shiny, but it is not waterproof, it's still just paper. Then I have the matte paper, which is just like a regular sheet of paper. This one is really great for planner stickers because you can actually write on them, so I got that. I also use these as packaging stickers for my branding, and this has been cut with a dye cutting machine, which is why I can get a kiss cut. But you can also get these types of stickers made by outsourcing them. These are two types of paper stickers. Now we've got the special ones at the vinyl. These vinyl stickers have been outsourced to sticker meal. It is nice and soft and it's got a satin finish, which is really nice and it's waterproof, which is fun because you can decorate your water bottles or anything really. I did finally try the premium vinyl sticker paper that I ordered off Amazon, and I must say it looks fantastic. Let me show you. I have a few here and they look really great. They're nice and matte, nice and well, not matte, they're like a silky smooth finish. They are a little thinner. Then the vinyl is a little thinner than the commercial one. The only thing I found and I did a little test where I placed it under water, this is before I cut it out. I placed it under the running faucet and while it was under the water, I was able to scratch off some of the color. Now, once it's dry, I've got no problem, but it's not scratching off. But these it says that it's waterproof. See, it says here that it's waterproof, but I guess while it's wet, you have to be careful not to scratch it. I don't know how it would go in the dishwasher, I'll have to try that out and let you guys know. This is a really special sticker that I got from Sticker Mule and it's made on holographic paper. It's more of a cardboard texture, but it is really beautiful when the light reflects on it. It is not completely waterproof, but I believe it is water resistant. But I wouldn't throw it in the pool. The next few slides will cover the pros and cons of making the stickers yourself at home and getting them outsourced to an online company. I've also thrown in a bonus in there of the pros and cons of using a dye cutting machine at home in case you were ever interested in buying one for yourself. Up next, bonus lesson number 2, Clipping Mask versus Alpha Lock versus Layer Mask.
15. Bonus Two: Masks vs. Alpha Lock : In this second bonus lesson, we do more of a deep dive. I go into detail and explain the differences between the clipping mask, the layer mask, and the Alpha Lock function. Let's just do a little exercise and go over exactly what the differences are between the clipping mask, the Alpha Lock, and the layer mask. I've covered them very lightly in the project. But let me just go and show you using a circle or a square, just exactly what it is. I'll just draw a circle using our quick shapes. Fill it in. I'm going to move it. I'm going to copy it two times to have three examples to show you the difference between the three functions. In order to copy something, all you need to do is select it, take three fingers, swipe down, and hit the duplicate button. Now we have a second one. We are going to do the same thing, select it, three fingers, and duplicate again. I'm just going to bring it down here. Now we have our three examples. I'm going to rename them. Let's start with the clipping mask example. In order to do that, we add a layer above our shape. We tap on that layer and then we select clipping mask. It's set as a clipping mask because there's a little arrow pointing to the layer below. What that means is whatever you draw on this layer, will be contained within the shapes on the layer below. Let me show you what that would look like. I'm going to go select my monoline brush, just going to make it bigger. Let's just draw stripes. Make it very simple, not complicate things. As you can see, my stripes are actually on the layer above my blue circle. But because it is set as a clipping mask, it stays contained within that shape. If we remove the clipping mask, now you can see that the lines are still there. We could definitely go modify those lines or erase them all together. We could go and erase some lines. We could also definitely very easily change the color on that. There's a few ways you could do that. You could select the second color, let's say the pink. Because I erased through my lines. Now, these are all separate shapes. If I wanted to change the color, I would have to individually go change them. Let's turn this off. Let's turn on the Alpha Lock. Now, the Alpha Lock, you don't need to add a layer above it. You can either do it with two fingers, quick swipe to the right. Or you tap on the layer and select Alpha Lock, you know your layer is on Alpha Lock when there's a little checkered background behind your shapes. Now, let's go add our yellow lines. You're probably going to say, well, it looks the same, it's the same thing. Sure, it looks the same. But now let's say I want to go and erase those lines here, just on the yellow lines. Well, let's try that. Let's take the eraser and try to erase only on the yellow. Well, we can't because what that does, because everything is on the same layer, it actually erases your base color underneath. This is a destructive way to work. However, there are some ways to use Alpha Lock in a strategic way. For example, you can change the color of everything on the layer. That's what I'm going to do here with this one. I'm going to turn my layer with my stripes. I'm going to turn that into Alpha Lock. I'm going to change my stripes to a pink color. I'm going to select the pink. I'm going to tap on my layer. I'm going to fill the layer because it's on Alpha Lock, it will really just fill only the stripes. If I have it on Alpha Lock with the stripes. Let's go on the layer where we did the stripes on the Alpha Lock directly. If we do the same thing and we do fill layer, it's actually going to fill the whole shape. That's a good way if you want to change the color of the whole shape. But you won't be able to change the color of a single item. Let's turn these off. Let's go to the layer mask. The layer mask is a little different. It's not about being able to change the color or add a texture or a shading. The layer mask really what it does, it helps you modify your shape. Let's add. Where is that mask? It creates a layer above it, so it actually counts in the number of layers in your whole project. Keep that in mind if you are working with limited number of layers. The layer mask, what happens is whatever you draw on the layer mask layer in black will actually appear as if it is being erased from the shape. Whatever you draw in white. I'll show you. Right now it automatically turns my color to black. If it doesn't simple, just go and select your black. I've got my brush. Let's say I want to turn this sphere into a crescent. I'm just going to draw in black on my layer mask. It has erased what is below. However, it's not gone forever, it's not permanent. This is a non-destructive way to work. If I turn my layer mask off, you can see that my circle it's still completely there. If you made a mistake or you want to bring back something that you erased, you just do the opposite. You draw on the layer mask in white. Make sure you have your layer mask selected. Then you can either bring it back all the way, or you can decide that you wanted to just cut it in half. That's how you can modify it. If for example, you are running out of layers and you have a few layer masks that you used, and you're happy with how the shape looks, and you know you're not going to want to modify it again. You can definitely squeeze those two layers together and make it permanent. Let's see what we have here. To recap, layer mask is a way to modify your shapes in a non-destructive way, in a non-permanent way. Once you flatten the layer mask with your layer below, then that becomes permanent. You can't change it anymore, but until then you can make as many changes on the shape of your items, of your motifs that you want. The Alpha Lock, lets you draw on a shape, but directly on the same layer. This is a destructive way of working because it's very hard after the fact to go change one single item that you added. Or for example, if you added a shadow or lines, or stripes, it's really hard to then go change those colors without having to start over that layer. The clipping mask, I find is the best way to work. That's the way I work for anything that I add to shapes or to any shadows or highlights. It also allows you to play with the blend modes. You can put your layers on a different blend mode and play around with those. It's really fun. They change color according to what the blend mode is. That is really fun to play with too. You can go ahead and play around with that. I use a clipping mask almost for everything. The only time that I will use the Alpha Lock is when I'm re-coloring something, it is really great to do that. Sometimes I will use the Alpha Lock to add a shadow or something. But I really try not to because I can't go change it after. I like to change my mind and I like to go change things and change colors later on down the line. I think that about covers it. If you have any questions, just pop them in the discussion. I will gladly try to clear things up for you if I did not explain it clearly. Sometimes it doesn't quite come out of my head as I wanted to. That's it. I hope this helps.
16. Final Thoughts: Thank you for spending some time with me today. I hope you enjoyed learning how to use layers and masks in your projects in order to create your images in a non-destructive way. It's now time to share your project. I would love to see what you've made. Feel free to upload it to the student gallery section of this class. Just remember, in order to upload a project to the gallery section, you do need to be on a browser. Unfortunately, at this time, the Skillshare app doesn't allow you to upload your project from the app. While you're in the gallery, please feel free to support your fellow students by leaving some encouraging comments on their project. If you post your project on social media, please tag me @isabellewood.art and use the hashtag, #simplefunstickers, so that I can see it and share your work. Also, if you've enjoyed this class, it would mean a lot to me if you could just leave a review. You can also click "Follow" next to my name to get notified when I publish my next class. If you would like to keep up with me on a more regular basis, Instagram is my social media of choice. You can follow me @isabellewood.art. If you'd like the cliff notes on what's going on and get some occasional freebies, you can sign up to my newsletter at isabellewood.com. Thanks again for taking my class and enjoy drawing on Procreate. See you next time.
 Isabelle Gagnon Wood, Artist | Designer | Teacher