Transcripts
1. Wellcome to the Class: Welcome to our wonderful
wildflower basket. A fabulous world of illustrated flower
assets in Procreate, where whimsical leaves
meet bold flower heads and the prettiest pistols
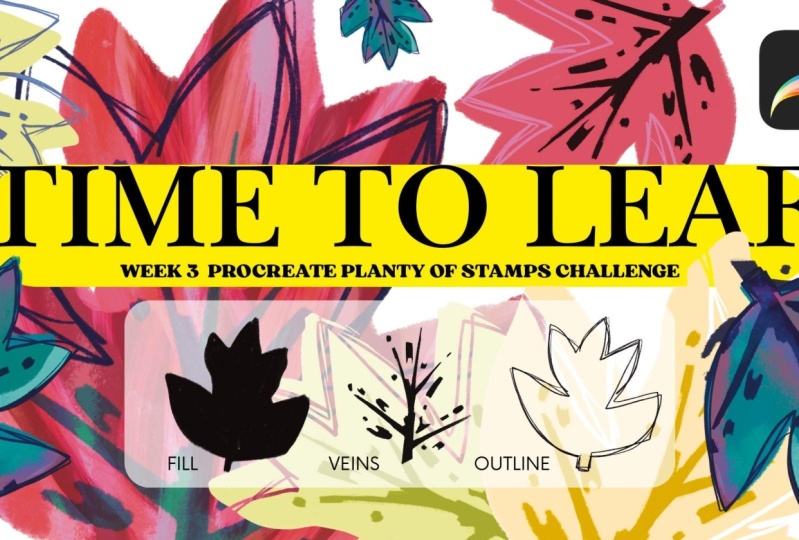
or long story short. Let's have a class that is all about graphic stamps
in Procreate. This class is your
jumps-tart to speed up your creative
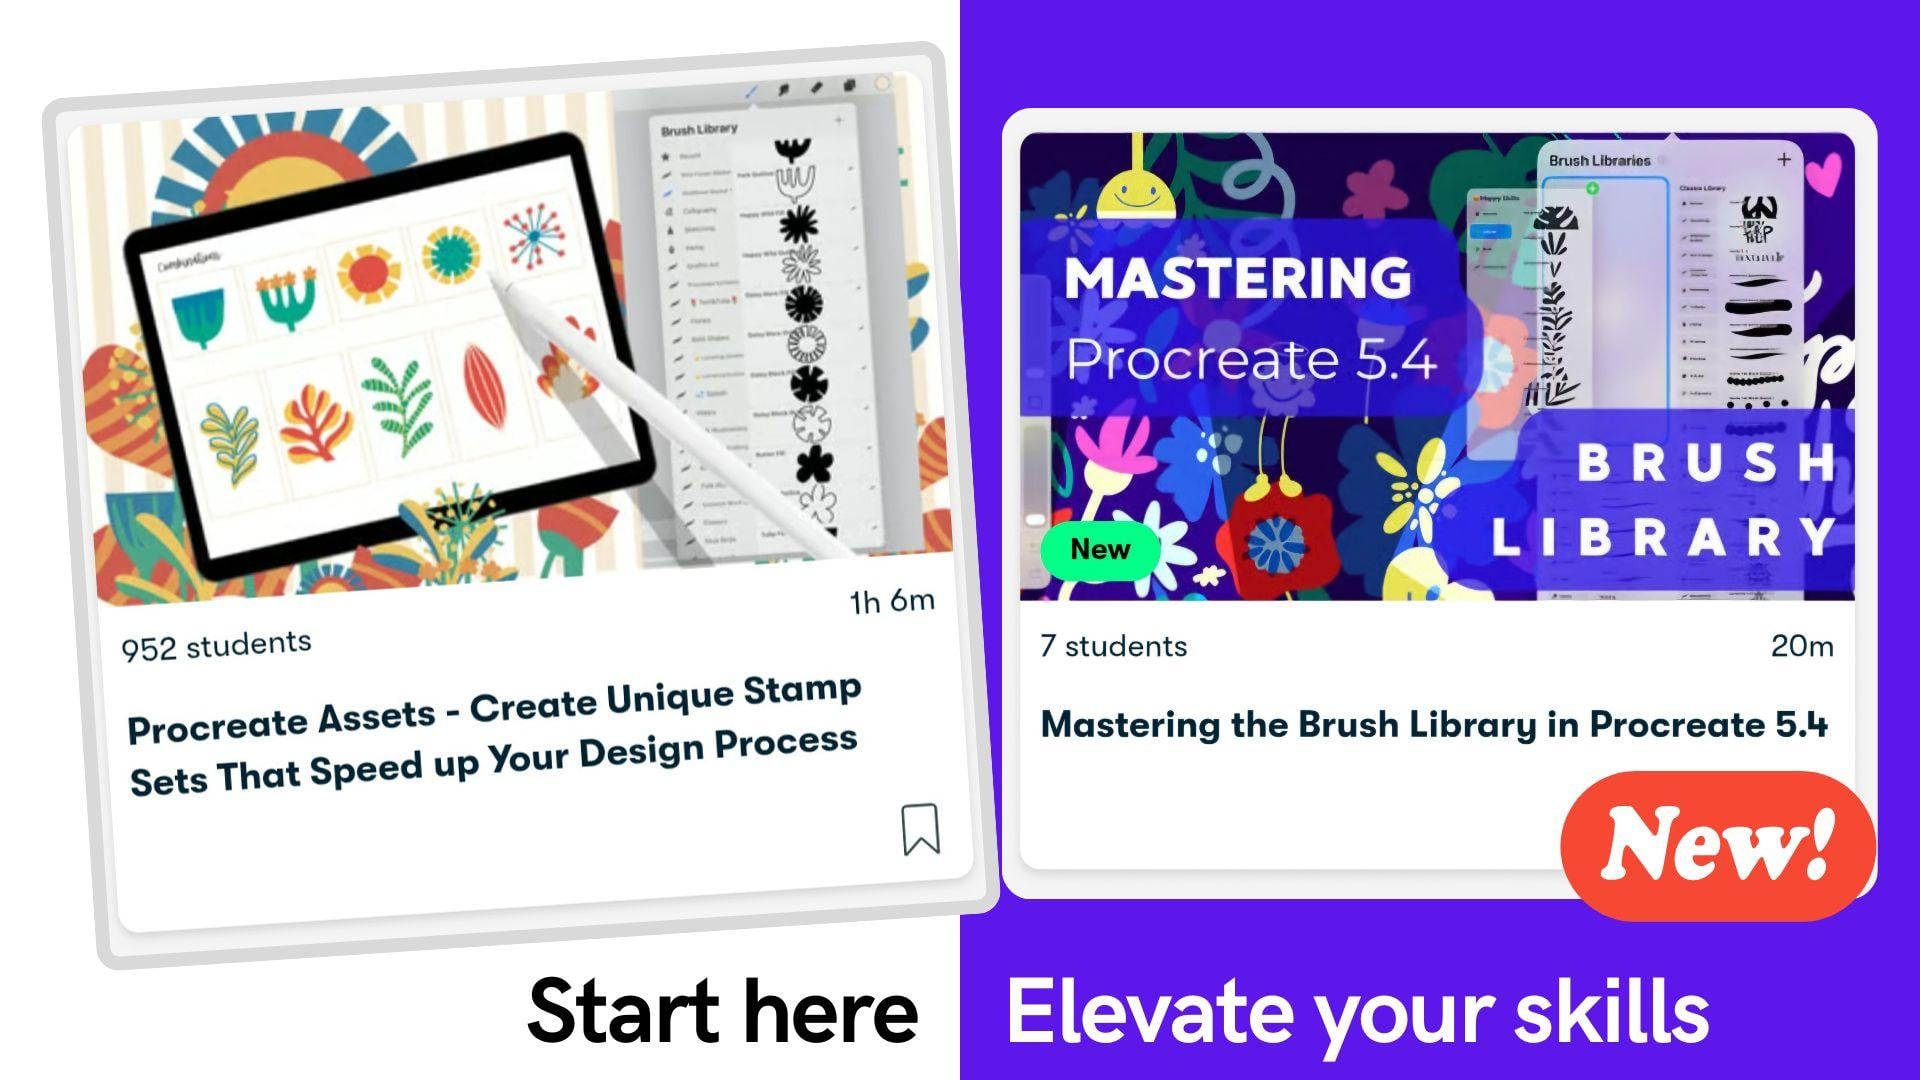
workflow in Procreate. Assets or stamp sets allow
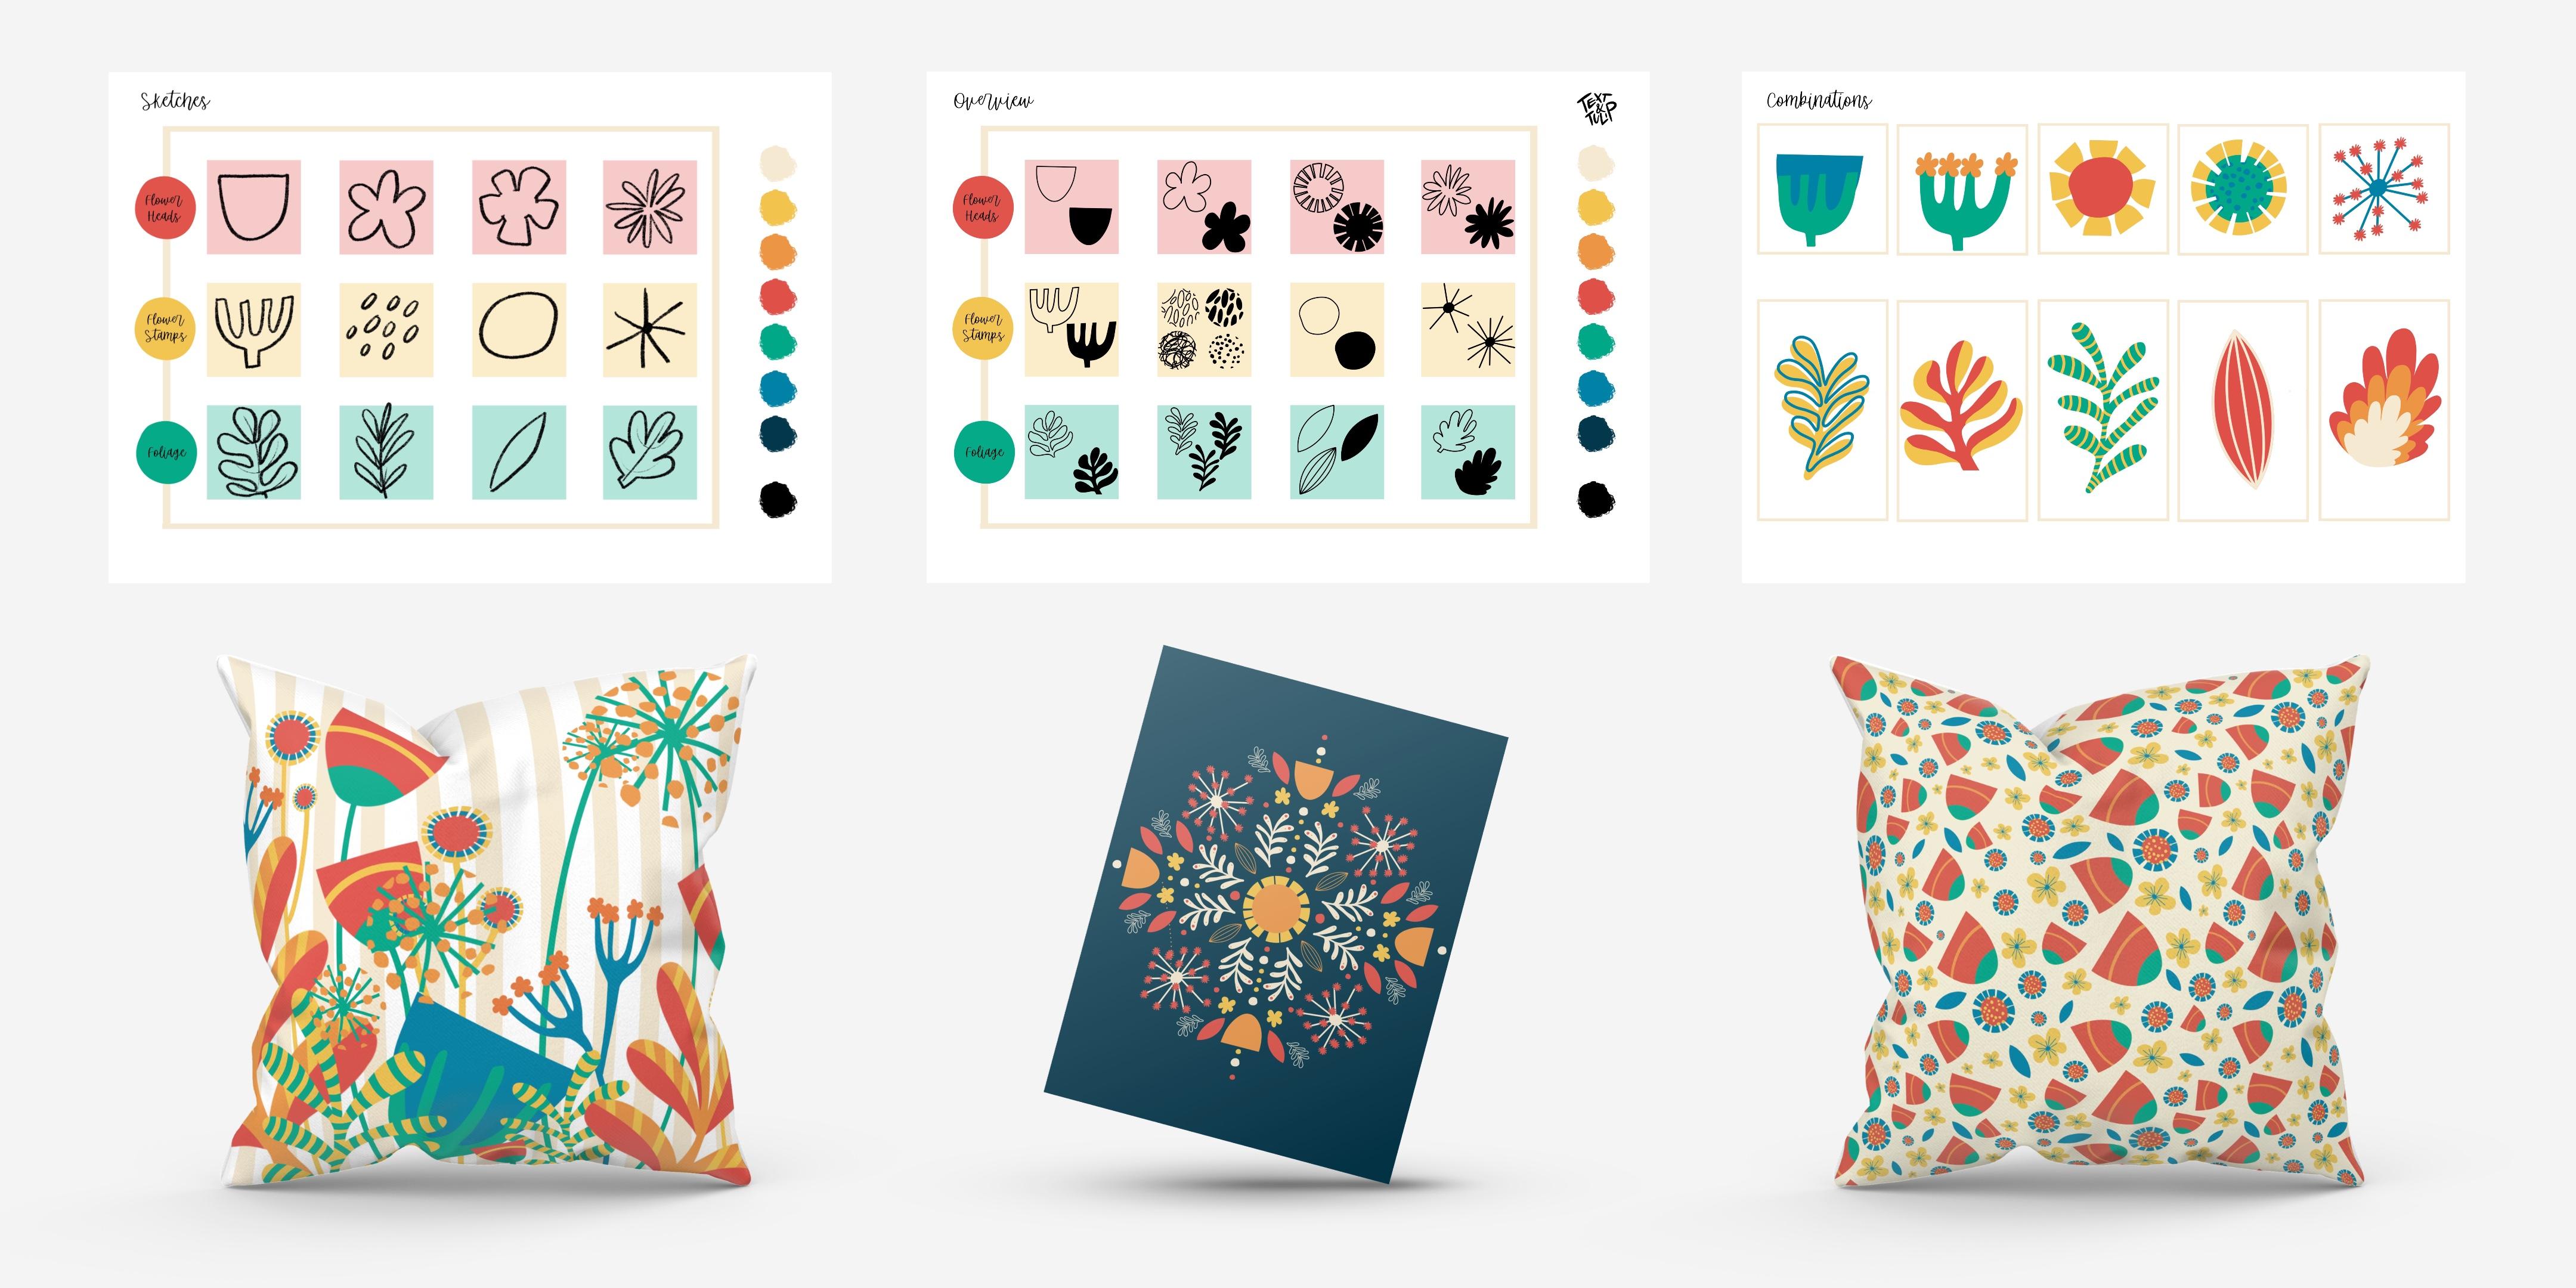
you to have a reliable shapes that turned into stamp brushes organized in your brush library. What do I love most about them? They provide a consistent look throughout a series
of illustrations. Plus, and that's a big plus, assets make my design
process even faster, especially in pattern design or when I create greeting cards. Hi. My name is Ulrike. I'm an illustrator
from Germany and I'm absolutely in
love with Procreate. Funny enough, I got my very
first iPad in Melbourne, just a few miles away
from where the team of Procreate makes this
amazing drawing app happen. Today, we dive into
striking tools like the Brush Library and
the Brush Studio. Grab your iPad, Procreate, and a workbook from the
resources here on Skillshare, you will learn how to come
up with unique shapes in a fun brainstorming session with no references next to
you in a limited time. We will prepare Procreate so you know exactly
how to set up your canvas and create reliable shapes sources
in a graphic look. Of course, the highlight, we create a stamp
collection where you get a basic understanding of the Brush Library and
the Brush Studio. Plus, I will show you two ways to turn a
shape into a stamp. We will also create a reference
sheet for your asset. By the end of the class, you'll be proud of a set of
24 unique graphic stamps and your first combination
sheet that will spark your creativity for all
your upcoming projects. No matter if you are
new to Procreate, I'm going to look
behind all the curtains on how to create graphics stamps or seasoned Procreate artist who's looking for a new
approach to do their art. I will guide you through
my entire process plus two bonus lessons for
those who want to dive deep into all
the tips and tricks. Let's get right to it. I can't wait to
see you in class.
2. Your Project: [MUSIC] By the end of the class, you will have a bursting set of illustration stamps,
your first asset. Take a screenshot of it and save the image to
your camera roll. Then head over to Project & Resources on
the Skillshare page to create a new project. Don't worry if this
is new to you. In the last lesson of the class, we'll go through all
the steps together. Now, here's the summary
of your project. Join our procreate community
and click "Follow" here. That way you won't miss any
new classes and tips from me. Next, we'll look at the tools
you'll need for this class.
3. Your Tools: For this class, you will need an iPad and the
matching stylers. This one is the
second-generation Apple pen, but I know some artists who
draw just with their fingers. I work with the iPad
Pro in this class, but you can use any iPad. In most cases, the
main difference is the number of layers you
will have available. Of course, what we also
need is the Procreate app. Procreate is available in the App Store and is designed
exclusively for the iPad. Tap "Open", and you will see
the Procreate interface. What you also see here is a worksheet that I
have prepared for you. It should help you to keep track of your progress
here in class. Where and how you can find it, I'll show you now. [MUSIC] Under Project
and Resources, I have created a few tools to help you work
through the class. The first is the workbook PDF. Click on it to download. It has in total three pages
on which you can work. Save the PDF anywhere you want, and then click on
open In Procreate. Procreate will
automatically show it in their page is this view. You can now flip through your
pages here in the bottom. In the Layers menu, each page equals one layer, 1, 2, 3. If you want to draw on it, I recommend you
create a new layer on top of it and group them both. Too fast? No worries. In the next lesson, we'll go through all
these together again. Easier to use is
the Procreate file. Click on it, click "Load", and then choose the file
under your downloads. In the beginning, you will also see the workbook on three pages. The difference is in the layers. You see each page has a group. Here, I have already prepared a layer on
which you can draw, plus the grid is always
on a separate layer. Your third tool is a
color palette that opens automatically in Procreate
after downloading. In Procreate, you will
find it at the very bottom of your palate
gallery. There it is. Click on the three
dot menu to have it at hand as default in
your color options. From now on, it will be always available no matter
if you're in disc, classic, harmony or value. Last but not least, below, you will find a
stamp set prototype for additional backup. After the download, this also opens
directly in Procreate. A new brush set always arranges itself at the top of
the brush collection. Feel free to use it, but I'll show you
exactly how to create your own set from
scratch in this class. Here's the summary
of your tools. Please note that you can only download the resources
in the browser, not in the Skillshare app. Everything in place? Let's meet next for our
first exciting lesson.
4. Sketching: Imagine Flower Heads: [MUSIC] Welcome to Procreate. I have opened our
first worksheet. You can see that it
expands during the class. In this version, I need a
new layer for my sketches. To do this, I click on the
"Plus" in the Layer menu. In the next step,
I choose my brush. For sketching, I
recommend one of Procreate's sketching
set, the 6B pencil. Let's also choose a color. I work with black. Let's try the brush
first. Looks okay. Now a two-finger tap
deletes the first try. The goal of this
class is for you to be proud of your
unique stamp set. To do so, we make ourselves independent of other artists
during the sketching stage. We won't look at
Pinterest today. There will be no extensive study of Illustrated botanical books. Instead, I will show you ten
photographs of flower parts, one after the other. Then a one-minute timer
will start for you to make quick sketches
without any reference. You can work with
pen and paper or directly on the worksheet
here in Procreate. This lesson is all
about flower hats. Start in the first row. Are you ready? Let's go. [MUSIC] Let's start. You now have one minute
for your sketches. Draw four simplified
shapes of a flower hat. Half a minute is left. Remember, you can work
in top and side views. The last 10 seconds. One minute is up. Pens down. Bravo. You have mastered
the first step. You created a loose sketch
of four flower hats, and maybe worked with different perspectives
like top view and profile. My sketching stage
looked like this. I even had a time to
work with more guides. The important thing is that you sketch without
judging your process. That way something
you can emerge. I admit that was a good
push into the deep end. In the next round, you will be more familiar
with our brainstorming. Then it's on to the pistils.
5. Sketching: Imagine Pistils: [MUSIC] Now we focus
only on pistils. For this, use the second
row on the worksheet. When you see the images, also pay close attention to
the options in the side view of the flower. Are you ready? Let's go. [MUSIC] Sketching time. Again, you have one minute
to create four drafts. Keep everything as
simple as possible. Half time. Maybe
think of elements that connect the petal
with the flower stem. Ten more seconds. One minute is up. Pens down. Bravo. Your worksheet is
two-thirds of the way. Again, have a brief peek
into my sketching process. You see, I tried simple
shapes to capture the pistil and what
belongs in and around it. Like those little dots. Part of my drafts is a very odd shaped middle
part of the flower, and the base for a dandelion. As simple as this, our last turn will be super
easy, we sketch leaves.
6. Sketching: Imagine Foliage: Last turn, now we
focus on the leaves. Use the last row
on your worksheet. Before we start, here's a tip. Observe the picture for individual leaves
and leaf bundles. In other words,
several leaves on one stem. Are you ready? Let's go. [MUSIC] Final sketch time. Again you have one
minute for four drafts. Keep everything as
simple as possible. Half a minute is up. Check again if you have a
version of a leaf bundle, a stem with several leaves. Ten more seconds. One minute is up, pens down. I sketch this way. A small leaf
structure to provide some guidance and play
four line work around it. Maybe you recognized one of your shapes in my
worksheet as well. My first two shapes are
what I call leaf bundles. My last two forms are
simple single leaves. Finally, save your
image as a JPEG in your photo gallery so we can use it as a reference
in the next step. Let me show you how it works. In the actual menu, the little wrench in the
upper left, go to Share. Then click on "JPEG". "Save Image", and the image becomes part
of your photo gallery. Fantastic. Now we are right on our way to preparing
the stamp templates. In the next lesson, we will set up and procreate
everything we need.
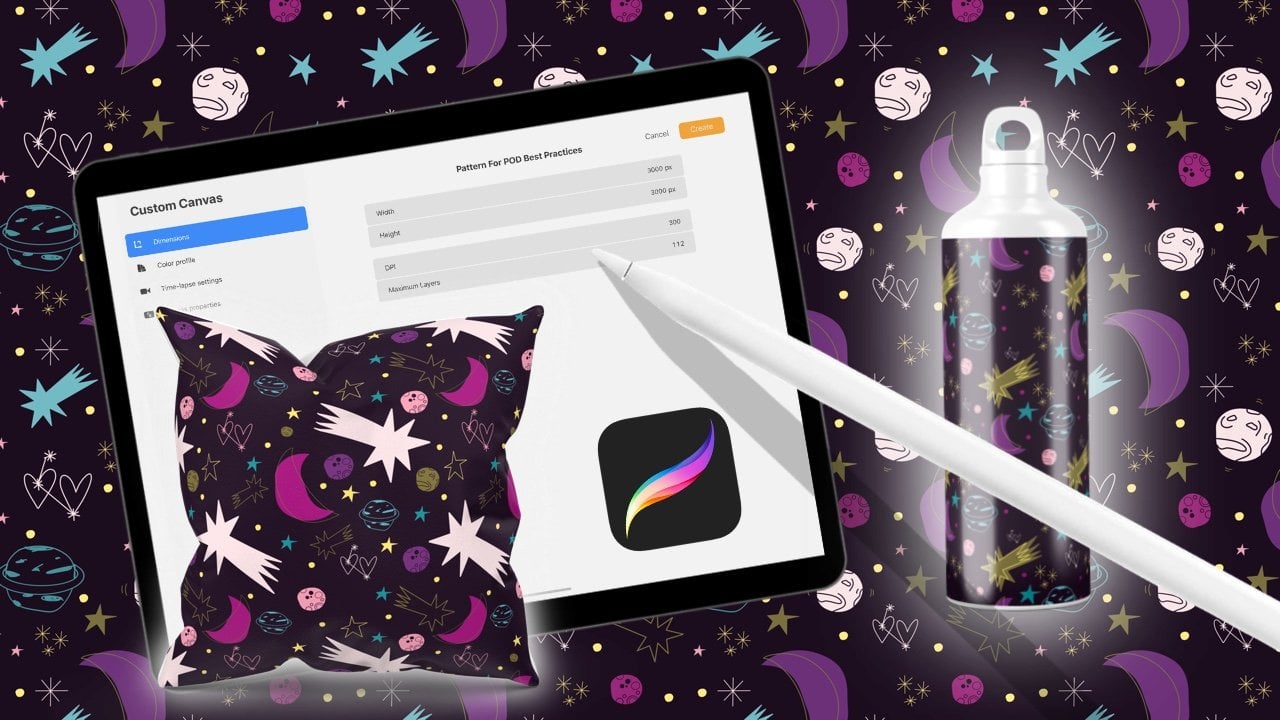
7. Prepare Procreate: [MUSIC] Welcome back to
the gallery of Procreate. To get started, we
need a square canvas. Click on the plus in the upper-right corner
of the gallery, then click again on the
plus in a black rectangle. Now the camera's
editor will open. To create any stamp, you will always need
a square canvas. To aim for a high quality, go for at least 2,000 by
2,000 pixel and 300 DPI. Give your template a name
to easily find it in your canvas library stamp
template as easy as this. Press "Create"
when you're ready. This is our canvas. The stamp set we will create
together today should have a graphic look with forms which offer reliable sharp outlines. Therefore, I select
the mono liner brush from the calligraphy
set of Procreate. Also, our stamp should have full color without any
effects or opaque elements, so we need to create a
shape source in pure black. Tap the color field, and now switch to value in
the color view options. Here you see six
different options. Move all sliders to the left. The hex color code should
now be six times zero. Great. Attention, if you add for example seven degrees
to this color value, it won't change the hex number, but your stamp would
not be pure black. It could appear a
little bit transparent. Easy correction. Use the slider or scribble a
zero into the number area. Fabulous. Now let's
try out our brush. Looks good, but if we zoom in, you will see that
Procreate is pixel-based. The edges are never straight lines but
appear in small squares. However, in our stamp, this outline will
be pretty graphic. [MUSIC] We want to collect the single shapes of our set without creating
a new canvas every time. Let's do a stamp book. To do this, tap the wrench, tap canvas and turn
on page assist. Now each layer will
equal a separate page. The little row at
the bottom shows you the pages in thumbnail view. If you add a new layer, it will automatically appear
as a new page at the bottom. Also, you can tap new page to create a new
page or new layer. I will briefly label the pages so that you get
a better understanding. Number 3, the bottom layer
is always your first page. You can navigate in the page
panel or in the layer menu. If you group two
layers like this with drag and drop, they
become one-page. This is especially handy when
you create a portfolio or a comic where several layers
per page are what you need. To finally get started, we need our sketch
sheet as a reference. Click on the wrench again, select canvas and
turn on reference. Now the image of
your current canvas will be displayed automatically. Switch to image,
click import Image, and choose the picture
of your sketch sheet. You can now adjust the preview. With a small gray handle you can move it across the interface. You too too zoom in simply
with a two fingers gesture. I would like to see
only the first row of my worksheet the
flower hats sketches, and I would love to have
it in the top-left corner. Let's do a final check. We have the monoline brush, we have pure black, we have our square
canvas and page assist. The reference also helps us to keep track of
what we're doing. We will see each other
in the next lesson. Then it will be work intensive. We will create the
shapes for our stamps.
8. Create Your Shapes: Now, things are getting real. We are designing the actual
shapes for our collection. Let's start with
our flower hats. First, I draw
something very simple, a jeweler pad in a sight
view first as an outline. If I hold my stylus on the
canvas just a moment longer, a neat arc is
automatically created. This is called quick shape, and the same works with lines. In fact, I like it that simple. Next, check that the
shape is closed. Look carefully at
all the transitions and endings of your line work. These shapes are 100%
identical to your stamp. To ensure that the
line weight is identical for all shapes, I set a plus in
this slider here. Now, a marker appears that
I can always fall back on. Procreate allows you to mark
up to four brush sizes. For my touch ups, I want a very fine
brush, maybe 4%. Now, when I'm done with my fix ups and want to
draw a full outline again, a tap on the top marker
is all that's needed. Once again, I check
the other outlines. Looks good. Now,
keep the outline. For the second form, we need a copy of that. Go to the "Layers" menu, swipe the original to the left, and click on "Duplicate". This shape, I fill
with color drop. Having both options
as a stamp is fantastic for future
possibilities of combinations. I think that tulip looks okay, but it's a little too
accurately curved for my taste, so let's do a
second version with assisted drawing only
for the top line. Like this. Again, I check the transitions
and they look perfect. Now, I also duplicate this layer with a
swipe to the left, and you guessed right, I fill the shape
with color drop. The free hand shapes that are filled get a very
straight upper edge. For this, I use the eraser. Again, I can leave my
stylus on the canvas for a second to create
a straight eraser. Now, this will give the
shape a very graphic look as something cut off with
scissors. Looks cool. Now, a little housekeeping time. Name your layers, switch
to the Layer menu, and tap on the thumbnail
next to the layer name. Now a little layer
menu shows up. Here, select Rename. Now, name your layer with
a keyboard or scribble. I call the first one very simple tulip fill and a second
one is tulip outline. I don't want the bottom two
shapes to be part of my set. So quick fix, Delete. Now let's create a new
layer and let's draw another shape together based
on the second flower hat. This time, let me show you how to work with
the drawing guide. Click on the wrench in
the upper left corner, "Canvas", "Drawing Guide",
"Edit Drawing Guide". Here I select symmetry in
the menu on the right. You see, I got the vertical symmetry line
in the center of my canvas. This is the flower head
we are aiming for. Now, check again if
your brush is correct, the mono line brush. Then look at the Layer
menu to see if assisted, appears beneath
your layers name. In this case, Drawing
Assist is enabled. Everything I draw now on the right side appears
mirrored on the left. Of course, you can work
with quick shape again. That's my first funny try. Again, I want to check
the line connections. If Drawing Assist is enabled, it also applies to
your Eraser Tool. If I erase here, this also affects the
corresponding place on the opposite side, so handy, and here, perfect. Now I have my outline form. The only thing missing
is there filled shape. Do you still know how to do it? Exactly. Duplicate the layer and then fill it
with color drop. For my taste, this shape
is a bit too stiff for Wildflower Garden so I stick
to my free hand drawn forms. At the connection point, the beginning and end
of my line overlap. I leave one line and erase
only the end of the other. Great. I'll create
the filled version. That looks good. Finally,
a little housekeeping. I have to name my layers and I will delete all the
shapes I don't like. Fantastic. The last shape we draw together is to show
you how to work with guides. We will take this shape. First, we create a new
layer for the sketch and I switch in the brush
library to the "Sketching" set and
choose the "6B Pencil". Now I draw loosely
around closed shape. When I hold down two
fingers on the Canvas, Procreate automatically
creates a perfect circle. I repeat the same in the middle. To align the center
circle a bit more, I use the selection tool, pick "Freehand" and circle
loosely around the shape. Then I switch in the
main menu here above, to Transformation
or the Move tool. Now I can bring this circle
into the position I want. You see, here below, snapping is switched on. That's why my shape locks in some positions for
my assistants. To be able to draw on it, I create a new. Layer because we
are in Page Assist, the sketch layer and
the new layer must form a group to be
visible together. Fast-forward, I have already mapped out where I
want the petals to be. I create a new layer
and now I switch back to the mono line brush
in the calligraphy set. Again, I repeat
the round shapes, keeping two fingers down for precise circle and
the second circle. Perfect. Now I connect both circular shapes
with straight lines. These will be my petals. Let me untick the
visibility of my sketch. Fantastic. Now I have to erase the spaces with
a lot of patience. In addition, I have a close look at the
end of my line work. There is already
one little spot. This work seems time-consuming, but trust me, it is
worth in the long run. With a two-finger tap, you can also undo
a failed eraser. Adjust the size of your
eraser whenever you need to, and rotate your canvas to
find the best way to work. These are my first shapes. Take your time to finish yours. Then we move on to
the final task. Finally, we need to
center each shape on the canvas to get an
ideal stem template. Switch to the arrow icon, make sure Magnetics
is turned on, and now your object is perfectly aligned when you see that both golden lines appear
horizontally and vertically. When all your
shapes are aligned, our preparations are done. If we look at our sketch sheet, you'll see that they are still our pastels and the leaves. Now you have two
options to continue. You can do these
shapes on your own and then jump right into the
lesson, create stamp set. If you want more tips, check out the two
following bonus lessons. I'll tell you more
about them in a minute. If you jump ahead, take the time to make a template for your
signature as well. In bonus lesson 1, I'll show you how to polish up your free hand shapes so
that they look like this, and how to work with clipping mask to create
cool stems like that. In the second bonus lesson, I'll show you how I draw
my leaf variations and what it takes to create the most contrasting
shapes for your set. We'll also work with cutouts. Let's discover all these
together right now.
9. Bonus: Create Cool Pistils: [MUSIC] Welcome to our
first bonus lesson. Here, I'll show you a few
tricks for creating pistils. As you know, I like
loose shapes better. What I don't like though, is this very wobbly
finishing line. Do you see? I erase that part
and then work with a solid stroke I
create with quickline. Do you know what work
is waiting for me now? Yes, all the lines that I don't need have to
be erased neatly. Remember that every
little Pixel crumb will become a part
of your stamp later. Now it's time for
high-speed erasing. Work with Zoom as
much as you need to see if you are
satisfied with everything. If so, copy your shape and fill a variation
with color drop. [MUSIC] To assemble the top
view inside a flower head, you can work with quick
shapes and oval shapes. The great thing is
if the beginning and the end of your
line meet exactly, you get a neat line work where you don't have to
touch up anything. Here's another trick to make those loose shapes
sit in a circle. For this, I work with a copy of the form I just drew
and clipping mask. First, I create a new layer. Second, I draw a circle and
align it in the center. The guidelines will make it easy to get your form
into the right spot. Let me turn off the
background color to make it more convenient
for you to follow. The color of my circles
should be white. I swipe the layer box to isolate my circle or
put it in Alpha lock. What does it mean? If I now choose white and click fill layer only the form will be filled and
not the whole layer. Now I move my pistil layer on top and activate clipping mask. Well done. It is cut into a circle. Experiment with this. Another effect is simply
working with three lines. In your final stamp, you will only see what appears
now black on your Canvas. This will be your shape. [MUSIC] Very important. There is no right or wrong, no correct proportions
or shapes. You define the look. For example, when I draw the
framework for my dandelion, I tend to make sure that my
diagonals move off center, but still pass through
the middle point. Let me show you how. A third should go like this. When I create a second variation with fewer and slightly
different lines, I keep the first for
orientation in the background. Pistil stems are done. I'll show you a few more
in the next bonus lesson. How I create leaves.
10. Bonus: Design Fantastic Foliage: [MUSIC] For a great
start into the leaves, I work first with a shape that
will be filled completely. I start again with
a loose sketch. That's pretty cool. Then I create a new
layer and reduce the opacity of my sketch
here with a slider. For the final drawing, I work again with the monoline brush from
Procreate's calligraphy set. After filling this shape, I again start making
touch ups until I'm satisfied. That's enough. Final task, the shape has to be aligned in the
center of my Canvas. When you create your shape set, make sure that you create
different contrasting shapes. Those details will make your
creations lively later on. Here I have now prepared
a tidely framework. Now I have two options to place the single parts as
long arcs on it, freehand or quick shape. Sometimes you have to zoom
far into your image so that Procreate recognize
the difference between a line and an arc. That's okay. Again, leave one outline version
and create a second. You can fill the second one
differently with black. Maybe once just the
lower half of the leaf. [MUSIC] One shape can be your starting point for a
range of great variations. Experiment, and better
save one more try. Here I have an outline, a shape made of outline
and whining like this. Of course the last one will
be a fully-filled form. But even this one can be modified to create
something completely new. I copy the original
and with the eraser, I now do indentations. I get this graphic
tropical look. There are two ways to
achieve the result, first, by erasing. Or if you don't want to alter
your fully-filled shape, you can also work
with a masking tool. You can find this option
in the little Layers menu. When I'm making cutouts, I don't want identical areas. Everything should look
a bit more organic. This process is
clearly about trying, deleting, try again
so be patient. Quite famously for the
cut-out variations, of course, the
Monstera has become. When you're ready, I will see you in the
next lesson where we will turn our shapes into stamps.
11. Create Your Stamps: [MUSIC] Now we are
all back again. Ideally you now have 24
shapes for your asset, 12 outlines and 12
fully filled forms. Maybe you even thought of creating a layer
with your signature. I'm going to show you
now two ways to create your stamp set from your
large number of shapes. Scroll to your starting point, roll up your sleeves,
and let's begin. In our first option, the shape must be available as an image in the photo gallery. Make sure that you
have all your forms on a square Canvas and that they
are on a white background. Now, click on "Arrange" and in the Action menu,
click on "Share." We will now save it as a
JPEG in the photo gallery. Click on "Save Image"
and you're done. Let's do the same with
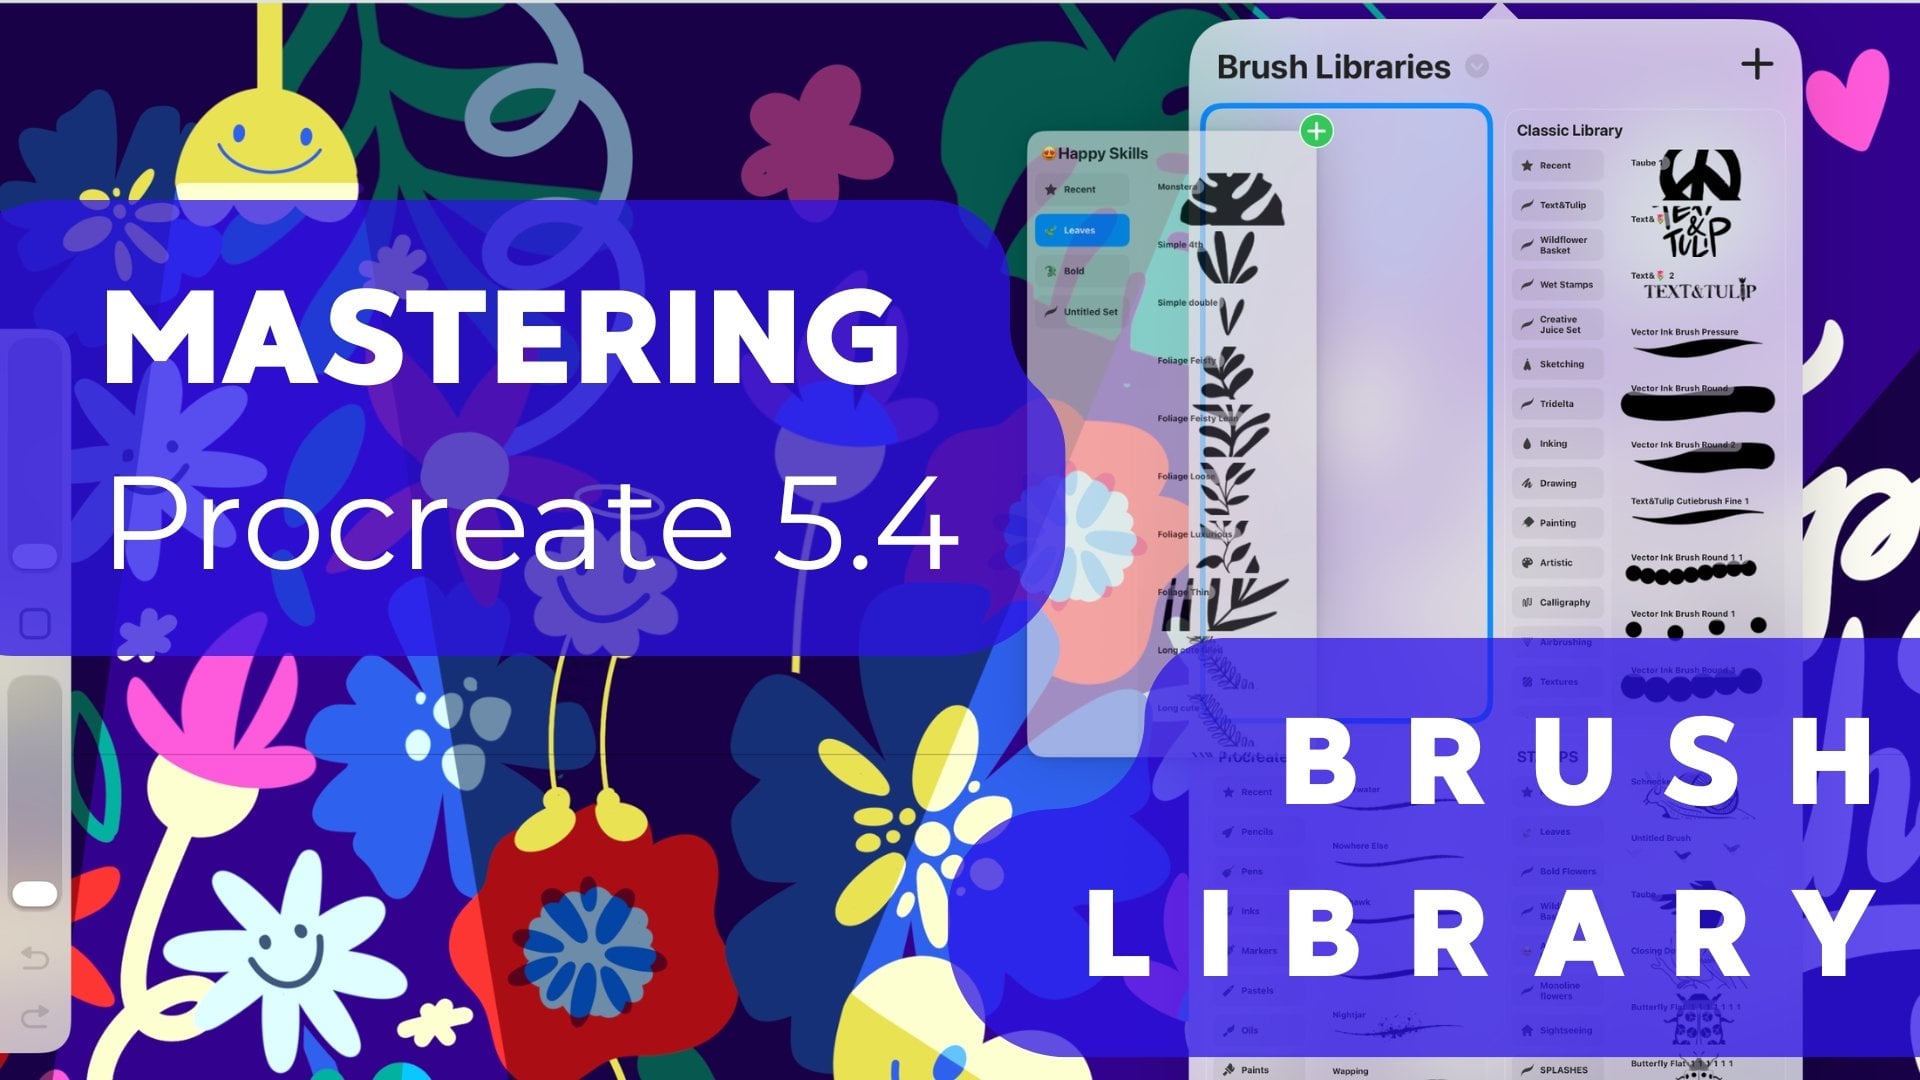
this second shape. Click "JPEG", "Save Image", and brilliant, that's it. Now it gets serious. We will create our stamp set. Click on the "Brush" in the upper right corner to
open the brush library. When you drag the
list down quickly, a blue plus will
appear at the top. Tap on it to create a new set. Give your set a unique name
like wildflower basket. Your new brush set appears below the recently used
stamp collection. You see, it's still all
empty on the right side. At the top right
of your new set, you will see a plus sign. Tap it to create a new stamp. Welcome to the brush studio. I have to admit if this
is your first time here, all the options can be
pretty intimidating. Let's focus on the
essentials for now. First, go to Shape. Click on "Edit" next
to shape source. Now the shape editor opens. At the top right, you will see Import, Cancel, and Done as a confirmation
when you're ready. Click on "Import." Now you'll see a list of places where you can
get your shapes. In this example, I
click on "Import a photo" and select the
image from my library. For your image to
work as a stamp, it must be inverted. Tap with two fingers. Now what was white is black and what was black
is white. Good job. To confirm your shape, click "Done" in the
upper right corner. Now our brush looks
like a wild sini. To turn it into a single shape, tap the first
option, stroke path. Drag this slider
spacing to the maximum. Now the shapes are single
but they look gray. Now, switch to Apple pencil. Under Pressure, go to
the second option, Opacity, the transparency
of your stamp. Drag the slider from
maximum on the right to the very far left to
none. Looks great. Now we want the shape to
work as large as possible. Underneath Apple pen,
select Properties. Now go to Brush behavior first and change the
size to maximum. On the very top are
all options how our brush appears in the
preview in the brush library. First, activate stamp preview, then choose a smaller
size, maybe 10 percent. Finally, make sure your
brush is recognizable as your very own and go
to About This Brush. Give your stamp a name, like the form plus
fill or outline. Choose an image or your logo, and enter your name
or brand at Made by. Finally, sign it. All good to go. Then click on "Done" in the
upper right corner. Perfect, this is our prototype. The good thing is
you don't have to re-enter all the
settings every time, it is enough to make a
copy of your prototype. Swipe to the left
and hit "Duplicate". Now click on the stamp to edit. All we have to do now
is go back to shape. Now click "Edit", "Import" "Import photo", and select the picture and you
see it's already inverted. Click "Done". Let's take a
quick look at the preferences. Everything in Apple
Pencil has been saved and we don't have to change anything in
properties either. The only thing we
have to change is the name of the stamp
in about brush. Are you ready? Then click on "Done" in the
upper right corner. Great. That was easy. Now let's look at
the second method. For our next stamp, I want to show you another
way to transfer your shape. Choose the next
form and go back to the Action menu in the
upper right corner. Select the first option, Add and here, Copy Canvas. Everything visible
on your Canvas now is copied to the clipboard. Now go back to the
Brush Library. Swipe one brush in the list to the left and then
tap "Duplicate". Tap on the brush to
open the brush studio. Here we go again
directly to Shape, Edit, Import, and now
the last option, Paste. Voila, now confirm
the shape with a single tap on Done in the upper right
corner. All there. Now name your stamp. Click "Done" again to confirm
and leave the editor. One more time together to be
sure you know how it works. Select your next shape. In the Action menu, go to Add, and then
to Copy Canvas. Click on the brush to
open the brush studio. Here we go directly to Shape, Edit, Import, and now Paste. This is really easy and a bit faster than first
saving all the JPEGs. Finally, rename your stamp. You can use your
keyboard or scribble. Once you're ready,
click on "Done." Now it's time for art work. All the shapes now want
to be in your set. The goal of this class
should be to have at least 10 shapes as
a stamp in your asset. Don't worry, the same work
is waiting for me too. Treat it as a good time
for some amazing podcast. For instance, Andy J. Pizza's Creative
Pep Talks that are packed with wonderful
inspirational interviews, or legend Jerry Saltz has an interview
partner in Art2Life. For me, their motivation
in times when my pen doesn't want to
dance across the paper. This is my stamp set and
it was a lot of work, but it was definitely worth it. Come on, let's give one a try. I create a new
layer and I choose the warm orange from our
wildflower color swatch. This little happy wild
stamp can be in any size. Great. You see the forms are always reliable and
have nice clean edges. I recommend you do one last diligence before you get started
with your designs. For this, we need
our worksheet again. On the overview page, you can sample all your stamps to have them at hand later. I have already worked
ahead and entered all my flower heads and the
variations of the pistils. Now we need a separate layer in this group for the leaves. Go to your brush library
and choose your set. Now, scroll up and
select the first leaf. Of course, I've set my
color to pure black. Now I can bring the shapes of
one category into one box. I always put them down a little larger and then transform them. I repeat this for all
the remaining stamps. If some of them have
three variations, I try to get them into one box, 1, 2, and last one, number 3. The last component of my
asset is the oak leaf. This is my favorite tree
here in the garden. Yes, all those layers
also want to be organized at the end. That's it. I'll see you in the next
highlight lesson where we'll finally try out our stamps
and play with combinations.
12. Try Combinations: This is where the
fun part comes in. First, let's save
our overview to the image gallery, tap "JPEG". Then let's go back to Canvas
and turn on reference. Here's where we want
to see our overview. Click on "Import image" and select the picture from
just a moment ago. You can try your
combinations now on a white Canvas or work on the
last page of your workbook. [MUSIC] On our worksheet is room for five compact
creations and five vertigo ones. The first thing I do is simply
stamp my favorite Tulipad. If I now choose a
different color and put the fork shape as a stamp on top of it then it
could be a single bluebell. As you can see, each shape has its own layer, so I can still tweak it. How many layers
you have available depends on your
iPad's performance. It also depends on the
size of your Canvas, and the resolution
you're working with. You see the fork stamp can also be the base for
another wildflower. Then I add with a
small stem size, my little round one here
at the top. That's cool. Let's take a filled,
wobbly circle. Now I switch back to the
tulips and use them as petals. I minimize this stem size and maybe also this circle as
such. That looks okay. When you rotate your Canvas, your stem rotates automatically. You hardly have to readjust. If something doesn't
sit like that, a double-tap on the
Canvas is all it takes, and it is erased. Fabulous. Look what
a cool flower had recreate when you place the inside of the
flower one layer above. Cool and a little
adjustment, and we're ready. Now let's give the filled daisy a different-colored
pistil. With clipping mask, I ensure that the new color
is only inside the flower. You can put as many layers on top as your iPad will allow. First, I'll do a full circle that I paint with
the monoline brush. Next, I put the funny speckles on top
of it on a new layer, of course, and also
with clipping mask. As a last combination
in this row, I also would like to
try out my dandelion. For this, I take the
little spiky here and put this little wildflower
onto it 1, 2, 3, 4, 5, 6. That's fun. Take
your time and use your stamps for your
unique combinations now. You are the boss. I tidy up my layers a bit and
group them into first row. Now, let's have a look
at everything that is tendril and
slender, the leaves. First, I'll show
you an example of a cool combination of a
filled shape and an outline. Here I move the outline
a little bit up and to the right to create some
offset print effect. It's also fun to add a pattern
or shadow to the shape. For this, I use a new
layer and clipping mask. Exactly. Now I go with
the monoline brush. Now the brush stroke appears
only on the field area of my main layer or as in
this example, on my leaf. If you want to use color drop, then your shape or pattern or your line must be completely
closed in itself. Otherwise, the whole
layer will be colored. You'll see the end will
always meet the beginning. Great. Two more left
and we're done. Wonderful. To have nice
contrasting shapes and fields my slim leaf
will get a rather delicate, funny pattern in curved stripes. I draw them with freehand or if you want a
very precise arc wait a little moment
for a quick shape to snap in and help you draw. Your fields can be as fancy, crazy, or simple as you like. Now, here's a little
tip if you want your outline to sit exactly
on the shape below it. Create the outline shape twice. So duplicate it, and then fill
the one below completely. Back in the Layers menu, select the outline layer, set it to Alpha lock with
a swipe to the right, select the new color, and choose Fill layer from
the little Layers menu. If you want to try colored
radiation in your shape, duplicate the basic
shape twice, 1, 2. Now, re-color one copy
and reduce the size. Repeat the same with
the third shape. Recolor it, and resize it, and put it into the right spot. Great. If this all was too fast, you can always re-watch the lesson or jump
back a few seconds. This is my combination sheet. Wonderful. For backup, I'm going to save it as a JPEG. I want to celebrate with
you your accomplishments. Open your brush library with
your new stamp set and take a screenshot of the
combination sheet and your brush library
next to each other. Now, save the image
in your camera roll. Soon, this will become your
project for this class. Now, a big applause
to you if you filled your combination
sheet also so diligently. Finally, very light, fair, I take you behind the scenes to the composition of a
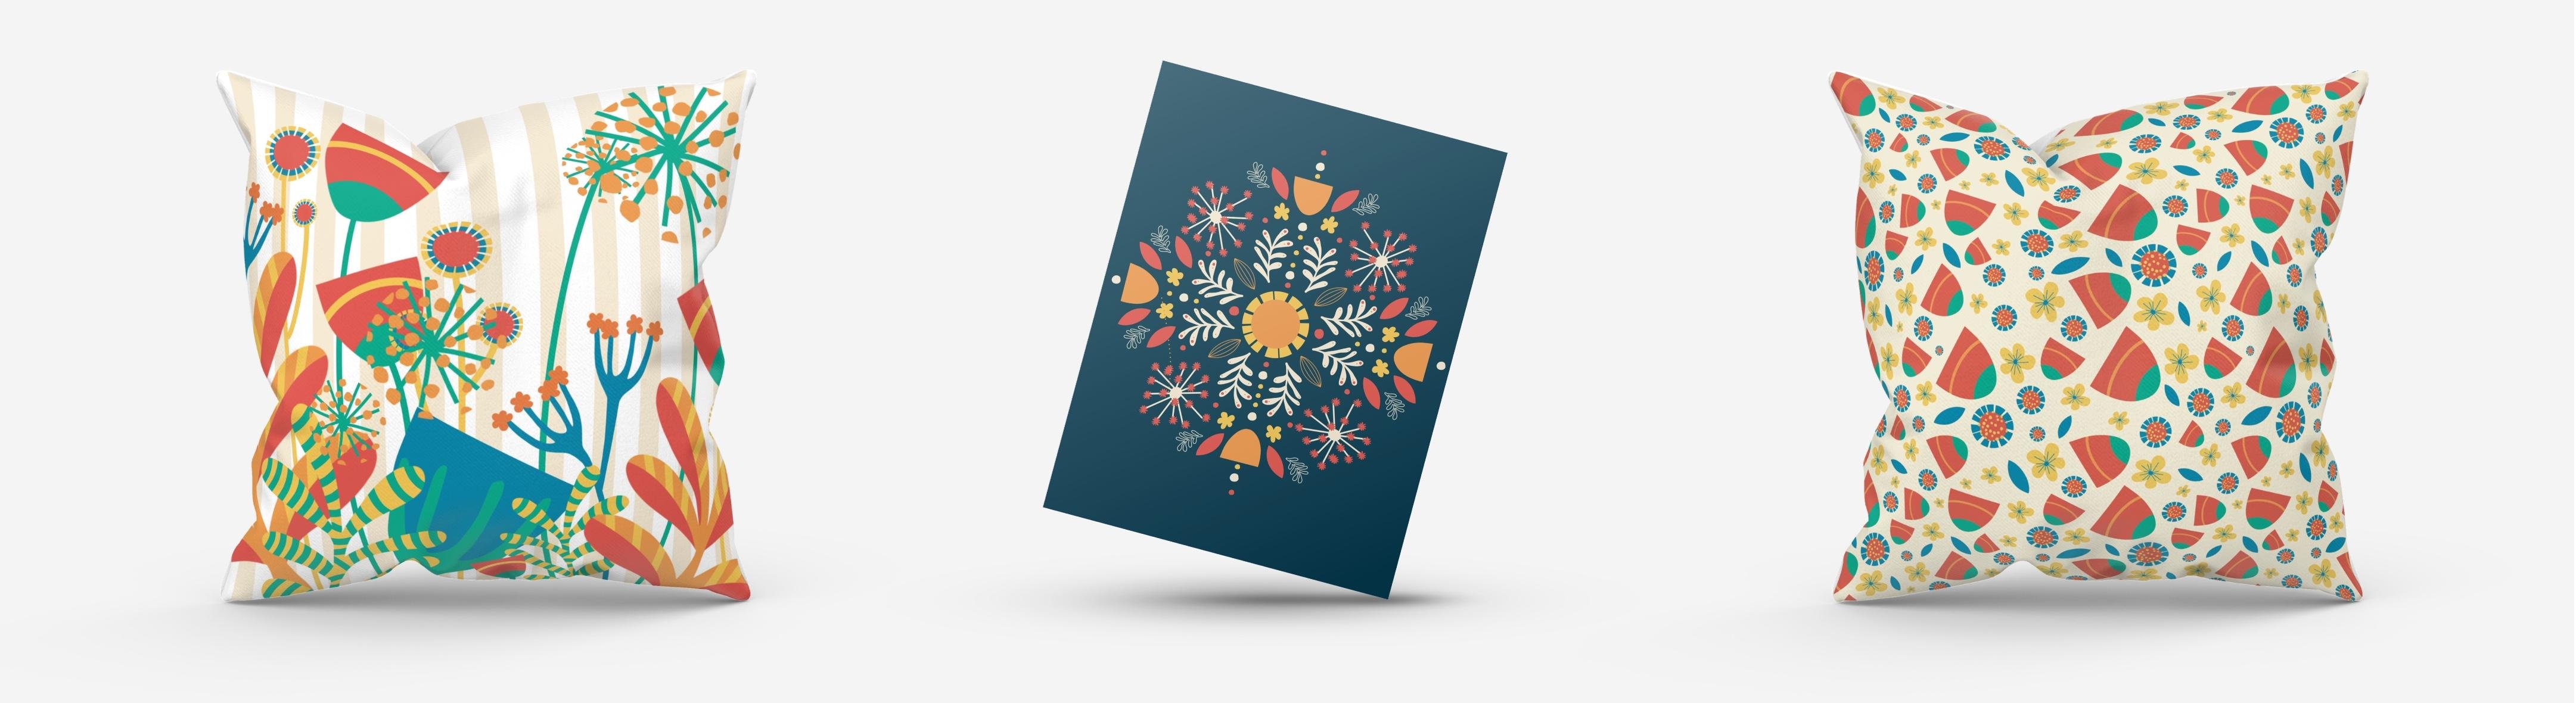
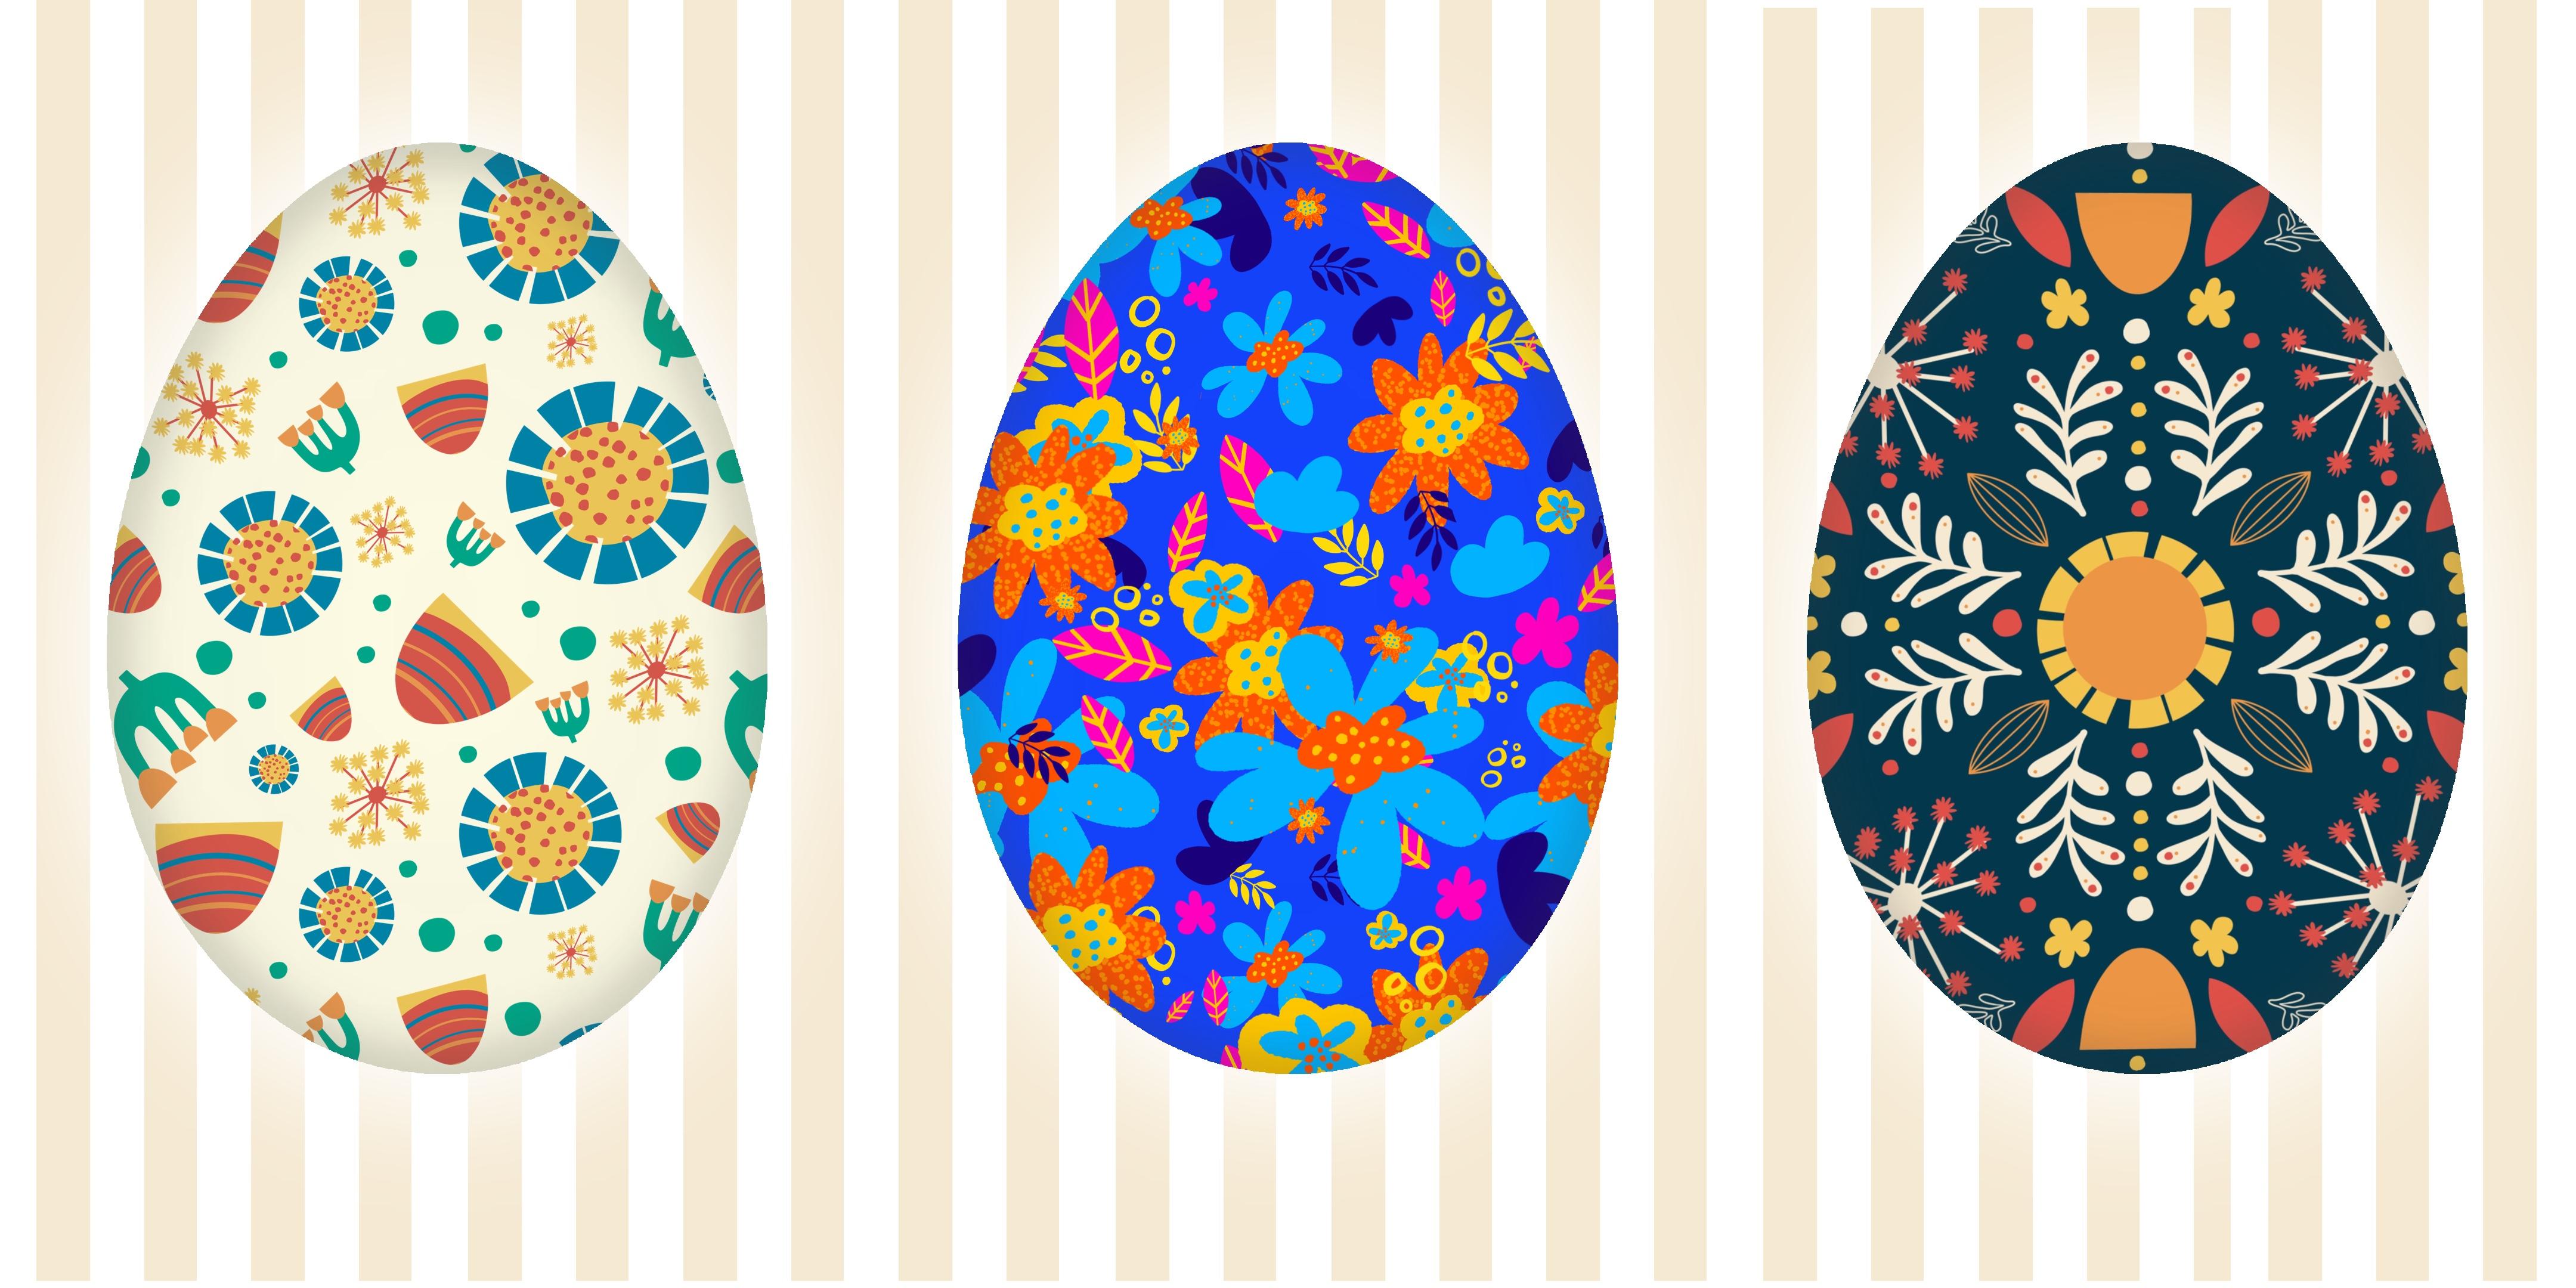
wildflower greeting card.
13. Get Inspiration - Composition: [MUSIC] The possibilities with your wildflower asset
are of course, endless. In this last practical lesson, let me show you how I approach
designing a greeting card. In the sketch, I leave space
for the text and think about a dynamic line that becomes a guide for the height of
the individual flowers. Now I place about
three main flowers. I indicate these
secondary flowers, and think about where filling
elements would be good, such as my dandelions. Finally, I will reduce the visibility off
my sketch layer. Now, I start on a new layer with my main elements one
after the other. Also the fields are created
on separate layers so that everything remains
adaptable no matter where my design is heading, you will see that I work
a lot with clipping mask. Start to decorate your flowers with two different
elements or more. Here, for example, I would like to have
a yellow center. [MUSIC] The way I align the flower
head always gives me an idea of how
the stem should sit. But even here, I work
on separate layers. If you have finished a flower
like me, my tulip here, then you can continue
to work with a copy of the original
and use it for mirroring. This way, you can create prototypes that helps
you in your design. Please note, always copy the original and scale
from large to smaller. Otherwise, you will lose
quality in your drawing. Here is also my
funny folk flower where I ended up working with different sizes of blossoms. For the foliage, I leave the flowers off for a moment and you see
I placed the bold, darker leaves in the
foreground and fill the background with
lighter, slender leaves. [MUSIC] Contrast are vital
in such a bold design. Maybe add to something very big and round, something
more delicate. In case you want
to extend a shape, you can duplicate the original and then arrange both offsets. The next step is to remove
all the redundant elements. This method works
especially well if you increase the
transparency of one layer. Now you can see the
transitions much better. Recollect all missing elements
in the final touch up. Now, I like this training
leaf so much that it should appear again on the
other side of the picture, but perhaps a little lower. As a nice contrast, I have chosen as
simple stripe pattern for the background in
a soft yellow base. Here's the time-lapse
for my greeting card. You see it took a bit of work, but it was quite easy to design. This asset is a great stepping
stone in all designs. You can work with
enlarged elements, maybe for surface design or
create a repeating pattern. You may also want
to explore more with Procreate's Symmetry tool. We can brainstorm
all your options in the discussions
here on Skillshare. See you for a brief summary
to set up your project and to have a little dive into
the Skillshare community.
14. Class Summary and Your Certificate: Congratulations, you
did a tremendous job. Now your first wildflower asset is ready and this might be just the start of
a whole new way to approach your designs
in Procreate. Here are the four major
takeaways from the class. First, you brainstormed
unique forms and sketched with no references next to you but in a limited time, you even know how to organize sketches as references
in Procreate. Second, you know
what it takes to prepare shape sources
in Procreate. We talked about the canvas size, the best brush for graphic look and how to achieve pure black. You know how to polish your
shape and gave each shape the perfect alignment in
the center of your canvas. Third, you know how to
create a collection. You have a basic
understanding of the brush library and
the brush studio. You know two ways to
turn a shape into a stamp and created a reference
sheet for your asset. Last but not least, I hope you enjoyed a
beautiful brainstorming around new combinations
and creations. Now that you've
completed the class, it's time for the next
step, your project. Show us all your
hard work and share. Remember, we took a screenshot of the combination sheet with your stem set unfolded and
saved it to the Camera Roll. Now, head to the Project
and Resources page on Skillshare and tap
"Create Project". First, upload your cover image. It will show as a thumbnail
in the project gallery and will be the first picture on
your project page itself. Also, give your project a title. Underneath, you
will find plenty of space to write a little
about your workflow. Share some more pictures
if you like, for example, your sketch sheet and the overview page of
your stamp collection. You can always
come back and edit more of the progress
you did make. Maybe if you used it already
in your pattern design. I would love to see that. Finally, enter some tags to make the class even easier
to find on Skillshare. Once you're ready,
scroll all the way back up and hit "Publish". [NOISE] Congratulations,
you earned your official Skillshare
certificate for the class. It shows your name and
the class details. You also see on the right-hand side the
project you submitted. Of course, once your
project is live, I'll be happy to
give you feedback. Watch out for the notifications
to stay in touch. Another quite way to
stay connected on Skillshare is our
discussion board. Let's have a chat
about how we use our assets in our
creative practice. It's also your place to
meet your fellow students. Ask me all your questions about a topic and for me to share
the hardest tips with you. One small request, Skillshare and especially
me as a teacher, love to know how
you like the class. Please take a moment
and leave a review. Your rating is one of the most important keys
to make this class easier to find for new students and it
is really easy to do. Don't miss your
chance to have a say. I love to read your reviews. Hope to see you in one of my other classes I teach
here on Skillshare. Let's have fun with Procreate. They are also
beginner classes in German if you like
and maybe by now, they're even more
in both languages. I wish you the best of luck with all your
upcoming assets. Create and share. Can't wait to see your
fabulous work. Cheers.
 Ulrike Text&Tulip, Digital Art in Procreate