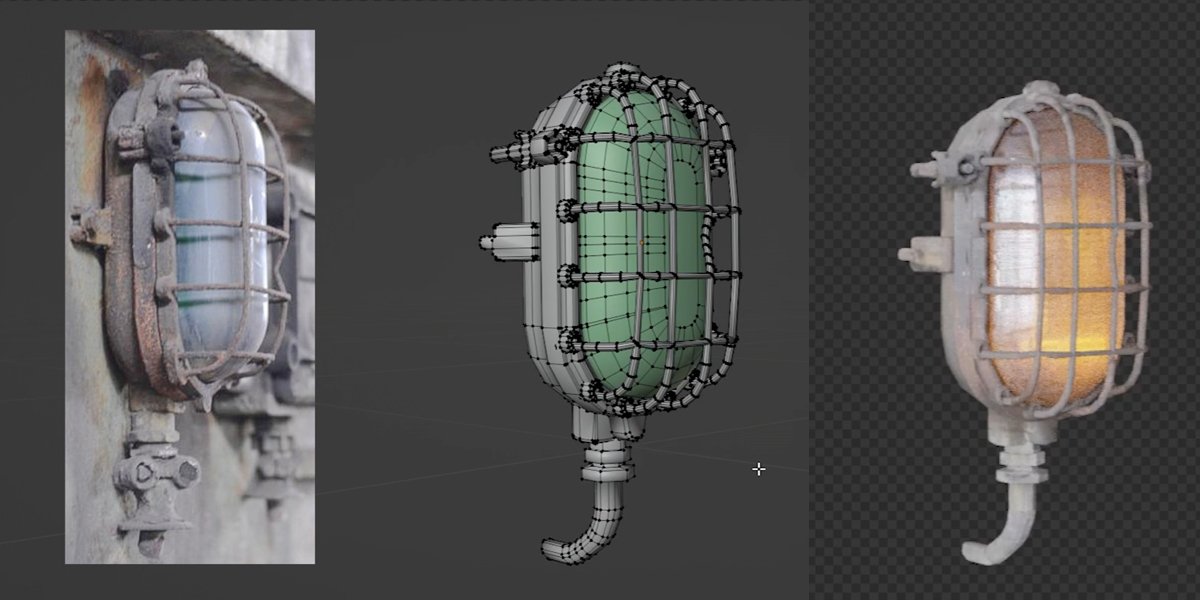
Transcripts
1. Introduction: Hello, and welcome
to New tutorial. It has been some time
from my last tutorial, and I'm excited
to be again here. And in this tutorial, we will do a lot of
creative things, and I think you will
enjoy this tutorial. In this tutorial, we
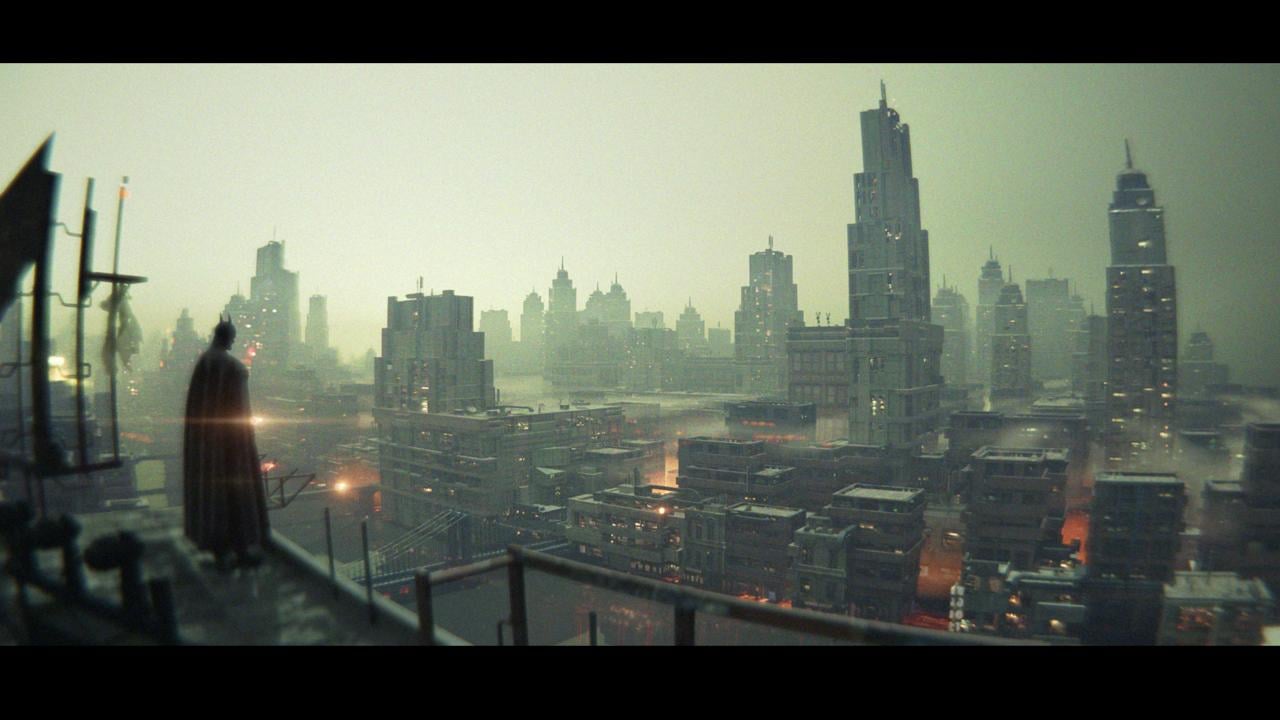
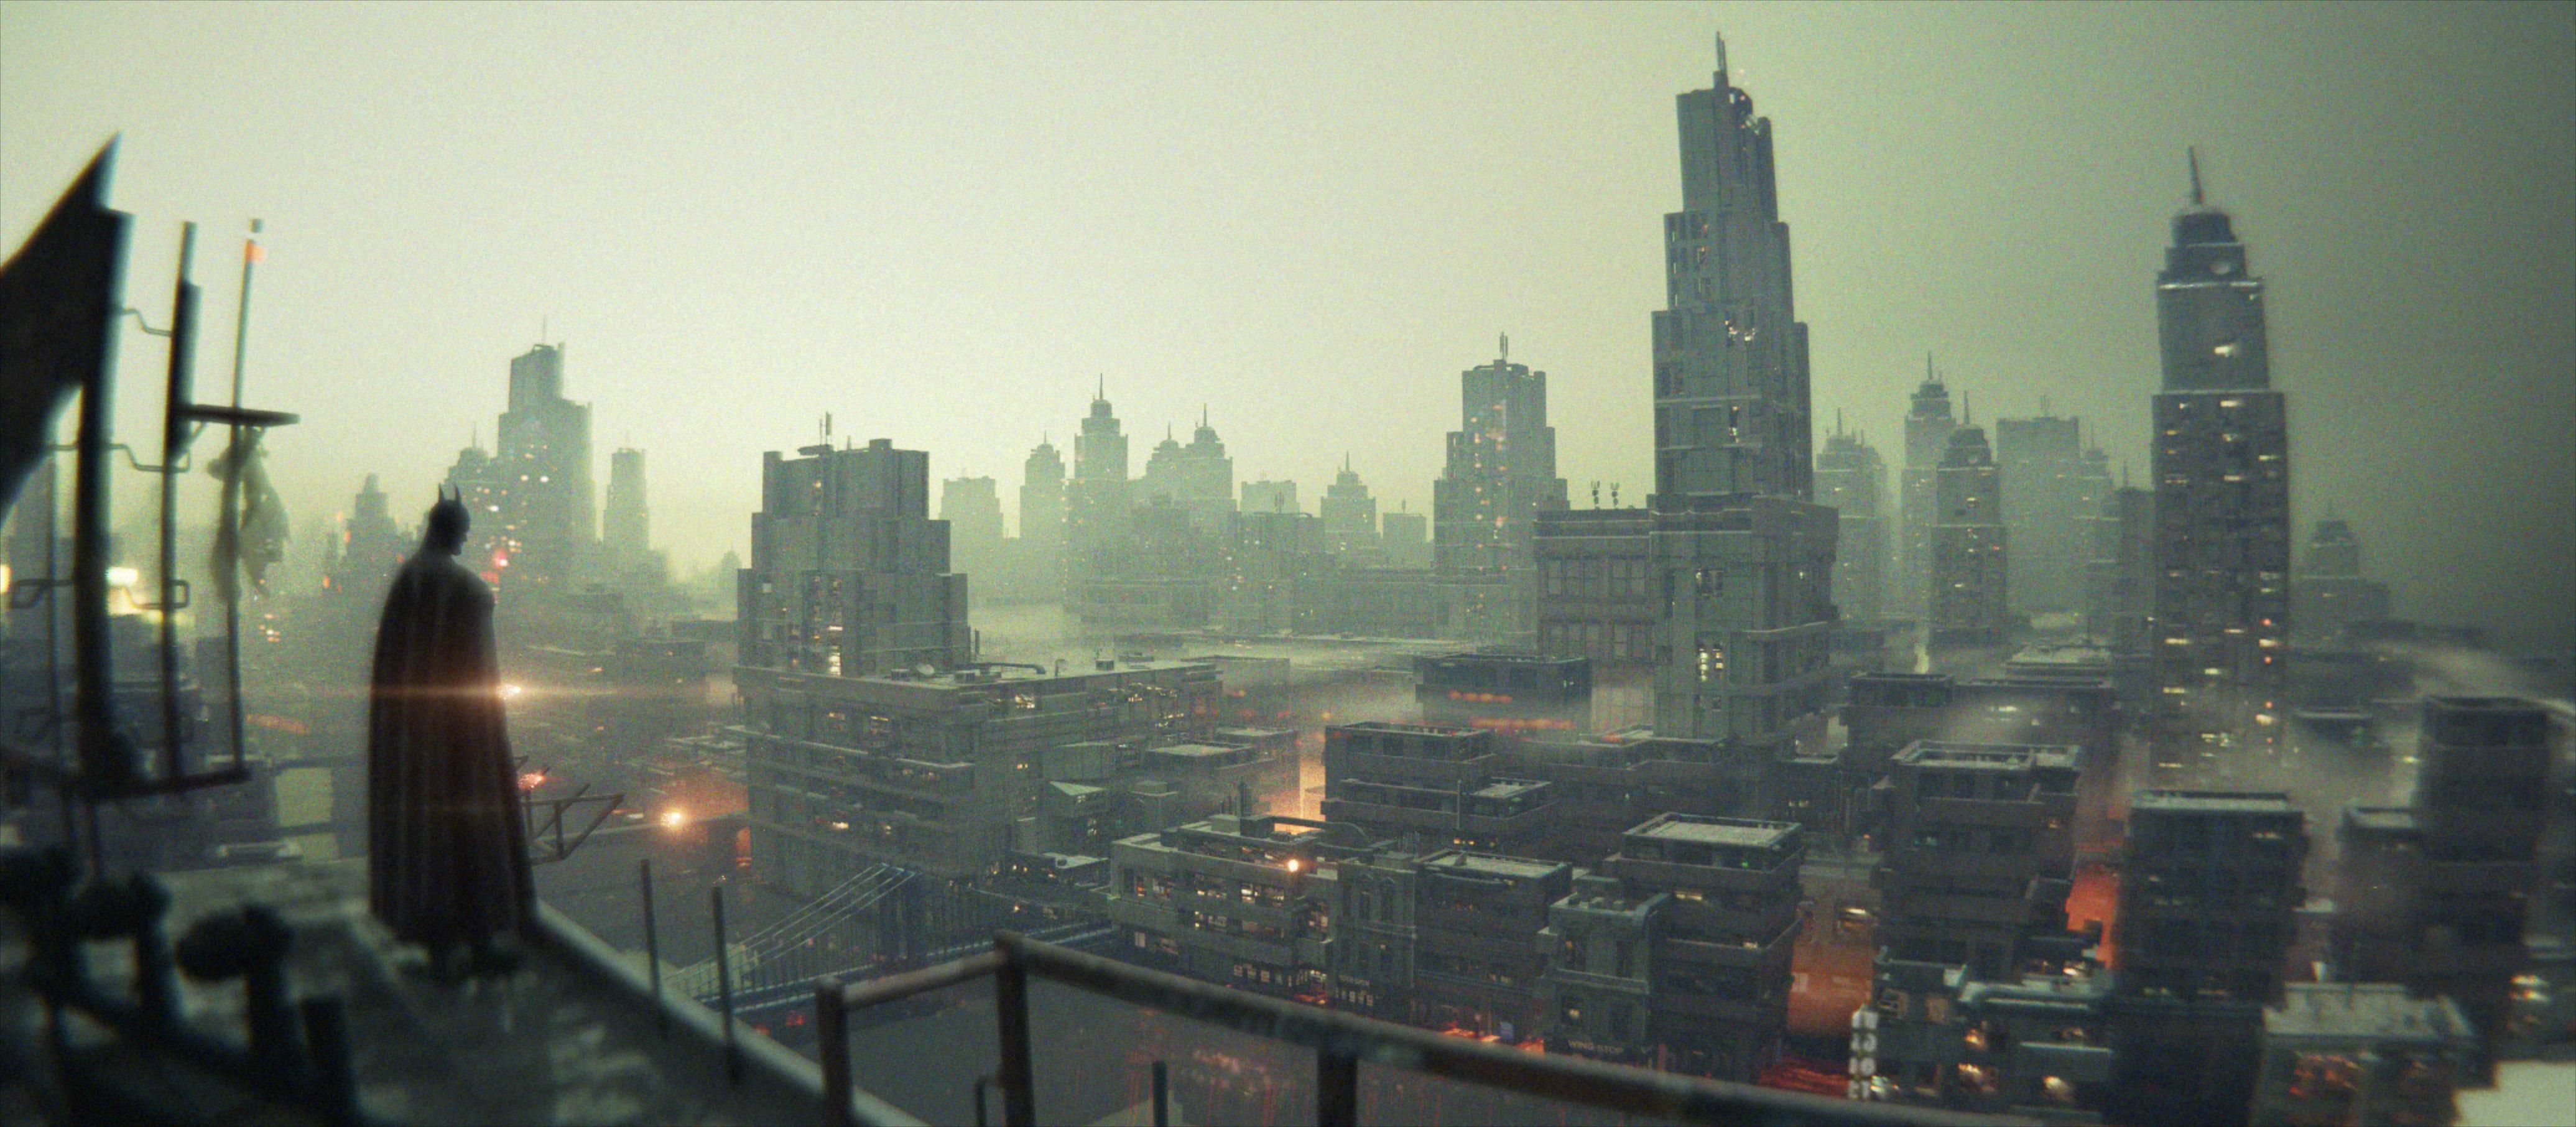
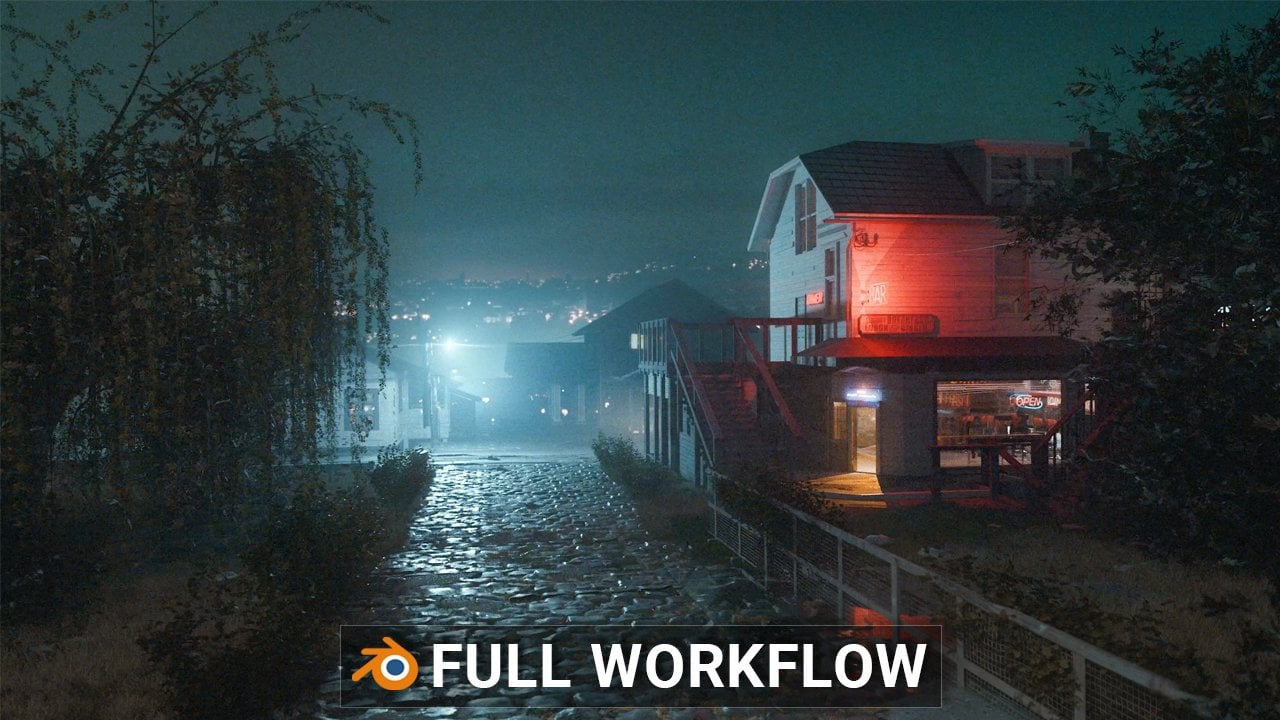
will create this scene. Or I think not this one. I think we will create
this scene here. Okay, I believe that you are
confused and believe me, I am also because I started
with creating this scene, and I ended up with
this scene here. And the reason for
this is very simple. When I start creating
this tutorial, I make some notes on paper. And when I come to
this city background, which is a big part
of this scene, I make just two notes. So first one is to download this editing
building asset Peck, which is my asset pack. And the second advice is to
import this in this scene, which is this scene here. This is actually how
I created this scene. I actually just go to my
editing building Asset Peck. You can see a lot
of buildings here. And I have these low
pool city blocks. So I import this high detail
buildings in foreground. You can see all these
buildings here. And in background, I import
these low poly city blocks. Then I realize this is
not point of tutorial. Point of tutorial is to
learn something new. Then I open new blender file, and I started building
geometry nodes setup, which create this city here. And this is where I ended up. You can see this city
here is actually simple geometry nodes setup which we can control
with these sliders. So we can change seed. We can add small buildings
with this slider, we can change seed, and we can add more of these
big buildings here. But we have a lot more
options, for example, if I select all
these buildings I created We can also control these small buildings here with another small geometry no setup. For example, I can
add details on roof. I can change seed here. And we can also control lighting
inside these buildings. I will switch to
night mode here. And with this empty cube, we can actually control
this lighting here. And if we select this object here and go to shade the editor, we can also control how
much lighting we want. You can see that we
now add more lights. If we move this right, we remove some lights. And we have a lot
more options here. For example, I can control
lighting with this plane, which is not just simple plane, which is actually
a city from above projecting on this
image and which is plugged to emission. And we also can control
color of these lights. And we can also, of course, control intensity so you can see that we are
much more light with just this simple plane. And we can also control where we want this light
or how much we want, which area we want
to bright here. So if I move this, you can see that this is
actually just brick texture, but if I move this, we can see that we remove
some lights here. You can see these
clouds here or fog, and we actually control this with also
another simple node set up here in shade the editor. But because we will create a lot with this city generator
in background, I think it is not problem
to create this scene. We just need import
some model of Batman, put some things in foreground. This is, I think, mostly from my industrial
decoration asset pack. And when we put these
things in foreground and with some compositing
and lighting, tips, we can easy
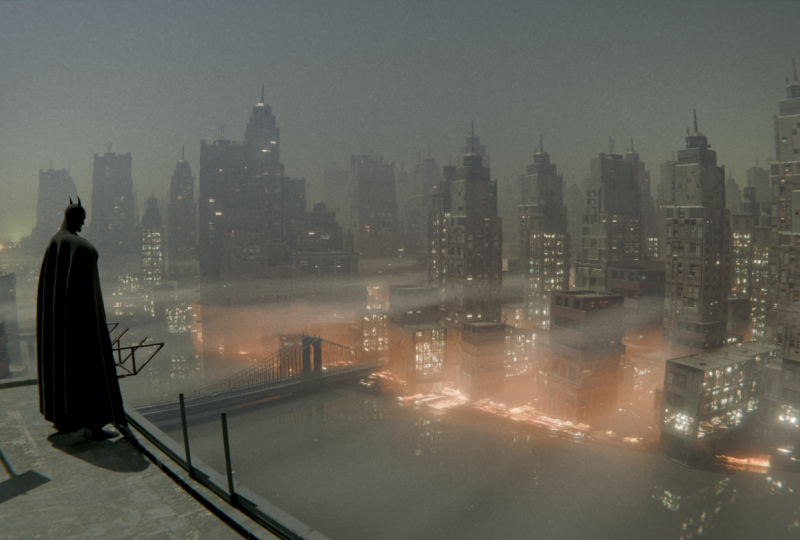
create this scene. So I think in this tutorial, we will also create this scene. Okay, when I'm here, I can also show you how process of creating
this scene looks like because from time
to time I save renders. So this is like first version, I make maybe two buildings
and I scatter these. And later, I realize that I have nice city for background, not foreground, but
for background. I started adding more details. I here on lights and
when I set camera, little better than before, I get whole city and I
continue with adding details. So I add more buildings. Later, I add this water, which is just plain
with glass shader. And I added these bridges. And later, I realized that I have almost complete scene
here. I just need Batman. And I place this edge
of this building here. Later, I replace
this with Batman, and I also place
something for ground for vignetting and I
get this version. Later, I just play
with this lighting. And I'll add some color
correction later. A lot of these are
just very similar, and here we have here, I added these clouds clouds
with volumetric effect and all these versions are very simple because I play
a lot with color grading, which is not point
of this tutorial, I think point is
geometry knows for beginners and how to create
this city background. But of course, we
will talk a lot about texturing because we need all these models
and texture them. Here, I try create
sunset version, but I was not happy with this. And a lot of these are just color correction
and adding some details. And here, I think I
added some do overlays. You can see all
these tiny lights here and these reflections in water are just
with the overlays, but it creates a lot of details. And later when I realize
that I have city generator, I can just play with seed and I can get completely
new version of city. And that's exactly what I do. So you can see before, after Every time I
click Change set, I get new city. So this one is more with small
buildings and let's with the big buildings in background
and another version here. Here I add more
these big buildings. Okay, I think this is
enough for introduction, and we can now start building this city
with geometry notes.
2. Introduction to Geometry nodes: Let's now start creating city generator in side Blender
and with geometry notes. Here I have some
textures and references which we will use later
for creating buildings. But we will talk
about this later, and I created this got tutorial folder so I can
save here my blender five. And you can see that
I use Blender 4.5. You can download this for
free from blender.org. I will also keep open this file, so I can always jump if
I need something here. And I will go with file, save navigate to this
folder and I can call this. I always like to
add numbers here. So this is about 176
project I done in Brenda. Some of these are small
projects, some big, but I always like
to add numbers here and I will call this
Gerta Tutorial. So what is geometric nodes? Geometry nodes is
actually modifier. I will start with plane 1,000 by 1,000 which actually will
be based on our city. And I delete this cube, so we can also delete. We can press A to select O, and we can delete this camera. But actually, I will
first enable this screen cast key so you can
see what I'm typing. Okay, this is big. I just want this mode, but you still can
see what I'm typing, but usually I say what I type. Let's now back to
geometry nodes. We can now be plain. If I press N, we
can open this tab. Under item, I can type here. 1,000. So this will be our seat. I will now before I press N, you can see the
scale is not one. And for geometry nodes we
need apply scale, Control A. Control A and apply scale. Now, this is one and everything
should work correctly. You can see that we have
this clipping problem, and I will again, press N V, and I will just add here 10 to fix
this clipping problem. And you will also get same problem later
when you add camera. And you need to fix this
in camera properties, but we will do this later. Okay. So this plane will be our geometry
node, the holder. To create geometry node,
you need some holder, you need some object, and
we can now press new. And now we get first geometry
node set up and we can hold this maybe city generator. And what geometry
node actually is, geometry nodes is
actually modifier. So you can see here a lot of
modifiers and all of these are actually predefintd
modifiers which we get, which blender
developer make for us. So actually, we can now be something like
blender developer, not from this first stage, but from second because
they split whole blender inside or blender functions
inside these node groups. And with all these node groups, we can actually develop our
modifier for what we need. And for this purpose, we need a city generator. So we want to make
something which can create city to
simplify everything. So geometry node is
actually empty modifier, which we can build by our wishes with all these
nodes we get here.
3. Low-poly building modeling: And to create city generator,
we need buildings. And we will for now, just make some very
simple buildings which will actually
be just cubes. And I will start with Shift
A and I will create cube. And you can see that we
have very small cube. That's because our
plane is very big. Let's bring this here, and I will now press
Napet slash key. Or you can go with view local
view and total local view. So this is same, like
Numpe slash key. So we can now just zoom
this building here. Or isolate this building here. And first thing we
need to do here. We don't want origin in center because later when
we scatter these objects calf or building will be there is few ways we
can move this origin. I think simple wave for you, if you are a beginner, you can just press,
you can select this object and you can
click here and origin. So now with this
tool to move origin. We don't move object because we don't need be super precise. We can just place this down. And there is one thing
you need to know. If you now press S, you
actually scale this Gizmo. So you need be sure
to remove this. Now, when you press S to scale, we actually scale this building
from this origin here. If you want to be more precise, you can easy ways to just
Shift click Shift click, you actually move this origin. So shift, click here. Now, this origin is
precisely on the surface. And if you now go to
object set origin to, let's move this here so you
can see what happened object set origin to three cursor, you can see that
this move a little. But now we are completely sure that this is on
the surface here. And if I now go to item, this building is 2 meters, so you can see if
I now type one, if I now type zero here, we will be completely on X axis. But I said before, you just remember this option, enable this origin, and you
can always move this down. Okay. Now I want to make something which is about real world scale. So how big is one building? Maybe zero on Zois 20 meters. Let's make this one 10 meters. Okay. This will
let's apply scale. This will be super
low poly building. I don't care about details, but I want to add one thing here which so with control
R, we can look at. I want to create some
windows because I want C in which directions
this object is facing. So maybe we can go
with subdivide here. And if I now press I twice, I, we get this we insert
this and we can now go with E. You can see
that this is Y axis EY. Okay, now we have some
windows here. Maybe we can. I don't know, go with
EX to extrude this. So we just know that in
which direction this facing. Okay, this will be O, first building, and okay, I should before duplicate this object to save this origin, but we
can create new one. And one thing I will do here, you can see that we cannot see this from tortographic view. So when I press Namp at one, we go to front tortographic, and we cannot see anything because we are perfectly
on 90 degrees. But we can fix this
in if we click here, and we can enable this gravity
and we now need these two both so we can see these
shadows here and another ways. Just go. With tab, you can go to Edit mode
and we can press A to select Control B and
with holding Shift, we can be precise here
and we can add small bel. We are now sure that we
see all these windows. These screen cast keys
are not visible here. Okay, what we can do? I will go with number one. Okay, I think all these
settings are not connected, so we need to bring this
for clipping here and we need enable screencast keys in all these windows separate. I didn't know this before,
but let's do this. Let's make here layout
this geometry node setup. So let's see what I want to do. I want maybe our
geometry node here. Here we have actually
this three Upur later, I can always go with a vertical split and add some vido here, but
I don't need this. So I will go with join right. Okay, Nampa key here. So this is first building. Let's add another one. And because I didn't
do this before, I will do this now again. So origin and let's move
this to about here. We don't need to
be super precise. We just want scale
this from bottom. Okay. Let's make another building, maybe 15 meters tall and like, maybe 12 meters on X and YX. Now I will duplicate
this few times, so I don't need do
all this later. One thing I will do now,
it is always nice to have some references inside
on your monitor, we try click horizontal split
this window, image editor, and with middle mouse button, you can click and drag
hold middle mouse button, you can move this slider here. We can open this. So I will locate this copy
address of this path here. And open. So I prepared this
image for you. So this will be our
reference image. We have some buildings. Here, I think I will fix this and I will add even
more of these buildings. But this is what
we have for now. Okay, let's see. That's great. Maybe very simple version
of this building. I can even go with Napa k twice. And let's see how we can create super low poly
version of this building. Maybe just E Y. Okay. And now we can let's
move this even more. So EX. You can add some
stores here down with holding lt and
click where this corner, you can select hold this loop. But when you click in middle, you will get this loop here. So I will click here, maybe. I will go with Control Z
because I extrude this now. So AT extrude along normals with holding shift
and moving mouse out, you can create space
for these buildings. Maybe we can sell this. I think we get this
small program here, if we click Dissolve No, connect this part here. Okay, I expected that vendor
will delete this part down, but this is not so important. This is not even
important for us. So we can maybe subdivide
these few times. I don't know, we can
maybe add loop cut here. And now we can subdivide
these few times. So if you press I twice, you get this depend what
you press last time. So now I need press I once E Y. So we have some windows here. Okay, I made some mess. Now I cannot add loop cut, but you can always go with K. You want B with number three
to write orthographic view. And you can press K for R
two and Z to hold this x. Okay. I don't know. This is
not important for now, so just go with EX and we just want to see which
direction this building face. Maybe some doors here. X. Okay, we have another building
and I will go with A, Control B, just to add some level so we can see
all these corners here. NumpaK and we can
select third building, which can be this one. So this one and
this one is taller, so we can maybe 35, maybe ten. Again, control AK, Control R, maybe add shops down. OT extrude along normals. Let's now try click this null. It happens same before. One thing you can always
do when you're modeling, you can go with hD
to duplicate this. Now, you can see this
is separate phase, SZ, scale, bring this here
and you can go with EY. Maybe we can create
some ownings here. Let's see how we can create
this glass part, Control R. And that's now add
bunch. Look c here. I'm not sure how to
select all this, how we can quickly select all this and I
think there is no way. So select this one,
control this one. Now shift to switch to another place and control to
select everything between. So shift to another place, control shift control. And last one. We want this insert. So T stored along
normals, set this inside. And let's take these
small windows here. We can see these windows here. Maybe we can maybe we can
select double this these two now I'm holding just
shift shift selection. A T exclude along normals. Let's create these
two nice doors, subdivide not subdivide. Control I, I to insert
this JZ, move this down. B Y. Okay, now we have a building and doors for these buildings
and select or with A, Control B, small barrel. We have small building, can scale this
little if you want. Next one, Nampa key. Let's duplicate
this shift the X, so we can more these buildings. And let's see next
one, maybe this one. We can again, this easy, bring this up with one, two or three or your keyboard, you switch between vertex, H and face set one, two, three. Let's go. We now need to
select this part here. Control B to bevel. And we get this. Now we can maybe three,
bring this little up. You can also use G for grab
and Z to stick on Z axis. Control R. That's great
place for this shop. We will now go with Control B and A T extrude along normals. So we create this part here. Now we can create
all these windows. But what we can do, we can also do same thing here. So T extrude along normals. We can also select this
loop with holding lt and maybe create this edge here. Okay. Let's see
what we can do now. We can, of course,
create these windows, control our add few cuts, and now this can be our windows. I will not select this one. Maybe we can create even more
windows if I go subdivide. Okay, this will be
too much windows, so I will press IOT
extude along normals. If you want, create
these rounded windows. We can see here. You can grab these edges here. With so if you select
something you don't want, you can hold control and
just drug to remove this, let's select all these with holding shift,
we add selection. We can now go with Control B and add this round corner here. So we have another building and let's actually
add two windows here. We can go with SZ
scale on the axis, maybe move this down
or maybe just one. Volt extrude along normals. We can move this out and maybe
It extrude along normals. So doors for this shop. Control B. And we have
another building. So this is low poly building, but we also add a
lot of details. Let's add maybe
one more for now. Let's see what we have here. Let's create this simple
building maybe 80 meters or 22. Apply scale. And let's see. We can create these
parts here. Control R. Control B, scroll mouse down, all the extrude along normals, if you want, select this
here, bring this up. We can also create this on top. Let's just make more space, throw R, and I will
add few layer. So this may be two. Okay, so we can now select
withholding this loop, shift select another
loop, shift, select another O
Let's select now. These two or last one or T. And, we have these layers here. If you want, you can double
hold hold this loop. It holding hold maybe Control B. You can have fun with this so you can
do whatever you want. Three windows here. And let's add three
windows here. So now we can select all
these and also down I. Maybe you need I twice, but I need press I and ton
extrude along normals. Okay. This is another
low poly building. And one thing you can do here, you can see this roof type. So like this part. Actually, we can
just move this down. Easy, move this down.
4. Low-poly building modeling (large building): I think we have enough
these small buildings. I will extrude some parts
here so we can easily see when we rotate
this building, maybe we can make
some balconies here. Okay, I think I want
even more these cut. So here will be our balcony. Maybe we can even
select these parts, and I don't know. We can press I EZ,
bring this down. Okay, now it will be easier to see later when we
rotate this building. Okay, let's now create
bigger scale buildings. Let's now start building
these big scale buildings, which we have some
references down. So we can take this
part and from this make something like 35
meters big or 55 maybe. Now apply scale and I
see some parts here. You can create this as control R. I will go with OT
extrude along normals. We can see some corner here. So if I now go with maybe
EX and if I now move this, we will get this type
of building here, you can rotate this, but I
think this is not important. Okay, let's see how we
can create this part. We can simply I E, Z, I again. Maybe I again, E Z, how we can create
this rounded part. So if you go to edit
preferences, and under addons, you can enable this Look tool or maybe you need to go to
GEtension and first install, click here to Install Look tool. We can press I. Maybe we
can subdivide this and now we can two, go with circle. We can subdivide this two times. So now if I go to circle, I can maybe bring this up and
I will what I can do now, I can go with delete
limited dissolve to remove this and we can now
get clean mesh. We can now go E Z,
maybe one more time. Okay, I whole time,
press Z intend of I. I'm not sure why, but Z is to change between frame
render and solid mode. So I need to be in solid mode. So I and O this last time, we can maybe just add
small antenna here. Has to scale this
Easy scale this. Okay, let's see how we can
add more details here. Maybe we can scale this and
make something like this. Okay, this should be
a low poly Building. I don't need too
much details here. So this will be maybe place for this clock here and now we should create some windows here. S Y to scale this on Y axis. Okay, I will not use this here. I will just slide this because I effect this part
here, which I don't want. And what we can do here, we can maybe select
all these parts. Maybe OT extrude along normals. Now we can take this
place for our windows. Okay, I also want to
extrude this part out. OT extrude along normals.
Maybe this part. Extrude along normals. Okay, now we can maybe take
this part, extrude this out. We can first model and
then texture later, but there is better approach. So we can apply texture
to this model and then model according
this texture. So I don't want to destroy
this nice building. Now, with windows and later try place texture
on each window. I will later project
texture on this and later we can create windows
according this texture. So I think this is
enough for now. We can switch to
another building. I will duplicate
this few more times. She VX, she VX. Okay, let's see this
type of building. Again, this can be maybe
80 meters to building, and maybe on XX is 20 meters. Apply scale. Let's see how we can
create this building here. We can just add
few lo cards here. So let's add one here
and another here. Now, I can select these two faces OT,
extrude along normals. Let's do this again OT,
extrude along normals. And let's see what we have up. So we can go here
with I and now scale, maybe only on X axis
so Y to bring this to about here and AZ. I will do this a few more times. EZ. Let's create
this top part here. So I ax maybe subdivide
once circle EZ. Now, delete, limit and dissolve. And let's go. We can just go with Control
B to bevel this part. And now we can select
this part here. I. And I again, EZ scale this. So this will be our antenna. And let's see. Maybe we can just add
if you look at aX, and we can do what we do before. So let's try select
this loop here. At extrulon normals. I think it is easier to
just select extrude ons. I will just extrude
this for now, or I will go with
Shift D as sex. Let's move this little out E
Y to create this part here. And later, I will add more
details when I project texture to this building
because if I add more geometry, later will just be more
hard to control everything. Maybe we can extrude, move this up or you
can go always to Wi remote and select
move all this up. I get this nice
little which I like. You can always press to scale to get even more
interested shape here. First, I started
with idea that I will create just low poly
buildings for geometry nodes, but I think we can use
these basic shapes later. So I will not add windows. For now, later, we will add windows here when
we apply texture. So let's now create another one. Okay, this one is much
bigger than this one. We can scale this a little
Let's try create this one. And maybe 35 and maybe here 20. Let's go with Control R. Control B, scroll mouse down, or T extrude along normals. Let's add a few
more things here. One here and another one here. So shift bolt to select
these two loops. Hold the extra dal normals, and we can add one more here. So extrude along normals. And maybe we can select this
loop here, bring this up. Okay, I want these parts here. Let's first actually
create this part. So I as scale, maybe scale on Y. And let's now go with E Z Z, again, extrude along normals. I E Z, and now I will press I, maybe subdivide this
limited dissolve. Subdivide this. I will
go with Control Z. First, when I subdivide, I need van. This circle. Now I can go with delete limited dissolve
and now we can go with Z, I with Z and Control
B to bevel this. And I like these parts here. So this looks almost like this
building here, but small. What if he just press L, Civ D as to scale this
and what if he just place few of these small
buildings here on corners. If I go with she'll be X L to select this loose
part, she'll be Y. If I place this here. Okay, this actually looks good. Maybe we can just
make all the smaller. If I now press, everything
scale is in origin. But if you switch this from median point to
individual origin. Scale to origin of
this big object, you want individual origin. Now we can scale this here. And now we have also few
of these on top, CD, Z. But now we want to scale these to median point or bounding box, which is same in this case. Okay, let's we can maybe SZ
stretch this little Z axis. We get this shape here. Okay, and later we will add more details than we
create these windows, but I just want
maybe go with CD, scare this on the axis and EY maybe adds more parts
of this building here. Et's now try to create
this type of building. Let's select this one. And now I will again go
with maybe 40 meters, and I don't know
maybe 20 here or 30. Apply scale, and let's
see what we can do here. I will add one support loop
cut here and maybe one down. Now I can go with
three loop cuts. I will go with Control Z.
I want actually two cuts. Now I have three faces here. And let's go with I. Sert this EX, move this inside. Now we can make this
arch type here. So here select and let's
go with Control B, how we can make this roof. E, Z. And now I can just
scale this on X axis, and I already get a roof type. Let's see if I go with
Control plus shield the X. I go with Y and to
scale, everything. Actually, I want
to stretch this on Yaxs Z 90 to rotate
this on the axis. Can we get this small
roofs here? Let's see. Now, we can control. Extrude along normals. We can also create
this door here. EX. Let's see what I want. I bring this down, EX now we can grab
these edges here. These two, Control B. Later, we will add
windows to all this area. I think I don't have four
where this is here or I have, but this is or stretch. I will duplicate this
one, shift the X, and it is easier for me
just to scale this let's go with no numpe three numpDO you can just use this gizmo here to rotate around
this building. Let's place this in middle
SZ scale distance Z axis. I want to place this
somewhere here. And now I can easily
extrude this. So EX Hi. X. Hi. Ex. And I can now go Control B to bevel this scroll mouse down. And now we have nice
col Shield divide. I will go with Sx to
scale this on X axis. But you can see that now we stretch actually this
part, which I don't want. Maybe I will go to number
seven F remote and edit mode, and now I can just with age
select, just move this out. Now we don't stretch this
building which actually just move this part out. Z, preview, we need to
disable this remote here. Can just add cut here, throw R. Let's just go with EY throw R. EX. Okay, we will texture
all this later. I think we have enough
for geometry node. So we can always back later and add or create
more buildings. And of course, we will add more details and textures
to these buildings later. But I think for now,
we have enough and we can start building out
geometry node setup.
5. Geometric nodes for beginners: First, I need to set these
two collections because we will scatter collections
in geometric nodes. So I will select all
these buildings and I will press M. M, and we can now get
new collection, and you can call this. I will add one here. So one is small small buildings. And Let's select this. I don't want this cube. Let's press M. To will
be big buildings. Let's select now our city and we can scatter here
small and big buildings. I will press to remove this tab. Okay, so this setup we will create now is very
basic and very common setup. You will see geometry nodes, and it is very friendly
for beginners. If you don't know anything
about geometry nodes, if you just learn how to scatter objects in geometry
nodes, you know a lot. So you can do with these things, a lot of useful things
inside blender. Scatter objects inside
geometry nodes, we need to distribute
points on faces. If you just think logically, you can just search for. Distribute points on faces. So we actually now distribute this amount of
points on these faces. There is one thing
which you note, we have a lot of points, and you can see only
number of seven here. And the reason for this
is because this is in correlation with the
size of the subject. For example, if I scale this
all down and apply scale, you can see that we get
less and less these points. So I go with Control
Z to make this plane. And because this
plane is very big, we get a lot of these points. For example, if
you type here 0.1, we get less of
these points here. But we don't want to work with
these very small numbers. And we have two
distribution methods here. First is random and
second is poison disc. And I will switch
to this poison disc because we get this slider here. And now I will type here 0.1. And now you can see
that with this slider, we actually can control how
much we want these points, which later will
be our buildings. Now, when we have these points, you can also note that
we lose our ground. But our ground, this will
be ground for our city. So we can just go
with join geometry, and we can now join these points with this
original geometry, which is our plane. Now we have all these points. Maybe they are not so visible,
but they are still here. But these points are
actually nothing. We can see them in Viewport. We cannot see them
in final render to be able to see something
we actually want. Add instances here. So another node will be
instances on points. Instances are something
which go here. Instances will be our buildings. We can import one
by one buildings. But actually, we can import
whole collection here. So we can just jug this here and now we can plug instances here. Okay, before you plug this here, my recommendation is
to bring this 0.01 maybe because this can be very dense and this can
crash your computer. Now I will plug
these two instances and you know something, this doesn't look correct. That's because we
need to set this to relative children reset
children and pick instances. Because now before we click
all these three buttons, Blender actually place
whole collection on each of these instances
on these points. Now we have this, and you can see that we can choose how much of these
buildings we want. Okay, let's see what we can
do next to improve this. We can randomize, for
example, scale first. We can add here
random value, no. And by default, we
get this vector. So that means that
all these will be actually stretch
on X Y and Z axis. You can see that we have value
of zero here all to one. You don't want value of zero. That means that some buildings
will completely disappear. We want something between
maybe 0.6 and maybe 1.6. All these buildings will
be between these values. But because this is vector, this also happen
on all three axis. You can see that some
buildings are stretched, but this is okay because if we don't have two big
offset between one, it is okay to stretch
these buildings a little because this is low poly
buildings for background. We don't care about
this too much, maybe we can go
maybe 0.8 and 1.4. But if you don't want
stretch, just scale. These buildings, you can set
this from vector to float. Now, you can see, we can. Okay, let's plug this to scale. We can make these
buildings bigger, smaller, but they are not stretch, but we want to maybe
stretch this a little. And we have too much
buildings here. Okay, so this is before
and this is after. And if you now press, you can see how this works. You can note one thing, you can see that all
these building facing in same direction like
these buildings here. So we can not see
another side of the building here because all this facing in
same direction. We now want randomize
this rotation here. So if maybe plug
here, random value, you can see that we rotate this buildings on all three
axes, which we don't want. We want affect only Z axis. So how we can do this, you can see that we don't have point for all these
three values XYZ. So we can get this if we
go with combined. X Y Z. Now we have nothing happen. We just get all these
points for all these axes. And we actually don't
want to rotate this on X, Y, or we just want to
rotate this on Z axis. And if you now plug
random value to Z, this is what we get. And we don't like this
because we actually want to rotate our buildings on zero, 90 and maybe 180 degrees. In real life, buildings are usually buildings
usually follow street, so they are rotated on values
which are divided with 90. So what we can do
here let's see. I want maybe random value here, but I think integer. Okay. So we have
here decimal number, so zero, one, uh 0-100. So if we now change this, we actually it is
something like seed, but we want seed 90-1. So 90 or zero. And we actually want
just two options. First will be first option
will be value zero, and second will be value one. Now, this value of
one is random value. For example, this is maybe 33. So you can see this building
is 33, this one is 33. This one is 90. And this
one is 33. This one is 90. So we want to tell Blender, Okay, just choose
zero and night. And we can take this very easy with Matt and set this
to multiply by night. And you can see that we
didn't get what we expect. And the reason is very simple. Blender don't work with degrees blender
work with radiance. So if you type 90
degrees in radiance, you can see this value. And if you type this value here, we actually get what we want. But if you don't want,
remember this value, you can do this
you can type here, 90 and you can just
duplicate this and blender here this
option to radiance. Blender will actually
just multiply this 90 with this radiance, value, which is
actually this number, so you don't need
to go to Google. You can just say these to radiance and Blender
will multiply this. And now, if you change
see you can see that our buildings rotate
on zero or 90 degrees.
6. Geometric nodes for beginners - part 2: Have very simple setup which works for these
small buildings. Let's see how we can
create big buildings. All this is actually
our small buildings. We can now group this. If I rest Control G, I will actually make
a group of this. And if I now click here to B, we can now call this. You can see that we
have this group here, we can always go inside, but we can call this
small buildings. And now what we can do, we can go with Shi D, and we can plug this here, and we can now join
with to join geometry. So we can actually now addhe big buildings and
how we can do this. If we enter inside
this and change this collection for
small for big buildings, you can see that
actually here also, we lose small buildings. That's because if we go
inside, same happen here. So you can see that they are linked and how we can fill this. We can change this
if we click here and you can see that we
get another variation. So they are now not connected. But I will not do
this while I go with Control Z
because I think if we expose some values
here to group input, they are not more connected. So for example, we need
this collection here. If you plug this here, you can see that we get
small buildings, and if we now change
these to big buildings, even they are connected, still. So this is same group. These exposed values
are changeable, so we can change this value. Now I want get this slider to control how much I want these small buildings
and big buildings. I will go inside and this
density factor is this I want. And now I can control how much I want these small
buildings and how much I want these
big buildings here. And you can see
that this is very useful because we don't want
too much big buildings, but we want small buildings. And this density max
is actually value which control how this
slider is sensitive. So I will go inside and
I will set this to 0.05. Now, this is not so sensitive. But for this one, let's see, you can see that this
value is linked. So we now need here, and we can now rename
these two big buildings. Okay. Now for this, because we want less of
these big buildings, I will set this to 0.02, maybe. Let's see. Okay, this
slider is still sensitive, so I will go even less 0.01. Still too sensitive, maybe 0.05. Now, this is not so sensitive, so we can keep this five. And the next value I
want exposed is seed. So we want seed here and
let's go inside this group, and now we have seed for small buildings and we have
seed for big buildings. And maybe we also want rotation
seed, which is this one. So we can plug this here. And if we go inside, this group, we can
plug also this here. So we have rotation seed for small buildings and
for big buildings. I think this is mostly
all we want to expose. So you can maybe expose this scale value so you can maybe control from
this tap here scale. But I think we don't need this, or you can also
scale seed expose, but I will not do this for now. But we don't control this
from this geometric node tab. I want to expose this even here. For example, if I have here, shader editor and
select this building, I don't see this and I
don't want to always open this tab to control this
city generator here. So I want to expose
this even here. How we can do this, we
can do this very easy. So I will back to
Geometry node and I will plug this here. And now you can see that we actually get this slider here, and I just want to rename this because I don't know
what this means. So I will press N, and here
we have density factor, which we can rename
to small buildings. Small density. Okay, let's now rename these small buildings seed Let's rotate these small
buildings rotation. Okay, and let's now do
same for big buildings. So now what we can do, we can control everything
from this slider here. We can decide how much we want. These more buildings, how
much we can change seed. This is rotation seed, and we can control how much
we want these big buildings. And this is big building seed, and this is big
buildings rotation seed. Now we have very simple but very effective
geometry nodes setup. In next part, we can maybe
set camera and some lighting. Later, when we improve
our buildings, we can compare before and after.
7. Camera and lighting: Let's now set camera,
so we can go with Shift A and add camera. And one thing we can do. I think if we go with
Control O number zero, we can switch view
to camera view. Or we can switch our camera to UPortVew and I said before that we need to increase this end clip value
to see all city. And I will also switch
to cycles to GPU, and we can now set this from
perspective to panoramic. And last time, okay, but we are not in
render preview here. So I want to keep on right
this viewport and on left, I will set render preview. So render preview, and now
I will set this to 21. This is value I used last time. And now we can we can maybe go about here and maybe
control all shift zero. But we will send this manually. Last time I go here on
the axis to 70 meters. So if we want to get
similar perspective, like I get last
time in this scene, we can just copy this line. So here I have 70 meters
on the axis is about 35. So let's type here 35. Okay. Now we can maybe
just adjust this one. Y axis and X axis. So I want maybe move this
to about here. Let's see. First, I will select
camera and let's go under UPO display and this pass part out,
increase to one. Let's see what I want. Let's see how we can
make this more green. So I don't need this overlay. I don't want this
yellow overlay here, so we can disable this here. I don't want even
this gizmo with we can remove this toolbar here. Okay, now we have
more clean look. And one thing I will add here
to make this more visible, I will add sun lamp light sun. And the last time I
add here bluish sun, so we can I know why this
is so bright because we put this in small building
collection and we get a lot of sun
here, suns here. So I will press M
and CN collection. Okay. And now we can set
this to value of two. But later we will also
add volumetrics here and this will change this effect. Okay, we can play
with some rotation. This is not important for now, let's see why this city. So this city looks so small. We have thousand meter here, and let's see what
I do last time. Still 1,000, but there is
one thing I do last time. I actually, um duplicate this. If you go with Shift D Y, we can actually duplicate this. And now I will scale. If I now scale this and
if I got A apples scale, you can see that we now
fix these buildings, and the good things
about geometry nodes is that this setup is
independent with this one. So for example,
change seed here, we can also don't
affect this part here. So we can have another
seed on this side. Let's scale this even more. The sex and apply scale. So this will be another side of river which we can see here. Maybe we can even rotate this. Okay, what I will do, I will just copy this water.
So this is just plain. So let's go with copy objects. We don't need lose time. To make this, if you wonder
how the shader look, this is just normal shader
with roughly zero principal BDF and glass shader with this greenish tint and
now I mix between these. I'm even not sure why. I just sometimes I just
play with these sliders. Okay, this looks bad in preview. Let's see if we just
make this glass. We have only base color
here roughness zero. Not sure. We will
see later in render. I think in my scene in renders
just look normal and good. So we can fix this later
if this will not be good. But let's see. I think
it look normal here. We just get some glass shader. This will not be so
visible in final render, but I think it
looks good for now. Okay. And again, this is in
small buildings collection. So we need to be careful. We need just make this
scene collection. Maybe scale this.
Disrotation is 90 degrees, so you can always you
can set this to 90, but you can always if you
want to look little up, you can increase this value. If you want to look little
down, you can also. Let's keep this to 90. Okay, I'm in old file, let's see which HDRI use. So you can go to HDRI Heaven and download this HDRI for free. I will just set this for now, so we need to go to world
Environment texture open. I used last time this one. And let's put this
here. Control T. We can play with this rotation. But I think I will
just copy this value. So if you want, same rotation, you can paste this here. I think to avoid these trees, we can always little rotate we cannot do this too much
because it will be visible. I go with value of four, but this will not be
visible later when we add all these things here
and the volume metrics. Let's now add volumetric. This is just cube. Let's copy this so we can
just see values here. So I just, again, a sin collection. Let's
see what is this. If I said these two object
and select this object here, you can see almost nothing. So I said this is by default. I also this one is
also just for test, so I make a few of this to
see which one is best for me. This is volume scattered. This is, again, volume scattered with
different color and values this one is
principal volume. In principle volume, we have
this emission strain which is which adds a lot of
brightness here in our scene. So this is another test, but I think last time
I used this one. And let's see what
also affect lighting. So I have another smaller
cube here, which is this one. So we can copy these objects, and let's see what this does. Sin collection. And I will share this project
file with you. So if you don't want to mess with this copy all these values, you can just copy this
cube and place this here. So this is something
like sky, clouds or fog. You can see this effect here, low sky or fog. I will now show you
how I get this. So if I select this cube,
you can see what is this. We have principle
volume which have this emission strength,
value of 0.06. And then I duplicate all this setup and I set this to emission
strength is zero. So this is emission strength
zero, let's preview this. If, for example,
use only this one, let's go to render preview. We have very dense and very
bright volumetric effect. And if for example, use this one, this is
completely transparent. So all this is zero, zero, zero. And now, if I mix
this and this one, and plug this to volume, I can control with this
noise texture where I want completely transparent
shader and where I want this one with
emission strength. And when I combine
both of these, I get this effect. And I control this with noise
texture which I stretch. If I, for example,
said this to two, you can see this is
now not stretch, but I like this stretch effect. You can always play these
values here if you want. If you like this effect, you can type here similar
number like this one. This color rant is just increase contrast
to see this better. If I, for example, move this down, you can
see how this effect. This is very sensitive. And you can also you can
avoid this slider here, you can type here,
maybe value of five. Okay, bigger value create
less of these clouds, so if you want intense, this, you can type maybe
one here or 1.5. Okay, this is I used last time. So you can play
with these values. You can also play with
color of if you want. Okay, I think mostly this emission strain
color will affect. If you want bluish
tone or reddish, you can also play with this.
8. Camera and lighting part 2: Let's see what next
effect lighting. So this is plane, 200 meters by 200. And if I go to world from word to object and
to shader editor, let's see how this works. So we have actually can
build this from scratch. This is very simple setup. Let's just see
what we have here. So we have here, brick texture, go to color ramp, multiply this. So with this, we control how
much light we actually want. I actually mix this with this color here to
make this reddish. And this also control strength. So let's lead this
setup to practice this. Even we can just
import this very easy. So I will go with Napa key, and let's place one. Okay, I will actually
go with image play. So I have this street JPEG here and if I now go
with image, mesh play. No image play mesh play. And now I will go select
this L's R -90, I think. We need to check face
orientation here because we want to be sure
that red color is down. This is good. Let's see. 200 by 200 and let's see. Okay. But be sure that this
is about real world scale. So what we can do, we can go to we can select
few of these buildings or just place below these
buildings to see how this look. So if I go to material preview, these buildings are big. Okay, here we have
two buildings, three, four, five, six. I think this is about
real world scale because we have
here six buildings, and if we maybe few of
these buildings here, it looks similar like
real world scale. So we can start build this. I will press N and apply scale. And if we now go with emission. So if I plug this to color and We're going to
plug this here. Now we control brightness of
this with this value here. And let's first build this checker texture
or no, brick texture. I used brick texture last time, and I will go with cola. Clamp so we can see this
better how this look. We need send this to zero, and now we can play with scale. Let's see which scale I used
last time to about two. Now, what happened? Now, when we play
with this color ramp, we actually control where we
want our lights with this. But first, we need
to multiply this. Shift T click with Wrangler. So if you are Blender beginner, you just need enable
here, not Wrangler. This add on or if you
don't see this here, maybe you need to
get extension and search here wrangler any style. Let's make this here.
Now, we want to send this to multiply to take
only dark parts here. And if I send this or one, you can see how
this affect this. We actually control where
we want our lighting. Okay, this, again, is
small building collection. Let's set this to
sing collection with E. And let's see
where this plane is. GZ, Okay. Next, I want to multiply
this with red color. I like this reddish
color effect. So we can multiply
this with red color. This is what I do last time. So what I do I think RGB. So I can just take
this red color. Shift click to mix
this and you can see, we get this reddish tint here so we can choose
how much we want. You can use mix or you can use
maybe color blending mode. It will affect a
little different. Maybe this color
blending mode is better because this
affect only color. Okay, so we add
this reddish tint, and let's see what I do here. So I actually plug
this to strength here. In between, I add
multiply to control this. So we have here value of one, but we can also use brightness of this
image to control where how intense is this light. But for this, we need t and
we want this to multiply, and now we can multiply
this any value we want. If you want very bright, we can set this to 12, and we will see
later setup we like. We have this black color here, which look ugly here. But in my renders
is not so visible. But what thing we can do here, we can basically delete all these blacks and
make this transparent. How we can do this
if we go with. Transparent BSDF, we can mix
this and for mix factor, we can basically
use this map here. We should invert this so we can make this
down this on top. Now we basically keep
only bright parts and all the rest is transparent. But now we have this white
background which is visible. I don't know, it's
better white or black. We will see this later
and what you can do, we can do as before, we can control how much we want. So this is basic
setup I do last time, and now I can go with DX
maybe place here or DY, and this should
affect our lighting. If we put some
crazy number here, you can see how this
affect our lighting. But I didn't use very
strong value here. Let's see. What more
affect our lighting here. One thing I like to do if we go, for example, to solid, not here. If we go here in solid preview, everything is white, so we cannot see difference between
this plane and this one. And now it's hard
to select this. What we can do, we
can just change Viper display color to red. So now we know where we
have these planes here. Okay, and we didn't make any
test render, so if you want, let's set this to maybe
to 100 slot one F 12. And last time I make this
more cinematic aspect ratio, so if you want, you can
just decrease this value. And if you need more resolution, you can set this to maybe 100 p. And this take 14 seconds
or so I have this 40, 80. I said this to Vulcan, this
should be much faster now, but I didn't make test. But we also have here
volume metrics and HDRI, all these things slow
down our renter. And I found one
more lighting setup which also affect this render, which is the atometric cubes. Okay, this is something
I have in Ast browser, but it is very similar to
this thing here, which I did. So let's pace this here to see how this
will affect our render. Based object sin collection. And if I now place this here, you can see that we get
this bright spots here, which is actually another. Let's select this. So this is just a mission cube
with this color. If I remove this, you
can see how this affect. I also add some bevels here so you see these rounded corners and I set this strength to 0.02. So this is value I like. And then I add this gradient texture
which go from bottom to top then I go with color ramp to create this effect which
is not so visible. These values are
pretty sensitive. So this is why you could
not see this clearly, but we have some gradient. You can see this
part is more bright. This part is completely black. And if you plug this here and
let's disconnect this here, you can see this
gradient effect. That's because we have
complete value of zero, and here we have this value. Okay. When I plug
this to surface, we have more of this glow effect or emission effect down and
this fades up on top. Even if I stretch this, you can see this more clearly. Now when I create this, if you don't want
to create this, you can just copy this
cube in my Blender file. I go with if you select the buildings and
press He to hide this, you can with old ge
unhide this and o
9. Placing elements in the foreground: Hello, it's me from
future because I lose my microphone and I now
need recall voiceover, but nothing special here. First, I place this clue, which will be our
foreground building and I just insert this
and add some details. Now, here I use concrete texture to add
texture to this building. I just use this texture for roughness and bump
to add more details. And in this part, I just copy Batman and all these
assets from my last scene. I will share with you link where you can download
this Batman model. This is free model
from Sketch Fub and all these rests are just from my industrial
decoration asset take. I will also share Link if
you want to buy this assets, but you can use any assets here because this is
just simple assets which use here to create
silhouette and add some detail. And all these details
will be out of focus, and it is not important. You can basically place
anything here in foreground. And here I place origin, and I will use this origin
to adapt and field. So we will basically place Bama, a little out of focus, and we will put focus on this first rove of
these buildings.
10. Details on the roof: Next thing we will do here is
texturing these buildings. So I will select
these buildings, but not this sun. And let's see what
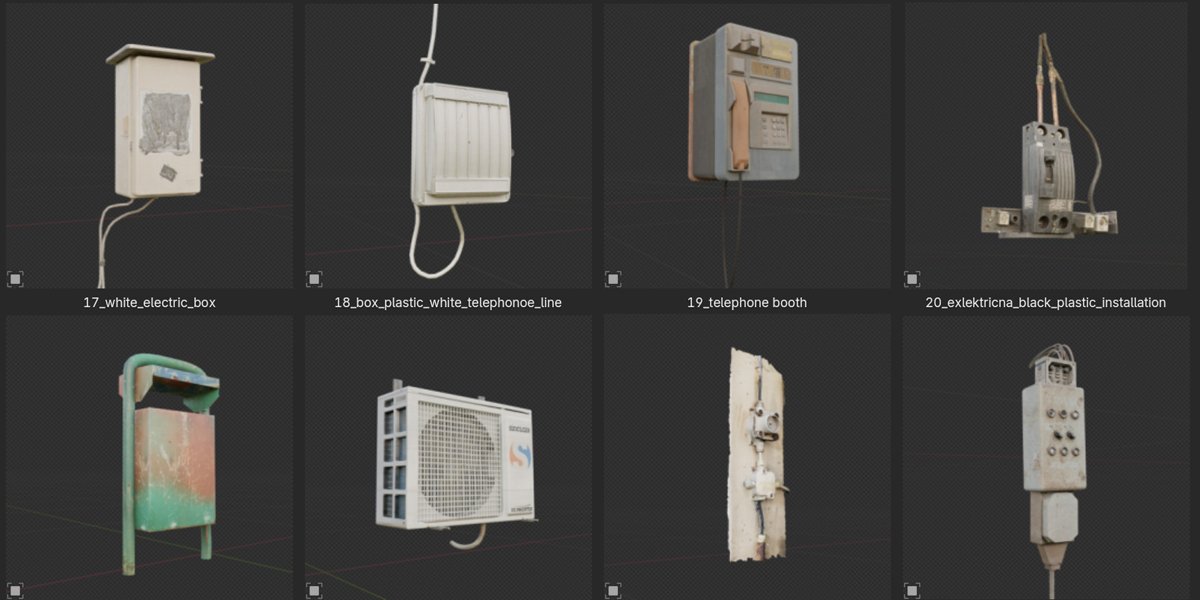
we can do here. Actually, first, let's add all these small things on roof. You can see all these
assets on roof. We can model this, but I
do this a lot of time. And I think I also recorded tutorial which I model
editing building asset pack, and I also maybe model
some of these things. So I will just import this
now from my asset browser. I put this all in industrial
decoration asset pack, but few of these assets I
will also share with you. I will place them here. So I want a pin this. Maybe we can use
this thing here. Let's bring some antennas here. Maybe one, this one. Let's use some air conditioners. And we can also place some of these big
structures on roof. Okay, I think this is enough. I will press M, and I will
set this to new collection. And I will call this roof. Okay, how we can place this
in top of our buildings. I will select this
building here. And let's again go
with geometry nodes. And I will call
this geometry roof. I will again go with
distribute points on faces. Okay. And let's set this
to points on disk density, 0.1, and again, join geometry. Let's make our building. And now we want to distribute
this only on this roof. We can isolate these things by maybe normals or something, but I think there is easier way. So I don't want to
complicate this. Let's import this
roof collection here. Let's set first
instances on points. And for instances, we
can again use this. Let's set these two
relative separate children. We said children. Let's bring this
all down because my computer can crash now. Let's see and pick instances. Let's see what happened here. So separate children. Okay. Let's see. First, I want to check where origin of
all these objects is. So I will go with numb at one. Let's separate these things. I will okay, this look good. I need to fix this origin. Let's set this to middle. And I think I will scale
these objects, but later. Let's set this one here. We want all origins on bottom of these objects. This one here. Okay, I think now is better. Let's see what happened. If I select these
buildings, this building, you can see that we distribute these objects on
whole building here. But we want this on the top
and how we can do this. We can take this selection
and we can expose this here. So you can see, we
get this attribute here and what this
attribute In this case, we want vertex group. So I will go to Edit mode, and I will first let's
bring all these to zero. First, I will make this
roof type situation here to insert E Z. Okay. I want to use this
selection for attribute. So I will save this as
vertex group, assign. If you want, you can
relate this to roof, but you don't need a sign. Now if we go here, we can select this vertex group. Now when we play
with this slider, we get only on this roof. And you can see this one go out. But the reason for this is
because this one is big. So we can just play
with this seed. Let's expose this seed. Okay, I think we have a lot
of these big structures and we have small buildings
which don't fit. But maybe for this is
enough, these two assets. Okay. Because this
building is very small, and it is not easy to find the right assets
for this building. From silhouette, this can
create a lot of details. Okay? Maybe all these
assets are too small, so maybe we can put this 2.8. 0.7. Okay, and how we can apply all how we can apply
this to all these buildings. We can select this
except the sun. You can see this yellow
coral. This is last selected. If you don't see this yellow, you can go with shift and
click this now Control r Link. Let's see, copy modifiers. Now we say modifier
to all these objects. Now we just need add
this roof selection. For example, here, I will again make this
roof type. Easy. And I can now. Let's pen I can now
assign this vertex group. So I may call this
roof assigned. Okay? You already see that
we get some assets here. This look okay, maybe I
just want more this here. Okay. Now we can do
same things here. I twice, E Z, and roof. Assign. Okay. Let's see Sd. I think this can look
okay from distance. It can create nice sealant. Let's see here, so Roof, assign. And let's play with seed. Okay. In this case, I didn't
get any of this, but you just need
to play with seed. And we of course, can
play with Of course, I forget to expose this density. So we can expose this and we can also this part here and assign this roof roof and maybe we
can get some antenna here. So I will maybe
increase this value and move this seed until I get maybe one antenna
or something. Okay. And we can also
maybe apply here. Or so of vertex group. Okay, now this will
be a little hard. I want maybe only
one asset here. Okay, I think I get what
I want. This look good. Maybe if you bring this density, 0.1 maybe we delete
this, but I like this. Okay. And let's see where we
can apply. Group maybe here. And Roof, again, sign. And let's play with seed. Okay. 0.8. Okay. And with this, you
can very easily maybe place air conditioners on
all of these buildings, you can just duplicate
this vertex group and change this from roof to
facades or something, and then you can create
new vertex group. With same princip you can
add much more details. Maybe down, we can add some
neon signs or something. I also have neon signs. In my At browser, maybe I will do this later without recording. Okay, here we can apply
roof vertex group also. And let's see what we will get. Roof, sign. I don't want density max. I want density factor here. This is what I want,
not density max. Okay, and I think we need just because I put
very low value here. I just need sum of these assets. And this same name, but we can rename
this density factor. Okay. Now we can continue. So density factor
here is too intense. And we can again play with seed. Okay, maybe only a few of
these here and that's enough. And here, it's very easy. We can just place on this area, create roof here, E, Z to extrude this a little. And let's create roof. Roof, assign this, and
let's now play with this. Here we have more space, so we can maybe search for
some bigger of this like this. Okay. And we get much more details here,
especially in sile. And you can also see here
on render how this look. So I will go to slot three
and now make test render. And you can see how this look. I see that all this
facing in one direction. So we can do what we do before. So let's see. We have rotation here. We need combine X Y Z. So we want random value here. Random value. Okay. And I don't think I need fix this degree so we can have or maybe this
look maybe silly. Let's set these two. So every time we change seed. Okay, we need to plug this here. Yeah, we get this silly. So I will go again with You can type mat or
you can just type multiple. And you will get this. And I will send this to night
and let's go with again, shape D to radiance. So from degrees to radiance. Okay. And now we have this seed. We can also, I think
this seed is important. So we can extract
expose this also. So if I place this here, I can for each building
make seed I like. So this is seed for let's
rename this rotation seed. Rotation seed. For example, if I
don't like this seed, I can just type this
here and I can fix this. Let's maybe add one thing here. Now, I can rotate this
and it will look good. And of course, we can also add this roof vertex group
assign this here. And now we have
this seed option. Maybe this is better. Okay. With this, we
fix a lot of problem. And let's see now before and after this is actually the
same building and this one. And this is because we don't
have too much buildings. We can play with seed
of these buildings to maybe spread them
to another area. But I think best solution is
to create more buildings. So maybe ten or 15 buildings, and we will break
this repetition here.
11. Building texturing: But this is not
point of tutorial to spend whole day just
modeling different buildings. We are here to learn
different techniques, and then you can take time
and create another buildings. So let's now select
this building and go to Shaver Editor, because we now start creating material for
this building and call this B for
building outside. Because we will have
inside building also. So let's call this outside. And for this, I
created this texture. So I created texture
for buildings inside. You will use this for lighting. You can create this varies. You can just go to maybe
pick up a splash and find free of these
textures and just make collage of them to
make more variation. This is say I just go to Google Maps and make a screenshot of some
of these stores. Here we have some facades, and here we have a larger area. For example, for
roof, this one also. And here we have some bricks. Okay. And you will
see how this works. So now I will bring
this to blender. And I will plug
this to base color. Okay, I say before that, maybe we can use two approach. We can first project texture and then model wording texture. But because we are
already for model, let's try what we can do here. U projection. And let's try, I don't know, project to this building here. And then we will fix
try fix this later. Okay. This part down, this can be one of these shops. Let's see here nice shop here. Okay, let's go one by one. This will be this one shop. This can be this and
this can be this one. Now, what we can do, we can model according
to this texture. So I have this part up. We can maybe go with T extrude along
normals, move this inside. Okay, I get these intersections, but all this will not
be visible later. And now, you can just
put more effort here. I don't know. I can
I need UK here. All this is we actually do
low poly buildings which are useful only from distance from we are not close to camera, so we don't need care too much about all
these tiny details. We just want to create
something which look good from distance. But one thing I want to do here, let's maybe ex through this part EX through
this part out. So this will be our shop. And we can now create
another material here. But let's first finish this material because later
will be easier for us. So I will go with
image texture here. I will load here this
concrete concrete texture we use before. Now I can plug this to
maybe to roughness. And let's see how this look. Control. I will use
same UV Mp here. So I don't want grew
Ump so I can just gave this until this look
wood, maybe 23. Let's now use this
for roughness. You can see what
we actually get. We get all the right
angle to see this effect. We get all the
difference between. Okay, I need color ramp. That's why this is not visible. We need to i to
make this visible. Let's now go to material prove. We get difference
in reflection here. You can see this effect. I don't want anything
to be too shiny, so I will bring the blacks up. And we can also use this
if you want to call input. So now we mix this, but we can maybe set this to multiply and use this to
add dirt to our building. Something like this. Maybe we can also use this for
small bump variation. Let's plug this to height, this to normal, and we
will get some bump here. Now, we can use this setup
to create another material, and another material
can be maybe Miss. So I will click here two plus. I will select same material, and I will make this click here to create new
version and amiss Amis. And let's see what
I want to do now. I want plug, these two. Let's open this
emission. Tab here. I want to plug these two, color and also to strength so we can define strength by black and
white values of this image. And let's go with my let's
say this to multiply. And now we can change
the values later. If we go to render preview, we cannot see
anything here because we need to assign this
material somewhere. For example, a missive here
and let's see I want to bring this for now 2.1 to create night atmosphere so you can see what we get. We get light from this area where we
assign this material. Let's assign this material here. Okay. And now you can
make some variation. I don't want all this
area to be bright, so I can maybe keep only
this right side admissive. This creates a lot of
details from distance, if we want, we can play with. We can select this
object and if we say this 12 or something, we get much more lights here. Okay. And maybe we can
fix UV here. Let's see. Okay, so we have lights,
some lights down, but we need to fix Evinb to
material. Review Let's see. This balcony is Okay, this will not be so
easy to select us. I think that we can
select all these parts. Control mpEPlus and now
control lumped minus. And I will go with
UQ projection. But we can do, we can
maybe project this to this concrete part.
Let's see how this look. Okay, or we can just
project somewhere here, but not on Windows. So But what we can do, we can just scale this all down. Just project this color here. Or I think we use this one. Yes, use this one. Now we can add windows here. Let's see. Let's project
on these windows. I will add one more
loop cut here with K to fix this part down, we can place this here. Okay. Now, I think
I make big mess here because I cannot add loop
cuts with Control R. Now, only option for me is
to go with Knight. And this is the reason
why I say before that it is not a
good idea to create windows first before we place texture because we now
get these problems. Now we can select
all these windows. And what I will do, I will
press I to insert this. First, let's do this. I will go with EX, extrude all this inside. And now I tie to create
all these windows. EX maybe one more time. And now when I have
this selection, what I can do here, I can duplicate this
material one more time, create new variation, and
I will call this glass. But we can do now, we can go with glass
maybe transparent. And we can make another
variation of this. So transparent glass. But we can hold this mix. We can keep some of
these values here. So we can hold this
mix with another mix. Shader and for glass, I will also place
this in glass color. So here we have
transparent glass, and here we have this value
before shader from before. Now we can choose if I go all to left. I choose this shader. Let's first assign this, so maybe we will
see this better. If I go all to right,
I just get this glass. You can see. But we
can mix this 0.5. Okay, now we have glass, but we also keep some of
these shadows because we plug this color input
in glass shade. I forget recording some part, but I just make holes here
where we should have glass, and I just bring this out this part and this look
like owning or something. So nothing important.
And the important thing we will do now is we will
create some lights inside. So we have some glass
which is transparent. We have some holes,
so we need to put lights inside and
how we can do that.
12. Lights inside the Building: We can create that by
creating one object, a massive object, which will
be inside of this building. I don't see this cube
because I'm in solid view. I think I lose my cube now. I will create shift cyclic
and I will create new one. Okay. Now I can select
both of this object. Let's disable this render
preview on left because this slowed down my computer.
And let's see. I want to create this cube. Let's scale this on the axis to match this building
a little better. This don't need be perfect. I just want something inside. Number seven. Let's see
from top, this is wood. And let's bring this on site. And now I will call
this Let me see inside. And let's see principle, BDF. I need a mission, and I need
this texture I created. So buildings inside. Let's see what I do last time. So, this is big mess. I think it is better
to not look here. So if I add this to color
and these to serve, we should get these
bright parts. And this is this
depend on UV map. So this is connected
to UV Map by default. If we go with Control
Shift T. NorolT. You can see that by
default is UV map. And UV map is very
bad option here. Reason for this is we have
ten different objects. And when we duplicate this, if we want scale these lights, we need select each object and change UVMp again and again. So there is another
solution for this. We can control this
by another object, which in this case, will be empty object. I'm not sure why when I select this image don't get this here, let's go inside
buildings inside. This is now projected
with UV map, and we want use empty
object to control this, and for this, I will
use empty cube. Okay. Now we have this empty cube, and if I now select this object and I can set these two objects, I can pick up this cube. Why this don't
work. Maybe, scale. I think we need to set
this to box. Let's see. Okay, now it's better if I
scale this I don't know, 2.1. Okay, let's see now. I think this is better. Maybe I think this is stretch because this image
is also stretch. Maybe we should get similar aspect ratio from
this image with this cube. Let's apply scale here and
what I apply scale here. Let's bring this down and
let's now apply scale. I think I need to
stretch this cue because this image
here is also stretch. And something like this
is about real size. And here we have
one, two, three, four, windows we have here
one, two, three, four. So we need scale
this little up Okay. Now, later, we can
play with this cube, and it will affect all
buildings in same time. This is reason why
this is good solution. So if I now place
this here and you can see our buildings now
get a lot of lights. I do same trick
with brick texture. So we can d brick texture here, and we can go with Clem. Can plug this here
in material preview. We need to use same
projection method here to get this brick
texture to life. Or we can just use this object, projection or let's see. Maybe object and let's try rotate this. Again, I lose my microphone, but luckily, I didn't do
anything special here. So in this part, I just
scale this to two. And here, I just play
with color ramp. You can see we will use later this for turn on
or turn off lights. Now, I just multiply
these two shaders. So here I send this
blending mode to multiply. And now we can use this
slider or we can use this color ramp to turn on and turn off some
of these slides. And now I add another multiply with control
intensity of lights. And here, I use black body node with low value to add some
reddish color to this light. So here is just preview, and now we will again mix
with this original image. And with this, we can control how much we want
this reddish light. We need to remove
this empty from this object here because before I use this
empty object I want, when I remove this, I
use this as object. So these black parts are visible where we
have day render. So you can see
problem, I get here. I can clearly see these
black parts here, and later I fix this. And let's fix this now. I will go with
transparent shader. And now we can go
with mix shade there, and for factor, I will
use this image here. So I will go with
color Rum is here, and I just want white
color will be transparent, black color will be visible. And let's plug this here. And now it's opposite. I just want to plug
this one down. Have lights and all
rest is transparent. One thing is important here. So I before plugged this
to this brick texture, but we need to plug
this texture plus this brick texture
to this factor here. And now this work, now we can control intensity here, flight. We can control how
much light we want. This is too bright. And now, one thing
is also important. This object is not
part of this object, and I need pressm and sent
this to seeing collection, **** the X. I will put
this object inside. This building. Okay, we
didn't finish this part here, so we cannot see anything here. We need to cut these windows. And now I will select
this object Control J. Now, if I bring this world 2.1, you can see that we have
lights inside this building. Let's make this to
one, and now we can now we can make test render. This is what we have for now. So we finish only one
of maybe ten buildings, and you can see that
this already looks nice. So we have a lot of lights here. And when we finish rest
of these buildings, it will look much better
and much more realistic. So this is only first building and you can see
all these details. And I think I add too
much buildings here. This is all. For
today, I think I will continue
recording tomorrow.
13. Texturing Building two: Hello, it is another day here, and let's start
with new building. But before I just want
to fix this roof here, And I should press Control
lumped plus to expand selection so we can
also select this part. And now with Turba we'll
go to Object mode. And one thing we can do here, we cannot bevels to
these sharp edges here. I think this can be visible
depend on lighting. So maybe just on this roof part. So with control, we can
select I think with Alt, we can select this
whole loop and shift and Alt together
to select this loop. So shift switch to this part, control shift here, control. Shift, control. Control. But you can
see that blender find this part a shortest, so I will press shift
here and now control. It is not important
if we skip something. Now we can go with Control
B to add small bugger here. I will adjust one segment. So if I press Z and
go to render preview, this is what we have, I will fix this part later. I think we don't need
to lose too much time on repetitive tasks because we have a lot of things to do. Now I will go with Napk and let's now make one big
building, maybe this one. Nape key. And one thing
I think I can do, I can select this building,
this one and this one. If, if I select
this last building, I can maybe press Control
L link materials. Let's see what happened. If I now go to
Material Tab, yes, I get all these materials
on this building here. Now I can go with nape key, and let's go to material
preview to see what first, I will assign this building
outside to for this building, which is by default because
this is first material. And let's go with projection. Let's see what we get. I will first fix
these big parts. So maybe I will
select this loop here and let's place
this same position. I like this texture here. So if I project this here? I will press S scale to
make these windows smaller. Okay, we can adjust
one by one this piece. And I want maybe loop cut here and let's
select one by one piece. I will go with Control Z
because I think I need maybe two parts to
make this square. Okay, now it will be
easier to project this. I think in this point, I will also fix
these parts here, and I think I will
spit up this a little. Now we can add more details. For example, we can
extrude this part out. So I will go with OT, extrude lrmals,
extrude this out. We can maybe select
this whole loop. And we can just go with RZ. Or we have also textures. I prepare for this type. You can see these bricks. We can maybe place this here. And we get these bricks
and I make this seamless. I make this whole
line of these bricks, so we don't care too
much about projection. And if you care, you can also project
this part down. It's no problem if
we stretch this. We just want get same tone here. Okay, now we can continue
with adding details, so control R here. OT extrude along normals. Let's see how we can
make these windows. I think there is no easy way, but we can spend some time
adding loop cuts here. Let's try isolate these windows, and I also want maybe
this seam here. Okay, let's see what we
will get if we now try. Select some of these windows. Okay, I will also
add on this side. I will select some
of these windows. We don't need to
select all of them. And you will see later why. Okay, let's add my cat here. I selected some
of these windows. I think this is a
harder way to do this. We can for next building, just select one of the plane and make a few times go with
subdivided and then insert. And make windows
and then project on some concrete texture.
We will do this later. Let's now go with T
extrude along normals, insert these windows and
assign this as glass. I will also maybe
open these windows, or I will just delete
some of these faces. I can also delete few of these. So delete phases to see what effect I will
get. Delete phases. Let's now continue extruding
some of these parts. Maybe this part here,
OT extrude alonrmals. This will create
some random details. At extrude Dalonrmals
and if you care, you can sell this part, scale this to fix
this stretch texture, you can see here,
G, move this up. Let's select this one. Project this here, T, extra dal nor marks. Maybe this part. OT. At extrude along
normals. And let's see. I think we get a
nice building here. This white part is
something I want to avoid. Let's fix this top part and where I want project
this maybe here. Maybe just a few windows here. Okay, I will look good later. Maybe draw RT for
phase selection. Extrude along normals,
maybe one more time. Throw R Extrude along normals. You can maybe grab
this edge here, G to bring this up. Let's also project this
part here somewhere. Maybe we can project this
down very concrete texture. Okay, and let's create
random details here. I will select maybe a few
of these pieces here. And maybe P extrude
along normals. And I will go here with Control B to smooth
this a little. This will create some
random details on top. Let's see what we have here. We can go with old to lumpe
clus to expand selection. And let's reproject
this here on concrete. Let's see what we can do maybe similar thing
like we do before, select each other of these rows for T
extrude, along normals. Maybe Control B to level this. And maybe four T
extrude along normals, GZ, bring this up or down. Maybe like this. And let's see here, um, expanse selection. Let's project this
part on concrete. Maybe a few of these and
T extrude long run marks, maybe extrude this inside. Well faces to make
these holes Control B. Control lump at plus maybe. Or we can maybe select
this slope here. Something like this.
Okay. All this will look good from silhouet. Maybe we can make some holes
inside here, delete faces. Okay, and let's see
what we can do here. If you want, you can
also insert this window. At extrude along normal
move this inside. Maybe here. Et's see in solid preview, you can see that we
have a lot of details, and maybe we can later adds for some of
these sharp corners. For example, if you
select withholding gold, we can select whole
op shift to select this part and maybe
just some random beers. Maybe this one, this one. Some of these which
will be visible. So shift lt and it is very easy to select
all these loops. Okay, now I can go
with Control B, scroll mouse down because I
want only one segment here, and this is what we get. And this is how
this building look. And I think from distance, this will look pretty good.
14. Texturing Building two - part 2: Okay, let's see what we can
do with this part down. We can select this part with old and maybe Control nt plus. And let's go with Q projection. Let's see what if I
project this here. I think we already
get something. Maybe we can I don't
like this part. So we can project
to this part here. And let's see if I
go with Control R, and I need a few loop cuts here. So we can project shops down. So if I select this
part and let's see. I can go with T extrude along
normal smooth this inside. Okay, now this tagonal
edges work for me. So it's just remove
everything down, which is what I want. Let's see. Now we can just manually reproject some
of these stores here. And we can maybe apply later
this emissive texture. Let's see what we have here. Okay, let's fix this part. Okay, let's now I want maybe
bigger scale windows here. Let's scale this. We can always tress this with X And now we can you can see when
we add more mesh here, this seed change for
the roof assets, but we can fix this later. And I want also project this or make bigger
scale buildings here. I haven't fixed this before, before we are much
more low cuts. Okay, let's maybe
project this one here. Okay, let's see
what we can do now, we can maybe extrude this out GI to move
this out. Let's see. We can make maybe
one corner here. So I will select this part. Let's reproject this
a little better. Z 90, maybe project this here. And now P extrude along normals. I think I want to
move this here, but this is not important. Okay. And maybe we can now start adding more
details, so control here. Now we can maybe
reproject this part. Now, according this line here, I want this little up. I want this line
to be about here. This one is okay. I will
just move these windows, scale these windows
a little on YX. Now we can maybe select
hold this slope and OT extrude along normals and
same with this slope here. And we can, of course, create these windows here. And one thing we can do here, we can select all these windows, T, exclude along normals. We can create smaller windows. If we go with subdivide, we get all these small pieces, and if I now press I twice, I, we get small. These windows OT exclude along normals, last material assign. And I think I will again,
delete some of them. Just delete faces, and we
have a lot of details here. Let's see. Okay, we don't
have anything inside, but you can see
all these details. So, and let's back
to material review. Let's maybe also extrude this part or extrude
along normals. And I will start isolating
the windows here. First, I will extrude this part, 40 extrude along normals, and we can project this
part here to make here column Extrude along normals and let's now select
all these windows. At extrude this inside
and glass material. And I will maybe
a look cut here, and I will maybe
just delete some of these windows, delete faces. And we already have a
lot of things here. Let's see what happened with. I project this on
this white part, so I will stretch
this a little Okay, and this part don't
have too much sine, so I will project this
to this edge here, and maybe we can. I think I will do same
with this part here. Okay. And let's extrude
these windows, delete faces. Let's see what is
with this part. Z 90. Move this here and T
extrude along normals. And we have a lot
of windows here. You can just hold shift, and just drag this to select all these faces
at the same time. Holt, extrude along
normals, glass material. Let's select this loop with. And actually, I just
select this part. Let's reproject this here. At extrude along normals. And, okay.
15. Texturing Building two - part 3: You can play a whole
day with this. What I will do now, I will
extrude some shops here. Maybe we can add
some loop cats here, select this part, T, extude alongnormal and
emissive material. This part also can be emissive. Maybe Control R. Select these phases, OT,
exude alongnormals, loemissive this part here or low insert this inside and also this part. Let's make this column here. Let's throw this out
and make all the part M Let's extrude this column here. And let's see in random
preview how this look. Okay, I think we can
spend more time here, but I think you
understand point. And this roof part is
something we want to fix. Let's see. If I go to
select similar normal, this blender should select everything which is same normal. And if I now go numb
and one with remote, I can diselect
everything I don't want. So I can diselect all this part, and now I have only
this projection. And I want to project everything on this
concrete texture. We will get some stretch parts, but I don't care about that. And one thing we can do here, we can go with delete
limited dissolve. And you can see now we
get only one flat plane. This also stretch a little
this concrete texture because we don't have
enough geometry here, but I think this is okay. So with this, we delete a
lot of unnecessary mesh, and I will now press I or T extrude along normal
smooth this side. I or T extrude this
along normals. And, okay, let's see, this should be like roof. I think this is already
marked as roof, but let's apply this, and now we have one building. Next, we need add lights here. So back to our scene with Napa K and let's go shave
the X. I will now isolate both of these
objects and let's now if we stretch this so you can see that
we don't stretch UVM because we use object
empty object for UVM, and this is pretty good. This is what we want. And now I will just place this inside. So as to try cover all
this building let's see. This look good. Okay. Okay, I select
this in mode. Now I will go with Shiv DX mod duplicate this move this down. And I want place one here. Now, we can select
everything and not just control to select this. And we can see
what we have here. Okay, now I will go with Six
and maybe place one here. Okay, now, this
will be hard too. If you go with SX,
you just reach this. So you can go with local
view now SX and SY. Okay, and now I
will back to glob. And let's now join all these
together to one object. Control J, and let's
see what happened. Okay, we have all these lights
from this emissive cube. So this is emissive inside. If you want, you
can increase light. You can scale these
lights with this empty. Okay, where is this empty. Let's select both of
these and if I now want. If for example, see that this scale of this
light is not good, I can always scale control
with this empty object. I can do everything I want. And you can see that we don't have lights inside this part, that's
because we need. Create windows here.
Let's see what if I go maybe with subdivide and I twice and the OT exclude along normals and assign this
glass material here. So we can create this quickly. And we have everything
but one building have. So we have a missive
stores down. We have a lot of bunch
of these lights. We have a nice silhouette and lot of details in mesh here. And let's maybe just open
a few of these windows. Maybe we will get some
lights from inside. Or we can assign this as glass. You should also see inside
through this glass. You can put much more effort. If you want, you can spend the whole day modeling
one building. But for assets for background, I think this is pretty enough. Let's now make one test render. And one thing you
need to care about is that the building should be in side big buildings
collection. And because I join
this with objects, Missive object this
now go outside my collection so I need
press and big buildings. And you can see
another weird problem. My building go upside down, and the reason for this is not sure which is
reason for this, I think because of
the Z rotation. So control A, apply
all transform. Okay? This is another
thing you need care about. And I'm not sure why
I get this here now. Okay, let's see where is origin. Now I need back origin to place. Okay, I lose my origin, so just be sure to place
origin in place to apply or transform and to set
this to right collection. And now, finally,
everything works. So you can see, we get
nice detailed building, and we have now two
finished buildings, one small and this big one.
16. Texturing Building two - part 4: We can maybe make one of
these small buildings, texture one of these
small buildings. And I will again go select this last one Shift
tel link materials. Let's see what we get here. I make this viewport
color to blue. So this is my recommendation
because later, you always know what
material you apply here. Maybe for glass, we
can change this too. Okay, I will disable this
random preview maybe soft blue. For emissive, we
already have color. Okay. Now we can go to tap
to Edit mode, Q projection. Let's see where we
can project this. I also have put here some of these textures so we can
maybe project this here. Okay, I will select this
maybe this windows here. So we can project
these two windows. Then we can select this, this part with old. Okay, maybe first this one. Maybe we can project this here. And then we can, let's
also do same here. I get same problem before, I add lucas too much Lucas, which I don't need to add. But let's not go with one
thing we can do here, we can press to go to Y remote. And now I can go with K. And if you press C, you can cut through. So C to cut through. And now I can press X
to stick on X axis. And I can press Enter. Okay. And I will do same here. So, for knife, C to cut
through X to stick on X axis, and let's now see what we get. Okay. And one thing
you can do now can select this with
Old and with GG. So G twice, you can
slide this without. So if you don't press G
twice, you stretch this. But with G twice,
you just slide this. And now I can easily cut
this part here with K. Okay. And now you can fix
this UV projection a little. You can see that this
part is a little stretch. Mm. And now we can go
with T extrude. Let's see, T extrude inside. And here, it will be easy
to fix this projection out. At extrude this inside. And let's now OT
extrude this inside. Here, I will first
fix little UV. Maybe we can hold the
extrude all this. Now we can. Let's I will
also make one column here maybe project this here
and we have a nice part. We can extrude along normals. Okay. What I will do here, I will maybe just
subdivide these ones. And now I will make a few
smaller windows here. Extrude along normals. I'll sign this glass
material here. Maybe we can delete these two. And I will do same here. Let's say this part is maybe
window frame or something, and now I will subdivide this
or I will not subdivide. I will just add loop cut here, and we now get these nice
parts to inset this T, extrude along normal glass. Let's see. This part down
should be our stores. So I will select one by one piece and I
will project these to some of these stores. I think this part should be
maybe just concrete part. This one, also. Maybe we can make this
red bricks part here. All this should be store. Something like this and
this one also should be. Four. All these parts should be concrete part. So let's bring this here. Z 90 and let's now project
this to these brick parts. Okay, now we can add
more details here. I will maybe isolate this
coum here, this one. At extrude along normals
and maybe this one here. Now we can select
this maybe this store here or extrude this inside. And let's apply
Miss material here. We can extre this inside, apply aiss material
and maybe hold this part here and apply here. Miss material or T extra this inside and miss. And I think this part
also can be a missive. And let's see how
this look in render. We get some nice shops here, and we can now play with
these windows here. I will just go with K.
Stick this here, again. And and let's fix this
stretch part a little. And now we have space
for our window, and we can add few
loop cuts here. I insert this whole T, extrude along normals and apply
this glass material here. We can extrude this part here. And now we can let's fix this little
stretch texture here. Air to rotate this
slightly and now we can extrude inside this one outside. Let's make a few
windows here. Glass. Maybe delete a few
of these faces. And of course, we need
project concrete texture. You can also use
C for brush tool. We didn't use this for now. Let's select all
the Numpad seven, we can use project from you. And now we can just take
this to concrete texture. Let's go with delete
limited dissolve to simplify all this. Now we can maybe insert some of these phases or T extrude along normals to
get more details.
17. Texturing Building two - part 5: Okay. And this part, look, Bd, we can just project this
to some of these windows. Or we can maybe select
this part here, this like this one, and let's project
this somewhere. We don't have stretch text.
Let's make this part. Glass and one thing
we can also do. In model process,
we can just add another cube, scale this here. This is also what
I do before a lot. Now we can just
project this here. Z net. He to select
this loose part, Z net and just fix this
stretch texture. Okay. And now when we have this piece, we can maybe bevel this. What we can do, we can press
to select this loose part, Shiv D, maybe SZ to get
even more details here. And now what we can do, we can just steal this
in more places or this building CDY and Z IT. And we don't need care
about stretch texture. And let's now select everything
we tell all these parts, Shiv the X, L Z -90. Stretch this on Y axis. And we got a lot
of details here. So Shave y again, Z -90. And let's place one here. Okay. This part is pretty straight. So I want to add
more details here. Let's project these two. Maybe this part or T
extrude along normals. We can maybe select this part
here, scale this bubble. And now with C, we want to select
this roof part again. But with phase selection. Control num plus to
expand selection. I think this don't work, but with C, we can select
all these phases one. Now, we fix this concrete. This should be all this
should be glass material. And this part here
should be glass. Now, we need both a
missing cube inside. Okay. Let's see. I go to material preview SX Okay, I have selected origin, sorry. So reach place this here, scale this Z axis. This is okay and ship the Y. Scale this Zois number
three to side, a scale SZ. Okay, we have now
another nice building. Scale this on X. If I now select everything, I think I want this building
to be yellow, Control J. And let's see. Now I want to check all
these rotation location, and this is inside small
building collection. So origin is right place, and I think this should
work correctly now. If I now press F 12, I can see before and after. And you can see how this look, and more buildings we add, we get more detail city. And I think I will stop
with modeling buildings. Um, I think we have
too much lights here. So you know how to
fix this problem. Let's go to material preview. And if you select
this emissive inside, we can play with this check artecture to turn
off some of these lights. And this strength is too
intense, or maybe too. So let's see how this looks now. Now you can see. So this
is before, this is after. So we can very easy and simple control city lighting
with just a few options. So before and after. So with this slide
there, this strength, and you can also with
this empty here, control scale of these lights. And of course, we can control whole city with this modifier here so you can change seed or add more
smaller big buildings. But because I will not model more buildings for
this tutorial, specifically, so I will just now copy objects I do before. And let's see what we will get. So all these buildings
are not finished, and let's now place this here. So I move in this roof
collection, which I don't want. I will press them and I will
send this to see collection. And I will now add one by
one buildings in this. So this is let's see. I set this building and okay, I think I have collection
inside collection, which is not what I want. So I'm put this in small
building collection. I will for now just delete this just to see
what we will get. Small buildings, this should
also be small building. This should be big building, big building and big building. And let's delete a few of these. And you can see what we get. We get a whole city
similar like I get before. And now, if we select
this city and if we now play with the seed. You can see effect we get. Okay, I think we have too
much of these big buildings, and we cannot make
a few test renders. I now render more variations. So we will go from
slot one to eight. So this is what we have before. So this is first
version of city. Later, I just change seed. Here, I add more
smaller buildings and less these big buildings. And these two variations. So this is seven and eight. I just increase little
brightness of light, and I increase this
black body value to make this more reddish, so I get these
reddish lights here, and I also increase
some of these lights. So you can see before and after. Now, it's very easy and simple to get a new
version of city. So you can just play with the sliders and every time
you get a new version of sit.
18. Post-processing: Talk quickly about
post processing. I done this in after effects, but all these things I
done here are very simple. You can do this in
Blender compositor, and you can see a
lot of layers here, but most of these layers are
just same repetitive task. You will see what I'm talking. So you can see all
these lights here, which don't match
this render here because I change seed
and now this stay in A. And what is this?
Let me show you. I download a lot of
this reference image from actual Batman movie, and you can see how this look. And then I use these lights
for my post processing. So I will show you
how this work. And let's choose one. Maybe we can choose this one. So I just bring this here, and I like these slides here. And what I can do, I can just mask this part here. Now, I want set this to screen blending mode to remove
blacks and keep only whites. But you can see we have a
lot of whites also here. So we need something like
color ramp in blender, which is in after effect, which is in after effects level, so we can also use curves. Now, I just want to make
bigger contrast here. Okay, I want push these blacks. And you can see what I get. I can now just place this
here and get more lights. So I post, I have
much more control. But I don't like
this render here because I turn off turn
on a lot of lights here. This doesn't look good. But when I do this first time, I turn off a lot
of these slides. Here, I keep some of them, and then I have much more
control in post processing. For example, I can maybe play some of these lights
or this building here. I can adjust this mask a little and you can
see result I get. And I do this a lot. But again, this is another seed and this
don't match this building. But I also get this nice
bouquet around Batman. You can see if I
and all these are just the same screenshot
which I duplicate more time. For example, now,
I can duplicate this same image, another one. And if I now sell this
to blending mode, let's remove this mask to see where our
image okay here is. Here and we have this letter so we cannot see all this look. Let's say I like this part
here so I can grab this, sent this to screen
blending mode. And with these levels, this should be
even more visible. Now what we can
do, we can maybe. Let's select hold this part. Maybe we can put somewhere here. I'm not sure. You
just need to find the right place where
you can place this Okay, here, let's see. This one is from actual
movie, this part here. All these red and orange
lights here are from movie, this part here, I think you can see a few of these lights. With this, I just break
little repetition. So you can see all
these lights are from movie and this part
here, you can see. I will show you how
I do this part here. I collect in my computer a
lot of the video overlays. This one are from Ian Hubert, but I also have
another folders I keep where I keep a lot of this
video and image textures. And if, for example, import this, this here don't
work with this player. But let's see if I go to After Effects and I can
create new folder. Overlays and let's
import all them here. Now I can just see
what we have here. Okay, this one look nice. So we can now go to Screen blending mode and we
get a lot of these lights. We can scale this, and
we need to rotate this. If I press, I can rotate this. And now I can match
this part here. I can type here
maybe 19, 18. Okay. And the now you see one problem
this overlap this Batman, but we have easy
solution for this. I from Blender import miss
pass, which is let's see. I don't need this one. I
need isolate only Batman. Maybe this one, yes. So this is layer 57. Now I can easy set this as mask. So I can select layer
57, which is done. So 57 enable this mask and
you see now what I get. Based on this mask, I actually tell Bender put these slides only
on this white area. And I can always controls, miss pass with these levers. Let's disable this. And you can see effect we get. We get a lot of lights
here, and of course, we can always take
mask, take this, yes, selection tool and for example, take only maybe this part. Okay, you see that I remove
rest of this and I can now press twice
to add feather to this mask to make this
less sharp, maybe 50. So this is something
like met painting. So we paint over this render
with all these overlays. Okay. So this is all
carbor elements, and we have here similar
like I do before, so we can just maybe
place this red overlay, these small red lights. Here, let's scale this a little. And if I now said this and if I now said this
to screen rending mode, you actually get
only these lights. All these overlays
are just same. So you find out disabled, this some lights
disappear from the city, but we still have a
lot of lights here, so we don't need more lights. This here is just
simple grain effect. You can see grain, nothing more. And let's go from bottom. But first, I want
to show you how you can get this missed
pass from Blender. So in blender, you just need to. You don't need this anymore. Layers here and enable miss. Now, you get this in
world properties, you get this missed pass
by default is set 0-25, but we have large
scale city here, and we can now preview how
this missed pass look. So zero to 25 don't
cover anything. We can give here
five to maybe 1,000. Then you get this range
and you can later in with color ramp or
levels in after effects, you can tweak these values here. But I like render
this in Let's see. You should render this in EXR, but because I need
just two passes, I render this with PNG, but just said this
to maybe 16 bits to get more depth here. Because if you now go, let's select one of
these missed pass. Then you have more smooth you have more control
over this missed pass. You have more smooth transition. For example, if I want to play something between
these buildings, I can just easy isolate this. And for example, if we
now set this visible, we can see what effect we get. We actually let's
put this on top. I will show you now.
So this is mis PNG. And if I now set this on top, and if I set this as
screen bending mode, I can now with levels
are miss here. You can see exactly where we have transition somewhere around
these buildings. We can tweak this even more. And now we have
nice mist effect. We can decrease
this maybe to 50%. So this is before this is after. We can do a lot here.
We can, for example, tint this if you want maybe
yellowish color or something. Now we get yellowish tint here. So this is before and after. And there is one thing
you can also do. I will find another asset, so I have the fog overlays. For example, we can place
fog here in our scene. Let's scale this down. And if I now set this to
screen blending mode, and now I will use some of the
mask miss pass here. Okay? This is miss pass 60. Let's see which one I selected. This one. Okay. And you
can see how this look. Now, if I move this this
will affect my fog. So we can basically place fog in three D space with
just two D layers. Okay, I want place after
these buildings here. So let's see this mis stuff. Okay, why this is so blur. I'm not sure. I turned on
glue effect somewhere. But you can actually
see what I'm talking. So we can scale this down. We can place this fog
after these buildings. For example, if you
place this here, it will not be visible,
but here is visible. I will reopen this because
I turn on some effect. Here is another one. So
you can see this f here. Let's increase visibility. You can see. I use this 57 mis pass to place behind after
this building here. Okay, so this is effect I get, but I like to keep
this very subtle. This is too intense, maybe just 20%. This is
good if you want. Put this but one in focus. You can place behind him
and increase contrast. All these are mostly garbage. I just try something and then I
19. Post-processing part 2: These are lens overlays. Same technique as before. I download this lens
overlay here and I place to get this
lens flare effect. Let's increase this even more. And all these are same overlay, I just duplicate this few times. Let's see what we have more. Okay, let's disable this. So these are just
color correction. For example, if I go
with apply color, I download this from Internet. For example, these
are different movies, and most of these look very bad. Okay, I will create new
layer, new adjustment layer. Let's apply lot, and you can see this change
completely look of render. But most of these look very bad. But when I try maybe 20 or 30, I just find one I like, and I maybe just reduce
intensity of this. For example, if
you like this one, you can maybe decrease this. Okay, I delete this
so this is something you can find on Internet or
you can buy or anything. I have from lots of movies here. But, this one is, for example, breaking bad. It will be something orange or something. Yes, you can see. But if you wonder, I think
only tool which worth money is this film convert
Adon Let's see here. Let's increase this. So this actually look like from movie. And we have some presets here. And I always how some
of these prices, but I also keep this
subtle maybe just 30%. I don't want overkill with this. And, of course, you can
play with these sliders. Okay, so this is what I
use for color correction. All these are just
with the overlays. I try with glow
and some effects, but at the end, I usually delete all of this. This is just a curve effect. I just make this small curve
effect to increase contrast, barely visible male blur. So let's do this now. So this is render. This is what you
get from render. Now if I duplicate this and now I can go with fast box blue, Garcia blue, anything
you like, blue. I just want to this image. For example, with
maybe 300 pixels, I can now set this
maybe to screen. If you set this to screen, it will make whole
image more bright. Now I can maybe create something like
missed effect with this. Again, we can for
this use some of these missed pass to apply this effect
only in background. This one is not good. Let's see, maybe this one. You can clearly see this effect more in
background in this area. Or we can just maybe add mask here to add more
fog on this area. I'm not sure why this
is not so visible, but you can see Okay, I will remove this, this is not visible because we use this mask and you can see this
effect clearly here. We can of course
play with this mask. And now I will
decrease this a lot. So this is before and after. To intense, of course, but this is how you
get this effect. This is something like
fake volumetric effect which you can create in
post without re entering. Let's see what we have
more so this darken but man I just make this
foreground dark, again, with this mask. So I apply this rumatrilor
and bring exposure down. This is before. This is after. And for this, of course, I use this mask, 55 mist. Let's see how this look. And
I, of course, invert this. So I tell after effects, use this mask, but where is
black color put this effect. So this is before and after. But I decrease
this a lot, maybe. I also try this angent
occlusion and glossy direction. I will show you how this look. So here we have
ambient occlusion. I render this from render, but I think this
is not so useful. And let's see where is glossy
direction. Okay, here. So we can increase
glossiness with this, and with ambient occlusion, we can increase
ambient occlusion. For ambient occlusion,
usually you want soft light, and let's see how this look. I just make this mask. Okay, I will remove for now. And you can see effect we get. We basically enhance this
ambient occlusion here, and we can more clearly see these edges of
these buildings. You can see. And again, I use this miss pass to put this after Batman and
only on this part of city. You will see when I remove this now whole image should get
this ambient oclusion. This doesn't match
this render because I render this later and
this is problem now. Okay, this is ambient oclusion and let's see glossy direction. With glossy direction,
we just enhance this glossiness.
You can see before. With the ambientoclsion
and glosy direction, we can basically maybe put focus on these buildings
in foreground. So you can see this effect. And when I said this to
screen blending mode, I get this glossy part here. And if I remove this mask and this mask and this one, this
is how this look. We get almost like glowing
effect on these buildings. But, for example, you can maybe put in focus few
of these buildings here with this mask and
I can now SM twice. To smooth this mask a
little to add feather. Let's remove this fence. And this is, this is I
also render emission pass. I will show you what you
can do with emission pass. So this is a glossy puss and maybe if I
decrease this to 40, which is still too much, you get this effect. Okay. Let's talk
about emission pass, which is actually from render, we render only these
lights with emission pass. We have here emission pass. Let's set this on top. Okay. And now, if I
send this to screen, you can see that we get
a lot more lights here. And maybe I want expose only
this area, I can now go. Make this feather, and you can see we get
much more lights here. But we can do a lot of things. For example, fast box blue, we can maybe brow
these lights here. And we get something like volumetric effect or fog effect, but only with these lights. But if we go with maybe
value of just five, it will look more
like glowing effect. I think this is all
for this tutorial, I hope I will record another Batman tutorial
in which we create another scene and in
which we will talk more about compositing real
footage with CG elements. And okay, this is
my final result. This is what I get last time. All these are just variations. And I will also release
this city generator, Asset Pack and Blender file with Batman and all
these things with you. Thanks for watching Tutorial
and see you next time.
 šime Bugarija