Transcripts
1. Introduction: Hello and welcome to the
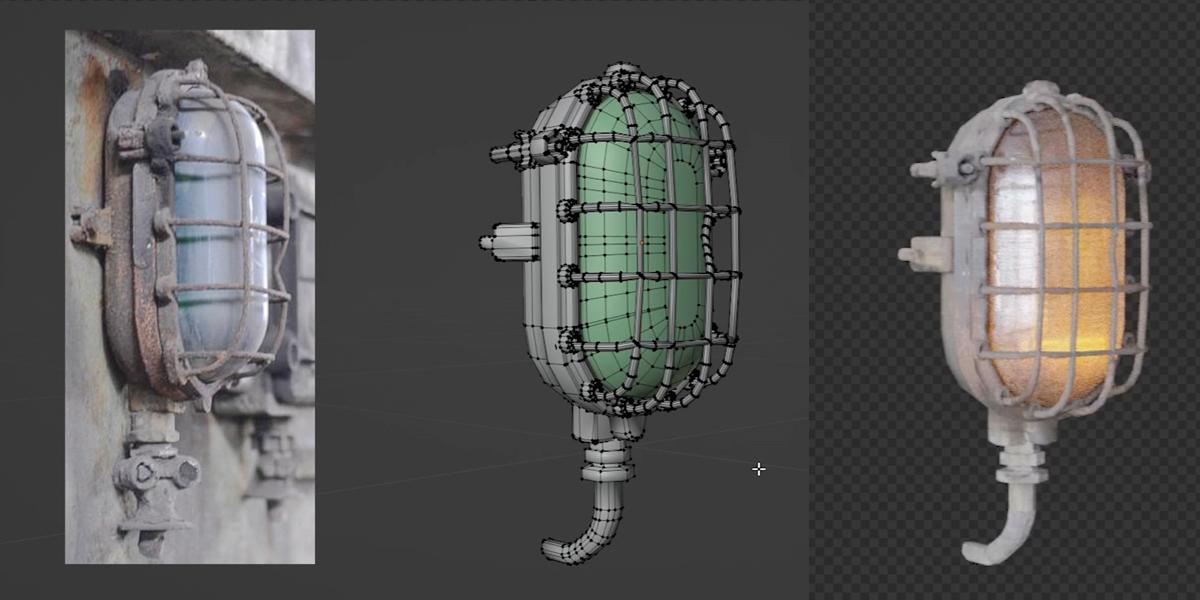
tutorial in which we will model and texture this old lamp in blender from start to finish. In about 1.5 hour, I will show you how to make
a realistic three D model with a lot of details
from this photo, which is a quite low resolution
and taken at a bed angle. The old lamp is just an example. The modeling and texturing
techniques you can learn in this tutorial can be applied
when creating any object. Or for example, you can create an entire asset package
that you can later save to the asset
browser or sale online. To follow of the tutorial, you only need blender
which you can download for free and
the photo texture, which I will share with you. You can watch the first of the nine parts for free
in the video below.
2. Basic shape modeling: In this tutorial, we will
build this lamp from scratch. Only resource we have here
is this collar texture, and here we have reference, and we will also use
this as texture. So you can see that this is
very low resolution image we have here from
this point to this, we have about 300 by 800 pixels. But we can also use some
parts of this collage here. So I will share this texture with you and we can now
start with blender. And for this, I will
open new blender file. And I will now just save
this for this purpose, I will just save
this on desktop. So I will call this lamp. Now, I want to import this image as reference
image inside blender, so I can always take
look on reference image. And let's see how I
can split this window. Okay, I need click
here and now I can go with horizontal split, and I can make space here
for reference image. I will open image editor, and now I will just copy address pat where this image
is saved and I will open. This image, I think, Okay, this is this one. And now I will just zoom here and now I always have this reference image
here in this corner. Next, we can start modeling, and I will press A and
delete everything. And now I will try estimate
dimensions of this. First, I will enable
this screen cast key so you can see what
I type here on left. So with N, we can
open this tab and I want this tool tab here. I will now estimate dimensions. So I think I will try go with 20 centimeters on Z
axis and ten on X axis. **** they cube, and I can
press N and under item, I can type here on X 0.1. So this is 10 centimeters, so you can just type ten
CM here 20 CM and here. Maybe zero, two
or 2 centimeters. Okay. I think maybe on the axis, I want to scale this,
so I will press SZ, scale this little down,
maybe 70 centimeters. And now you can see that
we need apply scale, so Control A and apply scale. Okay, now I will close
this tab with N, and we can now bevel this. So we can do this very easy
if I select these corners. Okay, I think if I go with
select similar maybe length. Okay, this don't work,
but what we can do, we can go with holding control, diselect what we don't need. And we have selected
these four corners, and now with holding Control B, we can double this and we can scroll mouse
up to smooth this. Okay, I think this is good. And let's see next. So we have this part on back. So we can create this very easy. I will select this I to
insert this and E Y. So you can see that this is
y axis you can always take. Look up and EY, move this out. And let's now go with Control B. Okay, something like this. And now we can just
move this inside. And let's make this part here. So I will just again go
with I and E Y again. Okay. Let's see what is next. I will now press I and
EY to move this inside. Now I will go with Shift Y because I want to make
this glass part here, and now I will go with EY again, something like this, and
let's go with Control B. You can always press L to
select this loose part, maybe S Y to scale
this little on Y axis. But I think this is okay. We can always scale
this a little and maybe move this inside. And I want to make this thicker. So I will maybe press
withholding or, you can see that I hold. If you click here, select this loop
here, but I want loop which go in this direction. So I think I need click
closer to this edge. Okay. And now I will just press this to make this thicker. Now, I want to create
the vars here. And I think what I can do here, I can press L to select this and press H
to hide this part. And I have this part here. Let's see what I can do. I will go with ShipDX and you can skip this part because I think
this will not work. So if I now go with
E Y and Control B, this will not work.
I want to get this. So we have here one,
two, three, four, five, this on X axis and
two on Z axis or Y axis. And you can see that this
mesh is not the same. As we want, this go
straight on Z axis, and we don't have
this loop here. We have this which stop
here, we can, for example, go with K and try
later line up this, but this will be mess. So we need different
approach here. Actually, we need
different topology here, and I think we need
to start from cube. So what I will do here, I will with shift click
place origin here, and I will go with plane. And X 90, we rotate this plane. And now I just want similar dimensions
as this object here. So SY, SZ Okay. And let's now press delete, delete vertices, and I want to separate this
object from this one. So I will press here P
separate by selection, and now I will select this
and set origin to geometry. And you can see that
origin is now in geometry, and for any case, I will make backup of this because I'm not
sure if this will work, but I think it will. Okay. And now, because I want
to make this virus here, I will select this object. So with tab, you can
go to edit mode. Or you can click here, but I usually use tab, and now with selected all this, we can go with EY,
exclude this on Y axis. And I don't need this back
face here, so delete phases. And I will now try with L and Control
B to see what I get. Okay, now I get these lines
on the axis which I want. So one here and another here, and I need five of
these on X axis. So we have here one, two, Okay, this, will go with
ControlZ to show you. So if I go now, I
cannot get in middle, I want three in middle. So to get this, I need one loop cut
here in middle, and now I can press
A to select all, and now I can go with Control
B. I will simplify this. So we have here three
in middle, two on top, and okay so one, two, three, four, five, and here we have one and two. And now I will withholding,
select this loop. And with holding shift,
we add selection. So shift hold. You can see here. I hold both and click here, and now I will again shift
hold this will be one, two, three, four, five. Okay, so one, two,
three, four, five. And now I will go with shift div And we just need
to delete these faces. Select all this withholding
sheet and delete only faces. Okay, this is what
we need to create this mesh here or this wires. Let's now delete this part here or we can maybe place
this here for backup. I will again go with tab to edit mode because we
need press L here. I will select this
with Vertex select, but only this with L. And now, P separate by selection. So we want separate
from this object. And one thing I will do here, I will select both
of these objects, and I will press
M. New collection. Backup. Call this
backup and now we can just hide this collection
from UPortenRnder. And if for any
case we need this, we can always click here
and use this backup. We have what we want, but you can see that this
is very low resolution, and I will use for
this to smooth this, I will use subdivision
surface Modifier. So you can just click
here on Modifier Tab and search for
subdivision surface. And maybe two segments. So this is before
and this is after. And if you want even
more resolution, you can go with three. But now, let's see
how this look. I need convert this to
mesh to thickness here. So I will go with Right
Click cover this to sorry, I need to convert this
to curve. Select this. Right click, convert
this to curve. We do this object mode, right click convert
this to curve. And now we get curve properties here and here under
geometry and bl. We can increase this value. But you can see that
this is very sensitive, so you need hold shift. You can see that tie hole shift, and now you can
move this slightly. And let's now try
estimate how thick is this maybe 0.008. Now, I think this
part is too big. So if you can go with
S Y to scale this, but actually, you don't scale
this, you stretch this. So you can see that if
you go too much here, you can see that this
part is thinner here. So I will go with Control Z. I actually want cut this part. Actually, we can keep this curve and delete
these vertices. We don't need to convert
this to mesh in this point. Let's now do this. I will maybe delete this too, and now this should fit better. I will again say this to set origin to geometry
and let's now see.
3. Creating details: Okay, you can see that we
have some rounded part here. So this need be a little bigger. Be well later model
this part here. I will scale this even more. Let's see. Also on top part this go
in these rounded parts. I think we can scale
a little on Z axis, but we can fit this later. You can also go with x to
scale this little on X axis. And advantage of keeping
this as curve object is that we can later
change this value always. So this is advantage, and I will not
convert this to mesh. For now, let's now
model these parts here. Let's see what we can do here. I think the best solution
is to go with new objects. So I will go here with cylinder so we
can scale this down. So x light to rotate this
on X axis and let's go. I think I want to
cut this part here. You can intersect this, but I think better solution
is just cut this. So go with tab to
edit mode Wire mode. Because without a mode, you just I will show you
just delete this part, not this part here. Let's go to Wire for a mode. Actually, I want to
do one thing before. I want first make
this small hole here. So I will select both of these parts, and
I will now press. And let's make small hole here. I have this add on Loop tool, which you can activate here
under Edit preferences. I get extensional search
for Loop click here, Install and then
under add ons, again, op and activate then
try click Bridge. Or this bridge option is inside but then you can just
search here with F three. Bridge edge loops. Okay. And now I will scale
this on YX number at one. Let's delete this
part. We don't want. Okay, now X ray mode. And let's select this part here. Let's see if I delete vertices. Okay, I think better solution
is if we just cut this. I don't care too much
about bad mesh here, but I will just delete these vertices because
we will stick this here. I think if you want,
you can go here, maybe F. Let's this part. F, fill this and then fill
this maybe this part here, but all these will not be
visible because we will just okay, this part here. So F, we will just stick. This is not correct, so
you need click here and then F and then this part here. But all this will
not be visible. We will just tick this here. Here. Okay, so we will not
see these intersections. I just want to go with
tab to edit mode. This hole here is so big, so I will go with RT. So again, you want to be closer to this edge to select this. And with holding shift
and you can here. Let's scale this
down. And let's now. I'm not sure. Is this part
bigger than this one. We can create this easy. It will be one more detail, so we can press maybe S t or old E extrude along normals
and scroll mouse up. Okay. Now we can maybe just
be little this edge here, maybe this too, with old like this loop with holding shift and old this loop, Control B. And we can maybe bever
this edge here. Control B. Now we can just tick this here. I think I overcomplicated this part, which is very simple. Mm. And we just need
to intersect this. I just want to see
this small hole here. Okay, let's take this down. Okay, I think actually, I want to make this hole bigger. I want to go to X ray mode, and now I can just this
part, make this bigger. So I definitely overcomplicated with this small part here, which is not so important. So let's just tick here
to finish this Okay, now we have this part. Let's scale this on Y axis. Now we can go with Shiv D Z. So we have one down. Shiv DZ, let's bring one down. And I will just go with RV to rotate this a little
to stick this here. Okay, this will not match
perfectly because we start. We didn't use this mesh here. We start from another plane and this part will
not match perfectly. But I will see what
we can do here. Let's see how I can
select only this part. So numpad one and just
select this part. And I don't care too much
about these stretches because this just create
imperfections which I like. ShafDZ, let's place
another here, Sav DZ, another one here. And now I want to rotate this Y. Let's take one here. Let's now fix this. So again, tab go to edit mode, and let's scale this down and we can move this here if you
want, play with this. And I think we can now
select hold this part, and I will go with Control
J to make this one object, shift the X a X minus one. So you can look here
as X minus one to flip this and not sure why this happened this is
because of origin. So I don't care too much. I just want press Y. Let's move this here and
let's now stick this here. Okay, you can see
that this match pretty good but you
can always like, just place this here. I definitely overcomplicated
with this small thing. Last time I do
this very quickly, but this is how it is, and let's now continue it
Tutorial. So let's see. We have Okay, this part here, this is this one in middle
and we have this back side. But in this part here, you
can see how this look, and let's see how
we can make this. So I want to grab
this part in middle. And now I will just
stretch this a little. Now, I will go with EZ. SX scale this a little. And now we can go with Del. It's like this edge here. Control B double this. I think I want scale
this to get more space. Let's now just double this. In this point, I can
press old age so you can look here to make
this glass material. This is not a problem
in this point. And let's see what we have here. Here, we have something similar like this part, but bigger. And let's see how I can do this without
overcomplicated this thing. So I think I will go with shift likely to place origin here
and let's see what I will do. I think I will just
go with cube cube. This should fit here. And I'm not sure, but I think I will
just bever this. Let's place this here. And I think I will move this move this little up and
we can just be this maybe. Maybe these two
corners control B. Okay, this part here
should go all down. So you can see this part here and this part here are
connected in same py. But this is not so important. We can make similar
type of this. It will not be completely
same. It will be similar. So let's just make
some variation here. Okay. And if we want
to make whole here, I think we select let's see
if I select both of this and if I press I to
insert this and so, subdivide will not work here
because we have angle here. So what we can do here, we can just go with
Bullion objects. So another object cylinder. I will delete this
cylinder because I don't need 32 vertices here. So I will sell this maybe two. 12. And now, Eric Snipe just scaled
this to make this bigger, and we will use this
as bully an object. So I will place this here. Let's go with numbered
one. Somewhere here. And now we can quickly
just select this object. Boolean, this will
be our Bolan object. And if I now set apply this, if I now delete this,
we get hole here. And now, we always need
create some bevels, select this part here, shift to go to another side and port to select this slope. Okay. Control B,
scroll mouse down, and let's also double this part. With holding control,
we can select the first one and we selected first one and
with holding control, we can select
everything between. So everything between
first one and last one. And okay, this don't work, so I will first g here
now with control. Here. Now with shift, we skip to another
part and again, control a few times. Let's bevel this one segment, and now we can just press L, **** the X S x minus one, flip, paste this here. Now I will press
this is so small, so I will press L here. I now press, we scale
this from bounding box, but we can or medium point, which is same in this case, and I will set this to individual orage and
let's scale this. Again, this hole is too big. So we can go with phase
selection Otec this loop. Control amped plus,
scale this down. But this will not be visible and this is
not so important. So select this loop. Control amped plus
to expand selection, so you can see here, scale this down, and now it's better. We can just select this
phase here and let's try it proportional addicting,
scale this a little. So I will press S. You can see that we scale everything
because brush is too big, so just scroll mouse down
until you see this brush, and we can now maybe press
G to move this down. A to scale or we can maybe
select these two parts. Stretch this a little, maybe SX. Or I think I will select
these two edges, SX. Let's now disable
proportional, everything. Okay, we need now bounding box, SX scale this on X xs, maybe Control B to smooth
even this a little.
4. Creating even more details: Okay. And I think I guess this part we model here
should be same on top. So let's see what we can do. L here, go to edit mode, L here. **** the Z, a Z minus one. Clip this. Let's just
stick this here. And I will select this part. Let's just try SZ. This is not a good idea because we now lose this
position here also. So I will just go to edit mode, maybe go about here, move this little down. Not too much, and now I
will select this part, move this little down. Okay. Now this is almost
perfectly in this course. All these parts are too big. I'm not sure why I
make this so big. So what we can do if
I select all this. And if I said this to
individual origin, we can just scale this
and move this here. Or I think I will just
make this part bigger. Okay. Let's now, I also need
to do this on this side. A, scale this down. Let's now make this screw here. This is just cylinder with
six vertices here, six faces. So very simple shift right
click cylinder and type here, six, scale this down. Rx 90, scale this all down. S Y. And let's see position
of this is about here. And now we can again
go with bridge option. So I the first I will duplicate this shaveY because I need this
small part here. Let's now select this
right click bridge. Now I can press Bever
all this to smooth this. I just want small bever here. Okay, let's see how big is this and one thing which
is a little annoying, we cannot see this edge where we move here, but it is here. We can add bevel here, but one thing you can also do, you can just go to click
here and under cavity. We have this cavity option
and just say this do both. Now we can always see this edge. Even if we rotate this, look like small bevel, but it is just in Buport. A. We make this big screw here. I think it is a little too big. Tab to go to edit mode. Let's see what I
want with this part. Now this part is perfectly
middle which I want. Let's now just extrude
this EY, move this here. And let's see what is this part. Okay, I think I will not
complicate it too much, so I will go with Shift D move this
here, scale this down. E Y. I think I want
move this little down. Maybe L Axcale SX scale
this little on X axis. Scale this on Y axis. Ship Z, S Z minus
one, clip this. And let's see what we
have here. I don't know. We can just maybe
grab this ship the Y. Y move to about
here and SX Okay, we can maybe just scale this
mod this up, mood this down. And I think I will select
hold this Control B to smooth this this is not so important, but it also creates
some random details. This part here also need to go to another side even
we cannot see this. So shift the X. Again, there's six minus one. But it is symmetrical on both
sides, so nothing happen. And let's see what is next. We can now start
modeling this part down. But I think I also
see something here. So we can just make something
similar like this par down. So I will select this and maybe we can select
three of these. Now I can press SX EZ, as X again, and I now just
want to be like this. So we can maybe move this down. Control B. And I will also
select all this and let's just smooth all
this not this part, this one here. Control B. And I think now also
subdivide will not work, yes, because we
have angons here. But I think if we just
go with K and connect to K, Okay, here, enter. We now have four vertices. And now, if I press I, I can go with SZ and we
can bring this little up, subdivide this maybe
two times circle and we can now press right
click and the bridge. One thing which is
important here is bebels on all these edges. So let's first select this
part and let's click here. Et's try Control. Select all this loop. Control here, control here. Okay. Let's now go with
Control B and add bevel here. And also here. I will try with lt and lt works. So we can now do with
Control B, smooth this. But first, what I will do,
I will make this bigger, so I will just press
S to make more space for Bel olt Control B, Control B and smooth this solid. Let's now make this bottom part. We can see here. So for this, I will grab this edge. Let's see what we have here. I will try select hold
this with phase selection. I and I first one text
through this so easy, move this down with holding Z. So we get this small part here. You can see that
this is not line up. If you want, you can press Z zero to line up this perfectly. And let's see what
we can do now. I think I will go
with new object. So cylinder with six faces
so we can scale this down. Sometimes it's just easier
to go with new object. And now we can let's see what we have here,
this small part. E Z, scale. Let's bring this little
down and easy again. Let's do again with EZ, scale this to about
here and easy again. Easy as to scale
this easy again. Okay, now I will
press as to scale. I will subdivide this. Okay, this will not work. So let's try make circle. From this, actually,
this subdivide works. You can see that if
we go with circle, we get smooth circle here, and I will just try
make this shape here. So easy. And I will now try just
place this involve. So I will go with EZ. This is not best solution, but let's try rotate this, easy. Let's try with nupetT
to see what we do. X a little easy nos just E. And let's now x to
rotate this and E Y. Okay. Now what we can do, we can select these loops here. Okay, I create too
much mesh here, but this is not so
important for now. So just select these edges here, Control B to smooth this little. Okay, I see one problem. If we go with Control
B, we can see that we cannot get bevel here. That's because I press
E for Extrude twice, and we get double vertices
and we can now go with Merge by distance. Merge by distance. And you can see that we delete a lot of these double vertices. So now, this will work. Control D I add tom
subdivision here, and I don't what now, do this. Okay, let's see how this look. We can make ticker
everything here. So I will press L. Let's press to scale, maybe a scale this
little on the axis. And I think this should be okay. Let's see what we have here. We can also quickly model this I will go again
with new object. So let's now go with
cylinder maybe eight. Now Rx 90. And let's now place
one piece here. What I will do now, I will
scale this on Y axis. This should go in side wall, and now I will press I here EY this on Yaxis maybe
I again, EY again. And let's now maybe just deform this a
little shave the X. And what I will do now, I will maybe add wallop cut
here, another one here. And now let's maybe just
connect these two parts. Maybe, again, I to insert this and now
we can go with brag. Okay, we get something
similar, we can see here. But I will bevel this,
but not everything. So let's go with old here, old, here, old, here, and also here. And this part here. Let's now go with Control B
just to smooth this solid. Et's now make this
small part here. I'm not sure what actually
happened here, but let's try. Do this so we can
grab this phase here. So shift the X. Let's move this little
on X axis, S Z, scale on Z axis, S Y axis. And now I will go with EX. Let's move this to about
here and Ex again, Okay, I think this is enough. And we can maybe smooth
this with Control B. And let's also smooth
this a little. And now let's add bevel here. So shift and just with shift, I will select for this
part. One level here. And now we can just place
mouse here and cylinder, again, six to make screw
and let's scroll all down. Alex 90. That's
basically what I need, and we can select this
phase, Control B. Okay, let's see how big is this. Maybe we can make this
crew a little bigger. And let's see. Okay,
this look good. And let's go with tab, he select lose part, maybe a little bigger. And now I will go with Okay, I will go with Shiv D, SX minus X minus one to flip this on X x
and let's stick this here. In this point, I think we can
cover this curve to mesh. But before I will make
some imperfections, you can see this type
of imperfections here. It is pretty easy,
so we can just move this let's move this
little also inside. You can basically randomly
do some imperfections. Okay, I think this is enough. And now I can go with Right click and
convert this to mesh. Now, I will select
everything and Control J. So everything is now one object and we simplify everything. So now we can play with
this. So this is smooth. By angle, you get
this if you go just with right click and
shade out smooth. And you can choose angle here. So 30 is by default. I will keep 30. Okay, we need more than 30 because this angle here is 30%, and you can see that we
don't get this say smooth. But when we just
increase a little, this value is smooth,
also this edge is here. Okay, and when you
are heap you can also apply this modifier.
5. Creating Materials: Let's now create
some materials here. First, I will switch
to render preview here and to cycles GPU, so we can upload some HDRI to see to get
better preview here. And to do this, I will go to share
the editor world. And let's now search for
environment texture. And you can now go to HDRI hen. And you can download for free. So you can go to ASSETs HDRI, and you can download any
of these HGRI for free. You don't need
Diva registration, you can just click here. And for lighting, you need one K. But I have a lot of
this on my computer, so I will just plug this here, and here I have this folder. Let's load this one. So if you want SAM
like I use here, you can just type this name here on a search bar and
you can download SAM. And I will go here under film, and I will click here to transparent so I don't
want to see this background. Now I will press N to remove this tab and let's now
back to object mode. Next, I will create
new material, and let's call this maybe base. And for this, I will use
texture I already load here. So now I can go
with image texture, and I already have here this texture because
I load this here. We can now plug
this to base color. And another texture I will use for imperfection is
concrete texture. I will also share
this with you so we can load or this here. Okay, because these
two textures are not same proportions and we
need another UV map. If you go here and
under UV maps, you can see that by default, you get first UV map. And this UV map is already
what we use in this subject. So if you go, for example, with Control you need enable wranglar addon
you can enable here. No wrangler if you
don't have Okay, this one, and then you
can press Control T, and you can see that by
default, blender use UV, and by default, we have
this first UV map. So this is same,
like we go here, UV and choose this first
UV map and plug here. But because we need
another UV map, we need click here plus and
we can call this concrete. Now, this texture here
also use this first Ump, but we can change this if
we duplicate this with Shiv D. If we change this to
concrete and plug this here, now we use this second UV map. And now I will open UVditor
and now we selected this one, I will go with select all
and maybe Q projection. Now we can project this concrete
texture on this object. Okay, and we will use
this for imperfections. Now, I will select
this texture here. And now I will
select first UV map, which we use for color input. Okay. So with this second input, this concrete texture for now, we don't use for anything, but we will use this later. And this metal
industrial texture, six we use for base
color for now. So I will select
this first UV and let's now project this
to this part here. So how we can do this. Because we have this angle. We also want a similar
angle to project this. And I will try make similar angle like we
have on this photo here. And let's now go with
project from you. And you can see that
we get basically project from you
from camera view. Now I will try reproject
this on this object here. Okay. And you will see
that these already look much better and already look
like lamp we have here. But of course, we
have a lot of things. We need to fix here in Ui ditor. We now need to fix all
these things one by one, one by one pace or one piece. So I will first let's select
this part, this look here. So again, we need to be close to this edge and with
control lamp plus. Okay, I will select, we can just select this is
here and control number plus, we can select this area. And this area here is
actually for a second, move this part.
You can see here. Okay. Now, what I will do, I will scale this
maybe stretch a little x let's project
on this place here. And now, this part
here is actually this part which I slate here is actually what we have
projected here on this side. And you can see that
this is very bad. So we actually want flip this. So a X minus one. And now I will project
also this here. Okay. Now, this part
is a little better. For this space here, we don't have this
image is not good, so we don't have any area
we can project here. But what we can do, we can maybe go with projection, reproject this somewhere
on this collage. For example, maybe
on this metal part. Here. But this will not
be visible in any case, because we will only use this
front face in our renders. Let's now fix this part here. So with old, we can
select this part, and this should be this
part, this part here. Let's scale this XX. Now I will select this
part ax minus one. Just flip this and reproject on same. Let's see how this look. Maybe on this part here, we have projected this screw, so we can see this screw here. And what we can do, we can
maybe just select this area. If I add 10 cut here, we can maybe just reproject
to hide this screw. We can maybe
reproject this here. Let's see how this is. Maybe scale this
little on X axis. Let's see how this look.
Scale this little. Okay. You understand points, so we can now search this
face and this should go here. But we have a lot of these
parts here, a lot of shadows. I will again project
on this area. Let's now flip this
part as x minus one. Okay. Now, with
these small parts, let's see what we can do. We can again just project
on this green area. L, if you want, you can maybe project this here. But I want to avoid
these shadows here because the blender
will create shadows for us, and I don't want shadows
from this photo here. And we can fix this even later. So I will just try
fix this screw here, and then we can create
a glass material. Let's select this part. Okay, I will I will
do this again. So let's maybe the
screw projects here. Maybe this part.
This should be okay. And maybe this part here. Okay. This is not perfect, but let's now try
fix this glass. Okay, let's before
fix this part. So let's go with all and we
want to project this here. Again, control Lampe plus to expand selection.
This should be here. And let's fix this cable. So we can select this part and Control Lampe plus.
We don't have any area. We can project this cable. Maybe we can just
place this here. Let's see what this part, we can maybe Okay, we can maybe just go with a similar angle we have
here, U project from. Let's see. This is here. So A, to select all, and let's maybe just scale
this down like this. This is not perfect,
but it will work. Okay, let's see what we
can do with this glass. And later we will fix
these wires here. But before we create
this glass shader, I also want to plug this
in roughness and maybe a little to color
input because we will duplicate this material and I don't want to do this twice. So to do this, we
can go with color. Let's make more space here. I will now plug this to color and let's now see how this
concrete texture look. I want to make more
contrast here. I think we need to scale this. I will again, select
this concrete and let's maybe scale this down to
make these details bigger. Okay, something like
this. And let's now make this material and what
I want to do now. First, we can mix this
little in color input. If I go with Shift click I get this mix I get this
mixed color node. I don't want choose between
first option and second. I take only black parts of this, so we need multiply
blending mode. And we can see what we get. We basically keep
this texture but add only these black
parts over this texture. And in color input here, I don't want too much
maybe just 10% here. But we can use this
maybe for roughness. So for roughness, I need
another color because if I now plug this here, you
will see what we get. We get very shiny parts and then very rough
parts and also here. So black parts are shiny
and white are rough. We want to trig this so
for this metal part here, I want much more rough parts. So I will go closer
to white here. And for bump, let's see
what we can use for bump. I think we can use
combination of these two texture
which we have here. So I will plug this to normal, but we go to bump. This is not good
solution because we need black and white texture here
or black and white map, and I will create this
with another color. So we can plug this color here. And now I will go with bump. And this should go into height. Okay. So now you can
see what we get, and this is two in tens, so maybe 0.05 here to distance. And let's now bring this all
down. Something like this. So if we move this, we
get a lot of bumps, but we don't want this. Okay.
6. Glass shader: And let's now create
glass variation. So I will click here base. I will just click here plus
and select again base. I will now just click here
to make another variation, and I will go this glass. Let's see how we can
create glass shader. So usually we want to go with glass BS
DF and transparent. Okay. But first, I will
select this part here, L to select this and
assign this glass shader. To see that this work, we can go to display color, say this as blue. Now we know that this
is glass shader. Let's now back to the preview. Okay, this is not transparent. This is translucent,
so transparent. And we can now mix these two shaders and
if I plug this here, you can see that we will
get perfectly glass shader, but with a little transparency. So we now have shader
mixed with transparent, so we get a little more.
Transparency here. And if you are not
blender beginner, you know that we need to use this transparent
shader combined with glass or another option is
this in shadow ray factor, but I don't want to use this. I just want a little
transparency. So Blender will easier
calculate this glass shader. And let's see what
we can do here. I like the projection
of this image here. So I think we can also
use some part of this, and we can mix this with
what we have before. So this is just perfect glass, and this is what we have before. We can keep maybe 20%
of this texture here, even this is not correct, but I will for this bring
this bump all down. And for roughness, I will
make this more shiny. So I want increase this bright color here
and also this one. Okay, I also want to
make some variation like dirt on this glass
with this white color, but I will bring I want more area with this clean
glass or shining glass. Okay, let's now make this
shader and let's now also use this as factor for
this glass roughness. And what I will do now, I will first go to UV
Maps. So this is concrete. UV Map. We need project this maybe I want project
this on this part here. So for this, I don't want
to use project from you, I will just go with projection. Let's now scale this and
project this on this part here. Let's see how this looks. If I now click here, I will see how this look. I think we can go
with color M here. We can maybe tweak this a
little to make more contrast. Okay. And we can use this for
bump in this glass shader. Let's see. And also here. This is already bump here. So we can now increase this. Let's see what effect we get. And we can also plug this here. Okay, so we get this bump
based on this texture here. But this is too intense, so let's bring this down. Maybe we can increase distance here and bring
this strength down. Or I will make this to 0.05. So we can change color here. For example, we can make
bluish glass, orange, but let's see if I
plug this texture, we have here into color input. Okay, or we can
just with control, you can cut this
connection and we can maybe choose color we like. But we cannot see how this look before we add
some light inside. So I will also do this, and let's see how
we can do this. So what I do last time, I basically put some maybe cube. I scale this cube, and I think I barrel this at
Control B to smooth this. Now we can create a missive material here.
So I will click here. I will also start
from this base, and I will now call this Misive. Okay. Let's see how we can
now make this emissive. I will first project
this with Q projection. I will also project this on
this maybe this part here. Let's go to material
preview to see this. Now we can to render preview. Now we can plug this. So I will plug this to emission
and emission strength. So let's plug this color. Here, we basically
now have this color, and now we can play with
emission strength here, or you can also use
this us factor. Let's see how this look. So we have some variation here and the bright part will be more emissive and the black
part will be less emissive. But we now need control this, and we can control this with Mt. We can now multiply this value. Let's see, maybe by ten
to make this more bright. You can always
open preview here. If I said this to one,
you will see before, and let's try maybe 100 to
make this really bright. But this is too much
and now you can see that we move when we play
with this color ramp, we basically play
with this area, which are bright and more
bright and less bright. And I think these are some
details, some variation here. And only thing I
need to do here, I now want place this inside. And let's see how this look. We can also scale this stretch, but this is too intense. Maybe ten. Now we can back to this glass shader and we can
play with this even more. Let's see if I make this
less transparent or more. I want to make this
less transparent. And let's see if I
mix with this shader. How this look. Okay, so
this is all up to you. You can play with this slider. I like this when we add more this principle BSDF now
this is less transparent, but we get more details. And we can always play
with this color here. But we also have here
this orange tint. We project on this area. So if you add, for
example, blue here, you can also maybe
go with mixed color. And set this to maybe color blending
mode and you also maybe want that bluish tint here or orange and
also same tint here. Again, this bump is a
little too intense, because you mostly want glossy this is completely this glass and this is with all these imperfections
we have here. And you need to know that this texture is very
low resolution. So we get this low
resolution here. But if you want to make this model to be
closer to camera, you will find better texture. This texture here and this
one is very low resolution, and this object
here or this model is not intended to be
very close to camera. Okay. And I will also play with this part which go to roughness. So this slider here, this is too shiny. Okay, now this look better, and now we can increase
little this bomb. Let's now make just a little
of this and let's now make this more white to add
more imperfections here. Okay, so you can see
that with tweaking, these settings we
get better results. So we just need to
invest more time. Okay, I'm happy
with this for now. And the only thing
you need to do now is continue playing
with this UV editor. So I want to select this first UV map because
we play with base color. And let's now reproject
This part is bad. Let's see. Also this one. We tell you can select Los par and let's project this here. And we didn't fix
these wires here. So you can see that this is off. So we just want project this on this metal part,
something like this. And let's press L here. And I want project
this maybe here. Let's maybe grab only
this part. Here is 90. Maybe, we can just
maybe move this here and project this
on this metal part. And now, this
already look better. So this part is very bad. Let's see how we can fix this with tab, you can always skip. I don't like this part here. So let's see what happened here. Okay, we can maybe
just project this and rotate. This part here. Okay, this look a little better. It is not perfect. We need
to fix also another side. But I think I will not lose too much time fixing
this because we still need create dust shader to make all these imperfections
little less visible.
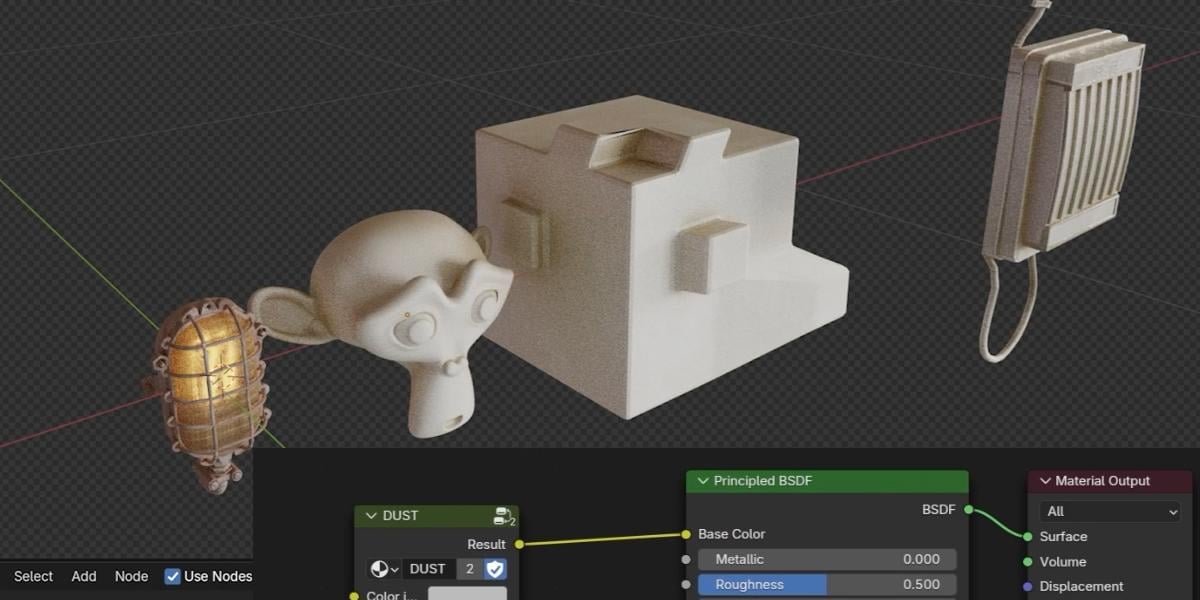
7. Creating dust shader: We are done with
modeling and texturing, this object, we can
now build dust shade. And I will show you
how this looks. I will first select
this base color. And this is the shader
I build last time, and I save in my
blender startup file. So I can just type here dust
and I can paste this here. It is not so intense, but it is how this should be. And I will show you maybe on this monkey because this object is white and it will
be more visible. And if I search for dust
and if I plug this here, you can see actually
before and after. Let's increase this a little
to see this better. Okay. This is actually this change
color of this object. But to make this
even more simple, I will just search for RGB, and we can now make
this completely white. And now if I plug. So this is basically
just white color. And if I plug this between, this is without shader
and this is wi. And you may say that this is
just over with this color, let's try change this
color to see this better. But now, I will show you
that this is not case. If, for example, just go with mixed color and with
control C copy this here. I will plug this in first input. So this white color and
this will be second input. If we now move this slider, you can see that we actually
just replace this color. So this doesn't
look like D shader, we actually just add overlay of this color in each pixel same. But if, for example, plug this here and mute this, you can see that d shader
work little different. And what actually this does. So if we go here, we can see that we
have here factor, which control where dust appear. And for this, I
will now back here. And this factor actually
tell that we want more dust here on
top of this surface. We can also preview this here. This color is not so good, so we can see that we have more dust here in
these greases gaps. So we basically use ambient
occlusion to add more dust. In this area. And this bit occlusion also work when we intersect with
another object. For example, if we add ground, you can see that we have dust. We have more dust now in
this intersection point. So if we move down,
if we move this up, you can see that
we add more dust where we have intersection here. So this is before
and this is after. Okay, so we use world Z axis
to add more dust on top. We use ambient oclusion and we also use layer, weight, node. So layer, weight, facing node. What this does, if we
now move camera here, you can see that we
lose dust in this area. But when we look from this
angle, we get more dust. And this is similar effect
we have in reality. And I will show
you example here. Angles. So you can see
when we move camera angle, we see more dust
when we are lower. And we also have
same effect here. So when we move from this angle, we lose some dust, but when we go down, we can see more this dust. Okay, let's see what I do. So where axis camera
facing ambient oclusion and last one is randomness, so just little noise variation. Before we start with
building this node, I will just release this
part here so you can better understand what I'm talking a few minutes
last few minutes. The dust shader is
the second step to add detail and make
everything more compact. I created an odd group that goes into the color
input and adds the color of choice as an overlay and use the
following as a factor. More dust goes to the upper
parts of the objects. The dust depends on
the camera angle. The lower we are, the
more dust we see. A similar effect as in reality. Dust collects more on the
parts such as greases, holes, gaps, and parts that
intersect with each other. Sounds almost like a definition
of ambient occlusion. A little noise variation for imperfections
is always good. All of this is mixed together in the right proportions
and used as a factor. The result is fairly
realistic dust shader. Do If we say with
us at node group, we can easily add
us to any model and make them look like they
are from the same space. Let's now see can I remember
what I do last time. So I will remove this monkey here and I
will go to Shader Editor. Let's see. So we have here
base and glass material. I will do this on this base and just ignore this glass part. I will turn this here to
ignore this glass part. So we have here base color, and we want this shader
only in base color. And what we can do if we go with mixed color I will
make more space here. So this is what I do before, if I just add some
brownish color, we can just choose between this first input
and second input, which is completely just
this brownish color. We can see some details here, but this is from
roughness and bump. This almost look like dust, but this is very bad. Shaders so we need
to improve this. And let's now follow this
formula here where Z axis, how we can make this if we now go with the separate color. We actually have red,
green, and blue, which actually represent
this X, Y, and Z axis. Now I want rest Control T to get this texture coordinate
and mapping mode. I don't need any
image texture here, and you can see that by default, by default is UV projection, but we want normal projection. Now if I go with Control
Shift click here, we have basic gradient. X axis, green is Y axis. So we have this
gradient here and the blue is actually
what we want ZX. Now, if we use this as factor, I will just plug this in Color RAM so we
have more control. Color RM, so let's
preview this one. Because I click
this second time, now this go to Alpha, go with Control Shift
and click this again. And we have basically gradient we can control with this slider. Okay. And if you now
use this as factor, let's plug this here and with Control Shift preview this node. We can see that we
actually get what we want. We get more dust on
this upper part. You can also see here, you can see more
dust here than down. And let's now maybe tweak this. But one thing I don't want, I don't want completely
delete dust from this area. I want less dust but also. So let's maybe keep half dust
here and 100% dust on top. Okay, so this is first factor. We can select all this and press S to scale this to
make more space. Control J to make frame. And if I now select
this and press N, we can rename this to World Z. So this is world Z
axis factor. Okay.
8. Creating dust shader part 2: Let's now see what we have next. Okay, camera facing,
we can add this later. I think more important is
this ambient occlusion. So let's now build this. Now I will move this up and let's now go with
ambient occlusion. And let's now control
shift click here samples. So this is just like resolution
of we need maybe 12. And this distance, I think
this is maybe in meters. So this is just calculate area
of the ambient occlusion. I don't see this effect a lot, so we can now go with color. We can increase this
with color ramp. Actually, we want invert this. So we want more dust on
this area where we have these creases gaps and parts which intersect with each other. So we need actually invert this. Okay. So this white area
will be area with more dust. Okay, something
like this. Now we can maybe scale this Control J. And let's first use this as factor so we
can preview this. If I plug this here. Let's see. You can
clearly see this effect. So we have more dust or this yellowish color
on this area here. Let's now play even
more with this. But one thing I want, avoid. So I don't make this part
completely clear from dust, so we can again bring
this little up. So if we move this all up, we basically add
dust everywhere. I want to move this
to about here. Okay, now, we can
rename this two, maybe A O for reembrant Abltion. I need to do now. So we
now use this as factor. We don't use anymore
this SAS factor. We can just mix this. Let's bring this here. I don't know why
I keep this here. I don't need this join left. I actually want this on this side of window.
So let's do this. I should do this first. Let's split this window, and now we can maybe open
shade the editor here. Okay, now we have full
preview of this on right. Let's now mix these two nodes. Color mix color, and this
will be first input. This will be second one.
Let's now preview this. Now we want actually, put this to one and
let's now set these two maybe multiply Or
I think screen. We need I think for this, we need screen,
but we can check. Let's plug this factor. If we said this to multiply, multiply takes only black parts, but we want to keep white parts. So let's set this to screen. Actually, we can see clearly
this ambient occlusion here, we can see that we have more
dust on top of this part. So this is actually correct. And we can see when we increase this where the axis this work. Next is layer weight, and we can search for the wait. So we now build
this camera facing. And we have here facing effect. So first one is fronel we don't need this,
we need facing. And you can see what this does. When we go on top, we from camera angle always
get this black part. For example, if we go on side. So actually, when we go
with camera on 90 degrees, we actually get this black color and this always
follow camera angle. And this is actually
effect we get here. You're really sitting
at the top of objects. You don't see dust very often
on the bottom of an object. Dust is in Okay, how we can use this. So we can again go with color to have more
control over this option. So twice, go with control shift here to
get to this color. And actually, we
get what we want. Black color is actually, we don't need this
too much because we actually get
correct colors here. So black color
will disable dust, and this is what we
want when we go up. So I will maybe scare this. Just want to be sure
that this area is white. So I will bring this push this little here because
I don't want if I, for example, have biolor here, this will just fade this effect. I don't want this.
So let's keep this completely white and move this. Maybe on left to fade
this effect a little. Okay. Now I will go with Control J. I will call this
camera facing. And to remove this step, and now we can again
go with mixed color. Mixed color now plug this here. So this is now both of
these are now first input, this is now second input. And let's see how
we can combine. Let's now control
shift here to preview. Let's see how we
can combine this. Okay, this is mixed
blending mode. I think we now need multiply
this because we keep only we want keep black parts
from this bottom input. Let's see, is this work? This actually works. So when we look from this angle, we can see a lot of dust here. But when we go on
top, we can see that this effect now
fade on this area. This works, but I don't
want very strong. This effect maybe 0.5 or 0.4. So you can see this little fade, but from this angle, we have a lot of dust. But if we increase this effect, we can see this even better. Now, this area fade. Now, this area fade. So let's see before. Okay, so this is, I think, very nice effect, but
let's keep this maybe 0.5. And the last thing we want to
do here is this randomness. This is actually
just noise texture, so we can bring all these up. And if I now go with
noise texture and again, fall ramp to control this. Color. Let's now plug this here. Control Shift click
here to preview this. I actually want a very
subtle effect of this. You can tweak this. You can
also play with this size. So basically, we have
some randomness here, and now I will go again
with mixed color. This will be first input. This will be second input. Let's try also multiply this. Okay, let's back whole shade and not just this color input. So I will make more space here, control sheet and click here. So if we go, let's
just quickly review. So these black parts
will fade this effect. These white parts
will keep this. So I want more of
these white parts, maybe just some area
with these black parts, but not completely black. And let's now preview this You can feel
some randomness here. So I will not use too much
of this factor, maybe 0.3. So we have some randomness. It is not so obvious,
but it is here. Okay. Basically, we are done. We just need to make
a group of this. So you can save this
in your Brander startup file and you
can use this in future. But let's first
go with Control J and let's press N. Let's
call this randomness. Okay. Okay.
9. Finale: Now we basically have
all these four factors here and how to make
a group of this. What I will do now, I will now select all of this
and I will go with, let's say, this Control G
to make one group of this. And what now happened, you can see that we
are now inside group. So we can click here
back to our shader. Let's now bring this down. And we can rename
this group ones. Dust Shader. Now we have this node group. But every time we want
change something, we need to go inside this group, which is not practical. So what we can do, we can basically extract some of these values
we need here. And first value I want
control is this color. So if I now plug this here, we can see that we cannot
see this color here. Actually, it is here, but if we cut this,
we can only see this. But now when we
extract this here, we can see this color here, which is very practical. So we can always
change this color. But I don't want call this B, so we can just go here, and I think I need select
this and let's rename this. So this will be coal. And
this is our main coll. So this is our
main cooler input. For example, in this case, this is this texture,
this image texture. So this always go in this input. Okay. And next I want slider to choose how
much of this I want. And we can now create this easy. I think I need more space here. Now, just mix color. So this first input
will be our main color or this image texture and
second input will be this. Okay. Now we have this slider. So we can basically choose how much we want
this base texture, base color, and how much we want this shader, that shader. And now we can extract this out, so just pack this
here. Now like this. Let's rename this to how much. Okay. Let's now back here, press N, and we are
done, basically. So we can choose color I want less saturated,
maybe color. Actually, with this value, we also increase this effect. So let's bring this
to about here. Now we can choose how much
we want this dust shader. And let's now test this
to another object. So you can also preview
this effect here. For example, if I now
go with Oh, monkey. So shift a Monkey, let's shade, smooth this, and let's now actually
create new material. And now we have this color here, but we can also if you
just go with dust. So we call shader. So this is our main
color which is white, but we can do what we do before. RGB. And let's say
you have white monk. And if you now plug this here, you can see this dust effect. So this is before, and this is after. And now you can see that these two objects look like
they are from same space. For example, if I add, let's add another
object, maybe just cube. And if I now add same material, we can see before and after, it looks that all three
objects belong to same space. And this is actually
very important. For example, when
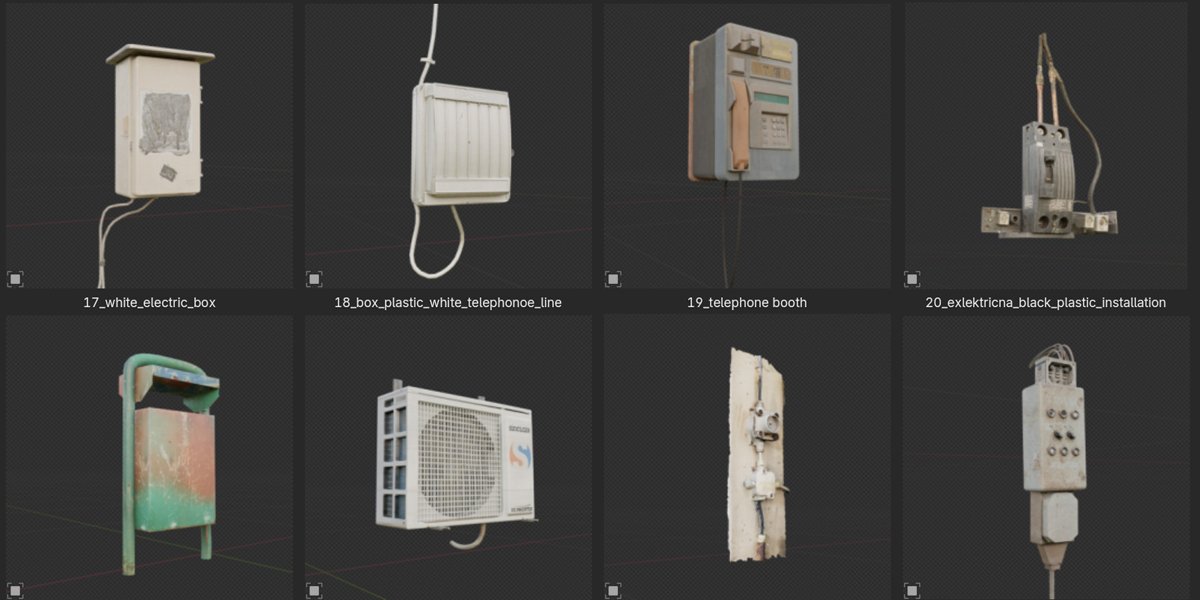
I build this hole this asset pack,
we can see here. A lot of different objects don't look they are
from same space, but when I add this dust shader, they actually look they
are from same space. So let's for example,
if I, for example, bring this object here, and if I now increase
this dust shader, which is not the same
dust shader, we do now. But you can feel that this look more natural
than without this. Okay. Let's instead of this one. Let's add one we create
now. Dust shader. Okay. Now, this
look very similar. I think this effect on
top is little intense. And we can always fix this. So this is the axis, let's now just
decrease this value. It is a little too intense. Okay. So you can always play, continue playing with
these sliders to get more realistic dust shape. And we can also clearly see
here this noise texture, so you can see all these
tiny randomness here. We can maybe increase
this ambient occlusion. Now, when we build
this dust shader, we can save this in your
startup blender file. So in future, every
time you open Blender, and I think in new
blender version, you will also get this dust shader and
how we can do this. First, we save
this Blender file. I have saved this on my desktop. So this is first step. Now I can close this and I can open
completely new Blender file. So I will also close this I
can open new blender file, and this blender file, which is completely new is
my default blender file. And what we do now, we need to change this
default blender file. We need to go to file append, and let's find on my
desktop this blender file. So Lam, what I want append here. I don't want appended images, collection, materials, objects. I want node three append. So I will go here and you can
find this dust shader here. Okay, now we append this
in our blender file, but we need to save this file. Default and say startup file. But before I do this, I just
want to make one thing here. So if you go to Blender file, you can find here node groups. And you can see that this one this shield
and this don't have. I think, for example,
if you sometime don't use shader Blender will think
that this is not important. And after some time, blender can delete this. But if you add shield here, Blender will never delete this. Let's now make
this to a layer in file default save startup file. Okay. That's it. And now, next time when we open
blender, for example, I can go here and let's
now go to Shader. Editor. And next
time when you need this, you can go with Shift A. You can go with Shift A, layout group dust, so dust shader or you can
just search dust. And if you now plug this here, we actually get our
dust shader here. This is EV and this also
works in cycle cycles. Okay. I think this noise texture
is a little too intense. Again, you can just open this node here, so
this randomness, just add more or less And one thing I will
do I will share this with I will share with you
this lamp blender file. So here you can also
find this dust shader, so you can just from this file, extract in your
defourblender file. Okay, so this is for
this part of tutorial, I hope you'll learn something new and see you in next one.
 šime Bugarija