Transcripts
1. Introduction: Hello, and welcome
to new tutorial. This tutorial, we
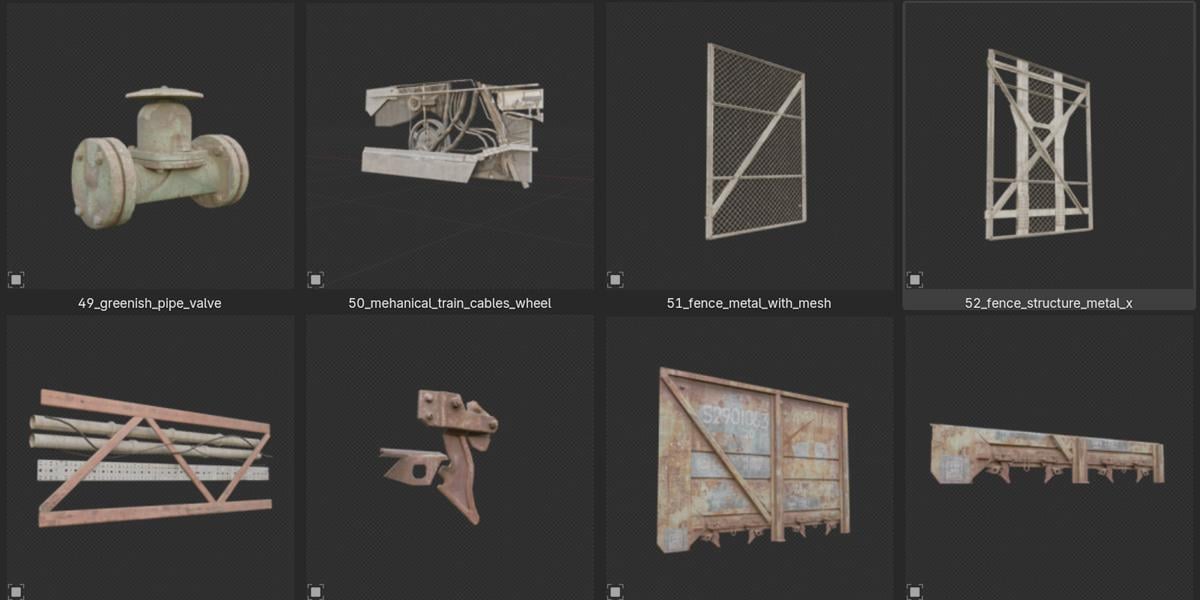
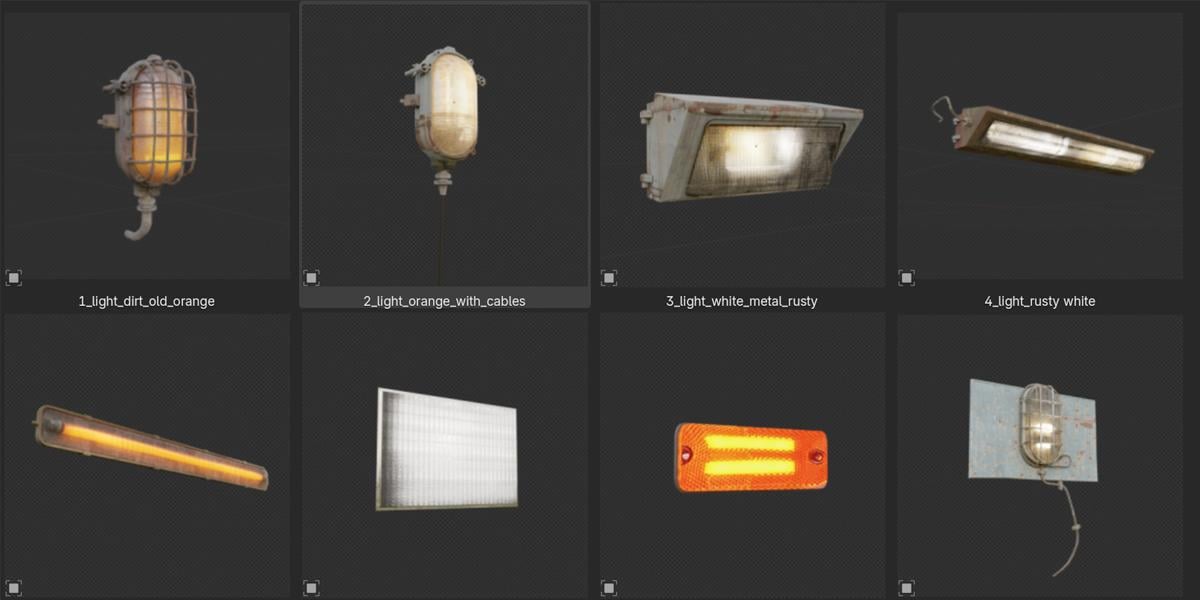
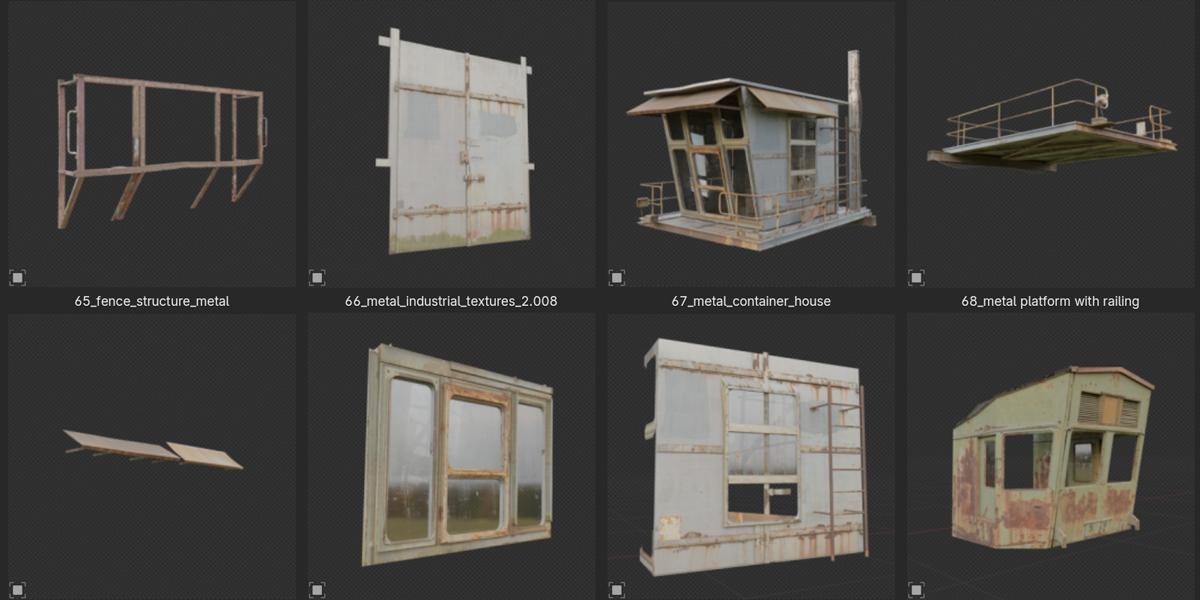
will model gribbles. And what I think when I said, gribbles I think on stuff
like this one here, these pipes or wires, this part here is also
gribble this fence here. And we can also see a lot of gribbles on ceiling and
also the structure here. You can see pipes here and actually half of this
render here is gribbles. Actually start with
recording tutorial about this scene or I actually start
recreating this scene and record whole process. But very fast, I realized
that I made this base shape, and very fast, I realized that, most of this half of this
scene is actually gribbles. And then I decide to stop
with recording this tutorial, and I actually want to make small tutorial
inside big tutorial. What I mean about
that. So first, I stop recording
this tutorial and I will record tutorial
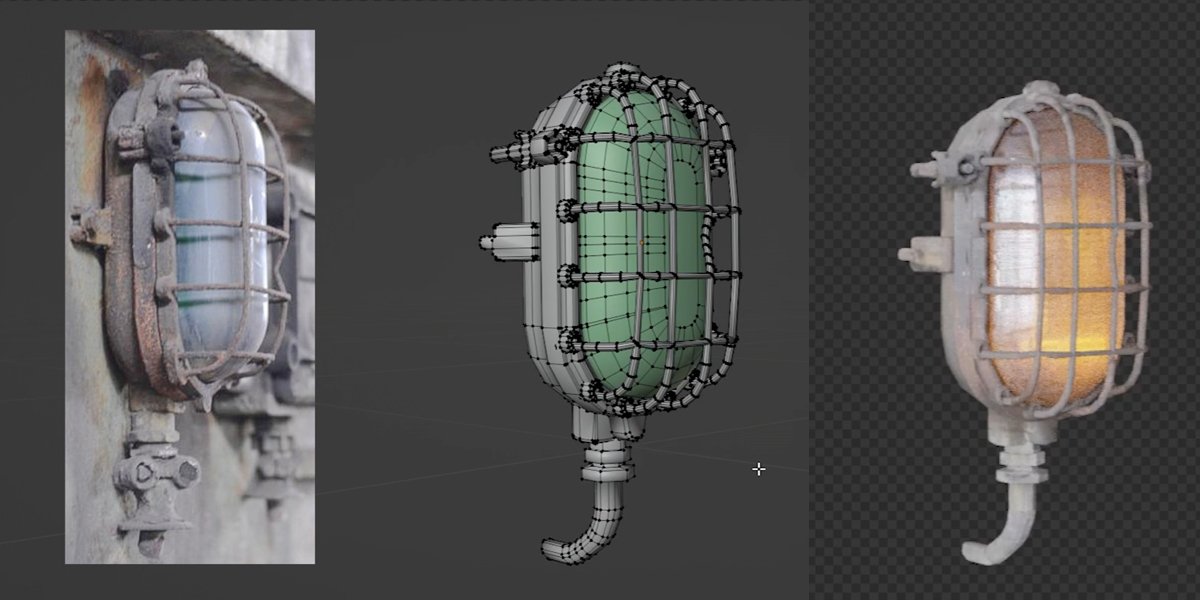
how to make gribbles. I actually make small
preparation for this. So I made this image. This image will be
our reference image, and also we will use
this for texture. How I get this, this is
just a collage of things. I think it will be
useful in this tutorial. You can see just quickly
resolution is about five K, but you can see that size
is only 17 megabytes, which is very small. When we know that we will use one texture for a
lot of objects. This is very small size image. I just want to explain
how I get this image. I mostly go to splash or pixabay.com and you can
find these links here, if for some reason need. Some of these images you can find high resolution
images here. But because I will share
this collars with you, I think you actually
don't need this. So you can just search
for I don't know metal, industrial gribble or structures or something similar like this. And another thing I also do I actually go to
Google Maps and here where I live is one
industrial area. And what I do, I just make
screenshot like this. I just copy this and
paste in Photoshop. So then I turn around and I
found here some nice things. So this is also a method you can use to find nice textures. Let's see this one.
Okay, so I also take a screenshot of this and paste this here because I think this can also be nice gribble. These images are not
high resolution, so this is maybe
500 pixels here. But because we will use
these gribblesFar from camera and this part are
very small and tiny, we actually don't need
high resolution images, mostly when we use
these gribbles. So if you, for example, use these dribbles
in front of camera, we will not put this in focus. We will maybe use
depth and field, and this is reason
I don't care too much about resolution. B
2. Practice 1 - part 1: Let's now actually start
with this tutorial, I will open this blender 4.3. We have new blender file
and let's now save this. I made this folder, so I will save here
this blender file. File, save. Let's call this Gibbs tutorial. In Blender, I will first go
with A to select, delete. I will also enable
screencast key. Let's see if I press SN, I have here, the Sedon. So when I type something, you can see here what I'm
typing to remove this tab, and first, I will go with Numpad one to front
orthographic Q, Shift A, and we have
image mesh plane. Okay, and I will load
this texture here. Now, I want to rotate
this on xx x -90. Okay. And let's see how this look. I will check. Okay, this
is opposite I want. So RZ, 108. So this is face orientation. We want blue color
in front of us. Let's maybe scale this
control A apply scale, and now we can switch
to material preview. Okay, Y, Y hundred 80. So this is inverted, and now we can cut
one part of this. So let's start with
this gribble here. Let's see what we can
do from this part here. So this is from this part
I take from Google Maps. Let's see how we can model this. I will go with tab to Edit mode, or you can go to Edit mode, and let's go with Control R. Let's just cut this
part from this image. Control R down and we can
move this to about here. What I will do now,
I will go I have this move tool so we can see what is selected and
I will go with Shield X. Now I will go with
P and selection. So we actually separate
this part from this image. So we have one object
and second object and right click Set
origin to geometry. Okay. And we can go with
Hage to hide this, or you can go with nape key to isolate only this object
or make this object solo. And my recommendation is to use this numpad slash key because when you
back to this scene, you will forget that
you hide this and you can unhide this if you
click here or old Hage. So let's go with
Numpad slash key, or you can go with Local
View and Toga Local view. So this is this option. So what we can do with this, I will start with isolating
this red part here, so tab, Control R, and I will try
follow these lines. It is not perfect because
this image is not perfect, but we can fix this later in
UV Editor. Control R here. Same on another side. And now, what I will do here, I will cut make another look
cut to about this part, and let's now select
this line down, delete vertices this part here. Oh so we don't need
these extra parts, so we can now start with
K. So K is for Knife. And before, I will
add one rope cut in middle of this part here
and another one here. Okay, now we can
go with K, Enter. And let's go again
with K to about here. I just want to make
this parallel. So I don't care about
this part in middle, and let's do same here. Okay, and same with
this part here. Next, we can make this part here before we
delete these extra parts. But I think easiest way is to go with new objects with shift, and rightly, you can place
origin where you want, and I will now go
with plain x 90. Okay. And let's scale to about here. And now I will go with S Z
to scale this on Z axis. Or we can actually just
grab this part here. To this line and let's
bring this one down. I will press L to select only this part.
Let's move this here. Okay, what we want now
we fix this UV map. So I will open make
more space here and I will move this
all right to open here, shade the editor, and on left, we can have UV editor. Now I will go with
U project from you to unwrap this and
let's now reproject this. With A, you can select all. We have here and with
G, you can move this. Let's zoom this here,
scale this down. Okay, now we can reproject this. Scale this a little and let's reproject
this to about here. We have this part. We
don't want this red part. But I think I will fix
this just in your Editor. Maybe it's easier with AI tools to remove
this in Photoshop, but I will just fix this here. And I said before that
this is not so important. This will not be
close to camera and all these tiny imperfections
will not be visible. Okay, let's now select
this part here. G and move this down. This one up and let's
see this one, last one. And nobody will note that we
made these adjustments here. You can see that this is hollow, so we have small holes here, and I don't want to use bullion
for this or model this. It will be too hard. And one thing we can do here, we can just use
Alpha mask for this. So I will go to Edit mode, L P separate by selection. Okay, let's set origin here. And now you can see that both of these objects use same material. We actually create this material when we import this image here, so you can see that the bladder create shader with
name of this image. Okay, I will control
and right click disconnect this here because
we don't have Alpha map. So JPEG don't have Alpha. I won't create Alpha map, but only for this object. So we actually want separate
object materials here. So I will re here two plus, and I will just rename these two metal industrial
texture with Alpha. Okay, so now this object use one material and
this another one. And what we can do, we can
create Alpha map with color. If I plug this here, black
parts will be transparent. So I want to make this
completely white, and I just want to keep
these black parts here. Something like this.
And if I now plug this to color to Alpha, this should be transparent. But we actually can see
that this is transparent, but let's now switch to
cycles to see this better. So I will go with
cycles and GPU. Let's say this maybe
250 just for preview. Okay. And if I now switch
to render preview, you can actually see that
this is transparent. But let's just make
this lighting better. So I will go with
environment texture, and I will load some HDRI. Maybe this one.
Okay. So we actually see that we get this hole, so this is transparent. And now I will go to Edit mode. We tab and let's now
extrude this on Y axis. Y. We now get this
stretch texture here. Let's go with maybe
Q projection. So this is not so important, but if you want fix this, you can say to select Z 90 and just reproject
to this part here. I think we don't waste
time too much about this. I will now just make
some Bels here. I will press to select tool, and I actually don't
want beverls here, so with control and
just left mouse drug, we can remove this selection. This is not so important, but I don't want make
beels where I don't need. Okay, let's just
go with Control B, and I think we are done
with first gribble. So this part can
be useful later, and let's now continue
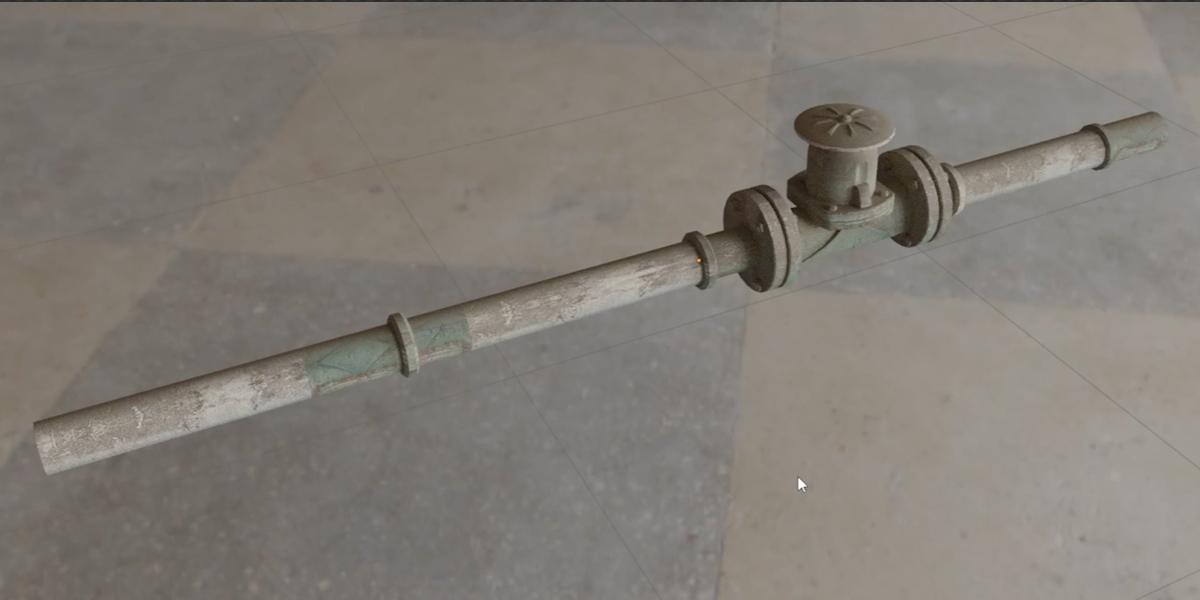
with this part. I will make these pipes here, so shift try click, mesh cylinder, and I will
reduce this number maybe to 16. I don't need too much
resolution here. Let's now scale this
down and edit mode, and let's go with Wireframe. I will move this
all to this line. I will press L CDX. Let's make another
one here because I know that there is two pipes, and what we can do quickly here, we can go with Control R
and scroll mouse up to add another loop cut
Control B to bevel this Old T extrude og
ormars and move mouse. With holding shift,
you can be more precise and move mouse up. And what I can do now, I can go with Old. So with lt, we select
this loop cut, and with shift,
we add selection. So actually, I want hold Shift
and lt at the same time. So you can see here, click
Shift told, click, click here. Now I can go with Control
B to smooth this. You can go with two
loop cuts or one. I will go with two. So we won't make this low poly,
but not completely. Okay. And let's make same here. So maybe you can go
with three of this. This is four. Control
B, scroll mouse down. Let's make this smaller O
T extrude along normals. So shift hold. Click here. This loop and this one here. Control B and make
small bubble. Okay. Let's now reproject
this UV ditor. These pipes here are
not good texture, so we have a lot of
reflection here. We have this part
I want to avoid. So that's the reason
in this collage, I also put these textures down. I made this part from start
to end of this image, so we can reproject this
easier in UVEditor. Let's now open Veditor and L Let's see. We don't see this
image here because this object don't
have any material. So we can just place
this material here. Okay, L and U, we can use Q projection. Smart TV project.
It will be similar, and I will go with Z night. So we can just reproject this to some of this metal texture here. Maybe this one down. And this one. So again, you unwrap your
projection ER night. Let's maybe for this one, use this part here. Okay. We have this part
black part here. I think if we said this
to repeat repeat here, we fix this problem. We now have these pipes. Let's move this back. And we have also this
part which go here. Let's now delete
this part we don't need from this texture
here. Delete faces. With shift, we can add selection and we can
delete all these phases. Now we need to fix
this U V. So first, I will select with shift. So we use X ray mode here. That's the reason why
this is hard to select. So with control, we can select everything between
first and last one. So when I click here and
withholding control, we can select all this line. And let's now
reproject this better. I will select this with
left mouse and as to scale. Move this right part. Scale this g to move this here. Scale scale this
and move this down. Okay. Let's with control, select this part
here and do same. And also this part. M Okay. Now we fix this UV and we
can now select all the E Y, extrude this on Y axis.
Something like this. We also get this
stretch part here, so we can fix this if
we want Q projection. A to select, scale this down and just project
this on red color. RZ 90, project this here, scale. And next, I will press L to
select this loose part here and Control B to
bevel this one bevel.
3. Practice 1 - part 2: Okay. I think we can also
add a lot of details if we create cables
render like this one, you can always see a
lot of these cables. So we can do this if we go
with Shift A curve busier. A Y n. Okay, scale this down. I think I press
first time Y nine. And let's see if we
go to Edit mode, we have these points. Here, I I select these two, we can go with subdivide. Let's go to IFR mode. No, this is not point, sorry. So this is just controller.
This is not point. So we can with this
control this curve, we have two points here, so subdivide and subdivide more. So we can now maybe place this is this part here and
actually move behind this. And maybe let's see, I want to select these two
and maybe subdivide this here and maybe place
this in front here. Okay. And let's now we
can play with this a lot. So if you press to scale, let's maybe delete this. This here to smooth this. We can now play with RX RY. And now I will go with the
curve settings under Geometry. Under Bevel, we can
withholding shift, just add depth to this. And I want to bring
resolution down. I don't need too
much details here, maybe here to eight. Let's go to edit
mode. Bring this up. This can be one shift the
X to create another one. And with tab, we can
again go to edit mode. We can bring this part in front, maybe maybe this one in Okay, I think I want to
go with num pet three to write orthographic
view to smooth this a little. Okay, again, now numPet one. Let's now play with this. Just make some
imperfections here. So Y or X and you can
rotate this a little. Okay. I think this
should look good and I will change depth of this. I think this is 6 centimeters. So this is too much,
maybe just three. And I will also create
new material for this. I will call this new
material and call this black and add
some black color here. We can also assign this
black material to this one. Okay. And one thing
I also want to do when I go to solid Preview, we cannot make difference
between these materials because all have the same
viewport display color, I will make this black. So we know that
these are cables. Okay, and next thing
I will do here, I will join all these objects. But because this
is curve object, we cannot go with Control
J to join this we need. First go with click, convert this to mesh,
convert this to mesh. Now if we go to tab, we can actually see
that this is mesh. And because all this is mesh, we can now go with Control J, and now this is just one object. And one thing which
always help to add some realism is
seams or some cats. So all these red part look flat. We can go with tape to edit mode and we can
add some seem here. So if you just press S to scale, we can note some
difference here, especially this
depends on lighting. For example, if we
have sunlight here, we will see some shadows
between this part. Let's try just quickly
change lighting here. So Control D to get this texture coordinate
and mapping node. And if we now rotate this, if you don't want
to see this world, we can always go under film
and enable this transparent. Okay, so this is very flat. Lighting, we can always go
with light sun lamp here. So you will note small
shadows here in these parts. I always like to add
some seams when I can. So as to scale, scale this. And we can maybe add
here three loop cuts. So second one. So we have two support
and second one. One in middle, we will
actually use to add C, or you can always
go just to S Y. Okay, so we can see
this nice cut here. Let's do one here, so control R, scale this. And we now have one
nice piece of wibble, but I think we can also
improve texture here. I want this rotate in
this direction so Y, 90. And for example, if we
add here array modifier. Something with origin
is problem here, set origin to geometry. I'm not sure why this happened, but let's try, move origin. Let's see what we can do here. So I start with one. Okay, this is X axis. This let's remove this. This is not what we want. Let's move this on
the axis source. And I will go with top view. So this is not a
problem you should get, but I miss something
with this origin. This origin is not right place. So I will just fix this like this and this
will not be problem. And we have some
intersections here. Again, this is not problem. You should get this
should line perfectly, but I will not care
too much about this. So I will add RA modifier here, and if I need increase this, I can always play
with this count here. We are almost finished
with the first gribble, but one thing I also
want to do here, I also want to import
another texture. And usually for this,
I use concrete. I will copy this image so
I can share this with you. Past this under texture so
we can import this here. Okay, so this is black material, and I don't want this here, but if I now delete this
I import this embedded. So if I go with image texture, I should find this here. Okay, here is this image. If I now go with control
sheet and click here. I want to use this for roughness and maybe some imperfections
and also bump. So we will see. And
we have one problem. If I now go to edit
mode, change this UV. If I select this here and
for example, scale this. When I back this material, you can see that I destroy this UV use for
this texture here. So I will go with Control
Z to back this UV, and we need another UV map because we use completely
different texture. Under object data properties, we have UV maps. So this will be
like main UV map. And let's now create
another one concrete. So if I go with UV map here, Actually, we don't need to plug anything here
because by default, blender use always first one. But we can if you want, you can just to know
that we use this UV map, and if I go with Shift
D duplicate this, I will now set this
concrete UV map. And because this one
is selected now, we can select all these objects. And projection. Now we can load this
texture here if you want. And if I now go with Control
Shift and click here, we can see how this
texture is projected here. Maybe I united to rotate
to another direction. I actually want to
go this direction, so we can get this leaking here. This look like leaking
from top to down. You can always maybe select
just one part of this and maybe reproject
to part you like. What I will do, now I will
use this for roughness. So we can make more space and I will go with colorRamp to
make this black and white. So when you use
all these inputs, you actually make
this known color. But if we use this
through color ramp, we actually make this
black and white. I will plug this to roughness. This actually control how
this object is reflective. So if I add more black colors
here, let's see how this We should now see
difference in reflection. And let's back slam because
this is not visible now. This depends on lighting, so we can see that
this black part is pretty is reflective and
this white part is rough. So I don't want this very
strong contrast here, but we can make some variation,
something like this. And one thing we can
also do we can always make one of this
pipe more rough. For example, if I
select this texture, I can lead here to plus, and I will load
same texture here, and I will make
duplication of this and I will call this shining. And now we can just increase this black parts here
to get more reflection. Okay. And what I will do now, I will press L and I will
assign this material. So L assign this. And if we select this part, you can see that this
use this texture here. So we basically
made variation in roughness with two textures. So I will go let's
go with smooth. So let's see how this looking. If you go with shade
out or smooth, we actually get modified here and we can play
with this angle here. By default, it's 30 so
we can keep like this. I will also add this
concrete in color input. And how we can do
this, we can go with another color ramp. I need more contrast this time, so I will go with color ramp. Plug this here. Let's see with shift right
click how this look. We can add some leakings with this and now I will go with Control Shift try click to mix these two shaders. So we now actually mix
first one and second one. If we go to left, we
get this main texture, and if we go to right,
we get this color ramp. But if we said this to multiply, we actually take only dark
colors from this image. So this is before,
this is after. And now you can choose how
much you want this effect. And I want copy this
with likely copy, and this is with Alpha. So we can also paste this here, plug this to roughness. And this part look more shiny. So this material
should be more shiny, so we can always make
another variation here. Okay. And the next thing
we can do here is bump. But this part intersect
with this one. So, let's move this out. So let's go with this
main texture and can also use this for bump. So I will go with
bump If I plug this, let's plug this one to
height and this to normal, we should get some bump
with this texture. But I also want to use
this main texture. I think we can use this. So this is actually mix
between this one and this one. So let's use this for bom. So you can see if we go to left, we get bump from this image, if we go to right, we get this leaking
included here. So I think this
is better option. And we need to bring this a lot. So let's bring this or down. Maybe just p one. And let's do same. Here. I think this is enough
for this first gribble. So we have a lot of
things to do here. I think we spend too much time just creating this gribble, but we now have
functional gribble. So I will apply this Shamod. And we now have
functional gribble we can use later in our projects. This can fit maybe on ceiling
in scene like this one. We can just delete
this part here, delete pass now I will rename this object to I
will call this one gribble. I think I will rename later, all these gribbles but for now, I will back with Nampa
key to our object, and I will hide this in
view port and render. And what I will do, I will back this
for second and I will set this object,
new collection, maybe gribble actually, we can now just hide
whole collection. Oh
4. Practice 2: Let's see what we can do next. This tutorial will take too long if we model
everything from here. So I will record only some gribbles and later I will continue
modeling without recording. So let's see what is what can be interesting
for modeling. I think we can now
do this part here. So I will go again with Control R. Controller down and here, now we can just grab this part. Shift the XP separate by selection set
origin to geometry. And let's go with Napky. Now we can focus
only on this object. I will not model
over this image, so we can just use this for reference and later for texture. Let's see what we can do here. I think I will start with cube. So I will go with shift
right click and let's start with cube now
I will go with X. This will be this part here. Later we have this cylinder so Shift mesh cylinder 32 is
maybe maybe 24 for this. And now I will go with Irvine. Ax to scale this on X x
is and now shift the X, so this will be second one. Okay, let's see how we
can get this shape here. I think for this, I will use subdivision
surface modifier. And because I don't want to
subdivide this part here, I will just go to edit
mode and I will delete pass I X ray mode, we can select these
delete faces, and let's now
disable X ray mode. I see this shape here. So what we can do, I will go maybe Control
R to look cuts. Maybe we can just
bring this down. And if you increase
this subdivision, we can see that we
smooth this mesh. Let's keep this to two. And now, if I bevel these corners here, I will get sharper
edge as I have here. Control B, you can see what
I get This is good for now, but because we don't have
too much edges here, we can always back to this later and shape
this even more. For example, I can
select this one and withholding all that shift. Also this one and I can scale this or I can go with
Control B to bevel this. Okay, let's keep like this. Now I will make this part up. So again, we can
start with cube. You can go with Shift A and
create a new cube here, but you can also just
copy this Shift DZ. And because I don't want
this subdivision here, I will just press P separate by selection
and remove this. Okay, this is not good, so let's see what I do here. If I separate this selection
and remove this modifier, this should be plain. This is good. Before I have selected this
object, not this one. So this now works. Let's go with this object, and I will go with E Z
because I want Bevel. I want check this scale,
which is not one, so I need to apply scale, and now I can use Bevel correct. Let's set origin to geometry. Before I do this,
I will add look cat Y scale this on Y axis, and we can now smooth this with Control B, maybe even more. Now we can smooth this and
we can now add betels here. Okay. Control B to bevel this. Now I also want to
add one bevel up. Now RT don't work here. I will go with lt and then with Control,
select whole loop. Bevel this part here. I will add only
one segment here. So Alt again, control. And let's add one bubble here. Okay, now I will make smaller bubble
here. Just like this. Now I will go with Shift D Z, a Z minus one to flip this. Okay, and let's make
this little bigger. Maybe scale this on
Y axis, apply scale. Let's see what is
next this part up. So for this, I think
I will use loop tool. Okay, I will add one loop cut
here or few loop cuts here. And now we can select
this mesh here. Now we need one add on
which is called Loop tool. So you need to go to
edit preferences, get extension and first install Loop tool and click
here Install and after that, you need to go here under
add ons and activate this. Now when you go with R click, Loop tools, you have
this circle option. And this basically
convert this to circle. And if you want smoother circle, you can add one subdivision
more and now circle. Now we can go with E Z, extrude this on the
axis. Control B. Let's now go with delete limited diol clear this
mesh and Control B. Now let's first bring this up. Control B, and just smooth this. Now I will select this part here and I will
press to scale this. We can now go with
E Z to extrude this on the axis a
little and easy again. As to scale. Es again. And now I will go with E Z. Again, bring this little up. I will scale this even more, and now we can control
B smooth this mesh. We can go with
Control amped plus to expand selection,
bring this here. Now we can shift hold to
add selection, bevel this. Okay. And let's
make this up part. E Control B to bevel. And now let's go with S
to scale and E again. And last bevel here. Okay, now we have this top part. Let's now try make
these small parts here. So I will not care too much. I will go with number seven, maybe I will select
few of these. So shift control.
What we can do now, we can just u T Z
extra distance Z axis. And if I now scale all
the scale to center. But if I change this
to individual origin, we can scale each of
these part individually like this and Control
B to smooth this. This now look okay. But if you want, you can add one subdivision
surface to smooth this, but I will not do this. We already have too
much mesh for this. And let's now make
this part here. I will select these two E, Y. And let's now if I bevel, let's now first
move this inside to make this shape and
maybe Control B now. But I will go with
ControlZ to undo all this, and I will just add one loop cut here because this was too big. E, Y, AX we can rotate this on Xxs
Control B to smooth this. Let's see what we have here. Maybe we can move this part
to create this gap here. Let's just move this inside. Maybe x again. Maybe we can smooth
also this part. Okay. Let's try
with Shade Smooth. This now look better
or we can go with shade out smooth so we
can play with this angle. And let's now create
these screws here. So I will bring this here. So this is just a
cylinder with six edges. So I will apply origin here, mesh cylinder and
I will type here, six, scale this down. S Z to scale this on Z axis. And we can make this small part. I will not complicate it, so we can get this
type of shape, but this will not be quick, so I will just scale this
on Zaxis, scale this down. I will just duplicate
another one, shift the Z, and scale this down and
scale this on Z axis. Okay. And what we can do now, we can add one bebl here
to smooth this a little. I will not even add Berbl here. I will just go with Control J
to join this to one object. And I will go now
with Shiv the X. Now, select both of
these, Shift D Y. And let's see where
we need place this. So we have four
here. Shift the X. Any night, Enter. And I think I will
make this bigger. So we can place one here, Shiv this one down. Let's go with number three to see where I need place this. Okay. There are
two big so scale. Let's place one here. Let's go with number
three and shift the Y place two here. And now I will just duplicate
this to another side. Shave the X. I will place
two here in middle. So we can see they are
connected with this one, so I will place these
two in middle and I will go with X X X minus one. X minus one to film this. And I will not copy this in another side because at first I want to make
texture for this. Now I will select both of this object Control J to
make this one object. I think I can add
one bul to all this, but you can see that
this bevel is not even. So that means that we have
scale is not correct. Control A, apply scale. Control B, add one level. We can add this detail, but later when we
apply texture to this. So I will now I
will join all this. So I will go select
all this, Control J. Now this is only one object. Okay, Control Z. We need first apply modifier. So if we join all that's If we join this, this will apply this modifier
also to these objects here, which I don't want, so
I apply this modifier. Now I can control J join this. Let's now add new material here, so I will use same
material as before. And one thing you
need be careful here, you need to create
another concrete UV map because if you go here, you can see that this is red. So that means that this object
don't have this UV map. So I will call this concrete. And we have selected this mask. Let's see how this is
projected on this model. I will go with
you. Q projection. We have some imperfections here. Now, I will select this texture or we can
just back this material. Now, I will select this
up and now I will go with project from you. Now, I will load this texture here and let's now reproject
this base color. Now we can just try, match this with
this texture here. It will not be good, but I
will fix one by one part. So first, I will
select with this part. And let's now try project this. You can see that this is
straight and we have this angle. So it will be very hard
to project to this. So what I can do here, I can try get similar
angle from this camera, which is something like this. And now, if I go with
you, project from you. We can see that now it is
much easier to project this. We basically have a
similar shape here. And I will just do the
same with this one, similar angle, project from. G, move this here, scale down. Okay. Now, this look good
from this angle, we need fix this part
here, which is stretch. But I will do this later. And let's now tell
select this part here. Let's now just try and
match with this image here. Let's select this part
project from you. What I will do here, you
can see that we have basically on this part
projected this part here. So I will try fix this. I will select this in middle and I will enable
proportional editing. And now if I go
with G, I move all. That means that this
brush is too big, so I will go with G
and scroll mouse down. Scroll mouse down until I get this brush smaller and now I can only affect
this area here. Let's now select this part. Okay, this is not good idea, so I will try, select all these. We can go with G Y. So we stick or I don't want
stretch this on X axis, so I will go with GY to
perfectly move this down. Okay, you can see that
now we avoid this part. We can go even a little more. But now, avoid this part. Projection of this part
on this area here. Okay. Let's see what we can do next. Let's select phase selection and maybe select hold this loop. This should be here.
It is not perfect, but let's keep now like this. What we can do. Next, we can try model this to get
more geometry here. I will go with Numpad one. Let's go with K fork knife. We can try, cut this. And now enter, and let's do
same with this part here. This will not be perfect, but now we can select all this
area with holding control. And now I will go
with maybe E Y, move this on Y axis
and X to rotate this. Okay, we have proportional
editing here, so I don't want this. I will go with ControlZ. Let's move this inside the X and maybe just
move this edge here, this one and this one,
this is not good. Control B. Let's check scale. This bubble is weird, so Control A, apply scale. Now, Control B. Let's see what
we can do with this part. This will not be perfect, but let's try fix this. Let's go with you
project from you. And maybe reproject this here. Or we can just go with
C. C is for brush, so we can just maybe select
this project from you. Okay. No perfect, but this will be good for assets which
are not close to camera. And what I will do I see
also the screws down. I will go select all the Let's try reproject this. So I will go with projection. Let's see what we
can do with this. What if I project this on
these white colors here? No, I think I don't like this. Let's now try project
this maybe here. I think this look now better. Shift Z a Z minus one. No. SX minus one. I think we need back
these to bounding box, SZ minus one to flip this. Let's see where we have
parts to reproject this. I will just holding control, select all this part,
control ump plus. No, this don't work. This work, but we also have
selected this part up. So I will go with xray
mode with holding control. I will select this and
now you projection. Scale this so down. Project this here, and now
it's better than before. And we can also do
with this part here. Okay, this looks better now, and only this part
is problematic, so you can go with
NMPADPlusEpans selection, Smart TV project
or Q projection. In this case, I
think it is same. Okay, better than before. And now I will just when
I'm happy with this, let's also this
part, fix this part. Smart, project, and scale
is also on this part. You can also use maybe this white part to
see how this look. But I will keep this
green part here. Okay. This is for background and all these things you can
see here are not better. So I do this last time and
I spend even less time. But in final render, they always look good. And this will also look nice. I will maybe go with C to
select this brush tool, and I will just select
this part down. Smart UV project,
scale this down. Okay. We have nice model and this part down
will not be visible, but maybe this one will be
smart, you will project. Just project everything
on this green part. And we can also
try fix this one. Okay. Now, if you go
to Solid Preview, you can also see how
the look shade smooth. Let's see. We can go with
shade out of smooth. And we can now
change this angle. Let's see why I have
this shading here. So we have inverted
the vertices. This one should go down
and this one should go here and this one here. Okay. Now, I think
I make mess here. What we can do, we can
merge at last or first one. So now we merge these two. We can move this here and
let's do same with this one. H three merge at last. And we now should fix
this bad shading. But this is not problem. I just want to show you
how we can fix this Okay. Now, we are all done, and I will back to
material preview. I just want to select all this from left side with X ray mode. You always need the X ray mode. In these cases Control
umptPlus now I have let's see, Control umpt plus one more time. Help to select
these loose parts. Shield the x minus one. Okay. Now we have nice part. Let's this one object. So if I press G, yes,
this is one object, and I will call the
two Giable Later, I will rename this,
but let's now go with NumpeK back to our scene
and let's enable also this. So if I go with Shift D Z, let's see if this can fit
to this pipe, for example. So I duplicate these two times. This is too big, so
let's scale this down. Now, what I will do here. I will place this object
here and I will just go with L. I will duplicate
select this pipe here. Shift the XP separate
by selection. I will now reuse this pipe. Let's set origin to geometry. Now at seven, let's
place this to position. Okay. Now we can make more detailed pipe with this piece or we can use
this piece separately. I think only color of this
pipe is not what I want. So let's just be careful. We always this. If we want change, color, we need this UV map because if we select
this and for example, change, move this,
you can see that we only affect this
roughness standard map. Now, I select this UV map
and let's see what if I try. Reproject this on
this part here. I will not scale this too much because then I
stretch this part. But what if I select
only this loop here. And now I can just
place this part here. Okay, problem is
that we don't have enough texture to
make this look good, but we can just try. Yes, I think this blend a
little better than before. So we can also select this
loop and we can project this on green part to merge even
better this part here. Okay. I like this green color because it looks like
it is the same part. Like this, you can also
maybe add here loop cut. So shift and Q projection. And let's project this
only on green part. So, and to select all this Okay. With this green colour, I just merged this
little better. Let's also select this part and project this
on green colour. Maybe we can go with Control B or T extrude along normals. Again, bevel this. And now maybe we can
select who this part. Control Lumber
plus Q projection. And let's again
project this on green. Okay. We can now let's go with shield the X. I will keep this
as Gribble two, and I will join this Control J. Let's see. Maybe we, we have RA modifier because this object have
RA modifier apply. Now I will go with Control J. Now this is like gribble two, and this will be gribble three. And I will place this
in gribble collection. Now we can just hide whole
collection to make this clean, and we can continue
with another gribble.
5. Practice 3 - part 1: Now make this type
of structure here. And I think for this, I will use mirror
modifier because this is symmetrical on both sides. So let's see how we can do this. I will again cut this part. We have enabled this X ray mode, and I will go with Shi X
be separated by selection, set origin to geometry, and I will move this down. Napk let's see how
we can do this. For this object here, I don't want to cut this image, and I also want to
use mirror modifier. So to do this, I think I will set
origin in middle and I will go with
plain x night. Now what I will do, I will go with tab and make look cut in middle and now I
will delete this right part. So delete vertices, and
we have origin here. So if we now use RA modifier, not RA mirror modifier. We should get mirror
this right side. So now if I go to edit mode, you can see that
when I move this, I also do same on right side. Now I can move this left side and it will also affect
this right side. So we can now start modeling
according this image. And I will go here with lobe cut Now I can grab this edge and I
can move this here. No, I want true this EX. But for this, I want
enable this clipping and you can see without
clipping this intersect. But when we enable
this clipping this should now merge in center here. Okay, and we also want
EX extrude this part. Let's add another
connection here. EX and another one here. So EX and EX on another side. Let's see what about
this cross section. I think I again, want
mirror modifier. So I think if I
duplicate this Shift X, we also get this
mirror modifier. A Z, and let's place this here. And what I will do now, I, I think for this, I don't
need mirror modifier, so I will just delete this
and I will go with Control Z. And I want rotate this
on 45 degrees, so I 45. Okay. Let's now just
said this in middle. And now, if I grab
this edge and move, you can see that this
follow global Zaxis. So I want said this to normal. And now I can move
this on 45 degrees. And I see one problem. So when we remove this modifier, we also affect this object. So I think for this, I will just press LP separate by selection and I will use mirror modifier just
for this object here. I will now go to Edit Mode and let's try follow
this reference here. Okay, we cannot follow this because this image is
not aligned properly. So we can just watch this reference image and
try get similar shape. I will add the loop cuts here and maybe two more in
middle and I will just move this on x here and
also to about here. We get this type of shape. Let's see how reference Okay. But I want extrude this. So this part, I want extrude. So I think I will go with K, and I will again collect
this part in middle. And now we can select only this part and E Z.
Extrude this on Z axis, and we can also
extrude this part. But just a little. So easy. And this is how we
get this part here. And I think I want to move this. One thing I forget
to tell you when you move this with EZ, be sure to hold Z to
stick on the Z axis. So I need to do this again. So E Z. Easy. One thing I also forget
to tell you when you go with front orthographic, you don't see these edges, but we can see this if
we enable cavity here. So I will say this
from screen to both. So we will now be able
to see these edges. Now I will create
this part here. So for this, I will just
again go with Shift A, mesh plane x 90. Scale this all down and RZ 45. Okay, now, go to edit mode
with normal selection. We can just move this out. And move this all to here. I want these intersections here because when we said this, if, for example,
cut this part here, as in our reference, we will not be able to
use array modifier. We will, but it will not
intersect correctly. So I want to cut on
45 degrees here, and I will go to edit mode. Let's just extrude this. Okay. And I also
want to move this little out both of these. I'm not sure why I cannot use X ray mode in material preview. Okay, what I will do here, I will now cut this part here. So I will go select this
image, I will go with K. Let's first go with Control R. I want straight lines here. Okay, cut also to about here and to about here.
Now we can go with K. I just want cut
this part with K. And we can now just
duplicate this. I will now back to Global. So shift dY, B
separate by selection, and I will go to edit mode, E Y. And I will go with
Control B here. Let's first check scale. Scale is okay. Tap to go to edit
mode and Control B. L or A to select
Tl and now Control B. Okay, now I will just
stick this part here. Set origin to geometry. Let's stick this here. And I will go Shift the ax
milus one to flip this, and we have another part here. Et's now make this
seam here or insert. I will first extrude this
part or we already do this. Okay. So I will go with Control
R. Control R here, T cuts. Now I will select this with phase selection in middle
and I will go with E Z. And let's now add tp cuts more, and I will now just do opposite. So I will with control
select this and E, again, sell this inside. Okay. Now I will press L to
select these loose parts, and I will go with Control
B to bevel all this. Just one segment is okay. And I think we need to do
same with this part here. So select this control R to add two loop cuts
with phase selection, select this middle, go with
E Z to stick on Z axis. Control R two loop cuts here. E Z, again, move this inside, L to select everything
and Control B to add one. Okay, I didn't extrude
this part here, so I will do this now EZ. Move this out, L to select, Control B to add, small B. Okay, I see that scale of
this object is not one. Control A applies scale. And let's now go with
Control B to add Bb. Let's move this
reference image out so we can clearly see
our shape here. And now, we need also do
with these objects here. I will go to edit mode. I will go with E Z, I
will move this out. Let's see what we have here. On our reference, I want to
extrude also this part out. But let's first
make these scenes. So control R here, top cuts. E Z, move this out. This is too much. And again, select this and E Z. And I always like to hold
shift to move this slightly. Okay? And let's now go with Control B to bevel this. And this part is a
little different, so I will skip this part and I will just add the
seam here in meter. Now I will go with Sx to
scale this on X axis. I just want to
extrude this inside. So s shift to move this slightly L I will not go with L here because
I already bevel this. I will just make
small bevel here. Let's select this edge here. Maybe this one
here, small bubble here to see this C better. Let's now extrude
this part here. So temp to go to edit mode, Control R, Control R
here and let's now. Okay, I think if I extrude
this or we can do this. If I now select all
this and go with EZ I can go with SX zero, Y zero to line. I can go with S Z zero to
line all this on the axis. But because we use local here. But this is not good
because we have a lot of these edges we don't need, so I will go with Control Z. I will just select one phase, Shift D X mode about
here, extrude this out, and now we can just
place this here. Okay. And now we can
select this E Y. Okay. And you can know
that everything we do on left also follow this part
on right, which is good. Now I can go with Control B, make one bevel here. I think we are done
with modeling, and let's now just reproject
this in UV Editor. I will open UV editor here, select this go to edit mode. Let's apply mirror Modify now. Apply mirror, and I will
go with we need, again, concrete Ump and we need
apply first material here. So you can see that we don't
have red color here now, and now I will go
tab to edit mode. Okay. This should be
part of this object. So I will go with Control
J here and Control J here. And now we can go with
project from you. Let's now see how we
can project this here. We can try match this here, but I think we will need
to manually fix this. But we have selected
this concrete. So for this concrete, I will just go
with Q projection. And let's see how we
project this dirt. Okay, this is okay. I will not care too much
about this now. Select this we map you. Let's back texture
project from you. Okay. This is now
roughly projection, but I think I will
reproject this one by one. So with holding shift, we can select this part. And this will not be so easy, so I will grab all these parts. I will scale this
down. Scale this part. Move on right. Okay. And as to scale this part. I just want to be sure that this is on this gray metal part. If I go to render preview, is this still problem? Yes, because we select
this part behind, but we have this part here. We create this part
later after this, so we need to also
reproject this. And you can see that we
have here this screw, so I will reproject
this on this part. Okay, now this look okay. And let's now
reproject this part. I think it is better to go
to material preview here. So I will select these two, and now we can
reproject this here. Let's now fix these
four faces here. You can always stretch this, so ax to stretch this because we don't
have enough texture here. AX here, and also this. Let's see how to select this. I think if we just drag this, we can select this part. And let's now reproject this. And now, this part here. I will press L, and we
can now try line up this. Let's just scale this, and also this part. We have now projected this, but in back side, is
very bad projection. So if you want, you
can reproject this. But I think I will just use
this site visible in camera. So if you want, you can do this. I will do this now quickly
without recording.
6. Practice 3 - part 2: Now join all these Control J. So now, this is all one object. And one thing I want to do here, I want to make
another variation. I will call this more
bump with more bump. And I will just increase
this bump here. So to make this molded
and you can always add these imperfections here if
you want to make this molded. So we use this concrete
texture for this. And we won't keep this rough, but you can also let's
see how this look. If you want to get parts
with more reflection, you can always play with this colorim here which
go to roughness input. This is maybe 210.25. The last thing we want to
do here is these screws. We have a lot of them here, but we don't need to create
each of these screw, we can just make a few. Let's just quickly do this. I will again go
with cylinder with six vertices switches and Rx 90. Let's go with S Y, scale this on Y axis. I will go to Edit mode
and I will add one bevel, but maybe only on this phase. Control B to make
them more visible. And now I will go with Control J to join
with this object tab, and now we can go with
U project from you. Let's try reproject this
to one of these screws. Okay, something is wrong here. I didn't join them,
so Control J. It's here and UV
project still works. What I will do now,
I will go with Shift the X, shift the X. If you want, you can
reproject this maybe on this one to get
some variation. And let's now just go with
Shift X, move this down. L, again, just place mouse over this screw
and then go with TL, Shiv DZ, move down. And that's now
again select this. Let's see where we can do. Move this now, Shiv DZ. Maybe a few here. Shiv DZ. And if you go with Shift R, we can repeat last action. So I will now let's see
can we select this? Okay. And this is problem because
we use phase selection. Let's try do this in x ray
mode and with vertex select. Let's now just diselect. If I go with NAPA three, I can go to side view and I
know that screws are here, so we can just get
cold and control. Diselect this part. Now we have selected only these screws. And I can go with Shift
DX move this here. I Okay, one thing I want to do I want to make cut
here on 45 degrees. I expect to get intersection
on same point here because I go with RZ 45 when I
rotate this and this one. But I think I move origin, and I get this problem. So this is not how I expect, but let's make maybe cut here. We are now almost done. I just want cut this part here, and I think I can
go with Knife tool. So I will go to Edit mode
and I will go to X ray mode. And if I now go with K, Okay, let's see what we have
already this cut here. If I go with delete vertices, this work, we have
this small gap here. That's because this is not
perfectly on 45 degrees, but I manually select this part, and let's see if I move this up, I can fix this problem. Okay, this is good and let's
move this little down. And now I think I forget record, but I go with RA modifier and you can
see that this fit nicely. I think I have a big
empty space here. So what we can do, we can
maybe or what I can do, I can just grab one face here. Let's see if I select okay, what we can do, I will
grab this part here, and I will go with Shift the X, and I will rotate this Y -45. Okay, this should work now. And let's see if I move this. No. This should be in center. And now we have same problem. As before, I just want
to make cut here. So I will go with
tab to edit mode and I will press K. I will
follow this line here, K, X to stick on X
axis C to cut through. So you can see this cut through
option here with shortcut is C n and now I can go. With X ray mode, I can. I didn't cut this
small edge here. So I will go again, Control Z. So. So first K, let's see K and stick
to this first axis. So K, stick to this
first stage here. X, move this on X axis. C, to cut through,
click and Enter. Now, I hope we can select
all these, delete vertices. And let's do same here. X for X axis, C to cut through, Enter. Let's now delete this. And now we have a
nice structure. We can array with
this array modifier. We can now delete this. Let's now try combine with this mesh here. This
will be quickly. I will just go with
mesh Plain x 90 and let's now just cover
all this part here. So as Z, what I will do now, I will go with Control A, apply scale, and let's now add a bunch of these slope cuts. And now I will go with face
poke fas and fas again, face twist to quads to
get this type of shape. And now, what we can do, we can go with I think in
shortcut in edit mode, this control F, we have
this frame option, and now you can play with this. But if you want more control, you can go with iframmdifi. Here. And now with
cold and shift, we can play with this thickness. And we have this boundary. This will add edge here, and you can play
with these options, but I think this should
be okay, maybe too thick. I will go even more down. And now we can apply this, and I will use a material
for this And now, if I go, we again need
concrete UV map here. Concrete, and I will
just go with you to edit more projection for this
dirt imperfections. And now we need back
to this main UV map, maybe again, smart UV
project or projection. And we can maybe
try project this to this rough metal texture. I will stress this, this
will not be visible. Let's see how this look. We can save this
a separate part, but we can also combine this
with this structure here. I think I want also this part
on left shift the X maybe here and shift the
X Y 90 degrees. I think this curve sense
if we put this on top, maybe we can just go with
S Z to scale this a lot. Scale this on X xs. Shiv the Z. And we can also duplicate one here just to
get more details. Let's see how this look. Go with X ray mode and select
all this part inside. We can maybe use this only as fence, something like fence. So I will press L. I want to select this part
here and maybe move this here. This can be something
like fence. If I go with Control J, I can keep this as fence and
I can use this as platform. Or maybe we can just delete this part here and keep
only this in middle. If I now join this Control J, and if you now go with RA
modifier, let's move this here. We can get nice gribble. So I will keep this
will be D I join this, I will keep this four gribble and this piece
can be Gribble pile. Okay. So we now have two nice pieces, and let's now just
press M and send this to Gribble Collect Napk let's see what we can do next.
7. Practice 4: Let's now made this part, and this can be interesting
because we will play more with shaders than
we need to model here. So I will again cut
this with Control R. And we can now select these
spaces and go with Shift D X and be
separate by selection. I will go with set
origin to geometry. And let's move this here. Let's switch to material
privy. Let's bring this down. For now, I will
press delete or X, and I will go with delete. These low edges. And now
I will cut this part, which we don't need. Now, I will delete.
We this is here. Okay. And now I will just little line up
this in UV editor. We have this X ray mode. That's the reason why
this is hard to select, and I will also add loop
cut here and another here. So we can now select
these phases here and let's just reproject
this a little better. We have small offset here. So vertex select, move this to about here and this one is okay. Oh now I will extrude
this on Axis. E Y move this out. Okay, this should be
books like this one, and now I will
select these phases. And let's go with Q projection, and now we can select
all these pass and just project on
this metal part. Okay, to avoid this seam, we can just move this here
or we can go with Z 90. Now, I will isolate this
part so we can also extrude this control R again. Just grab this E Y, extrude this on Y axis, and I want scale this a little because I want to
avoid these shadows here. Just as slightly maybe a sex to avoid these shadows here because Brander
will create shadows. We don't want
shadows in texture. So just move these down. You can hold the Y. So GY move this down. And let's go with SX, move this about here. Or we can just move here
and also this part. And let's bring this edge up. So GI, move this slightly up. Okay. So now we need again, reproject that part
here, projection. Scale this down and
project somewhere here, Heir Z 90. Okay. And before I make Bbel here, I want also cut this part
here, so numb and one. And Lo got here. Okay. Now I will extra this out
E Y, but just slightly. Now we can grab
these edges here. Let's see what will get
okay. This will work. Okay, I will reproject this before I make better.
It will be easier. Q projection has to scale
and place this here. And now we can select this. So with holding shift. Okay, I didn't do this good. So with holding shift, we can just add selection. And now I will go
with number one and Control B to bevel this. Okay. And now, what we can do, we can just press I and
maybe set this inside. E Y, move this slightly inside. And next I want to make
this let's see here. I want make this part glass. So later I will add glass
shader, but inside, I also want model this or
make this three dimensional. So I will go with shave the X, and I will press P
separate by selection. So this will be glass part. We can keep this for later, set origin to geometry, and now we can model
this part here. I think I will go with
new objects here, so shift click Shift click here, and cylinder maybe just eight. I will go with 12 here, so as to scale RX -90. Place this button here, and I also want cube here, so I will go with cube, scale this cube down. S Y, scale this on Y axis. Okay. And let's bring this. So, Y, move this inside. I will now go with
Control J to join this and let's now just
make small better. I will select both of
these and just Control B, but we need apply scale. Control A, apply scale. Control B, at one level here. I will now go Shift D X, and we can go with Shift R
to repeat this last step. Now align this and I
will do same down. Shift D shield the X one here. Let's see how we can
make this part here. For this, I will go with
tab to edit mode and Okay, no, don't work. Control R don't work because
we have bevels here. And what we can do, we can go with K. K, and X for XX is sty
here, enters now. And if I now do same here, control R X. Here, enter. I think we can now add the loop cuts in this
part because this is not anymore ngon we have
four faces this is here. Now we can go Control R. But Control R but
scroll mouse down. W loop cut here. Control R here. Okay. And again, we can
reproject this little better. I want to avoid this
black part here. So I will just grab
this sedge GY, move this little up and
scale this little inside. To avoid this white part, let's grab this edge. GY, move this down. GY, and we can add
some bevel here. We can try model this part here. Let's see what I will
use for this sheet I click I will just
go with cylinder. Ex 90, scale this down. Move this inside, and let's see. Maybe cube. So shift a
cube. Scale this down. RX, and let's but
before I do RX, I will just X to scale this on XX I don't want mess with
this normal orientation. And now I will just go
with GY, move this out. ARY now. Okay. And what we can do, maybe we can scale this, move this inside and Control B here. Bel this Control B also. Okay, this is not perfect,
but it will work. And you can know that this
is part of this object, but this is separate part. That's because I do
this in edit mode, and in this case, I do
this in object mode. So we can go with Shiv
the X, Shiv the X here, maybe rotate this on Y axis, shave the X, Y here. Okay, I think this
is enough details for something which
will not be so visible. We can grab this edge here. One thing you can do, you
can go with number seven, and in X ray mode, you can grab this very easy. Okay. No, because we have
this part which go out, so I will do this manually. So this part, control,
control, control here, and let's now move
this even more out to make more space
for these buttons. Okay. Now, let's select these parts. And U project from you. G, place this in position. Scale this down. And let's
now manually place this. Okay. And with
these pieces here, I will select all this. Control J to join
this now Control J, again, to join
with this subject. Now, all this is one
piece, and let's now. Again, L or what if I select all this and then
just select these parts. Okay, this one, project from A to select all and let's now project
this in places. Okay, let's now do
this one by one. So this one go here. Okay, now we have buttons here. So let's see how this
look in solid preview. One thing I want to do
always is these bevels, shift so old to select whole loop and shift
to select also this part. Okay, this don't work, so I will continue with control. And this last part
and Control B to be Now we can also
add bevels here. Control B to bevel this part. Okay. We have one problem. If we go over this part here, we get intersection.
We get this ugly part. So there is two solution. You can just move this down and make more space if
you want bigger bevel here. Let's see. Maybe, okay, we don't stretch this UV, but this is even I think if we enable this
correct phase attribute, we will not stretch this UV, but in this case, it
is not important. Now I will select all this. And we can go with
Control B to B. Now we can go to this edge
without these intersections. Okay.
8. Practice 5: Next thing we can model
is this stairs here, and we can model this because I think this will be
very quick and easy. And we will use this
photo just for reference. We cannot use this for texture. I think I even don't
need reference for this. So I will go with Shift
click to place origin here, mesh plane, and
let's just estimate. So this is maybe
less than 1 meter, and this is maybe five meter. So we can press N
maybe 0.7 and five. Lampe slash key to isolate
only this subject. And let's see how
we can model this. I will close this timeline. Control A apply scale. And now I will go with
tab to go to Edit mode, Control R, scroll mouse up, and this will be our stairs. So I will now press A and
right click edge split. So if you go with
select one phase, for example, and press Y, you basically split
this from this part. But if you want to separate, you can go with right click and I'm not sure why
I now lose this. Let's go again,
Control R. Edge split. Now we basically separate
all of these pieces. And what I will do now, I will go with x 45 to
rotate this on 45 degrees. And now I will do this again, but from instead
of bounding box, I will use individual origin. And now if I go
with x 45, x -45. We basically get these stage. And let's now try to
add more details, I will try go with
phase book phase. Okay. This will add
much more details, so I will go now with E Z. And what we can do now with
this bottom face is selected, I can go with I to
insert this or I twice. So I and E Z. Move this on Z axis, and now I will press
A to select all. Let's now go with
Control B to lvtics. Okay, now we have steps and
we now need great fence. For this, I will go with
side view with number three, maybe mesh plane. RX 90 Z 90. No, Y n. And now I will
scale this down and X 45. Okay. Now I will go to normal orientation and
we can now press Y. And maybe SX bring
this to about here. And now I will go with maybe control apply
scale tab to edit mode, maybe look cut here and
let's see how this look. We don't have too much here, only two or three. Okay. And we can now go
with Control F, but first I will maybe to
make this more interesting, I will add Bevel here. So we can one vertex
with Control Shift B. And now you can add
this type of fans. Now if I go select O with A, R, we can basically
create fans with this. Or you can, of
course, use modifier, but I will now for
this use Control F, and now I will go Control B to smooth this a
little scroll mouse down. Okay, and we have
fans. Let's see. I want to make this part bigger here because
this don't look stable. Okay, let's make this
to global and with new I don't want to start with new face and then
rotate this on 45. I can maybe just grab
this and with control. Click here. And now let's again back to
normal orientation. Now I will go with ship D Z and E Z. E Z to extrude
this on the axis, just hold Z to
stick on the axis. Let's now press L. Okay, this normal orientation
look weird. Let's try it local a Z, scale this on the axis. And what we can do here, we can again go
with maybe phase. Poke phase. And if I
now press I again. Okay, this is not good. Okay, I want maybe poke, only these phases here. So book phase. And if I now press I, let's see what we get. So I twice or I once depend what you do last time and the allt extrude
along normals. Okay, we get now this type of structure which look
better than before. Again, we can I will
decide maybe without face. So I all T extrude
along normals. Now I will select only this part and tell and
Control B to bevel this. But we want only one
small bevel Okay. This look good now. And again, now we can basically select hold
this part and shift Z, move to another side, we have the stairs. But let's make a structure
similar like this one. So what I will do, I will select one of these
phases here, shift the Y. Let's go with E Y. Maybe extrude this here. Ex extrude this
or we can go with SX I will select this phase and SXcale on XX is move
this maybe here. And what I will do here, I will select only this face. And I will go with
Shiv D Z, and now E Z. Let's now add fans here. So a few cuts maybe
on this side. And now, I will go with
Control Z. I forget something. I will delete this top
face and this bottom face. Delete faces and now we can go with Control R. Okay. And now, L, Control F R frame. And let's see, thickness
of this is okay. And now I will go
with Control B. Okay. I should delete this before. Now, this will be maybe
problematic to delete, but I will add one
support look cut here. I should delete only
this phase before. And let's see what I can do now. If I select this and
delete vertices, this should delete
whole this part. Okay. And this look good. Let's now make this
structure more. Stable. So I will
select this phase. I will press I
will again go with subdivide and phase book phase. And let's see if we go
now three to quads. I think this is better, and now I will go with I or I twice and E Z
move this on Z axis. Again, select all Control B, one bevel Control B, one bevel, and let's see how look
This look good for now, but we want these legs because these don't
have sense to be in A. And for this, I will
just start with cube, so we can go with cube. Maybe scale is on
XX, scale is down. Lump at seven, and let's
place these two position Numpad one and SZ. Okay. And if you want to scale
this only on X and Y axis, but not on Z, you can
go for scale, Shift Z. Basically, we exclude Z axis and we left only X and Y axis. You can see that
this stay on Z axis, but we can scale this on
X and Y axis. Shift Z. But if you are beginner, you
can always go with x then Y. And let's make another
structure here. L to selector,
phase, book phase, I, or T, extrude along normals. Extrude this inside. L, Control B. We have intersections here, but I will not care too much. Let's see how this look. Now, shift the X. And now sit the Y. Okay, and maybe I want
connect with this one. And I will go with plain XY. Let's back this to global. So Y. A Z control A applies scale. Now I will go with
phase book phase. This should be enough and Control F a frame
again, let's make this. Let's play with this
thickness, Control B. Maybe SY, scale this
down. Maybe shift the X. Shift the X again and Z 90 to
bring this maybe here as X. Okay, we now stretch this a lot, but I will not care
too much about this. We can just take this
inside this part. As X, shift the Y. Let's bring this up. I think I want to delete this part here. I think if we add
one loop cut in middle and if we now
delete these vertices, we will delete this part up,
control delete vertices. Okay. This now
looks more stable. And maybe we can just
add small detail here. I E Z. Okay, we don't
have enough space, but with Control Lampet plus, we can Control lumped plus, we can expand
selection and now this select this part
may be easy here. Okay. Control B. Now we can join all
this with Control J. Now this is one piece, and let's now add this material. Let's just project this. So you you projection. And what you can also do, you can maybe just let's first see how this
will look on this material. Okay, I think this also good maybe I don't like this part. I think we can sample
only one pixel. So if I go with S zero here, I basically scale this all
to one pixel and now we can maybe just select
this reddish color from this structure here. So if I bring this here, I basically select
this reddish color. This don't look good. But let's see if this
concrete texture can help us. So this is first UIM, we need concrete concrete UM and now if I select this concrete
UM and U Q projection, this should add
this concrete dirt. And let's now select the object. I will call this more dirt. So I will separate this
texture, basically. More dirt. Let's now increase this Okay, let's now select
this first TV map. We can maybe change
different color here. So let's see how this
look with bluish thin. I think I will unwrap this again so we can back to
this bluish part here. So you smart UV project. I will project this here. And one thing we can
also try to do here, I will also mix this
with white color. So this is maybe too intense. Mix color, and let's see. This should be white or what if we mix this
with reddish color? Okay, these don't look bad. So we basically mix, maybe just another
tone of reddish color. Okay, I will keep like this, but you can play
with UV and colors. And I think we can try also. We can try make this metallic. So let's see how this
look as metallic object. And I choose mostly
this bluish color. But you can play with
this and you can choose any color you
like or any texture. So now this metallic
is all to one. Okay, this metallic is reason why this is,
like, too dark. So I think I will not
use this metallic, and now I can continue
playing with this color. So I will remove this
brightness contrast and I will basically I think I want to
make this more dark. Okay, so this is
we are now done, and we have one nice
piece we can use, and I will call this seven grip to put this in new collection. And let's now see what
we do for now because I'm not sure if I will
record anything from here, but for sure, I will
continue modeling. And when I finish modeling, I will share this
asset pack with you, and I think I will also try collect other gribbles
I made in past, and I will try make one
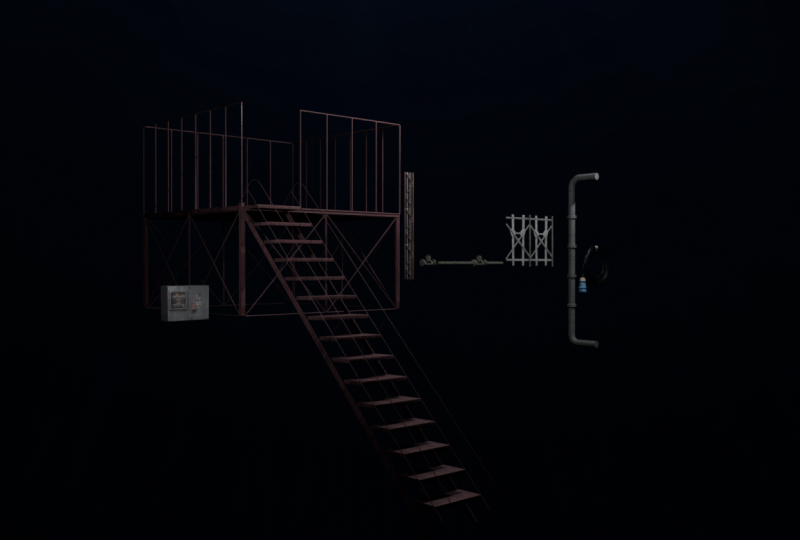
big gribble collection. So if I now enable this and with Napa Slash key back to our scene,
let's move this here. Let's bring this
down. Maybe this one here and this one here. So this should be much bigger. Apply scale. Let's
place this here. This pipe and this part
should be also bigger. So this is now individual let's scale this
from bounding box. Okay. This is what we
model in this tutorial, so this is what we have for now. I will now switch to render
preview to see how this look. So we have this
piece, the stairs, this pipe, and these
three pieces here.
9. Practice 6: Let's now make pipes, and I will show you two
ways how to make pipes. First, we can use
this spin tool, but this is only in edit mode. So for this, we need
first create cylinder. I will go with mesh, cylinder and maybe
X. I will keep rotation like this and I will go with SZ to scale this on Z axis. Let's see dimension of this. So this is 16 centimeters, which I think is maybe too big. And let's now go with
Control A apply scale Napk. And now I will go with naped one to front
orthographic view. And if you now go to Edit mode, we get this spin tool. Let's now select this. So first, I think we can see here, first, we need select
edge. We want spin. So go to X ray mode
and set this edge. And now you can see that
this is wrong direction. Because we are in
front orthographic, maybe we want wide direction. If I now move this, I think we cannot see because this spin
rotating around origin. So if I go with shift click, if I place origin here. Okay, Control Z. Again, let's select this. Let's now, we now
see what happens. So here is origin,
very important. And I want origin
about this line. To get this type of shape. But you can maybe place origin here to get more intense corner. So if I go about
here, you get this. I want place about here. Or if, for example, place here, we get this problem. So I basically want place
origin about this line. Okay. And now I want to make this about 90 degrees and
we can go with EX. And now I can go with you can see that
this is not line up, so I can go with X zero to
line up this perfectly, and we can now maybe select this part GX
to move this out. And let's now again
practice this. So Xray modes like this part
down origin about here, YAxis is what we want. And we can rotate
this to about here. X. Okay. And now we can
make things we do before. So you can, for example, go with Control R. Control B, or T extrude along normals. And we can bevel
these edges with old. For example, we can go with
Control B to bevel this. And then you can just
texture this so we can select this texture, Q projection or Smart UV project
and you can unwrap this. Okay, maybe I will
go with projection. Let's see how this look.
But I will do here. That's because I
made this texture which go from start
to end of this image. We can, for example, let's now go with ERs in IT. Now we can place this
on this part here. And we can select this part. Okay, I think I will first
select this part here. W L and maybe G, scale this here. L Z 90. Place this here. Z 90. We will get this
small stretch part, but this is not so important.
Let's place this here. And we can maybe
select all this, but okay, this works. So we can go with
G, place this here. And now I will select
only this part. The Z It, project this here, and this should now look
This now look good, so we just need to fix
this small part here. The new Veditor so
this is this part. Okay. So you can
with this pin tool, we have in edit mode, and with Bel with Control B create a lot of similar things. Now I will show you another tool you can use to create pipes. First, we need to
enable one add on, which is called Extras. So just type here, extra mesh objects,
click here, install, then go to add ons extra and just enable this
add on by clicking here. And then when you go
with Shift A mesh, you get all these things
you don't have by default. And let's see what
we also have here. So we can also use this gears. For creating gribbles.
Let's see what is this. So this is procedural gear, and you can play with these
values to get to create gear. Okay, you can use this
for your next gribble, but I will now go with so gear. Let's see what is w. So
you can also use this But if you go with Shift
A and under pipe join, you have different
pipe joints here. So this is one. Let's bring all this here. Second one. Third one. Another one. So
this is cross type, and let's see, last one. Last one, I think I
will not use this. So what you can do, you
can just go to Edit mode, I will select this
selection tool. With text ramode, you can
just tex through this mesh. You can use this
move tool or you can go with G, Z, for example. So this is sex, axis, and then you can again
go with maybe Control B. Because we have this angle here, we also get this here, and we can fix this
if we go with ZZ. Now you can go with
Control B again, through along normals
and texture this and you can get pipe. Okay. And when you have
angle like this, you need set this to
local orientation. Okay? Two. I try figure out how to move
these along normals. And if I send this to local, you can see, Oh, normal, we don't
have angle we want. And I remember one thing. I watched one Tutorial
a long time ago, and I try and this work. So if I select only one
phase, this is what I want. So I want extrude this
along the Z axis. But when I start selecting more, so I need select whole loop. You can see what we get. So
if I select more than one, we get different angle. And what we can do, we can select this part here. And now we can go under
this phase orientation, this orientation, and
if you now click Plus, we can save this orientation. For example, we can call this
my transform orientation. Now, if I select all this
with phase orientation, we can just move this out. Okay, let's now see
this work also here. Okay, now this I don't work. So basically, I say orientation which is on 45 degrees here. So we can now back to
global and move this down. Okay, so that's all how
you can create pipes. And you can also
watch reference image on Internet and maybe
add some more details, and I will not record how
I create pipes because this process will
be just repeating all what I show you now.
10. Practice 7 - part 1: Hello, and welcome to part seven of modeling
decoration assets. It has been about a month
from my last video. In meantime, I
modeled 127 assets, and I already made this peck and published this pack so you can
see how this look. In meantime, I also record
this YouTube video. So if you want, you
can watch this video. And this is Okay, I will show you here
how these assets look. So we have 127 of
decoration assets. Okay, I have double of this. I think that's because
I duplicate this. I make backup of this
file and because they are inside both file marks
SSI have double of this, but you can ignore this and you can see how
the speck look. Actually, I want to
show you techniques we didn't use in past six tutorial. So this will be first example, and the second one will
be this type of pipes. I think we will maybe recreate these pipes here because
I made this with another technique I basically
drop with one vertices and later bel this and convert this to curve and later to mesh. And after that, I think we will model this part and
maybe for finish, we will model this
big structure. This one here
because I think this is most complex object, and we can in this part cover
everything we learned in this tutorial or
tutorial series. And after we model this
small container or house, I think we can also
recreate this artwork here because we use
this object here. You can see this object here. So maybe again, I will show
you how I create this artwork because here we use all
these assets I create. So all these assets
you can see here are basically scatter here. So this is my plan, but I also have one thing I need to record. So you can see if you
go to Shader Editor, and if I grab some
of this object, you can see this
dust shader and I also think I need to show you how I created
this dust shader. Okay, you can see
what this does, and I will show you
better example of this you can see how this look without dust
and when we add dust. Okay, so now you know my plan, and let's start with
modeling cables. I will continue in
this vendor file. And if you didn't watch first parts of this file
where we create materials, my recommendation is to back
there because I will not recreate material from scratch, but we don't have too much here. If I go to shade the Editor, you can see how this
let's open object, you can see how
this material look, basically, we have concrete
which go to roughness, we have base color, which I multiply with
this concrete texture and dust shader, we will talk about this later. And basically, we
have just small bump here, and that's all. And this is with this dust
shader and this is up. Let's now actually start building this and this
will be pretty easy. Okay, I will enable
screen cast keys. So here and now you should
see what I'm typing. So shift the image mesh plane, and let's load this here, x night to rotate this. Now we can maybe grab this for reference
and go to Local view. Here, I have some cables, but I think this
black one is Okay, here, I have this cable
with this part here. But let's start with this one. So to make this, I just need go with shift here, shift A, and I will go
with curve busier curve. Now, I will go with tab to edit mode. So this is important. We are now in object mode, tab to edit mode. And now we have
here, draft tool. But first, I will
delete this part here. I don't need this or
this busier curve. So delete vertices, and we are still in edit mode of curve. So we can just draft this. We can just four of this lime, but you don't need
to be perfect here. Okay, I think this is enough and I will finish here on left. And now, only thing we
need to do here is okay, before I convert
this to adapt here, I will try maybe make
some variation on Yaxs. So we can see this
is flat on Yaxs. I can go with deep
and maybe I can just down more variation, maybe with proportional editing. So just play let's see
how this brush is big. Let's just make
some offset here. So with G, you can move this. Okay. And now I can go down to curve settings and under bevel
depth with holding shift, we can move this slightly. Okay, I can move this
out to see better. And now maybe we can increase
resolution if you want. Let's increase this to
maybe 2.5 centimeters. Okay? Now, I think
in this point, I can convert this to mesh. Okay, now this is mesh. And let's now make
this part here. So for this, we will use
shrink for modifier. And I will place origin
here and I will go with mesh cylinder scale this down and go to edit mode three
to go to phase selection. Delete, delete faces here. Now, I will add more vertices
on Z axis here or Y axis. Because for shrink
wrap modifier, we need more mesh, and now L Y 90 will take this in this
direction, scale this down. Now, Control A apply scale and let's now go here
under modifiers, search for shrink Wrap. And now I will select this object and you can see what we get
exactly what we need. And my recommendation here is
to add some little offset. So with this offset, we go inside or
down out or inside. And let's type here maybe 0.001 to move this maybe 1
millimeter out or even less. Okay. And you can now, if you have some
weird parts here, you can always maybe scale, move this a little because this depend on
geometry we have here. But this look okay. Let's see. Maybe
scare this a little. Okay, I avoid this part here, maybe move this Okay,
something like this. And now I will just apply this. So just apply this modifier. If you want, you can
maybe extrude this part. Let's try. Do this. I didn't
do in this last time. So maybe easy. Okay, we have proportional
editing here. Let's maybe move this down. Now, I will maybe join
these two objects.
11. Practice 7 - part 2: I also want to model
this part here. I will try line
up this a little. It will be easier
for me to work. If I line up this with Zoxis
or maybe RY like this. Now I will press sz0s0 to line up the axis so it will be a little easier
for me to model this. So now I will in X ray
modes like this edge here. Now I will go with maybe E Z to bring this down
and scale this a lot. Now, we can just follow
this shape here. You don't need to be perfect, but now you can go again
with EZ maybe about here and Z scale this and we can go now
EZ and move this all down. Now we can smooth this part. If we go with S to
scale and Control B, we can add one segment here, one more loop cut
here to smooth this. Let's say this is
this white part. So now we have maybe
small bevel here, so we can go with EZ again. Let's go again with
Control R to a loop cut, S to scale, control
B, smooth this. Let's add more loop cut here. And let's now continue
with this blue part. So easy, maybe about here. Easy, maybe scale a little. I think we have this step here, and let's go with
easy, move this down. Again, if you want, you
can smooth this troll B. And now I want to make this part here.
Let's bring this up. EZ, move a little
down and now scale this EZ, move this down. And now I will go with
EZ, scale this inside. And let's now make
this part down. Easy to about here
and easy again, scale, and this will be lost. Okay. I think this
part is too big, so we can now always
just move this up. Just try and make similar
proportions here. And now we can select whole
rop and shift add selection, and again, or shift shift old together and Control B
to smooth this a little. And we can t here, Control B, smooth this a little. And I think this is okay. We can always grab all this
and maybe SZ to scale Z axis. Let's now try and
make this part here. This will not be so visible, but let's see how
we can do this. I think maybe I will add
one support loop cut here. Maybe we can end one down. Now we can maybe
grab hold this area. Select this one and
withholding control. We can select everything
between and now to switch to another part
again shift and control. And I will press
maybe I and S Y, scale this on Y axis, maybe E x to move
this out. Maybe SZ. Okay, this is not perfect, but this will not be so visible. Let's now maybe Y to
scale this on Y axis. And if you want,
you can maybe grab these two edges, move this out. And you can also maybe smooth this whole part with Control B. Now I will go maybe
with Control plus and maybe rotate Y to rotate
this little down. Okay, if you want to make
this small hole here, we can and if you want to
make this small hole here, we can do this I want maybe
make more space here. Okay, this is not so important, so we can just maybe subdivide this one more time and
convert this to circle. And now we can scale this circle down and we can bridge this. Okay. This work, but I little
stretch this part here. So before, that's
the only problem, we can maybe so all this will be so tiny
so nobody will see this, but we will get one more detail. Let's now just try
try line up this. We can go with numb adv
to front orthographic, so we can try line up
this a little better. I think we spend too much
time on this detail, which is not so important. And let's now build
material for this. And because we already have
this material number six, we can just maybe
bring this here. Okay. And this is how this
material actually look. And let's now open UV Editor. UV editor, and I will load here. Actually, let's fix
this concrete first. So as you know,
from parts before, we don't have we need another
UV map for this concrete. So I will here plus
type here concrete. And you can note that
this is now not red, so we have this concrete UV map. And because we have
selected this UV map, we can just let's go with maybe numbered one
and U project from you. If you want, you can load
this concrete texture here, but this is not so important. We can just scale this. And now we are in material. We can preview how this look. This is how this look. Let's
select this with color. Okay, maybe we can
scale this even more to get more
these tiny details. So let's now back to Maine. You'll be map here. And let's
now preview how this look. So for this we need texture six here and let's now again
go with project from you. Now I will press L here. This is not lose part
because we continue modeling from this cable here. So we select this part down here and we need to
go with Control Amp plus to select this part here. Okay. And now we can
reproject first this part. Here, we have this blue part. Now, we just need to
stretch this rotate a little until this
match a little bit. Okay, this is low
resolution image. If you are not happy with this, you can maybe project
another part. For example, here. I will also look good, but I will not do this.
Let's go again with you. Project from you. Let's
try project this here. Or we can later play
also with this shader, mix with another color
or do some variation. Let's try reproject
this little better. Okay, we have this part
here, which is bad. I made this very small. So for this gable is very small. In this case, we can maybe only make this smaller and
then everything bigger. So let's again, select this with control mp plus,
let's scale this down. And now I think we can
make everything bigger. Okay. Let's now reproject
this part here. So with L, we can
select this and let's now reproject this to
maybe this part here. Okay, you can see that we have something which looks like
this sticker or something. So I will maybe just
reproject this more part. All this will be like background decoration
or something which will not be
so close to camera. You can see all this tiny
decoration here, this light, this part here, this
structure in background, here in foreground
also, these pipes. And all this is intended not
to be so close to camera. You can see all
these decoration. All this is mostly low poly
with low resolution texture, but it works in background. And you can also use
this in foreground, with some deptan field. And especially here, you
can note all these details, but they are not close to camera and you cannot see
all these imperfections. Et's now continue
with texturing this. Let's now see what we
can do with this cable. I will press L to
select this lose part. This part is not
selected, which is good, and I will just diselect
this with Control. Now, project from you. With UV Map selected, we can let's see
which one I will use. Maybe this white or this black. Let's try this white. Now, what I will do, I will just roughly project this here. And you can see that this
already look like cable. I think this cable is white, and maybe correct way it will be just to
make everything white. For example, if I go
with mixed color, I'm not sure why, but I
plug this to metallic. We don't have metallic here,
so I will delete this. So if I now go with mixed color, and if I set this completely
white, for example, if I go white here and
set all these to one, you can see how this look
I look worse than before. So with this projection, we actually get some
imperfections we have here, and I like this result more than if you just
place white color here. So I will remove this. First, I will try remove
this bad area in editor. So if I go with old old
and with phase selection, we can basically select one of this part and
control lumped plus, we can select this part, which is bad and let's just
try follow this cable here. With tab, you can
quickly switch to object mode to see where we
have another bad part here. So let's select this part. I just want to avoid this
concrete down this ground down. So I will separate
this material. I will go with Control C, copy this click Plus and
load same material here, and I will click here to
make another variation, and I will call this cable. Now, I just want with L, select all this and with
Control, this select this part. I just want assign
this material here. So basically, we have two
separate materials if we go down to view display color, we can, for example,
make this blue, and if you go to solid
preview, you can see that. Now we have another
material here. And now I will make
adjustments to this material. For example, this dust is zero, so you cannot see this. I will make this maybe black. To make this black, we
can go with mix cool. And now I will o, which material I have selected? Yes, this cable. So this should be good and now we
can just make this black. But we can still keep some of these imperfections
here in background. You can see that
this is visible. For example, if you try another
blending mode, multiply. I think I will
just use mix here. You can make this black. You can make this white. And keep some imperfections
with this slider here. Let's make this example. I think this is pretty rough
cable, maybe more shiny, so we can add some black color here to
make this more shine. I see various problem. I bring this metallic to one
in some of last parts. And because we copy
this material, here is a problem, and this should not be
0.5, this should be zero. Okay. Now we can
adjust this even more. And now we can play
with this roughness. Okay, and you can also maybe use hue saturation value to
make this even more dark. I add more mesh here. You can see that
this is more smooth. Let's see what happen if you
add subdivision surface. Here, it will be a
little more smooth. So if you want, just give this one to add
more details here. And maybe we can
stretch this down a little with proportional
editing if I press G here. You can play also with this. But I think this is good. So I think we need
subdivision surface here. Let's apply this and if
you go to edit mode, you can see how this look. I now select this object here. So you can see difference in
material I use first time. Let's see how so we have
this concrete texture. We multiply with
this base color. So if I know select this,
we can see how this look. So let's make this material
so we can basically add more this concrete
imperfections here. So this is not so visible
because both are black, but you can see some
of these details.
12. Practice 7 - part 3: Let's now make this
type of pipes here. And you can use same
technique, for example, to build this type here and also this type here and also the
mechanical parts here. I will show you now
how we can do this. So this is image number two. And I will now again,
select this object, and I can just select this
image texture to here. I will just cut this part of image here because we
have a lot of things we don't need control R. Let's go with BX, B separate by selection, right, click Set
origin to geometry. We can now delete this. Okay. I will just show you modeling techniques here because we talk a lot about texturing. So it is more about UV
projecting than texturing. We need for this one vertex. So we can just go with play Ex. Okay, now we need one vertex, so you know what
we will do here. We can select one of
these control I to invert selection and
delete vertices. Now we have only one here. Let's disable this
proportional editing. And what I do last time, I basically just watch
this reference image. For example, let's see. Let's build this
ticker pipe here. So we can just go
with number one, and let's now try four of
this reference image here. So I will go with EX. And this will be this part here. Now I can go with E. And now
I will rotate this a little, and I will go with EY
to make this part here. And let's also go here with EY. And now we can continue
with this part here. So EZ and EX. Let's move this about here. We can also maybe select
these two subdivide and let's make this part here, so Y, easy. Let's also make this
part with this piece because they share same
thickness, similar thickness. I will select this
part. Let's go with Y. Shield D Y. Now I will
maybe move this here, EX. Let's now maybe
go to about here. Es. Let's now go with EY. Okay, EY and easy here. Okay, I think this is enough. I will just move
this down, so easy. Let's move this down. Now they share same
similar thickness, so I will give this am object. Let's set origin to geometry. And now I will open here. I will first convert this to no, first, I will add Bevel here. So to do this, we
can go to Edit mode, select A, press A to select A. And because this is vertex, so we can bevel vertex
with Control S B. And now we can move this up, and with scrolling mouse, we can add segments how we want. Okay, something
like this. And now I will convert these two. So right can convert these two. Curve. And we get these curve
properties and now we can add resolution here. We can add thickness
here or depth. But now I will
convert this to mesh, and now we lose these
curve properties. So we cannot now change
these properties anymore. But what we can do, we can add more details here. And I talk about this windows
where we model pipes. So you can now just go with
for example, Control R here. You can see that this is
not lined up perfectly, so we can go with SX zero, SX zero, two up this perfectly, and we can now go with
G to move this here. Now, Y zero. No, Z zero. Okay. And now you can
make stuff we do before. So you can, for example,
select with phase selection, select this part,
Control NPD plus. Okay, this is middle
part control NP plus. We need to select
this with shift. Okay. Now we can go with old
T and things we do before. Just extrude this. We
can now select this with shift to select this
part we can have double this, add more details here. Control R maybe two
times here, Control B, scroll mouse down, or
extrude along normals. We can again, let's scale this a little better this throb. Okay, you understand point so you can play with this
to add more details, and later it's all about
reprojection in UV Editor. Okay, so this is
this thicker part. And if you want to make
thinner part, we can again, just maybe select one
of these vertices, Chi D X, and just press
P separate by selection. So we separate this part, but you need back origin here. So here is origin. So
set origin to geometry. Okay, now you can go
with again, E edit mode. EX EZ, you can maybe
move this to about here. You don't need to be
perfect on XY or Z axis. You can maybe move this a little to make
some interfection. Okay, now we can retail, select hold this part. And convert this to. Okay, first, we need bevel. So tab control add
some bevel here. Scroll mouse to add more segments and
convert this to curve. And now I will
make this thinner. Okay, something like
this. And now you can, again, convert this to measure
and add more details here. Control, no Control Rs. Control B or T exclude along normals and
you understand the point. And later is all
about texturing this. And now I will just show you in my asset
browser, how this look. So I also model this part here, and I will show you also
how you can do this. So this is, again, very simple. Cube. Let's go. Solid preview. No
material preview. So cube we can scare
this a Z a little. And let's see what
we can do here. I will move this
here, maybe a Y, ply scale and now I want
to make this part here. So for this, I think I
will bring this one down. Add one in middle and
let's bring this here. Control B now to
smooth this Okay, I think I want Let's clean. Let's keep this more clean. So I will select hold this. Look here, Control
B to smooth this. Let's even make this bigger. So Control B to bevel this. And now what I will do, I will select only
this top part. And if we now go
with for example, S, we scale everything because
everything is connected. But if we now press
Y on keyboard, we split this part. Now we can scale
on this part here. And I will go with all
T exte alongnormals, or we can just go easy to
extrude this on Z axis. Now, if I set press to select this part
with delete limited and dissolve we delete all these unnecessary edges
don't create anything. And now we can go with Control B to bevel, maybe just this part. And of course, I want to add some bevel here,
maybe Control B. Okay, this is basically
how I create this, and I will later separate this material and
make this metallic. We can now maybe
stick this here. Okay. This is everything
for this part of tutorial, and I think in next one, we will model, let's like
this all and we will model maybe this
light lamp here.
 šime Bugarija