Transcripts
1. Introduction: Hey everyone. So in this class we're gonna be primarily focused on blockings. Now the reason I
wanted to do this is really just to focus in on this one aspect of
beginning a head drawing. Now oftentimes it's something that a lot of the students I've seen will try and rush through
this part of the drawing, even though it kind of sets
the stage towards the finish. So I'm gonna show you a
bunch of different examples about how I like to
approach my block ends, what I'm thinking about
and some of the ideas and concepts that I use to kinda get me in
the right direction. Ultimately, there are lots
of ways you can approach this depending on the kind
of drawing you're doing, or maybe you have a specific desired finished
that you're after. But nonetheless, we
always kinda wanna begin a drawing with
a solid foundation. And so these are
going to be some of the more academic ways that I've learned over the years and how I like to
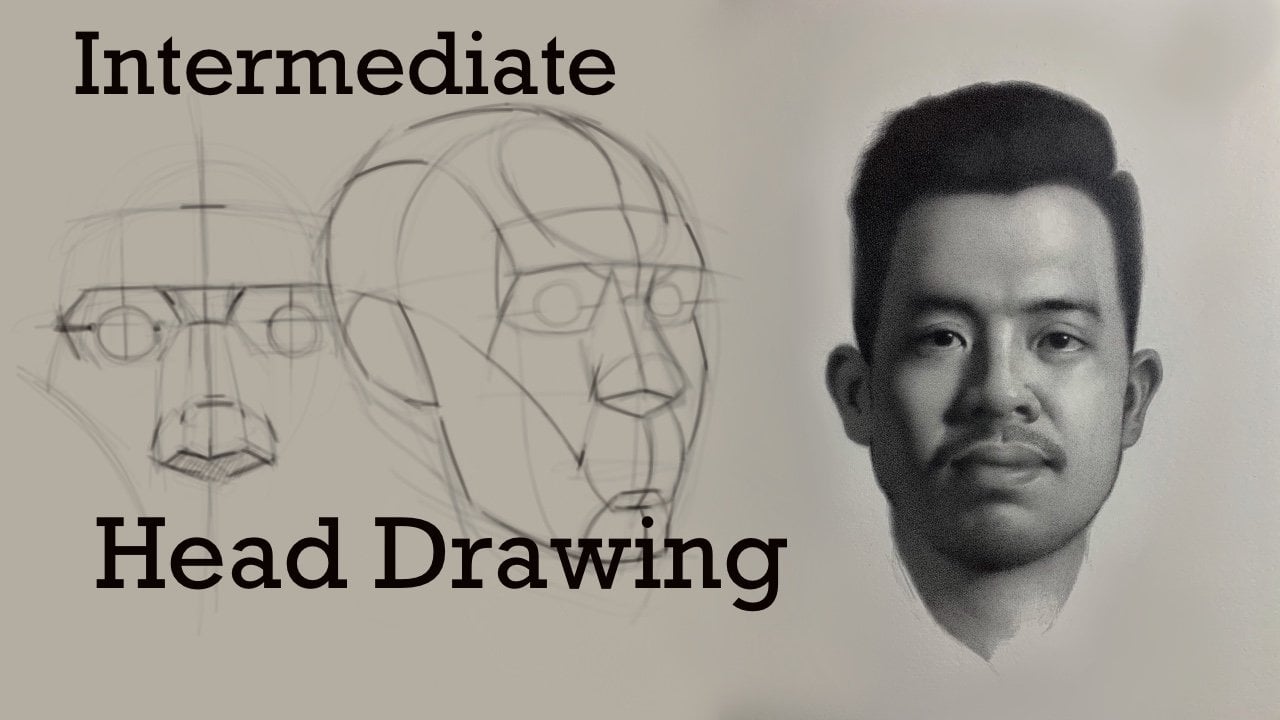
approach drawing. Initially, we'll begin
with a couple of diagram type head drawings so
that it can at least go over some of the concepts
in a simplified manner. Now ultimately, these
are just things that I use more or less on
every drawing that I do. And what I'll say in a lot of the videos is that oftentimes I find that I may not use all the rules that I know
to develop a drawing, but I'll use most of them, at least to get me
initially started. Every drawing we do
presents itself as a unique experience in a unique problem that
we have to solve. But we can use a lot of these tools in order
to help simplify some of that down
so that it makes the drawing process
a little bit easier. After the diagram demonstrations will actually go ahead and do two separate drawings of
an actual person so you can see how the principles
apply to a real face. Again, every drawing situation is different and there's
multiple things like a person's type and whether
it's male or female and there's other kinds
of variables that will be a part of the drawing. But nonetheless,
you'll see how I take a lot of the rules
we discussed and apply them to an actual model so that you can see
what that looks like. By the end of the drawing, our main goal is
really to just have a nice clean line
drawing that as well proportioned and is essentially
ready to move on to the next stage of whether that's shading or modeling
or what have you. But again, the emphasis is really going to
be on structure and just creating the
strongest beginning of a drawing that we can.
2. Block in approach: Getting started. I just wanted to talk about a general approach I
take with my blockings. Just so you can see it
in a very generic sense. Versus actually drawing
from the reference. I'm essentially this
is the approach I think about as I'm
beginning any drawing. And even though I'm making
this up out of my head, this is what I would
essentially use for a finished drawing. Whether it's from life or
from a piece of reference. With the starting shape. I'm essentially just trying to encapsulate everything
from the get-go. I'm not starting off with like a sphere or an oval
and then attaching a jaw or any sort of sort
of multipart construction. Nothing. Not that there's anything inherently
wrong with that, but I prefer to just start
with a larger shape. And then if I need to add
or take away from it, I find that it's much
easier to just begin with the totality of the
shape that I want to work from and
then go from there. Some people like to do more of a multi-part construction
depending on the angle, it can be adding
the skull itself, the actual general skull shape, and then attaching a
jar and then a neck. And it's just, I find that it's just it's almost too much. I like to just start with a
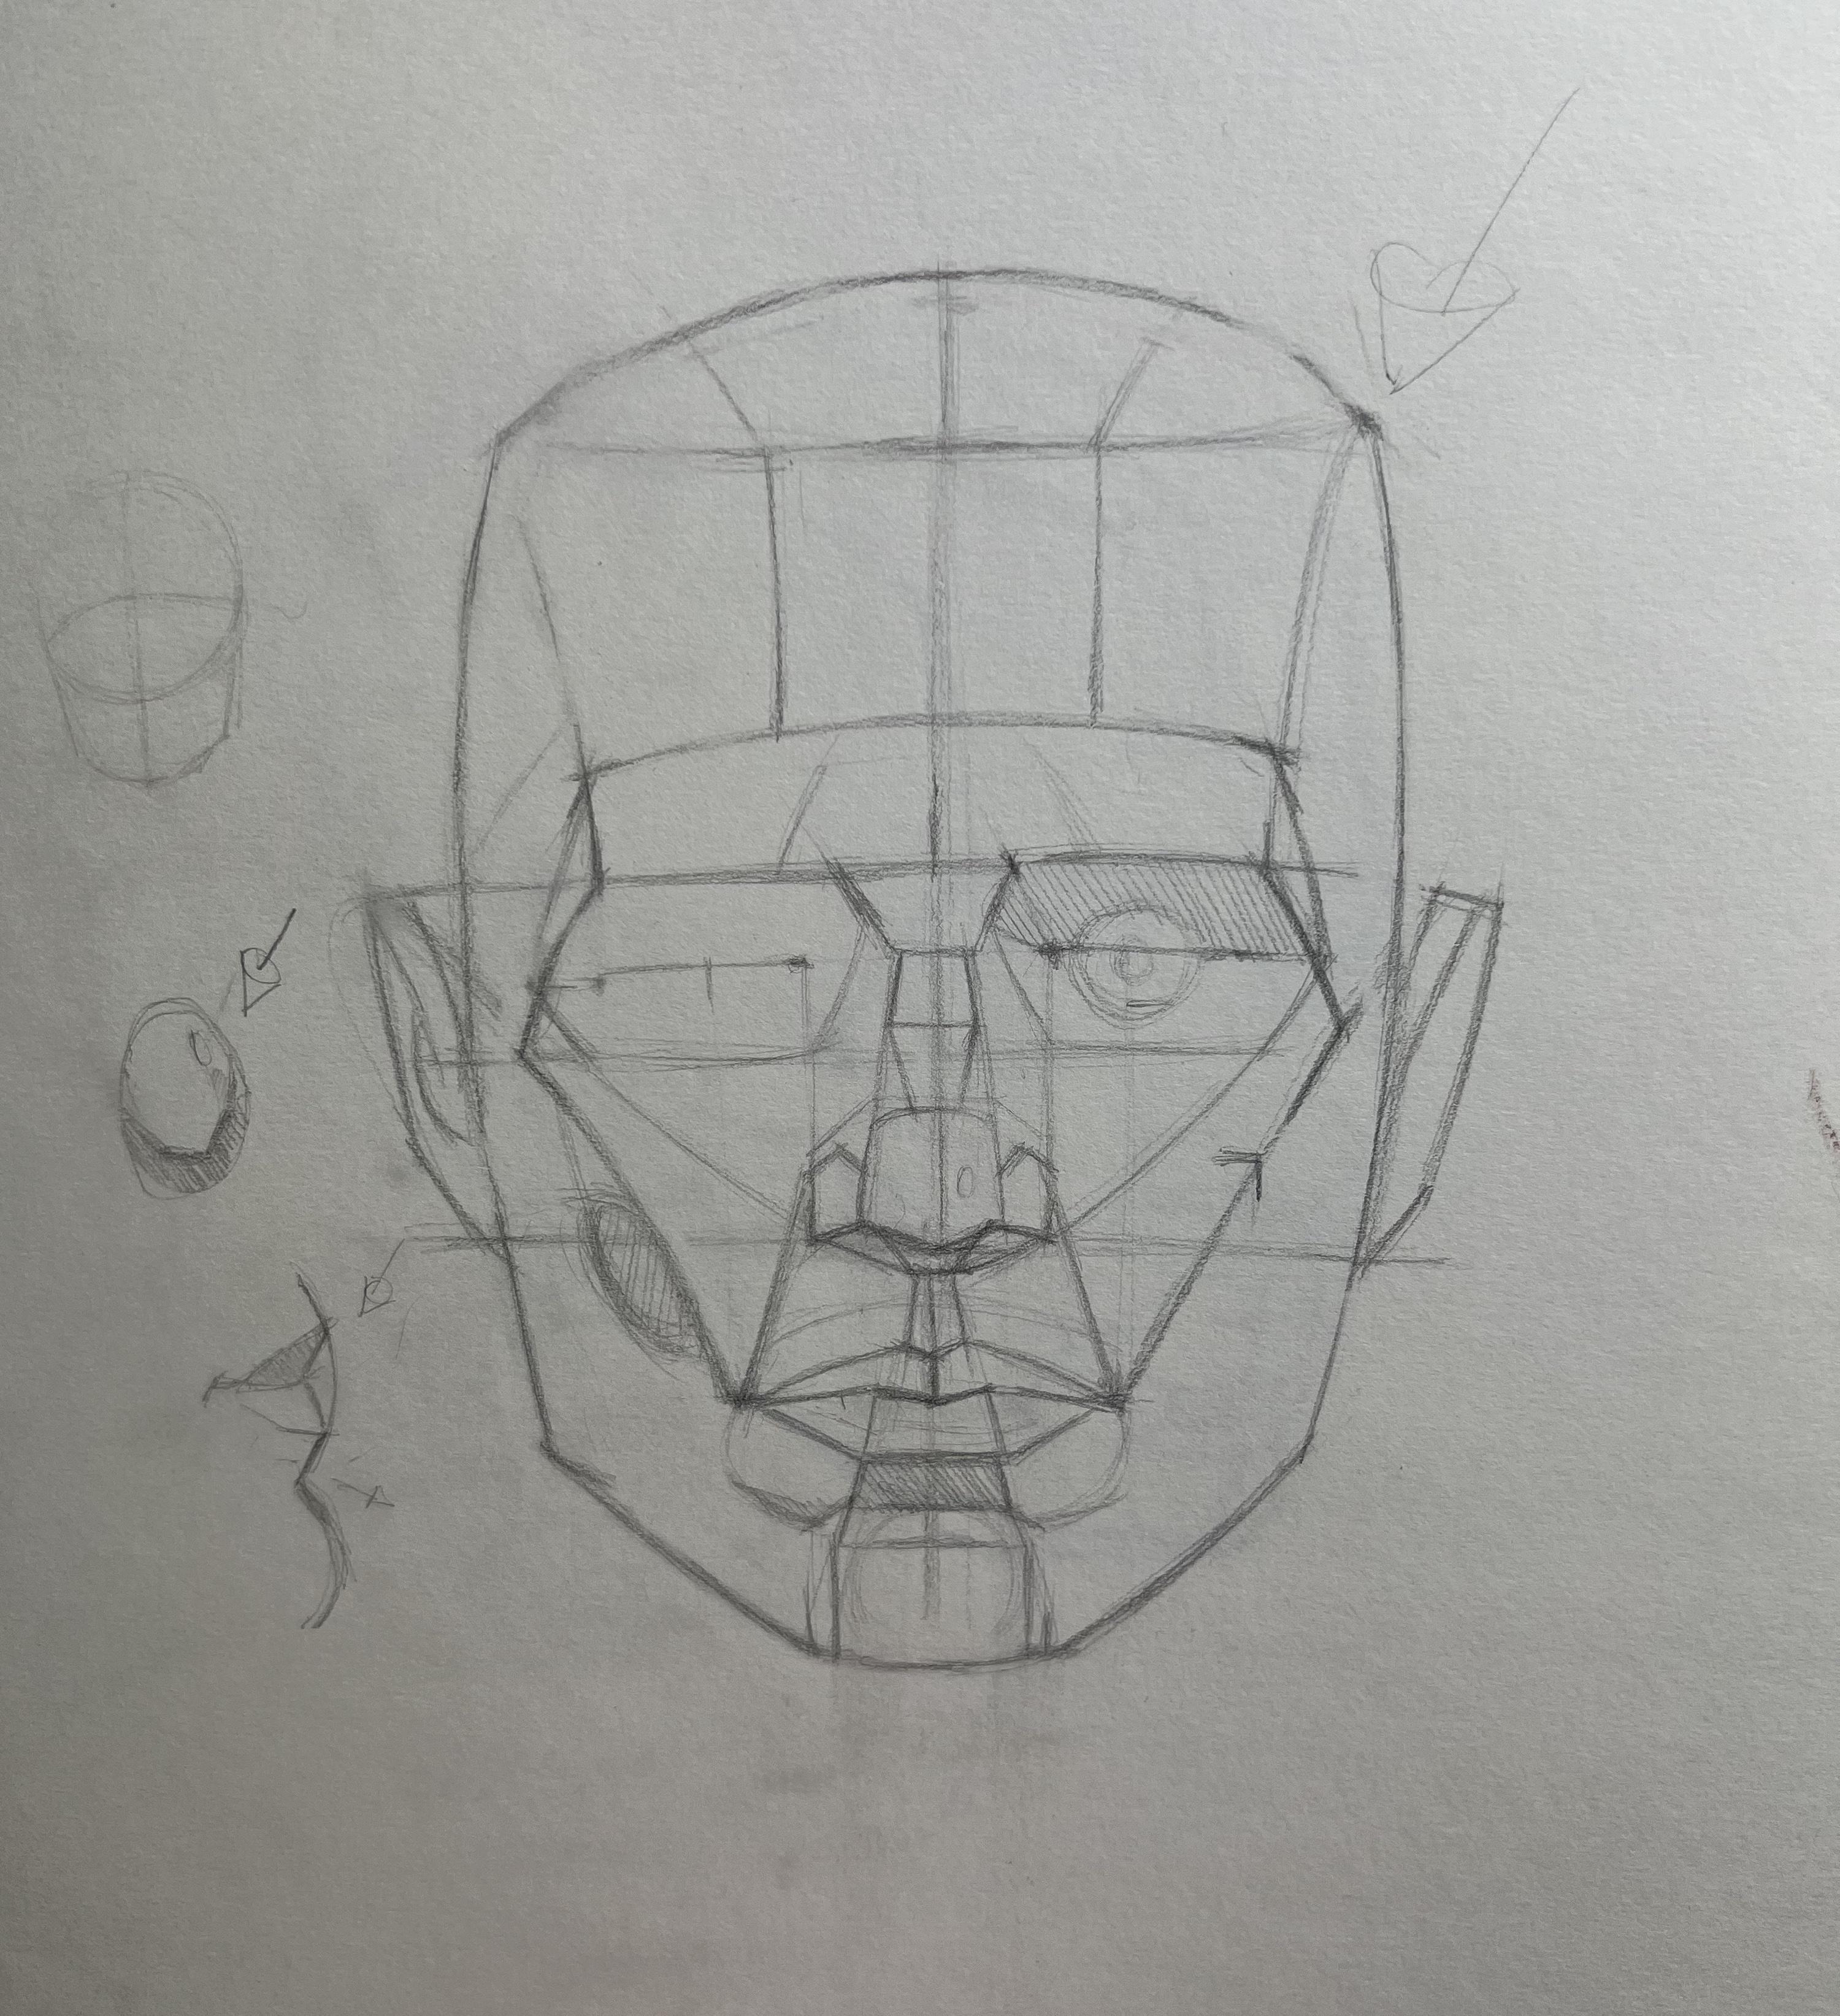
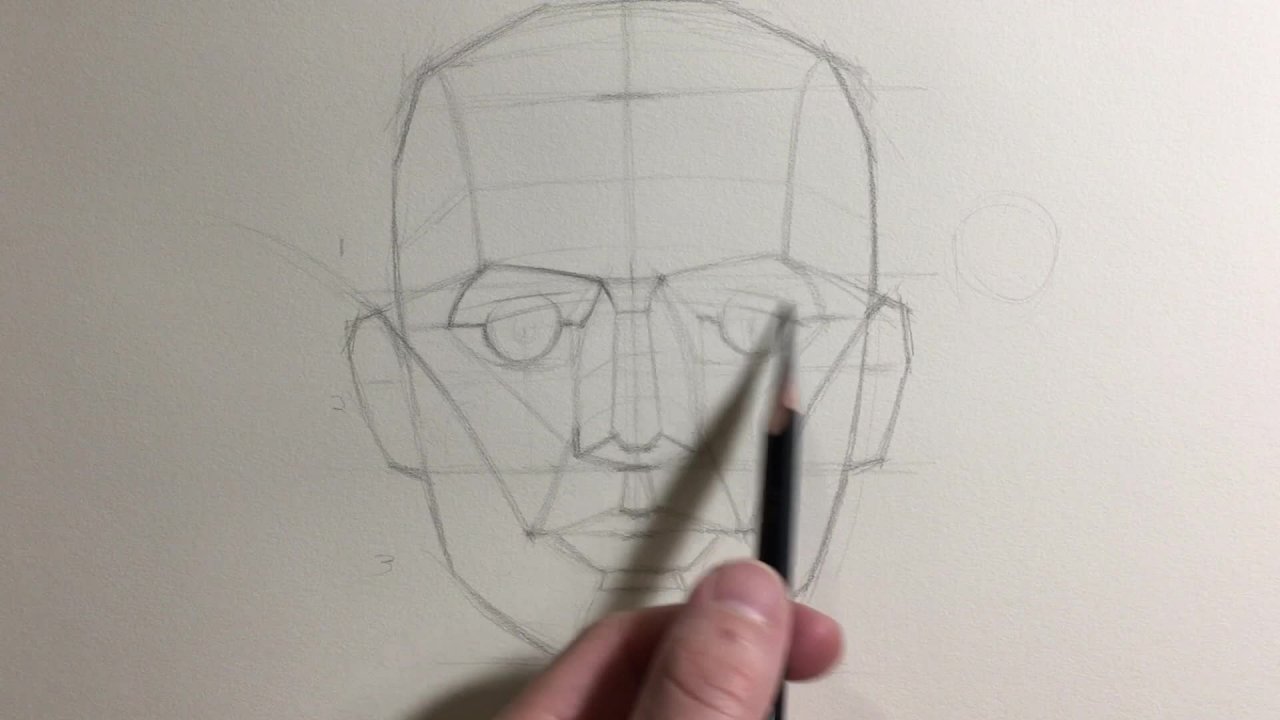
very general shape that will more or less try and capture the entirety of the head itself. I'll begin with essentially
establishing a center line. And then from there I need to break down the rest of the face. Now, the general rule is that
we can essentially break down the front plane of
the face into thirds. Now, that's a very
generic statement. And realistically,
you'll find that most people deviate from
that sort of general rule. But if you don't
know where to go, then this is a good
place to start. And then as you get a little bit further along and you start to measure a little bit closer, then you can find out
where the deviations are. Now in terms of the
thirds themselves. We're starting from the top of the hairline to the brow line, to the bottom of the nose, into the bottom of the chin. Again, the variation for most people is going to
exist somewhere in there. So you may not necessarily
have the equal thirds, but you can still make a
subdivision of thirds in general and then slowly progress
to fill the features in. Now with the third is in place. The next area I like to focus on is establishing
the eye sockets. And the reason for this
is that the eye sockets themselves or one of
the larger shapes that we can work from. So I'd like to begin
there and then gradually the work towards
the smaller shapes. The important
elements that I look for are essentially
the spacing in-between the eyebrow so that
I know roughly where the sockets
are going to be in relationship to another. And then really I need
to find out where the bottom of the socket
is going to roughly end. It's not a bad idea to say that maybe that the end of
the socket is gonna be about halfway through
that middle third, but you'll always want to
pay attention to the person you're drawing because every skull shape is
going to be different. And so we're just trying to establish some general
rules as I'm working here, but always, always
defer to your model or your reference with
the sockets in place. The next thing I
want to separate is the side plane from the
front plane of the face. Now, I'll look for this
at the corner point in the eyebrow or in the
brow line that we see here. And that'll essentially tell
me where the separation is going to take place once I have the side plane
and that gives me a clear indication about where
the brow ridge itself is going to exist on that
front plane because I can essentially
build it off of the socket and then
connect it from the side plane to
across the forehead. With the brow ridge established. It allows me to find some of the smaller forums like the
glabella in-between the eyes. But I can also start to separate the forehead out as well. Now, depending on the person and their type and just
the general sense of their skull structure. The front plane of the forehead can be broken down
in a number of ways. Now realistically
to simplify things, I'm only going to
really be looking for three major planes. Now, there's gonna be
two side planes right here on the edges where the
brow ridge is connecting. But there's also gonna be a front-facing frontal
plane that we see. Now again, how extreme this becomes is going to vary from person to person quite greatly. And realistically, if this was a younger or a female model, I may not really inject
some of that information. But if it was an older male
or anything like that, it might be nice to have
some of that information. More importantly,
it's just important to know that these planes exist. And depending on the
lighting situation, the planes might be more
obvious or less obvious. Depending on how the light
is set up on your model. While you can see some
of these subdivisions here in the front and
top part of the head. The one thing to keep in mind
is that unless the model is either a bald or
it has a shaved head, a lot of these elements are
going to be covered by hair. So you don't necessarily have to think about them as much, but it does help to know
that these planes are there. And depending on, again, the lighting situation, some are gonna be more
obvious than others. Continuing through the
front plane of the face, I'm gonna pull a line from
the corner of the socket. And I'm going to
estimate where the wings of the nostrils
are going to end. And I'm essentially going to
just take that to the nose. And that gives me a framework
to build the nose into. Now in terms of the nose itself, I want to just think
about for simple planes, we have two side planes, the front plane and
a bottom plane. Now there are certainly
smaller subdivisions, but in terms of getting started, always think of the
larger masses first and then make smaller forums. Now there is a general rule
from the interior tear ducts. You can pull a
vertical line straight down to find the
wing of the nostril. But I find that it varies quite a bit from
person to person. So I don't have a
tendency to follow that. I'd rather just from
the tear duct you can still find an angle where
the wing of the nostril ends and then base
it purely off of that measurement rather
than following a formula. Now the nice thing is
from a front view, once you find the
interior tear duct, you can carry a horizontal line over and find the
outer tear duct. With those two in place, you can establish
the ball of the eye. That's going to give
you an indication about the general sizing of
your eye socket as well. Now assuming your light
source is coming from above, this is typically where you'll
see the interior portion of the eye socket generally
being covered in shadow. Now from the tear duct again, once we find the side plane where the wings of the
nostrils are occupied, we can start to build out
the rest of the nose. Now. While there's multiple planes of the nose to think about, again, once we establish the
four basic planes, we can start dividing it into
the wings of the nostrils, as well as the ball
of the nose itself. Now, depending on
the person's type, there's all kinds of
different cartilage shapes that can take place
within the nose itself. But I find that it's
helpful to just think about the four basic
planes to begin with and then slowly start to deviate depending on
the person's type. Before we get too far ahead, it will be nice to establish
just the general ears. Now the sort of token
rule of thumb is that between the brow line and
the bottom of the nose, within that middle third, we can roughly establish where
the ears are going to sit. Now. The ears is being all cartilage. There's all kinds
of variability. So keep that in mind in
terms of the persons, let's say ear lobes or the shape of the top
part of the ear, which is the helix. There's all kinds
of variability. Now this is also assuming
that we're looking perfectly straight
on at the model. Now, if there's any degree of perspective or tilt or
anything like that, then you'll have to
adjust accordingly and then this rule
doesn't necessarily work. So keep that in mind
as you're working. But from a straight on view, we can generally say that
within that middle third, our ear is going to essentially sit perfectly right in there.
3. Block in approach pt 2: With the nose in place, I can start building out
the rest of the face, including the mouth as
well as the cheekbones. Now, what I want to go
ahead and do is I'm, even though I'm building
off my center line, I wanna go ahead and establish where the corners
of the mouth are because that's going
to allow me to essentially frame the mouth. And then once the
mouth is in place, I can more or less find
the rest of the features. Now again, the general
rule of thumb is that if from the vol of the eye, if we were to have
an iris in the eye, we can pull a vertical line down and find the
note of the mouth. However, the problem
with that is that it's such a far distance to measure. So I like to often use the
corners of the nostrils as a closer starting
point to measure the angle of where the corners of the
mouth are going to be. Now there's no reason
that you couldn't use the iris to the node of the
mouth as a measurement. But keep in mind
that will only work essentially from a front view. So as soon as the head turns are and there's any
sort of perspective, that kind of measurement
really doesn't apply. Now the other nice thing
about the corner of the mouth is that there's a
rhythm from that corner to the top part of the
helix that kind of creates this arc across the side plane and the front plane of the face. Now what this, what
this is essentially establishing is the cheek plane. And the cheek is essentially
going to exist as a top plane where it's gonna be most light facing Whereas
in line with the features. And then essentially
an aside and a bottom plane where it
kinda comes down the side, where the cheekbone is down into the lower part of the jaw. Now, the nice thing
about this is that it does essentially add a degree of dimension to the
front and side plane of the face because it frames the entire front plane and separates it out from
the side plane entirely. And then also, one thing to
consider is that if we're working from a light
source that's above, this is typically where
you're going to see the highlight on that
front plane of the cheek. And then it would typically
drop off into shadow once it crosses that cheek plane down towards the lower
part of the jaw. So by dividing the cheek
that way again, it's, we're just separating
the planes out so that if we think about how light
is hitting these surfaces, there are certain planes like the forehead, the cheek plane, the nodes that if our light
source is coming from above, those forms are more perpendicular
to the light source. And those are where
we're going to see our highlights hitting
quite abruptly and then other forms
that as they start deviating and turning
away from the light, that's when we start going off
into halftone and shadows. And while we're not
necessarily dealing with tone, it is still important to
think about your light source and what's happening even
in a block in stage. So keep that in mind
as you're working. As I start to build
out the mouth, I essentially would start from the center point
of the philtrum, which is just below the nose. Now the only reason I do this is that you can pull those lines directly from the philtrum all the way down into the chin. But it starts dividing
the lips into smaller sections that
you can build into. Now, depending on the
person's lip type, there could be variations
in the shapes themselves, but fundamentally
they can all be squeezed in into
this general shape. The more important part being is the degree at which the
nodes of the mouth are in relationship to the nose
because those essentially establish that top part of the
muzzle shape of the mouth. You can see here how
the top lip gets divided into two
separate pieces, and then the lower lip gets divided into three
separate planes. The nice part about
building it out this way is that you can kind of break down this larger shape
into much smaller sections. And I think it makes it a little bit more manageable to draw because you're no longer focused on all of these things
going on at once. But you can simply work
section by section. Now as we start getting
to the chin area, there's a lot going on that
we need to think about. Now I'm going to start
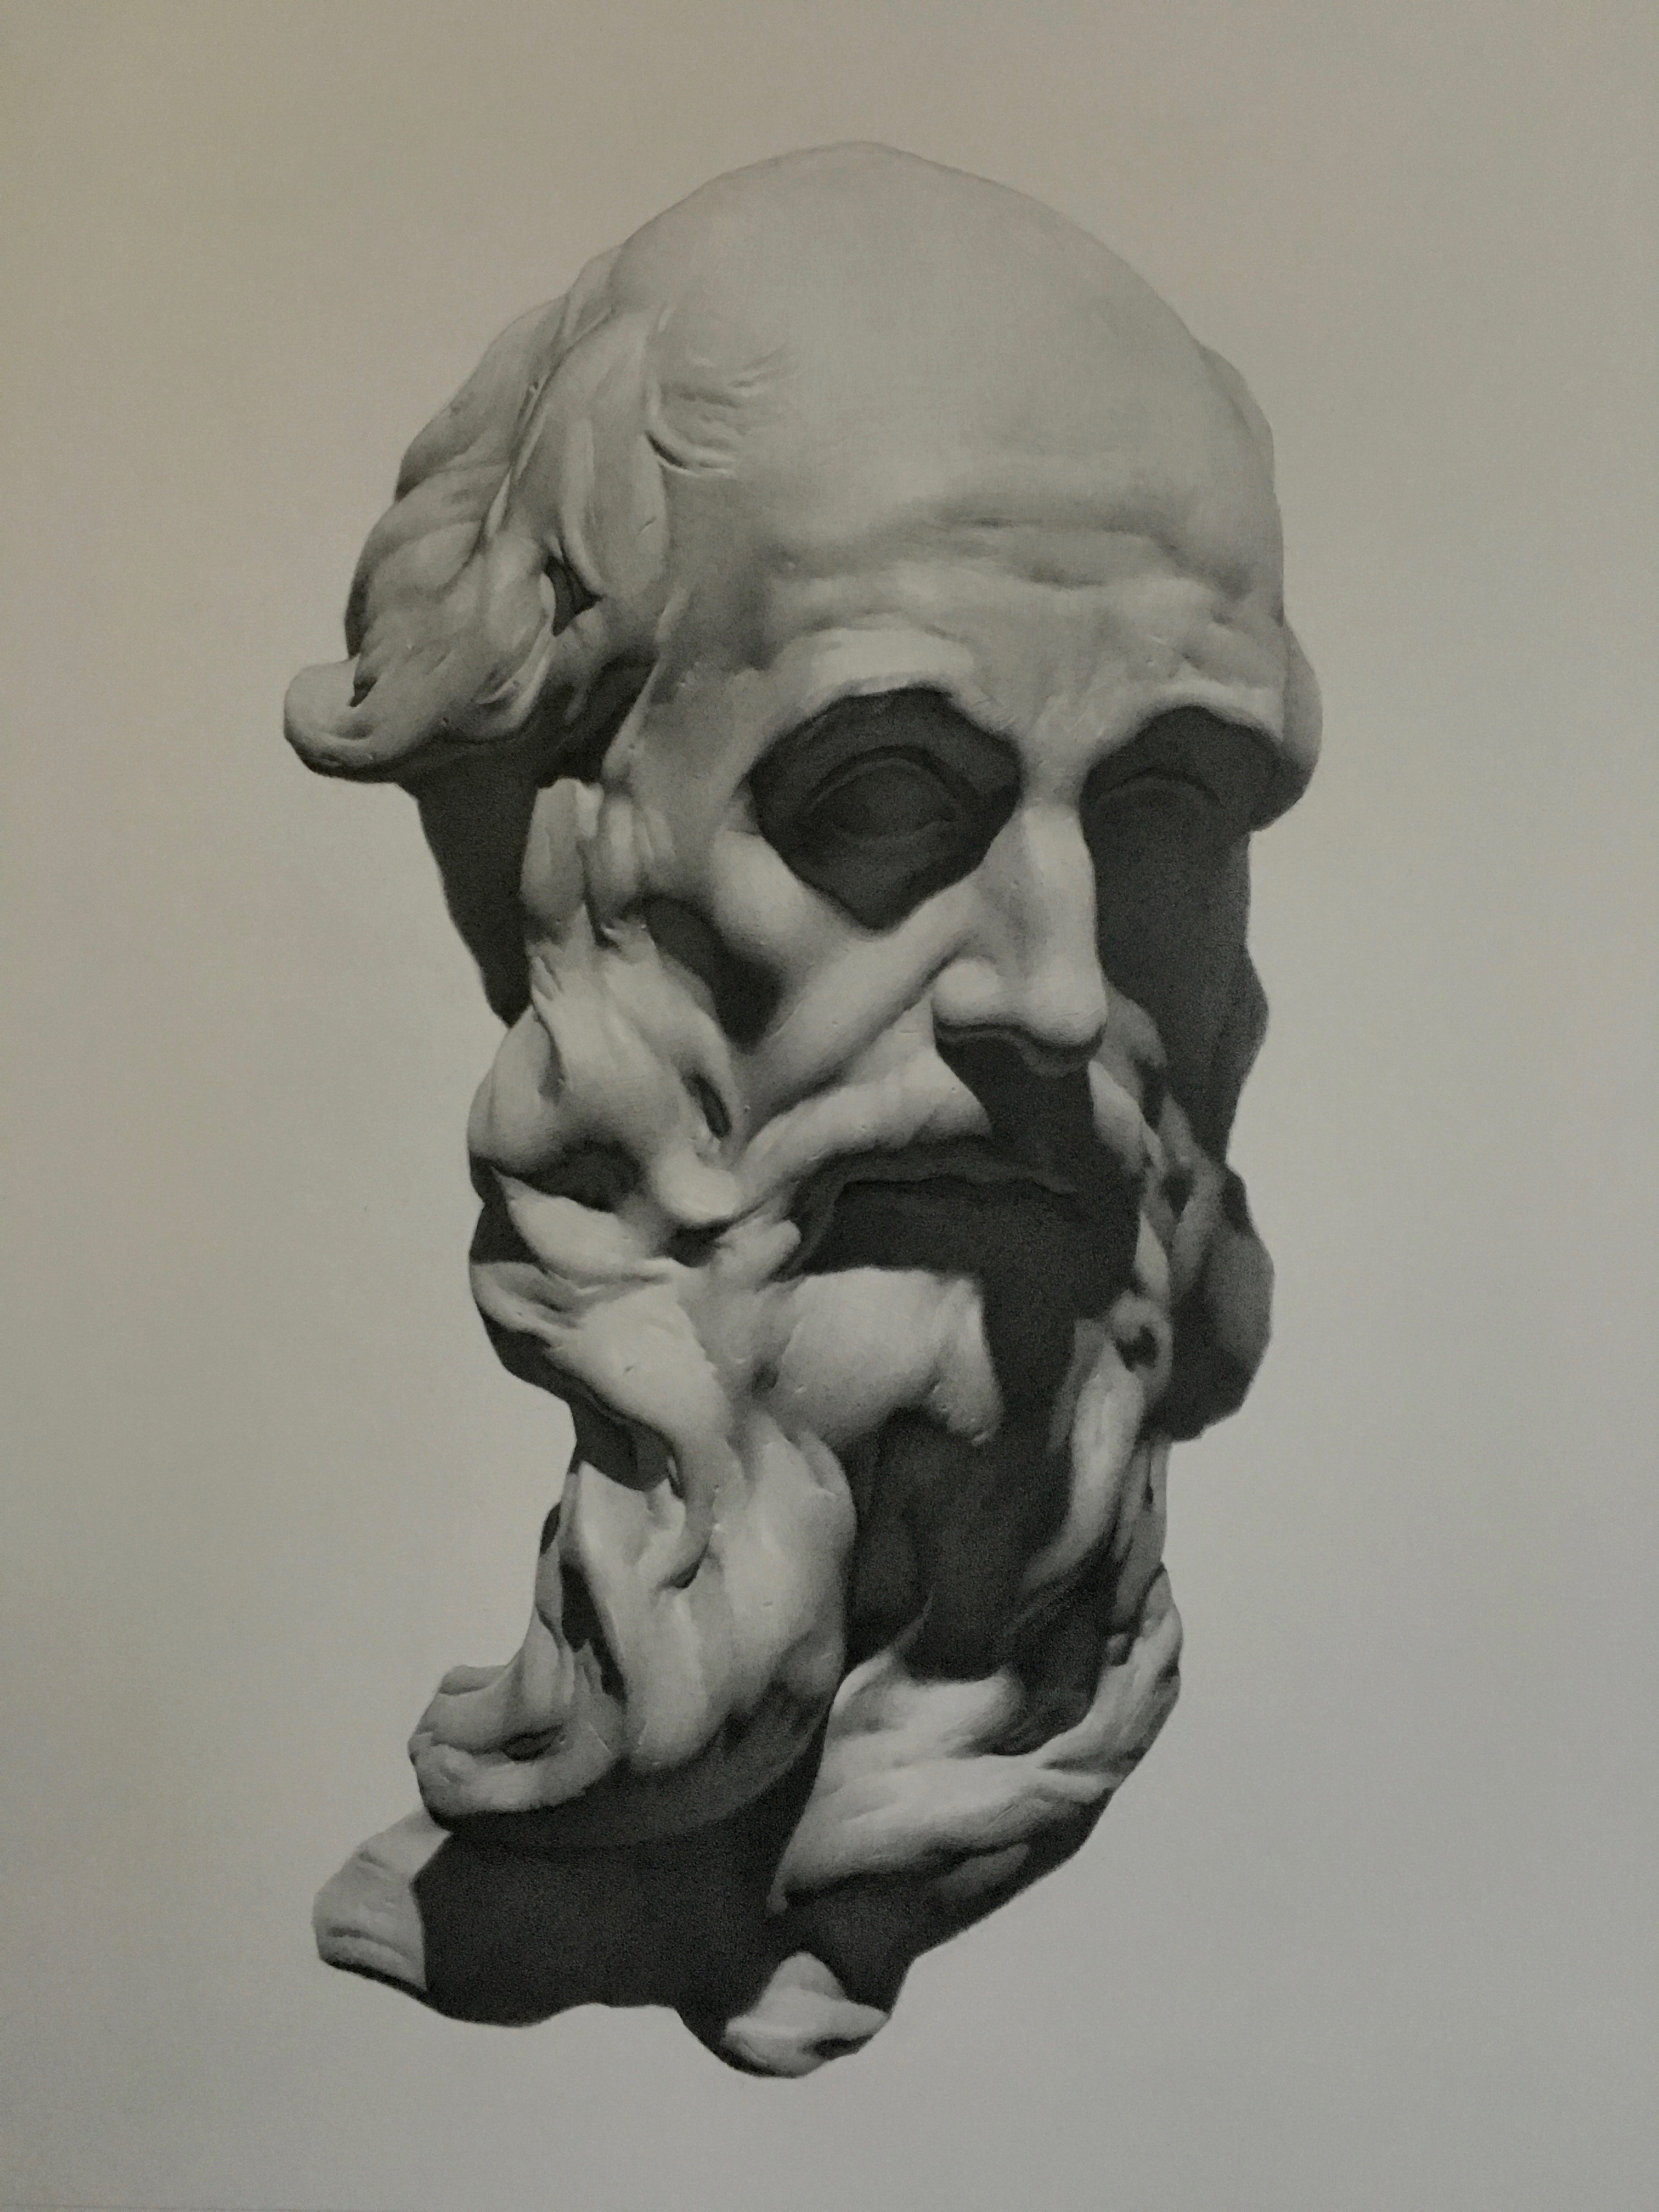
with this little transitional plane that's below the lower lip because it'll help frame the ball of the chin. What ends up happening
in this area, which becomes very important. And while it's a little hard
to see from a front view, I'm going to show you
what it looks like from the side so that you
can better understand. But essentially what's happening this area is that we
have a large amount of alternating forms or a stair-step effect
that's happening in this area with the lips in conjunction with
the ball of the chin. Now the way I like
to think about it is if we're drawing from
the side here and profile, if we think about the lips
as they come together, the top lip essentially is
going to be facing downward. The lower lip is going
to be facing upwards. Then we're going to have
the little plane just below the lower lip
that's facing downwards. And then as we get to
the ball of the chin, that top plane of it is
going to be facing upwards. Now, this isn't necessarily important from the
standpoint of a block in, but I feel like it's
an important aspect of the structure because as
you think about the mouth, the muzzle shape in general, this is what's
happening to all of these forums in this area. Ultimately, I think it's more important when you get
to modelling because then you need to
be thinking about forms and how they
orient in space. But nonetheless, I do think it's important to
understand all of the little plane
changes that are occurring in this
very small area. So once we have that in though, we've now essentially establish the majority of the mouth and the chin in that
general muzzle shape as they come together. Now, if we wanted to, the chin can actually be broken down into several more
planes if we think about the ball and
breaking it down into more of like a square or
rectangular form. But that's going to be dependent on the model and
the person you're drawing. So you may not always
find yourself doing that, but it is something
that you could do and create basically a top, a center and a bottom
portion of the chin itself. Realistically through
the lower part of the jaw and the
mandible area, there's not a whole lot
we really need to do. And while there's muscles
that exist in that area, There's nothing in
terms of form that we really have to
consider too much. Now, you could,
depending on the model, there is that little pocket
in the cheekbone where if you squeeze your cheeks together or it's
kinda suck them in, you get that little indention. And sometimes that can be
prominent on a particular type. But in terms of the amount of information in the lower jaw, that's not the chin. There's not a whole
lot you really have to factor in for those areas. So at this point we've more or less blocked in the
entirety of the head. And as you can see, there's quite a bit of
lines that are going on. Now one thing always
say is that when you are doing your block
and you always want to cater a lot of the
construction lines to the specific model or reference
that you're working from. So you may not necessarily need to draw all of these
lines in there. As you can see, it gets a
little chaotic and perhaps, maybe a little bit messy. That said, is if you do draw a light enough with your pencil, then you could very well have a lot of the construction
lines in there. And so long as they're easy to erase as
you draw over them, it may not be that
big of a deal. I'll always say that
you want to use the construction lines
that are gonna be more beneficial to you
as you're drawing. And there's really
no reason to inject extra lines in there if you don't feel that they're
going to be useful to you. So it's always one of those situational things
where you want to use the best tools that
are going to assist you and don't use
the ones that won't. Now if you're just starting out, I would actually recommend doing a lot of drawings
like this and not even worry about doing finishes
or any sort of rendering. But really take your time to
understand construction and structure so that you just get an idea of how to get
a drawing started. Because ultimately,
in my opinion, the block and is the
most important part of the drawing in general. And as long as the
structure is good, then finishing off a drawing
is generally much easier, but the placement
and proportions and just understanding
how to construct from start to finish is going to be a much more important lesson than any sort of
modeling at this point. So keep that in mind
as you're working. And again, even
just doing these as exercises and not necessarily
as finished drawings, I find extremely beneficial. And then you can really take your time with the
construction process. And then as you get better, it becomes more intuitive. Meaning you'll
have to do less of these construction lines
and you'll be able to move much faster
as you go along.
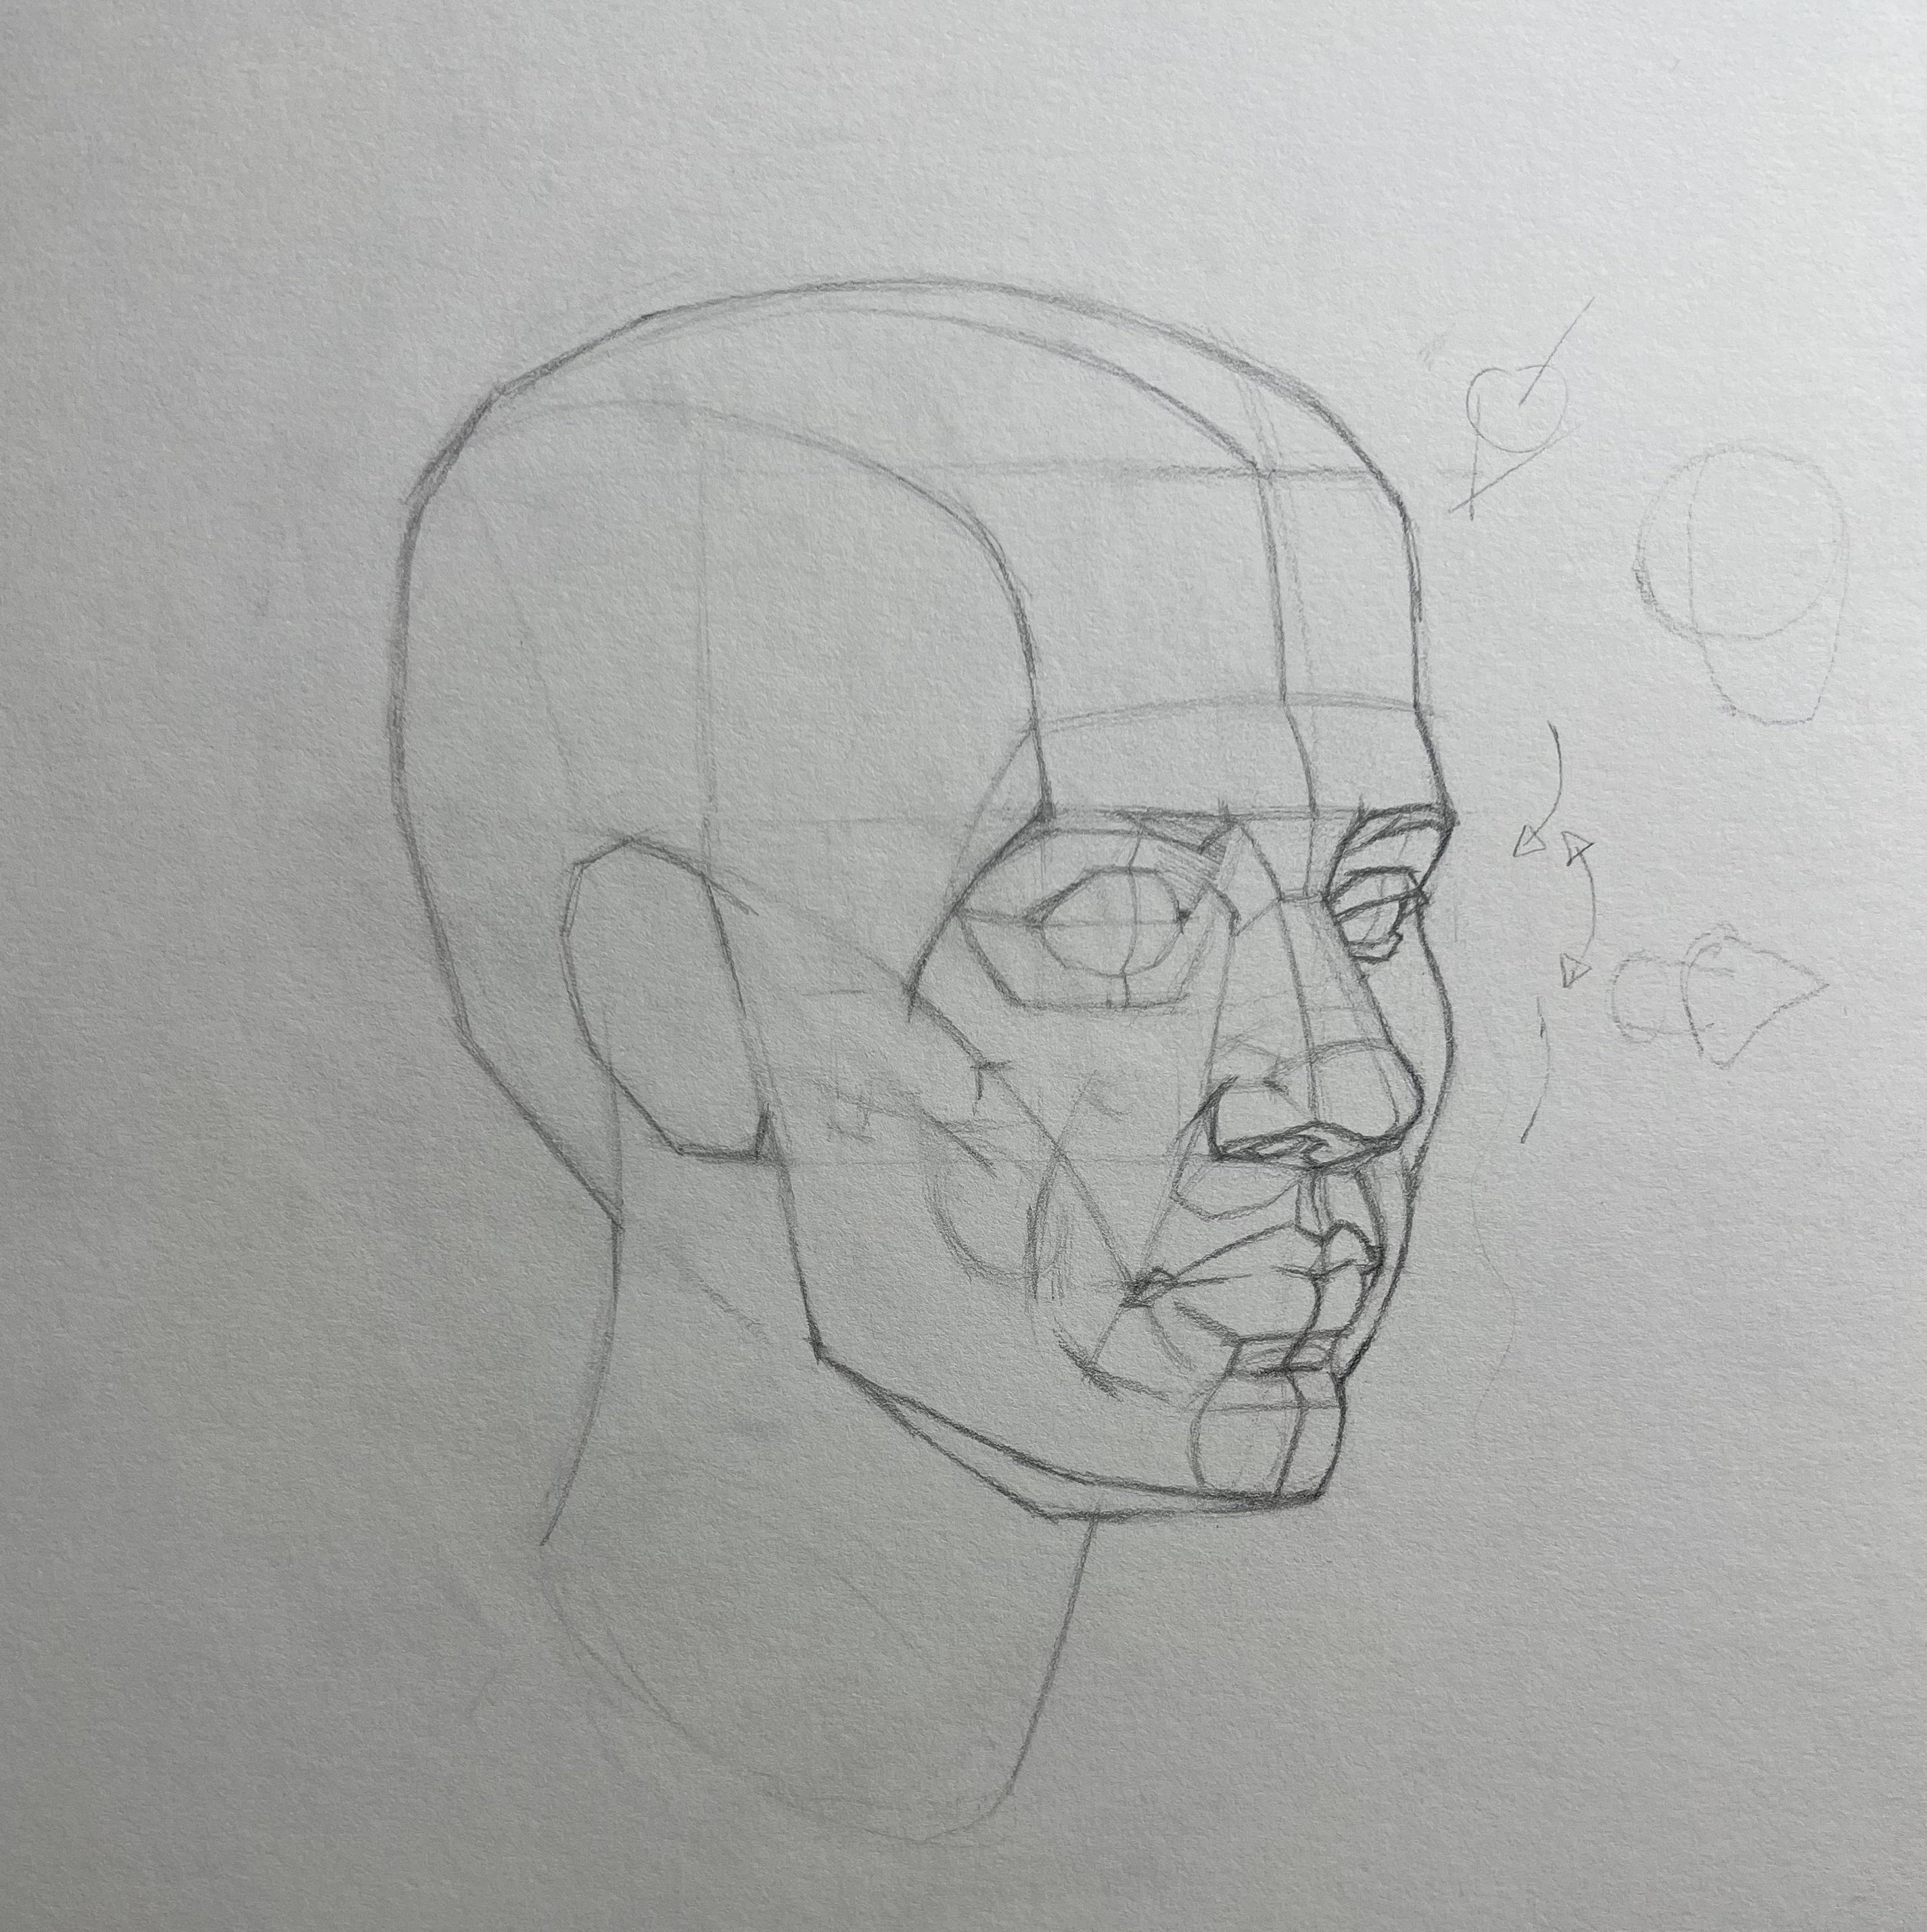
4. Block in approach 3/4: So in starting a
three-quarter portrait, a lot of the principles from a front view are
still going to apply. The only thing we have to deal with is obviously
the perspective. Now, the one difference
is that there's multiple degrees of angle when we're talking
about a three-quarter. So we always have to
keep that in mind. Nonetheless, I still
start with a large shape. And as I mentioned before
in the front view, I don't like to start
with multiple ball, a ball shape and
then add the jaw. I still start with one large shape just so that I have something
to work into. And what I'm trying to account for is the tip of the forehead, the bottom of the chin, and the back of the skull. And the reason I
wanna do this is that oftentimes people
forget the back part of the skull when
they're drawing. So it's something I want
to start with right away. But realistically,
again, for me, it's about establishing
a large shape. And if I can do that with
one shape rather than multiple sort of
construction shapes, then I'm gonna go ahead
and do that so I can account for everything
a little bit quicker. One thing to consider, at least for this example, is that because I
don't have to deal with a hair shape or
anything like that. I'm not including it, but depending on the
model's hair type and things like that, That's something you
may want to consider when you begin your
initial shape, regardless of the
perspective or the angle. But given that this is just a demonstration and I'm sort of making this
up as I go along. I'm going to just start
with the generic sort of head shape that I can work into. Once we have the large
shape established, the next important
thing is gonna be to place a center line. Now, given that it's
a three-quarter, this becomes
particularly important because wherever you
place that center line is essentially telling us
the angle and how much of one side we see
versus the other. Now there's a lot
of variability with a three-quarter pose
because it could be a very moderate three-quarter
where you're still seeing both sides of the
face relatively well. And then you can have an
extreme three-quarter where you really are not seeing a whole lot of
the other side of the face, but it's not quite a profile. So you really want
to think about that as you're
getting the drawing, start asking yourself of k, like how much of the far I or the far cheek do I
really see and just how extreme is that turn relative to what I'm,
what you're seeing. And that's going to
give you an idea about where to place
the center line. And then once you have
that established, then you can start breaking
down the rest of the head. Now with the center
line and I can start to break down the rest of the head. And I'm still going
to start with my sort of generic thirds. So it's going to be from the hairline to the brow line
to the bottom of the nose, bottom of the chin. Now again, I'll remind you
is that on most people this is not going to
necessarily be equal thirds. But if you're not quite
sure where to start out and are maybe you're having a little bit of trouble
figuring that out. That's at least
something to start by. So there's always going to be differences from
person to person, and might usually be one
section of the thirds that is a little bit off for a little bit
different and not equal, but it gives you
a starting point. Now one thing to consider
as you're putting in these axes lines is not only if we're dealing
with a three-quarter, we have to factor that in. But if there's any sort
of tilt in the head. So not only is the
head turned away from us in a certain angle, but let's say if the model
has some tilting their head, then we also need to
be thinking about how these axes are tilting
in space as well. So I'm just keeping this fairly simple by making
everything straight on. But more often than not, depending on your
reference and the model, there's a good
chance there's gonna be some degree of tilt taking place and sometimes it's extreme and sometimes
it's very subtle. So just keep that in mind. Now in breaking down the
front plane of the face, I'm still gonna begin
with the eye sockets. And really I'm going
to want to key in on the spacing of the eyebrows and where that, how I see them. Because that's gonna
be an indication about really the sense of three quarter that
we're dealing with. And so I always want to
be asking myself is how much of that far socket
am I really seeing? That is sort of behind the nose? And so that's kinda what I want to get established
here in the beginning. As well as the
socket's being one of the larger features that I have to deal with
in construction. But also then I can do, once I have the
sockets in place, it's gonna be a lot easier to construct the rest of the
features based off of that. Now, outside of that far socket, the other thing to
keep in mind too, is in a three-quarter, you want to be asking yourself, is really how much of that
far cheek are you seeing? Because that's also
going to give you an indication of
not only the turn, but then that'll also
help you later on once we get to the
mouth area and how much we're actually seeing the mouth protrude in front
of that far cheek. So even though these things are going to vary from
person to person, It's something to keep in mind as you're working because
that's always going to give you an indication
of just how far away the model
is turned from you. Now, working from the corner
point in the eyebrow, I'm gonna go ahead
and extend that up to the front back of the skull because that's going
to give me an indication about the side plane
of the head itself. So that line essentially bisects the corner of the
eye socket here. And you can essentially
carry that all the way down to the chin
if you wanted to. But for now I
really just want to separate out the front plane of the forehead area so I
can build that brow ridge. So hopefully you can
see just by adding the side plane and a
few other indications, we get a better sense of dimension in the
three-quarters thus far. Now the other thing to
consider as we're building out the drawing is that we initially started
with a center line to tell us the relative direction
of the three-quarter. However, as we build out
the drawing farther, we want to start thinking about the actual contour
of what's happening. And so you can see
as I'm putting in a center line here that's
following the brow ridge, the front plane of the forehead, and then back towards the skull. We want to be thinking
about this as we start building the
rest of the features. So as we get down
to the nose and especially down in
the mouth area, thinking about how the
contours happening across the front plane of the head is going to
be very important. As I continued to work down
the front plane of the phase, want to start establishing
more of the features. Now I'm just trying to find a relative tear duct based on the shape of my eye sockets. Now obviously you would
use this and make those measurements based off your model that
you're working from. But nonetheless, I
would want to find the tear duct
relative to the ring of the nostrils so
I can establish the rest of the
shape of the nose. Now I'm not thinking about
the planes just yet, but I'm just want to find
a general location so I know exactly what
I'm building into. Once I have a rough idea about
the placement of the nose, I can start breaking it
down into simpler planes. I still want to think about
just the general front side and bottom plane. Now, the nice thing about a three-quarter
is that we don't really have to worry
about matching. Both nostrils are
both side planes. We're really only dealing with three planes fundamentally. Now, ultimately the
nose can be broken down into much more
complex shapes. And there's lots of sub planes
that we can think about. But in the initial block and
I really just want to find the very largest planes I can find so that I have a
good sense of the shape. Now again, the other
thing to consider with the nose in a three-quarter is whether or not the nose
is actually passing in front of the
far cheek or not. Because again, that's
an indication of how much the model is
turned away from you. And sometimes in certain poses you'll find
that the nose is actually extending past the
FAR portion of the cheek. And then what ends
up happening is, is that sometimes the mouth or the muzzle shape could
actually extend farther. Now this is always a
case-by-case scenario, but it's something
to keep in mind as you're working and you
want to pay attention to all of these forms
and how you see them in relationship to the perspective
that you're dealing with. As I find the corners
of the mouth, what I really want
to focus on is just the overall muzzle
shape of the mouth and what sort of
space that occupies in the front plane
of the face here. And again, depending
on the model and the angle of three-quarter
that you're dealing with. Sometimes you'll actually
get a good sense of just how far the muzzle will actually stick out on the
front plane of the face. So that's something
that you really want to pay attention to. Because ultimately
what's important is, is we want to see the
sense of overlapping forms in relationship between the
far side of the socket, the cheek, the muzzle,
and then the chin.
5. Head construction 3/4 pt 2: As we make our way down
to the mouth area, this particular portion of the head I feel is
very important. And it's for a
couple of reasons. And the things you want
to be thinking about is not only the angle of
three-quarter, but again, the important thing
to really pay attention to is the degree at which you see these overlapping
forms in the pose itself. So e.g. we need to be able to see how the eye socket
kind of tucks in. And then we get the cheek as it's wrapping
around the eye socket. And then as the
cheek comes down, depending on what
the mouth is doing, we may get the muzzle shape of the mouth extend
beyond the cheek. And then as the muscle
attaches to the chin, that's another form where we're going to see some overlap. And so depending on the model or your reference that
you're drawing from, these particular forms are really important to
pay attention to. Because in order to get the
sense of form that we want, we really need to make sure that these overlaps are
really happening in the correct areas so
that we get a sense of one form coming in front
or behind another. Now, just so I
don't get caught up in one area for too long. I want to go ahead and build
out the rest of the head. Now because there's
no tilt in the head, it's very straight on. I can essentially again go from the brow line and the bottom of the nose in that middle third, and extend those lines
outward so that I know the relative placement of where the ear
is going to sit. Now one thing to keep in
mind with the IRR is that it's going to be always
pitched at an angle. It's not going to be
straight up and down. So as you're constructing it, you want to make
sure that you're finding that angle that the ear is sitting on and make sure that it's not
completely vertical. Once the ears established, we can connect the
rest of the jaw to the chin area that
we've already established. And again, depending
on the person's type, they may have a
strong corner point in the jaw, they may not. So it's something to pay
attention to as you're working from your
reference or your model. One other small thing
to keep in mind too, is even though from a
straight on view in a head is you still may see some of the underside
of the jaw. So keep that in mind
as you're working and it really will vary
from person to person, but it's very possible that
you may see some of that. Now here we mostly have the majority of the
head established, but I want to start breaking
it down even farther. I'm pulling a rhythm line from the corner of the mouth
to the top of the ear. So that establishes
a cheek plane. And really why this is important
is that if we're working from a well-lit model and let's just say the light source
is coming from above. Typically, we're going to have that front-facing cheek plane is that's going to
be hit by light. And then that's typically
where we see that highlight on a cheek is where it
comes to an angle. But more importantly
is I want to separate the front
part of the cheek from the side part of the
cheek as it goes further down into the
lower part of the jaw. That way I have a very
distinct separation. So in building out the
I want to go ahead and establish just a little bit more in the interior of the socket. Now one thing I like to do when I'm constructing
the eye is to actually build out a little
bit of the eyebrow first, only because I can use that as a measuring tool so I know exactly where I'm going
to place the eye. Typically if our light
source is coming from above, the interior portion of the socket is going to
be heavy in shadow. So that's something
to keep in mind. But more importantly,
what I like to use that portion of
the eye socket is really just to gauge the
relative space between the socket and the upper lid and the ball of the eye as well. Now the one tricky part with a three-quarter is
depending on, again, how far turned the model
is turned away from you. The far I is gonna be obscured, are covered in some
degree by the nose. So you may not really find a
tear duct to build off of. So you want to use
the eyebrow and the socket as a guide
to construct that. I, the important part
of the far side, I is really going to be
getting that sense of overlap in the lids as they're wrapping around the
ball of the eye. And depending on the model and how much you're
actually seeing, you may see more or less
depending on their lid type. Now one thing to keep in mind is that the upper lid is
gonna be a little bit more telling in terms of how it's
wrapping around the ball of the eye as the
upper lid tends to be a lot larger
than the lower lid. This is going to be a case of like we were
talking about before with the cheekbone and the
muzzle shape of the mouth. Now, dealing with the eyes, we really just want to get
the sense of overlap in those forums as things are wrapping around the
ball of the eye. And then the eye
socket itself is wrapping around it as well. And it just becomes a lot
of managing these forms and trying to get that sense of one thing coming in
front of another. And working on the nose because we don't
have to worry about matching both sides of the nostrils or
anything like that. We can really just focus on the ball shape of the front
part of the nose and how it comes into contact with the wing of the nostril as well
as the bottom plane. Now, depending on your model and how much cartilage shape
they have and their nose, you can start breaking it
down into smaller sub planes, but you really just
want to basically take that large mass of the nose and just gradually break it
into smaller sections. This will vary quite a bit
from person to person. So it just kinda,
sometimes it's helpful to just work one plane at a time and then gradually just bridge
all of them together. Now the nice part is again, depending on your light
source and whatnot. Sometimes you're going to have just a heavy cast shadow
coming from the nose. So it may obscure some of that bottom plane of
the nose quite a bit, as well as some of the
wing of the nostril. It really just depends on your light source and
the models orientation. As I work on the lips here, you want to make sure
that if you haven't established a new center
line for the muzzle, you want to go ahead and put that in first
because I'm going to build the lips off of
that new center line. And the reason for
this really is so that we keep the
mouth in perspective. If I were to draw the lips on the original center line
that I started with, they would be completely out of perspective with the
rest of the face. So you really want to
make sure that as you build out the initial
muscle shape, that you build a
brand new center line that's in perspective with
the rest of the features. One thing to also keep
in mind as you're working on the mouth
is that you may not see both nodes of the mouth depending on the perspective
you're drawing from. The three-quarter is so
extreme where you're only seeing one
node of the mouth, then it's gonna be more important to think
about how the top and bottom lips come together
because you're going to see a greater degree of
overlap in those forums. Now just like the mouth, the chin itself will also have its own unique center line. And from that center line, if you wanted to
break the chin down into several planes, you could. But for the most part I would say with the chin is
you really just want to make sure that it's kind
of feeling connected to the muzzle shape of the mouth as those two forms interact
with one another. It was a male type. You can chisel out the chin and give it a much
stronger look. But if it's more of like a
younger person or a female, you may not want to carve
out the chin as much so that it appears a
little bit more delicate. I know we really didn't go into anatomy or anything
like that too heavy. And I feel like if
you're just starting out the more important
aspect of the block and is really just the
general structure. And seeing the big planes of the head and how these forms
interact with each other. You can always take your
time afterwards to really focus individually on the
features and the anatomy. And even perhaps focus on just drawing skulls
and things like that. But hopefully this made sense
in terms of a block in and that all of these
principles you can apply to your drawing as
you get started. Now, as you can see, there's obviously a ton of construction lines that
we're dealing with. And realistically, you
wouldn't necessarily use all of these as you
work on your drawing. You would always
want to try and find the most obvious
things that you see. But hopefully this helps you see the thought
process that I'm going through as I'm thinking
about breaking down the head and all of
these different sections. Now it certainly doesn't hurt to do drawings like
this where it's purely just sort of overkill
with the construction lines. And realistically, if you
draw the lines light enough, you can always take
them out and then move on to taking the
drawing farther. But even just as a
practice exercise, if you're just doing
sketches and you're not really focused on finishing a drawing or anything like that. Then oftentimes I do find
that it is beneficial to do just these really
structure-based drawings. Just so that you can
take yourself through the process and really start to see how all of these things come together when you
begin your block in.
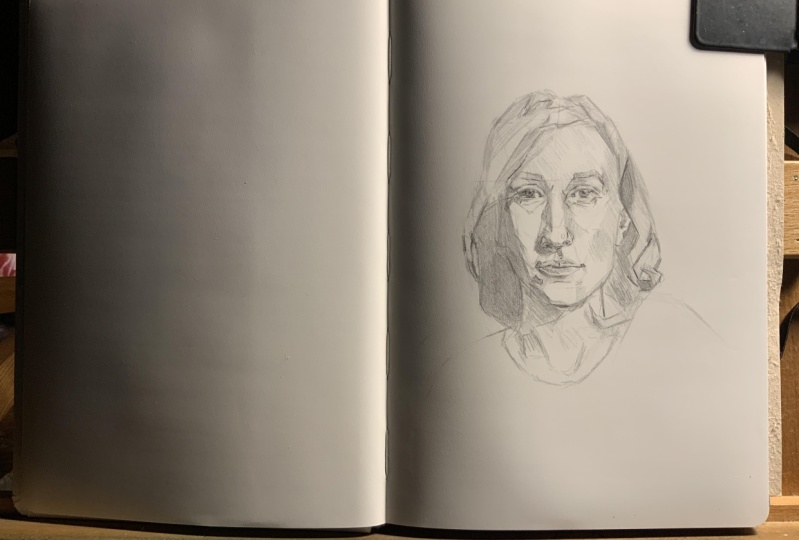
6. Beginning the block in : So as we begin the drawing, I just want to start
with a large shape. That way I know exactly where this is going to sit on my page. I'm not really aiming
for any accuracy or any specific angles
really at this point, I just want to get a large
mass established so that I know roughly where this drawing is going to sit on the paper. How much open space is going
to be around the head. And then kind of go from there. These early sort of mark
making in the drawing. Not that important. I really just want
to get something on the paper so that I have
something to compare, something to look at. The longer we keep
the page blank, the harder it is to
start a drawing. So it's really just a
matter of giving yourself something to go off of and then you can start making
better decisions. Now this doesn't mean I just
want to draw any shape. I do want to keep in
mind the general angles about the outside portion
of the head itself. So I'm looking for
angles and the hair. And early on what I like to establish is we want to
find an outside shape, which is gonna be the hair
mass, maybe the neck, maybe the shoulders,
depending on how much of the portrait
you're drawing. If it's just a head or a
three-quarter portrait. There's some variables
to think about, but really what it is is
I think of the portrait as the outside silhouette
and the interior silhouette. So how is the hair
framing the actual face, the skull itself, and then the outside
portion of the hair. So those are the two
things that I focus on. The very first few minutes of any drawing or
portrait I should say, is finding an interior shape
and an exterior shape. And then start to
make better decisions and start finding
measurements off of that. Now it's with these two
things that depending on the complexity of the person, let's say their hair type
or anything like that. You could very well spend
a good amount of time just trying to resolve
those two things. But if you can at least get a good sense of the shapes
that you're working with. Wood, that exterior silhouette
and interior silhouette, then you have a
much better chance, I think in the long
run of getting a better likeness as you
take the drawing forward. So I would really
spend a good amount of time establishing these shapes right from the very start so that at least you
set yourself in a very positive direction
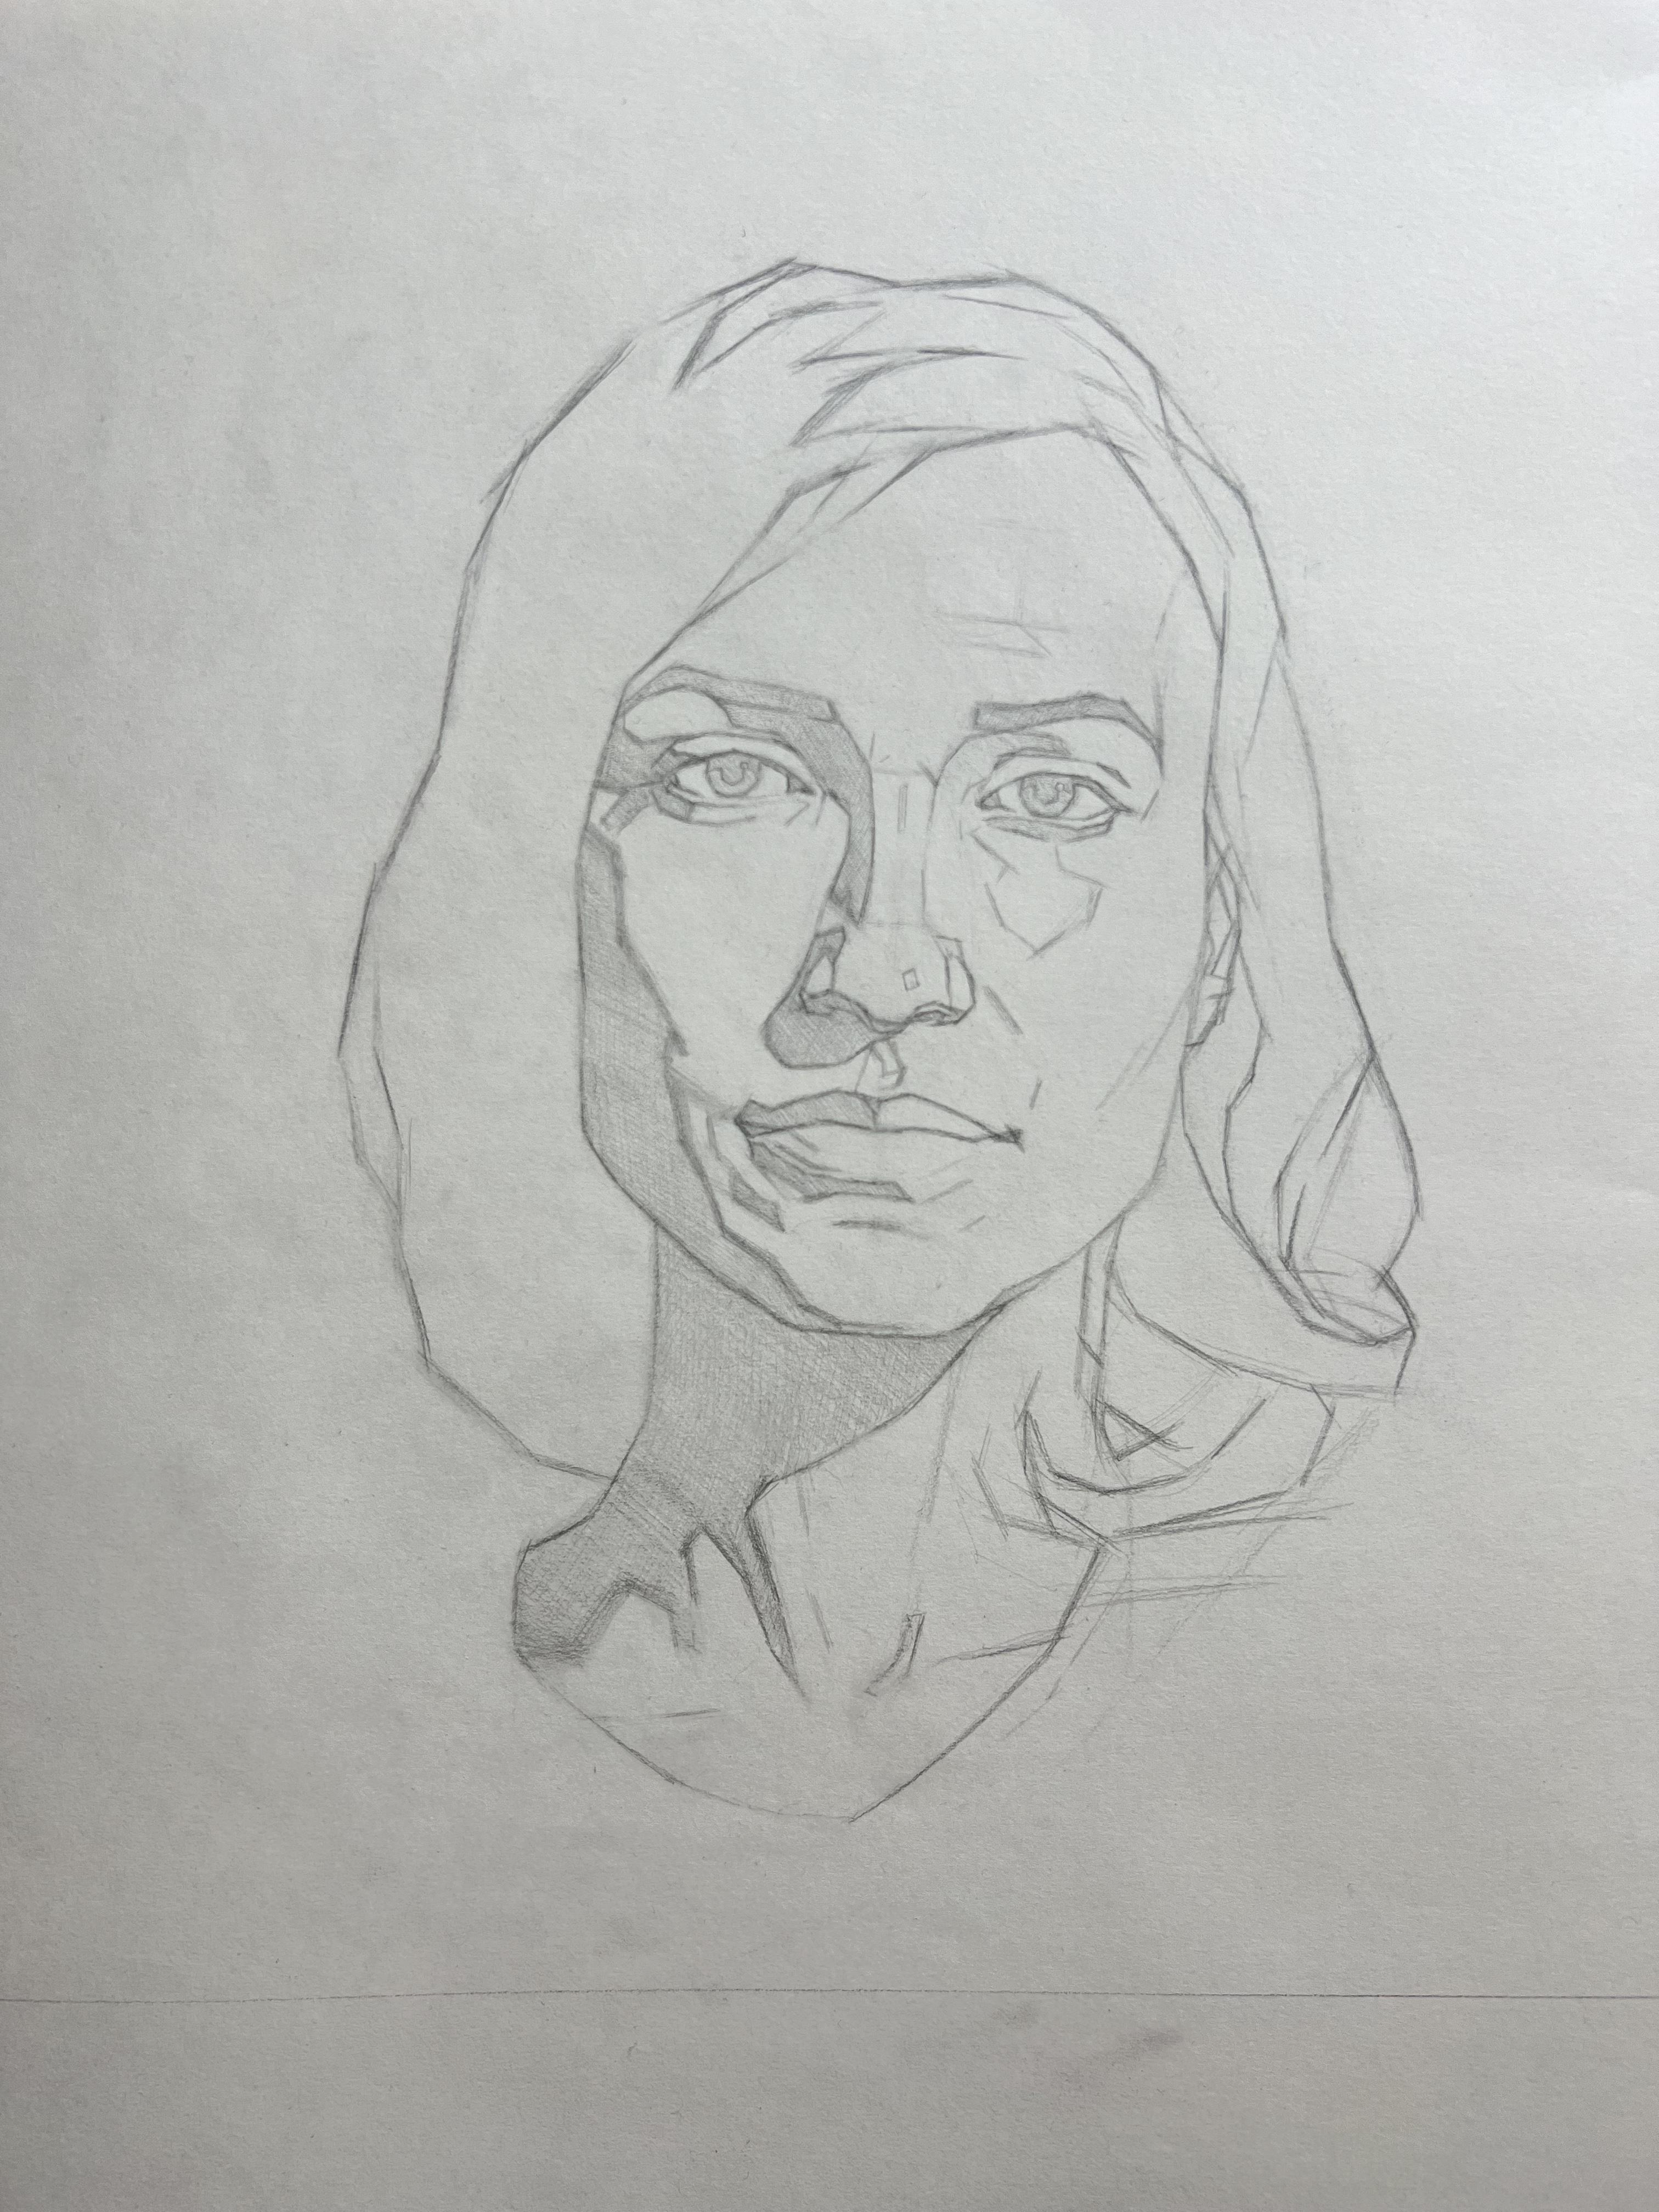
for the rest of the drawing. Once I feel okay
about those shapes, ice want to start dividing out the actual head into
some subdivisions. The most important for
this particular portrait because it is straight
on as I want to find a center line of some kind and noting what this
particular portrait is, that she's just
slightly off center. So even though she's
looking at us, there is a little bit of a head tilt that I
need to account for. So that's something
that we want to establish right away
so that we don't lose it or risk losing it as
we take the drawing forward. It's in these early stages of the drawing where we
really want to find all the necessary tilts or different if there's
a change in axes from, let's say, a brow line
where the nose is placed, the mouth or anything like that. It is something that
I want to establish very early on in the drawing so that I'm sort of mentally making a note for
myself that okay, I may need to pay attention as I start flushing
out other details like eye sockets or the nose or the mouth itself or
anything like that. It needs to be built
upon a framework. So that beginning
framework is going to start with an axes
line of some kind, whether that's horizontal or
vertical or what have you. These are all things that I
want to be accounting for as early as possible once I have a large
shape established. Now that I have a simple shape
established on the page, what I want to start
thinking about are my height to width relationships
in the face itself. So I want to start
thinking about, okay, how much hair on one side
do I see versus the other? What's the width
of the face versus the overall height of the face? Finding these
different measurements and taking my time
to check myself. This is all about trying to
be accurate and trying to maintain the models
sense of proportion. So there's so many variables
when you're doing a portrait that it can get overwhelming to try and think about
everything at once. So I try and work in stages so that I'm focusing
on one thing at a time. And now that I have a rough, simple shape on the page, I have a center
line to go off of. I can start taking these
other measurements and focus just on those before
I start moving forward. Now as I'm continuing to find height to width
relationships, you can see that all
of my lines right now are still very
angular and straight. And the reason for that is that every time I connect
two lines together, it's creating a point. With those points. I can use those as a guide. Essentially, as I see one
angle meet with another angle, I have all of these little axes points that I can use
to measure across, let's say the top to
the bottom of the face, or just from one
section to the other. That's the primary reason for working in a lot
of straight lines and not using curved lines
is that with a curved line, we have nothing
to measure off of because there's no
apex of any kind. So as I kinda build with these straight lines
in construction, I can always use the
points to help myself measure from one
distance to another and making sure that all of the angles that I'm
putting down are sort of in the right place and at the right angle to
what I see on the model. Now, it will make the drawing look very rigid and
structural at first. And that's okay because it's
one of those things that I know as I begin to
model the drawing, if we were to go that route, than all of those
angles will naturally soften as we begin
the modeling stages. But early on in the
construction portion, I really just want
to have this nice, very sort of almost rigid
drawing in the sense that I can use all of these
points to help myself measure and you
use them as a guide. Now one thing I will say is
that even though we're taking a lot of time here to
measure and be accurate, I know deep down that there's probably going
to be some things that I miss as I'm going along through the
drawing and that's okay. My eye is far from perfect. And I'm going to make mistakes. And I'm going to
miss something and I measure something inaccurately
or anything like that. And I'm totally okay with that realistically because I'm
just drawing in line. If something needs to come
out, I'll take it out. But what I would say
that is is that don't feel like you need
to get everything absolutely right the first time. There's sometimes
there's things in the drawing that you won't
catch till after you've put in several bits
of information that you'd never want to feel like you can't go back
and change something. So I'm going to try and be as accurate as I
can the first time, but I know that there's
very likely thing, little things that
I'm going to miss. So just be patient
with yourself. Give yourself the
time to continue on with the drawing
and know that you're going to probably have to make some corrections
as you get further along because
there's very likely things that you miss and that's
just part of the process. So keep that in mind. But so far with what
we've established, you can see we have a
nice simple shape that is slowly starting to form
into the model itself. And obviously we
still have a long way to go in terms of placing the features and
things like that. But we have a nice
simple shape for now that I feel pretty
good about in terms of proportion and angle and where
it's placed on the paper and for the first hour
or so in the drawing, I think that's a
good place to be.
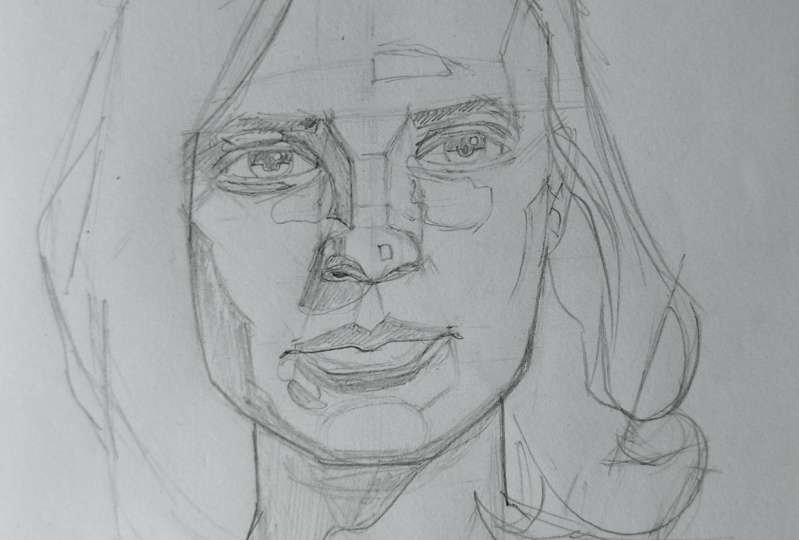
7. Continuing the Block in : So with the general
shape established, my next thing that I
want to at least get in for now is the axis lines. Now keeping consistent with
the tilt of the center axes. I also want to make sure
that I'm also keeping my horizontal axes in
relationship to those. Now, given that there
is a slight tilt, one thing to consider
is that even though the hairline at the very top is on a different axes
because of how her hair is kinda
coming down the head. I'm gonna be primarily
focused on the brow line, the bottom of the nose because I already have the hairline and the chin established and those themselves create their
own kind of axes. Now a very common
starting point when breaking down the axis
lines in relationship to the front plane of the face is essentially dividing
it into thirds. And this is a very sort of Andrew Loomis style approach
of constructing the head. Now, there's certainly
nothing wrong with that. And it's a maybe a
good starting point. But you'll find that on a lot of people that It's sort of a
generic starting points. So you wanna be a little
bit more mindful about the different sort
of proportions. So keeping in mind from the
hairline to the brow line, brow line to the
bottom of the nose, the bottom of the
nose to the chin. Those are sort of like your
generic starting points, which you want to look
for in every person or every model that you
draw as you want to find where they
slightly deviate. Because it's very seldom that you'll find someone that
is perfectly equal thirds. There's always
gonna be somewhere where it's a little
bit different. And this could also be in relationship to just
how someone's hair, it's coming down their face. And that can throw
off that measurement. So something to be mindful and something
that just look out for. Now. If you just need
a starting point, then go ahead and make
those equal divisions. But really you want
to focus in on where those differences are
so that you can really try and capture the
person you are drawing. If anything, always think of
it as just a starting point. And then as you start
adding information, you can make subtle changes
to these proportions. But again, initially in this stage because we're
just starting the drawing, it's okay to make
some generalizations just to move forward and
put some information in. But as soon as we
start seeing things where maybe we need to
make some adjustments. It's something that we
want to be mindful of and just keeping the back
of your head so that we're not getting
to in a sort of a formula of drawing heads because we want to try
and avoid that if we can, so that we're being a little bit more accurate to
our subject matter. Now with the axis
lines established, I want to continue to break this down a little bit further. For me logically, that's
going to be the eye sockets. And I'll start off
with my center line. Find two little points in relationship of where the eyebrows are
going to be placed. And then I will
essentially we'll just build my sockets out of that. Now. The one thing I need to keep in mind is the eye sockets themselves are probably
the next largest shape that I'm putting in here. So they are going to occupy a good amount of space
on the head itself. More so because we're
looking at her straight on, I don't have too
much perspective. So one thing I'm also
going to be keeping in mind is as I'm
building this out, there are elements of symmetry that I'm going to have
to be looking for. And it's not to say that I do see some asymmetry in
some of the features, but in just getting started with placement
and things like that, because of the angle
I'm working from, I want to make sure
that I'm at least capturing a good balance between left and right and making
sure that things are aligned and nothing
is looking to off. Now as far as blocking in
the sockets themselves, I tend to stick with a
generic sunglass shape. Because the reason I want to build them that way
as I want to sort of encapsulate the ball of the eye in the entirety
of the socket itself. So I want to establish the
entirety of that socket and I'm trying to think about the skull underneath as
I'm building that out. So the sockets
can't be too small. We have to have enough room to place the entirety of the eye. I need to make sure
there is room for the interior portion
of like where the tear ducts are
being occupied. So all of these little things, I want to just establish
a large shape. So it ends up looking like
a pair of sunglasses. And it's really just
enough for me to have enough room so that I
feel comfortable as I start to construct the
rest of the eye later on. With the sockets built out. Now essentially I can
just start breaking things down a
little bit farther. Now in this case, what I like to do is at least find
the tear ducts. And for this particular pose, because she's facing us, it'll be nice to basically make direct comparisons
from side-to-side. Now, if this were
a three-quarter, you obviously couldn't do
that because we're not really seeing both sides of the face. But in this particular instance, because I can see
both sides equally, for the most part, I can make relationships right across that whole front
plane of the face. And so as I find one tear duct, I can see where that is in
relationship to another. Then essentially carry it over to the other
side of the face. And I'm essentially
going to be doing this for the majority of this portrait only
because of the angle it allows me to make these
direct relationships. But nonetheless, if if I were
drawing a three-quarter, I would still maybe start
with the eye sockets, the tear duct, and then slowly work my way
down the portrait. But in this case
because of the angle, it allows me to just make direct relationship
comparisons from side-to-side. And I'll build out the rest
of the drawing that way. So with the tear
ducts established in the sockets at it now allows me to start working my way down
the rest of the portraits. So I'm not necessarily worried about drawing in the eyes
or anything like that. I still want to
establish the rest of the features in a
very basic sense. What I'm doing here is I'm taking from the tear
duct all the way down to the outer edges of
the wings, of the nostrils. And the only reason I'm
doing that is I want to think about the
entirety of the nose. So even though we
can break the nose further into separate planes, I want to think about the
entirety of the shape and the space that it's occupying on the front plane of the face. Once we have the large shape
of the nose established, then I can start breaking
it down into subdivisions. So I want to be thinking about
the bridge of the nose as it works its way down to
the ball of the nose. And realistically, because
I've already established the outer edges of
the nose itself, I don't necessarily
have to think about the side planes as much
because that shape that I established from
the very beginning here almost automatically
built the side planes. So all I'm really focusing in on her is gonna be the bridge of the nose itself and then the ball of the nose as
it connects to like, let's say the rest
of the nostrils. Now the one interesting thing
about her is that she has a very interesting
knows type in the sense where I do see bits
of cartilage that are established around the wings of the nostrils into
the side planes. And that's a cool
little effect that'll maybe dabble or try
and separate later on. But for now, I just want to find the largest
shapes to work with. And then as we get more information in the
rest of the portion, we can start focusing in on those smaller shapes
that are unique to her.
8. Building the features: As I keep adding information
to the features, I want to go ahead and still
check myself and make sure that things are lining
up the way they should. So in this particular instance, I want to make sure
that the outer edge of the eye socket and its relationship to the
wing of the nostril. And this sort of
triangular effect that I'm seeing from the eye
sockets to the nose. What does that look like? Are things lining up properly? And so these are all like kind of as you go along and you start adding
bits of information. These are just different ways to keep checking yourself to make sure that things are lining
up the way that you see them. And if something is off, this is the sort of the time and the drawing where you
want to change it now in this early stage of
construction so that as you go forward and you start adding more detail and more information
and things like that. And you don't want
to have to go back in and make big adjustments. So if I continue along with
the drawing as it is now and I see something that's maybe off a little bit off
or anything like that. I want to go ahead and try
and resolve that as best I can so that I don't have
to go back to it later. Now to find the mouth,
I'm going to just take an angle from the corner of the nose and then find the corner or the
node of the mouth. And then once I find one, I can essentially
carry that over across and then find
the other side, making sure that everything
is still in the line and on its axes with everything else I've established
and thus far. Now, the nice part is, is that as we're kind of getting the majority
of the features placed is now that I have
the mouth points in there, I can start comparing the
lower half of the face to the upper half of the
face and make sure that things are still lining
up the way they need to. Now the nice thing too with the corner of the
mouth is that we can pull these rhythms here and which help
establish the cheeks. And realistically what I'm thinking about is the cheekbones underneath the skin itself
and how that is established. And realistically you can
also use the shadow patterns, even though we're
not really doing a tonal drawing per se, you can use shadow patterns as a guide to help you find some of that
underlying structure. But because I'm just
dealing with line here, I'm just putting in these
rhythms from the corner of the mouth into the cheeks just so I know where things are. So with the two points of
the mouth established, I can start to
fill in the mouth. But I also want to
be thinking about the entire muscle shape that
this sort of space occupies. So it's not just the
lips themselves, but it's also what's
below the lips. And then that includes
the chin and some of the anatomical nuance that
is connected to that area. Now, I'm still
going to start with the lips because
then I can kind of build off that area
with the top lip. I want to just keep
it fairly simplified. That sort of bow shape
that we're used to seeing in that kind
of fits her type. There's some, there's
some subtlety that we'll get back to. But for the most part, just
to get to established, I'm going to keep the lips, the generic shape for now. So as I work in this area, even though I'm establishing
the lips themselves, I always want to
be thinking about the surrounding areas as well. So once I get the
top lip established, I want to be thinking about how that relates to the lower lip. And then there's always
that little tiny gap below the lower lip before
it reaches the chin. And there's this
stair-step effect that takes place as well. And while we don't
really see that so much in a front view, it's much more obvious in a
profile or a three-quarter, and it can vary quite
greatly depending on the person and their type. But I'm just trying to keep
that in mind as I'm working here that I know that these
little spaces have to exist. So putting the lower lip in, I'm thinking about just that
space it occupies as well as the surrounding area and how it connects to the gel
around the mouth, and then how that interlocks
with the rest of the chin. Now one thing to keep in mind is depending on
the person's type. Sometimes the chin can be a little bit on
the rounder side. On a male, it might
be a little bit more square and blocky. And depending on
the person's type, you can add additional
planes here if you see fit. And maybe on a male that
might make sense to add additional transition planes
in the area of the chin, but on her It's not
overly prominent. So. I want to just keep it
really soft and symbol. And I think in general, when drawing a female, it's probably best
to keep it that way so that it's not overstated. So with all the features
roughly placed, I can start really focusing in on not necessarily details, but I can start breaking
things down into smaller, more defined shapes. Now, in this
particular instance, I do want to better establish the exterior
silhouette again. And then the only area
I've really kind of neglected is kinda putting
in the eyes themselves. So even though I've
established the sockets, I still have to go in
and place the eyes. And I think one of the reasons I have a tendency to save it for the last bit of information is that
there's a lot going, a lot of information
that's going on in the eyes themselves. So outside of the sockets, There's things we have to
factor in such as the lids, how they wrap around
the ball of the eye, and there's a lot of
other things at play. So I find for me, drawing eyes are a little
bit more difficult, so I have a tendency to hold off and attack them lasts I can
put all my energy into it, but before I get to that, we'll go ahead and just clean
up some of the drawing, kind of refine some of the outer silhouette here
and then get to the eyes. Now, you could certainly
approach it differently in the sense that you
could very well attack the eyes straight on it. And it's really just a
preference thing on my end. Ultimately, they have
to go in any way. So it doesn't matter
if you get to him first or you get to them last, but just for me as I like to establish everything
else first and then work my way back
up and then spend the extra time
making sure that I resolve the eyes as best I can. And so for me, what I usually
end up doing first is just better establishing
the eyebrow itself. And in this particular instance, on this left eye here there's a lot of shadow
shapes going on. So I'm going to really lock
onto the shadow shapes first and use that to help me construct
the rest of the eye. Now, this could be very
different depending on the lighting situation
and things like that. And I'm not necessarily
going to fill in any shadow, but I do want to use those
shapes as a way of helping the place and construct the eye. So that's something to keep
in mind as you're working, is that even though we're
not dealing with tone, it doesn't mean we can't
use the shadow shapes as a tool to help us construct
portions of the drawing. You'll see here is
that as I'm working, I'm essentially constructing
around the eye itself. So I'm not really focused too focused on the lids or
the eyeball itself or anything like that as
I'm just kinda focusing on the areas around it and I'm circling around so that as I add information to
the interior socket, the exterior portion
of the socket, I'm kinda just slowly
inching forward to the eye itself and eventually start adding the lids
and things like that. But I kinda just approach it one little section
at a time so that, that way I don't get too overwhelmed with all the
details that are going on.
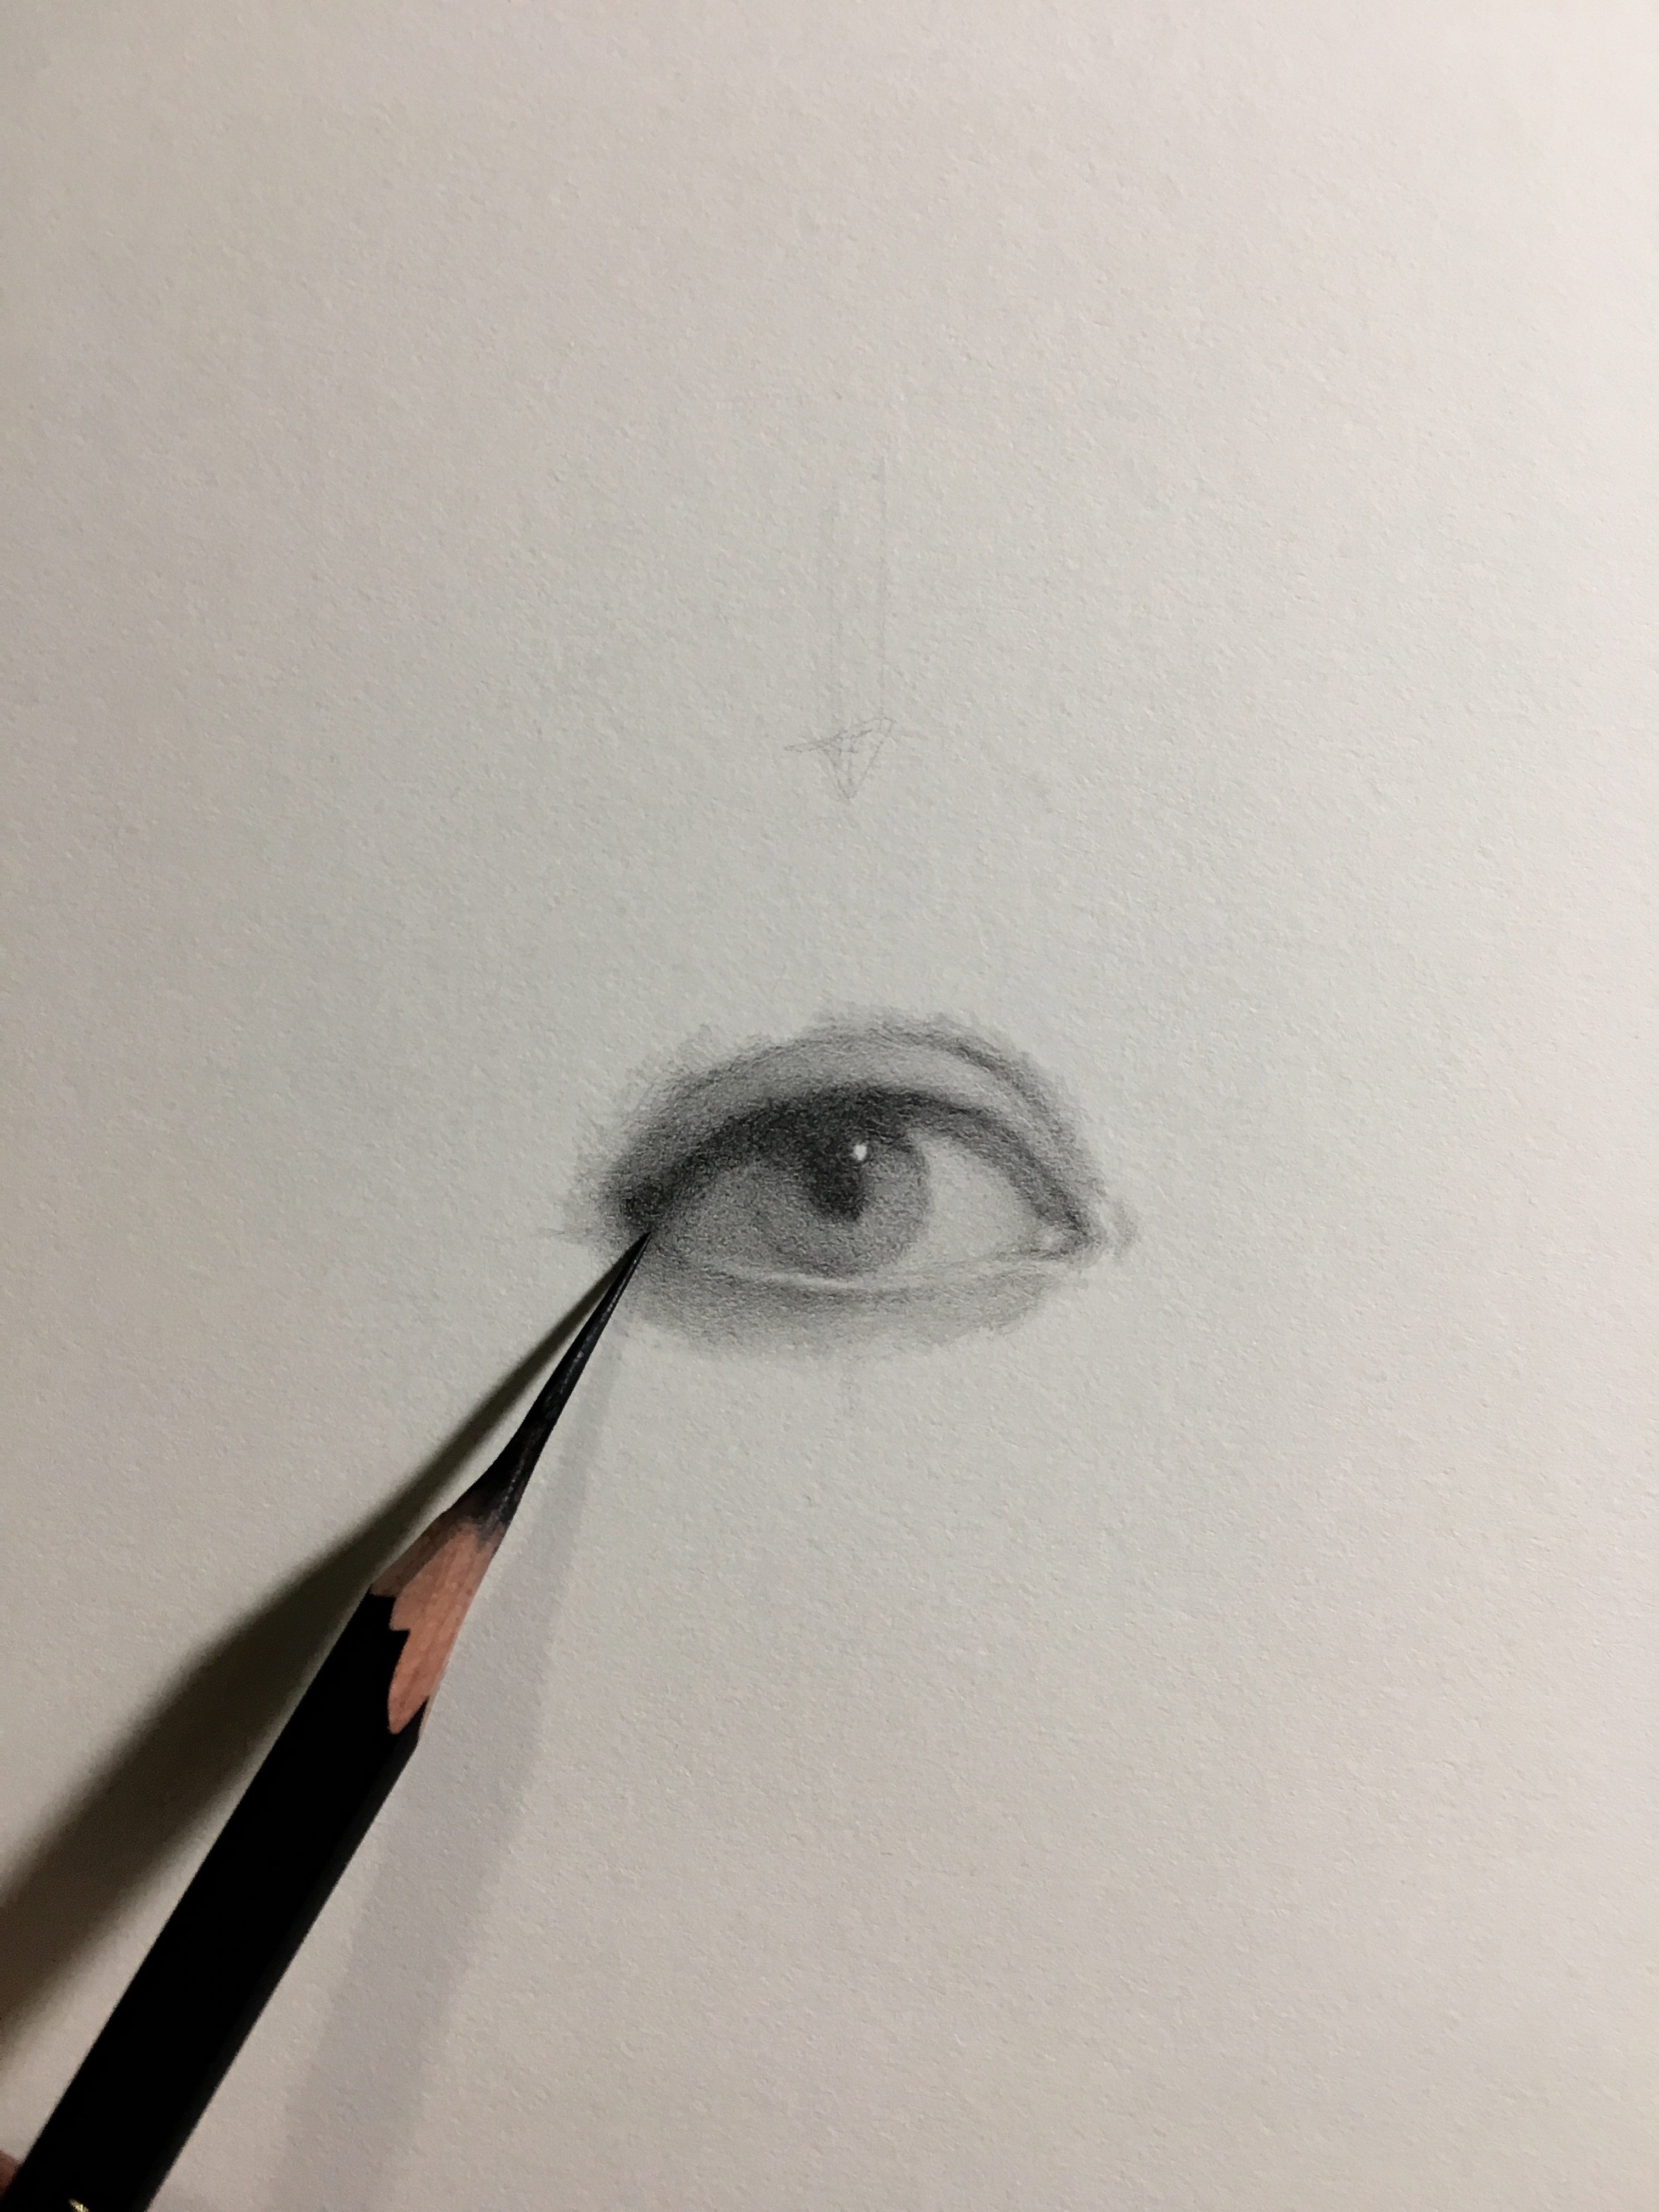
9. Continuing the features: So as I continue along
with the eye here, I'm just going to be drawing in small little
sections at a time. And realistically,
what I'm looking for in this particular
eye is actually just looking at dark
against light shapes because this eye is so
heavily in shadow that I don't want to
oversee or put in excessive detail for a block in that detail
might come at this, we're going to be
a finished drawing and I was modeling it. And then I want to
see that detail that might be
something to consider, but given that this
is a block in, I don't want to
overstate anything. I just want to find
the absolute necessity in terms of the
information that's going to drive the
drawing forward. So in this particular instance, because this eye is
so heavy and shadow, I'm going to actually just
draw the shadow shapes in because it's really
going to help establish the eye a little bit faster. And I think the big
effect is going to be stronger by having
those shadow shapes in there. Now ultimately, this
is going to depend on your model or your
reference that you're using and what the lighting
situation is going to be like. But if it means that you have to establish some of
the shadow shapes a little bit earlier
than you need to, just to help you resolve an area or find information or
help you block in better, then go ahead and do that. I'm not really
against prematurely putting certain things in
if it's going to help you. But again, it's all
situation dependent. So it really depends on
your lighting scenario. And if you're dealing with a direct light source like this and you have heavy
shadow shapes. Sometimes it can be beneficial, which is why I'm going
and just drawing in the shadow across the
cheek, down into the chin. It all kinda, it's
this large shape. It'll help create
the light effect that even though I'm
not dealing with tone, having those shapes in there kinda help you measure
against other things. So it's one of those
things where you have to just pick and choose what information is
going to help you. And in this case, to resolve some of these areas, drawing in some of
the shadow shapes is going to be
beneficial for me. Same thing for the nose as
I did with the eye is at, to help construct this
a little bit further, I'm going to use those shadow
shapes to my advantage. And part of this area, even though she has a
very specific knows type, I'm going to see more
of that perhaps on the light side versus
the shadow side, which is going to just kind of, it's all going to connect
to this cast shadow that's coming off
of the nose itself. So this side of the face, I can simplify this area. And I don't want to overstate
too much information. Once I get over to the
light side of the nose, there might be little extra
things that I may want to put in that are more specific
to her nose type. But for the shadow side, I can simplify it down so that it doesn't
become overworked. But also to the way I think of something
that's in shadows. I don't want to draw too
much attention to that area. I want to kinda keep that
shadow shape large and simplified so that it reads
very strongly as a shadow. Now one thing I'll say is
that as you're working and you perhaps start mapping
out some of these shadows. If you're having a difficult
time making out what's supposed to be in shadow and what's supposed
to be in light, especially in small areas, e.g. like the nose or the
mouth or the eye. Then what I would suggest
is put in just a very, very light bit of tone, just so that you can visually
separate lightened dark. Don't want to go overboard
with it because if you do need to make corrections and you have to take something out, then if you have a
heavy tonal area, it becomes a bit more difficult. But if during the
block M process, you come into areas where maybe things are
getting really close together or there's lots of information in a
very specific area that's maybe hard to make out. Put in a little bit of
tone for yourself that way you can differentiate
a little bit easier and then that
way that can help you with the construction
process as you move forward. Now as I work down
towards the mouth, I know she kinda has a lot of little shapes going on in the lower lip in around
this shadow side. Now, in this
particular instance, I'm gonna go ahead
and actually try and find all of those little bits of information just so that I have a very clear notation
of what's going on. So I do see a little bit of the lower lip separate
from the flesh area. And then there's a little bit of this kind of small little shadow shapes
that I'm seeing in. As much as I'm going
to simplify them down, I do want to make a mental note about all these little things that are going on over here. Because ultimately, if the drawing work
to progress further, it's something that
I need to make sure that I'm accounting for. Now. It doesn't mean
I'm wanna get carried away and just put in every
little thing that I'm seeing. But if there are things
that when I squint down, they still stand out, that means that the shape is relevant enough to where
I need to account for it. So as you're moving
forward in your drawing, one question I would be asking myself is
that when I squint down to try and
simplify certain areas, if they still stick out to me, maybe I should go ahead and
include them in my block in. Again, that's going to be
something that varies from drawing the drawing and
the lighting scenario. And there's a lot of
other factors at play. But in this particular instance, some of these smaller shapes
that I'm seeing around the mouth area
really stand out to me and whether or not they
would get fully fleshed out in the Finnish
might be another thing, but for the sake of a block in, I'm gonna go ahead
and put them in. So as I work over
to this other eye, I'm gonna have to be a
little bit more careful only because I don t have shadows to really lock onto in this area and this I is
fully out in the light. So what I'm gonna do is I'm gonna just trying to
relate things from side-to-side to the other eye that I've drawn just
to make sure that my alignment between the lids and the iris and
everything like that. Everything is looking
like the eyes are a unit. So I don't want the
hard part sometimes about drawing straight on
as you have to match eyes. And that's just one of the more difficult aspects of drawing a straight
on portrait. So especially with an I that's fully out in the
light like this with no shadows to lock onto. I just have to slow down and be a little bit more careful. In this particular instance, I just need to make
sure that the lids are staying in line
with each other. The gaze is staying in
line with the other eye. And then really after that, then it's just a
matter of drawing the lower lid and making sure that everything is
on the same axes. And that's one thing
that we talked about at the very beginning is when we're dealing
with straight on, then that really doesn't
matter regardless, even if it's
three-quarter profile, is that all your
axes have to stay in line with each other so that
nothing goes off kilter. So that's just
something I'm really trying to pay attention to as I'm drawing
these other aspects of the features is
making sure that all of the axes are staying in
line as I draw them. And then any other
things that stand out like if I see a
halftone shape or anything that maybe I can emphasize
it a little bit just to help me lock the eye into the socket
a little bit better. Or even I may draw
like if there's a very specific highlight shape or anything like
that that I see, I may go and actually draw in that highlight shapes
so that I have something to latch onto
in the light side. So as we keep moving forward, we're getting to a
point where we have the majority of the
information in the drawing. And then what we kinda just get to a point
where we have to start refining and perhaps
we start getting more specific with some
of the shapes right now or still in a somewhat generic block in the sense where we
have everything there. But we haven't been
overly specific just yet. So I'm just trying to
keep that in mind as I continue to push forward here. But we're almost to
that point where we have what we need and things are kind
of looking all right. Everything is in
line with each other and I feel good about
the construction, but now we just need
to take it further and start to develop
it a little bit more.
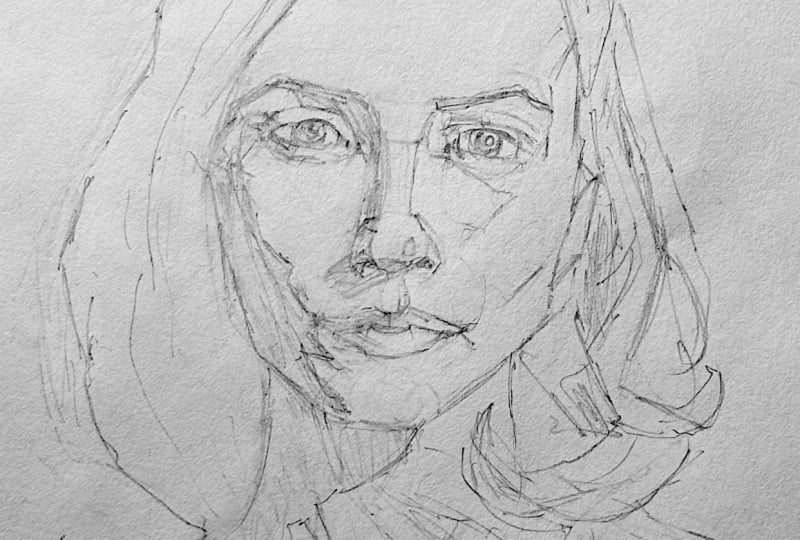
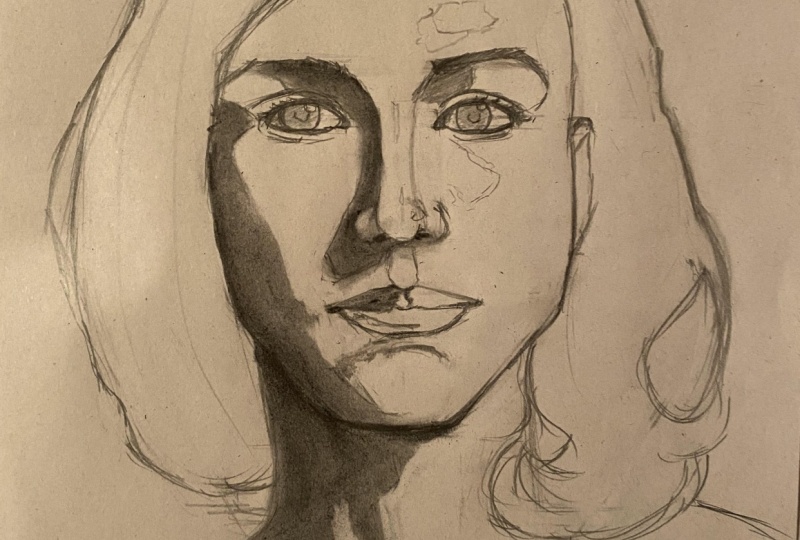
10. Drawing hair and refining: With everything in place right now at this point in the block. And it really is just gonna
be a matter of finishing up things like the
hair, the neck, and then just cleaning up and reassessing everything that I
have before moving forward. Now, you can see
there's obviously a lot of construction
lines still. There's a lot of things that
I've left in and it's really more so for
demonstration purposes. But if you find that
as you're working, if some of these excess lines become a little bit too hard to manage or you're
having a hard time seeing what is
supposed to be what, then go ahead and either
start removing some of those initial construction
lines or take out any extra information that
is no longer benefiting you. It really will vary from
drawing to drawing, but I know sometimes a lot of these lines can
get overwhelming. So you want to just
try and do your best. That's going to serve
the drawing in the end. If you need to take
certain things out, go ahead and do so. Now in terms of her hair itself, it's gonna be like I see the
way I see it as it's like a 5050 thing and that the
left side of the hair is very calm and there's
a lot of shadow. So I don't wanna get too
complicated with that shape. I want to keep it simple. Whereas the right side
of the hair has a lot of extra curls in some
shapes that are going on that gives it a
little bit more interest. So the way I'm thinking of
it is that there's very much a passive side which
is simpler and more calm. Then there's an
active side where I have some extra information
that might be cool to put in just so that there's a little bit going
on in the hair that gives it some interests, but nothing too crazy. That's going to take
away from the face. Even though it looks
like there's a lot going on in the
hair on this side. I still want to
squint down and just look for light and dark masses. Anytime I'm drawing
hair on anyone, whether it's short
or long hair or curly or anything like that. I never want to try and
copy it one-to-one. I do want to try and
get as close as I can. And since I'm working
from reference, I don't have to worry
about the hair moving. If you are working from life, It's one of those things
where you would want to try and find a sitting
where the hair is in a nice spot where
you like the shapes and design of it and then try and just nail it in one sitting. In this particular case though, I still want to just focus
on light and dark shapes. It would be very easy to get caught up in like little strands and little extra details and the hair that
you might see like highlights or
anything like that. But that's really
kind of more stuff you would save for
the end if you were doing a finished drawing. And even then, if it
was a finished drawing, you would still
want to simplify, I think a lot of the
information down. So in this particular case
for the block in sake, I'm still just thinking
lightened dark shapes and I'm trying to design the hair a
little bit so that it looks nice for a drawing, but I'm trying to not
copy it one-to-one. Working down the neck. I'm really just going
to be thinking about the cast shadow that's
coming off of the jaw down into the pit of the neck and a little bit of the
sternocleidomastoid, which is that long
neck muscle that's creating that kind of unique
sort of sharp shadow there. But realistically,
even though I see quite a bit going on through
the collarbone and the neck, I want to try and
simplify that down into some larger shapes
and not really copy what I'm seeing there. The reason for that is that she's she has a
very thin neck and I see a lot of little striations coming off of the collarbone
and things like that. And if I were to try and
copy that one-to-one, I feel like it's going to
take away from our face. So I want to just
simplify that down into some larger shapes so
that it remains a nice, simple area that is not drawing too much
attention to itself. Now this is simply just a
judgment call on my end and you can draw as you as you
interpret things, but Anytime I'm working
on a portrait, I'm always trying to think about elements that
are not in the face itself that could potentially distract the viewer
from the face. So if there's things that
you see that are maybe very busy or other
outside interests that is going to detract from, let's say, the features of
the face or the face itself. Then I have a
tendency to try and play those down a
little bit so that the focus remains
purely on the face and everything else just
becomes a supporting element. Now with the hair
and neck in place, I can start cleaning
up the drawing and removing any excess lines
that are no longer needed. Realistically, what I
wanna do is I want to get rid of not only extra lines, but any lines that I
see in the drawing that are perhaps a
little bit too thick. I wanna go ahead and trim
those downs that I'm purely left with a nice,
clean, simple line. I really just want to see
what shapes I've created in the block and so that if I
need to adjust anything, it's going to be easier for
me to re-assess and decide. Okay. If I need to adjust the shape or if something
is completely off, I want to be able
to just then remove it without having to worry about extra dark lines or super thick lines
or anything like that. So depending on the
complexity of the portrait, this could take awhile to
kind of go through and just make several passes
over to clean areas up. And that's okay. As long as as long as
you haven't drawn too heavy handed and your
lines aren't overly dark, then this process should
go fairly quickly. But again, every drawing is going to be a
little bit different. And so I want to just
take my time and just go section by section
and start cleaning up individual areas
as I see fit. And then from there
we can start to reassess what needs to be
changed to move forward. So as you begin to take out any sort of construction lines, hopefully if there's
anything that looks off or something
doesn't feel right, then at least it gives
you an opportunity to refocus in on those areas
to see what's going on. Now sometimes again, There's going to be things
that you miss early on that just for whatever
reason your eye doesn't catch them or anything like
that and that's okay. I think that's
part of the normal drawing process as
you're working. And remember, this is still
just a block and so we're not really focused on doing a
Finnish or anything like that. This is our time to make those mistakes and
double-check our accuracy. And if something just
doesn't feel right, then we want to go ahead
and try and address that right now before we get too far along in
the drawing where it's gonna be even more difficult to make
those corrections.
11. Refining shapes: So at this point, now that
we've cleaned up our drawing, my next sort of path
that I'm gonna be making is really just trying
to refine everything. Now, depending on
what your goal is, this can mean a lot
of different things, but for me, I essentially have a good
framework to build off of. Now, I've cleaned
up the drawing. All the shapes that are
there need to be there. And I really want
to just focus in on individual areas and start
looking for subtleties. This really for me,
what that means is if there's specific
angle changes or other little tiny details that I didn't put in initially. I want to start looking
for those things now. Now, again, that can vary
wildly from drawing to drawing. Because I'm not using any tone. I'm gonna, they're gonna be
some limitations to that. But nonetheless, if there's little things
that maybe I didn't put in initially or just
sort of left out intentionally because
they would have complicated the drawing
too early for me. Now's the time to just
go into those areas, refocus, and start looking for those subtleties that makes
it really looked like her. So depending on again, what your goal is
for the drawing, we could very well lead the
drawing as it is right now. And it would probably
be fine for a block in if I was going
to take this to, let's say more of a
Finnish and let's say maybe transfer it to
another sheet of paper. Then in reality, I could probably just move forward and
just go ahead and do that. But I really want to try
and get as close to what I consider a finished
blocking so that you can see what that
looks like to me. Everyone's going to have their own
interpretation of that. But I want to try and just
get this as refined as it is so that if I was
taking it to a finish, I would want to have all of
this information in there for myself before I move forward into tone and
things like that. Now, in reality,
all I'm gonna be doing is just injecting a
little bit more information, looking for more subtleties
like angle changes and putting in details
that I skipped past initially like the pupil, maybe the the subtlety
and the lower lid. Extra bits of
information in the nose. Again, that's going to vary
from drawing to drawing. So it's one of those
things you just have to assess each time you work. So even in an area like this
with this particular eye, there's quite a bit going on. So this would be an area where I would slow down
and I would really want to assess each individual
shape that I'm drawing so that I can be
as accurate as I can. So in this instance, like the lower lid area, there's actually
quite a bit going on. And as it connects to the
corner part of the eye socket, there's a little cast shadow. So there's all
these little things that could potentially add up. And I think it's more of a cause in this case of
the lighting scenario. But every drawing
again is going to be different so that you might end up seeing
more information, seeing less information
from drawing to drawing. So sometimes you may not
really need to put that much, but it will ultimately become the way I sort of filter all of this is
what is going to help me. And if the answer is, this little bit of
information is going to make it easier for me to
understand what I'm looking at, then I'll go ahead
and put it in. If it really doesn't matter and I'm maybe an indifferent to it, then maybe I'll leave
it out or simplify it and maybe not develop
it much further. Ultimately, that is up to you. But I would say use that
as a filter so that if, if something's going to help
you go ahead and use it, put it in, Make it count. But if not, then
maybe think about it. Don't, don't actually put an unnecessary things that are
just going to confuse you. So as I'm working
through the nose here, there's very specific plane
changes that I'm seeing in the cartilage that even though this area is
in heavy shadow, I want to at least put some of that information
in there because it might help inform me as
far as what I need to draw or look for
in the light side. I would say this lower half of the face in particular on her. There's a lot going on as we get to the side of the cheek. And as it connects to the mouth, there's lots of little halftone
shapes that I'm seeing. And so this is an area where I'd really want to slow
down and try and look for very
specific shapes that are going to be reflective
of her likeness. And depending on what your lighting scenario is and
the model and all of that, There's always these variables that you have to account for. And so if you find yourself in a situation where there's a lot going on in a specific area, then you really just want
to slow down even more. Now assuming we've taken
the time to measure in the relative proportions of our block in our
feeling pretty good. Then it's really just a
matter of working within that area and starting to break it down
section by section. So as an example, the lips themselves are kind
of two separate shapes, but they're connected
by shadows. And then those shapes are then connected to the
chin and the cheek. And so all of these little
things are interconnected. But if you focus on one
little section at a time, it's much easier to manage
than thinking about everything that's
going on all at once. So e.g. a lot of
what's going on and the lower lip and some of the smaller shadow shapes
that are happening. And as they connect
into the gel, there's these halftone
shapes that I'm seeing in those halftone shapes aren't strong enough to be
part of the shadow, but they're helping group
the shadow together. So I may indicate those with some softer lines just so
that I know that okay. These areas all essentially
need to be tied together, but they may not be part of the larger shadow
shape in general. Now, again, that's
just a judgment call, but for me that I find that
beneficial when there's very strong halftones to
just group them as part of the shadow shape so that you're left with a much
larger shape overall, rather than a bunch of
small shapes that may not necessarily make
sense on their own.
12. Finishing the block in : So as we're getting close
to being done here, There's only a handful
of things left for me to really focus on. And again, with this
particular eye, because it's out in the light. There's not a whole lot for
me to lock onto in terms of making it feel connected
as part of the socket. So what I end up doing in
this particular instance is that some of the halftone shapes that I see in the
interior portion of the socket, as well as the lower lid and
that whole general area. I end up just trying to find little shapes that
allow me to connect it to the rest of the eye
so that it doesn't feel like it's
this island that's floating out in the middle of nowhere in terms of the
light side of the face. And so that's something
that ultimately, if we were doing a
finished drawing, that might get downplayed. But at least for the
sake of the block, when I want to find
as many areas where I can make things
feel connected. So I'm kinda, kinda
emphasize some of those halftone shapes that I'm seeing so that I
can finish this i, and just kind of make it feel just a little bit more
connected to everything else. There's still a lot of
information in terms of the lids themselves, the pupil and the iris
and and all of that. But realistically, I
was saying previously is that when you
have an eye that's completely out in
the light by itself, sometimes it can be a little bit tricky to make it feel anchored. So like I said, in this instance, I'll
play up the half-tones. I'll even draw like the highlight shape that
I'm seeing on the cheek. Just let it feels more
cohesive overall in this area. And knowing full well that if we were doing a
completed drawing that some of those mid tone
ranges in the flesh would allow me to just make that I feel a little
bit more grounded. But since we're
working just in line, sometimes it's a
little trickier, so I'm using whatever I
can to make sure that this eye feels connected
to the rest of the face. I'm going to do some
last minute things here in the hair as well as the neck just so
that I feel like I'm not neglecting these areas now. I wouldn't necessarily
have to go back in. I think if I didn't want
to because these areas are fairly simple and they don't necessarily need a whole
lot of refinement. But just for the sake of doing
a nice finished blocking, I wanna go ahead and revisit
these areas and maybe just describe a little
bit more information. Maybe put some more details
in the hair just so that it looks cohesive with what
I've done in the face. I don't want one area
of the drawing to look incomplete versus another. So I want to try and bring
the same level of finish, even though again, the block in the same level of finish to
the entirety of the drawing. Now I don't necessarily
have to do too much in this area because again, the neck and the hair and all of these little areas that are
further away from the face. I don't want to draw too
much attention to them. So I'm gonna just
put kinda what I feel like I can get away
with information wise. Now, you can certainly
do do it differently if you feel like you want to add more information or
anything like that. But again, keep in mind that when you're
working on a portrait is that you want to
try and maintain the emphasis purely
on the face itself. So any peripheral areas like the hair or anything
like that are always going to be
supporting elements. So I like to not overemphasize too much information
in those areas. Getting back to the hair
on the right side again, this is a little bit more
active side and there's some cool little
bits of information that I'll go ahead and put in. Since the other side of
the hair is primarily going to be in shadow and
it's a much simpler shape. Now again, I still
don't want to put in strands of hair or
anything like that. I'm still thinking about lightened dark masses
and seeing where the hair is sort of
curling in on itself. But I still want to
try and maintain. Large mass overall
and then maybe find a few individual
shapes on the interior that will maybe just give it a little bit more life
than just having it be one solid, flat mass. Now there is one
thing I will say on the lower portion
of the hair, or kind of creating some smaller cast
shadows on the neck. And I see that kind of
repeating and a few areas. Now I won't necessarily
those kinds of details in because
for a block in, I just don't really feel like it makes sense that
those would very much be like finishing elements if we were going to take this
to like a tonal finish. So just kinda keep that
in mind unless you have a very prominent cast shadow
or anything like that. If you see little subtleties of very small shadows
that are taking place, I, I don't necessarily think it would be that important
to include those. You certainly can,
if you'd like. But I would say try
and play those things down so that they don't
stand out too much. So this step is
completely optional, but it's something I might
recommend so that it becomes a little bit easier to see what shapes you've created. And that is, once you feel
like the block and is in a good place and
you don't have to make too many corrections. Or if you feel like
you know what, I've reached the
point at where I don't know if I can do
anything more to this drawing, then I would suggest putting in just a little light tone in your shadow shapes or any areas where you feel
like it might be beneficial. And that just allows you to
see the drawing a little bit differently now that
you're not just looking at a series of lines. To me, this is also
another way of using that light tone as a tool so that if I need
to make corrections, they become a little bit
more obvious now that I have some contrast on the paper, I'm filling this in
with a hard pencil so that I don't go too
crazy in terms of value. But it's enough where there's some contrast
against the paper. And if something feels off, I can just make
quick comparisons. And if I need to take
something out or make changes, then I still have that
flexibility to do so. So as I'm finishing up again, I just want to emphasize, even though this is the
end of the block in, is that all these steps
that we did originally from the beginning is the
most important part. So as you're beginning
any drawing, whether it's a portrait or still life or
figure or whatever. All of the steps where
you're measuring and plotting angles and trying to find spatial
relationships and making shapes. That's kinda where you want to spend the majority of your time. And these, these last little
pieces I'm doing here, It's kinda, it's
kinda the reward. You get to fill in some shapes and get to see what you've made. But all of the work
happens up front. And that's really
where you want to just give yourself the time to really slow down,
measure, find angles. And in my opinion, and I remember when I was a student is that doing
these block ends was the most difficult thing and it should take a
while in the beginning. If you're just starting out, give yourself plenty
of time and don't put any pressure on yourself to try and get these done quickly. The more you do, the
more you practice them, you'll naturally get faster as you get confident
with the process. But the first few
drawings you end up doing could take
you several hours. And that's okay. As long as the drawings accurate and you're
going through the steps, you'll gradually just pick
up the pace and you will, you'll start to understand
and things will become a little bit
more intuitive. But for now again, just give yourself
plenty of time to go through the very
beginning stages. And the emphasis ultimately
is going to just try and be on accuracy
and proportion.
13. Start three quarter: So as we get started here, the main reason I chose
this particular pose, an angle is that it's fairly
standard three-quarter. It's not too extreme. It's not it's kinda like a nice happy medium,
three-quarters, something that's fairly standard that you may come across
as you're working, either from reference
or from life, there's a good chance you're
going to find yourself in some sort of
three-quarters scenario. So now, depending on how far away a model
is turned or gaze, there's always gonna
be variables in terms of where the center
line is placed. But nonetheless, again, this is a very standard
three-quarters so that hopefully I can go over the process of a block in
and how I get started. Now you'll notice
I've started with this sort of oblong shape. That's not quite an egg
shape or anything like that, but it has a couple
of points to it. And what I'm looking for here essentially is like a
corner of the chin, the back of the skull, as well as the forehead. And from the back
portion of the skull, I'm going to pull this
line down and just trace it over to where
I think the neck is. Now for the time being, All of these are
just estimations, but it's simply a way for
me to get a large mass established on the page right away without overthinking
it too much. Now this could very well change depending
on the degree of turn or how much of a
three-quarter you're working with, depending on the pose. But this isn't a bad way
to get started because you're accounting for a lot
with a very simple shape. The next thing I want to
do immediately once I have something on the page is
establish a center line. Now again, this is a fairly
standard three-quarters, so I don't have the nose
going past the far cheek. It's just it's a nice
balanced three-quarters, so but I still want to have
a center line in there. So I kinda have a
good idea about how much space I have on
one side versus the other. With a rough shape established, I immediately want to start
thinking about the hair shape and essentially the exterior
and interior silhouette. Now because in this instance
she has short hair. There's not a whole lot
I need to account for, but I still want to
get some sort of basic shapes so that I know
what I'm working with. So what I'm going to focus on
right now is just establish the interior angle of the hair as it's wrapping
around the skull. And then I want to think about the back portion
of the hair shape. And it's gonna be a fairly
simple geometric shape, but I still need to account
for it so that I have the entire shape that
I want to work with. And things can be
changed from here, but I want to just get started and get something on the page. One thing you may
want to consider is really in these early
stages of the drawing, I want to try and capture is this very nice poster effect. Meaning with just
these simple shapes of the head and the hair and those interior and
exterior shapes is I want it to read
from a distance. Does is what I'm establishing right now
in these early stages, does it already have somewhat of a likeness in the
overall large mass? And I'll try and
stay in this stage of the drawing until I feel like it's working fairly well. I wouldn't want to move too
far ahead at this point if that large mass effect
was not working well for me. Now in this particular instance with her having short hair, there's not a whole lot
to really try and get in. I'm gonna be more focused on specific angles that I'm seeing. But nevertheless, if the model has longer
hair or shorter hair, we still want to
try and establish this large poster
effects so that it sets the stage for
the rest of the drawing. But at least we got these
large masses established and looking as good as
we can get them for now, this early on. So with the general
shape established, I want to go ahead and start
plotting some axes lines. And I am keeping in
mind that there's not a whole lot of tilt
overall in the pose. So what I'm going to really
be focusing on is making sure that all my axes lines are
in line with one another, but also maintain that
there is the spacing between the left and
right side and how much of one side
versus the other. So that's something I'm
always gonna be keeping in mind given the
three-quarter pose. Now generally speaking again, we can think of
the front plane of the face is being broken down into thirds from the
hairline to the brow line, to the brow line to the
bottom of the nose, from the bottom of
the nose to the chin. And that's a very generic
way of getting started. Now on her in particular, I find that the maybe the
top third is perhaps a little bit shorter and the middle third being a
little bit longer. But I won't necessarily know until I get some
more information. And so starting off with a general even thirds isn't
a bad place to start. But at the end of the day, you always want to
make sure that you're measuring against
other things in the drawing so that
you're more accurate to the model and not going
off of a formula. Once I have my axes
lines in place, I need to start breaking this
down a little bit further. And for most portraits, I like to start with
the sockets simply because it's one of the larger
masses to build out of. Now, in this particular instance being a three-quarter pose, what I want to be looking
for is the angle of the brow and then the corner
point when the brow comes to a peak is something I want to focus on because
that's gonna give me an indication of
where the side plane of the face is coming into
contact with the front plane. You can see this rhythm I pulled all the way
from that corner of the eyebrow and all the way wraps around
down to the chin. And now you see a separation
of a front and a side. And this is something
I like to do immediately anytime I'm
dealing with a three-quarter, regardless of how extreme it is. Another way to think of
it really is also is that if we were to draw
the head in a box, we want to make sure that the front plane is showing
where all our features are. And then the side plane
is mostly going to be, let's say like the
cheekbone, the ear, and then where the hair is
coming into contact with that. The nice thing is though, with
the side plane now firmly established and I
can feel a bit more confident about how I'm going to construct the rest
of the drawing. And I also have a very simple
degree of dimensionality, even though there's not
much on the page right now. With the one eye socket. And I can kind of use that as a tool to help me
construct the nose. And I really just want
to start building into the third that
I've established. Now in terms of the angle, I'm just going to keep
something generic for now. I'm not too concerned
with any sort of contours that are specific
to her nose type just yet, I want to just get the
general masses established. Now from the corner
of the socket, I'm going to basically just
pull an angle down to where I think the wing of the
nostril is gonna begin. So I'm looking for that
triangular relationship between the eye
socket and the nose. And just trying
to make sure that those angles line up together. The nice part is, is that once I find the corner of the nostrils, I can then relate it to
where the tear duct is, where the corner
of the eyebrow is, and start creating
different points to measure against and make sure that at least heading in the right direction
before I start adding any other information. The nice thing, at least
with a three-quarter, is that I don't have to
worry about matching eyes or making something completely symmetrical as if I were
drawing it straight on. So once I establish a lot of the information on the
side that's closest to us. Getting the far
side of the face, which is mostly just
gonna be the socket and the cheekbone is it kind of
wraps around that far socket. There's really not a whole
lot for me to solve. So I can spend the
majority of my time really focus in on
the side that's closest to us to make sure
that things are lining up in are essentially
where they need to be. I'm just going to establish the far socket that I see here. Not so much that again, I'm not going to be dealing
with a whole lot on this particular side of the face except for the eye itself. But more importantly, what I really wanna make
sure is getting the cheekbone that's
wrapping around the outside socket as it
goes down into the mouth. At least in the sense
of a three-quarter, depending on how
extreme your angle is, making sure that the far socket, as well as the cheek and
the mouth area are gonna be very important elements for
this particular kind of pose. Because depending on how
extreme recorder is turned, we need to be able to show
the viewer the sense of overlap in the forums as
we're constructing the face.
14. Three quarter 2: So continuing along before I
get too far ahead of myself, I want to re-establish
my center line. The reason I want to do
this is because I have enough information
in the portrait now where the original center line I use to get started really
is no longer helping me. So I want to just re-establish a new center line that's going to follow
down the forehead, through the nose,
over the mouth, and then down the chin. And the reason I want to
do this is you can see the difference from the
original center line to the new center line. And I will only adding this new center line to maintain
a sense of perspective. Now with my center
line in place, I can go ahead and
start breaking down the rest of the features. Now, I want to just establish a ball of the eye
for this far side. Not because I intend to
draw this I right now, but what's more important for me it with this three-quarter
is that I want to make sure that I'm
getting the overlap of the eye socket as well as the cheekbone around
the ball of VI. This will be one area later on where I'm going to
have to really pay attention to the
overlapping forms as I get further
into the details. But for now, I just
want to start with a simple shape and then build
the rest of the features. Using the corner of the nose. I want to go ahead
and pull a line down to where the corner of the mouth is because it's a close distance and
easy to measure. And if I need to
make a comparison, I can also use the tear duct or any other point that I've
established thus far. And what I end up doing
is a lot of the times is just making a
checklist of areas. I can check one point
to the next and I find that I do that all over the face just so I can make sure that things are lining
up where there needs to be before I need to draw
any other information. Getting to the mouth. This is one of the
more important areas when I was talking about
altering my center line. And the reason again for this is the change in perspective. You always have to
consider that the mouth is protruding off of the
front plane of the face, just like the nose is. And so the reason we need to
adjust that center line is to make sure that
the mouth stays in perspective with our
three-quarter pose. If I were to draw my mouth
on the original center line, it would be terribly
out of perspective. So that's something
that you want to keep in mind depending on the the three-quarter view and how extreme or
annex dream it is, you want to adjust
the center line for the muzzle shape
of the mouth to match it so that you can make
sure that everything is staying aligned in perspective
with the rest of the face. Now the reason I'm stressing this quite a bit is
because it's something that I struggled with a
lot when I was a student and I was constantly drawing the mouth
out of perspective. And so it's just something to
keep in mind for this area. And depending on the model and everyone's mouth
and muzzle shape is going to be very different. And so it's just something
that you want to keep in mind as you're, as
you're drawing. Is that the amount of
perspective or how much the mouth is protruding off the front
plane of the face. You really just want to make sure that you're
carefully observing that. And in this particular instance, it's gonna be very important for the little bit of the
muzzle shape as I see it overlap with the
cheek and then how the chin is inserting into
that muscle shape as well. So again, with a three-quarter, depending on how extreme it is, the amount of overlap that we see amongst the features
is going to be very important because
that's what's going to give the drawing that
sort of depth that we need given that we don't have a whole lot to work with and this
particular instance. So now with the features
all roughly in place, I'm gonna go ahead and
just start focusing on areas like the neck and just kinda reshaping the hair
since I haven't really deviated from the
initial block in. Now one thing you
want to try and do is as you're working
on your drawing, try and bring up everything
together so that you can see all areas of the drawing
develop simultaneously. It's very easy at
first to kind of get stuck in one area
and just focus in. And sometimes it's
better to just either step back and see what areas need to be
brought up so that everything is resolved
as you're going. Now in this particular instance, there's not a whole
lot that I'm gonna be doing on the lower portion, pass the neck, so
I'm not too worried about the collarbone
and areas like that. So it's not something I'm
going to even focus on as far as the hair concerned
and like areas like the ear, the majority of it is in shadow. Based off of my
initial block in, there are still some small
changes I need to make. And once I get to the
front part of the hair, there's a little bit
more information that I can develop a little bit more. Now granted, shorter hair, there's not going to be a whole
lot to really latch onto. But she does have a couple of interesting shapes towards
the front of her hair that I can at least separate from the rest of the back
part of the skull. Now I do want to establish
a little bit more of a cheek plane so that way I
can at least get it in there. And I'm gonna go
ahead and just pull a line from the mouth. You can kinda see it would
loop around towards the ear. And by doing so, it's establishing
the cheek plane. But you can also see
how the form shadow of the cheek is inline with it. And it's nice in this
particular instance with the very standard sort of lighting that
we're dealing with. And you can see how the, the, the side plane of the
face and the front plane of the face are coming together
in that particular area. Now you can also see how it
ties into the corner portion of the eye socket and
we're left with that little cut out here. Now realistically, I think with this particular
form shadow, it's going to just
go down that cheek and then it starts
getting a little bit more interesting as we get down
towards the mouth and then into the lower
part of the chin. Now there's some halftone
shapes that I do see that are coming
from the gel area. But for now, I want
to just think about the major form shadow and not get too caught
up in half-tones. Now, in this particular
angle and lighting, she does have a unique
knows type in the sense that there's a lot of small little planes and
the cartilage that I see. So I really want to
take my time with this particular feature
because there's a lot of information
that's taking place. Now, I am still
thinking about there's four basic planes of the nodes
that I have to consider. But I do want to keep in mind as they go beyond
those four basic planes, There's a lot of other
information that I need to sort of put so that I
capture her nose type. Well, I have the majority of the bridge of the
nose established. I find a lot of times with this sort of lighting
scenario starting from the base or the lower part of the nose and working
with that bottom plane. Because you can tie a lot of these areas to shadow shapes. And we do have a cast
shadow coming off the nose. It makes it a little
bit easier to establish some of the
other information. And you can kind of build
off of that bottom plane and see how the wing of the nostril connects into the
ball of the nose. And then that naturally connects into the side plane and then reattaches into the bridge or the front plane
of the nose as well. I will say that anytime I
have a model that maybe has more interesting cartilage in their nose is I still want to focus on the four basic
planes of that nose first. Now in this instance
I only see three because of the
angle of the pose. But nonetheless, I still, before I start breaking
things down into smaller plane structures
or anything like that, I want to think about the
large mass of the nose itself and then slowly start dividing it
up into sections. Now if you find
yourself getting lost, maybe in some of the information than what I would
suggest is just try and either squint down a little bit more and see how you can
simplify this shape. Because ultimately at
the end of the day, we want the larger effect that's happening in
the portrait itself. So we don't necessarily need to inject some of these details. It does sometimes
help to know what's there underneath from an
anatomical standpoint. But if you're not that
familiar with any of the anatomy of the features
or the face in general, try and squint down, simplify. Think of just
lightened dark shapes. With this kind of
lighting situation, it does make it a little bit
easier so that if you do find yourself maybe
getting a little bit lost in some
of the structures. Rely on the shadows to help resolve some of
those areas for you.
15. Features: As I'm finishing off the lower
part of the mouth, again, the important part in this area is really just maintaining the sense of overlap
that's happening. Now because of the
lighting situation, it may be a little
bit hard to see. But the one important thing in this particular area is making sure that the muzzle
shape of the mouth, and as it comes into contact with the lips and
the area around the cheek is we want to
make sure that we're getting that sense of
overlap in these forms now, even though they're in the
light side of the face, it can be maybe a
little hard to see. So even in a block in stage, you really want to make
sense of these forms as one is coming in
front of the other. And so in this area
around the muzzle and the cheek is an area you'd want to spend a little
bit of time resolving. And I would say for
most three-quarters, how extreme this is, is going to vary from
model to model because of everyone's facial features
and things like that. So just keep in mind
with how extreme of a three-quarter and how much overlap you encounter
in this area. You but something
you really want to focus on and make
sure that everything looks in perspective and it's
sitting right on the face. I think on her in particular, there's some smaller sub forms like in the lower lip area, as well as some of the muscles underneath the lower lip
and around the chin. So even though they
might be in like a halftone type
of shape or area, as far as lighting is concerned, I would still want to go ahead
and include them and make specific shapes so that I had something very
solid to work from. If I were going to take this drawing a little bit farther. And again, I would
say that depending on the lighting situation and
even the model in particular, if you have halftone
shapes that aren't necessarily super in shadow
or anything like that. If you can make them
very specific or even grouped them to
the larger shadow mass, it might be a good
idea to go ahead and even do that as part
of your block in just so that there's a
little bit more cohesiveness in some of the shapes that
are occurring on the face. I think in this case really
it's not a whole lot, but you can see some of
the smaller shapes I've created around the muzzle
shape and the chin. And it's really just because
I want those areas to feel like they're
very locked together. And I don't want any
small shapes just floating out by themselves
or anything like that. You wouldn't necessarily want halftone shapes to be isolated. You would always want to find
a way to connect them to something else in
the face so that they feel attached to something. And they, they're not just these little shapes
that are kind of idling, sitting out in a light
space that makes it feel a little disassociated
with the rest of the head. So getting back up to the eyes, I wanna go ahead and start blocking these in with a
little bit more information. And realistically how I'm
gonna do this is I'm going to just start with the shadow shapes because they're
very prominent, especially on this eye
that's closest to us. Now I would want to start more or less near the tear duct, but I want to build out the interior shadow shape
of the socket since that's the largest shadow
mask in this particular area. Once I have that in, I can use some of the eyebrow to connect some of
the other shapes. Because we have the
far shadow shape on the outside of the socket, then that all kinda ties in together with the
rest of the eye. But what I like to do is just
think of the I in sections. Even though I know that
there's the socket, Both lids, the eyeball itself, and then some shadow shapes. I first want to just keep
it as simple as I can. So I'm just going to
try and copy the shadow shapes that I see
because I already have the exterior structure of the eye socket that I
established from the beginning. So I want to just work around that and then
build those shapes into it knowing that I have some parameter that
I can work into. And if I need to make any
adjustments along the way, I can go ahead and do
that while there's very little
information in place. With the shadow shapes in place, I'm going to start building out the rest of the eye
from the tear duct. Since at least the
tear duct I can use as a landmark to
connect everything. Now, one thing to keep in mind is with the shadow shapes there. All I really want to look
for is I want to look at the light shapes that
I see in-between. That way I don't
really have to think so much about the eye itself. But I'm just trying to look at the spacing in-between
the shadow shapes and the light shapes. I would say initially as
you're blocking things in, is try and just
think objectively about the shapes
themselves so that, that way you're not getting
caught up in trying to draw an eye or nose or mouth. And realistically, as you
go throughout the drawing, you want to just be
focused on making sure that the shapes
are accurate. And then anatomy is
helpful to an extent, areas where you start to get lost and you're not quite sure about how things are
overlapping or connecting. That's where sometimes
the anatomical knowledge can come into place. But I think in the
sense of trying to just capture the general
shapes of what we're doing. Then oftentimes they just kinda forget about what I'm
drawing and I'm just objectively trying to
recreate the shapes that I'm seeing regardless of what
feature or anything that it is. And that way I can
turn my mind off in that sense that I'm not thinking about anatomical features or, or anything like that, but it's purely a
shape exercise. Now on this particular,
I do see a lot going on in some of the shadow
shape around the lower lid as it's kind of connecting to the corner of the cheek and this shadow
shape through here. So I want to take note of that and I do see a little bit
of information coming from the lower the anatomy just under the lower lid of
the eye and how it's connecting to the
rest of the face, including the side plane of the nose and that entire area. So those things are something that I'd probably
want to keep track of as I'm blocking the eye
and the surrounding areas. Even though if we were to finish this drawing into like a tonal drawing or
anything like that. It's stuff that I would
probably play down and I probably
wouldn't overstate those kinds of things because
it would have a tendency to age her or make her look
older than what she is, but from the standpoint of a block and I'm
really not opposed to putting in more
information just so they have a better
understanding of what I'm trying to
sort of suggest in terms of the
structure of the face, but keep in mind that it's ultimately
information that you might get rid of down the road as you progress the drawing. Now as I start to
build out this far, I am going to treat it very similar to how I
thought about the mouth and the lower cheek area in that because of the angle of the
eye and how much I'm seeing, I have to be very
careful about how the forms are overlapping
in this particular area. So I'm keeping in mind
that the eye itself, as it sits in the face, I want to make sure that the eye socket is wrapping
around correctly. And then as I build out the lower lid and the rest
of the I need to make sure that the cheekbone is wrapping around the eye
correctly as well. There's a lot of little areas
in this portion of the face that I need to make sure that the overlap is really
feeling right. And so the hard part is, is that there's a
lot of little forms like the, the top lid, the way it wraps
around the ball of the eye, the lower lid. And then how all of that
is interconnected with the eye socket and the far
side of the cheek bone. So in this particular area, I might spend a
little bit more time really making sure that the way I'm overlapping these different forms and how
they're connected together. They really need to sit right, so that the perspective feels correct with the
rest of the face. So that's something
to keep in mind with the three-quarter portrait, depending on how extreme
the angle is, is again, the way that we're
overlapping forms in certain areas as
they're turning in space and as one is coming
in front of another, just be very mindful and take
your time with those areas. As a good practice, I would really just say is that just work one
shape at a time? So as I'm building it out, it's like I want to
finish one little area, add another piece, then
add another piece, and then hopefully
things look right. And then once I have all
the information in place, so both lids, the eye itself, then I can really focus and say, okay, well what's not working? What forms are not
reading correctly? And then I can go back and
make corrections as I need to. But just kind of take it slow, do it one shape at a
time and just making sure again that the
overlapping is sort of happening correctly and that things just
feel like they're locked in place in conjunction
with the rest of the eye.
16. Refining features: As I'm getting close to more or less wrapping
up this eye again, the real area of focus for me on this particular feature is just making sure that I'm
overlapping things correctly. And again, depending on the angle that you're drawing
from the light source, is that sometimes there are
certain areas in a drawing that could give you a little bit more
trouble than others. And so if you find
yourself in that position, what I really suggest that that point is you'd
want to just slow down and really just
chip away at it. Don't if there's a trouble area in a drawing is it's
just slow down. Take your time and
really try and solve that particular
area one shape at a time. Unless you're working
from life and there's a very specific time limit, then that's one scenario. But if you're working
from reference like this or anything, just really take your time
and make sure that things are looking correct before
you move too far ahead. Alternatively, is if there's an area that is maybe giving
you a little trouble, sometimes it's good
to maybe step away, buildup another area
of the drawing, and then come back to
it at a later time so that you kinda just
free your mind of that trouble area for
just a little bit and focus on other parts of the drawing and then
come back to it. Usually I would say
there's always one part of a drawing that might give me a little bit
trouble and then just, you know, it's,
it's kinda changes from drawing to drawing. So I always expect it
and when it does happen, I just don't freak out. I just take my time, work really slow and just try and resolve things as they come. So just keep that in
mind as you're working. But again, if you find yourself getting too
caught up in one area, sometimes it's good to just step away and start developing other parts of the
drawing just to give yourself a little
bit of a break. Now, just getting
down to the ear, I'm not going to
do a whole lot in this area simply
because it's, you know, it's in heavy shadow, but I do need to have some
information in there so that it's not just a
completely flat area. Realistically, when you get
something in heavy shadow, you want to just squint down and indicate things that really stick out so that way
you're not putting too much information
into the shadows. Now you could very well decide to flush out
every little bit of information just so that you know where
things are sitting. Ultimately, if we were to
continue on in this drawing, this would be an
area where I'd want to make sure that the necessary
information is there, but I wouldn't want too
much so that it draws away from the light
portion of the face. Now for the neck
and shoulder area, I'm not gonna go too deep
in this particular section. I do want to account for it, so I'm going to put just a
little bit of information. Really, I would say
the primary thing to focus on would be like
the cast shadow that's coming off from the lower jaw onto the neck and down
into the shoulder. But otherwise, I'm going to keep this area fairly simplified. And I would say in general, unless you're doing like a
three-quarter portrait where the rest of the
shoulders is involved. Then you would want
to either find a nice way to
vignette the drawing. Which is why I always look for either the neck line or how it, depending on what the
person is wearing, you really want to find a
nice way to end the drawing. But you would want to keep some of those
supporting elements, let's say like the clavicle
or the pit of the neck. You'd want to
simplify those down a little bit so that
they're not taking away too much from the face, but they do need to be in there, so it's nice to
account for them. Now as I move on to the hair, realistically because of
the lighting situation and the fact that she
has shorter hair, there's not gonna be a whole lot for me to really get into. The upper portion
around the top part of the head has a little
bit of light hitting it. And so I can indicate some of
the shapes that I'm seeing. And I really just want to
keep it fairly simple. I'm not going to be
looking for strands of hair or anything like that. I just want to kind of look
at lightened dark shapes, making sure that it reads like what I'm
seeing on the model. And then if I were to finish
this drawing in the end, realistically the back
part of the skull. The side plane of the head and everything like that a lot. That's gonna be in heavy shadow, so I wouldn't
necessarily have to worry about that area so much. But because of that, some of the little strands around the sort of the
top part of the head. I might find a few, just a little bit of highlights
just so that it's not in this completely ignored area or I'm not paying any
attention to the hair. But for the most
part with this kind of hairstyle and whatnot, I want to keep it fairly simple. Now that everything is more
or less accounted for, I'm just going to
go into the drawing and start cleaning
it up a little bit. I really want to
just remove some of these construction lines and really see what shapes I have left to work with and then
start making any sort of changes or adjustments
that stick out to me. And again, it's one
of those things where you can leave the construction lines and
if they're helping you. But at some point, it
might just start to be a little bit too much that's
going on in the drawing. So you may want to take
some of those out just so that you have a clear idea
of what you're left with. Now as I'm cleaning
up the drawing, I'm going to just
slowly start to refine those areas
as I go along. Now, I'm not really going
to be changing a whole lot, but if there's little things that maybe I missed initially, or if I had simplified them too much
initially in the block. And then now I want to go
back in and be more specific. So if there's like
little angle changes or subtleties that
perhaps I missed, then now's the time that as I'm cleaning up and I go
back over these areas that I really want to focus
in on those subtleties so that I can really try and capture the likeness
as best I can. Now it doesn't necessarily
mean you want to go in and just adjust everything, but you really just
want to focus in on each individual area and
look for subtleties. Look for slight angle changes. Look for the way
shapes are designed. And it's those little
things that add to the total effect of the
drawing in the end. And so I would say that these are the things you want to
capture in the block in, while the drawing is still
in the linear stage. Because if we were to
hypothetically take the drawing forward with tone than trying to make those adjustments once there's tone on the paper, becomes a bit more
difficult to do. So if you can capture all of these things right
now at the start, then you're going to be
in a much better place if you decide to take
the drawing to a finish. Just to make this area a
little bit easier to see, I'm going to put in just
a very light bit of tone. And that way there's a lot of lines going
on in the eye area. So sometimes that's
a little helpful. And I would suggest if there's if there's any
sort of confusion as you're going along
and cleaning up the drawing is if
you need to put in a little bit of tone just so that you can see
are shapes better. Then go ahead and do so. Considering that I'm using
a harder lead pencil, I'm not too concerned about the overall tone getting too
dark or anything like that. You know, just something
to keep in mind is that because there's a lot of lines that occur as you're
blocking things in. It does get confusing. So if you need to put
in a little wash of tone just so that you can read everything a
little bit easier, then go ahead and do that. Now finishing up the nose, even though there's quite
a bit of this in shadow, I still wanna go ahead and draw a lot of the information
that I'm able to see. So in this particular instance, a lot of the smaller
plane shapes in the nose that I
see in the cartilage, I want to go ahead and inject. So even though I've established the larger masses of the nose, there's a lot of these
smaller sub planes that I see in the wing of the nostril and around
the side plane of the nose that I want
to at least try and capture that even though they
may not be in the finish, I want to account
for them so I know exactly what's taking
place in that area.
17. Finishing block in : So as we're getting
everything more or less filled in, at this point, I'm just going to
focus on looking for smaller details are
transitional areas where I can maybe either add
more information or clean up areas so that they're a little bit
more descriptive. Realistically, I would
say at this point that the block in is more
or less finished. Now, how far you
take it from here, It's really up to you. As long as all the sort of the features and
information is in place, how much accessory information
is more or less up to you. Now because we're
really focused in this particular lesson on
going overboard a little bit, I would say what the block in. It's kinda nice to have some of these extra elements in
there like little planes and the lips or just
below the lower part of the underside of
the lip and the chin. Sometimes it's nice to maybe over-explain these areas just visually for yourself
so that you really understand what's going
on in these areas. Now, ultimately, like
I've said before, is that as you
start adding a lot of this accessory information
is at the drawing can get very busy and perhaps
maybe a little bit overdone. But because I know I'm
not taking this to a finish or adding
any sort of tone, then I feel okay with
putting in some of this extra information just
as almost its own foremost for details sake, I
guess you could say. But again, I would
leave that up to you depending on what your focus is and what you're
practicing at the moment. I think if anything, what you really want to pay
attention to is just finding different ways in which you
can describe information. Whether that's in a
particular feature or particular
planes in the face, is finding a little ways
where you can inject information to describe
a piece of form. But doing it with line
and not really relying on tone to suggest those
forums for you. Some of the more beautiful
drawings I've seen really were essentially linear drawings and that they didn't really
have any tone per se, but they were still very descriptive and they
still had a nice sense of form regardless of
having any tone or not. Now, I think for this
particular exercise, I'm still thinking about form. But more importantly, for a block when I'm
thinking about how forms are overlapping and
kinda what I was describing earlier
with the three-quarter in terms of the relative degree at which the head is turned in how an eye socket is gonna be overlaps by a cheek and then
through the mouth area. Those are the things
I would really focus on with this kind of a pose. But regardless of what your situation is with the
model or your reference, you still want to find
little areas where you can suggest form, even though we're
only working in line. So finding overlaps, finding the way certain
things are turning. Sometimes you can
even suggest these with different line widths
or anything like that. Now that's something I really
haven't talked about as far as varying or line. But to be honest, I think in a block
and I'm not really concerned with that too much. I'm really just focused
more on construction where I think varying the width of your line is
more of a finishing thing if you're going to include
linear elements in a finished drawing, but that's just my
own interpretation. But that might be
something to think about in your own work
as you move along. So again, even working on
this far I hear what's really important
is the overlap in the lids that I'm seeing on the model and making sure that the top lip is really wrapping around the
ball of the eye. And then the lower lid itself, even though it's much smaller, still needs to have some of
that wrap-around effect. Now I'm only seeing
a little tiny hints of the lower lid as it's
kinda tucking around. But in this instance I would
say even including maybe a little bit of the pupil and then maybe suggesting
the lashes. It really depends on
the person's type in the model and their
general structure. But ideally you
want to find again, those areas where if you can suggest the idea of
something wrapping around and thinking about
how the lid is hugging the ball of the
eye and that surface. That's really what
I want to suggest in this area because
otherwise I don't really have a whole lot to
work with on this far side. I because I'm not seeing the opposite side of
the far tear duct. I'm really just seeing
the single tear duct that's closest to the nose. Then I have the
rest of the eyes. It's going off in perspective. Again, things to be mindful
of as you're working. And again, depending on the how extreme the three-quarter poses
that you're working from, that you may not see as much
or even less information. It really just
depends on the angle. But the majority of
the face resolved, I'm just going to get back up
into the hair and do maybe do a little bit on
the neck here just so I can finish up the drawing. Realistically, we are
done at this point, but because the hair and the neck are
supporting elements, I want to go ahead and put in just a little bit
more information. Depending on the pose
that you're working from. Let's say, depending on, let's say what the
model is wearing. If they have an
interesting shirt or maybe they have
some accessories, how much you include in the block and is
ultimately up to you. But I like to think as
the drawing as a whole. So it's not just the
portrait itself, but it's also what's
connected to the model. So sometimes you may have
accessories that are part of the pose that are actually really important to the composition of the drawing. Sometimes too, that
could even just be the model's hair if they
have really long hair. And that becomes part of the composition in general
and part of your design. Now because she has shorter hair and a rather simple shirt, this particular pose is
perhaps not the best example. So I'm going to keep
it relatively simple. But another drawings I've done, let's say the model
has a scarf or again, like long hair or an interesting jacket that has an interesting color
or anything like that. Those all become supporting
elements of the drawing. So those are things I would include as part of the block in. Now again, given
that the focus for this lesson is
really just the face itself and the
general construction. We don't really have to
worry about that too much, but it's something to
consider depending on what reference or when
working from a model, what you want to include
as part of your block in
18. Closing Thoughts: So I hope that after watching the demonstration
videos that you have a much stronger sense of
how to block in a portrait, or at least what
your goal should be at the end of the
block and stage. Now, I just have a
few drawings here, just show you different styles of blocking that are
more or less the same. And maybe some have a little bit more to them than others. But you still get the idea about what the goal for
the exercise is. Now you can certainly
do different kinds of blockchains where some are perhaps a little bit
more simplified. Sunlight, these are perhaps
a little bit more in depth. I think it does
ultimately depend on the situation and what the
goal is for the drawing. And as you get more advanced and more confident in
these blockings, sometimes you can go with very little in that block in
stage before you proceed. So long as you're careful. But if you're just
starting out on your kind of a little bit uncertain about
what you should be doing. I hope that this gave
you an idea about the thought process
that goes into it. And I would encourage you to
really just take your time and get as good at this stage of drawing as you
possibly can, because it, things will just get so much
easier after this stage, but it does take a while to just get comfortable
with starting from a blank sheet of
paper and just kinda constructing a head out
of nothing essentially. So I'm hoping the demonstrations made sense and you're
able to follow along. And I would just encourage
you to keep practicing these and don't be too hard on yourself or put
too much pressure. It's just kind of
do the exercises, practice them frequently, and
just do the best you can. Thank you for watching.
 Mark Hill, Fine Artist