Transcripts
1. Pop-up Box Card Class Introduction: Welcome to the pop-up
box card class. I absolutely love cards that
have dimension to them. There are 3D that also
fold flat to male. And this is one of my favorite. Let me show you what we're
gonna be making in this class. This is the three
cards that we're gonna be making for this class. Now they don't look interesting
at all this way and that's because they're folded flat and that's how
you would mail them. But look at this, they pop up. Isn't that fun?
You would put them on your mantle or whatever. It just play them like that. And it has some
three-dimensional to it. But it's not gonna cost
an arm and a leg to mail because it folds very flat. So we're going to make three different
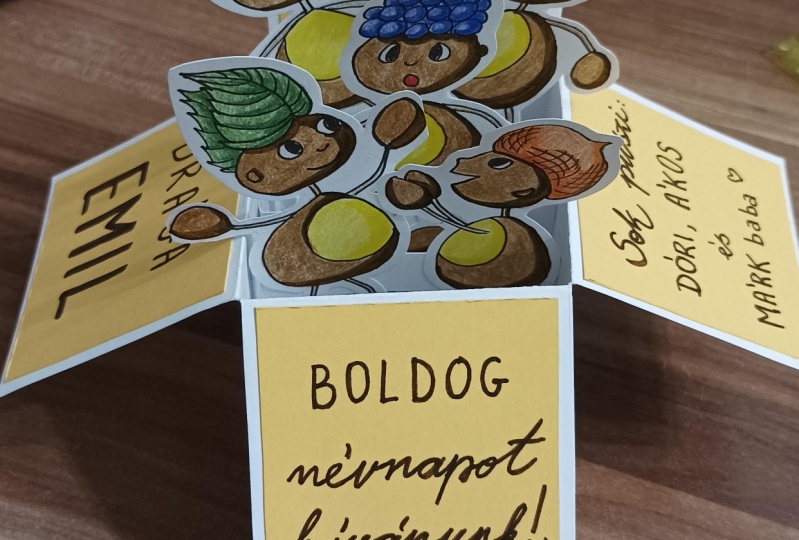
versions of this card. I've got the boxful of daisies, we've got the box
full of balloons. Then we've got the box
full of butterflies. I'll show you how
to create each and every element for the cards. I'm going to show you how to
create the base of the card. Really from there,
the sky is the limit. You can create whatever
themed card you want. Have fun with it. Not super easy to have displayed flat on
their backs though. Now, because the card
is a different size, some people may not have easy access to
six-by-six envelopes. I'm also going to show you how to create a custom envelope for your card so that they'll
matter what size you make. If by chance you
have little bits poking out of different
places of your card, you can create an envelope customized to whatever
your card size is. If you're ready to get started, let's go start creating.
2. Making the Pop up Box Card Base: The very first step
for creating this card is to create the card base. This is what it looks
like with nothing on it. Folds flat. So we need those little
strips in there and then we need the piece
for the base here. And that's what it looks
like with some stuff in it. So I've got three pieces
of card stock that are half an inch wide by three
and three-quarter inches. And all we need to do for those score half an
inch on each side. That's ready to go. This piece
here is that 11.5 inches wide by or long by
six inches wide. So what we need to do for this piece is we
need to score it at 5.5 inches and 11 inches. Then we're gonna move
it up a quarter an inch and we're going to score
it at three inches. So really that's two
and three-quarters, but I don't have a two
and three-quarter mark. And then we're going to
score it at 8.5 inches, which again is actually
eight and a quarter, but I don't have a
quarter-inch mark there. So by just shifting it up a quarter-inch,
you'll have that. You'll be able to
get that right. If you happen to have
some scoreboards have quarter of an inch
eight dementia or whatever, you don't need to
do that shifting. Then along this side
we're going to score at the three inch mark up to
the third line right here. And then we're gonna skip. Then we're gonna do right
at that little tab there. Let's move this out of the way because we don't
need it anymore. Then you're gonna get
a pair of scissors. First thing we're gonna
do is we're gonna cut this tab right off. All of these measurements
will be lit, listed on the supply list. So you don't need to necessarily remember every single one
of these measurements. I'm going to cut down that line just to the score line there. Then I'm going to fold this over just to make sure that they are all folded at the same mark. You could do the rest of the
cutting and then fold it. But I just like to
do it now so you can just do it all at once. Then we're going to cut along these lines up
until that score line. Let me go. Um, then before we actually glue
anything together, Let's get these folds in here. Make sure we have nice creases. I'm just using my finger. You can use your bone
folder if you want. There we go. So there
is our card base. Now, let's put
some tape on here. I have some 9.5
millimeter soup wing, which in Canada we have our Oliver are
labeled with metric. I believe for imperial
that would be three eighths of an inch wide. You could do half
an inch because we've our tabs here
or half an inch. But then you're leaving
very little room for accidentally getting the
tape on crooked or whatnot. So I like this size for this, I'm putting the tape on that half-inch tab
on the card base. And then on all of these little half-inch
tabs for inside pieces. There we go. Put this
tape to the side, which is press down on the tape, make sure that you've got
some good adhesion to it. There we go. Now, I'm gonna take these tabs. I want to make sure that they're
all folding back nicely. The first one here, I hold
it so that the tape is down. I'm doing it about in a minute, about an inch down and
then about halfway, halfway mark in that square. It does not need to be exact eyeballing,
it totally works. And then the only other
thing that you want to, and again, eyeballing it works. Make sure that this is
about parallel to that. That square mark there. We don't want our I didn't even know what they
would call these things. We don't want them cricket. Alright, so this one here, I place it about halfway between
here and here and there. If it's not halfway, it's okay. It's not something that has
to be absolutely precise. Then this last one
here goes in here. And this one, I take a
look at my space here, and I put about that
same space there. So we've got three tabs here. I'm going to take the
backing off of this, press that down and
then I'm going to press this peace in here. So that piece is going to
attach to that tape there. This is going to make so
much more sense in a second. All right, so we take that tape, so we've got all of
our tapes exposed. Then the score line, just pass where you
put those tabs. We're going to fold it
and then press nicely. And then I do it the
opposite way. There we go. We have our card-based all made and ready to go,
as simple as that. So we'll see you
in the next video and we'll start putting
a card together.
3. Box of Daisies: Prepping the Card Pieces: Alright, so this is
the first card that we're going to put
together here. So the very first thing that
we need to do is dicot all of our flowers and stamp
and Emboss our sentiment. So we're going to
start by stamping and her boss saying
our sentiment. My piece of paper ready here, as well as my stamp. So I'm using a verse
of Mark English is just a sticky ink and the powder is going to
stick nicely to that. I have card stock
that has a texture on one side and a smooth
side on the other. Doing this on the smooth side, you're gonna have a
much cleaner stamp when you're doing it on the smooth side of the card stock rather
than the textured side. Let's pour the powder on, lightly tap the excess off. Any of this excess powder was right back
into the container so we're not wasting it. Don't meet this paper anymore, but let's take out my heat gun. Melt this. There we go. Now my heat gun was cool. I hadn't used it for a few days, so it did take a few extra
seconds for that to heat up, but still it happens
quite quickly, so we can set that to the side. We've got four pieces
of card stock here. They are two and
three-quarters by 2.5. They are ready for us when
we are going to assemble. Next, we need to die
cut our flowers. This is the two dice
that we're using. I just liked these
two together because they're the same flower just
from different perspectives. Alright, so I have some
distress heavy stock here. You do want to have a heavier, thicker paper because you want the flowers to be able to
hold themselves upright. If by chance you don't have
something that's heavy. This is a, a 130 pound. You can put some acetate
strips behind it. I've got acetate strips here
holding up the butterflies. That'll give it
some extra support. But much nicer if you don't
even have to do that and you can simply have IT
support itself. So this is half a
sheet of 8.5 by 11. And I'm just going to get as many flowers at a here
as I possibly can. For this sample, I got three, the full flowers and then I got for the half ones
that are tilted. So I have my die face up, have the card stock over top. I'm bringing it up, I'm
running it back and forth so that it goes both ways. There we go, forward down. We're just going to
continue that until we have the entire piece
of card stock cut. I will let you watch, but I will speed it up a bit. All right, our pieces are
all die cut and ready to go. So we're going to
ink the flowers. Now I'm just using
blending brushes. And for the yellow in the
center of the flowers, this is not the most
precise way to do it. Probably a finger dollar would be a little bit more precise. But I'm just looking for the yellow in the
center of the flower, so I'm not too worried about it. While I was laying
those pieces out, you probably noticed
I was picking out little bits from here. I also have some
flowers facing one way. If some flowers
facing the other way. Just to get a little bit
more variety for the leaves, I'm going to start
with a lighter green. Put my blending brush
in and I'm going from the bottom up so that I end up with a bit of a shadow at
the bottom of my leaves. And I'm not being
super precise here, I'm just wanting
the color in there. I don't need to worry
about the bottom That's going to be
either hidden or cut off on my card. Then I'm gonna do the bottom of the flower there just because
there would be that bit of green holding below the
flower that we would see. Then once the light color green is done and you could just do it with one shade of green and it doesn't necessarily
have to be two. I just like deepening
the greens there. Oops. Just add a tiny bit of the
dark right below there, because there would
be a bit of a shadow. You can see I'm
very quick with it. I'm not putting too much
thought in it. There we go. We've got our
pieces ready to go, ready for us to put
our cards together. I'm gonna wait a few
minutes for them to dry and clean off my desk so that I'm not putting a car together with some
green ink on my desk. I'll see you in the next
video and we'll assemble it.
4. Box of Daisies: Card Assembly: All right, We've got
our pieces here. We've let them dry for a few minutes and we've cleaned up. So let's put the car together. The first thing I'm gonna
do is I'm going to put my mats on the card. Now. I just have one match. You could if you wanted put them another
mat inside of it. It's just personal preference. I wanted to say stay fairly simple and keep the
focus on whatever was popping out of the card.
But it's your choice. And then the other
thing is I only put mats on the top
part of the card. I didn't put anything right here simply
because I thought, you know what, once
the card is popped up, you're not gonna see
any of that anyways. So if you choose, you can put stuff, you
can decorate this. I didn't find it necessary. Whatever you choose to do. And I'm using a mat
collaged medium here so that if by chance there's anything that squeezes out
beneath my card stock, it is going to dry
matte and it's gonna dry clear and you're never
gonna see that it was there. Then let's put the sentiment on. There you go. I just chose colors that coordinated with the daisies
that we're going to go inside our little basket here. I'm going to put it this
down while I do this. So it's gonna be kinda hard for you to see
and for me to see. I'm going to place
it in there without glue to see how far
up I want it to go. And then I'm going to
put my finger there, add a little bit of glue,
then put it back down. And I do need to hold it in place for a second because we're using sum liquid glue here. It doesn't immediately stick. Want to hold it for a
second just to make sure that it's going to stay. For the other cards. I'm using double stick tape, I'm using the same Sukh weighing that we use to put the cards together for that one because
it's double-sided tape. I don't need to worry
about it quite as much because it will
stick immediately. We're just going to keep
building up the card. And I find it is easier to hold it in place from
the bottom because then you're not playing or
touching the flowers. I'll place them. And then I will hold
it from the bottom. For a few seconds. For a video, I'm being a little bit quicker than I
normally would simply because I don't want to be sitting there
watching me hold stuff for Just being on
your own gluing it probably would take
my time a little bit. Let it sit. So I've got
seven flowers total. I put three in the back of that. I'm going to put two in
each of the front layers. I put the full flowers in the
back and the second layer, I'm going to put my half
flowers more towards the front for no other
reason than I feel like it. You could also fill this
up with more flowers. It doesn't need to
be just this many. You can fill it up with
as many as you want. After a little bit, you kind
of get to know how far down. We need to put your glue. Which takes a little bit of
the guesswork out of it. Let's get this last one in here. One of them one
of them fell out. Hold it for a few seconds
to make sure that it is all stuck together. Here we go. We're ready to go. Anything that stuck out of
the bottom, we can snip. Here's our final card
all put together. I'll see you in the next video and I'll show you a
different version.
5. Box of Balloons: Prepping the Card Pieces: This is the second card that
we're going to be doing. The balloons are done on vellum, but I didn't have
any colored velum, so I custom colored it to
the colors that I wanted. The other thing, I kind of figured it's a birthday
card with balloons, so I added a big number
on the front for that. The other thing is these ones
are on pieces of acetate. So I've got some stuff pre done so you don't have to
watch every single thing. But let me show you how I
got to this 0.1 of all, I'm going to got some acetate and
you want to have acetate that's fairly thick. You want it to be between 34 inches long just so you can cut it down to
whatever size you want. And you're going to cut
it into half inch pieces. And it's super easy to cut
a bunch of them at a time. Don't need any more than
that, so that's good enough. Next step is to take
your velum and color it. So all I'm doing
for the velum to color it is alcohol ink. I've got my phone here. And these foam, like if you're doing a bunch of
different purple stuff, you can reuse that foam. This is from doing the
prep in order to reuse. It just adds some
blending solution. And then I still have
to add a few more drops of alcohol ink. Velum typically
doesn't like moisture, but for some reason, alcohol ink is different. You can get away with alcohol
inking velum, no problem. It's not going to curl in
bubble like it normally does. The nice thing with
this is you can get whatever shade you want. You can mix up a couple
of shades if you want. If you wanted a variegated look, I wanted it darker than this. I could add some more
alcohol ink to my phone. But this is good for now. I'm going to set
that aside to dry. It doesn't take
very long to dry. I want to say a few minutes. And then you can decrypt it. And it's super easy to dicot at dicots just like regular
cards, chocolates. Put that to the side. I've
got some already done, but I still need one of the smaller blooms in
each one of the colors. So let's do that now. I've got my guy here. Let's move this up
a little bit here. Got my die there. And I'm gonna put my velum
rate over top of it. It's super easy to see
exactly where the dye is. I know that I'm cutting in a perfect spot for what I need. Take that out of the die, and then do my next color. I need one more of each of the colors of LM
that I've created. This is great because you can
custom color your velum to, I mean, you're only limited
to colors of alcohol ink. And really if the color of
alcoholic doesn't exist, usually you can mix a
couple of, couple of, couple of colors up and create the color
you're looking for. Peace that fell on the ground. Definitely want to make
sure your velum is fully within the plates
of the machine though. One last color, green one. The dye that I'm
using happens to have dyes for balloon strings. If you wanted to use
them, you could use them. If you wanted to just use a black sharpie
and color it down, you absolutely could do that. The other option
is to actually use string if you can
have fun with it. So I need one more set of my balloon strings that to the side. And then I was going to say one more thing
I need you to do. And it's gonna be a
number for the front. I'm just going to grab a number. It really doesn't matter because I'm actually not making
this for a specific person. If you were, obviously you would choose a number that suits them. There we go. Let's take the machine
out of the way here. Let's take this out of the die. Have that ready? Died back. Alright, so I need
four of these. What I'm gonna do first
is put my tape on there and I'm using
the same tape that I used when I put my car together. For velum liquid glue
doesn't work too well, so a double-sided tape
is perfect for this. The other backing
off and we're just gonna glue or balloon
right down to it. Hardest part of
this whole process, all honesty is taking those
little bits out of the die. There we go. Then I'm only going to show
you gluing one string on because the other
strings are gonna be exactly the same as the first. And that way you
don't have to watch me to come all out of the die. So all I'm gonna do, I'm using my matte medium once again because it dries
completely clear. Just putting a tiny little
bit on the back here. And it's great because it glues paper as well as non
porous surfaces, so it's perfect for
gluing onto the plastic. I like to put my
string bullied below that velum from the balloon. If you wanted to put
it on top, you could. Then I'm just gonna
let that sit and dry. I'll get these last
few one's ready to go and I'll see you
in the next video and we'll put the car together.
6. Box of Balloons: Card Assembly: All right, We've got
all of our pieces ready plus our card base here. If you forget how to
do the card-based, go back to the card base
construction video. We're gonna do the same
as the second card. We're going to add the mats
to the side and the back. And once again, I didn't
do it on the card base. By base. I mean, I didn't do it down below here. But you certainly
can if you want to. I'm using liquid
glue to put the mats on simply because
that way I have a little bit of leeway to place them exactly
how I want them to go. But when it comes to
putting in the balloons, I'm gonna be using back here. I'm gonna be using some
double-sided tape. And that way I'm not going
to have to hold it to dry. Put our birthday
number in there. At the very end, we're gonna put stickers around the number here just to make it
sparkle and look special. Let's put the cap
on our glue here. All right, So now we
put in our balloons, so same as the daisies. I'm going to eyeball
where I want it to go. Put my finger there so
that I know where to place my tape and then I can put a little
bit of tape on there. Where did I put my
scissors here there? The thing with the tape is you want to make
sure that the tape is completely glued to your whatever these things
are called here. You don't want it
below or above. So wait, because if it's exposed when you
flatten your card out, it could stick to your card
base so you want to make sure that you're completely covered. That way. I'm just putting a line of glue or tape or whatever rate across. I'm not worried
about angling it to how how it's positioned on
that little piece there. Let's get one more in here. By having tape a little
bit narrower than the half inch width of
that little piece there. That's going to give
you the flexibility to put these pieces to the, to an angle, however
you'd like them to go. All right, actually I want
this piece to go up in here. Put it slightly
higher than some of the balloons in the background. I want it to look like
a balloon bouquet. And typically with
a balloon bouquet, the ones in the center
are a little bit higher. Because you can control
what colors you're doing. You can have some fun with
just being creative with this. You can even stamp some prints
on them if you wanted to. Nothing saying you can't. Just realized I put the tape
on that one but actually didn't gonna I'm gonna
put it here in the front. That particular piece was
a little bit shorter. The acetate was a
little bit shorter. So I want to put
that in the front. Now, when I'm placing them, I'm trying not to put the same colored balloons over top of the same
colored balloons. I'm trying to make
sure that I have different colors over each one because I want to be
able to see them. If you put the same color
over the same color, you're just going to just going to hide each
other and you're not going to really
see them clearly. Put pink one there. I'm going to take
one with a longer. Some of my acetate pieces
are a little bit longer because that last
piece that I cut was the end of a sheet. Just keep in mind if you want your pieces to be sticking
up a little bit more, you want to make sure to have
longer pieces of acetate. This is for the front. Just like before, after a while you're going to get to know how high up to put your
pieces of tape here. Now let's see if I can leave
this to the side so you can see the last little bit
of it going together. One of those things that's
hard for you to see when it's on its side or when it's sitting straight up and
it's hard for me to put it together when it's
laying down flat, but that's good. Last balloon. We go. So we do have it up here. So we're going to be creating a custom envelope at the end. One of those things, if
you want it to completely encase the six inches
by six inches. A little bit lower. I think it's 6.5 or
six inches by 5.5, then make sure that your
balloons fit within there. I knew I was going to
make a custom envelope for them anyways. So there we go. Our card is done. Let us get some
stickers out of it, a sparkle to that number. You could put the
sparkle around the entire or over the
entire number. I'm just outlining it with it. I think less is more. By just outlining it. It adds that sparkle. But you also get the contrast of the plain pink with
the sparkly pink. I'm just using an
opalescent sticklers so that you see the card
stuck underneath it. It just adds some sparkle to it. There you go.
Birthday card done. You need to set this aside
to the ********* can dry depending on how
thick of a layer you do. Sometimes it can
be a half an hour, it can dry fairly quick. If you do a really thick layer is going to take
longer than that. So I'll typically put it
somewhere where I can't touch it until it's
completely dry. We'll see you in the
next video and we're gonna do our pop-up
butterfly box.
7. Box of Butterflies: Prepping the Card Pieces: Alright, so this is our
third and final box, pop-up butterfly box. So we're gonna do some
stamping first and I'll tell you for this one to
get the soft prepped. There's gonna be waiting
for drying time in-between. The butterflies are watercolors, so you need to wait
for that to dry. Then we'll die, cut them
or handcuffed them. If you don't happen to have the dyes or you're choosing
a different stamp. Then at the very end, before we put our card together, we're also going to
add stickers, so we need to wait for that to dry. It's going to be much
easier to put this to go on the butterfly before
they are in the box. But the first step,
let's stamp our pieces so we can let that ink
dry for a few minutes. I just have some
stays on ink here. I've got my flower stamps already ready to go to stamp
them on the little tabs. If by chance you have some printed paper that you liked that you'd
prefer to use. Absolutely. You can use printed
papers for this. Then you can custom paint your butterflies to
match those papers. Obviously much easier to stamp these before a card is together. And just one last
stamp image there. I've already got my
sentiments stamped. And aside to dry,
this is stays on ink, so it's going to
dry pretty quick, but I do want to give
it a few seconds. Or if some time to dry while
we're creating the rest, I'm going to cut my butterflies. You do have to do
this fairly quickly because the ink dries
fairly quickly. This particular water
paper, watercolor paper, It's kind of textured
on both sides, so I choose the
least textured side. I clearly chose a piece
of paper that was smaller than my butterflies. But that's okay because I
already have some perhaps. So this is just to show
you the technique. So you would obviously
want to either use less butterflies to fit your paper or have a
bigger piece of paper. You do two pieces of
paper, whatever you want. I, when I was
creating my sample, the papers that I had were already pre-cut and
they were this size. I clearly grabbed one
that was a little bit smaller without realizing it. Once again, this takes a
few seconds for it to dry. While that is drying. By a few seconds. I really mean like
a few seconds. It doesn't take that
long for it to dry. I'm going to use distress
rate anchors to watercolor. I like them because
they're nice and vibrant and they're transparent. This is what it is. It's
just re anchor to fit into that just distress pads. And I love having a tool
that does dual duty. So all I do to color
these butterflies. Let me grab a piece
of paper towel to clean my brush off in-between. I'm choosing bright
vibrant colors. Start with peacock feathers. I started in the
center and go out. I started the darkest part
basically, and go out. I find it's much easier to point your paintbrush where
it's going to be darker. Then for all of the butterflies, it doesn't matter
which colors I'm using. Clean to the brush. And this brush, you only
clean it by squeezing it out onto paper towel and
then your brush is clean. That was a little bit
lighter than the other side. So I'm just going to add
some more ink to it. All of the butterflies, I did
one color in the center and then a different color
from the outside going in. So that same picked raspberry, I'm gonna go in the
center of this butterfly. You can see that I
rotate my paper. I just find it easier to rotate the paper rather
than to try turn my, oops, that wasn't quite clean than to turn
my brush around. I'm gonna do yellow
on the outside here. Like I said before, if
you choose printed paper, you can custom color your butterflies to match
whatever papers you choose, which is also gonna
be very pretty. That same yellow mice will grab that for the center
of another one. Then. I know I had some
of those purple. The one thing to know about these real anchors
is on this palette, they never dry, so they have
to be stored horizontally. Just something that
was better to know ahead of time rather than thinking they're
going to dry and tipping them up and
having them all leak out. Alright, so you would
continue until all of your butterflies were
completely colored. Now you need to let
that totally dry. So I'm gonna pause the camera. When this is totally dry, we'll go into die cutting. Now. This particular stamp
set when it first came out head dies
that matched it. Likely that said
is discontinued. If you happen to have it,
this is how you die, cut it. If you don't happen to have
it, I would hand cut it. Butterflies are fairly
simple to handcuff. These are all simple shapes. You don't have to hand
cut the little antenna, even the dice don't
cut those out. I'll see you in a few minutes and we will do some dye cutting. Or butterflies are mostly dry, but I got impatient. Knowing that I already
have some ready to go. I don't really need to
wait until it 100% dry, but you definitely want to wait till it's dry because
otherwise you're gonna be transferring your ink
to your machine plate. Making a mess. Basically. These particular dyes have the blade raid on
the line there. So it's really easy to just
look at it and line it up. You need to tape it
in place so that, you know it's not going
to shift in the machine. If by chance you have your entire piece
colored ready to go, you need to do it in two steps. You would do those
butterflies first or second. And then you would do
this in another run. And the reason is the chances of the dyes overlapping,
overlapping each other, or is too great, as well as the fact that
you can't properly tape your dies down so that
they don't shift. And we don't want
to ruin our dies. After taking the time
to stamp a watercolor. We also want to be able
to do position everything as best as possible
to get a clean dicot. So I'm going to
put it face down, run it through my machine,
then just poke it out. I'm going to set
that aside because I actually don't need it. I do have some ink on here, so you definitely need to clean
this off before using it. Otherwise, it's
going to transfer to whatever other piece
of paper I put it to. I'm going to show you how I
put one of these together. I already have the tape
on my acetate piece, same as I did for the balloons. I'm going to glue
this to the back. That center is
still a little bit wet so it may not
want to stick to it. I like to shape my butterfly
wings a little bit. I just think it makes them
look a little bit prettier. I did that for all of them. And then I took some struggles. I have platinum here that
I put in the centers of the butterflies because
otherwise their bodies got lost. Then I added just
a little bit of an opalescent one
because I didn't want to hide the color
that we painted it. I'm just adding it
to the outside. I only did it to the
outside outer edges if you wanted to do it
to the entire thing, you absolutely
could. There we go. And then that needs to be
set aside to completely dry. And then through the
magic of redoing things, I have a whole bunch
already made and dry. You'll be able to see
right there the difference between them when they're dry, the stick was
flattens out a little bit and it just becomes
really pretty and sparkly. I'll see you in the next video and we will assemble our card.
8. Box of Butterflies: Card Assembly: All right, Let's put our
card pieces together. You pick out whichever
one of these is your favorite to put on the front because
that's the one that you see the most. Actually going to
leave that cap off for a moment and then glue
the rest of them on. Once again, I'm using the
liquid glue for this so that I have momentum. Shimmy it in place
if I don't get a place correctly
the first time. One on the back. Now I kept these fairly
simple and neutral. I just have flowers,
silhouettes. You could go as elaborate
as you want it. I didn't want to take
the focus off of the butterflies
because I thought they were pretty on their own and I didn't want anything
to compete with it. But this is one of those
things you can have fun with. This one is butterflies, but when it also be
cute with little bugs, have you had someone in your
life that just loves bugs? Maybe we'd get a kick
out of this card. All right, same as
the balloon card. I am going to be
gluing all of these in place with double-sided tape. That way I don't have to
wait for anything to dry. Tape on the acetate. Could often glue it into place. So altogether I have got eight butterflies. I've
got three things here. So I'm gonna put three on
the back and then to know, sorry, two on the back and then three in the center and
then two in the front. Either way you can do
it however you want. But I just want don't
want to put too many of them on the
back and not have any for the other layers. If you wanted, you could even do more butterflies than
what we did here. You could have a ton of
butterflies all completely made. Really loaded up. Some of these. I'm putting
the haystack on the front, some of them I'm
putting on the back, it really doesn't matter. Just make sure that
you're putting your peace on the
appropriate side. The glue was the tables stick to the things in the center
of the card there. Well, it looks like I was wrong. I'm doing three in the front. Here we go. And just like the balloons, I try to keep from having the same colors
in front of each other. Because I'd like to be able
to see all those butterflies. You put all those
that work into it. It's kinda nice to be
able to see them all. So I tried to pay attention
to what's behind it. And just put colors
that are going to pop and show up a little bit. There you are. Ready to go. I do again, need to make a custom
card for this, but I really like it when the bouquets pop
out a little bit, so it's hard to keep it
within that six inches. But that's okay.
Custom cards are really quite fun
and simple to make. And I'll show you
in the next video.
9. Creating a Custom Envelope: Creating a custom envelope
for your cards if you have a non traditional sized cards
is really quite simple. I wouldn't do it for
traditional sized cards because you can easily find
the envelope sizes for that. And likely there
are a lot cheaper than making them yourself because you're making it with card stock and cars start tend to be a little
bit more expensive. But this is great. When you just can't find an envelope that's
the right size, what you're gonna do is
you're going to flatten your card and you're going
to measure how big it is. The base of this is 5.5, but because I have a daisy
sticking out, six, Bye. Six is going to be the
right size for this card. It's got a chart radon here. So for a six by six card, I need to cut a piece of
card stock 9.5 by 9.5. Pull my tumor out
and doing that. And I'm just using a white
piece of card stock for this. You could easily use
a printed piece. You really find if you've had some printed Daisy card stock for this particular one just because it's daisy or
have one that matches whatever theme of the
card that you've created. It says 9.5 by 9.5. And my first score line is going to be on four
and three-quarters. There's a lot. There's a ruler right here. I'm gonna put it on the
foreign three-quarter mark, punch it, and then I'm
going to score it. I find it easier to score from
the center and it's easier to stay on the channel
when you're in the middle here and going out. Sometimes it's hard to feel
where that channel is. When you can see this, it's easier to go here and do it in. After that, we're going to match that little tab
there with our line. And because we're doing
a square envelope, it's going to end up being on the foreign three-quarter
mark still. They all are. When you're doing
rectangle envelopes, they're not going to be. But if you're doing squares
as a great way to know that you're keeping everything
completely straight. Before we put it
together on this side, we can round those
corners there though I did go in quite as much
as I would like it. Round those corners
in folder pieces up. There we go. And then I just use the same
double-sided tape that we've been using throughout the class. This one is actually
quarter of an inch. I want to make sure
that it doesn't tape, doesn't get exposed
and the inside of the envelope and probably
the other one, it wouldn't. But the quarter-inch is enough
to hold it all in place. And the wider one is just a
little bit more expensive. So this is enough. Mice will do that. There we go. We can put our card in there. I'm leaving that Daisy
part up because I don't want to push it onto the bottom of my and blue. Then we can fold that down
and glue that in if we want. I'm not gonna do that
because I haven't addressed the car to anyone. But there we go. A custom envelope for our card. And this little tool here stores rate in there,
so I never lose it. But perfect and
super-simple to make a custom envelope for
whatever size you need. So if yours stuck out
a little bit more, you might need to make an envelope that's a little
bit more totally doable.
10. Pop-up Box Card Class Thank You: Thank you so much
for joining me for the pop-up card class. I hope you had fun making this cute little design and that it inspired the
creative juices and you thinking of all different themes that you can make them in, there is so much fun to send
and so much fun to receive. Hope to see you in
class again soon.
 Artsy. Island Girl, Teacher