Transcripts
1. Class Intro: Do you love the look and
feel of traditional film. But now that you're shooting
digital, you really miss it. Well, in this
class, I'm going to show you how to recreate the timeless look and feel of film without
ever loading a roll. Using a plugin
called DhancerPhoto. Hi, I'm Rob Davidson. I'm a photographer, a teacher, and an obsessive about color
and texture in photography. You may have seen my previous
classes on Skillshare, including the one
on color grading, where I taught how to enhance the emotional appeal of your photograph through
the use of color grading. In this class, we're going to
build on that knowledge and move into the next level
of film emulation. Using plugin called Dhancer. Now, film emulation is the process of recreating
not just the colors, but the feel and texture
of traditional film. And DhancerPhoto is a powerful
tool to accomplish that. Dehanser allows you to
recreate the look and feel of traditional film stocks. In fact, over 60 stocks from companies like Fuji,
Ilford, Kodak. But it goes beyond just color
grading and presets because it has powerful tools
to create film bloom, halation, grain, and even dust and scratches that we all so much loved in
our traditional film. Digital photos are
incredibly sharp, clean, but sometimes they lack a certain warm quality
and film emulation allows you to bring back that quality to
your photographs. In this class, we're
going to cover all the essentials of
working with de hanser. All the available
presets that are there. But in addition, all
the customization tools that you can use to create
your own unique look, adding grain and bloom, even the frame
edges of the film, to create your own
personal film emulation look for your photographs. Whether you're after
the warm glow of Kodak Portra or the grit of triax or something
that's uniquely yours. This class is going
to get you moving from pixels to poetry. So let's get started. Oh
2. Your Class Project: No. Your project
for this class will be to create one or
more film look versions of your own photographs. So here's what I would suggest. Take a little time getting
familiar with Dehancer, have a look through the preset film stocks
that are included. There's 60 to look at. And then get a little
familiar with some of the customization sliders
on the right hand side. Play around, see what they do, then start having fun. Grab one of your recent
favorite photos, open it up into Dehancer and try a couple of different
preset film looks, and then go crazy on the
customization sliders. And when you get something
that you really, really like, save it. And post a before and after version to the Projects
panel for this class. That way, I can give you some
feedback if you want it, and other students can
see what you created. Hopefully, you'll be able to post a couple of
different versions. And another thing
you can do is take one photograph and create two or three different
film looks for it. That's a great exercise to do. So have fun with Dehancer and post your results in the Projects panel
for the class.
3. What is Film Emulation: So, what exactly
is film emulation, and what sets it apart from, say, color grading
in light room? So let's step back a little bit. And when we just had
film to shoot on, one of the most important
decisions you had to make as soon as you decided you
wanted to take pictures was, what film am I going
to put in the camera? Do you want to shoot black and white or color, first of all. But then beyond that,
each film emulsion had its own unique
characteristics. And that can be things like fine grain versus coarse grain,
something like, you know, plus X versus Ilford XP five gave a very different
look to your finished shots. And in color, there was even a wider range
of saturations and intensities of color and how the film stock responded
to each particular color. So each photographer usually had their own favorite
range of films. For instance, I loved Fuji ala for its
beautiful rich colors, whereas other people preferred
things like Kodak Portra which had a much
subtler range of tones and beautiful skin tones. So it all depended on what
you were shooting and what your personal feeling that you wanted to get
from your shots was. But of course, once
you've loaded the film, the look and the overall feel was pretty much baked
into the film stock. And so that's what you
got out of the shots. Well, now, with film emulation, we can take our digital shots and apply film looks to them. And what the lovely folks
at Dehanser have done is actually gone back to
original film stocks. And right now, they have over
60 different film stocks, and those are black
and white films, color still films, cinema films, whole range of
different films from different time periods as well. Some of them archival, some of them contemporary. And they have analyzed the
color response of the film, how it responds,
and renders colors, as well as the grain structure, the pattern of the grain, whether the grain was more in the highlights
or more in the shadows. And that did vary because when you have different
levels of exposure, you get different
levels of grain. So they've done a very
detailed analysis of each of these film stock. And they've given them to
you as a set of presets. So the first thing you can do is look at your photograph and then go through the presets and just see if there's a
look that appeals to you. But you're not just stuck with that individual look, right? You can then go to the customization side
on the right where you have access to all the sliders for all the parameters that have been
applied to the film. So the saturation, the highlight
and shadow saturation, the grain structure, whether you want more grain in
highlights or shadows. And when you see how D hanser applies something
as simple as grain, it's not just sort of a pattern overlay the way that you get in something
like light room. It's an actual
structured grain that responds to the density
levels of the film. So it's not a uniform grain, which that's what
film was really like. And having shot a lot of the emulsions that are indi hanser, I can
tell you I mean, I had a real sort of emotional flashback
moment looking at them because they really look and feel like the films that I'm so familiar with from having used
them for decades. But then, as I say, you can go in and
customize them make the grain smoother or coarser. And then you have things like Highlight bloom where
highlights spread a little bit. You can control that. And you can also add in some of my favorite stuff is
like dust and scratches, which we worked so hard to get rid of when we
were shooting film. But it's actually
nice to see some of those sort of film
based faults in there. You can go in and apply exactly the amount
of dust scratches, all kinds of things that
you really want to do. And when you get a look
that you really like, you can save that and apply
it to other photographs. So it really is a
great combination of getting original film stock feel very authentic
feels to them, and then being able to customize it to your
heart's content. So let's dive in, explore what's available in Dhanser and see what
we can produce.
4. The Dehancer Workflow: So now that we know
what film emulation is, let's have a good
look at Dhanser. Now, Dhanser works
with Adobe Lightroom, Adobe Photoshop as a filter, and it also works
with capture one. So depending on what
software you want to use, you can install the portion
of it that works for you. I'm going to be using Lightroom and we'll be
using a Light room plugin, and we'll also be using the Photoshop
which works as a filter, and I'm going to show you the
difference between those. But one thing I should
mention is Dhanser comes with a great PDF that they
call their Quick Start guide. It's actually a very, very detailed instruction
manual for the whole program. It runs through all
of the options, all the sliders and
explains in detail what exactly they do if you
want to dive in that deep. But most importantly, what
it has right up the front is settings for color management in Photoshop and your export
settings in Light room. And these are actually
important to set up properly because Dhanser is designed to work in the SRGB color space. And I know a lot of us work in either Adobe RGB color
space or P photo RGB, but Dhanser works best in SRGB. So they have detailed
instructions on how to set up the color management in Photoshomp and the export
settings in Lightroom. And I'll tell you, when I first got it,
I didn't I thought, Oh, that's not that important. And then when I went
to actually use it, the color sort of
shifted the wrong way. I wasn't getting a true
picture of what the color was. So if you haven't
already done so, take a few minutes
now and set up the color management according
to the Quickstart guide. So pause, go do
that. Come on back. Okay, so now that we have everything
installed and running, let's have a look at
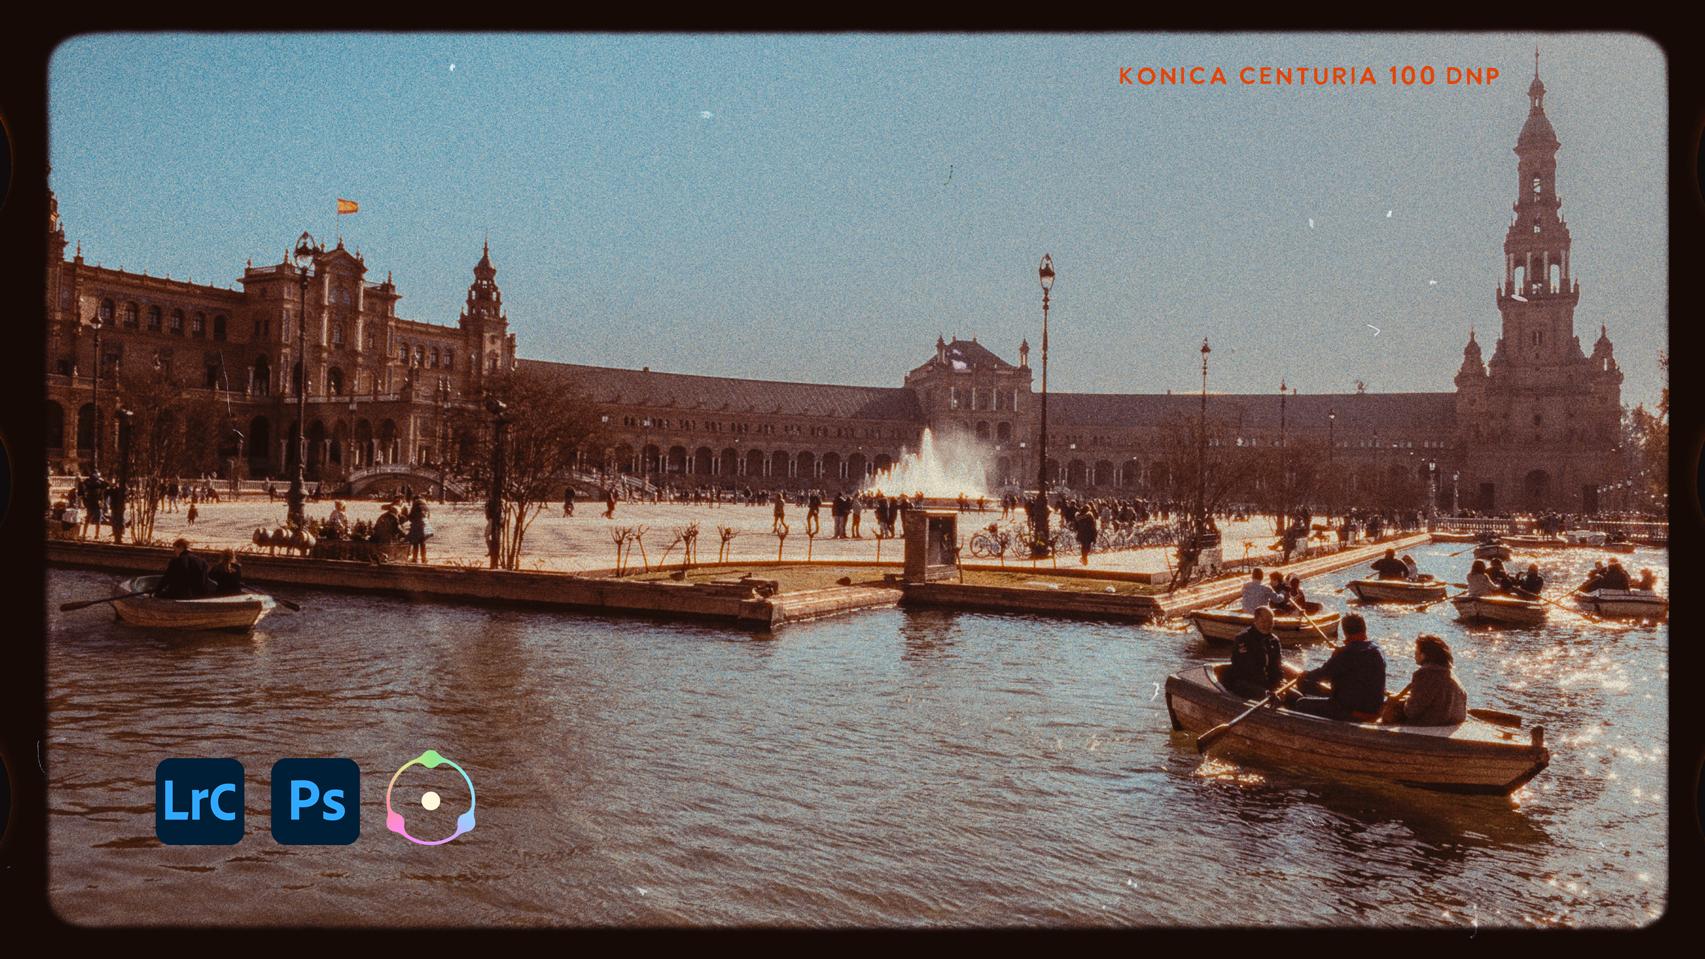
how Dhancer works. So I'm going to start
with this image here, which I actually
like for a film look because it has a bit of a timeless look to
it, right to start. Now, there are some
suggested settings in the Quick Start manual for working with
raw development. They say exposure minus one, contrast -40, blacks plus 60
curve linear, sharpening. So they give these settings. I have found that the best
sort of guide is to get a nice looking
rendition of the image in light room before you start working
on it in de hanser. And two things that
are very important. And that is you want sharpening and
noise reduction at zero, because those will be applied in de hanser and you don't want them sort of
working at cross purposes. And you also don't want to apply any grain to your
image here because, again, that's something that D hanser will do and you
don't want them fighting. Plus, one other thing
they mentioned in the Quick Start Guide
is don't do any sort of extreme local corrections in light room or
Photoshop because you may end up getting little halo edges around your
local adjustments. So try and keep things general, get a good overall
look to the image. Make sure that sharpening
and noise reduction are down to zero. So that's in the detail panel. Noise reduction and
sharpening are both at zero. And that way, it's
not going to have a fight with the hanser. So once you have your image, looking nice, make sure you have a full tonal range if that's
what you want to get. Then you can select and you can right click on
the thumbnail for the image, or you can go into the menus, but I like to right
click and edit in. And if you've set
everything upright, according to the instructions, you should have Edit In
Dhancer Light Room plug in app in your Edit In menu. And you click on that
and your file options, you're going to edit a copy with your light room adjustments because you've set everything up in Light room the
way you want it. You're going to
make a TIF in SRGB, 16 bit, 240 resolution
and no compression. So that's as it was set up. And now we have the
De hanser interface. So this is really nice. It's very clean, very clear. You've got your preview right in the middle
of your frame, and you have a big
live histogram right across the bottom
of the preview window, which I really like
because it helps you to sort of see what's
going on tonally. On the left hand side, you have all your films
that are included with Dhancer and you also
have a panel for presets that you can
adjust yourself. But for right now, we'll
just look at what's included in the in Dhancer. Oh, you've got all these
different profiles. It's a huge list of films, starting It's in alphabetical
order by default. A for the AGA films, all the different films, including Scala which
is black and white. Now, a couple of things
to watch out for. As I click on these, the preview should change to reflect the film
that I've selected. But there's a couple of
things that can trick you. Up here in the right
hand corner where it says, film profile, right? There's this little checkbox, and you have to turn it on. In a lot of these adjustments, if you look on the
right hand side, a lot of the adjustments
also have check boxes. So you have to turn them on. What's nice is
that allows you to see an adjustment
that you've made, turn it on, turn it
off, turn it on, turn it off alone
so that you can decide whether you like it or whether you
want to change it. So that's just something
to be aware of. These little check boxes allow the preview to reflect
the changes you've made. The other place is up
here on the right, there's a little eye icon, and if you turn that off, it shows you the original image. So you can turn off individual panels to see
how they're working, or you can turn off and
see your original image. But if you want to see what you're doing
with Indi Hanser, make sure that the icon
is not crossed out, and your check box here on
the film profile is checked. So you can see all the
different film profiles. And then as you
click on each one, you can see how it
affects the image. There's a black and white,
there's Astrum color. They even have an Ambra type, which was a very early
printing method, which is actually
really, really pretty. All kinds of different. And, you know, feel free
to dig down through all of these Fuji Provia
ala. And you'll notice that the
overall color look to the image changes as you
click on these, right? Because, you know,
it's reflecting the look of the individual film. Now, I know when I
played with this before, I got down to Kodak
Ectar 25. Oh, no. I think it was the Ectar 100. I really like that one. What I like about
this is it does a really interesting
way of sort of shifting the colors to give
it a little bit of an old, slightly faded look as if you'd, you know, shot on film that's been sitting in a drawer
for a couple of years. So I happen to like this look
for this particular shot. So I'm going to go with that. And now, by the way, you can look at all the films. You can save favorites. There's a heart up here. You can just mark your favorites. Or you can look at
just color negative, motion picture films,
black and white, color positive, you know, all the different types
of films that they have, you don't have to look through the whole list if
you don't want to. So once you've selected
your film stock, you also have a little slider
here called push and Poll. And push pull was something that was part of the chemical
process of developing film. You could leave the film in the developer a
little bit longer, in which case it built up density or shorten
the development, in which case it was thinner. So depending on the
film and it also changed the relationship
of colors and contrast. So you can play with
that the same way we used to do in a
chemical dark room. You can push, pull, and you can see the
colors are shifting. For this one, I find just a little bit of a
push seems to work nicely. There we go. Once
you've chosen a film look that you like and adjusted the push pull a
little bit if you want to, then you come over to the right hand side where you can now customize the
look that you've done. Now, De Hanser has
sort of a recommended workflow whereby you can
sort of work through and, you know, follow their
recommendations. I find it's pretty fluid. You can sort of go by instinct. This first one, this is the one that they suggest you
sort of start with. This is where you can
adjust this sort of input of what you've
put in, right? So you can do a little exposure. You can bring the
exposure up or down. You can change the overall
color temperature. And, you know, you're
doing this with the film emulation look enabled so that you can sort
of tweak your overall look. And I don't find I usually
have to do that much in here, but it can be fun to play
with, play with the tint, you know, a little more green or vaginta depending on
where you want to go. Now, they then suggest
that you look at the expand window where you can basically expand your black and your white points to
fill the total color range. So with the expand, you can take the black point, and you can use the
histogram right at the bottom to stretch that out and expand the black point, make the black a
little bit darker. There we go. And
the white point, you can bring it up or down. And I find bringing this one up a little bit so it fills
the full tonal range, but without burning
out to highlights. So there we go. And then they suggest that you work
with your print output, and you can choose what whether
you're printing on paper, Kodak Endura glossy
or Kodak print film, film log or linear. So, you know, I tend to leave it on this Endura
glossy paper because that was sort of a standard
printing paper that we used a lot when we
were printing images. And you can then also play with your exposure, your whites. And this would be
your print exposure. And you can just flavor
to taste, I would say. There we go. And the
other thing that they suggest you play with
sort of as a starting point. And this is their
suggested workflow, de hansers is play
with the color head, and that is adjusting the overall color balance
of the final image. So it's replicating the effect of working in a dark room
with a color larger, where you have yellow blue
filters, magenta green, cyan red, and you can play
with the shadow and midtones. This is a very sort of
powerful part of De hanser. It allows you to really
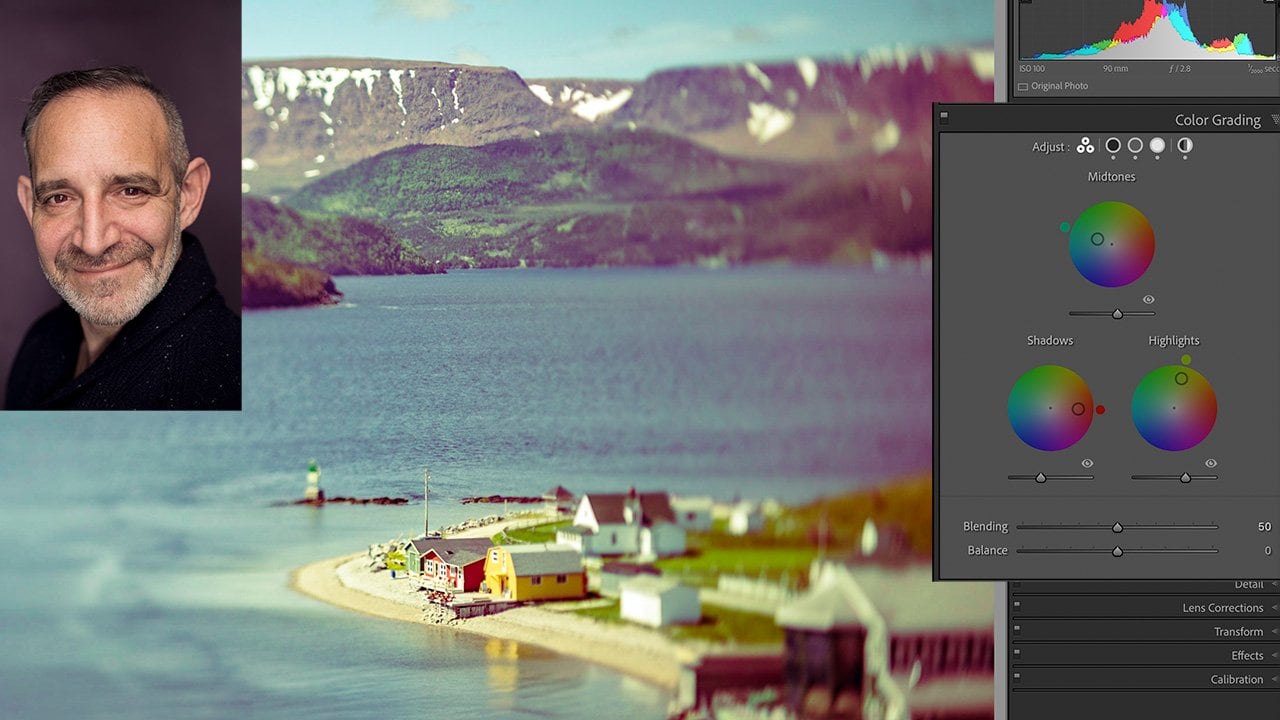
tweak the tonalities. And if you look back at
my color grading, class. You will see there's a lot
of similarities between this panel and the color
grading panel in light room. It allows you to apply a bit of a color grade beyond
what's already been applied to the image
or to the film look. You can really
customize it here. I can take this a
little bit more towards a green and a can look. To give it that
sort of, you know, sometimes you're
rummaging around in the drawers and you pull out an old print that's been stuck in the back
of a file folder, and it's a little bit faded. But it's really sort of nice, and that's sort of where
I'm going with this shot. So it's picked up a little bit of a color tint with the fading. I can play with the shadows, the mid tones and
the highlights, if I want. There we go. It's very, very detailed. I mean, you don't have to
dig too far into this. So, these are the sort of steps that De hanser the
Quick Start guide, sort of suggests as
your initial steps. And then it says, some salt and pepper will
make the dish even better, which is very true.
5. Salt & Pepper to Taste: I think we have a pretty nice looking sort of
look to this shot. There's our original image, and there's our a little
bit aged ctarPrint, right? Which I really like
the look of this. But we have some interesting other things
that we can play with. First off, one of my
favorite features Indi Dehancer is the film grain. Now, we have within film grain, they have a number of sort
of preset film grains, everything from 65
millimeter IO 500. So this is a cinema
stock type of grain, um and we can zoom in. When you're applying the grain, it really helps to
zoom in on the image a little bit and see how the
grain is affecting it. So this is a 65 mill
film at ISO 500, they have 35 millimeter stalks. And you'll notice when you
change the film grain, it's not just a smooth,
even grain structure. It varies depending on the
density of the actual image. Which is really the
strength of Dehancer. And then as you get to smaller
sizes and higher ISOs, the film grain increases, right? So this is now 16
millimeter ISO 500, which was pretty fast
film in those days. And you can start to
see the film grain, and the color of the grain starts to really
come into play here. And then you can go all the
way to eight millimeter. Which is really, really grainy. But I tend to prefer
when I'm doing this. And these preset ones are great. They're a nice place to start, or you can go with a custom. In which case, you
have sliders for all the aspects of film grain. The size, you can
adjust the size. I thought that eight millimeter
was a little bit strong. And you'll notice as
you adjust the size, it's not just
zooming in and out. The grain itself is
changing and moving around. Right? And if you do this, Dehancer also works in video, and when you have it
running in video, the grain actually moves because if you were
to shoot film, each frame of the
film on the cinema, would be slightly
different grain because it's a different
piece of film. So it's very, very realistic. The amount of grain
you can play with. So I like to go a
little bit finer here, the resolution, the
sharpness of the grain. I tend to increase
that a little bit. Shadows, midtones
and highlights, like how much grain is
showing up in the shadows, the midtones and the highlights. And this is truly, truly flavor to taste. It's really fun. And the color, you can increase
the color or decrease it till it's just basically a black and white
or a black grain. I like to have some
color in there in a color image, obviously, because when you had
grain in a color image, it was actual granules of color that form
the actual grain. And you can make it
negative or positive. So that's the film type
that you are working with. And you can have it
as analog or noise, which is sort of digital noise, which I really,
really don't like. I want it to be
my whole point of doing this is to
create analog grain. So I think that's a
nice amount of grain. And the other thing, I don't know whether we'll
see it on this is halation. Halation occurred in
film when light sort of hit the film and spread within the
emulsion of the film. And it's a uniquely film look. And so basically
your highlights tend to get sometimes some
color fringes around them. I don't know whether
we'll see this. Yeah, it's giving it
a nice film look. Halation is sort of it is partly a purely chemical and physics
response within the film. So you just have to
play with it a little bit and see when you
get something you like. This Super eight seems to look really nice
with this image. And then another one of my
favorites is film damage. So we'll turn on film damage. Right. And again, we have
just sort of typical 65 mil, which is very, very minimal. But if you get to, like, 16 mil, you start to see some dust and scratches coming through
or superate a little more. And if you hit the
refresh button, if you don't like where the
dust and scratches are, you can hit refresh. I'll create a new set
of dust and scratches. So we have these presets, everything from Super
eight to 70 mil. But of course, I love
the custom feature. So I turn on the custom. And then, these are all the things that we can
play with in terms of dust. So we have dust enabled, and we can control the
amount of little dust spots. If we dial it up, we get, like, pieces of dirt and hair
and all kinds of mess. I'll dial it up a little bit
so you can actually see. And you can see, as I adjust it, things move around because
dust falls everywhere. So there's a goodly
amount of dust. You can play with the
scale of the dust. You can make it
smaller or bigger. And the size balance,
the range of sizes, and whether it's all white or black and white,
or, you know, you can change the color because sometimes you got black specs, sometimes white specks depending on where the dust got in. So huge range of
things you can do. We also have hairs. And we can, you know, hairs fell off when
you were printing. And this is all the stuff
that we worked so hard to get this off of our film before we printed it to
get rid of all this stuff. But now it's nostalgic. So we can put some
hairs in there, and the size of them
we can play with. I'm going a little strong so you can actually see the things. Size balance, white and black, again, same sort of thing. And we have scratches. And scratches occurred
when you were pulling film out of
its little, you know, envelope or if it was cinema film as it
went through a camera, if there was a piece of
grit in the camera or if there was a piece of
grit in your camera. Sometimes that would
scratch the film. So you get to play with that. And we can add some
scratches to this. And the scale, it's really
This is just sort of fun play. And some of the scratches
are sort of jaggy, and some of them are
singlinearmount. So this is just, I think, a lot of
fun to play with. I'm sorry. I get carried
away with this stuff. But that's why we have this. And then another
one that's one of my favorites is
you can get Oscan. And overscan is
when you actually see the edges of
the film itself. So you can see, right
now, we have, like, film sprockets, let me
just dial this down. And you can choose the
type of git. There we go. You can choose a Superight and, you know, the Super eight
film, the little sprockets actually overlap
the image slightly. Standard 16. So you've
got widescreen 35. I sort of like the 16 mill, and you can change the
shape of the gate. Whether it's rounded
or cornered, whether the perforations
are negative or positive. I like the negative.
It's a little subtler and whether the film is oriented vertically
or horizontally. So for this one, I
like the vertical. And you can control how much you see little of the over scan. So that looks really nice. Scale. Play with that. There we go. And you can control
zooming in on the image. There we go. You can adjust because we're taking a vertical image and putting
it into a horizontal frame, we are cropping it, but we can center it on her face,
which is really nice. And you can even have the
gait be slightly softer, which is actually really nice. There we go. So many
things to play with. And the last one down here, and this is what
they refer to as the salt and pepper makes
the dish taste better. So those are some
of the settings that I like to play
with with these images. And you can turn them on
and turn them off at will, to see exactly what you've got. I really like this image with the over scan
applied to it. So I'm going to click
Okay, to this one. And there is our image
back in Lightroom. And saved with all of the settings that
we just put on it. Now, one thing that I
should mention here is this image gets
saved as a TIF, right? And it's a one layer tif. So these changes are basically
now baked into the image. And if I go to edit
it again, say, if I want to edit in Photoshop
and I hit Command D, I would edit the original, which is now this file, and it opens up in Photoshop
as a single layer TIF. So there is a
limitation to this in that if I wanted
to change any of the settings that I
applied to this image, I would have to go back, open the original file back into Dehancer and
change the settings. And if I've gone on and
done other settings, that could get a little
bit of an inconvenience. So instead of having all of the settings applied directly to the image and saved as
a single layer tif, let's look at a workflow that allows us to go back and
change our mind in the future.
6. A Better Workflow: Oh. Now, if we go
back to Light room, what we have is our
original image, and we have a TIF image with all of the Dhancer
enhancements applied to it. But there's one little
thing to be aware of here. If we take this image and open
it up again in Photoshop, Edit in, Edit in Photoshop. We will notice that it
is a flat TIF. Right? It's saved as a TIF,
flat, no layers, and the changes that Dhancer did are basically
baked into that TIF. So if I wanted to go back
and make some adjustments, I can't really do it because that TIF has been
saved as a flat image, and I don't have access
to the Dhancer settings. So there is another
workflow that I actually prefer so that
I can re edit things. So if I go back to
my original image and rather than go edit edit in Dhancer
Light Room plug in, what I'm going to do
this time is open as a smart object in Photoshop. And now it opens in Photoshop, but it's a smart layer. It has this little
smart layer thumbnail. And in Photoshop, under filter, right down at the
bottom Dhancer, we can apply DhancerFlm
as a filter, and it's a smart filter
to the smart object. So let's click on that. So there's our original image. One thing you may notice is
whenever you open De hanser, your settings from the last time you use it will be the
ones that are active. But we're going to start
with a whole new one. So what we're going
to do is we're going to reset all the settings. We're going to do a quick one so you can just
see the workflow. We're going to
turn on all films. And let's do a black
and white one. We'll choose a black
and white for this one. And plus X pan was a really popular black and white portrait
film in its day. Very fine grained. So I'm going to do a quick
little adjustment here, add a bit of grain to it. Oh, that's a lot of grain. We're gonna go nice
and fine grain a plus this film stop PlusXt
was pretty fine grain. There we go. That's nice. And we'll add a little bit
of film damage. There we go. And I won't add the
overscan to this one, and we'll click Okay. And now, what you can see is that because
this is a smart object, we have smart filters, and Dhancer film has been applied as a smart
filter in Photoshop. So I can turn it on and turn it off to see what my
overall look is. And the best thing
is, right now, or at some point in the future, if I open this image again, it will still be a smart object, and I'll be able to go in, double click on the
DhancerFlm layer, and there's my image with
the Dhancer film filter, which means I can
now adjust it again. If I want to add a little
bit more film damage, I can go to the eight millimeter
and add a little more. Click Okay, and that
will be updated. So when I close it, now we have our original image, the TIF that we saved, which is a flattened file, and we have this PSD file, which if I then go and open
that back into Photoshop, I still have access to
the DhanserFlm filter, which means I can
change settings and alter them in the
future, if I want. So that's a workflow that
I prefer because it gives me I always like to have the option to change
my mind in the future. So to sum up this
workflow, in light room, make your overall adjustments to give you a nice
full tonal range, open the file as a smart
object in Photoshop. Then apply Dhanser as a filter, and then when you save
it, if you want to go back and change your mind
in the future, you can.
7. Class Wrap Up: Thanks for joining
me in this class on film Emulation and
the Dehancer plug in. I hope you've
enjoyed finding how powerful this plug in is in
terms of creating warmth, texture, and emotion
for your images. For me, I particularly like the sort of nostalgic
feel it gives me because the emulsions that I'm familiar working with
look so realistic. I really like the ability to customize each look,
adjusting grain, even dust and scratches,
halation, bloom, all of these factors
that you can customize for each
individual photograph. And now it's your turn. Don't forget to complete
the project for this class. Go and grab a few of your favorite shots and
explore them using Dehancer. Find a film book that
you particularly like, and then customize it to
your heart's content. And when you're happy
with the results, please post them to the projects
section for this class. That way you can get feedback
from other students. I'll give you some as well, and it's a great opportunity for people to see what
you've created. Remember that film emulation isn't just about copying
an existing look. It's about finding a style and a look that suits
your personal taste, what you want to
convey emotionally and the particular shot
you're working on. If you enjoyed this class,
please leave a review. That helps other students
discover these classes. And you can also
give me some ideas of what you would like to
see in future classes. If you enjoyed this class, I think you'll probably
really enjoy the one on color grading using
Lightroom and Photoshop. Again, it's about adding an emotional feeling
to your photographs, and I think it will help you
develop your editing skills. And remember, it's not
just about the image, it's about the emotion. So go and create something
and then share it with us.
 Rob Davidson, Food Photographer and Videographer