Transcripts
1. Introduction: Hi, and welcome to this class on how to photograph
your own artwork. I'm Rob Davidson and I'm a
commercial photographer. But I also have a lot of friends who create beautiful artworks, whether drawings on paper
or paintings on canvas. And I often get asked, how can I go about getting photographs of my art
work high-quality enough for reproduction
without having to break the bank having them
photographed every time I create a new
piece of artwork. So I thought about it
and I came up with a system that you can use to photograph
your own art work. Hi, I'm Rob Davidson and I'm a commercial photographer and I specialize in making
food look beautiful. But I also love
teaching photography, sharing my passion for the art and the beauty
of photography. However, this class is not specifically
for photographers, but it's targeted to anybody
who produces art work, whether it's paintings on
canvas or works on paper, calligraphy, drawings,
whatever you produce. I'm going to show you
how to create beautiful, high-quality photographs
of your artwork. And it's not going to
require a fancy setup. Nothing here is going
to break the bank. If you have a camera,
you can use it. If not, the camera in your
phone will do the trick. So we're going to learn how
to make an art board that you can keep around for photographing your
artwork in the future. The smaller one or a larger one. Then we'll learn
how to photograph either outdoors on an
overcast day or in shadow. Or I can show you a
setup for indoors using inexpensive hardware
store supplies and LED light bulbs that anybody
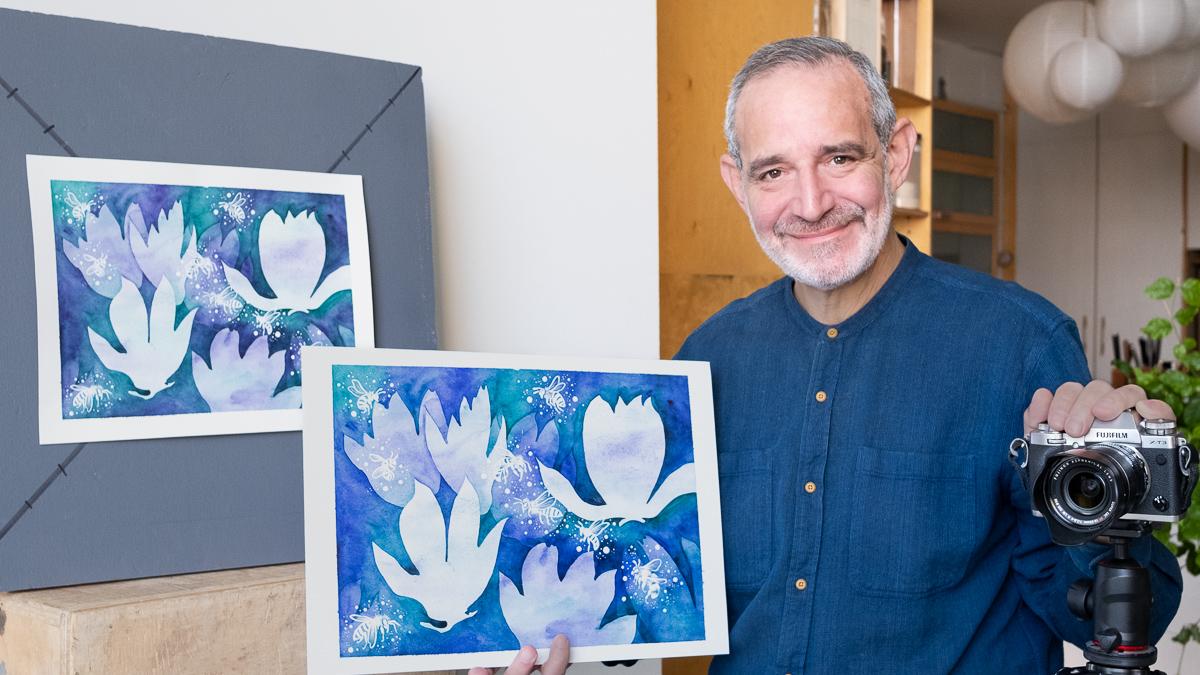
can set up very easily. So I'd like to thank my
friend Heidi Hashimoto's, who supplied this
beautiful artwork for us to photograph
for this class. And in the next lesson, I'm going to show you the
things you're going to need to have on hand to
create this setup. And then we'll move
on to showing you how to set up and
photograph your artwork. So I think you're really
going to enjoy this class. And I'll see you in
the next lesson. Bye bye.
2. Your Project: Your project for this class
will involve creating your art board so
that you can mount your artwork and you can either do a smaller
one like this, or a larger board like that one, depending on the size of
the artwork you create. And you'll be using a little hand-held
mirror to center up. It's going to go right in the
center of your art board. And you'll use that to center up either your camera or the
camera in your phone. And then guilt make a
setup to photograph your artwork and photographs
some of your own artwork. So I'd love to encourage you to photograph your
setup when you have it. And also some examples of the artwork that you
photographed and post them on the projects section
of this class so that other people can see what you've done and the
results that you've got. If you have any questions
about the setup or settings, post them in the discussions
forum for the class. And I'll be happy to jump on and answer any questions you have. In the next lesson, we'll review some of the supplies
you'll have to have on hand in order to create
your art board and your setup. And then we'll jump right into photographing your artwork. So, see you in the next lesson.
3. Supplies You Will Need: Hi, and welcome back to how to photograph
your own artwork. What I wanna do in
this lesson is go over the things you're
going to need to have on hand to create your
shooting board and your overall setup to take beautiful photographs
of your artwork. So obviously you need something to take
photographs width. And that can be a camera, a DSLR or mirrorless,
a point-and-shoot. If you have it, I happen to have a mirrorless camera
with a zoom lens on it. I have this because this
is what I do for a living. But you don't necessarily
need this fancy setup. So don't run out and
buy a new camera for this because you have a great camera in your pocket in the
form of your phone. Our phones these days take
remarkable photographs. If you have a phone that's
within the last few, 34 or five years, it will take photographs
that are more than adequate for posting online, building a website,
sharing through email, everything up to
large-scale reproduction. If you were doing
posters of your work, you'll probably want
to shoot that with a camera, but anything else? Your phone will
do a perfect job. You will need a phone holder. This is a device
that clamps onto your phone and holds
it to a tripod, because you need to be able
to hold either your phone or your camera or your phone steady in the same place, right? So this works for the
phone on a tripod. And then obviously you're
going to need a tripod. So this is a fairly fancy
professional model, again, because I do this. But I've given links
in the notes too. I think three or four
different tripods in a much that started like $30, that will do a perfectly
good job for this purpose. It will hold your
camera in place, keep it level pointed
at your shooting board. And that will do the trick. So you don't need to spend
a fortune if you happen to own a tripod, that's great. But if you don't, you
can save some money. Now, the other thing that's
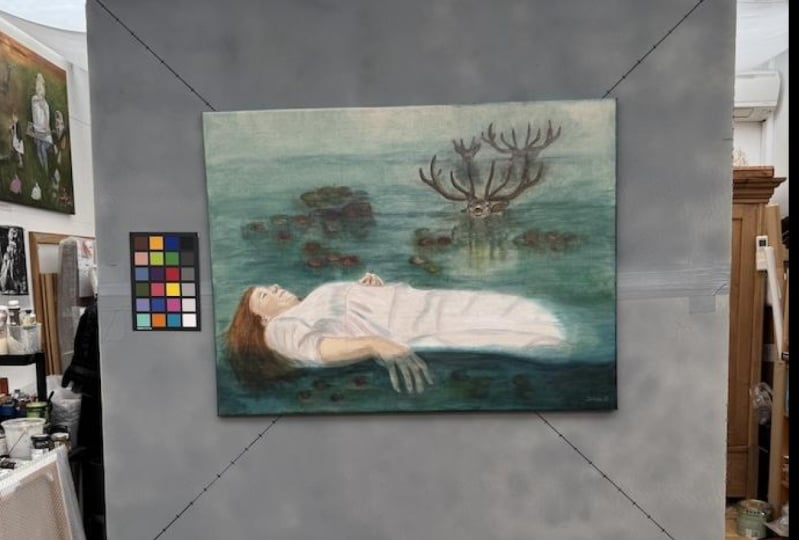
very handy when you're shooting is these color cards. They are standardized colors and they have a gray
scale at the bottom. This is very useful for color balancing your artwork
when we're editing, it makes sure that you
have the right color. Because when these
grays are neutral, then you know, you're in
the right color balance. And then after
you've gotten that, you can crop these
little colored cards out of the photographs you have, just your artwork, but these
are very handy to have, again, links in the notes. So that's sort of the
camera side of things. Now we're going to create what I call a shooting board
or an art board. That is a rigid, solid board that we can
mount your artwork to. That will stay in place and will hold
your artwork nice and flat so that you can create consistent images
of your artwork, each one the same,
and you can swap the artwork pieces out and keep them positioned
in the same place. Now, I've looked around at a bunch of different
alternatives, but this is the best I found
in a hardware or building supply store like
Home Depot, Lowes. They carry pink
styrofoam insulation, which is rigid boards of
pink foam for insulation. Now, if you don't
do big artworks, they also carry these things
called project boards, which is a two foot by two
foot piece of pink Styrofoam. It's very rigid, nice and light. And if you do drawings on paper, illustrations, calligraphy, and it'll fit
on this two-by-two board. This is perfect, right? Nice and small, easy to store. And we'll make this
into your art board. If you do larger works like
canvases or larger paintings, you will need a bigger
board to stick to. So what I got one of
these insulation panels, it's 2 ft by 8 ft long. And while I was in Home Depot, I got one of the sales
attendance to take their their box
cutter and a ruler and just cut it in half into
22 foot by four foot boards. And we are going to tape
these together very strongly with gaffers tape or duck tape also available
in hardware stores. This stuff is nice and strong. It will take these
two boards together. There's designed to
interlock and we'll make one rigid four-foot
by four-foot board. And that will work great. Now, we don't want
a photograph on a pink board because that will affect the color of the artwork. We want a neutral background. So I picked up a
can of gray primer. This is a math primer, so it won't be shiny,
won't be reflective. It's a nice neutral gray. And it paints onto these boards. And we'll give them a
nice neutral gray color. Now we're also
going to be drawing two diagonal lines
across the board so we can find the center
of the board and use those lines to
line up your art work. So you need a couple of, you need a permanent marker,
black permanent marker. These are sharpies. I have a big fat one for the large board or just
a regular sharpie. And you're going to use a
straight edge like this one. This is a big one
for our large board. You don't need it. This big one if you're using
the two foot by two foot, but you're going to draw a
diagonal lines that will mark out the center
of the board and allow you to align your artwork. These need to be permanent
markers, not water-soluble, not dry erase because
you don't want them transferring to the
back of your artwork. And at the intersection
of those two lines, what we're going to
do is we're going to mount a flat mirror, a small mirror like these guys. Little rectangular, one, little circular one there
in flat holders. We're going to mount
that to your board. And that's going to allow
us to find that where the camera is positioned right over the
center of the board, no matter what angle the
board is that that's going to find the perfect
place for the camera. So when you can
see the camera in the mirror, it's
positioned properly. So the one thing, these are both from the pharmacy or drug store. There. This is little purse
size makeup mirrors. The one thing you want to
be sure that you get is one that isn't a
magnifying mirror. This one has a magnifying
mirror on the back, but on the front it's
irregular mirror. This one's just
plastic on the back. You want to get a
regular flat mirror are nice and small,
they're not expensive. Then to attach your artwork
to the board if you, especially if you're
working on paper. I recommend FUN tack. This is law pages, fun tak. There's a couple
of other brands. They're all available in office supply stores
or on Amazon. And it's basically, these
are designed to put up posters without leaving marks
on the wall or the poster. We just use a little teeny tiny dot of that and it's just enough to hold your artwork to the board while
you photograph it, then you can take
it down and not mark either the board
or more importantly, not tear your artwork. So this stuff is great. And then, oh, we
need something to hold the art board of the
shooting board up consistently. It's got to stay in place and not shipped around as you
change the art workup. Now, if you haven't
artists easel, if you work on an easel
and you have one, That's a perfect
way for doing it. If not, what I'm gonna
do is I'm going to use my stepladder because
that's what I happen to have. And this will be
perfect for holding either the small board
or the larger one. If you have a sturdy chair. That would also do the trick. When you see how I
make a setup, you'll, you'll realize what you have around that will do the trick. I'm going to recommend
that you photograph outdoors on an overcast day or in the shadow of a building, if you don't have
that available. I'm also going to show
you how to create an indoor setup with lighting. And in order to do that, you're going to need a pair of these inexpensive little spring clamp lights that can clamp to a chair or whatever
you have handy. And you simply need
a couple of daylight balanced by 100 watt
equivalent LED bulbs. These are amazingly good quality these days for photographing
artwork, believe it or not. So that's what we'll do if
we're doing an indoor setup. If you shoot in the winter, for instance, you
don't want to freeze. This will come in handy. That's basically everything
you need for your setup. And in the next lesson, I'll go into a little
bit more detail about some cameras setups and settings that you're
going to use. And then we're going to get into creating your shooting
board, your art board. And then I'll show you
how to set it all up, bringing it all together
so you can create beautiful photographs
of your own artwork. So I'll see you in the
next lesson. Bye bye.
4. Camera or Phone?: Hi, I just wanted to
talk briefly about the camera you might use and
some suggested settings. If you are using a camera versus how are you going
to handle using phone. So if you have a camera, it probably came with
a kit zoom lens, which is really
convenient because it allows you to frame easily. And if you are not a
dedicated photoshoot or you can feel
totally safe setting your camera for totally
automatic settings. You can use the P or the
a setting on your camera, and it will determine
the exposure. You can use auto
white balance and autofocus because
the camera is going to have no problem finding your art work because it's
going to be easy to focus on. So you can use it on
totally automatic. You can shoot jpegs
because we're going to make some adjustments after, afterwards in our settings. So you're all set to go
with automatic settings, automatic focus,
and shooting jpegs. If you are familiar with the settings on your camera
and how to adjust them, you can opt to shoot
totally manually. The same. You're going to get
very similar results. But if that's the way
you're used to shooting, then that works perfectly well. If that's the case, you can set your white
balance for daylight. You can shoot RAW files
if you want, or jpegs. If you're used to editing
your files in say, Lightroom or Photoshop,
you can shoot RAW files. Then you can set your
own shutter speed, aperture, and ISO settings. So what I recommend if
you're shooting outdoors, you would set your ISO
for its lowest value, which is usually
around 160 or so, 100, hundred and 60. So keep the ISO low because
that's the highest quality. You would set your
aperture for around F8, F11 because that's,
you're usually are sharpest apertures
on most lenses. And then you can adjust your shutter speed to give
you the correct exposure. Because your camera is going
to be locked onto a tripod. You don't need to worry
about if the shutter speed is too slow because it's
not gonna go anywhere, because it's gonna
be on a tripod. So those are the settings. If you want to shoot manually, you can use those settings as your starting point
or as they say, set the camera for totally
automatic and you just point and shoot and
they do an amazing job. So that's with your camera. If you're shooting
with your phone, you don't have that many
controls on the phone. You don't have full
shutter speed, aperture controls, who basically
you line up the phone, you're aiming to get
it straightened away and you press the picture button and it will shoot in JPEG. And for most purposes, the phone will do
perfectly well. Now, you will need a holder to put your phone onto a tripod. Because you want
to definitely have a tripod because you want
the phone to be held in the same place
because we're going to locate the phone
perpendicular to your board. And then you can just take
all the pictures as you go. So you'll definitely
want a tripod and you need to mount your
phone to the tripod. And that's what
these clips are for. This just clips onto the phone. Leaves the camera free. And then this has a tripod, a hole in it. So in this case I have a tripod
plate and this goes here, locks onto the tripod and now the phone is fully
attached to the tripod. So you set the
tripod up, your aim, the phone, press the button, take the pictures,
and you're away. Those are your options in
terms of camera versus phone. Now the phone is perfectly good for pictures that you're
going to post online, put into a website, send it via email, and even make small prints. So for instance,
if you wanted to make a postcard size prints, if you were having a show and you wanted to send to mail out postcards or have cards available at the show
for people to take away. Phone will do a
perfectly good job. It's only limit is if you
wanted to print, say, 16 by 20 prints for sale
or poster size images, I would say you'd be pushing
the limit on most phones, in which case, you'll
probably want to opt for a camera to
shoot images for those. But really, other than that, you can go with either a
camera if you've got one, or use your phones. So in our next lesson, we're going to look at how
to set up our shooting board and how to get it all prepared so we can make
our final shooting setup. So I'll see you in
the next lesson.
5. Make Your Art Board: Hi and welcome back. Today in this lesson
we're going to put together our artwork
board or are shooting board and get it
painted gray and get some cross lines on it using our Sharpies and get this
all prepared to shoot. The nice thing
about these boards is once you've made it, once, you can basically
keep it forever in anytime you need to
photograph your artwork, it's available and ready to go. So the smaller boards,
these project boards, the two foot by two
foot Styrofoam boards, they don't require
any prep in advance. At least they don't
require any assembly. But I am going to spray painted with gray and put
the lines on it. So I'm just going to
set this aside for now and we're going to
assemble our larger board. Now, this larger
board, as I mentioned, is a two foot wide
by eight foot long, big tall piece of
rigid Styrofoam, an inch and a half thick. And I had it simply cut in half. I had it done right in the
hardware store and Home Depot. Somebody with a box knife
just put a straight edge. We cut it, snapped at. This stuff is really
easy to work with. The nice thing is
it's sort of pre grew to stick together. So all I need to do is
push these two pieces together and then use some
gaffers tape to assemble them. I'm just going to
hold them together. Strip of tape and be sure to flip it over
and do the backside. Does that make sense? So there we have it. A nice, stiff, rigid
four-foot by four-foot board. So this will be suitable
for doing a larger canvas. Pieces are large pieces
on paper and it's stiff enough that it will
stay rigid and it's light enough that
it's easy to handle. Only thing you have to be
careful of is high winds. So our next step in the
project is to paint this gray, and I'm using a gray primer. This is from, this one happens
to be from restore Liam. Any neutral gray primer
will do the trick. It's a matte finished
because it's meant to be painted over, which is great. The only caution that
I would say is don't try and build up a
thick coat in one pass. Because if you do where
the paint sort of pools, it'll tend to eat into the
Styrofoam a little bit. So do a couple of light
passes and you'll build up the gray and it will seal the Styrofoam and
all will be good. And then we just put
some black lines on it, stick our mirrors to it,
and we're good to go. So time to step outside and
do a little spray painting. Now that my boards
are painted and dry, they're all ready
to be marked out. And by the way, you're paying job does not have to be perfect. I'm not exactly a patient
person with a spray paint can, but it's just a
background and it's gonna be cut out anyway. You're going to crop
the background out when you make your
photographs anyway. So does not have to be perfect. It just needs to be a
basic neutral background. What I'll do is I'll
use a tape measure. Just sort of mark
out my diagonals. Like that. Then I'll draw them with the straight edge just to use a tape measure
to put a couple of marks. Go. Then I can use my sharpie. Lay in some nice black lines. And then we want to draw
from the other corner to corner so that we get two diagonals meeting
in the middle of the board. And that's what
we're going to use to center up our artwork. Because excuse me.
What's happening? Here's our large
board marked out. And now I'll take
our smaller board, which will be a little
easier to deal with. And put my lines on that. If you don't have
a big fat sharpie, you can just use a regular any permanent ink marker
will do the trick. Just make sure it's
not water-soluble or dry erase because
that could risk getting, transferring pigment
onto your artwork to the back of your art
work which you don't want to make like two-inch
increment marks on the board. Because that way, when I'm
putting my artwork on, it's easy for me to get it lined up and straight
and that just makes it easier when I go to crop it. So starting from here. Okay, so now we have our boards, the gray marked
out with markings. And at the center of the board, what we want to do is attach a mirror
right in the middle. So I'll use my cross hatches to line it up in the
center of the board. Alright, so when it's sitting
right where the lines intersect and I'm going to use some gaffers tape to attach it. If you want to be
very neat about it, you could use
double-sided tape or you could even use a little bit of the law pages font attack. But I'm just gonna do it with the tape that we've
already used. Our artwork will just
lay right over that and it's not thick enough to
really deflect the artwork. Especially if we're doing
something on Canvas. If it was something very rigid, like maybe in our
work on wooden board, then I'd have to
position my camera and I may have to take this off, but for most cases, this will work just fine. Now I'll do the exact same
thing with my small board. And I have a smaller mirror, which will place right in
the middle of the board. And again, this is
where these little hash marks are handy. Because that's a
mistake. There we go. Now our artwork, art
boards are all prepared and these will last as long as you take
reasonably good care of them. And now you've put the
work into it so it's ready anytime you want to make a
photograph of your artwork. Now, in the next lesson, I'm going to show you
the setup that we're going to use for
shooting outdoors. And then a setup for
shooting indoors, using these art boards
as our copy board. So I'll see you in
the next lesson. Bye bye.
6. Outdoor Setup for Natural Light: Alright, so now
what we're going to do is setup the boards we've created so that we can start mounting and photographing
our artwork. So the way I've got it set up, I have my camera on a tripod
and it's ready to go. It's it's sent for
fully automatic. I'm just going to let
the camera to take care of the exposure
and everything. So it's fully automatic. And over here, I have the basic step
ladder and that's what I'm going to use to
mount the art board and then the artworks,
we'll go onto it. So let me show how that works. Here's our nice gray
art board that we made. I'm going to just lean it here. And I'm going to use a couple of spring clamps just
to block it off. Just to be sure a puff of
wind doesn't blow it away. I'll use a little gaffers tape. Just run here. And I'm just taping
it to the stepladder. There we go. And you'll notice my mirror is mounted right in the
center of the board. And the board is tilted
just a little bit back. So the artwork won't
sort of lean off of it. And now we're ready to
set up and photograph. Now, here's the fun part. The thing that we need to do is make sure that the camera, it is perpendicular
to the board. So it's straight out from the center of the board
and centered on the board. And the way we do that
is by using the mirror. We have the mirror
at the center of the board and it's flush
against the board. So the trick is when
I can see the camera, when the camera can see
itself in the mirror, then it's located exactly perpendicular to the
center of the board. That way when I shoot
each piece of art, It's going to be square. It won't be tapered
at the top and bottom are won't
be out of kilter. So when we go to crop it, it's just a simple crop. It doesn't require any
fancy adjustments. So this is held in place. And now I just want to
set up my camera so I can start by just looking into the mirror
till I see my face. Then I can put the
camera right there. So if I adjust right there, I can see my face in the mirror, which means I'm
perpendicular to the board. If I place the camera
right in front of my face and look through so I can see
my face in the mirror. And I just need to raise the camera a little
bit. There we go. Now I can look through
the camera and I see the camera if you
have trouble finding it. Sometimes I find if you can see your hand around the lens, it's a little bit brighter
than the black lens, so that helps you
find the camera. But right now, if I said a wiggle my fingers in
front of the lens, I can see that in the mirror, which means I'm
perfectly positioned. So now that I'm in
the right position, I can just aim the camera so
that the board is centered. So now my camera is perfectly
centered over my board. And it can see itself. I'll just take,
I'm going to take a picture just so that I can show you that the cameras
sees itself in the frame. Okay, so now the
camera is all set up. The board is held in place
and nothing is moving. And I can go and
mount some artwork. In terms of our lighting. Today is a beautiful
sunny day outside. Blue skies everywhere. But we don't want
to photograph in the direct sunlight
because that's gonna be very hard to control. So we want to be in what's
called open shadow. So we're in the shadow
of this building with the artwork so to facing out towards the light
or towards the sky. But we are in shadow
so that we have nice soft even light for our artwork. Now that we have our setup done, cameras in place, the
board is in place. All we have to do is
mount our artwork. So now I have this
beautiful drawing by my friend Heidi Hashimoto's, who's graciously agreed
to let us use her work. And I'm going to
mount it to the board using little balls of the
fun TTAC at the corners. I just wanted to use enough
to hold the art work. So the minute or
so It's going to take for us to photograph it. And then I can use
these lines and the hash marks to get it
centered on the board. I just gently push it onto
the board. That's it. Now. I just wanted to attach my color guide so that it's just to the
side of the art work. Wherever it sits on the board. And I'm using the fun track
to hold it in place as well. Now we're all set to go. Our works mounted,
everything is squared up. It all looks good in the frame. And we have our picture. And that's it.
Everything is perfect. All right. If I want to change the artwork,
It's very simple. See how easily the fun TAC. Let's go, I'll go get
another piece of artwork. Here's another piece of our work with the fun
tack on the back. And there's another
one ready to go. Another piece of
artwork, photographs. If you find it's
a little tricky. Switching out there works
and pressing them into place without moving your board. You just use, I've got
a sand bag. We go. You could use a couple of five-gallon water
jugs if you own whatever you have around
to hold it steady, just makes it easier
to work with. So that's our setup. This, this setup will work with any piece up to about
two foot by two foot.
7. How to Shoot with Your Phone: So now I want to show you
just how easy it is to do this with the camera that we all carry in our
pockets, our phones. So I have a little phone holder, a little clip that mounts
onto my tripod, right? And these are available, I have links to these. So I'm just going to clip
my camera in. There we go. So the camera apps
running and I'll just mount the
camera on my tripod. And again, I just wanted to find the camera now the
phone in the mirror. And then I know I'm
all centered up. I'm going to come a
little bit closer. I think a lot bit closer because you can see the
image is quite small. So I need to bring
my tripod down. I'm a little bit
closer with this. So now I can see the little camera lens for the phone right in the
center of the mirror. Which means I'm
perfectly lined up. Here we go. I have my artwork. Fun tack on the back, then just position
it on the board. Include my color bars. And it's really the
black and white patches that you're most interested in. I can pinch to zoom in a
little bit. There I go. Perfect shot of my
artwork. Looks beautiful. So now I'd like to show you the setup for some
larger pieces. And we'll use the
big board that we created back in a minute.
8. Setup for Large Artwork: So now I have the larger
board that we made, which will accommodate
larger artworks. And in this case, we're going to shoot a canvas. So I'm going to mount it onto the step ladder
in a similar way. I'm just going to
put it on here. Use a couple of spring
clamps to hold it in place. Then some gaffers tape to
stop it from blowing away. And just to be extra shorts, I'm going to put a little
gaffers tape at the bottom. So here's a nice
painting on canvas. There we're going to
mount on this board. But first, we need to center up the camera
using the mirror. I'm going to stay with my
phone for shooting this. And all I need to do. We're going to back
up a little bit. The camera needs I
can see my face now. So the camera needs
to go right here. When I zoom in, I could see the
camera or the lens of the camera right in the
middle of the board. And there we go. Zoom out. We see our whole board. And I can just line
up to the board. The camera bind up to the board, zoom in a little bit to frame the board and
we are ready to go. So the Canvas is
a little heavy to stick to the board with FUN
tack that won't quite work. So I have a couple of nails and the advantage of the
Styrofoam board is I can easily push the nails into the board and
support the canvas. Now to prevent the
nails from sliding, I'm going to use a little
bit of gaffers tape. Now I call this gaffers tape. You may also know
it as duck tape. So here I have my Canvas
mounted our work. And what I'm going to do
is just see where it has to go about that height. A little bit. There we are. So in order to prevent the nails and these are just two inch common nails
in order to prevent them from tearing in the Styrofoam. I'm just going to
use a little tab of gaffers tape for
known as duck tape. We were about here
in a little bit. This doesn't have to be
totally perfect because you could straighten it up a
little bit when you crop it. Here we go. Artwork is mounted. I can just put my
color bars beside it. And we have our photo taken. So that's how we photograph larger pieces such as canvases. And you can use either your phone or
your camera to do it. And in the next lesson, we'll look at an
indoor setup for photographing your work.
See you in the next lesson.
9. Indoor Setup with Simple Lights: Hi, and welcome back. In this lesson, I want
to show you a setup, but you can do indoors to light and photograph
your artwork. Now, of course, indoors we don't have a big sky to
light everything up. So we're gonna be used some
small inexpensive lights and create a setup that
you can make indoors. Now a couple of things to note. The first thing you want to do, shoot in a relatively
dimly lit room. You don't want to have
big windows shining on your artwork and creating glare on the surface
of the artwork. You want to be able to control your lights so that they
don't reflect on the surface. So you need to have the room
lights either dim or off. So you could shoot in the evening after
the sun goes down. See you don't if you
have big windows that let daylight in, if you shoot after dark, obviously that's not a problem. Or if you can darken the
room with blinds and you can opt to turn the room lights off when you're
shooting your art work? I just have a fairly low light in the room just
so you can see me. So that's the general conditions
we want to shoot him. Now. The lights that I'm using are just regular old
hardware store clamp lights. And these often come
with a reflector or like an aluminum
reflector. There we go. Now you don't have to
look at the bright light. These often have an
aluminum reflector. You can use it or not use
it, it doesn't matter. But basically, what we're
lighting our artwork with is a daylight balanced 100
watt equivalent LED. Alright? And the quality
of the light from our LED light sources
these days is much, much improved over when
LEDs first hit the market. It's really good quality and it renders colors
very accurately. So the color of your
artwork will be rendered correctly by these
daylight balanced LEDs. They're really
excellent quality. These ones are Phillips brand, but I don t think it
really matters which one? Whatever your local
supplier has, a couple of hundred watt
equivalence will do the trick. As I say, I've got
them in clamp lights. My very fancy setup for
holding the lights in place is ikea folding chairs, which you're very
inexpensive. There. What I happen to have around, so whatever you have
around will do the trick. Few things to keep in mind. You'd like to have the light at about the height of the center of your art
work or your art board. Alright, so that way, if you have it higher or lower, It's going to light a
little unevenly from top to bottom and you don't want
to have to try and fix that. So if your light is
about in the middle, just so happens to work out
with this light clamped to the back of this chair,
works out perfectly. So we clamp that there. So the next thing you need to concern yourself with
is the placement of the lights so that they don't reflect in the surface
of your artwork. And in order to ensure that
you need to have the lights more than 45 degrees angled
wide of the artwork. If they're too close
to the camera, they'll reflect off the
surface and give you flare on the surface of your artwork and you
don't want that. So if there are more than
45 degrees out to the side, then they won't be
able to reflect onto the camera and cause flare. So the way you do that is if you stand at the artwork and look towards your camera and you measure straight out to the
side that's 90 degrees. Halfway is 45 decrees. And so your lights just wanted
to be wide of 45 degrees. Alright, so with this setup, I can just put this here. If I look from camera
and I go 45 degrees, that's wider than 45 degrees, so it will not reflect
in the surface. And the other thing
you want to be sure is that the lights are back far enough that they
light up your area evenly. If they were right up here, they would like one, each light would light one side brighter than the other and it would be hard to balance them and you could get
uneven lighting. They're both pulled back about
40 " or so for this board, which is enough to ensure that the light spreads out evenly. So when I turn this on and they're both
there in about the same, they're at the same distance. They're both wider
than 45 degrees, so they won't reflect in
the surface of the artwork. And as a result, you can see we have nice
evenly lit artwork. And if I have my camera, my cameras all set
up and ready to go. I have everything on automatic,
automatic shutter speed, automatic focus,
automatic white balance, automatic aperture camera
will handle everything. If you set your camera to p or a on your little dial on top, that will handle the
exposure of everything, which works just fine. Then I just aim and
press the button. And I've captured a well
evenly lit photograph of my artwork, and that's it. Then I can change out
artworks and do another one. So if you want to do
your indoor setup, here's the general idea. A dim room, no outside
light coming in. Daylight balanced LED lights, 100 watt equivalent is best because it's a
little bit brighter. They should be set at a height approximately equal
to the center of your art board and more than 45 degrees wide of the artwork. So that's 90 degrees like that. Half of that is 40 as
long as the lights are outside of the 45-degree, they won't reflect on the
artwork and create flare. You set your camera up the
same way you did before. Put everything on automatic, press the button and you've
captured your artwork. And that's all there is to it. So in the next lesson, we'll look at editing
your artwork, either right on your phone
or on your computer. And we can produce the final beautiful
photograph of your artwork that
you can post online, make a website, e-mail out
to friends and family, and use whatever way you'd like. So I'll see you in
the next lesson. Bye bye.
10. Editing on Your Computer: Okay. Now that you've taken the
photographs of your artwork, you're going to want to
edit them, crop them in, and make them ready to share or print whatever
you wanna do with them. Now, if you've shot
with your camera, you'll probably
edit the photos on your laptop or your computer. For this purpose, I recommend either Microsoft photos
or Apple's photos app. They both come with your computer so
they're free and they do a perfectly good job for the purposes that
we're doing here. If you are an Adobe subscriber, you can certainly use Lightroom or Photoshop
to edit your photos, whatever you're most
comfortable it. For today's demonstration,
I'm going to use photos on my computer
because I work on an apple. Here is one of the
photos that we took in our indoors setup. And it looks good basically
and it's ready to go. So the first thing we want to do is make sure that
our color balance is absolutely right on
and that the colors of the artwork are true to the
actual colors of the piece. So we're going to click
on the Edit button. And the first thing
we're going to do is go to the white balance. Now, white balance controls the overall color of your image. And that's why we have these color swatches that we stuck up adjacent to our image, because that'll allow us to
dial in the white balance. So down here, we have
the white balance area. And we want to use the
neutral gray setting. We're not using a skin tone or a temperature
and tint setting. We're looking for
a neutral gray. And with that, we click
on the little eyedropper. And that will pick up the tool. So when we come into our image, we have a little
eyedropper and what we do is just click on one
of the gray swatches. The ones in the middle
are usually the best. And if we click on that, it will turn it neutral gray. This ensures that the
colors in your image are neutralized and will match the actual color
of your artwork. Now, you might have to
play a little bit with the brightness depending on how the exposure
was in the camera. So you've got sliders up here for brilliance
exposure highlights, and you can play with those
at will and adjust them. And if you're looking
at the artwork itself, it'll help you dial it in. This could be just a
little bit brighter. There we go. Just a little bit. But overall, that matches
the art work quite nicely. And you have control over
a highlights, shadows, and everything about
the image to get it to match exactly to your
original artwork. But this looks
perfectly good to me. So now obviously you want to crop your
image and right up here at the top
of the window, there is a crop adjustment. And you can choose
a specific aspect, but I prefer to crop just
inside the paper itself. So I just grabbed the corners. Bring it in. You don't need to show
any of the background. There we go. And then you can adjust the angle
over here on the side. There's this little sort of
protractor looking thing. And it'll allow you to adjust the angle so that you
can get the edges of your art work perfectly lined up on the grid. There we go. There is a perfect photo of your artwork and you
can share that online. This would be perfectly
suitable for making prints and you're ready to go. In the next lesson,
we'll look at doing the same thing
right on your phone. You in the next lesson.
11. Editing on Your Phone: Hi. So if you've photographed
using your phone, you probably want
to edit everything right on your phone and
share it from there. So you can certainly use the app that comes with your phone
for managing your photos, whether it's the photos
app on an iPhone like this or whatever
comes on your phone. That'll do a perfectly good job. Personally, I
actually really like a little app from Google. It's available in the App
Store called Snapseed. And I like it simply because I liked the way the tools
are laid out and arrange. So I'm going to show you
how to do this on Snapseed. But as I say, any of
the apps that come on your phone do a
perfectly good job, or there's also Lightroom for your phone as well
if you want to use that. But here we are. So Snapseed is right here, open it up and had a photo. So we're going to look at
one of the ones that we shot outdoors of the canvas painting. So right there, there we are. So I like to, first of all, click on the tools
and the first thing I want to do is get the
proper white balance, make sure that the
color is correct. So I click on the
White Balance tool. And again you can see we
have a little eyedropper. So I can zoom in on this side. Move the eyedropper
over first of all, then zoom in on the
side where we have our little color chart and move the eye dropper until it's over one of the
little gray squares. Then we can zoom out. Have a look that
looks pretty good. If we want to make any
small adjustments, there's a temperature and tint. Temperature is the warmth or coolness of the rendition or
the tint is magenta green, but this looks
pretty good to me. So if I click Okay, I can go to my crop tool. There's the crop tool and crop
in just inside the image. Here we are. There we go. Now, that looks pretty good. I can even look at
the original artwork and that's a pretty good match. If I wanted to play
with the lightness, darkness, I have all the tools here that I need to do that. I've got curves, tone, image, dirt, sorry, tune image. So if I want to play with
the brightness a little bit, I can do that. But I can. To me, this rendition
looks pretty good. It will vary a
little bit depending on the light that you
were photographing under. But you can make small
adjustments here to make your image on screen perfectly match your
original artwork. And that's the
beauty of this app. And then when you're all done, you just click export
and you can save a copy, which saves it back
to your photo stream. And it's ready to share with
friends or make a website, whatever you want to do with it. Because we had a really
good setup with a camera, is square to the artwork,
so it's perpendicular. That's why we use the
mirror for shooting on an overcast day or in the
shadow of a building, it gives us nice even lighting. So the artwork is
beautifully lit, top to bottom, side to side. And all you have to do is
make minor adjustments for the color temperature
of the light to get. Make sure that it
matches what you see. If the original
artwork maybe make it a little brighter or
darker, just depending. But you can adjust that to
match your artwork with very little effort
and you're going to get a perfect photograph
of your work. See you in the next lesson.
12. Congratulations And a Quick Review: Hi, and congratulations. You've completed how to
photograph your artwork. You've learned how to
create an art board, which you can keep anytime you need to photograph
a new piece of art, you're ready to go and how to photograph it using either
a camera or your phone. So few key things
just to keep in mind, if you're going to
photograph outdoors, uh, an overcast day is perfect. Or if it's a sunny day, you can photograph
in the shadow of a building and that'll
give you very even light. You'll line up your camera using your little
mirror in the center. And that will ensure that you get perfectly square photographs of your artwork and they won't be tilted
in any direction. And if you're shooting indoors, then some hundred watt daylight balanced LED bulbs can be used to create
your lighting set up, just like we outlined in the class and
you're ready to go. Now, just to show you
how well this works. Here's one of the
original artworks by my friend Heidi Hashimoto's, who graciously allowed us to photograph her our
work for this class. Here's her original artwork
and here's a print that I made from the file that we
photographed for this class. And as you can see, they match incredibly well. And this is a really
high-quality print. So you can also produce really beautiful photographs of your own artwork that
you can post online, make a website, create prints, make postcards, whatever
it is that you need to do. I'd really like to
encourage you to photograph your art
board and your setup, as well as some examples
of artworks that you photographed and share them to the project gallery
for this class. That way, other students can see your setup and the artwork
that you photographed on it. Feel free to reach out to me in the discussions for this class
if you have any questions or anything comes
up and please leave a review because I take your
feedback very seriously. And if you enjoyed this class, hit the Follow button
so you can see any classes as I released
them in the future. So I hope you enjoyed this. Have fun photographing
your artwork and I'll see you
in other classes.
 Rob Davidson, Food Photographer and Videographer