Transcripts
1. Flyer Design Photoshop Class Intro: Hi students, welcome to the Photoshop flyer design cars. Now, this is a project-based class. So by the time you go through all the lessons, you should be able to recreate that supplier. Now the assignment for this class is to recreate the flyer that I am walking you through in the course. Now if you choose to do another type of layer that is so welcome and like to see creativity. So if you want to come up with something unique, I would love to see it. So now I have all the resources that I'm using in this class available for you to download right now. So just head to the resource link download so you can follow along. This class is for beginners, intermediate and advanced as well. So anybody can benefit from this class. So don't worry if you don't know much about Photoshop. By the time we finish, you won't be able to recreate this flyer. Not only that, but you are going to learn techniques that will help you to be able to create similar flyers or even mimic a flyer that you see online. So I'm excited to have you join me in the class. Thank you so much for choosing this class. I know they are a plethora of other courses that you could have chosen, but you chose to stick with me. And for that, I'm so grateful and I can't wait to see you in the class. So students, if you're ready, let's get into the class.
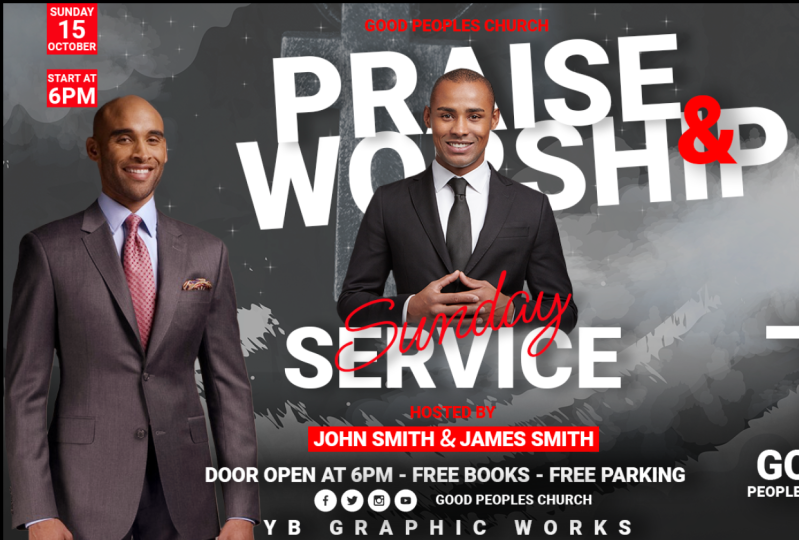
2. Add Background Levels in Photoshop: Hi students, Welcome to this Photoshop flyer design class. Now, in this lesson, I'm going to show you how to set your background. So without much ado, let's get started. So the first step is to go to File, click on New. And we are going to choose a ten by ten. And notice that the resolution is at 300 and my background is set to white. So you can go ahead and click on Create. Now, I'm going to zoom in holding down option, and I'm just planning with my mouse so we can have the maximum space to whack width. Now, the first thing that we are going to do is that we need to set our background. And I'm going to go ahead to drag in this file, which is going to be the first image that we are going to use to set our background. Now, you'll notice that when I brought this file in, it came in what across? You need to double-click to accept the file you brought em. And also you see that there are some activations on the image. Now, if you don't see that activation, you need to make sure that once you have your move tool selected, you have auto select and show transform all checked. Now, this is available in the newer versions of Photoshop. If you are on an older version, you can click on Command T on the Mac or Control T if you're on the windows and it will activate your image for you so you can scale it. So I'm going to move this image and set it on the bottom. And I'm just going to go ahead and hold down my Shift so that I can sort of stretch this image a little. Now, dependent on what Photoshop version your own, you might not need to hold down Shift. So once we are satisfied, we want to go ahead and double-click to accept the changes. We want to go ahead and pull and the other image. So I'm gonna go ahead and pull this end. And I'm just dragging and dropping. And I'm going to double-click to accept. I'm going to move this up. Now we want to blend in the background with the foreground image. Now there are a couple of ways to do this, but since we really don't need the access of the top image, I'm going to use the eraser, but you can also use the, you can add a layer mask so that whatever you do as non-destructive. So I think we'll go ahead and do that so you get the concept. So I'm going to go ahead to add a layer max. Now you see this little icon on the bottom. Click on that, it will add a layer max. Now pick up your brush tool when you're working with layer masks, always remember black hides, white reveals. Since we want to hide, we want to make sure our foreground color is black. Now, you want to make sure you can see or brush head. If you can't see or branch what it means your catalogs is on. Now when I ten of one attempt on my couple of, you only see a cursor. So if you see only a current, that means your catalog sense of and you need to turn that on. Now, if your brush is too big, it can decrease it using your left or your right bracket. Now, the last thing you need to check as your hardness, so we can right-click. It will bring up the brush options. You want to make sure your hardness is at 0. You set your hardness at a 100 percent. Watch what happens when I try to brush, you see is giving me a sharp edge. That is not what we want. So right-click, go back and set your hardness to 0, come out of it and watch what happens. You get a very nice gradual blend in of the two. Now, this is what we want. So with this set, we want to go ahead and bring in the third image. So I'm going to go back to my folder and I'm going to drag this gentleman and he's worshiping and we are going to sell them some way here like that. And I'm going to double-click to accept. Now the same step that we use for the second image using the layer max, we are going to repeat the same concept. So I'm going to go ahead to add a layer max, pick up my brush. And I'm going to go ahead and begin to brush since our default is already set to black. Now, if your default is not set to black, you need to click on the default icon right there. It was said it. Now, if you want a black on top, just flip your arrow and you have the black on top. Now we are going to go ahead to brush this area and so it blends n. Now I want to reduce the opacity so that my image sort of blends in with my background. So you want to go to your opacity and you just want to go ahead and reduce it like this, and this is looking good. Now, the other thing that I wanted to show you is that if I change my mind and I don't want the layer max of the area I've raised of my subject. All I have to do is click on your Layer Mask and say This able layer max. So now you can see that you have the full picture back. Now, this is how you use a nondestructive method to apply to any image you bring into Photoshop. Now, if I decide to go back, all I have to do is right-click on my thumbnail and say enable the umax and basically the command is put back in place. So I hope you've learned something new.
3. How to Remove Background of Subject: Hi students, welcome back to Lesson 2 of the flyer design cars. In this lesson, I'm going to show you how to take up the background of your subject using the quick action to so without much ado, let's get started. So back in our folder, we want to click on our subject and drag and drop in our subject. And we are going to double-click to accept. Now, while you work on this project with me, you can put em your own images if you want to create your own unique design customized to your church or your need. So just bear that in mind. You don't have to use all the images that I have provided. So we are going to go ahead to take off the background. So that is going to be the second thing we are going to do. So for this second step, we're going to use the quick action to take off the background. Now there's a lot of ways to tick off a background, but a quick action is the most easiest to use because Photoshop is very advanced, narrow. So we are going to click on our image. We want to go and property. Now when you go under property, you're looking for quick action. If you don't see quick action, it means that your image has not yet been converted into a layer. So you need to click on Convert to layers so that you can accept and convert your layer into a smart object. That way we can apply a quick action to take off the background. So we are going to scroll back down and you can see where it says Remove Background. Now, if you scroll down and you don't see Remove Background, even though you see quick action, you need to click on quick action again and it will activate the Remove Background. Now we are going to go ahead and click on Remove Background and look. Photoshop does a very good job in censoring all the areas that is not part of the subject and basically takes off the background. Isn't that fun and love it? So what we want to do is that we want to create a duplicate of us subject. But before we do that, I want to basically get rid of the layer max. So we are going to right-click on our layer and then we are going to say Apply Layout max. Now once we do that, we basically get rid of the background. Now, in this case, we did that because we really don't need the background aiming more. So with that said, we want to go ahead and create a duplicate of our image. So to do that, you hold down Command J to make a copy or Control J if you are on the windows. So I'm gonna go ahead and 10 of the top layer by 10 and off the visibility. Now we are going to click on this one. And we want to go ahead and zoom out a little. And we are going to go ahead and scale. Our subjects, make him a little bit bigger and so he's like that and we don't go into double-click to accept. Now we want to basically blend the subject also end to the background. So click on your Layer, go under your opacity and we are going to reduce the opacity. So he's sort of blends in all. We can even go and use the overlay. Now when you use the overlay and you set your opacity to a 100, this is the effect you get, but this is what I quite want. So I'm going to go back and set it to normal. And we are going to reduce the opacity like this. So we can still see our subject, but it's still too much. Now, the next thing that we want to do is that we want to erase the bottom portion of our subject. So we are going to again add a layer max. You're getting good at this. So add a layer max, pick up your brush tool with your foreground as black. We want to go ahead and basically hi, This portion of our subject. So we have something like this. It blends in nicely. And now we can go ahead and 10 on our main subject. And we are going to pick our move tool. And we are going to go ahead and, oops. So when you see that your background is move in, you need to go ahead and lock it so that nothing moves. So to lock your background in its it click on the layer that you want to lock. Go up. You see the padlock, click on the padlock and it will lock it. Now, if you want to unlock it, all you have to do is click on the padlock. And it will reactivate it for you to move. So I'm going to go ahead and turn back on my padlock. So with that said, now we can move this image freely. So I'm going to go ahead and click on this image, and we are going to go ahead and scale him a little setup right there. Now, we are going to go ahead and scale this image down. Now that we have a subject, it gives us some perspective. So now we can begin to move all the images in the background just so we can set our image, our subject in the right location. Like that. Now, we can begin to take all the other images a little bit further down in terms of the opacity. So the focal point is on our main subject image, also in the opposite end, we can go ahead and lock it and reduce the opacity. So we can still see our subject, but not too much. So with this said, I'm going to go ahead to lock it. So the next step is that we want to go ahead and enhance our image. So to do that easily, you want to use the camera raw effect. So you want to click on your image, go to Filter, and then choose Camera Raw Filter. Now, with this dialog box, you can see your subject and you can begin to play with the different effects, additive effect, so that you can get your image a little bit more brighter and richer. So I'm just going to go ahead and play with a different effect. Now, you can choose to either play with your temperature, your contrast, or even your black to set it to the way you want it. I'm going to go ahead and click Okay. So you can see the before and you can see how it transformed it after. So with this all set for us, we want to go ahead and erase the bottom of us subject. So to do that, go ahead once again and a layer max. Now pick up your brush tool and we are just going to go ahead and erase the bottom. Now, if you erase the bottom less, if we do this, oops, and it's too much. All we need to do is that we need to flip our foreground to white, still being on the layer marks. Now we campaign this end and you see that new alarm, it comes back. Yeah, so this is how cool it is using layer masks. Now, if you did erase, it means that you have to undo to get this back butt. If you are maybe way down the line way you have set all your texts and now you're like, oh, I wish I had more of my subject back. If you undo, you basically lose everything. So that's why it's key to use the layer max. So I'm going to flip my foreground again, and I'm going to go ahead and blend in a little bit more. So we have something like this. Now, if I want more of it back, I'll be able to do that.
4. Add Gradient in Photoshop: Hi students. Welcome back. I'm so glad you're still in the class. Now in this lesson 3, I'm going to show you how to add a gradient effect to enhance your flyer design as well as using the blend mode. So without much ado, let's get started. We're going to go ahead and drop this image in. I'm going to double-click to accept. Now we want to go ahead and take off the background. So go under your property and we are going to scroll down, just like we did with the image. Convert this layer to a smart object. Now go back and click on Remove Background. So with the background removed, we're going to set this some way here like that. And we want to make sure that we move this layer to set it below as Subject layer, so it's behind us subject. Now we want to go ahead and click on our layer and we want to change the blend mode. And we're going to go ahead and choose vivid light. We're gonna do that. I'm going to double-click to accept. And I'm going to go ahead and scale it like this and set it somewhere here. And I'm going to double-click to accept. So with this set in place, we want to go ahead and take the opacity down. We want to set the opacity at 50, or you can take it down a little bit more if you choose to. I'm going to go ahead to add. I'm going to go ahead to use my brush, pick up my brush tool, and I'm just going to go ahead and blend this end. So we sort of have this effect, textured effect on that portion of our background. Now, we are going to go ahead to add a gradient. So click on your layer and go ahead and go to your adjustment. We want to click on gradient. Now with this effect, we can go ahead and change it to whatever color we want. Now notice that the gradient I'm using as basically from solid to transparent. So if you don't have this default, all you need to do is click on your gradient, go to your basic. Now, in your basic, you have the option to choose a two tone or a transparent to a solid. So I'm just going to click on the transparent to a solid. Now, if you want to change the color, you need to click on your Callisto. It will activate your color, click on your color, and now we can choose any color that we want. So we're going to choose something in the hanging mass that orange. I'm going to go ahead and click Okay, now we want to make sure that the other side of it, we choose a black and we are going to go ahead and click Okay. Now you notice that the moment we changed it from the cyan, it gave it a nice effect. So always remember that if you use in the solid to transparent, that transparent portion is black. Now we are going to go ahead and click Okay. Now I want to move my angle position. So what I want to do festival is I'm gonna change my style to reflective so that we have the gradient in the middle. Now I want to change my angles, so click on your angle and set it diagonal. So you have something in this setting. So with this all set, I'm going to go ahead and click, Okay, we are really getting close to set in our background. So you can also see that when it comes to Photoshop, because there are so many different layering, you might start with just a basic image, but then as you add on to whip, it transforms your image for you. With this set, we want to go ahead and move our background image of our big subject and move it above the gradient so that you can still see your subject, but it's not too much, but you still have the gradient effect on your subject. So with this set for us, we want to go ahead and go back to our folder. And we want to go ahead and look for another image that we're going to bring in. So I'm going to drag this image and I'm going to set it right there, somewhere like this. And I'm going to go ahead and scale it down just a little. And I'm going to double-click to accept. Now with this in place, we want to go ahead and on and layer masks to this as well. And you're right, we want to just reduce our brush hair and basically blend this area n with our background image. So we have something like this. You can even take the opacity down just a little so that you get a very good blend. So with this offset, we are going to leave this like that because they are ADA thing is that we are going to bring in to basically blend in everything. So the next thing that we want to do is that there is another image that we want to bring in, a textured image to finish off the background. And I mean, yes, this is going to set off our background. So we are going to go back to our folder. So for our next image, we are going to go ahead and drag in this halftone image. And I'm going to set it right there. And we are going to move it this way and set it in place. Double-click to accept. Now, we want to go ahead and scale it out a little bit more like that. I'm going to double-click to accept. Now, we want to go ahead and change the blend mode of this to overlay. Now when you do that, you basically get rid of the background. So with this set, we want to take the opacity all the way down to about a 65. And we are going to go ahead and add a layer max. Now pick up your brush tool and we are going to basically paint in this area to hide it. So we have something like this. Now, I want to go ahead and make a duplicate so that we can apply that on the bottom. So click on that layer Command J to make a duplicate. And we are going to basically move that down and set it somewhere here. Like that. We can increase the scale a little bit more. So we have it go in, into the other side. Double-click to accept. We want to make sure that we are on the right thumbnail and we are just going to blend this n. So basically we are done with our background is all set for us.
5. Add Text in Photoshop : Hi students, Welcome back. I'm so glad you're still in this course. So for lesson 4, since we're set with our background, we're gonna go ahead to add our theme as well as bringing our logo. So without much ado, let's get started. So the next thing we want to do is to bring in our logo. So if you have your church logo or you have to do is just put it, place it in. Now, I already have my logo that I'm using, so I'm just going to paste it in here. Now, if you don't have your logo, you can create your own custom logo. But I already have a logo in, so I'm just going to set that right, that like that. Now, I want to go ahead and type in the name of the church. So you wanna make sure that festival, this layer, your logo is at the top, so is on top of everything. Now, you can make sure that you click on the top layer now that we want to add in our font. So go ahead and pick up your type tool. Now we need to set our background to the default. So click on your foreground and click on the arrow and saw, it sets it to the white. Now we can go ahead and type in the name of the church. So I'm going to go ahead to go to my font. I'm going to choose all, I'm going to choose the Century Gothic Pro. And I'm just going to go ahead and type M C. And I'm going to go ahead to use my move tool. I'm going to move it and set it in place. We're going to go ahead and scale it. So I'm going to go ahead and scale it down. And we are going to set it somewhere here. So is right there. Now, if you want to change your font, you can double-click on it and make it bold so it stands out a little bit more. So we have something like this. Now you can move it using your app or down arrow. Now, if we want to move our subjects a little bit away, we can always do that. But I think this is in a good spot. Now, we want to go ahead and begin to add in the texts. So the same concept that we use to type in the fade, we can actually make a copy of our texts. So you just have to hold down Command J to make a copy. Move this down, double-click on it, and we can go ahead and type in praise. Now, use your bowl tool and basically scale it and make it big and double-click or move it to accept it. Now I'm going to double-click on it and we are going to change the font style and we're going to set it on. We're just going to set this on regular. Now we want to go ahead and add a shadow. So you need to double-click on your layer. It will bring up the layer style. Now, you can click on your drop shadow. We want to add a very simple drop shadow. So we just have this simple one click on the drop shadow. Notice my opacity is not exactly at 100, so it's not so dark. Now my distance is at 16 and my spread is our 16. My angle is even at 90 notes as my blend mode as normal, I'm gonna go ahead and click Okay, now we want to make a copy of this. So just hold down Command J to make a copy. Move this down, double-click on it. And we are going to change this to see worship. And we are going to go ahead and highlight, change this. We want this to be bold. And we are going to go ahead to change this to pop ends. And we are going to go ahead and scale it down. So it lines up a little bit with our praise, aligns up with a phrase on one end. And we are going to set it somewhere here like that. Make this a little bit bigger and double-click to accept. Now we are going to move the praise and set that right there. Now we want to go ahead and add another font. So I'm going to increase this a little double-click to accept. Now, we are going to go ahead and add a cursive font. So make a duplicate comma j, and we are going to use that for the end. But we want to highlight this and we want to change it to adore you. And we are going to also change the color. So click on your color and then change it to like a cyan. And we are going to also add a drop shadow. So notice that because I made a copy of, of the first texts with a drop shadow, it already has the drop shadow to it. Now I want to move this to the top so that this falls on that. So we have something like this Double-click to accept and we're going to make this a little bit bigger. And so we have worship, praise and worship, like that. Double-click to accept. So with this in place, we are going to go ahead and add the wet consent. So we're going to play off the same font Command J to make a copy. Move that to the top, double-click and type in conference. Now, notice that all the fonts came in cups. If we just want the first alphabet and cups, everything in lowercase, you need to pick up your type tool, highlight all the other texts, highlight all the other alphabet as separate fest one, and then go under your property and the type option, check off the double tee and it will basically set your font in and lower. So highlight the font. We want to change this to breathe in and breathe in person now. And I'm going to go ahead to rescale this and set it right there. So we have something like this. So we basically have praise and worship conference. So with this set, we wanted to double-click on it to accept. Now pick up this text, click on it, make a copy command J. And we're going to set that on the bottom like that. Double-click on it. Now we want to make this whole thing one word. Now it's hard to do it because you'll notice that we are picking up on the large text. So go ahead and lock this texts. We can't move it. So we need to move this text away and make the changes that we want and then bring it back. So I'm going to go ahead to remove the spacing. Since this is going to be the social media name, we're going to double-click and make this black. So flip your foreground to set this to black. Now, you could go ahead and bring in your social media icons. So if you have your social media icons, all you have to do is drag and drop them. And just like we do with the logo, so I already have mine. So I'm just going to go ahead and paste those. And like that. We can move it and set it right there. So it shows very well. Or we can set this here. This is right there, and this is right here. So both of them show very well. So with this set in R, if you have Twitter or whatever, you can also bring those n.
6. How to Use Blend Mode in Photoshop: Hi students, welcome back. So in this lesson 5, we are going to basically finish of added all the information, like the date and time. So without much ado, let's get started. We're going to add a new layer. And we're gonna pick our marquee tool and we are just going to draw a little rectangle like that. Now you can use your shapes to do the same thing. But for some reason my Shape command is not working. So draw just a little thin line and then you want to make sure your foreground is white. Pickup your bucket, your paint bucket, and basically fill that in Command D to de-select. So notice that I have my line sort of lining up with my P and W. So that is sort of frames at. So with this set, we want to go ahead and we want to type in the date as well as the time of the event. So we are going to go ahead and basically click on our font once again. And we are going to go ahead and type in, highlight this. And we are going to choose a very simple font. So I just chose the all round Gothic. And I'm going to go ahead and set that some way here. Now, you can increase it or decrease it. So with this in place, we are going to go ahead and pick up our type tool again. And we are going to type in august like that. Go ahead, highlight. And we are going to set this to sensory conflict. And we are going to make this bold with our Move Tool. We're going to scale this down. And we're going to go ahead and move it and set it right there. Now I'm going to go ahead and zoom in so we can see it. So with this in place, we want to make a copy. So Command J to make a copy of this. Double-click. And we are going to say Sunday. And we are going to Zoom. We are going to scale this down. And we're going to move that and set that on the bottom like that. So we have something like this. We're going to go ahead and scale this, a little double-click to accept. Now we want to go ahead and add the pestis name. So Command J to make a copy. Move this out. And we are going to go ahead and type in pasta, Henry. And we're going to highlight the wet pasta and we're going to make that thin. And we are going to scale this down a little, move that and set that right beneath. Now, you don't have to do everything the way I've done it. You can be a little bit more creative. As long as you know what you do in double-click to accept. Now, we want to go ahead and add the time. So I'm going to make another copy command J of this double-click and type in nine AM. We're going to highlight this and we wanted to change this to the bee bus font. And I'm going to go ahead and move that. And we're going to set that right there. So we have nine AM for the service. We're going to double-click on my guest and we are going to change the color. So click on your foreground. Just select the cyan in the text below and that basically apply set. So we have this now, I need to add a shadow. So double-click on it and basically add a drop shadow. Since it's a default, it picks up on what we already have. And we're gonna go ahead and click Okay, so with this set, we are going to go ahead and also add a drop shadow. This is too much so I'm going to click on it. And I'm going to go ahead to basically reduce it. So I have something like this. Now, if I want to add the same drop shadow to my texts, all I have to do is click on the August texts, right-click and just say Copy Layer Style, click on my font for the pasta, right-click. And basically you want to paste layer style, so you'll notice that it just applied it to it and we don't have to go ahead and repeat multiple steps. We can do the same thing for the Sunday, just paste it and you are done. So with that all said, we want to go ahead and bring in another image to overlay onto our texts. We are going to go back to our folder and we want to drag in this image. And we're going to set it somewhere here like that. And I'm going to go ahead and scale it up a little. So we want to go ahead and change the blend mode of this and we're going to set it to soft light. Now with this, you notice that it doesn't take too much off your image, but it asks something nice. Now, if we want to double it up, we can make a copy command J make a copy. Now move that one up and we can go ahead and even rotated and set it somewhere here. So we have something more like this Double-click to accept. Now, this is the effect we have. We can even take down the opacity of the top one, so is not too much, but we can still see it. Now, I'm going to go ahead and zoom out so we can see everything. You have a very good effect. Everything sort of pops and everything is sort of reads well, now even the August we can make that does color so it pops a little bit more.
7. How to Create a Lense Flare in Photoshop: Hi students. I'm so glad you have made it this far. This is the last lesson in creating our Photoshop flyer design. Now in lesson six, we are going to add a lens play effect and use the color lookup to finish up the flyer. So without much ado, let's get started. Click on the top layer and we are going to go ahead and add a new layer. So the easy way to do this is go under your adjustment, add a solid color. Now we want to choose a black and we are going to go ahead and click Okay, now from here we go to Filter. Then we want to go and sterilize. We want to go under render, and we want to choose lens flare. Now, you need to first of all, convert your layer into a smart object. Now once we have that set, you'll notice that the lens flare, we have different options that we can choose from. But I'm going to stick with the movie prime. And you can basically move this light to whatever you want. I don't want to see all the double blue line, so I'm going to align these two. And I'm going to go ahead and click Okay, so now with this effect, to make it show up on your image, you need to change the blend mode of this to screen. Now, with a screen, you basically get rid of black. So with this set, we are going to use our move tool. And we want to move this and set this somewhere here like that. Now we can make a duplicate by clicking on command J to make a duplicate. And we can move that and said that some way here like that. Now notice that it has some white background around it. So I'm going to delete this to show you what to do. So you want to first of all, add a layer max and with your brush, with your foreground as black, mix your, your cup locks is 10 of we can basically ways to get rid of the bite bout boundary line. So we don't have any lines showing. We just have the light source. Now, we could make a duplicate of this light source command J make a duplicate and we can move that and said that somewhere here like that, or wherever you choose to do that is all your preference. And we can go ahead and set it somewhere here. So we have something like this. Now, if you want to move and we position things that's all up to you, you can go ahead and do that. Even with this worship, I can go ahead and increase it if I want. I can even increase the conference if I want, but I'm going to go ahead to leave it like this. Now to finish off everything, we can go ahead and add. We can go ahead and add a color balance. So what? So to finish this off, we want to go ahead and add a color look up. So we are going to first of all create one file. To create one file of the image, you need to hold down Shift Option Command E, and you need to make sure you are on the very top of your layers. Now, you notice that I have one file, which if I move, you see that is just one single file of all the files that I have done, the different layers. So I'm going to click on Command Z to set it in place. Now with this set, we want to go ahead and add a camera roll effect. So we can either do that on the single image. All you can do it before you create one file. So I'm going to go under my adjustment and then click on Color. Look up. Now you want to go under your property and you can begin to play with all the different effect. But notice what happens if I apply the three strict. You'll notice that a bond up the colors, it made it more rich and it made it very nice. So with this, all I have to do is that I can go ahead and actually make a copy again. So Shift Option Command E, It gives me one file. So I have this image which I can actually use as my final or if I want to add a little tinge of even a blue, I'm going to go ahead to add another color. Look up. And this time I want to change the sensory to horror blue. Now that one gives me a little tint of blue effect. So this, the effects that you have. So you can either go with this effect or you can go with that effect, or you can go with the original effect, which is this. I hope you enjoy this and I'm looking forward to seeing you in your version and your rendition of this flyer. So share in the discussion board so that we can all appreciate your work and give you a thumbs up. So if you're new on my course, I have two other classes. I have the gradient mastering class course, and I also have Photoshop for beginners, so you can join those classes as well if you're a beginner or you just want a refresher. And I also highly recommend the gradient course because that will teach you so many techniques that you can use to create your own custom backgrounds. So guys, enjoyed the class. If you have any questions, let me know in the discussion board and I will be glad to answer those as soon as I can buy.
 Patricia Quist-Therson, Quistt Photoshop