Transcripts
1. Photoshop is now magical through AI: Photoshop is finally magical. Let me show you, but please work along on your
second viewing. The first time around,
just sit back and watch. Okay, this is the latest
version of Photoshop, and I have a paid
subscription from adobe.com, the only place where
you can get photoshop. I'm going to activate the
Marquee Tool hotkey M. It's this tool right here and click and drag out the
box in this corner. This means I've
made a selection. Now, in this latest
version of photoshop, I have this option
called generative fill. Let's click it. Now, we have a field where we
can type anything. I'm going to go
with cranberries, for example, and I'm
going to hit generate. This requires an
Internet connection and a bit of patience. But after a while,
here's the result. This is why I said photoshop
is finally magical. This is only available in the latest version
of the program, but wow. It's fantastic. And if you don't like it, no worries, we have
three options in total. Use these arrows to
go through them. You can also see these options here in the properties panel. Now, some people thought
photoshop is washed up, and all these new platforms like Md Journey or D would just
make photoshop obsolete. That's not the case. That's
actually the opposite. Photoshop is now even
more powerful than ever. Let's do it again. The
Marquee tool, right? Hot key. Click, hold, and make sure you've
selected this one here. Now, let's draw another box. But what if you make a
mistake? No problem. Hit Control D. That's
command D on a Mac, where you can remember
D as in D select. Okay, so that's control D
to remove your selection. Now, draw it once again. Okay, click on generative fill, and let's type
something different. Let's go with
coconut, for example. You will have to
wait for a while, but that's totally fine. I'm going to edit it
out. Okay. The result, well, this is okay, but I'm not in love with it. I think we should try again. I'm going to click on
the same search field. But this time, I think I'm going to go with coconut chips. Now, this should give
me a better result. And, well, yeah, I think
this is a bit better. We can cycle through them
and look for the best one. Now, in my case, I'm looking
for something realistic, but also something that
matches the entire photo. Now, in general, I use this feature for my
social media posts, maybe for an ad on Facebook ads, but maybe for an image gallery, for my own webshop. Now you may ask, Chris, does this generative
fill always work? Does it guarantee
perfect results? No, of course not. At least not in this version. I'm sure it's only
going to get better. But here's the thing. If you make a large
selection, It's struggles. It doesn't do a good job. For example, let's select
the entire top part. Let's say I want to fill
it with some almonds. By the way, I'm editing out the way because I want
to keep the video short. But yeah, know that it
does take a few seconds. Anyway, here's the result. But this doesn't make any sense. You can cycle
through the options, but it just doesn't
do a decent job. But if I select a
much smaller area, say this part here, and I repeat the exact
same instructions, almonds, nothing else, you'll see that this is
actually quite decent. Now, obviously, you should
go through several options. You can generate
again, if needed. But yeah, focus on smaller bits. Now, to export all work, go to the top menu to file. From here, go to export
and then export as. If you prefer the hot key, that's all the modifier keys, control shift, and
then finally W. That's a very long one.
But you do get used to it. All the keys, control shift and then W. And now from
this new window, choose PNG and hit this
button when you are ready. Now, it's your turn to
use generative fill. Remember, this is only available in the latest
photoshop edition, and you do need a paid
subscription from adobe.com. Also, you should focus
on smaller areas. If you want to do
very large ones, you're not going to
get a good result. Now, we have lots to cover, but this was just a preview. Go ahead and practice
and have fun with it. You have the image attached.
2. This is the biggest improvement in Photoshop's history: Over the last few years, not a lot has changed
in photoshop. So if you're using a
slightly older version, you might be happy with
it because it works 99% the same as the
most recent version. But this is where things
change neural filters. This is a brand new
tool that allows you to significantly edit photos
in a dramatic way. But before we continue
talking about neural filters, you need to understand
that this only works if you have a paid
subscription on adobe.com. If you're not paying
for the photo shop, you won't get these filters. Now, the question is,
are they worth it? $10 per month? I say, yes, they're
totally awesome, as you're about to see in
the upcoming lectures, we're going to go through them. But I want to give
you some context because that's the
most important bit. See, imagine that you don't
have an Internet connection, and you have a library
of movies, right? If you want to watch something, you have choices based on
what you already have, right? You may have a few movies. Maybe you have a lot, be it
on your computer, on DVDs, on USB drives, whatever, but your library doesn't change. So you're stuck watching home
alone for the 20th time. But if you add an
Internet connection and maybe a subscription
to Netflix, Hulu, HBO, whatever, then
you get loads more options. You get a vast library, a huge number of choices. You know, just at
your fingertips. It's the same thing
with neural filters. See, Photoshop is pretty smart, and it can do some
wonderful things, right? But when you connected
to the Internet, it gets way way smarter. And that's how
neural filters work. So, for example, when you
want to colorize an image, just as a random example, Photo shop can look
on the Internet and see how other similar
photos look like. So that's how it can
do the job so well. Now, my explanation is simplistic and it's
not 100% accurate, but in short, that's
how it works. That's why you need a
paid subscription because your local photoshop
program is going to send your various projects to
various servers on the web. It's going to use lots of
resources that are on the web, machine learning software,
and various things, and then it's going
to come back to your computer with
a great result. But maybe you're not
interested, right? Maybe all those neural filtons maybe you don't care about
them, but here's the thing. This is a sneak peek into something that's not
yet available, right? Repeat. This is
not yet available. So let's say that we
need a great selection here with the hair
being the tricky part. Well, in the near future, we may have this option available for every
photoshop user. Use photoshops resources alone, so the local version of
your own library, right, or the better choice, process the image on the Cloud. So this is Netflix Hulu
everything, you know, you get access to
the entire world, all the resources in the world. And this indeed gives
you much better results, especially for tough cases. So even though you're not into colorizing images of those
various neural filters, you're still going to benefit hugely from using the Cloud. This is why you
should really use the latest addition
of photoshop. Look, the interface is
just about the same, the tool box, the layers panel, the hot keys, the principles. Everything is the same. But with the connection
to the Internet, through the use of the cloud, you're going to unlock new
and fast ways to work. More than that, your results
are going to be sharper, more polished, even if
you're the beginner. So if you're not sure if
$10 per month is worth it, it's now clear this
date that yes, you should definitely
get a subscription. Now, let's explore these neural filters and
see what's what.
3. Remove anything in one click – REALLY!: Welcome back. I have
to say it again. Photo shop really is magical
with this new release. Here's the thing. Hot
key J as in James. On the left side, click
and hold in this area. Look for remove tool, which describes
exactly what it does. Say we want to remove this
person on the right side. The removed tool
acts like a brush. This means we have to
click hold and draw. What we'll do is we'll check the size from the options bar, and we can adjust it. You can use this drop down here. Or better yet, you can use the squared bracket
keys on your keyboard. For this image, I think
about 100 should be fine. Now, go around this person
in a rough fashion. What you want to do is you
want to cover him completely, but not spill too much
into the background. But yeah, make sure you
cover him completely. Okay, after you
release your mouse, photo shop is going
to think for a while, and then boom. That's it. Fantastic. This looks really great. Now, let's switch
to a new image. Let's start with the top shelf
with a plant on the right. Say that for whatever
reason, I don't like it. Well, again, activate the
removed tool, hot key J, choose a decent size brush, and then roughly circle it. Here, it's fine. If I select just a
bit of the shelf, it shouldn't cause
any major issues. And just like that,
it's totally gone. Now, to make sure you have enough flexibility,
let's do this. This is what I
strongly recommend. From the options bar, enable this feature
called sample all layers. This is quite important. Now, make a new layer from the bottom of
the layouts panel. Okay, great. Now,
let's focus on, say the second shelf. S these yellow bottles, brush over them with
a removed wool, and obviously, it's
going to remove them. Now, in case you have
something left over, not a problem, use it again. Now, what's different? This is on a different layer. So flexibility. In case we change our mind, we can just hide this layer. This is the recommended way of working. Let's do it again. So we start off with
a brand new layer. Good. Now, let's take
care of this plant here. This is a bit tricky because
there's also a shadow. But no worries.
Use the move tool and with golden. Just circle it. Good to go. Again,
if you need to go a second time,
that's totally fine. But if you need three, four, maybe five tries, then you may want to
reevaluate the situation. Now, could you use this tool
for small imperfections, for example, the
dirt on the floor? Sure, of course. Just click. And that's it. Maybe click and drag,
depending on what's needed. This really is a fantastic
feature that was introduced in this latest
version of photo shop. If you haven't
updated, please do it. It's a must. Now,
let's switch images. You have all of them
attached, by the way. Here, these extra tennis balls aren't all that great.
Let's remove them. Zoom in closely, and choose
an appropriate size. Remember, the square bracket
keys on your keyboard. Okay, make a new layer so
we're going to work correctly. Okay. Then circle it. Just a rough one. This is a tricky situation because the
girl is in the background, but a photoshop knows it
and it does a perfect job. Let's try it again on this other ball that's
on the white line. Remember, new layout, please, so we have maximum flexibility. Okay. Now, again, this
is a tricky situation. But you know what photoshop? Magically does it. No problems. A few years ago, this would
have been a nightmare. Now it's a walk in the park. What you do have to
know is that this works best on large images. But yeah, you have
all of them attached. Go for it and see how you do. Try and remove
certain things and see how it works.
Have fun with it.
4. You need to learn this tool for AI Art (Generative Fill): Welcome back. The
Lasso tool is one of those things that didn't make a whole lot of sense
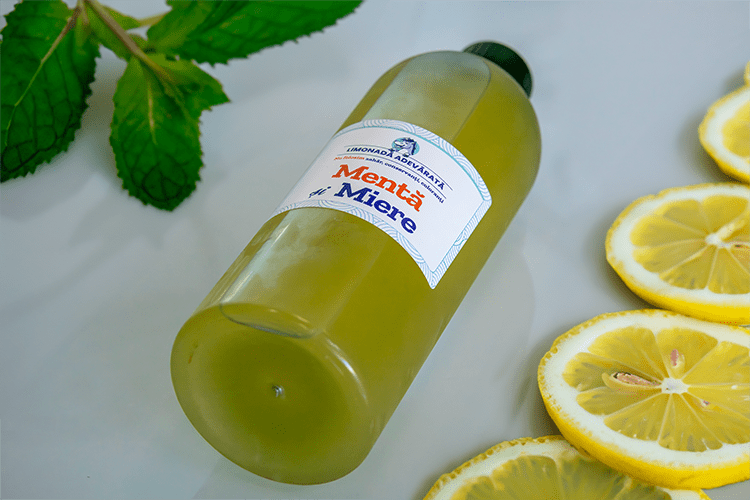
for about 20 years. Well, now it's an absolute must. Here's the situation. We have
this bottle of lemonade, and we want to add some
lemon slices and mint. Trouble is the Marquee tool
would be quite limiting. As you can see, I'm
going over the bottle, and that's because
I do want to have my lemons as close to
the bottle as possible. Now, could I do a
very small selection? Maybe something like
this? Yeah, sure, but it wouldn't look as nice. Remember, use Control
D to D select. Okay. Now, in comes
the Lasso tool, hot key L. It's this
one right here. Now, this is a tool
that helps you make selections by drawing free hand. So you click, you draw, and you circle back to
the starting point. Through the Lasso tool, I can really get close to the bottle and follow
this particular line. Now, this tool wasn't all that popular because it's
not really precise. When you try it out, you're
going to see that it's actually quite tricky to
get nice straight lines. But with generative fill, that's actually not an issue. So let's type in lemon slices and let photoshop do its thing. Again, this is the paid
version, the latest one. Okay, cycle through the options
and choose the best one, and as always, you can generate
more if you're not happy. This is a game changer because the Lasso tool
is so easy to learn. Let's do the top art as well. Remember, click and draw. If it's no good, use
Control D and start over. One thing you
should know is that you should go back to
the starting point. So here's what
happens if you don't. So I'm going to start drawing
a line like a rainbow. So a curve, basically, and say I'm going to let go
of my mouse click right here. Well, photo shop is
going to connect the starting point with this one with the current
position of the cursor. So this means it
will always give us a straight line. Let
me do that again. So you start using the
lasso tool, you click, you hold the click,
you draw something, and then you just let go. Well, photoshop is
going to connect the starting point with the last position of your
nouse and obviously, you're going to get
a straight line. Now, most of the time,
this is not ideal. So control D and do it again. The lasso tool requires a lot of trial and v. Don't be
surprised if you need five, six tries before you get
the right selection. Now, let me show
you something that works with every selection tool, with every single one. Say that you draw a
small selection like so. Have a look at the Options bar. See how this icon is active. This means new selection. But if you want to make that
selection just a bit bigger, you're going to hold down shift. Now, I'm holding it down
and notice this lights up. More than that focus
on the cursor. Notice there's a
small plus icon. So this means I
can draw again and I'm going to make my selection
bigger, just like that. So let's do it again. With
the Lasso tool selected, I can draw out a selection,
right, any size. Then if I want to add
to that selection without starting over,
I can hold shift. I'm going to get a plus
symbol on my mouse cursor, and now I can add to it. It doesn't even have to be in the same region, and it's
still going to work. I can work across
the entire image. But if we can add to it, we can also remove
parts of the selection by using t that's
the option Kono Mac. Notice the minus
symbol on your cursor. And at the top,
you're going to see that this icon is now active. Now, draw over your selection, and you're going to remove
that part just like that. Now, to recap, the Lasso tool, hotkey L is great when you
need a lot of freedom. Draw out any shape by
clicking and dragging. If your hand is
not steady enough, you can use Control
D and try again, or you can do your best and then use shift to add
to that selection, like so, or use Alt to remove parts of your
selection, like so. And then when you're happy hit generative fill and type in something like mint,
what mint leaves. And there you have it. The Lasso tool is
finally useful, and now you know how to use it. As always, use Alt Control, Shift W, export your work. That's all the
modified keys plus W. You have this image attached. Please go ahead and practice. Have fun with it.
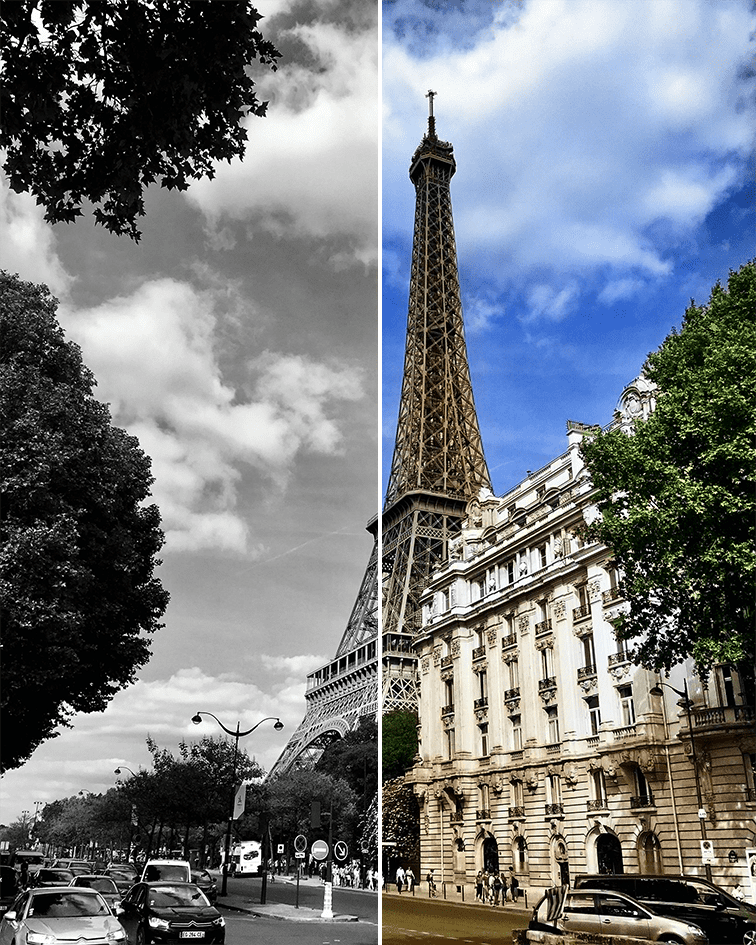
5. Colorize a black and white photo: Welcome to this lecture, where I'll teach you how to colorize a black
and white image. From this to this in
just a few clicks. This is very powerful stuff, and it's part of the
neural filters that we've just introduced
in Photoshop CC 2021. I know neural filters
sounds a bit odd, but it's actually awesome stuff. Let me show you
how easy it is to get great results.
Let's jump into it. Here, we have a black
and white photo. It doesn't matter how
you open the image. Just make sure that
particular layer is selected. While the image does have
a certain charm to it, say we want to bring
some color into it. Go to the top menu to filter. From here, choose neural filter, which is Adobe's way of telling you that
all these options are based on artificial
intelligence and machine learning. Okay, click on Colorize. But to activate it, you actually
have to flip the switch. And it's that easy. The
difference is significant. Photoshop did a
really good job here. Remember to use this icon to see the before and after shot. You can see that photoshop even handled the walls
in the background, the coat and the scarf, too, just a splash of color, so it brings everything to life. When you want to go back to
the regular photoshop work, space to export it
or foot that edited, please remember to
change the output. I suggest you use smart filter. This is why it doesn't really matter how you open the image. Dragon drop control
or any adoption. Hit okay and have a
look at this panel. This is a non
destructive technique, meaning we haven't permanently
modified the pixels. Or to put it another way, we can always disable the
effect by clicking here. But my favorite way to
work is with the mask. Click here to activate it, and then grab the brush tool. Say you don't like how
the color was applied to her cheeks or her
chin. No worries. With a soft brush and
a very low opacity, you can paint with black to slightly remove the
colorized effect. You need to be subtle about it. But just so you can
see what's going on, I'll bump up the
opacity to 100%. Please don't do it
in actual projects. So with the mask selected and with black as the top color, I'm removing the effect, and as you can see,
it's quite dramatic. Okay, hit X to paint with white, and that will reapply
the colorized filter. You have complete
control over it as long as you use the layer
mask and the brush tool. Let's move on to another case. Here's another lovely photo. Apply the same neural
filter one more time. Now, the great thing is you
can always make adjustments. For example, the saturation, increase it to make
the colors pop. And by the way, there going to be a lot more neural filters. You can check out
the weight list. But yeah, coming back
to it, use the sliders. Check out the saturation, but you also have a
few other things here. For example, you can add a tent. Now, can in red doesn't
really work all that well, to be honest, but it's
something that you can add. Green. It may look a bit funky. Magenta. Well, I think Magenta may work in
this particular case. It may transform it to basically something
quite old vintage. But yeah, overall,
you can play with it, and you can see
how these sliders really make a difference. Now, it really depends on
the look you're going for. But yeah, in essence, this is absolutely fantastic. And because we can always
come back and adjust it, we have complete freedom. Now, to be fair, the automatic
mode is 99% bullet roof. Now, in rare cases, you may want to do manual edits. So you could
potentially click here on the photo and choose
a different color. Now, in my case, it's red, and it doesn't look all
that good to be honest. You can see it's quite blotchy. And obviously, photoshop doesn't do all that great
red in the sky. It's obviously not a great idea. But yeah, you can always
come back and refine it. You can put as many
points as you want. But yeah, in general, 99% of the time, let photo shop do its thing, and you're going to
be happy with it. But just know you could
potentially work on it manually. Overall, this is the colorized feature and
photo shop have fun with it.
6. Automatic Skin Smoothing: Welcome back. Let's talk about the first neural filter
and that skin smoothing. Now, before we start, please make sure that
you clog the layer and transform it
into a smart object. You're going to see why that's
important a bit later on. Now, this is a symbol
that you're looking for. Okay, let's go to the
top menu two filter. From here, go to neural filters, and you'll have to wait a little bit until this new
panel loads up. Okay. Now, initially,
you're going to see a cloud icon instead
of a toggle switch, and that means that you need to download that filter
from the web. Now, as I said before, you do need to pay
for the photoshop to get access to this stuff, and you do need an active
Internet connection. Okay. Now, let's click
on skin smoothing. Though to enable it, you will have to
flip the switch. Okay. When you're
using a big image, you may not see the difference, but notice that to
both on the left. This shows you that you can pan around with the hand tool, but more than that,
you can zoom in. So let's zoom in and
see the differences. Now, to truly judge
this one click wonder, you're going to
have to click here. This is how you can see
the before and after. Click it a bunch of times and you can spot
the differences. Now, the result
won't be perfect, but it's a very good tool, but those cases where you quickly want to improve a photo, and the accent is on quickly. That's the main thing.
One thing you may notice is that the blur
amount is quite substantial. Now, you could potentially
play with these sliders. Though the second one in this specific situation
is just about useless. You could potentially
lower the blur and see if it improves it
just a little bit. You do have the image attached just in case you
want to work along. And while you could
potentially increase the blur, I don't think
that's a good idea. Overall, this did improve
the skin quality a bit. It's definitely not perfect, but it is what it is. I'm going to hit
okay, and I want you to have a look
at the layers panel. Now notice that we have
this white square here. That's a mask, and we won't
touch it, at least not now. And underneath that, you
can see neural filters. This is why we made
this layer into a smart object because this format allows us
to edit the filter. F starts, I can turn it off. Then turn it back
on, though, again, it may take a few
seconds to reapply itself or the most
important thing. I can double click
it, and now we can continue where we've
left things off. So that's why it's best
to convert the layer to a smart object before
you apply any filter. Okay, let's move on
to another photo so we can see this in
action once again. This time, I'll leave it as it is so you can see the issue. So let's go to filter,
neural filter. And I'm going to
enable skin smoothing. As before, we have to zoom in a bit and have a closer
look at the skin quality. Now, this, again,
it's not perfect. This is maybe a 30%
improvement, right? The dark spots are less obvious. The wrinkles are a bit finer, but it's not a night and
day difference, right? Basically, that
skin smoothing from neural filters for
you. It's not magical. It's not a huge transformation. But that brings me
to my next point. The most important thing, what are your expectations? See if you're working on a photo for the Nvatar on Linden, maybe your CV, you know, maybe a bit of
blurring, maybe a bit of skin smoothing.
That's totally fine. Avatars, in general
are quite small. You know, people won't
really spot the blurring. So if this is what
you're going for, this filter is a great choice. Flip that switch and
you can expect anywhere from a 20% to a 50% improvement. That's what you should expect. Now, in case you want to become a supermodel with perfect skin. Neural filters can help you out. But, to be honest, I
really don't recommend it. I don't think it's a
good idea to completely change the facial features
in a dramatic way. I'm going to show you an
example in the next lecture, but back to skin
smoothing for the moment. So here's the
thing. Remember, we didn't make this
into a smart object. So I'm just going to hit okay. Now, by default, we're
going to have a selection. You can see this dotted
line around the canvas. To get rid of that,
simply use Control D, D as in D select, but have a look at
the layouts panel. We can still see that this is a single layer that's
locked as it was before, but there's no neural filter
here. There's nothing here. That means we can't edit it, we can't disable it. We can't adjust it. And that's because we didn't first convert it
to a smart object. Now, if you convert it now, you still won't get access
to the previous editing. But for the future filters, yeah, of course, you
will have them here. But yeah, that's why you
have to do it before. That's why you have
to convert it to a smart object before
you apply any filter. Okay. Now, let's move
on to the final photo, which is quite important. So let's transform this into a smart object,
first and foremost. This should become
an automatic habit. Now we're going to enable skin smoothing and see,
this is the issue. This is what I want
to talk about. These freckles, in my view, are part of this
person's character. They're not a defect. They're not something
you should cover up. And I agree that it's a complicated discussion
about freckles, acne, wrinkles, what
other features, and what other flaws. I'm not the one to judge, but I can say that I don't recommend you use such a
filter for such a case. Sure some people may prefer
you remove the freckles, but I'm not
comfortable with that. So I'm going to hit cancel, and I'm going to end with this. I think skin
smoothing is totally fine as long as you
want a 30% improvement, and you don't want to
transform yourself into a barbie doll into a
completely different person. If you have that
approach in mind, 30 to 50% improvement, sure use this feature
with confidence. Now, in case you
do want to take it to 100% magazine
cover the touching. There are a few lectures
later than the court, where I'm going to show you
some advanced techniques. Or there's another neural filter that really changes things. It's absolutely incredible. Again, I don't really recommend it except for certain cases, but let's have a look at
that in the next lecture, and you can judge for yourself. Thank you.
7. Look like a model with Smart Portrait: Welcome back. We saw
how skin smoothing can slightly improve your
skin quality, right? Well, let's use the same
image so I can show you how you can transform it into something
completely different, how it can look like
a top model, right? Now, that's smart p traits. Now, before I flip the switch
in the needle filters, I'd like to tell you
my personal view. I think that are
only a handful of cases where you should
use this type of filter. Okay, let's enable it, and I'm going to do
a V min of change. I'm going to change
the happiness slider to something like minus five. Wait a few seconds, and you'll be quite
surprised to see that this looks like
a different person. So what happens is this. We let photo shop analyze the web and come back with
certain beauty standards, and then it applies
it to this image. Have a look at the
teeth, for example. The smile is totally different. The teeth are whiter, the straighter, the
Hollywood like, right? The face is also a bit slimmer. Looks like he lost ten pounds
or something like that. The wrinkles aren't
so obvious anymore. And this is a very, very, very small change. Happiness minus five. That's it. Now, let's have a look
at the facial age. If we slightly edit it, let's just make him a bit
younger. Wait a few seconds. Basically, again, you're
getting a new person. The hair is just
about perfect in terms of what algorithms
consider to be perfect. The color of his skin
is much more uniform. It has less variation. Overall, this is a new person
as far as I'm concerned. Now, to be fair, if you check
the settings drop down, you're going to see
a slider here that says, retain unique details. So, Adobe is very much
aware that you can use these slides to make this into a completely
different person. Now, to be honest, at
least in this case, the slider doesn't
help all that much. You can try it out, but the
differences are minimal. There are other parts here
that are quite interesting, like the head position
or light direction, but those don't
work all that well, at least not in this
specific image. Now, I think smart portrait is awesome for very
specific cases, right? So maybe there's a group photo and someone just sneezed
or something like that, but maybe someone was blinking. Maybe someone was angry
for the split second. Then, yeah, I think using
this is totally fine. Another use case, maybe
for your headline. You know, if your
head is thinning, if it's something that
you're having trouble with, this can really help you out. So things that you're
self conscious about. So, you know, you may refuse to post for the glue photo
because of those things. But with this feature, it can obviously help
just a little bit. Now, more than that, when
you cut someone from the background and
the head selection isn't looking all that great, you can really hide
those imperfections. So again, these are
very specific cases. What I wouldn't do
is I wouldn't use these slides on my own photos and upload them to Instagram, Facebook, or any dating app. So this is very powerful stuff. Sure, but don't try and
fool people, you know, it's one thing to slightly retouch some imperfections
you're insecure about. It's another thing
to try and become a top model and subsequently
a different person, basically fool other people. So while I appreciate
the technology, and I'm in amazement
of the improvement, I really don't recommend you use it for your own social life. Now, for an avatar on
Twitter or inside a game, sure totally, you know, if you're curious
about, you know, whitening your
teeth in real life, and you're curious
how that would look like, getting braces. Again, this can help you out, you know, But that's about that. Let's move on to
another use case that shows this
filters limitations. So this is a group photo and there are loads
of people here. Unfortunately, some of them are not getting picked
up by the program, so you can see these
white squares, these are your choices. And while you have the
hand toel selected, you can actually
click on any of them, and basically, that's the
person you're going to work on. You could also use
this drop down here. So this is a decent
use case, right? Say, this is your only photo of your classmates and this person isn't too happy in the photo. Even though he had
an awesome time. Well, you can single him out
by clicking on this square. It turns blue. And now maybe we can ramp up
the happiness slide, or maybe the surprise slider to. It does change the facial
features just a little bit. But if you know this
person well enough, you should know how much you can actually use these sliders. So my advice is you always go for less, just minimal editing. Here, I'm using
quite big values, so you can actually
see the difference. But yeah, that's smart portrait, a neural filter that
can totally transform you into a different person
if you let it go too far. But it can also be a lifesaver, but those moments where a photo was snapped
at the wrong time, but maybe hiding
certain insecurities, you know, hiding certain things you're self
conscious about. Because again, maybe you want to do a beautiful album, right? Maybe of your wedding,
maybe of a special moment. And maybe you're a bit
upset about, you know, maybe some acne, something
like that. So imperfections. You're not really
confident about Well, you can snap them in piece. You can note that
you have that moment captured on film
inside the camera, and then you can use something
like this to clean it up. So that's how I would use it.
8. Improve your portrait & change your background: Welcome back. Let's try
out these neural filters a bit more and see if we can
create a nice pot trait. So here's a photo that I
snapped with my camera. I did some very minor
and camera raw, but now I'd like to
remove the background and maybe touch
up my face a bit. I need a fast result,
five, 10 minutes. I don't have a couple of hours. So let's start by getting
a selection tool, hotkey W. It doesn't
matter which one. Let's select subject,
and please make sure that you use the Cloud
version, if possible. Okay, this is good to go. We have a selection. Now
I'm going to add a mask by clicking here so far so good. Okay. Now, file up your browser, go to onslash.com or any other website and look for
some abstract backgrounds. Here's one photo that's
fairly interesting. Now I'm going to drag it in, but as you would expect, it doesn't fit. No worries. Either use this field
to increase the width, or grab a coordinate handle, click and drag outwards. Hold Dal key while
you're working, so it goes a bit faster. Now, in case you get stuck and you can't see the
coordinate anymore, just use control zero. Now, you're still going to
be in free transport mode. So again, you can hold
Dal and drag outwards. And by the way, reposition
the photo if needed. Okay, when you're
done, hit enter, Now, move to the layers panel and
drag it underneath my photo. Now, it really depends
on your abstract image, if this works or not. My advice is you load up many images and hide
them one by one. So that's how you can
see what works best. Don't assume that
your first choice is always going to be best. No. When I'm not filming, I typically select at
least five images. I don't exaggerate. I
never go over 15 images. But yeah, I do like
to test things out. Okay. Now, let's
touch up my face. Select that layer. Otherwise,
nothing is going to work. Next, get the Zoom tool hot keys and let's bring my
face into focus. Now we can finally enable
Adobe's neural filters. Now, in this case, I'm going
to use smart portrait, and I have two main sliders
that I like to use. And that's facial age, a very small value like minus five or
something like that. This improves my skin tone, but it also changes the
texture of my hair. With initially, I did have
quite a few white hairs. This facial age makes
everything much better. So that's the first thing
that I like to use. And then the second thing,
hair technes again, a very small value. This makes it a bit darker, but it really matters when you're dealing with
a close up shot. Otherwise, it's not
really noticeable. Okay. Constantly
use the before and after the shot and see
if this makes sense. Now, the question is, can
you still recognize me? If the answer is a clear, yes, then we'll get to go. But here's where you
can really mess up. If I use the happiness slider, things change dramatically. Even with a very small value, my facial features
change dramatically. And now I don't think that
this represents me anymore. I don't like it at all. So I'm going to bring
that back and you can see how this is
much more natural. This is me. Well, better
said it's closer to reality. So that's how I like to use mod portrait. One final touch. Let's make a new layer, an empty one that sits between the background
image and myself. Get the brush tool, hot key B. Now, right click and
drop the hardness to 0% and increase the
brush size quite a lot. And I do mean quite a lot. Check my settings at the top in case you want to get
the exact same result. Now, with white as
the top swatch here, in case you have a different
set of colors it D, D is and default. Now it X to swap them around. So white is the top swatch. Okay. Now, go somewhere around this position
and click once, and then you go a
soft glowing light. Obviously, this is way too much, but move to the layers
panel and drop the opacity. Maybe 20%, maybe
less, maybe more. It really depends
on your background. But, yeah, that's a quick
and easy way to use neural filters to create
a lovely portrait image. Try it out on your own
and see how you do. You really should have a
portrait shot for your CV, for your Linden profile, maybe even Twitter
skype of discord. So I hope this helps
have fun with it.
9. Bokeh Effect: Use depth blur for a beautiful look: Welcome back. There's another awesome
neural filter that allows you to blur your background
like you see in this photo. Now, to be fair, this is
shot on an expensive camera. Me, specifically, it's
shot on an expensive lens, and it has been retouched. But I think we can appreciate the lovely
blur in the background, which really makes
the subject pop. Now, a lot of people call
this effect bouquet, and photoshop can
help you achieve it. Okay. Let's open up this
image of a girl doing yoga. This is from unsplash.com, and it hasn't been edited. So let's transform it into a smart object and we can
see what we can do with it. Now, before we get to it, let me tell you that there's loads of room for improvement, and this filter is
far from perfect. It's actually in Beta right now. Okay, let's enable a depth blur. Which is currently found
under the photography. Now, Adobe is adding more
and more filters every day. So if you see more of them right here, that's totally fine. This is a very dynamic area in photoshop. It
changes all the time. Okay, let's flip the switch, but notice at the moment again, it does say beta. So that's another way of saying, Hey, lower your expectations. This is going to be good,
but it won't be amazing. Okay. Now, by default, this isn't anything
to shout about. But let me show you what can happen when you
actually ramp this up. First of all, my advice is
you enable focus subject. This tends to give
you better results, especially if you're
not into photography, and you're not really sure what focal distance and
focal range mean. Now, the first one is
automatically disabled. So this makes our lives easier. Next, let's ramp
up blur strength quite a lot so you can
really see the difference. I'm going to go up to 90
with something like that. And as you can see, immediately, the surroundings
have been blurred. Use the before and after the
button to check things out. Still here, we can raise the brightness up
to maybe plus 30, something along those lines. By the way, this is
quite intensive, so you will have to wait for the photo shop to
process the image. I have a very powerful computer. Neural filters in general, getting faster and faster. But again, you might need
the powerful computer and a very strong
internet connection for the best results. Okay. Now, in terms
of focal range, I found low values work best. They give you the
most amount of later. Now, my advice is
you take it case by case and you play
with the extremes. Either use very low
values or very high ones. Now, the result
looks quite nice. But if you zoom in, you're going to find some issues on the edge of your subject. You're going to give
some strange artifacts, and you could potentially remove them in some
different ways. But here's the easiest
way to get rid of them, disabled focus
subject, and instead, use this small preview here. So click anywhere on the girl, and you're going to see
that the edges become cleaner and there's less
weirdness in the image. I still think that focus subject in general
is a great choice. But in this particular case, with the lake in the background, that's causing a bit of
issues. Now, one more thing. Let's increase the saturation
just a little bit, something like maybe plus five. I really think this filter is going to get
constant updates, and it will eventually
become more powerful. But for non professionals, I think this is quite good. One stylistic choice
you do have is haze. You could push it to something like 20 or something like that. And that will make the photo
look a bit more interesting. Now, it does wash it
out just a little bit. But hey, it's really up to you. Now, in terms of output, I prefer smart filter, so make sure you choose
that in the drop down. It okay and have a luck. Now, to be fair, I would open
up the image in camera raw, and then I would play with
the image just a bit more. We have an entire
chapter on camera raw, so be sure to check it out. But in essence, by playing
with just a few filters, by playing with
just a few sliders, you can achieve something
like this, maybe. Basically, this is night and
day from where we started. Ething images can
take hours on end. You never know when to stop because you can always do more. But let's go back to depth
blur on another image. This is going to
show us how we can make some fine
adjustments to our blur. First, I'm going
to manually select the subject by clicking
on his face right here. Then I'm going to
turn up the blur to about 100 so so we can have
something to work with. Focal range is set to zero, and focus subject is unchecked. Okay. So the before and after shows us that the wall
itself is quite blurred, a bit too much for my taste, but that's fine for the
purpose of this lecture. But notice the forearm. This is getting blurred as well, and that's not really okay. What I do like is the blur
on this par right here. It really moves the center
of attention to the person. Now, we could potentially
enable focus subject like this. Wait a few seconds,
and then you're going to notice the four
bottom isn't blurry anymore, but there's another issue, quite a big one
with his fingers. And the pot is now no longer
blurry in the foreground. So we need to fine
tune the result. So let's uncheck focus subject, and I can show you two choices. So the first one, which
I really don't like, at least not in this version, it's using these two
tools right here, the plus and the minus symbols. Basically, you can use these
tools to add or remove the effect from certain
places, say the forearm. Trouble is, this
looks quite bad. It's not beginner
friendly at all. It's quite difficult
to get around it. So I'm going to use
control Z two and. So that's the first option. But let me show you
what I prefer to use. So set this as a smart
filter from this drop down, and then hit k. Now, in the layer spanel,
you're going to notice this white rectangle. That's a mask. But the mask is only applied to the filter. The mask is not applied
to the layer itself. Now, what does this mean? You can get the brush
tool, hot key B. Please make sure
you have the tool selected because B can actually
bring up several tools, and then have a look
at the options bar, pause the video if needed. These are the settings
that you're looking for. Now, with black
as my top swatch, if I paint, I can
remove the effect. So black hides when
you're working on a mask. You can remember it as closing
the light in the room. In the dark, you can see it. So black hides. Okay. So if we paint over
the four tom, it's all good. The blur is getting removed. So basically, we're
removing part of the blur. This is what's going
on right here. But please be aware the
white square is selected, not the layer itself. So if you try to paint
over the layer like this, you're going to get an
ad, and that's no good. The reason why I'm showing
you how to work with a mask is that this
works on every filter. So if you learn how to use the brush tool in this
situation, you're golden. Sure, you may need to
shrink the brush size, maybe make it bigger,
maybe change the opacity, make it softer, make it harder. For example, a soft
brush is going to give you a very gradual
transition, right? While a hard one, well, that's going to
be quite obvious. The difference is super obvious. So you will need to
spend time on it to make it look better,
to make it look good. But yeah, overall,
this is my approach. And, you know, zooming
back on things, the depth blur feature
isn't perfect. It's still in Beta, and it's
likely going to improve. See how it goes
and try it out on your own photos.
Good luck with it.
10. Cut out a person and replace the background: Welcome back. Here's a
very popular request. Say you want to
remove the background and replace it with a
different one, right? Now, develop loads of ways
of doing this in photo shop, but can we do it in a method of clicks and still have
a realistic look? Well, with the help of neural
filters, I think we can. First of all, this image
is from unsplash.com, and if we're going
to check the size, I control C, or if we simply have a look
in the properties panel, you can see that this
is a huge image. Now, this is important
because the bigger the image, the better the result. Okay, let's go to
the layers panel, click and convert this
layer to a smart object. Next, we have to find
another photo that we want to use as a background
image as a new one, right? So this is what I've selected, but please be aware that
when you drag it in, it may be smaller. No problem. Use control
Z though, if needed, grab a coordinate handle, old Alt and drag outwards. Now, if you can't manage
to do it like that, move to the options bar and increase this value right
here in the W field. Obviously, make sure that
the chain icon is pressed. Okay. So this is it.
Let's hit enter. Now, as you can tell, the
image is covering the girl. Go to the layers panel, click hold and drag
the forest down. Okay. It's completely hidden,
but that's totally fine. Next, select the layer
that contains the girl. Okay. Now, hit W
on your keyboard, W. Now, that should activate
one of these tools, tough which you can
make a selection. If you click here and hold, you can see you have
a bunch of options, but all of them have
the same feature, and that's select subject. This is what we want to use. In the latest photoshop version, you get this drop down arrow, and that gives you the
power of the cloud. So, this means that your
selection is going to be much better than what
photoshop can do by itself. Again, this is if
you're paying for the photoshop and if you
have the latest version. If you don't have it,
I can't help you. Okay, click on select subject, and you're going to have
to wait for a few seconds. Your local photoshop program is going to connect
to Adobe servers, analyze the image, and then
come back with the selection. So that's what this
dotted line means. Basically, we isolated
this part of the image. We have loads of lessons
about selections, but for now, let's
keep it simple. Go to the layouts
panel and click on this icon between FX and the
Ying Yang looking symbol. And just like that,
you've created a mask. But more than that, the
original background went away. Well, this isn't
overall terrible. It's not great either, right? The girl seems to be fake. It seems to be edited, right? Well, there's a neural filter
for this specific case. First of all, before
you do anything, check the layers panel. See this highlight. This means
that the mask is selected. If this is the case and you
go to the top menu to filter, neural filters is going
to be grayed out. Now, to fix it, click
here on this Tumbnail. So the tumbnail of the girl. Now we can go to filter, neural filters, and we
can continue working. From this new window, we looking for harmonization, which sounds a bit iffy, but it basically means
make it look realistic. Now, turn the switch on, but nothing seems to
have happened, right? And that's because you have to select the other
layer, the fest layer. Once that's selected, photo shop is going to think for the
while and there you go. Now, this makes it look
that much more realistic. Basically, photoshop blends
the colors together, so the girl doesn't
stand out so much. It doesn't seem that fake. Use this button to check
the before and after. It's quite a big difference. For the output,
select smart filters, then hit K. No worries if
you don't get it just yet. We're going to do it
again in a second. But let's take this one
step further, right? We've just learned about
depth blur, right? So let's try it out here. First of all, hold the control key and
select the other layer. Now, with both of them selected, use Control E E as in Eric. This is going to
combine the two layers. The official term is merge, and you can find the command
in the top menu under layer. Now, this isn't ideal way to go, but trust me on this, it's fine. Scroll all the way down, and you're going to have this
option here, merge layers. Now, this is a standard layer. So it's best we make it into
a smart object once again. And when that's done, we can open up neural
filters yet again. Turn on depth blur and crank
it all the way to the max. Now, my advice is you have
focused subject enabled. That's going to give you
a better result here. But yeah, now, this looks
even more realistic. And obviously, when you're done, you can export it with
Alt Control Shift W and post it anywhere. I'll share it with your friends. But let's do it once again. So I'm going to use Control, and I'm going to open
another landscape image. This time, it's a beach, and there's a lovely
sunset in the background. Next, I'm going to drag the
girl inside photo shop. Now, please be aware
I'm not using control. Instead, I'm just dragging
it from the desktop. Okay. Head, enter. Then click on W if you're not
there already. Okay, select the subject
and wait a few seconds. Now that we have the selection, click here to make a mask. Lovely. Click on the thumbnail to select the actual layer. Then go to filter
neural filters. Always choose the
one from lower down, please, not the first one. This is super important. Okay. Let's enable harmonization and choose the beach layer. Wait a few seconds, and this is it with great
the colors match. Hit and we've just about done. If you want to take
it for, select both layers by holding control, then merge them
together with control, then make them into
a smart object, though, it's optional
at this point. Go to filter, neural filter, the one lower down,
not the first one. Enable a death blur
this time around. And for the settings,
maybe go for 90 for the blur and
about 20 for the haze. And that's how you
can quickly combine two images and make
them look real. Now, does this always work? No. Do you need big
photos? Totally. But that's the quickest
way of doing it. Try it a few times
and see how you do. Post your own work in
the comment section. I want to see what you can come up with. Good luck with it.
11. Restore old photos with neural filters: Welcome back. If there's
one neural filter that's magical is the
photo restoration one. Now, I absolutely love
it. Here's how this goes. I have this image from the
1920s in Berlin 100 years ago, and it's obviously in
poor condition, right? It's scratched up.
It's black and white. It's not exactly
impressive, right. But we can convert it into a smart object and then bring
up some neural filters. Now, the photo restoration
one is still in Beta. But let me quickly
enable it along with JPEG artifacts
removal and colorize. So the combination of
three neural filters is going to totally transform this image and bring it to life. Have a look at this,
to be fed with losing some bit of
detail here and there. If you focus on this hand, you're going to
see that photoshop basically blends it
together into the clothing. It really doesn't make
a whole lot of sense, but Considering how
many things are going on in this photo,
I'm super impressed. So my advice is you raise up scratch reduction to the max, and same with photo
enhancement, though, be aware that Beta means
that sometimes this breaks. For example, if I try to enhance the faces in
this particular photo, it will say another
has occurred and that photoshop has
disabled the filter. But yeah, you can use these combinations,
these three filters, or you can turn off color yes, so you keep that old
charm of the photo. As with small portrait, it's one thing to push the
technology to the limit. Seeing it in color is
obviously fascinating. But then there's the
human element, you know, by seeing it in black and
white as it was snapped, it has more of an
emotional connection to that era 100 years ago. Maybe that's just me. But if I were to have a set
of these photos, I would actually keep
them in black and white, restored, yeah, but
in black and white. Overall, I love these features because just a few years ago, people would spend ages on
these tasks on restoration. It would actually be
a lot of manual labor with the Clone stamp
tool, healing brush tool, and it was quite
tedious work was on end for the one single photo if you wanted a great result. Nowadays, photoshop is
getting smarter and smarter, and I believe this is
just the beginning. If you have old photos, scan them at a high DPI, put them into photoshop and
save them for the future. Try this out and see how you do. Good luck with it and have fun.
12. Make a photo 4x bigger (GREAT quality): Welcome back. Neural
filters are impressive. Sure. But if you don't care
about that creative stuff, you may not be excited
about them, right? At the end of the day,
not a lot of people are going to use photo
restoration, right, or the landscape mixer
to generate some never before seen
pictures, right? I get it. But smart portrait
is very powerful. Harmonization is very useful. The depth blur may help
you here and there. But if there's one filter
that takes the cake, that's super zoom, and
you got to use it. You got to try it. Super Zoom is absolutely amazing,
hands down, incredible. It's the best piece of tap
ever seen in photoshop. And let me show you why. Now, here's a photo of my
healthy food product, right? Now, use all Control C to check the canvas size or have a
look at the properties panel. So this photo of my product
is 800 by 1,000 pixels. This is not small, but it's far from
being generous, right? Let's make it into
a smart object. In general, by making
it into a smart object, Photoshop will do
its best to keep the image nice and sharp
when you enlarge it. So let me actually do that
by using all control. I'm going to make it way bigger. Now, I'm going to
keep it simple. I'm going to use percent
in this drop down, and I'm going to use
a ridiculous value 400% four times as big. Now, if you've ever played
with this type of thing, making images much
bigger in photoshop, you probably know that the end result is
going to be rubbish. It's going to be
blurry, pixelated. It can't be used anywhere. This is the latest
version of the program, and it's doing a
decent job, you know. Although this isn't perfect, this isn't all that great. This is still miles better than the previous
versions of the program. And when you compare something
like this to which you would get in CS six from 2012, The difference is night and day. In Photoshop CS six, you could probably spot
individual pixels. Now, I'm exaggerating,
but you get the idea. This is a solid improvement in the latest edition
of photoshop. It's much better. But let me save this because this is not
what I want to talk about. Okay? So let me open up the
image again in another tab. So I'm going to check and see
if this is a smart object. Next, I'm going to go to
the top menu to filter. From here, let's
choose neural filters. Wait a second, then
from this list, I'm going to enable Super Zoom. This is the biggest improvement I've ever seen in photoshop. No discussion. Here, you can use this
symbol to enlarge the photo. Fool clix means 400%. You can see that it
says Fox right here. And of course, you should
enhance the image details, and you could potentially enable this other feature as well. But before I get into
all of these settings, let me tell you the
essential point. You should change the output to new document in case you want to have the entire
photo blown up. Otherwise, you're just go
to get a small part of it. And if that's the case, you
may not be happy with it. Now, in case you do want
a small part of it, just use this preview to adjust which
you're going to get. Okay. Now, I'm going to hit
okay I want the entire tan. But you may not realize how much of a
difference this makes. So Spazoom is from
another world. The standard resizing
method was already much better in this latest version of photo shop compared
to previous ones. Sure. But when you check it out versus super Zoom,
wow, it's fantastic. Now, to change the viewing mode, go to the top menu to window. From here, go to a range, and I like to use
two up vertical. Okay. Finally, to make
sure that we're looking at the same spot, go
to the same menu. Then from this list,
choose Match A. This is the simplest
way of going about it. Okay. Check out the differences. Super Zoom is miles better. It's less noisy,
that sharper lines. It's seriously improved versus the standard resizing method. And that's through the
use of neural filters. Which is basically a way to
which Adobe applies machine learning to various situations and comes up with
a better result. Now, sure, the result
isn't perfect. You can still see some issues,
especially in the label, where the small text is
getting a bit hard to read. But still, this is fantastic, four times as big, We didn't even play with all
those settings that allow us to sharpen the image to
try and maximize the result. You know, out of the box. This is something
that's going to completely change the
way we view up sampling. So making an image bigger,
that's upsampling. With before, this was
quite a challenge. Now it's a piece of cake. And that's because,
you know, it's not reasonable to ask 400%, right? An increase of 400%. In general, you may need 200%, maybe 300 at the most. And you might even
start out with a bigger photo than
this one, 800 by 1,000. So if super Zoom works so well with these fairly
modest conditions, then you can really
put it to good use in more realistic
situations, right? So my advice is you try it out and test it and see how it goes. For me, 200 maybe 300%
is the absolute max. And I'm pretty
comfortable printing a photo after using
Sperzoom on it. For example, if I take a fairly standard
situation, you know, from 2000 by 3,000 pixels, doubling that to 4,000
by 6,000, I mean, that's still very generous, you know, so we get
a sense of things, four by 6,000 pixels, means about 13 by 20 ", or 34 by 51 centimeters. So as far as printing goes, that's more than decent, you know, and that's
just doubling it. So if four times gives
you these results, doubling it is going
to be awesome. Give it a go and let
me know your thoughts. Now, to be fair, I'm
probably more impressed than the average person
because I've been working in photoshop
since CS four. And throughout all of
these years up until 2022, enlarging a photo was quite
a challenge, you know? Now that's no longer the case. Good luck and have fun with it.
13. Get creative with your nature photos: Welcome back. This
is a quick lecture, and it's about a fun
filter that you can use just to have some fun with
it, you know, play around. It's called landscape mixer. And as before, we need to make our layer into
a smart object. Okay. You can find the landscape mixer under
the creative category, and this is something
that totally transforms your image
based on a few presets. Basically, click
here and watch how the photo becomes something
completely different. Photo shop maintains the
structure of the photo, but you can play with
in a dramatic fashion. This is honestly
very impressive. But, It's not exactly a filter that I have
a specific use for. Some of these results are quite odd and not usable
in the slightest. And considering you have
so many sliders here, you can basically create just about anything that
you can think of. Now, to what purpose, again, I don't think there's
a clear cut technique or a specific case that
I could recommend. I see this exactly for
what it is, you know, playing, experimenting, trying to get your
creative juices flowing. And I think Adobe is doing a good job for giving us
these types of things. Sure, we love to have
better selections, right? Better results when we're
enlarging an image. But I appreciate this
type of stuff as well. So my advice is you
go try it out for 20 minutes or something like
that and see if you like it. To be fed with AI generated art, this becomes less valuable. But in case you don't want to mess with artificial
intelligence, this is probably the
next best thing, though it's something
very similar to that. You can have some alien
looking scenes, you know, or just enhance your photos from your vacation. The
sky is the limit. One feature that I really
like right here is the night slider that totally changes the look
and feel of the scene. It's something that
transforms it. Though I found that low values
tend to look a bit better. You can easily mess things up. If that happens and
it's bound to happen, please use this arrow to come back to the
default settings. At the time of this recording, this is still in Beta. So on your end, if you're using the latest
version of the program, it may work better, or you may have some
different presets. But idea remains. This isn't all that practical, but it's fun and lighthearted. Give it a try and let me know in the common section if you like this type of stuff.
Have fun with it.
14. Instagram filters in Photoshop: Welcome back. Let's
say you want to play with your images
in a creative way, similar to what Instagram
offers you in terms of filters. Well, now we can do that
through neural filters. First of all, let's make this
layer into a smart object. Okay. Next, go to the
top menu to filter. From here, neural filters. Wait until the new
panel loads up, and then under color, you're going to find something
called color transfer. Now, at the moment of this
recording is still in Beta, which means you should
lower your expectations. But still, this is working
well enough for my taste. So flip the switch, and you're going to get
access to these presets. Try them out one
by one and see how the image changes into
something completely different. It's very similar to
an Instagram filter. Now, some of these are great. Others, not so much. If there's one major
drawback about this filter is the fact that it does take
quite some time. It does take processing. Meaning if you're
using an older laptop, this may be a pain to work with. See, every time you click
on a different one, photo shop has to think. In my case, that's pretty fine, but I'm using an expensive
desktop computer. If you're on the go, your
laptop may not cooperate. Another thing, you
may think, Hey, this yellow one, for example, this is absolutely terrible. But the thing is this, you never know what
you're going to get. Yeah, for this specific photo, the yellow one doesn't
look all that good. True. But let me change to
a totally different photo. I'm going to do the same steps. Okay. Now, here's the thing. In this new image, the yellow preset is actually
looking quite decent. That means that you
have to play with these presets until you find the one that works best with your photo according to
your taste, of course. Now, to be fair, you could
spend a lot of time by playing with these sliders because these dramatically
change the result. By working in the
lab colored space, you get access to all of these features through which
you can adjust the effect. Now, my advice is you
stick with the presets, even though you could potentially
upload your own image. Now, again, you never know how photo shop is going
to interpret upload. So I think it's best that
you stick with these slides and play with them until you
get a better looking result. I think the DP is going to add a bit more
functionality here. But let me actually show you
something a bit different. A different way of getting some awesome Instagram
looking filters. So I'm going to hit cancel. From the same top menu, from filter, we're going
to use camera raw filter. Now, this is the
latest version of the program and the latest
version of camera raw. If you're using an older
one, please upgrade. Okay, now, click here on this
icon above the three dots. And right here, you're
going to get loads and loads of beautiful
filters, so to speak. Now, these are actually
presets, camera rop resets. The great thing about it is that these are structured
in categories. So if you have something
in mind, just go for that, you know, open
that drop down and then simply hover
every one of them. What I love is this
is super fast. Photoshop really
doesn't hesitate. So choosing one that looks
awesome is a breeze. Now, for example, in
this specific case, I think I'm going to use
the autumn category. And probably I'm going to
go with the first one, TM Z one, the V first
choice in the list. Now, we do have a complete
section on camera raw, so please make sure
that you check it out. But once you're happy with it, you could either click here on this icon that will allow
you to customize this look because basically
all the sliders are already moved
according to that preset. But, for example,
say that you want, I don't know, maybe
less vibrant. Sore go ahead and tone it down. And when you're ready,
you can hit okay. Now, finally, you can export your design with old
Control Shift W, or if you can't remember
that long hot key, go to the top menu to
export, then as usual, export as, choose PNG
for the maximum quality. And basically, that's it. You're good to go.
Have fun with these, try them out and see how you do. You can get more
camera raw resets. But in essence, it's all about
playing with those slides. So it's really up to
you. Have fun with it.
 Chris Barin, Certified Photoshop Expert