Transcripts
1. Welcome To The Course: Hello everybody and welcome to an exciting journey into
the world of Photography. My name is Mario, and I'll be your
teacher through God, these amazing Beginner scores. Have you ever looked at
stunning photograph and wonder, how did they capture that
moment so beautifully? Well, my friends,
that is exactly what we're going to
exploring this course. Photography isn't ART form that allows us to freeze moments in time and create
visual stories that can evoke emotions, spark the imagination,
leave a lasting impression. And this course is
all about unlocking your creative potential
and empowering you to capture those incredible
images yourself through held the course will cover three fundamental
pillars of photography, Light, the Light Triangle,
and composition. These pillars are the building
blocks that will help you understand how to create
visually compelling images. We'll start with light. Light is the essence
of photography, understanding its qualities
and how it interacts with your subject is crucial without
light, there's no photo. As simple as that, we will
learn how to manipulate and control Light to achieve the desired effect
in your photographs. Then we'll talk about
the Light Triangle. It consists of aperture,
Shutter Speed, ISO. These three elements
work together to control the Exposure and creative
aspects of your photographs. You learn how to manipulate them to capture the perfect
balance of Light and also understanding
the Light Triangle you be able to shoot
on manual mode. You will understand you're
coming up more than we will talk about composition
as another key element. It's all about arranging the elements that
you have within the frame to create a visually pleasing and balance imaged. By the end of this course, you'll not only have
solid understanding of the technical
aspects of photography, but you'll also have
the creative confidence to shoot in manual mode. You'll be able to take control
of your camera and capture stunning images that truly represent your
unique perspective. Whether you're aspiring
to be a photographer or simply someone who loves to
capture beautiful moments. This course is designed for you. No prior experience is required. Just bring your passion
for photography and we'll embark on this incredible
journey together, you get ready to unleash
your creativity, discovered the power of Light, and learn The Art
of composition. Join me in this
photography course and let's capture the world
one frame at the time
2. Introduction To Photography: Photography is all about
capturing moments, telling stories, and
unleashing your creativity. It's like painting with
light, which is the Greek. You freeze time and create ART. Isn't that amazing? Now let's talk about the key elements you need
to know to become a fantastic photographer
composition, lightning, and perspective. Composition is like the
foundation of a photograph. It's how you arrange the
elements in your frame and create a visually
pleasing image. Lightning is the magic
ingredient in photography. It can make or break a shot. You remember natural light
is your best friend, but don't be afraid
to experiment with artificial light to remember that light is the most important
thing in photography. Without light,
there's no picture. And you will see during
this course that basically everything
is related to Light. Perspective is what gives your photographs depth and dimension. Don't be afraid to
change your point of view and explore
different angles. Get low, get high, and find that unique perspective that makes your photo standout. Now that you
understand the basics, it is time to understand Light
and remember what I said. Without light,
there is no photo. So let's go to the next lesson
and let's talk about Light
3. The Light Triangle: Like I mentioned before, Light
is everything in a photo. And for that you
need to let light touch the sensor of your camera. After that, the camera
makes the picture. There are three variables. Your photo can be underexposed, the photo could be overexposed, or the photo is
perfectly exposed. Now there are three ways in how the light can get
to your sensor. The aperture, the shutter
speed, and the ISO. And this is what we call
the Light Triangle. Each of them has a function. And if you manage to understand the three of them perfectly, you will be able to control your camera manually
hundred percent, and you will be
able to understand Photography is
actually very simple. Each of them allows
a certain amount of light to enter the sensor. And the trick is
as simple as this. For example, if the
aperture is letting in more light than required
for a perfect exposure, then you will have
to lower the ISO and shutter speed to get
the proper exposure to compensate if you
need to manipulate the Shutter Speed and that
is affecting the Exposure. Well, the same thing. You have to adjust the other
two so that you can get the Light that you need
to get a good exposure. It is all about compensation. As you can see, the
aperture, the shutter speed, and the ISO work together as a team and they help each other. Now that we understand
how they work together, let's understand what
exactly each of them are
4. Aperture Shutter Speed and ISO: Light is measured by stops
in the camera when you have a perfect exposure and
you take one-stop down, then the image gets
a little darker. If you add more stops, then it gets overexposed. We have three ways to let
the light into your sensor. They all work together and they are called the
Light Triangle. Imagine the Light Triangle as a secret recipe for
perfect exposure. It consists of three
key ingredients, aperture, shutter
speed, and ISO, as I mentioned before, Let's see how they
come together to create the magic in
your photographs. The aperture represented by an f-number controls the size of the opening in your lens. Imagine the aperture is
the eye of your camera. The wider the aperture, the more light enters the
camera, but that's not all. The aperture also
affects depth of field or how much your
image is in focus. Now pay attention.
I mentioned that aperture is represented
by an f-number. The bigger number, like
F 16, for example, means that the aperture is small and the lower the number, like F18, for example, means the B aperture is wide. Okay, These put sound
a little confusing, but with practice,
you'll get used to it. Don't worry, we don't white aperture like a
1.8, for example. Let more light in and you create a much higher
depth of field, so less is in-focus. This is very good for
portraits within 16, for example, is
completely the opposite. The overture will be smaller, more things will be in-focus, very good for
landscape photography. Now let's talk about
Shutter Speed. It determines the length of time your camera's sensor
is exposed to light. So if we think again about the I that I mentioned
before in aperture, it will be how long
they I will be open. You can be very creative
with the Shutter Speed, a fast shutter speed
freezes motion, which is very good for sports, while as low one at a
sense of motion blur is very good for long exposure
pictures that are so nice, but be careful because
to slower speed without sterilization can
result in blurry images. So I will suggest
you to use a tripod if you want to do
along exposure. Let's stop. We have
the ISO sensitivity setting that affects how your
camera responds to light. A low ISO like 100
is perfect for bright situations
because you really don't need to add ISO in
these situations, like in a bright
daylight, for example. While a higher ISO like 1,600 comes to the rescue
in low-light conditions. If you put 1,600
ISO in your camera, it is going to add light. But always remember that
it is not real light, but one kind of artificial
meet with your camera. Also, be aware of noise. You can sneak into your
photos at higher ISOs, even though nowadays
the cameras have a noise reduction system
inside and even with solvers like Photoshop
or Lightroom with the new AI can
take out the noise. It is always better to
take a good picture from camera instead of
fixing it impulse, you have to practice
to understand more how the Light Triangle works and
why they call it like this. I will give you an
example. Imagine that you want a very nice they fulfilling your photo and then your aperture is wide open. And that is actually adding three stops of light
in your photo, which makes it overexposed. Then you can try to keep
your ISO as low as possible. And maybe that takes
one stop of light, which makes your picture
still two stops overexposed. Well, then you have to play
with the Shutter Speed, tried to make it fast in a way that it compensates
those two stops. And voila, perfect exposure, as you see, is like a game and breakfast will
make you an expert. Okay, now we understand
what aperture, Shutter Speed, and iso are. The real magic happens
when we balance all three sides of
the Light Triangle. We need to find the
perfect harmony to achieve the desired
5. Camera Essencials, Exposure Modes: Cameras come with
different exposure modes to make our lives easier. We have the program
mode, aperture priority, and Shutter Priority, which
are like half out of Modes. And then we have the
manual mode would give you full creative control. You don't be shy
and experiment with this modes to find
your comfort zone. Aperture priority. When you use these
mode in your camera, you have all the flexibility and manual control of the aperture. And when you choose the
aperture that you want, the camera will
automatically fix the Shutter Speed
and the ISO for you. That's all I said,
that he's kinda like a half out of Modes. This is good for
portraits on the go. Or if you have a fast lens and you want to take
advantage of it. By the way, fast lenses
are the lenses that allows you to have a
very wide aperture, like a one point a to point to, because not all the
lenses can do that. The same happens with
Shutter Priority. When you choose this
mode in your camera, it means that you
will be able to change manually
your shutter speed. The camera will adjust the
aperture and ISO for you. And this is good for
sports photography, where you need these
fast shutter speed to capture these moments. Now the program mode is a
little bit more complicated to use because if you have to
have experience in this mode, you will select the ISO that you want and the camera will
look for the best balance between Shutter Speed
and aperture to give a well exposed image with sufficient depth
fulfilled and sharpness. But you have to be very careful, for example, in a low
light environment, because if you have a
low ISO programmed, the camera can arrange
the Shutter Speed very slow to allow more light
to hit the sensor. And that could
bring a lot of blur with a very simple
small movement. Be careful with that. Of course, with
Practice and mistakes, you will get the point
and decide which is the best mode for you
and when to use them. Now, manual mode is basically when you have full
control with the camera. If you change the aperture, the camera will not do anything with a Shutter Speed or the ISO. So you will have to
play with all of them to compensate for
the stops needed. The perfect exposure,
I would suggest you to turn on the Exposure
guide of your camera. It helps a lot. I
always have it on. Also practice a lot with
manual mode because like this, you will be able to better understand your camera
and its capabilities.
6. Let's Practice: Okay, So here we have a can and I want to make a
portrayed out of it. I put in purpose a bottle
of champagne or their, Of course, I'm going
to open it later on. So here, like a little
plant over there. And there is a reason why I did this and you will
understand in a bit. So I'm gonna use a lens that is a 50 millimeter
lens and he's with the aperture of 1.8 F18, which is amazing for portraits because it makes
the image possible to be very unfocused while the background is
completely blurry. So let's take a picture at 1.8. Let's turn on these lights so the can is going to be visible. And let's take a picture. As you can see, the
picture is really good. It's a portrait because
basically all the background is completely blurry and it makes
the image look very nice. Now what I'm going to
do is I'm going to go a little higher
instead of 1.9, I'm gonna go to 2.8
just for you to have an idea of what is going to happen if I go a
little bit higher. Okay, let's take a
picture also here. As you can see in this
picture is not much of a difference
between 1.8 and 2.8, but still the background is a little bit less blurry
or just little tiny bit. But what happened if I
exaggerate and go to F 16 or even more? Let's try it. Now. You can actually see
the blood in the back and a little bit of the
champagne bottle over there. And that's why I told you, with higher numbers
is much better for landscape photography.
I'm gonna go to F22. That is the maximum that
this is allowing me. Now you can actually see more of the image and the background. Of course I have a light here point in just that they can. So the can is going
to be more visible. But if I will be taking
pictures outside, what I was telling you,
landscape photography, this is gonna be really
clear and you will see the big difference between
1.8 all the way to F22. Really a huge difference. You've seen aperture priority, which means that every time
I changed the aperture, the camera by itself
is going to adjust the ISO and shutter
speeds for me. And normally I have my
common in aperture priority, but this is because the kind of photography that I
do now of course, if I will be in a studio or in a place where my subject is with me and he's not going
anywhere, he's not moving. It could be the scan
because I can take the can put it there and it's
not going to move anywhere. Of course I will go to manual
mode because I have time to change everything to
set up wherever I want. This is not moving and
he's not going anywhere. Now if I would be, for example, in a stadium and I'm taking
pictures of a soccer game. I wanted to take
pictures of the ball moving all the way
to the keeper. Players running around. They are constant moving. But it's not just
the movement there, is that if I take a picture, I want to capture the moment, I want to freeze the
moment. For that. I will. You need to go to
Shutter Speed priority. So like I mentioned
before, it's up to you is what your photography is. So now the first thing to do for us to go outside and start taking pictures and
practice as much as you can read all the modes. So like this, you will be
able to choose the mode, the goals with your
photography for you guys who are using the
smartphone. Don't worry. What I did with the 1.8
and the 2.8 pictures. That is the, you
know, the blurry background than the
portrait photography. You can do it with your phone. Now, most of the fonts printed, say all the phones nowadays are coming with the portrait mode. It's gonna make this
blurry background. But having mind that, that blurry background
is not made by the lens, is actually artificially made by a software in your phone. It's not gonna be the same, but at least you
have that option. I think now it's time for
you to get out there and start experimenting
and taking pictures. Practice. Remember that Practice is what is going to help
you to become a pro
7. White balance: White balance refers to
the color temperature of light sources and how it affects the colors
in your photographs. The different light sources have different
color temperatures. We can give your images
a warm or cool tone. The temperature of light
is measured in Kelvin, where lower numbers indicate
a warmer temperature, yellowish colors,
and higher numbers indicate colder
temperatures, bluish colors. By default, your camera will
be an auto white balance, which in most cases
will be okay. This mode allows your camera
to automatically analyze the color temperature
of the scene and adjust accordingly. It's convenient for quick
shooting situations, but it may not always
produce accurate colors, especially under challenging
lighting conditions. When you go to the settings
of the white balance, you have symbols that help
you to understand it. For example, if you
are in a sunny day, you could use the
sun icon option. And you have options for a cloudy day when you are at home, when you are using tungsten
lights, et cetera. It is actually very simple. If you want to be more accurate, you can actually
go to your camera and in the white
balance options, you will have the
option to capture the white in your
studio or whatever you are by taking a picture of a white paper or
a white surface, the camera will understand
what is pure white, where you are and adjust itself. Now if you're in
a studio and you want to replicate a
certain temperature, you can use proper studio lights that allows you to
change the temperature. For example, the famous
Utuberpeter Kino nowadays is using a
warm temperature, like 3000-4 thousand Kelviing
for his studio videos, of course, you will have
to adjust your camera manually to match the
lights that you are using. Personally, in videos
like this one, I normally have my camera
in auto white balance. But it is because I'm in
a controlled environment. But if I would be outside
and the sun keeps moving, plus the clouds are covering
the sun from time to time, the camera will be changing
and adjusting constantly, which could be a problem. But you know what?
As I keep repeating, it is not about understanding. By learning the theory, take
your camera and practice. Practice makes perfect.
8. What Is Dynamic Range: What is dynamic range? Dynamic range is like a superhero power
for photographers. It's all about capturing
the widest range of light and dark tones
in a single shot. So basically, we want
to see the details in the shadows and also
in the highlights. A limited dynamic
range can result in loss of information in the
shadows or highlights. While a wide dynamic range allows you to capture
all the details. Imagine you are out in nature surrounded by
breathtaking landscapes. You want to capture everything. A good dynamic range, you can capture those
vibrant colors in both bright sunlight and
also in the shadowy areas. When you take a photo,
your camera sensor tries to balance the
light and the dark areas, but sometimes it struggles
to capture all the details. In high contrast scenes, just imagine that
your eyes can see at least twice the
dynamic range that the top camera in the
market can do right now. What can you do to maximize
your dynamic range? First, you have to take
photos in raw because it allows you to have more
control in the editing. Raw photos have more
information because they're using all the data
captured by the sensor. Then find the right exposure, settings your cameras
histogram to ensure that your image covers
the entire range from shadows to highlights. If you're shooting in
a high contra scene, try dialing down the exposure to retain more detail
in the highlights. And if it's the opposite
in a darker scene, bump up the exposure to
capture the shadows. You may need to bracket your shots by taking
multiple exposures. You just adjust your exposure to the highlights
and take a picture. Then you expose the shadows
and take a picture. You can even try with more
exposures and take pictures, of course, use a tripod so that the pictures have all
the same framing. Then when you have
all the pictures, go to the editing
software and you can use the bracketing option to put
all the pictures together. That is a good technique. I use it a lot for
landscape photography. Now the magic doesn't
end in the field. Post processing is
equally important. In post processing, you can fine tune the dynamic
range of your photos, bring out the details in
shadows, and recover highlights. That is why I recommend you
to take pictures. In raw. Post processing or
editing is where your creativity can truly shine. It is incredible
how dynamic range can take your photography
to the next level.
9. Composition: Composition is basically how
we arrange the elements in our scene is the
most important part of The Art of photography. It's even more important than the camera and the
lenses that you have. You can actually
get amazing shots with the cheapest
cameras in the world. Just think about the
amazing pictures taken by the National Geographic
Magazine back in the day. And just for you to know,
National Geographic was first launched in 18 88. Nowadays, any phone takes much better pictures than the most professional
cameras in that time. Still, we're talking about incredible photos
they were taking a long time ago and everything
was in the composition. So let's talk about
some guidelines that we could use to
make our photos better. Sometimes I use
negative space to attract the viewer's attention
to the main subject. So basically, negative space
is the use of a lot of empty spaces to help define your subject or
like I said before, to attract your viewers
attention to your subject. Normally in this
kind of pictures, your subject is going to be
in a small part of the photo. For example, look at this boat in the middle of the ocean. Here we use the ocean
as a negative space. The ocean is not
distracting at all. So you make your viewer
focus in the boat. Try to keep your horizon level. Some cameras are
going to even have a guide to level the horizon. If your camera doesn't have it, you can always use the
greets that your camera has. Their very useful not just
to level the horizon, but also to follow certain rules that are very popular
in photography. You can always fix
the horizon imposed, but it will crop some
parts of the picture. And that's why I always try
to do everything on camera. One more thing about
the horizon in pictures is that it doesn't
have to be on the top. You can try different pictures, positioning your horizon in
different parts of the photo. But please always try your
best to have it leveled. When you are in the place
to take the picture, you have to move. And I don't mean one
or two steps move, you have to move around, look for different perspectives. You can have a lot
of different photos from the same place,
just by moving. Photos can use leading
lines and they make the picture very
pleasant to the eyes. Leading lines are lines that you can see in the photograph. And you have to put them
in a way that are going to draw attention to any specific
place in the picture. It is fascinating how
the brain tends to go to specific places in the photo by unconsciously
follow the lines. Let's start by saying
that the rule of thirds is actually
not a rule in Art. There are no rules. This is more a guideline
and it is variable. We have to break the
image into thirds and then you're going to
create nine frames. And the idea is to
place the subject in any of the
intersecting lines. This is the most
popular guideline. And normally this
is the first one that you learn in photography, maybe because it's very easy to understand and believe me, it helps a lot major
feature in most cases, very pleasing to the eyes. I believe that with the
guidelines I just gave you, your Photography is going
to improve very fast. There are more guidelines
that I could give you, but I think with these ones,
you can already start. The idea is for you to get out there and start
taking pictures. Remember, I keep saying it. I keep saying it. I want you to practice
10. All About Cameras: Selecting the right
camera is essential because it affects the
quality of your images, easy of use, and your overall
photography experience. With numerous options available, it can be overwhelming,
but don't worry. We'll break down the main
types of cameras and their key features to help
you make an informed choice. Compact cameras, also known
as point and shoot cameras, are small, lightweight,
and highly portable. They are an excellent option for beginners who want
convenience and easy of use. They have built in lenses
and automatic settings, making them suitable for
everyday photography. However, they may have limited manual controls and a
smaller image sensor, which can affect image quality, especially in low
light conditions. Dslr cameras are popular among enthusiast
and professionals. They offer advanced
manual controls, interchangeable lenses, and
excellent image quality. The problem is that
DSLRs can be bulky, and there are no companies
making them anymore. You can still find
them in the shops, but they will not be
future proof because companies are not even making
lenses for DSLR anymore. Mirror less cameras. They are the present and the
future in the camera world. They are compact sized, lightweight design, and
have advanced features. They operate without a mirror, and that's why they are smaller. They offer excellent
image quality and are known for their fast out
of focus performance. They also offer excellent
video capabilities. Mirror less cameras have
electronic view finders which provide real time
previews of your images. All companies are now putting all their power into
making these cameras. So if you're serious about photography, this
is the way to go. By the way, all my
cameras are mirrorless. Smartphone cameras have
become increasingly capable of making them a popular choice for casual photographers. Convenient, always
renew, and offer a variety of building
editing options. Nowadays, many smartphones
have multiple lenses. They are compact,
always accessible, and offer instant
sharing options. However, they may
lack manual controls and have limitations in
low light conditions. They are best suited for casual photographers who want
convenience and simplicity. My suggestion is not to stress
about which camera to buy. Just get out there and
start taking pictures. Use your phone to start. Then little by little, you will understand what you really need. But now, if you already
decided to buy a camera, go for a mirror list.
11. Raw Vs Jpg: Raw versus JPG. It's a debate that
has raged on in photography circles for years. But what's the real difference
between these two formats? When you take a photo,
your camera saves the image as a digital
file on a memory card. The file can be safdy.
Different formats, with raw and JPG being
the most common. Raw files contain all of the data captured by
the camera sensor, while JPG files are compressed and lose some of the data
when you shoot in raw, you have more flexibility
in post processing. You can adjust things like
exposure, white balance, and color temperature without sacrificing image quality
with the JPG file. Those adjustments
are more limited. You can make basic tweaks, but if you push
the image too far, you'll start to see pixelation
and other artifacts. So which one should you use? Well, it depends on what you're shooting and what your
final output will be. If you're shooting
something that requires a lot of editing, like a landscape or portrait
role is the way to go. But if you're shooting
something that you just want to share
in social media, JPG is perfectly fine. Ultimately, the decision between Raw and JPG comes down to your personal preference and your specific needs
as a photographer. The next time you're
shooting, think about which file format
is right for you. A tip. Most of the cameras nowadays can take both
at the same time.
12. More Or Less Megapixels: Let's talk about mega pixels in cameras and how they
affect our pictures. If having more megapixels in a camera is better
than fewer megapixels. And this is not only related
to professional cameras, but also for smart ones. We see last year the last
iphone had 12 megapixels, and other smart phones reach up to 108 megapixels,
which is crazy. Nowadays, iphones have
48 megapixels and the latest Samsung S 23 Ultra has 200 megapixels.
That is crazy. But is it true that
more megapixels are better than
fewer megapixels? It is normally thought that the higher the number of megapixels, the better the camera,
which is completely wrong. Let me explain if we have two full frame cameras,
and let's be clear. We're talking about the size of the sensor being the same. One has 20 megapixels
and the other has more than double
45 megapixels. Now let's look at this image. And as you can see
on the right side, the pixels of the 20 megapixel
camera are much larger. They are more than double
the difference in size. Which means that because
they are larger, the camera with fewer
megapixels captures more light. And therefore the
image resolution will be better and sharper. Not only that, cameras with fewer mega pixels are much
better for photos and videos in low light
because they have larger pixels and therefore
capture more light. So it photos will
be much better. Also due to the size
of the megapixels. These cameras produce
much less noise. But now, why didn't buy a
camera with Mormegapixels? One thing I've heard is
that the cameras with Mormegapixels are a little
bit better with Auto Focus, which personally I haven't
seen because I tried many cameras with
different amounts of megapixels and I haven't seen
really a big difference. So what is good about
the camera with mormegapixels is
that they allow you to print giant photos and the resolution is
not going to be lost. One benefit of this is that
if you take a big photo, you can choose parts of the
photo and crop it without being afraid of becoming
pixeled or losing resolution. But is that really
what you need? Personally, I use two cameras. My second camera
is a Lumix G 85, which is an amazing
camera to start in the world of photography
and videography. It has only 16 megapixels and the sensor is
micro four thirds. So it's a smaller sensor, but it is really amazing,
especially for video. And the quality is very good. And the best of all is that
it's not expensive at all. My main camera is a 24.2
megapixel LumixS 52. This is a full frame camera and obviously the quality of
the photos is very good. I sell many of these
photos on stock platforms, which proves the quality
of this camera in the end, the camera to buy depends on the use that you're
going to give it. And remember that
the numbers and specifications are
not everything. The magic is in your creativity.
13. The Editing Process: Why do photographers
edit their photos? You know that it's
not just about clicking the shutter button. Photographers put a
lot of effort into editing their photos to bring
out their true potential. But let's understand
why anything allows photographers to take their
images to another level. Imagine a world
where every photo looks exactly like you
see with your eyes. Boring editing
helps photographers enhance colors,
adjust brightness, and even bring out
hidden details that make the image editing also let photographers express
their unique style, whether it's creating
a vintage look or playing with some filters. Editing allows photographers
to unleash their creativity. I will show you how
to edit one photo. We will be using Adobe
Lightroom Classic CC. The idea is going to be
the same in most software, so if you're using another one, you will be able
to follow along. So now let's go to light room. So basically what
you see when you open light room is exactly this, like I just installed, as you can see here on
the top wearing library. So what we want is to
pull a picture here in the middle so that
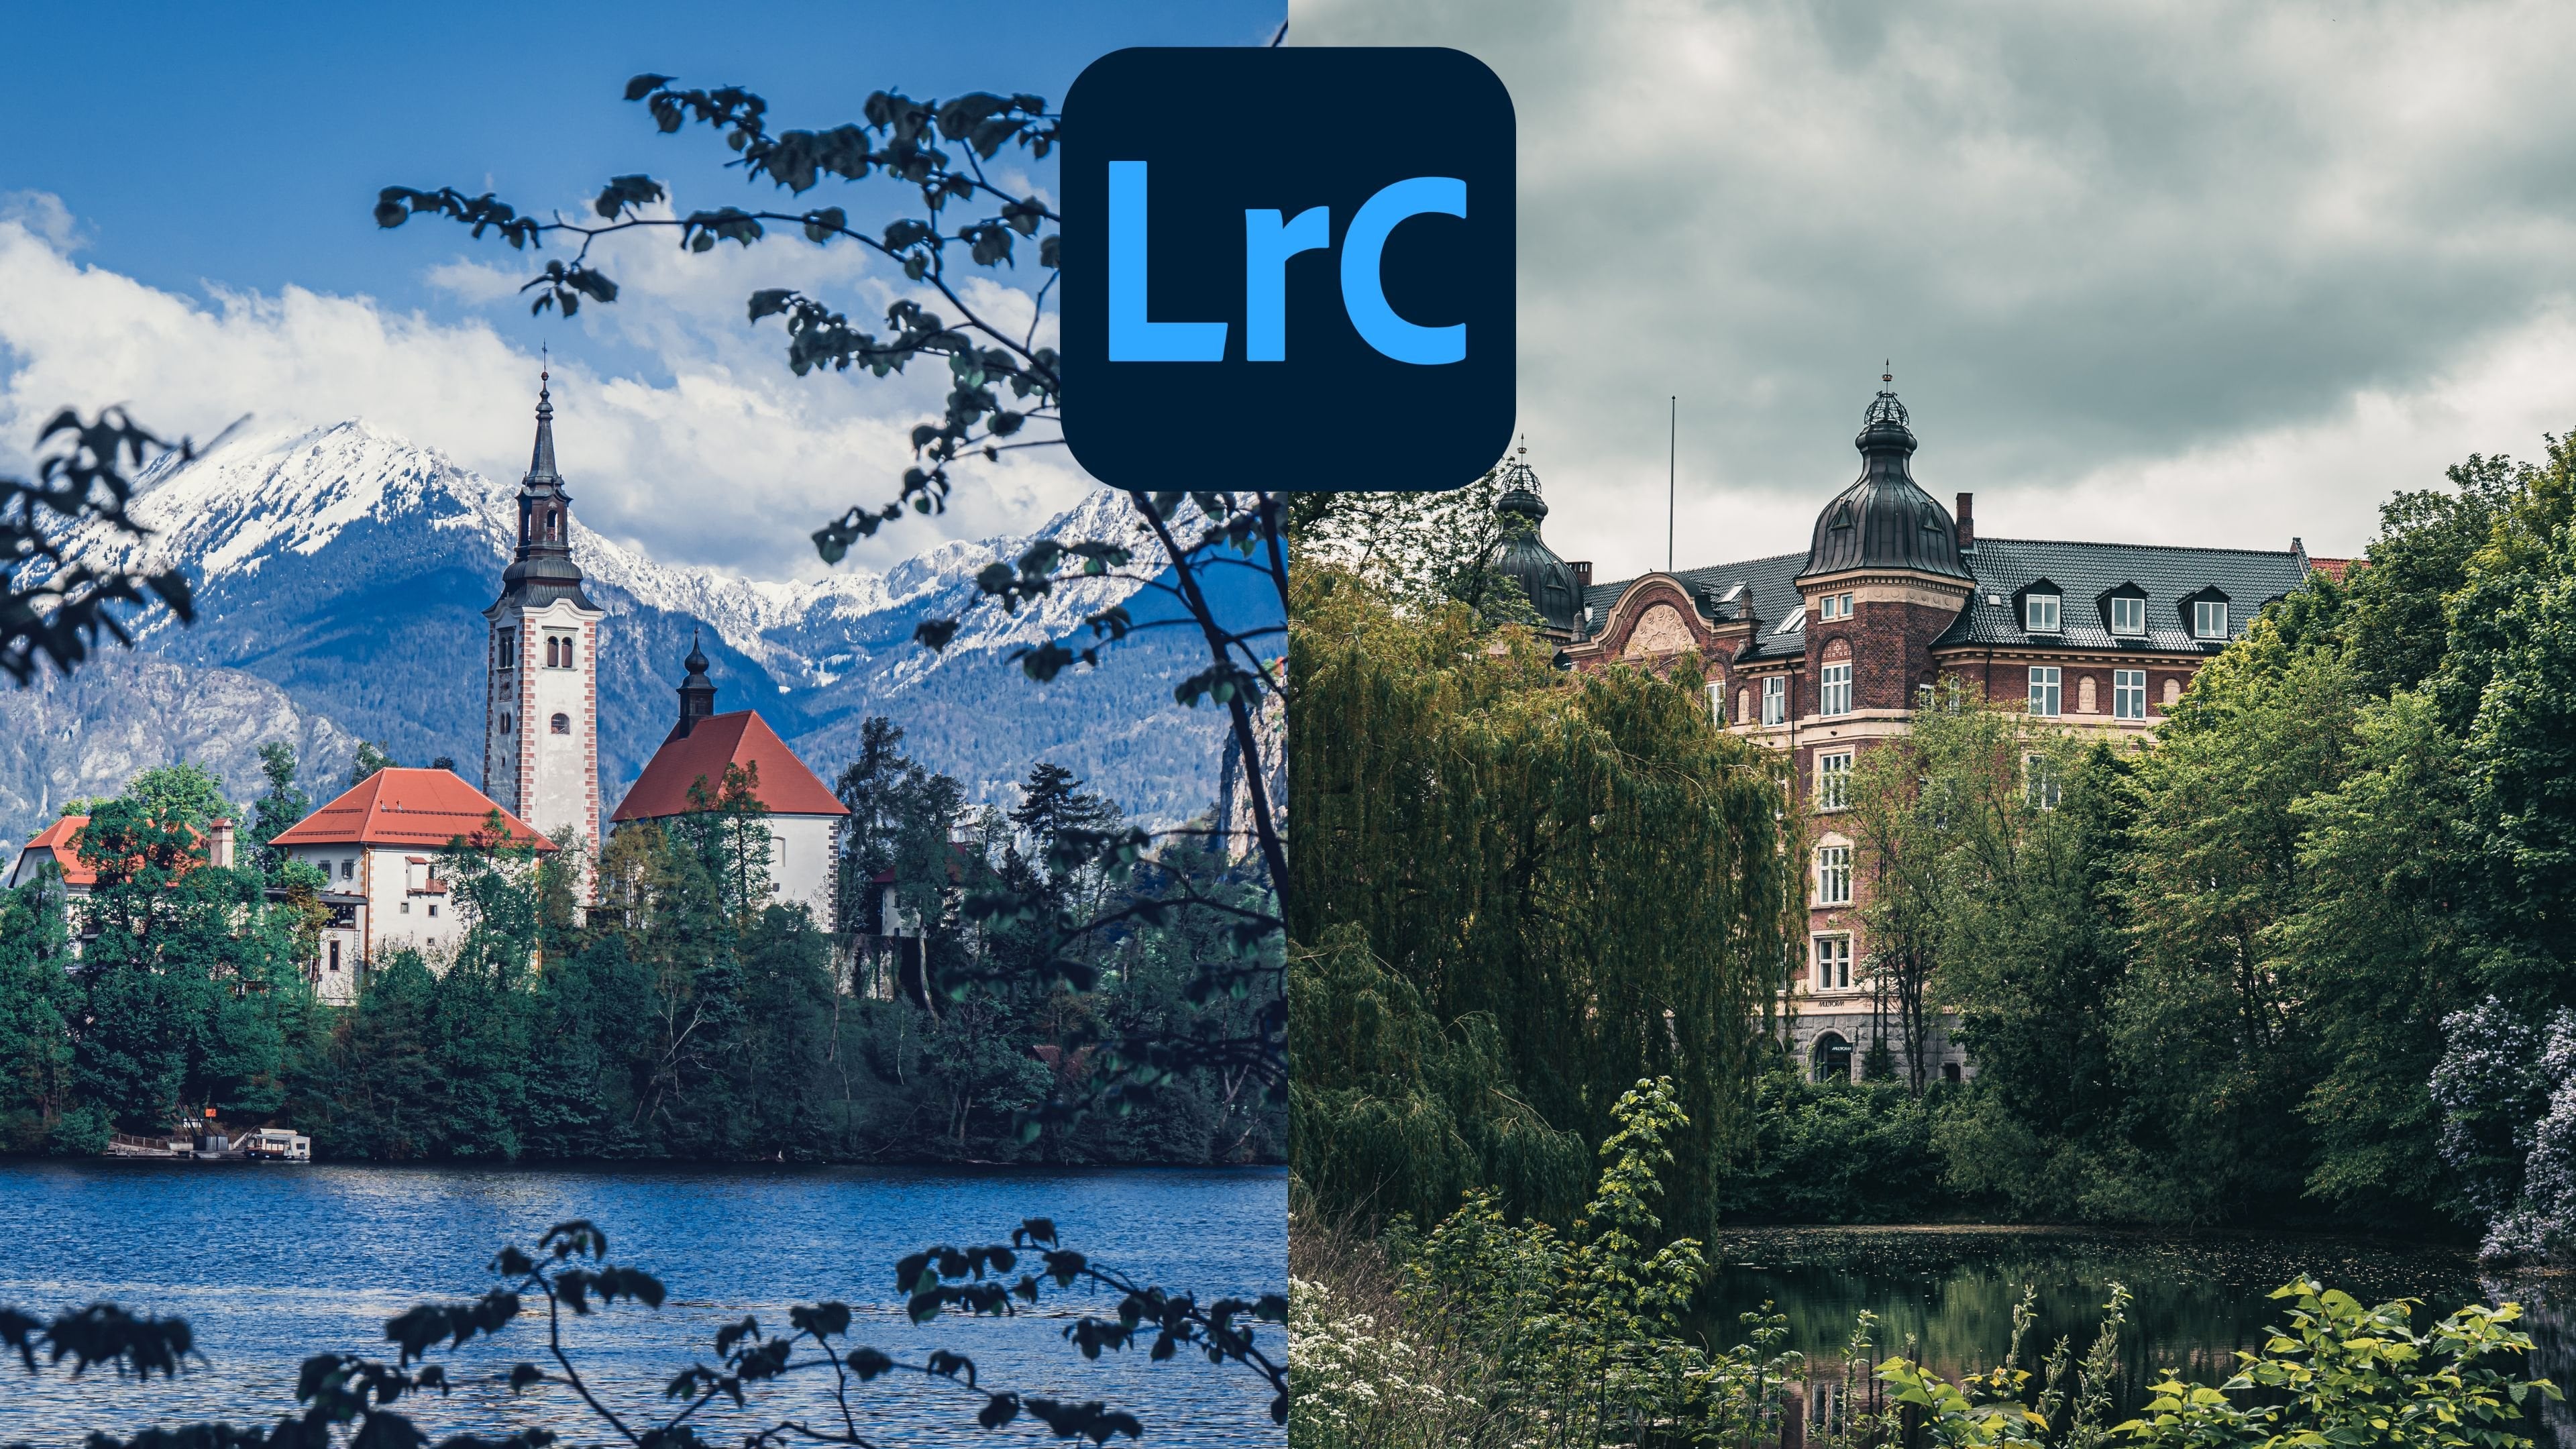
we can start editing. We have here a picture of
Lake Blet in Slovenia. So what we're going
to do, like I said, we're just going to pull it, release it here in the middle, and this is what is
going to appear. What I will suggest you to do is to add it to a collection. This is something I always
suggest to all editors. You have to be organized. So let's add a collection, and let's put in
the name Lake Blet. Let's put Create. And then
we click here in Import. So we're going to import the
picture into light room. Now what we're going to
do is instead of library, we're going to go to develop. And now we have
our picture here. This is what we're
going to edit. Amazing, Beautiful Lake
Bled here on the left side. If you click this little arrow, you can see you have few options where you have the Navigator, where you can actually
click here to Sum and to Sum out also. And here where it says History, you can see everything that
you're doing to the picture. So if you're editing
for 10 minutes already, you can come here and see exactly what you
did if you want to erase something
or if you want to come back to that editing again. If we click this arrow, we're going to close this, so
we have the picture bigger. This is what actually we want. Now in this side, you have
all the editing tools. Let me tell you, sometimes
when you see it, it seems overwhelming, but
it's very easy to use. Let's minimize this also. So these are all the tools
that you can use to edit. We're going to start with
the basic correction and maybe some cropping. Maybe we're going to
pick some little things. We're not going to go so deep. I have a course where I explain everything about light
room in this platform. So if you are interested, also check it out because
it's very dynamic. In such a short time, you're going to learn
and become a pro. Okay, let's go, we're
going to start cropping. This is the first thing
that I always do, even though I see the pictures. Okay. There's little things, little things that I don't like. So let's crop the picture here. We can see that the picture
is already kind of cropped. So what we're going
to do is we're going to come here and we're going to look for something
like four by five. I think this is
going to be okay. We can make it a little bigger. I think this is
going to be okay. So before we press Enter, you see here the angle. I think I'm going to move a little bit the angle
because I think I feel like it's a little
bit towards the left side. So I'm going to change it. I'm gonna fix it a little bit. Let's see, I think 0.5
is going to make it. I feel better like this. So now we press
Enter and it's done. Now let's go to the
basic corrections. When you start to
edit, you're going to find your workflow for me. I just follow what light
room is giving me. So I'm going to start
with the white balance. I'm not going to do any changes because I think the white
balance is perfect. It's correct. So let's go to tone exposure. Here is correct. I'm not going to
change anything. The contrast though, Yes, I like to add a little
bit of contrast. I'm not going to exaggerate because later I'm going to add more contrast with the tone
curves, highlight highlights. I'm going to take a
little bit of highlights, If I exaggerate, you're going to see the sky, how it changes. It gives more detail to the sky. So I think I'm going to
take highlights maybe to the middle and I'm
going to recover what I lost just adding a
little bit of shadows. The good thing about
this technique is that highlights are most in the sky and all the areas are illuminated not
in the shadows. So when you take them
out, it gives details. And then when you add shadows, the sky doesn't
have any shadows, so there's not going to
be any change now whites. My suggestion also when you are editing, is move everything. Move to one side, move to the
other side so you can see what is happening
when you are in the middle and you
move to the left side, it's darkening the picture. I don't want that. Maybe
just a little bit. I'm going to take out the whites because it gives details. Now, in blacks, this is going
to give a lot of contrast. If I add or if I take, and I'm going to show you, if I go here, it's like super black. If I go to the other side, it looks like you took
all the blacks out. So I think I'm
just going to take a few blacks out a little bit. And I think that's it
now in presence where it says texture clarity
and dehaze in texture. Normally, when you're
doing portraits or skin, you don't add texture because it's not good for the
skin and for faces, but because we have a lot of trees here and all
of these details, texture is going to
give something nice. If I take out the texture
look, it looks like a paint. So I'm going to add a
little bit more of texture. And then in clarity you
also I'm going to add a little bit more and then Hays. Look what happened with the sky. When I add dehaze, the sky becomes super blue and everything goes into
so much detail, we don't want that and we're
losing a lot of detail. If we go to the opposite side, is like a mist came. I'm not going to use
the dehaze for today. Now, in vibrance and saturation, this is about the color. Saturation is going to add
color to all the picture, and then vibrance is
going to add color. But in a very clever way, it knows where it needs. I normally use vibrance. I'm going to add a little bit of vibrance and I
think that's okay. And then saturation, actually
I'm going to take out a little bit of saturation
and I think that's okay. Just finishing with
the basic corrections, you can see the difference. You can press the
backslash and you will see how the
picture started. And then when you
release the backslash, look how it is now amazing. There is a change.
It's much better. You can see more
details in the tower. Okay, let's click
here in the arrow, so we are not a mess,
we're more organized. Let's go to the tongue curves. And here on the tone
curves is where you're going to
create this contrast. I'm going to pull a little bit, I don't know if you heard about the S curve is what
I normally use. And the S curve is going to give so much contrast in the
picture that it's amazing. Now here in this corner, if you pull it up, you're going to mute some
of the blocks. I'm going to exaggerate,
so you see what happened. The blocks started to mute. So what I'm going to do
is I'm going to just, that's a little bit here
and I think that's enough. As you can see now I got more
shadows, more dark areas. So don't be afraid
to minimize this. Come back to the basics and
maybe use more shadows here. So it opens the picture more. Okay, now what we're going to do is we're going to come
back to the tone curves. Because I want to
show you something here in this corner.
You see the eye. If you touch the eye, you can see how it was, the
picture before the curves. And when you release the eye, you can see how is it with the curves, it is a difference. Sometimes the
differences are so tiny, so not much of a difference. But all together, all these little
tiny differences make a huge impact
in the picture. Now, as you can see
here on the bottom, I don't like this, I don't
like these leaves here. I think they are a
little bit distractive. So what we can do is we can here where you see it says healing. You can press also and you
will go to the healing. When you get close to the image, you're going to see
there is this circle. And then here you
can see where it's a size and opacity in size, you can make the circle
smaller or bigger. As you can see, I'm
exaggerating here. You have the option
here, for example, it says Content Aware, remove. This is something amazing. It's AI actually. It's going to
analyze what you are marking and he's
going to erase it. So let's use it. Okay, there you go. And then you pull it
here and that's it. Light room is analyzing and
he's going to erase it. And boom, erased. This is really, really, this is making your life
so much easier. Come on. When I started editing pictures, this didn't exist and now we
are our picture. I like it. I think it's enough. There's a lot of
things we can do. Like we can use masks,
for example, here. And we can mask just the sky. We can start to mask
little parts of the picture, making
everything amazing. So I hope you like light room. I hope you like this editing. It was fast like this.
You saw my workflow. Actually, there
are so many things I normally will do
to this picture, but I think like this is enough. Let's click again
in the box lash so you can see how we started, look how we started
and look now. It is amazing the difference with little tweaks like you see. There is a lot we
can do with editing. If you want to learn more about editing with
Lightroom classic CC, I have a beginner course
in this platform. I made it very dynamic, so go ahead and check it out.
I know you will like it.
14. Conclusion: Now it's time to get out there
and start taking pictures. I'm so happy that you
chose this course. I hope you enjoy it as much
as I enjoyed making it. If you have any questions
or suggestions, please let me know and don't forget also the give me a
review because like this, you're not just helping me. You're helping also
other students to find what they need. Don't forget to check out my other courses in this
platform you'll never know. Maybe you'll find something
you like until next time.
 Mario Guimarey, Photo | Video | Youtube | Editing