Transcripts
1. Introduction: Would you like to learn
to draw human figure, but find the subject too
complex and intimidating? Do you want to add human figures to your landscapes
or urban scapes? But hesitate to do so in case
they don't turn out right. In this master class, I
will show you how to easily sketch people without years of studying anatomy
and proportions. This will be an
intuitive process where we will use such skills as sight measuring and
additive sketching to create human figures in
perspective and in motion. My name is Sina Anis. This is my master class, people intuitive sketching
with watercolor. The main goal of this class is to improve hand
eye coordination. And super important skill. I will show you how to
eyeball the proportions and angles to capture the three dimensional
object on paper. In this case, it will
be the walking people. But after this class, you will be able to sketch
any subject that you like. In this class, we will be using watercolor without a
preliminary pencil drawing. All we will need
will be sketching paper on brush and
one color watercolor. This fun exercise will improve our control skills and ability to balance the
paint and water mixture, which will mean better water
color skills in general. This exercise is also a great warm up before
a painting session. If you pick a subject and
sketch for about 05:10 minutes, then when you start painting, you will feel a lot more confident and it will
be easier to create. I guarantee that without further delay.
Let's get started.
2. Painting supplies and reference: The paper doesn't really matter. You can use your sketch
book if you want. I'm going to use Bristol. It's just kind of
thick, smooth paper. Anything you have will be good. I am going to use just
one color of water color. This is mineral violet by
halbe. A brush or two. I have a couple of my Asian
art brushes prepared here. I like them because
also if I wet them, they come to a
really nice point. Even though they're
kind of old and worn. I stain them with inks, but it's alright,
it doesn't matter. So you want something
flexible and pointy. Just if you have a good round brush or something
like that, it will work. We will not be doing a
preliminary pencil sketch, but we will need a pencil. I'll show you why
we're going to draw the horizon line and I'm
going to use a marker. This is just a permanent marker with the chisel tip.
I like that one. You can do thick
lines or thin lines with it, basically Sharpie. I have a Sharpie here too. We can use a Sharpie or
something like that. And we're going to do some, a little bit of work with
opaque white ink or gas, whatever you have available. A good option, I got all these for
free from unsplash and I just combine them
together so it's easy to see. And you can see it on my screen. So here's our reference
and without further ado, let's get started on
sketching our people.
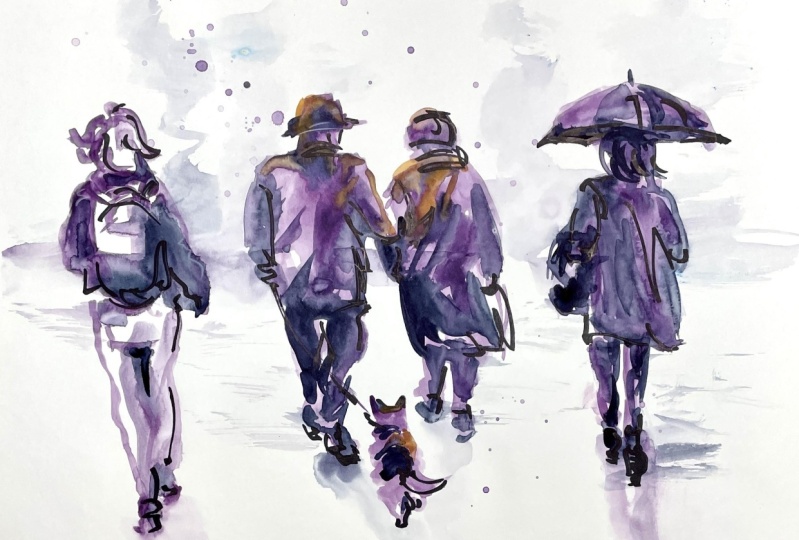
3. Figures in perspective: How to create perspective
when you sketch people. The interesting thing is that
all the heads of people, when we're looking at
a crowd, let's say, and you can see it really
well in this photo. There is some camera
**** distortion. But basically all the heads of the people are on one line. Let me bring it a
little bit closer to the camera because we're
looking at people. Our eyes are on the same
level as people's eyes. If we're standing, the heads
will be on our eye level. Obviously, people are
taller or shorter, approximately the same level, but depending how close or
far away from us they are, the legs will be at
different levels. That's what creates perspective
when you sketch a crowd. When you sketch several people, if you start moving the heads, you just making people
taller, shorter. But if you move their feet,
where their feet are, you paint them closer or further away from you. Does
that make sense? You will see it when
I start sketching. I'm going to start with
individual figures. Let's start with this couple. To make my task a
little bit easier, I am going to sketch that level where the
heads are going to be. Use a ruler. Just put a little
pencil line there. Another important thing
before we start that, I need to mention some people feel a little intimidated
painting people. I know it's a
complicated subject, like the human form
is pretty complex, but we need to forget about
that. That's human figure. We need to look
for shapes, right? And that's what I'm going to do. I'm just going to look at the shapes and try to
recreate them on paper, simply and in a very
abstract manner. And I'm going to
start with the head, and then I'm going to use
that head that I will sketch as reference and add
everything else to that head. And you will see what
I mean in a second. So let's get started. He's wearing a hat, so I go from side to side. I'm not trying to sketch
like his head and then, you know, I'm not
thinking, these are the shoulders, this is the arm. I'm working with a shape, so there is a big shape here. Let me stop for a
second. Like I said, I started with his head. That was my reference
shape, right? I don't have anything on paper, so I need to start somewhere. I started with a head
and I made it this size. My next step needs to be adding
this shape to this shape, and making the right size that
I have something on paper. Let's evaluate. If this is
the size that I sketched, I can tell that maybe this
needs to go out further. Then this shape
needs to be wider, this side needs to be wider too. You see, it's not that I know
what size to make things. I constantly evaluate what I'm doing in relationship with
what I already have on paper. There will be shape here, evaluating the angles
and the distances, and creating shapes in
relationship to other shapes. Okay. So this is my first, the interesting thing
about also that I noticed because
usually the light comes from above somewhere. The sun is above our head, the top will be lighter. And then it, you can even
see it in the photo, see how he's getting
darker towards the bottom. It always helps to make the figure look
more realistic and more relatable if we do
that with paint on paper. Just a little bit of
second layer here. Okay? And let's paint the other. I'm not going to say
figure the other shape. I already have something
on paper here, so I need to paint this shape in relationship to
this one, right? It's my life is already
getting a little bit easier because I have
something to go by, something to relate to. Feet are probably the
hardest to get right, especially in angle when people
are walking away from us. The less you do, the better. Just don't go into details with the feet
and you'll be fine. Sounds counterproductive. People can guess
everybody has feet, so people know they're there. Now I have this shape, I need to paint the
head in relationship to this shape and make it
hopefully the right size. I see that, you know, this shape needs to be wider. Now that I'm
evaluating the result, I can add a little bit here. Okay, so this is
my first figure. Wasn't too hard, was it? The important thing, I'm not painting like the
head and here's the shoulder and here's
the central line and I divide it into ads. Right? Like we were
taught in the art school. I'm just looking at the shape. I'm evaluating how tall it is, how wide it is, if the top, the head is this size or
the shoulders wide enough. So just working abstractly and looking for distances
and angles, right? Let's be in the dog. You
know, it's a shape too. Kind of fun little shape here. What else can we do? Let's do another shape. Here's this girl
with a backpack. Let's paint her. Now I will show you that theory about putting all the
heads on the same level. So I'm going to put her here and I'm going to start approximately
at the same level. She has kind of hair blown in the wind in every
which direction. Let's do her shoulders, her head a little bit bigger. Here's her backpack, again, looking for shapes,
looking for distances, and not putting in
too much detail, especially on the bottom. Her feet are unfortunately
kind of cut off, so we need to just
hint at something. It's usually not a good idea to try to invent information, it's probably not going
to work. So here she is. So what happened here? Her head is approximately on the same line I
made her very tall. I raised the top of
the head a little bit, but her legs are coming lower, right, than this guy's legs. And what does it look like? It looks like she's
closer to us, right? So this is what I was talking
about, the perspective. So the heads will all be
approximately on the same level. So we can tell this guy is tall, his wife is shorter than him. And the girl is tall
and she's closer to us. And these people are walking kind of in front of her, right? So they're further away from us. So that's how we create
perspective when we catch people. If you have a one
point perspective of a street or something
like that and you want to liven it up and
add some figures. So keep this in mind,
that's how you would do it. If you make the legs lower, people will appear closer to us. You know, if you want to
paint them further away, you will just make the
legs at a higher level. With the street, it will be a little bit
more tricky because you will have to
make those people proportionate to
the architecture. But you know nobody said that perspective is easy and it will all come
with experience. Let's do another one. There's this girl
with the umbrella. So the photo is kind
of a little dark, but you have the reference. I'm going to paint her, I think I'm going
to make her kind of in between these
two people, right? So I will need to make
her about this tall. Let's see how this works out. So the umbrella will
be above her head, but I'll make her a little
bit than the people, the umbrella and her hair is
sticking from underneath it. And I'm going to paint.
Just throw on a shape, like I said, we can always
make corrections, right? We can add a little bit, just rough something in. She has this bag in her arm, here's her elbow, and
here's the shape, the coat. So you see, I'm not
trying to be precise from the very beginning because
that will be very hard to do. I just feel my way around the figure and then if
necessary, I make corrections. Yeah, this is giant foot. Let's make it a little slimmer even though she does
have big shoes on. Okay, and now let's
find some precision. Let's give her darker here, so we can see the umbrella
casts a shadow on her right. There will be slightly
lighter shape here, and there will be the
top of the umbrella. Okay? Okay, So here's another
shape that we created, so we can tell
that she's kind of in between these people
and this girl, right? Because that's
where her legs end. I have a little bit
of room here and I think an interesting
thing to try guys, will be to paint these kids. Now we have people that are actually shorter and to
make them realistic, if we put their
heads on this level, they're going to be
either very far away from us or they will
look like adults, right? It's not going to
work. So if I want to paint those kids next
to this woman and make them look like her kids legs need to be on the
same level as hers. But the heads will be lower, right, because they're short. Let's try it and see
if this works out. I don't know how tall
I want to make them, but something like this, there
will be independent kids. I'll make the walk maybe hand
in hand with each other. Kids proportions
will be different, of course, from adults, but we don't care.
We're painting shapes. We're not worried
about calculating the proportions or we're not thinking about anatomy
or anything like that. We're just painting shapes. Here's the little girl makers dark, maybe make crore dark. Okay. So here are the kids and let's see where it looks
like they're walking. They're walking next
to this woman, right? And you can tell that
because they're shorter. They're kids, they're not
as tall as the adults. Okay. So that's how we
will paint the kids.
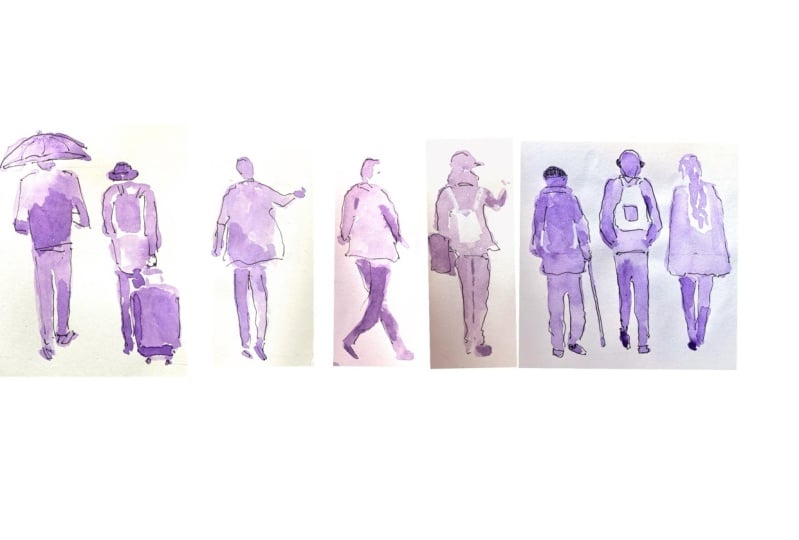
4. Sketching a crowd of people: Okay, so here's our crowd. If we look at the heads,
like I mentioned, they look a little bit, that line looks warped. I think it's actually
camera **** warping. The photography used obviously a wide angle **** to
capture all these people. We can kind of do the
same thing if we wanted. I will draw the line
of those heads right here and let's give
it a gentle warp. It doesn't have to
be super straight, that will make it more
kind of natural looking. There are some people that
stand out like they're closer to us so we can
try to capture them. They're also walking kind of at an angle diagonally, right, so there's a lot
of stuff going on, but let's see if we can
capture it for our exercise. I'll just start with
this figure on the left. And actually let's start with
this figure in the center. And so we can start from the center and go
left and right. Again, trying not to
concentrate on details. She's carrying
something in her hand, capturing those proportions
and putting the feet in the right spot will be especially important
for a crowd, right? So then we will create
realistic crowd. We need to watch
where the feet are and where the heads are. Okay, This is one, then I'm going to do this guy, he's closer to us, maybe slightly larger head
and it's hard to capture, to do the faces. I just don't do them either
because we just don't have the scale is not large
enough to show faces. This guy will be, feet
will be at a lower level. Of course, it's a candid photo and everybody was in motion. And sometimes people's
poses look a little funny, awkward, maybe hands
somewhere, but it's okay. We can also add stuff
or take stuff away. Do whatever we need to
do for our purposes. I'm going to do
this. Yeah. See, she she's pointing with her
hand, which is fine. Okay. Now that we sketch
the key figures Right. That we see in the reference, we can fill it in in between. So that's what I
wanted to show you, how to do that crowd, you can treat the rest of the people as
one shape as well. Because when you sketching, you're not going to do like every single figure separately. We need to simplify somehow. But because we know how
to create the proportion and how to create
the perspective, it's a lot easier for us now to show something that there are some
people down there, see how I'm connecting
it all together, and there will be
some people here. Just another minute, and
instead of just three figures, I have a whole crowd
going on here. Let's said some people
behind this lady. There's a figure here. I think you see my point, right? By moving the legs and making people further and
further away from us, that way we can create
the perspective. What color will be tricky to use alone for
these exercises if you're having a little
bit of trouble like mine is with this crowd especially is becoming
pretty messy. We will go to markers, the couple guys walk
in side by side. Let's just do this little
group with the distance, the last ones, and we
will move on to markers. Almost everybody
is wearing pants. A lot of opportunities to
paint people in skirts. But if you go to Sp and just put in people crowd and search box, you will find a bunch of photo free photos
that you can use for practice in this last guy.
5. Adding shadows and background: If you wanted to turn
this into a sketch, let's say a couple
of things we can do. Let me show you real quick,
I'll use this brush. First of all, shadows will
really help us to create even more interest and
volume in the painting. Shadows are always good. We can also do something
like this in reverse. Of course, it's hard to tell who is who and which
shadow goes where. But we can do something very
quick and abstract here, because this is one
point perspective. This is the perspective point where all the lines converge. We need to go in this direction on this side, okay. We can very quickly
do something for the hint at the
surrounding area. I'm not even worried about
showing buildings or anything, but just something real quick. You see, I'm already getting more or less finished sketch. I will need to use my
marker to work on it some very quickly
and very easily, I created a beginning
of a painting, right? Let me set this aside. Let me work on the
first one here. We can do the same thing. Maybe some shadows when
they're coming towards us. Little looks really nice. You can even pull some
paint out of the figures. We can give them a horizon. I don't know, maybe
there are trees or something in the distance. Just creating some atmosphere, some visual interest
in this skitch. And you will understand
why I'm trying to do this in just a second. Paper towel is
interesting to use because you can do a little
more texture with it. Right? I often kind of blot
things with a paper towel.
6. Adding linework and highlights: I think line and wash is a very suitable technique for this makes our life
a lot easier, right? Watercolor eating details with
watercolor can be tricky. Not so much tricky, but
it takes a bit of time. So if you're out
somewhere sketching, or you're just practicing, I would do the initial shapes with brush because brush gives you a lot more freedom and it requires a little bit
more control on our part. Because we're controlling
the bristles, we also have to control
paint and water. But after you did this, it's a good idea to
take a marker and just go over your sketch one
more time and give it a little more precision
that will train your eye to go from overall shape
to more detailed view. So my recommendation
would be to grab a marker and go over your
sketch one more time. All right, let's work a little bit on
precision of our photo. So the thing with
line to keep in mind, we want to show the darkest
elements on the figure. The sun is coming from above
and you can clearly see, especially on this figure
because it's all black. Like on top of the head
there is the light. And on top of the shoulders
and on the arm here. So we don't want to put the
black line there, right? We most likely even
will need to use our opaque white or white
marker or something like that to add those highlights to give our figure
even more volume. So the dark lines need to
go in the darkest areas. So most likely kind of
underneath the form or in the places where the two forms touch and form a dark accent. So something to keep in mind. I know it's very tempting
to just go around the figure and add the
black line everywhere. But it's not going
to work because that's not what the figure looks like, interrupting the line. A better. We're going to make her
talk on the cell phone. She's gesturing at something, but it doesn't look natural. See, I wanted to
draw a line here. But this is the surface that
gets a little bit of light. I don't want to put
that dark line there. And this can be all dark. This is fine, because this doesn't catch any light anymore. Okay. So you see just a
couple of lines and I'm getting a lot more precision and it looks a lot better. Let's do this one looking for dark shapes, leaving some things to
imagination to viewers, discretion, the people
in the distance. First of all, the lines, if we want to give them a
little precision, the lines need to
be a lot lighter. But maybe we can
even leave them as just watercolor because
they're further away from us. We don't see the
details, details here. This figure is closer so we can work on it a
little bit more. This is the time when we can actually make
some corrections. If we messed up the scale
or something like that, we can fix it a little bit. Somebody walking behind there, this figure is all in light, so I'm not even
going to touch it. Let's give this a
little precision in this case, okay? And the people,
I guess they can be, can touch them up a little bit just to finish up our sketch. And if your figures start to blend with the
background a little bit, just grab some opaque white. I'll show you just a
couple of breast strokes. If I start adding highlights, you will see a huge difference. See when I started
in the highlights, the first of all separated from the background and they became
more three dimensional. So this will be a couple things we can do to make the sketch more finished. All right, I can work on
these guys for a second. Let's just do the
highlights on the guys. If I add a bit of a little bit more
information right on the guys, shoulders on the hand. Even without the marker, we can, we can achieve more volume by playing with
light and shadow. Okay, so something like this, ma, the sketch, a lot
more interesting.
7. Summary and class project: Hopefully you will
agree with me. This is a fun exercise, very useful for hand
eye coordination. Sketching people will
help you to get over that reservation that maybe
you have about painting. People, you know, a lot of artists think I need
to study anatomy. I need to, you know,
practice from a live model. Which is all great if you can do that if you
have time for that. But to start sketching people and adding them to
your paintings, or just doing maybe quick fun
sketches like I showed you. Really don't need much. You just need to
look for shapes, for light and shadow, and evaluate the distances and start somewhere and then build the shape around that
reference point. I usually use the head, or you can go from the bottom. I think from the head
it will be easier because that's position in
the head on the same line. That's how we
create perspective. So great exercise, but
no preliminary drawing. Just do it freehand
and that will give you the biggest benefit in practicing for the
class project. Sketch individual
figures or whole crowd working from the
reference photos that I provided in
the class materials, you can use any color of
water color that you have. Any markers or even
soft pencils and also any opaque white paint that you have to bring
out the details. Just remember,
work directly with the brush with no
preliminary pencil drawing. This exercise is about freedom and not about
details of precision. If you prefer, you
can go out and snap your own photos
and work from them and post your work in the project section
of this class. I would love to see
what you created. Please visit my Youtube channel
to find more tutorials, including ones on sketching and painting people
in their faces. Examples of my art and links to my social media pages
are on my website, Tamra.com Thank you so much
for watching this class, and I hope you will check out my other classes here on
skill share. See you there.
 Ksenia Annis, Figurative artist