Transcripts
1. Introduction: Welcome to this class
on how to create your own mermaid scale
pattern with Adobe Photoshop. Hello, my name is Trisha, and I am a artist and
surface pattern designer. I love using Photoshop
to create patterns. In this course, I'm going to take you through
the basics of how to create a mermaid
scale pattern. We will create
several variations. We will also set up a
template document based on the mermaid scale pattern that you can use over and over again. Throughout this course, we will explore some various
Photoshop features, like how to use a layer
mask smart object. We'll explore the brush tool and the symmetry
tool to create fun, organic patterns in Photoshop. By the end of this
course, you'll be able to use the knowledge
gained in this class to create your own fun
Mermaid scale patterns. Thanks for joining
me in this class. Let's go ahead and
get started creating fun Mermaid scale patterns
in Adobe Photoshop.
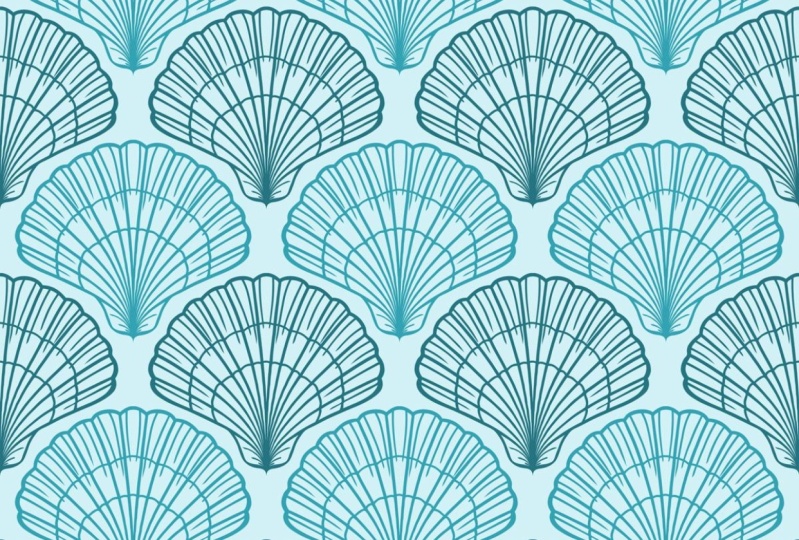
2. Mermaid Scale Pattern Variation 1: In this lesson, we are
going to look at creating a Mermaid scale
pattern in Photoshop. To start off with, let's go
ahead and create a new file. The dimensions I'm going
to use for this is 1,200 pixels by 1,200 pixels. But you could use any
dimensions as long as they are in a one to
one ratio square. The resolution is
300 pixels per inch. Color mode, RGB color, and then background content
set to transparent. Then I'm going to go ahead
and click on Create. I'm going to go ahead and
zoom out on my campus. I'm going to hit the
command or control of the minus key just so I can
see more of the area there. I'm going to start by
creating a circle. We're going to use
the ellipse tool to access the shape tools. Here you can write, click, and there are a number of
different shape tools here. The one we are going to
use is the ellipse tool. Clicking on the canvas, I'm going to create it to
the size of my Artboard, which is 1,200 pixels
by 1,200 pixels. Clicking on Okay. Then here at the top, we are
going to use the Align tool. You want to make sure a line
to canvas is selected here. And then just go
ahead and align it both vertically
and horizontally. Also in the top menu, we are going to change
our fill to no fill. And then we are going
to add a stroke. You can double click on
this color picker icon. You can select a color. In this case, I'm just
going to use black. I'm going to go 000
to access black here. And clicking on okay to
change the your stroke, you can click here
and I'm going to do 100 pixels for my stroke width. Next step is we need to
duplicate this layer. We're going to click and
select Duplicate Layer. Clicking on okay, then I want to position it here in this
bottom left corner. I'm going to go ahead and use the free transform
tool to get there, you're going to go to
Edit, Free Transform Path. Go ahead and click on it there. And then up here in the top menu we want the bottom left corner, we're going to set a
zero for our x and we will go 1,200 pixels for R Y. We're going to go ahead and
duplicate this layer again, the keyboard shortcut
is command or control. Then we are going to access
that free transform tool. Again, the keyboard shortcut for that is command or control. We'll go ahead and change the x value position
here to 1,200 pixels. And then clicking on Ok.
To get our Mermaid scale, we need to get rid of this
extra part of the circle. And we're going to do
that using a layer mask. I'm going to go ahead and
select this bottom layer here. And we are going to
create a layer mask. I'm going to click
on this icon here, and we can see the start
of our layer mask. When using a layer mask, you want to set, make sure you have black as your foreground. If you have a different color, you can hit D on the keyboard to get back
to your default colors. Then we are going to
access the brush tool here in the brush settings here, you'll want to make sure you are using a hard round brush. You can always adjust the slider here to
get to 100% hardness. Currently, I have
smoothing turned on, I'm just going to turn
this back to 0% for this. Then as I scroll on the screen, I can see the size of my brush. And I'm just going to use the right bracket key just
to make it larger here. Then I'm just going
to start drawing over that area there again. When using a layer
mask, black will erase. If you were to switch to white, it would bring that area back. In this case we
do want to erase, it will switch back to black, and then we will erase that extra area here
from the bottom. One more step that we
need to do to be able to get our mermaid scale pattern is you'll notice here
at the top is that our circle goes to the edge. So we have to repeat it and
bring it to the bottom here, we'll have a seamless pattern. I'm just going to click
on this layer and we'll duplicate it again. You can write click
Duplicate Layer. Then I'm going to access
the move tool here. I'm going to go ahead and
just start dragging it down here until you see the
grid lines appear. If you do not see the
grid lines there, you want to go to few and you want to make sure
snap is selected. And then under snap two, you want to make sure
guides is checked here. Now we have the bottom
part of our pattern here. Now we can save this as
a pattern in Photoshop. To save a pattern, you're
going to go to Edit, Define Pattern here.
You can give it a name. Let's go ahead and
call it Mermaid scales one and clicking on. Okay. What you'll notice here in my patterns panel is that you see the newly created pattern. If you do not see your
patterns panel open, you can go to window and
select patterns here. Let's go ahead and test this
pattern in a new document. I'm going to go file new. This time I'm going
to use the dimensions of digital scrapbook paper, which is 3,600 pixels
by 3,600 pixels. I'm going to set resolution
to 300 pixels per inch, which is industry standard
for digital scrapbook paper. Color mode is RGB color. And then background content
set to transparent. And click on Create from
the Patterns panel. You can just drag it into
the layers panel here, and you can see our newly
created mermaid scale pattern. I'm going to go ahead and double click on the thumbnail there. And here you can change
the scale of your pattern. So let's try 50% here. When this dialog box is open, you always have the option
to reposition your pattern. If you want to get
back to the original, just click on Snap to Origin. Let's go ahead and
click on Okay there. And then let's go ahead
and recolor our pattern. To do that, we're going to use a solid color adjustment layer. From the slider here, you can change the color. Let's go ahead and pick a
turquoise looking color here. And we'll click on Okay. Then let's create
a clipping mask. Right click, Create
Clipping Mask. And that will cause
your pattern layer to take on that color. Let's go ahead and create
another color fill layer here. This time let's just make
it white. Clicking on Okay. And then we'll drag that to
our background layer here. We have our fun mermaid
scale pattern here. In the next video,
we'll look at creating another variation of
our mermaid scales.
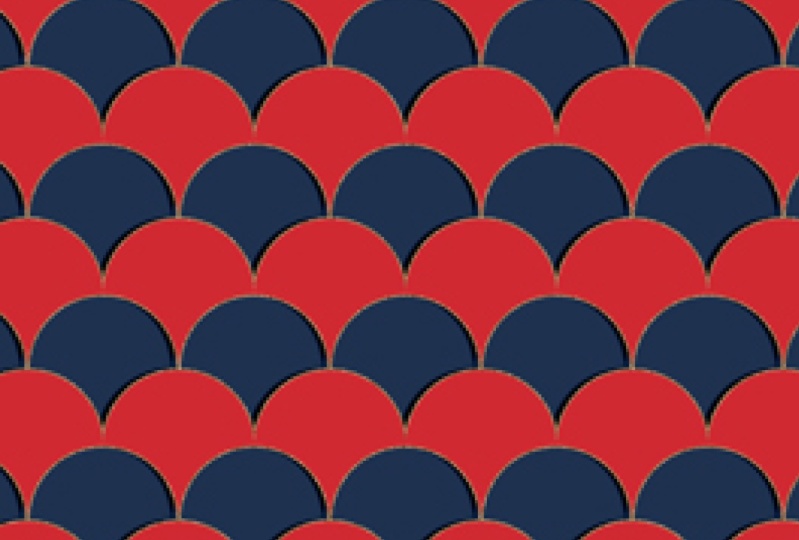
3. Mermaid Scale Pattern Variation 2: In this lesson, we are going to create another variation
of our Mermaid skill. To start off with,
let's go ahead and create a new document. We'll create this
one in our 1,200 pixels by 1,200 pixels. Again, click Create. Zooming Out Commander Control
with the minus key here. We're going to go ahead and use the ellipse shape tool
again in the top here, make sure shape is selected. And we'll just click
on our canvas. We'll use the
dimensions of 1,200 by 1,200 to match the canvas. And then we'll go
ahead and align that to our canvas here. Again, I'm going to go ahead
and duplicate this layer. Let's go right click Duplicate
Layer. Clicking on Okay. Then I'm just going
to change the color. We'll just select this
white color here, just so we can see it. I'm going to move it to
this bottom corner again. I'm going to go command or control to access that
free transform tool. Again, we're going to go O
for x and 1,200 pixels for y. Then I'm going to go ahead and duplicate that one more time. To get to our bottom
right corner, we'll go right click
Duplicate Layer using that free transform
tool command or control. Then we'll move that
x value to 1,200 pixels here with
these two layers. I'm just going to shift click then I'm just going
to write, click here. Then I'm just going to go ahead and rasterize layers together. Then we'll go ahead and just
merge those layers there. It's just one layer here. Clicking on the thumbnail here, I'm going to go Command
or Control Click. What you'll notice is it will show that that area is selected. We actually want the
inverse of that selection. We're going to go
to select inverse. Then we are going to
create another layer mask. Clicking back on that
original ellipse layer, we'll select that layer mask. Then it will automatically, using that selection,
create a mask. If we turn off the visibility
of this top layer, we can now see our pixel
layers underneath. Next, let's go ahead
and save this pattern. Another way to save a pattern
is in the patterns panel. You'll see this icon. But currently it is not enabled. That's just because we have
our shape tool selected. If we go to our move
tool and select off, we can see that plus icon. I'm going to hit that plus icon. Let's name it Mermaid Scale Two. We'll click on Okay. And then we can see our
newly created pattern here. I'm going to jump back in to
our digital paper file here. We'll click on that
pattern fill layer, select our new pattern, and we can see our fun
scale pattern here. This is a fun variation
of the Mermaid scales. Let's go ahead and
play with our color. I'm going to click on this
color fill layer here, and I'm going to go
ahead and duplicate it. I'm going to use the
keyboard shortcuts for that. That's going to be
command or control J. I'm just going to drag
it to the bottom here. Then I'm going to bring
this white layer up here. Currently it is set
as a clipping mask. For this to color fill layer, let's go ahead and change
the opacity to 50% And what you'll notice is we
have this fun to tone color. If you want to play
with a different color, you could always just
double click here, move your slider around, and select a new color. In the swatches panel here, we see our new color. So we can select it here
as well. Here at the top. And we have a new
color variation here. In the next lesson, we
are going to create another variation of the
Mermaid scale pattern.
4. Create Your Own Pattern Template: In this video, we
are going to look at creating a template document. A template document
is something that you can set up the framework of the pattern and then
just use it over and over again to create
new patterns. Let's go ahead and
create this document. I'm going to go file, new file. In this case, we are going to work with our same dimensions that we've been working with. 1,200 pixels by 1,200
pixels resolution, 300 pixels per inch. Color mode is RGB color
background content set to transparent. Clicking on Create. First off, we are
going to create a rectangle the
size of our canvas. I'm going to access that
rectangular shape tool here. Again, if you right click, you can see shape
tool you're using. We're going to use the rectangle just clicking on
the canvas here. I'm going to enter the
dimensions of 1,200 pixels by 1,200 pixels. Clicking on okay, then we'll just align it to
our canvas here. Then here in the layers panel,
I'm going to write Click. Then I'm going to convert
this to a smart object. Double clicking into
our smart object here. I'll just turn off the
visibility of that layer. Let's create a new layer. Then I'm going to select our
mermaid scale pattern here. Let's go ahead and save
this command or control. We'll jump back into
our document here. And then I'm going
to duplicate this. And I want it to be
in the four corners. Again, to duplicate,
you can right click and select Duplicate
Layer or use the keyboard Shortcut command or control J. I'm going to do this four times command or
control J to duplicate it, we have five total copies here. Then I'm going to use that free transform tool,
command or control. Then we are going to bring it
to the bottom right corner. So I'm going to go our x value to 1,200 pixels to
match our canvas. The same thing with our y value. Clicking on okay here. Then we'll do it with this
next layer command or control. We're going to bring it to
the bottom left corner. In this case, x will be zero
and Y will be 1,200 pixels. Then this one, I'm just going to leave
in the middle here. We'll jump to this layer here. Command or control. We're going to bring it to the
top right corner. We're going to go
x at 1,200 pixels, y set to zero. Then one more layer here, we'll go Command or Control. We'll bring x0y to zero and we have it in
that top left corner. We'll click on Okay there. Let's go back into our
smart object layer. This layer I'm going to just
change the opacity down to 50% And you can use this as what I call
a reference layer. I'm going to actually turn
off the visibility there. We'll click on this icon. We'll bring in our other
mermaid scale pattern. We'll do the same thing,
bring it down to 50% and you can use either one of these
layers as a reference point. I'm going to keep this one on, we'll create a new layer here. Then I'm going to
use the brush tool. Here in my tools panel,
we have our brush tool. If I right click, I
see my brush tool, The keyboard shortcut
for it is B. Then here under settings,
I want to make sure, in this case I'm going to
use a hard round brush, making sure my hardness is
sent to 100% Then here you can play around with the
size of your brush. You can also change the size using the left or
right brackets. Left makes it smaller, right makes it bigger. Then another feature I
want you to pay attention to here is this
smoothing feature. If we bump smoothing
down to 0% and I draw, it's very free, you can
get wiggly lines with it. But if you bump up the
smoothing here to 100% and you go to draw, it's very slower. And it allows you to create
more smoother lines. Smoother transitions here, you can play around
with the setting depending on how smooth you
want your brush stroke to be. We'll go ahead and undo that. Commander Control, get back
to our clean layer here. Then one more
feature I'm going to use here is the symmetry tool. We can see this, this
butterfly here. Click on it. There are different
options of symmetry. I'm going to use this
vertical symmetry. Then I'm going to just adjust
it here to meet the area in which we want to use clicking
on the arrow to accept it. Then we can start drawing. I'm going to use this area as the guide in which I want
to stay within this area. I'm just going to start drawing here, following that path. Then we'll create
another line here. We'll go one more here
we have our shape, and then I'm going to turn off the visibility of
this layer here. I'm going to save this
smart object command or control S. To save it, we'll jump back over
into our document and we can see that it
has been updated. I'm going to go ahead
and o out at this point. Command or control
with the minus key. Then let's go ahead and turn
on our pattern preview to, we'll go to pattern preview and we can see how
our pattern is repeating. Then let's go ahead and
save this pattern here. We'll hit that plus icon. We'll go ahead and just
name it Mermaid Scale. The clicking on, okay, we can see it in our
patterns panel there. This template is fun
because it offers that general repeat
of the mermaid scale. But you can create fun, more organic patterns here
using the brush tool. Using the same repeat. Let's jump back into
our smart object and go ahead and try another. I'm going to turn of
the visibility there. We'll hit our icon
and then we'll turn back on the
visibility of that guide. This time I'm just going to
create a series of dots here. Then just working
along this path here, we'll do the same here. Just working with that guide. Okay, and then we've
got that mermaid shape. We'll turn off the
visibility here. I'm going to go
ahead and save it. Commander control, jumping
back over and then we can see our fun mermaid
shape scale using the dots. We'll go ahead and
save this one as well. We'll go mermaid
scale, clicking on. Okay. I hope you enjoy using this pattern template
based off of our mermaid scale pattern to create your own fun patterns.
5. BONUS: Pattern Template 2: In this video, we
are going to look at another template document that I have created for you to use. It will be available in the resources section
for you to download, so definitely check out the resources section
to get this template. The template will be called
Mermaid Scale template Two. When you open it in Photoshop, this is what you will see
looking at the layers panel. This first layer, we have a smart object and we have
a group name template, and this just has the
different repeats related to this template. To use it, we'll go ahead and double click on
that smart object. This bottom layer is
just a placeholder, and you can just
minimize it here. Then I also have our
mermaid skill outline here, like we used in the
template that we created. Let's go ahead and
create a new layer. And we'll access
that brush tool. Then let's go ahead and use
that symmetry tool again. I'm going to create that
vertical line here. We'll just adjust it to our
area here. Clicking on Okay. And I'm going to
zoom in command with a plus key just so we
can see it better here. We have our brush tool here. And then I'm just going
to start following that guided area here
to create our shape. Then going along the top here to draw our
basic shape here, connecting our two points. Then I'm just going to create
a shape here in the middle. Maybe we'll do another one here. Then just filling
in this area here, we'll turn off our smoothing
to make it easier. And then I'm just going to
fill in the area here as well. Okay, I've got my shape here. I'm going to go
ahead and turn off those guidelines. I'm
going to save it here. Command or control, We'll check it in our
template document here. Then I'm going to command
or control the minus key. And then let's go
ahead and turn it on. Our Pattern Preview mode. We'll go view Pattern Preview. And then we can see
our repeating pattern. This is a fine repeat type, that is that mermaid
scale shape, and it creates this fine repeat. I wanted to include
this in the course. This template that you
can also use to create a fine pattern in based off of that mermaid
scale shape Here, go ahead and click that plus
icon to save my pattern. Then again, the benefit of using a template is that you can use it over and over again to
create fine new patterns. So I hope you enjoy
using this template. In the next video, we'll go over the class project
for this court.
6. Class Project: Thank you so much for
joining me in this course. Now it is your turn to create your own fun mermaid
skill pattern variation, using the techniques that you have learned in this course. To upload your class project, just go ahead and
scroll down within the course and click on the Projects and
Resource section. Here you can click the button
here to submit a project. Thanks again for joining
me in this class. This is Trisha and I look forward to seeing your projects.
 Tricia Lish, Graphic Designer