Transcripts
1. Introduction: Welcome to this class where
you will learn how to create your own checkered pattern
with Adobe Photoshop. Hello. My name is Trisha Lisch, and I am a surface
pattern designer, and I love using photoshop
to create patterns. In this course, I'm going to take you through the basics of how to create a checker pattern. We will also explore different variations of this pattern, including how to create an
inverse checker pattern, how to create a warped
effect to your pattern. I will also show you how
to take your pattern and create a
multicolor variation. Throughout this course,
we will explore various photoshop features,
including smart objects, the patterns panel,
the paint packet tool, and how to use the liquefy
filter in Adobe Photoshop. By the end of this course, you will be able to use
the knowledge gained in this class to create your
own fun checker patterns. Thanks for joining
me in this class. Let's go ahead and
get started creating your own fun checker
patterns in Adobe Photoshop.
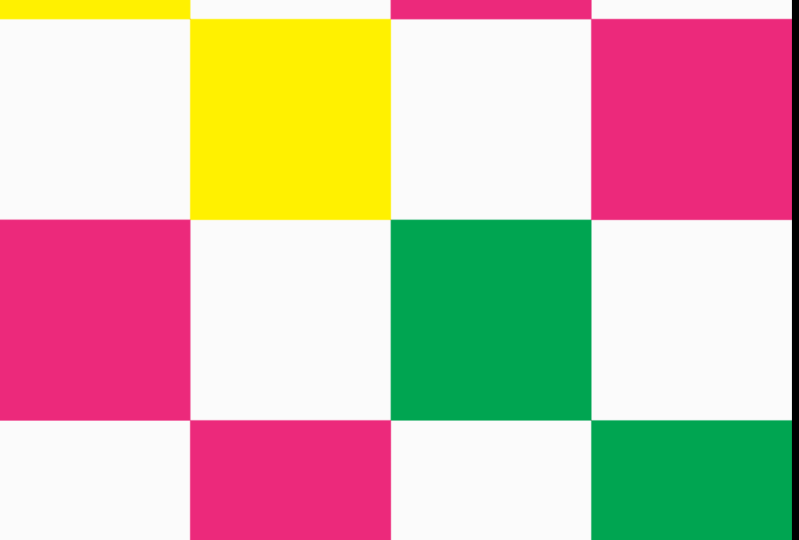
2. Create a Checker Pattern: In this lesson, we
are going to look at creating the basic
checker pattern. We are going to explore
some of the pattern features inside of
Adobe Photoshop. To start off with,
I'm going to go ahead and create a document. I'm going to go new file here. I'm going to use
the dimensions of 7,200 pixels by 7,200 pixels, setting my resolution
to 300 pixels per inch. In this case, I'm going to make sure artboards is not selected. Color modes RGB color background
contents is transparent. Then I'm going to go ahead
and click on Create. First off, when
creating patterns, it is helpful to have
your patterns panel open. Currently, I have my
patterns panel open here. In order to open it, you can go to windows and
just select patterns here. To create our basic
checkered pattern, I'm going to start
with some gridlines. I'm going to go to
Guides new guide layout. Here under columns,
I'm going to go with two columns and two rows, and then I'm going to click on. Then we see that
our Canvas has been divided into four parts. Using the Marquee tool
here, right click. I can see my rectangular
Marquee tool. The keyboard
shortcut for that is M. And then I'm just going to draw out a square in
this top left corner. To fill this area with color, you can go to edit fill. Under contents, you'll want
to select foreground color. In this case, I have black set as my
foreground color here. Then we get just click on, and
it will fill in that area. Go ahead and D
select these pixels, command or Control
D to D select. Then we'll want to
duplicate this layer and move it to the
bottom right corner. I'm going to right click
Duplicate layer. Clicking on. Then accessing the
move tool here, we can use ourlign options here. I'm going to align
it to the right and align it to the bottom. If you do not see these, you'll just want to click
on this three d icon and make sure you have a
line to Canvas here. Now we have the basics
of our checker pattern. I'm going to go
ahead and zoom out, command or control
with the minus key. If you want to see your
pattern repeating, Photoshop has this cool feature called the Pattern Preview tool. You can go to view
pattern preview, and we'll show you how
your pattern repeats here. If we were to move this, it will give you this live
preview of your pattern. So it's a cool
feature where you can see how your pattern
repeats in real time. We'll go ahead and align
it back to that corner. Now let's go ahead
and save our pattern. There are a couple of different
ways you can do this. One way is by going to
edit to find pattern. Here you can give your
pattern and name. We can call it Checker, One, clicking on k. Then here
in the patterns panel, we can see minewly
created pattern here. Another way that you can save
a pattern is by clicking on this plus icon in
the patterns panel. It will bring up
the same dialog box here where you can save it. If we go Checker two, clicking on k, it will show up in our patterns panel here. Let's go ahead and turn off
that pattern preview mode. We'll go view pattern preview, and then we're just back
to our normal Canvas here. So with these two layers, I'm just going to Command or Control click and then I'm
going to group them together. The keyboard
shortcut for that is Command or Control
G to group it. And then let's go ahead and just turn off the visibility there. And let's create a new layer. And then I'm also
going to go ahead and get rid of my
guidelines here. Let's go view guides
clear guides here, so we have our empty Canvas. And then if you have your
patterns panel open, you can always click
on your pattern, and it will bring up this
pattern fill adjustment layer. Another way to create a pattern fill adjustment
layer is to come to the bottom of your
layers panel to this circle half filled circle. Then you can select
pattern here, and then it will also bring
up the pattern fill box here. From here, you can
select your pattern. You also have the
option to scale it. Let's go ahead and
try a 50% scale here. In this case, we have
two layers visible, so we can turn off the
visibility of that one. We can double click back in to bring up that pattern
field dialogue box. Then when this is open, you have the option that you can also move around your pattern. If you ever want to get
back to the original, just click on Snap to
origin and it will reorient itself to the original
position there. You do also have the option
to change the angle. But what I have found
that it takes a lot of processing power to
change the angle here, and so it just kind of slows
down photoshop for me. I generally don't mess with
this angle feature here. I will just kind of create a different angle within the canvas versus using
this feature here, but it is an option as well. So let's go ahead
and scale it to 25% here. We'll click on. Then we can zoom in here, command or control the plus key. Then let's go ahead and
recolor this pattern. I like to use a solid
color adjustment layer. Let's go ahead and pick a color. Maybe try a purple. Clicking on here. Then with this color fill layer, you'll want to right click, and then you will
create a clipping mask. Then this color will clip
to our pattern layer, and then our pattern
will take on that color. We'll go ahead and
create another solid color adjustment layer. In this case, let's use white F F to get our white
color clicking on okay. And then I'm just going
to drag it below. And so now we have the option
to change up our colors. So if I just choose from colors that I have here
in my swatch panel, you can just easily change out
the color of your pattern, and you can do that
with your background layer here as well. Trying different colors, to find different
combinations that you like. We'll click back into
our pattern layer here. I'm going to bring
it back up to 100%. And so this is our basic
swatch of pattern. This is the file
that you'd want to save out if you wanted to upload it to a
company like Spooer, if you wanted to sell it
as fabric or wallpaper. To save the swatch here, we are going to go
to file save a copy. Here you would give it a name. Then in this case, I'm going
to save it on my computer. Navigate to the folder that
you want to save it to, and then under file format, I would save it as a JPEg
or you could save it as a P and G. Those are the
most common file formats. Usually I save it as a JPEg. Then we'll go ahead and
click on Save here. Under the JPEG options here, you can play with image quality. I usually just leave it at
the default for maximum, and then just click
on K to save it. In the next lesson, we
are going to look at creating what I call an in
verse checkered pattern. So go ahead and join
me in the next lesson.
3. Inverse Checker Pattern (Plus Bonus Action): In this lesson, we are going
to look at creating what I call an in verse
checkered pattern. For this, we are going to
set up a template document. That way you can use
it over and over again to create new fun patterns. Let's go ahead and start
with a new document. We'll click on that new file. I'm going to use
the same dimension 7,200 pixels by 7,200 pixels. We'll go ahead and
click on Create. Let's go ahead and turn
on those guides again. We'll go to view guide
new guide layout. I'm going to use the same
two columns two rows. We'll click on. For this
inverse checkered pattern, we are going to be
working with two colors. To set up these colored layers, I am going to use
the rectangle tool. If you right click here
under the shapes tool, we can access our
rectangle tool. Then I'm just going to
click on the Canvas and I'm going to create a
rectangle the size of our boards of 7,200
pixels by 7,200 pixels. Then just clicking on k, and then I'm just going
to make sure it is aligned to the Canvas. Just clicking on this
align icon here. We'll just make sure it is both centered vertically and
horizontally to our canvas. Then on this layer,
I am going to give it a name, Color one. Then let's go ahead
and duplicate this layer, commander Control J. We'll call this layer Color two. Then let's just
go ahead and pick white as our color here. Then for each of these layers, I am going to convert each one of
these to a smart object. We will right click,
convert to Smart object. Again, you'll see this icon here indicating that
it is a smart object. We'll click on Color
one, right click, convert to Smart object, and we have two colored
smart objects here. Let's go ahead and turn
both of those layers off. We'll create a new layer here. Then we are going to set
up our inverse pattern. I'm going to access
that Marquee tool here. Similar to before, we are going to draw out our
little square here. Let's fill that with
our foreground color. This case, it's changed, so I'm going to hit D to
get my default of black. Then I'm going to fill that
with my foreground color, option delete for Mac users, Alt backspace four PC. Then we will select
those pixels, Command or Control
D to D select it. I'm going to go
ahead and duplicate this layer, command
or Control J. With this layer, I'm going
to just name it object one, and then we are going to
go ahead and right click. To convert it to a smart object. Let's go ahead and click
into this object one, and we will create a shape here. So I'm going to go
ahead and Zoom out. I'm going to use the
keyboard shortcuts for that would be command or Control with the minus key just so we can see
more of our document. And then for this one, we can actually get rid
of our guidelines, view guide clear guides. Then I just like to turn
off the visibility of this layer and then just
create a new layer here, let's go ahead and add a object. Let's play with some of
Photoshops custom shapes here. If we go to our shape
and select custom shape. I'm going to hit
the drop down here and select the legacy
shapes in More, which are the default shapes
that come with Photoshop. If you do not see this folder, for some reason, click
on this gear icon, and then you'll just want to
click a Pen default Shapes, and they will be loaded
into your photoshop. We'll click on this folder here. May go to the all legacy
default shapes folder, and then scroll down
until I hit the shapes. And then I'm just going to
use this heart shape here. Clicking, dragging on my canvas. And then I can just
use a space bar just to kind of position it to see what size I want and then just
selecting that there. And then just to center
it on our cavas. Let's hit those line both vertically and
horizontally here. We have our shape. Let's go ahead and save
this smart object command or control S to save it. Then I'm going to
leave it open and just jumping back into
our document here. Currently, we can't see it
because they're both black. So let's go ahead and
take our color layers. Let's position them
here at the top. I'm going to take color
one above Color two. Then I'm going to
select both layers, Command or Control and click. And let's go ahead and duplicate them Commander Control J. With these ones here on top, I'm going to indicate
that they are special for us by giving them a color. I'll select green. If I ever work with
smart objects, I'd like to put them at the top and indicate them this way, that way, they are easy
to edit if I need to. I'm going to take this
white colored layer. Let's bring the
visibility back on. Then I'm going to
create a clipping mask, so we'll go right click. Create Clipping mask. Then our heart has
taken on the color. Now we have a white heart And to create our
checkered pattern, we need to add it to this
bottom corner as well. So let's go ahead and shift
click on all of those layers. Let's duplicate it
Commander Control J. Coming to my layers panel. I'm going to clean
this up a little bit. I'm going to drag
these layers beneath. Then if I click on the
move tool here and try to align it to the Canvas. We run into a little
bit of an issue there. I'm going to do that
commander Control Z. I'm going to click back
into my smart object, and then we are going
to just turn back on our full square here. I'm going to save it
Commander Control S. We'll jump into our template. We'll make sure those
layers are still selected, and then we'll hit the align to the right and
align to the bottom. Then we can jump back in here. Turn on our heart commander
Control to save it. Then we can see that we
have our pattern here. Currently, we just have
our checkered pattern, but to make it our
inverse pattern, we're going to add our shape to these corners here as well. I'm just going to bring
back up that rectangle, we'll save it, Commander
Control S to save it. Then I'm going to duplicate
this object layer, Commander Control J. I'm
actually going to move this object layer up here
next to our color layers. We'll create another copy Commander Control J that
we're actually going to use. But like before,
I'm going to turn this into that special layer where I give it a color of green and we can just
turn off our color. That way, it's up
here at the top if we ever need to make
a quick change. So we have our object here. We are going to move it
to the right corner. I have my move tool
still selected, so I'm going to use
those align tools. Then I'm going to
also duplicate this, commando Control J because we
want to move it down here. So we will align it to the
left side and the bottom. To see what we're doing,
we can jump back in here. Turn off our object layer,
Commando Control save. And we have our hearts. Let's look at this layer panel and do a little organization. We have our top right one. I'm going to move it down here. With this one, we want white
to be on the background. We need to duplicate this colored layer here
at commander Catrol J. We'll bring it below
our heart here. Then we also need another one of these
commander Catrol J. We're going to move
it to the right side. Put it underneath our heart
and our white color layer. Then this white color layer, we are going to create a
clipping mask, right click, create clipping
mask, and that is going to color that square. These two layers,
we can duplicate again, commando Control J. I'm going to take this square here and we're going to
bring it to the bottom. Aligning it down
into the left side, and then we want to position it. We want to find our heart here. Here at the top and then
we will drag it down. Then just one more step
is we are going to add our color layer
to our heart. In this case, it's black
because our heart is black, but we are going to
we're going to take this black color layer and add it to the appropriate places. I'm going to go ahead and
turn on this color layer. We want to add it here. Another way to create
a clipping mask is to cover between the two
layers and then just go Option click or Alt click for PC, and that
we'll take on it. We'll need to
duplicate this color. We need to color this heart. Let's do that same
thing. Option click. We'll duplicate this layer. We need to color this heart option click
for that clipping mask. And then we have
one more commander Control J to duplicate it, and we are going to color
this bottom square. So every object here
now has a color. Hopefully, you've been
able to follow along. It gets a little bit confusing
in the layers panel. But The beauty of what we can do now is we can click on these colors. I can select a new color. So if I try maybe a purple
color here, I can save it. Jumping into our document, and it will be updated, and I can do that same
thing with our color two. Maybe we pick a lighter
purple color here. We'll save it Command
S to save it. And then we'll jump
back into our document. And now we have the
power of changing out the colors of this pattern. And we also have the power
of changing out our object. If we jump back into
our Smart object here, we'll just turn off the
visibility of this heart. Let's select a new
custom shape here. Maybe we use this fun
star. We'll drag it out. Let's go ahead and
align it to the center. We'll save this, M object command and control
S to save it. Jumping into our template, and now we have a new
pattern that we can use. Let's go ahead and turn on
that pattern preview mode again, view pattern preview. We'll zoom out command
with the minus key, and we can see our pattern. Then let's go ahead
and save that here to our patterns panel, and we can see our
fun pattern here. So with this template, you
can change out your shape, and you can change
out your colors, and you can save it here. One thing that I like
to do is I like to work with black and white
with my patterns. And so I'm just going to adjust our colors here back to black. We'll save that Coman
Catal esta save it. And then we will
go for this color. We'll go ahead and save
it Comantl esta save it. Jumping back to our template, we can see our black
and white pattern. So we'll go ahead and
save that pattern here. For this next part, I'm going to go ahead and create
a new document, so we'll go file new. We'll use our same
dimension 7,200 pixels by 7,200 pixels,
clicking on Create. Then we'll click on
this pattern layer. Typically, when I work
with our patterns here, I like to work with
patterns that are black with a
transparent pattern. The issue that we run into with this inverse pattern is in order to create it with our
template is we have to give each section a color. And so we don't have
that transparent pixels. And so what I've done is I have created a action
that will help you convert this pattern swatch into a pattern that has black
with transparent pixels. Within the course
resource section, you'll be able to
download a action. So within the course resources, you'll find a file called
checker pattern en. ATN is the file extension
for actions for Photoshop. So in order to load these
actions into Photoshop, you want to make sure your
actions panel is open. To open the actions panel, go to Window selecting
actions here. And then clicking on
this three line icon, you are going to click
to load actions. Navigate to this file
and click on pen. Then here we can see
that it has been loaded into our document. So we have our pattern here, we have our pattern for layer. And then to run this action, you are just going to
hit this plus icon, and it will play our action. And then what you'll
notice here is it has gotten rid of the white pixels. When using this action, you might notice that it flips the color the black
or the white flips. Based on the way that
this action works is it may or may not
keep it consistent. Before we had this
part was black, but in this case, it changed it. For this pattern, we don't really care which part is black, which part is white because it is just an inverse pattern. But I just want you to be
aware of when working with this action that you might
notice that happening. So we can turn off this layer. We can select our
inverse pattern here. And then, like before, we can use our color
adjustment layers. We'll put this one
in the back here. Let's create another
color adjustment layer. Let's use white for this FFF. And then we will create that
clipping mass right click. And we have our inverse colors. One thing that's funded do is using a white colored
fill layer on top. Then for our pattern layer, if we just bring
this down to 50%, we can create a two tone effect. If I choose to change
out the color here, it will automatically adjust that second color because we are using that two tone effect. If we Zoom command
with the control with the minus key and turn on
our pattern preview mode, We can see the different
fun color options that you can use
with the pattern. So we have our star.
We can jump back in. We didn't save our
heart patterns. We can go ahead and do that now. Commander Patrol S to save it. We jump back into
our document here. We can save our heart pattern. We give it a name. Clicking on k. We can see
in our patterns panel. We'll jump back into
this document here. Go ahead and turn
up that pattern preview view pattern preview. And then with these layers,
let's just shift click. We'll group in commander Control G. I turn out the
visibility there. We'll go ahead and
delete this layer. We'll add a new layer, and then just use our
pattern fill layer. Again, this action starts
from a pattern fill layer. If we put play, it will create our inverse, so we can get rid of that layer, bring back our group, and then we can select
our heart pattern, give it a more a
different color, and we have our heart
pattern here as well that we can easily change
out the colors for. I hope you have fun creating some fun inverse
checkered patterns. You have this fun
template document that you can change the colors, change the shape, to create your own fun inverse
checkered patterns. In the next video,
we are going to look at creating a warped
checkered pattern. Be sure to join me
in the next video.
4. Warped Checker Pattern: In this lesson, we are
going to look at creating a warped effect for
our checkered pattern. In this video, we will look at the liquefied feature of Photoshop to help
create this effect. Let's go ahead and
create a new file. I'm going to use
the same dimension, 7,200 pixels by 7,200
pixels clicking on Create. From our patterns panel, let's go ahead and click
on our checkered pattern. I'm going to double click in, and then I'm going
to scale this down. Let's try 25% here. Clicking on. And then clicking on this layer. I'm
just going to right click. And then let's just go
ahead and convert this to a smart object. And then we are going to use the liquefy feature
in Photoshop. I'm going to click
on Filter Liquefy. And then it will bring up
this liquefy panel here, we have some various
option tire on the left along with some properties that
you can play with here. As I scroll over my canvas, we can see our brush size. You can always adjust the brush size tier if you
want it bigger or smaller. Or you can use the
keyboard shortcuts command or control with the
left or right brackets. You can't see it getting
larger on Canvas, but if you look at the numbers, they are getting
larger and we can see that our brush is
getting larger here. Here on the left side, we have various tools that
you can play with. We have a Forward Warp tool, Twirl clockwise, Pucker tool, plot Tol, push ft tool. You can definitely play with
any one of these ones here. Looking at the Twirl
clockwise tool, you can see that it makes
changes to that area. You can do it throughout
your Canvas to create various changes here. If we can do that,
Citic Control Z, get it back to our original. We can try with
another one here. We have our pucker tool. You can move it to this one's
a little bit more subtle. Maybe if we make
our brush bigger, we can create an effect there. You can just play with
the various features. Now we are on the below tool. Make it bigger. When
playing with this, what I recommend is a void making changes
to the edge pixels, because that's what makes our pattern seamless
is our edges. When you play with
this, I would just recommend playing
within the tools within this center area and not really affecting
the outside pixels. We've made a little
bit of changes here. Let's go ahead and just
save this clicking on k. We can see our
various changes here. I'm going to go ahead and
duplicate this layer. Commander Control J.
We're just going to call this one our original one here. I'm going to
rasterize this layer, and then we are going
to go to filter. Other offset. In this case, we're working with a 7,200
pixels by 7,200 pixels, so you want to go
half of that value. In this case, it would be
3,600 pixels by 3,600 pixels, and you want to make
sure reparand selected. What that basically
does is the pixels that were on the edge are
now in the center and the ones that
we adjusted and distorted are now along
the outside edge. Let's go ahead and liquefy this. I'm going to go to
filter, liquefy. Then we're going to
do the same thing just with these center pixels. We'll go ahead and just
alter this area here, avoiding those edge pixels because we want them
to be seamless. You can just get that
little bit of distortion. There's always more properties that you can play
with over here. But this is just a very
superficial overview. This liquefy tool, you could definitely get more
in depth into it. So I'm just going to go
ahead and click on OK just to make those
subtle adjustments. And let's go ahead and
save this as a pattern. We'll go ahead and
click on to save it, clicking on k here. We can see our pattern here. We'll jump back into our
testing document where we have our colorful layers in
our pattern fill layer here, and then we can select that. And then we'll see how it
looks if we scale it down. We can see that it is our seamless pattern because
we preserved those edges, and you can get
this warped look. If we select our black color, maybe we turn off our
opacity here back to 100. We have typical checkered
colored pattern, but we see that we've
got some warp to it, and you can certainly play with the degree of warp that you want using that liquefied
feature of photoshop. I hope you have fun playing
with the liquefied feature in creating your own warp
distorted checkered pattern. In the next video, we
are going to explore the paint Backet tool as we create multicolor
checkered patterns.
5. Multicolor Patterns: In this lesson, we
are going to look at creating multicolor
checkered patterns. We're going to explore the Pape bucket tool to recolor our patterns
using multiple colors. Currently, I have
a document open, 7,200 pixels by 7,200 pixels. Taking our pattern here. Let's go ahead and double
click on our pattern. Let's scale it down to 25%. Then I am going to give
us a background color. Let's just make it white F. Selecting both of these
layers, let's right click. I'm just going to
merge layers and we have our pattern that
we can play with. Here we have the
paint bucket tool. If we right click, we see that it is nested under
the gradient tool here. The keyboard
shortcut for that is G. We have it selected here. So I have a color
palette that I have previous selected
here that I'm going to use for this pattern. I'm just going to
select a color. Then with the paint bucket tool, I can just click to
fill in that color. Maybe we select two
of those squares. Then you can just easily
change your pattern here. And then you can just fill out your colors
however you want. In this case, I like
that color combination. I'm actually going to
define this pattern here. Instead of filling
out this whole area, I think I actually just like
this little section here. I'm going to pull
up some guides. I'm going to go view guide New guide layout just to give me those
automatic grids there. Then I'm going to grab
that Marquee tool and then I'm just going to
select this area here. When you have a selection made, you can define your
pattern of that selection. I've got my selection made. I'm going to click to
save it and it will just save that
defined area there. Then let's jump back into
our testing document that we've been working with
selecting this pattern. In this case, we will get
rid of that top color, and we can see our
repeating pattern here. That's a fun way to create
just a multicolor pattern. Let's go ahead and deselect those pixels commander Control D. When you create a pattern, you can hover over it and it
will give you the dimension. That one is 7,200
pixels by 3,600 pixels. I could create a new
document for that. I think I'm just going to work in the document
that we are. I'm just going to again
select that area. In this case, I'm going to go to image crop and it will
crop it to that area. Let's go ahead and de select
that commander Control T. So when working with patterns, I like to save each color
as its own pattern. That way, I can work
with the patterns from the patterns panel and change
up the colors that way. So to do this, we need
to get each color on its own layer and save
that as its own pattern. So we want to use the
Magic one tool here. And Let's start by
selecting our purple color. What we'll notice
here is that it actually selected the
blue color as well. So we do need to change up our settings a
little bit here. Here at the top, I have
tolerance set to 99. I'm actually going to
bring that down to 50. Let's select those pixels, commander Control D,
and let's try it again. If I select the purple, we can see it no longer
selects that blue, so I can get it
isolated on its own. What that selection made, you can right click
and go layer by cut. What we can see is
that we now have the purple layer on its own. When I save my patterns, I actually prefer
to save them Black. Let's go ahead and undo
that. Commander Control Z. We've got our
selection made here, and I have aother action for you that can help
with this process. Here in our action folder that you have already
loaded into Photoshop, you'll see an action called
separate layer to Black. This is when you can use that action. We've
made a selection. You've got that action selected, you click on Play. It will automatically turn that color to black and
it is its own layer here. If we go back to
our original layer, we'll select our Blue. Play that action again. It's now saved to its own layer. We'll select our green. We'll select our pink, and we have each one as its own layer here
that we can save out. We can now get rid
of this white layer and we have our layers. But now we actually
have to save each of these layers as their
own pattern layer. I've got another
action for you here. We're in click on this
first layer here. Then we can see here
in our actions, we have save pattern
two variation, Save pattern three variations, say pattern four variation, all the way up to eight
variations of color. The one we want to use, we
have four different colors. We want to use this save
pattern for variation action. You'll want to select
the first layer, and then you'll just go
ahead and click on play. Then what we can see
here in our patterns pal is it has automatically
saved each of those layers. We can jump into our
testing document here. We have this one here, we'll just call this one color. Then I'm going to create
just a new layer here. And then I also have
this action for you. Pattern Test four. There's one set for each of the different numbers depending on how many colors you're using. We have pattern test four. We'll go ahead and
click on Play. In this case, you're going
to get this dialog box, and you'll just have
to click on each time. You can actually make the
selection of your pattern. I just like to get
it selected here and then go in and
select my pattern. Like this. Then you can see we have our pattern
displayed here. Then you can go in and
select your colors as well. We'll just pick a color here. We have our original colors, but I could also work with a different color palette and try different
colors here as well. Orange. Put a blue here, and you can easily change up the colors of your pattern with the help of these
different actions to help save your
patterns in this way. As a little bonus
for this course, I wanted to include
these actions that I created to help you with that process of
coloring your patterns. That we can come up with
some fun color variations for this checkered pattern. In the next video, we
are going to take a look at the class project
for this course.
6. Class Project: Thank you so much for
joining me in this course. Now it is your turn to create your own fun checkered
patterns using the techniques that you
have learned in this class. To upload your class project, scroll down within
the course and click on the Projects
and Resources section. Here you can click the
button to submit a project. Thanks again for joining
me in this class. I look forward to
seeing your projects.
 Tricia Lish, Graphic Designer