Transcripts
1. Introduction: Hair: This is the eighth and final
episode in this series, daily exercises to
improve your portraits. If you've been working your way through the complete series, I just want to give
you a huge pat on the back for
making it this far. This final episode will focus
on drawing realistic hair. There are several studies
within this episode which provide an opportunity
for you to render loose, wavy blonde and Brunette curls. We show you two different ways of building value and detail. Straight hair, incorporating hard and soft
elements, for example, areas that are both in
and out of focus and a procedural breakdown on how to approach building tight curl Hi, my name is Shane, a professional portrait
artist based in the UK. I run my own commission
based art business where I'll help
clients re create heartwarming moments by drawing photorealistic portraiture
of their loved ones. Whether you're interested in photorealism or hyperrealism, knowing how to utilize
a full range of values is foundational
to achieving both. It's impossible to achieve this by using graphite pencils alone, so we need to incorporate
different types of pencils to give us a
full spectrum of value. It can be quite a daunting
prospect when starting out, even if you have a
little more experience and just want to up your game, trying to figure out which
techniques to use or which materials to buy can
be a frustrating process. So I wanted to develop a class whereby at
completion of that class, students will have nurtured
the skills necessary to produce stunning
photorealistic portraiture. I'll guide you through 26 small, manageable fun drawing
studies that will take you from novice to
advanced in one class. You'll learn a specific
lambing process that uses graphite, carbon, and charcoal pencils together to showcase a full range
of beautifully rich, saturated tones with
exceptional results. Separated this class into a series of eight mini episodes, each focusing on different
elements within a portrait. Please feel free to visit my
homepage where you'll find all eight episodes within the series to be added
over the coming months. Students will learn how
to observe and recreate details that help achieve
realism and authenticity, a skill set that actually translates beyond
portraiture and pencil drawing as it's relevant practice for
lots of visual arts. Beginner to advanced
students, welcomed. I want to assure the
very best of luck, so grab those pencils
and let's get cracking. A
2. Class Orientation: Hair: So, welcome back for the eighth and final
installment of daily exercises to
improve your portraits. It's lovely to see you here. Our first two studies
within this episode provide an opportunity to work with both light and dark
tone arranges, where you all learn how to build value in two different ways. The first by adding
multiple louser hair strands until the
desired tones are met. And the second by creating base block tones and adding
finishing detail on top. The second is a great method
to use if you want to render hair that shows
delicate changes in focus. The third study incorporates
straight hair with dramatic contrast and shallow
depth of field effect, and the fourth provides a procedural breakdown on the best way to build
tight curly hair. This is the first installment
you've come across, I encourage you to
visit my homepage where you'll find
all class episodes. I intended for the
series to be worked through from the beginning
as each individual lesson builds on the last and has been organized in
such a way so as to further your skill set as you go either by introducing
new tools or techniques, increasing time and
improving patients, or honing newly learned skills. Completing small
studies will not only help keep your
attention focused, but will also help
prevent you from feeling overwhelmed,
tired, and frustrated. Using a full set of values is key to creating photorealism. But if you place a
deep black charcoal directly on top of graphite, the contrast will
look too stark. So I'll show you how to layer different pencil compositions to maintain a consistency in tone and keep all values in
harmony with one another. I've uploaded gridded
printable sheets in resources below this video, along with reference photos, materials list, and schedule. You can mark out the
border shapes and use a grid method for outlining
or free hand if you prefer get the most out of
this realism class, I recommend that you one, mentally prepare yourself
to slow down before each lesson and take your
time with every project. Two, take a photo of each
finished study as you progress, place it alongside the reference
photo using an app like layout or on your desktop and make any necessary
adjustments. This is such an
important part of the process when learning
and will give you a greater understanding of any difficulties you may
be facing. And three, try to increase the time
spent adjusting and perfecting your work at
the end of each study. The basic materials
you'll need to get started will be arches paper, Stedler graphite
only pencil set, StedlerGraphite carbon
mixed pencil set, one contipary charcoal pencil, a few cheap brushes,
and some erasers. You can find a whole lesson
on materials in Episode one. Before we move on
to the next lesson, I'd like to give you a
bit of encouragement. There are four years between
these two portraits. My journey was self taught, so it took me a very long time
to figure everything out. Completing all the
lessons within this class will speed up your learning
process immensely. And if you create a
daily drawing habit, you'll be killing it
in no time at all. So have fun, and I'll see
you in the upcoming lesson.
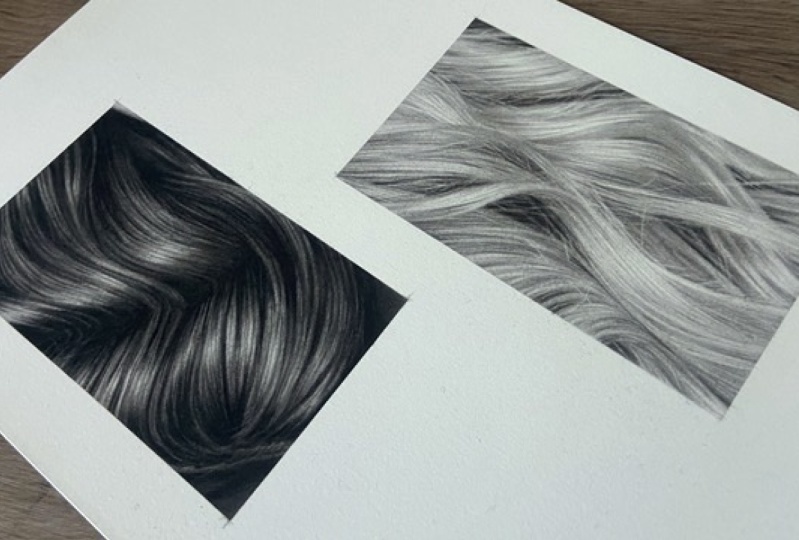
3. Hair Study 1.1: Wavy Brunette, Dark Tonal Range - Base Strands: Yes. Okay, so for our first study in this episode, we'll be rendering
dark, wavy hair, adding and deepening value by layering hair strands until the required tones are reached. The goal in this lesson is to maintain correct
hair flow throughout the whole piece and
to keep all ton of differences and
highlighted areas intact. We'll use brush
work to help create smooth transitions
with the charcoal pencil towards the end and then add the final strands of hair
on top of those transitions using a combination of
pencil and monozero eraser. This will help merge all
the different tonal changes together and make
them look natural. Don't forget to use a brush to soften every strand of hair you add and to soften the ends of every eraser
highlight you make, so they look like they're
naturally fading away. Enjoy. Okay, so
first things first, let's use the five B blue to add a base undercoat layer to all the dark areas
within the study. This will not only
create a smooth, blended surface to add the
darker tones on top of, but will also create a better visual guide
of the drawing as a whole and help you to keep track of what goes where
during the process. Also, the five B
blue is easier to erase than the black range of pencils in case of mistakes. I keep all my pencil
strokes going in the same direction as
the hair flow and use minimal changes in
pressure to create slight differences
in tone if needed. Pencil pressure is kept
very light throughout. I draw lines with both the forward and
backward motion of the pencil wherever
possible in kind of like a pendulum motion as
this saves a bit of time and pay close attention to all the different
changes in hair flow. It doesn't need to be
perfect at this stage, as this is just the base layer, and there'll be many
layers to go on top, which will provide an opportunity
to perfect all lines. You can correct any lines
that have gone astray using either a pencil
or Mono zero eraser. I use the Ig show
makeup brush to smooth out the fbb pencil
marks and blend together, ready to apply some
darker strokes. This brush is fantastic
to use for this, as all the bristles have
worn down to the nub, and so allow me to push
the graphite around more. If you have a brush
with longer bristles, you can trim them slightly with scissors to get
the same results. It's good to have both
long and short bristles to hand as they perform
slightly different. Using the six B blackmail to begin adding the dark
strands of hair, I'm paying really
close attention to which strands of hair are the darkest and trying to
replicate them as best I can. There are also
several dark patches of area within the
drawing as a whole, which I'll be adding as well. There are some very
subtle changes of tone in the two
bottom corners, which I also want to include. I use a small makeup brush to soften the tone of the
six be black pencil. You can use any
brush to do this, but this one is small,
so a bit more precise. Now that I have all the
darkest areas on the page, I can start to fill in
the areas around them. I use a combination of
several mid tone pencils alongside the mono zero eraser to pick out any lighter strands. I always use a brush to soften any pencil lines that I add. Also, to gently dab the ends of any monozero
lines I pick up. This will soften and
blend the ends of the highlights so they look like they fade
away naturally. I switch between the five
B and B blue pencils and the HB black to lay
down the lighter tones. The five B black is a similar
tone to the five B blue, but has a more stable lead which will give
you sharper lines. Try to focus your attention on each small segment of hair at a time until
nearly completed. We have the quanti three B
Charco pencil to add later on, which will give us
our darkest tone. You want to pay
close attention to how many small dark
strands there are and also small highlights
as adding too many will overload the
area and not look natural. I'm using the small makeup
brush here just to soften the ends of the
highlights so they look like they're
naturally fading away. There are several wispy flyaway strands of
hair in this area, so we want to first complete all the tones in
the area and then use the monozeo eraser to lift the lighter
flyaway strands. Okay, so using the exact
same pencils and techniques, I will complete all other
sections of hair until I'm ready to add the last layer of quant three B
charcoal pencil. I'll let you follow along with the time laps, but
just remember, we build with the
lighter tones first, that being the B blue and
the five B blue, if needed, then add the sharper HB black
lines alongside the mono zero highlights and
use the brush to soften every pencil stroke and the ends of every highlight. Keep your pencils and 10
erasers sharp at all times. And if you're
finding that some of your highlighted strands are turning out too thick,
say, for example, if you needed to go over a particular highlight
a couple of times, you can always grab a
lighter grade pencil and sharpen the edges of the highlight to make
the strand thinner. I'm just deepening
some dark areas and hair strands using
the six B black, being careful only to go over
the deepest black strands. Yeah.
4. Hair Study 1.2: Wavy Brunette, Dark Tonal Range - Finishing Strands: Yes. Okay, so now we can begin adding our
darkest tone to the paper, the t3b charcoal pencil. You'll notice that when we
add the jet black charcoal, all the other tones on the page will immediately
look a lot lighter. Don't panic as we'll
blend the powder left by the charcoal
with a brush to create smooth transitions
that will bridge the tonal gap
between the charcoal and lighter pencil tones below. We'll then use darker grades of pencils from the black range, along with monozero eraser
work to create hairs strands that will also help merge those transitions together
so they look authentic. Be mindful not to go overboard
with the charcoal pencil and only cover the darkest
strands within the dark areas. Also, I use soft brushes with normal bristle
length to blend charcoal as brushes that are worn or stiffer do not
work quite as well. Okay, so now we can use the
eight to B black to draw the darkest strands that protrude from the
charcoal areas, which will help transition the darker charcoal areas
into the lighter areas. Apologies for not
being able to see my pencil strokes due to
the pencil being small. However, you'll be able to see exactly which strokes I made when I remove my hand as the new strands of hair
will be really dark. So to recap, firstly, add all the darkest areas to the page and
build them first. This will give you a
better understanding, visually speaking of
the piece as a whole. Start with a five B blue as this pencil is easier to
erase in case of mistakes. Then fill in all the
gaps one by one, making sure to keep correct
hair flow throughout. Soften every pencil
stroke you make with a brush as you go and soften the ends of every
highlighted hair strand you make to make them look like they're naturally fading away. Add the final darkest
strands of hair using a charcoal pencil and smooth off with a small
soft makeup brush. You can then add the
finishing strands on top of the charcoal transitions to help merge different
tonal layers together. Lastly, don't forget to
add to finishing touches, the flyaway hears.
Have fun. Yeah.
5. Hair Study 2.1: Wavy Blonde, Light Tonal Range - Base Block Tones: Yes. Okay, so with this study, we're going to build
value and detail a little differently
from the last study. We won't be building value
by adding hair strokes, but instead we'll focus on building value
in block sections. The first several
passes will be used, making sure the
correct undertones are reached throughout
the whole piece and that they are smooth. We can then hone in
on individual areas and pick out more and more
detail within those areas. Each additional
pass will allow us to pick out more
detail as we go. This technique is great
for if you have hair, which incorporates a shallow
depth of field effect. Example, areas of hair that
sit side by side one another, that are both in
and out of focus. You can add more detail just
to the areas that need it as you go whilst leaving
the other areas looking soft and blurry. The contrast between soft and out of focus areas and sharp in focus areas will have a dramatic effect
on your drawing. If you study this
reference photo closely, you'll notice the hair becomes a little more blurry towards
the right hand side. Try to keep this in mind
throughout the process. Enjoy. Okay, so to start, I'm creating a single
tone layer using the five B blue to all the
darker areas within the study. It doesn't matter too much about keeping your
pencil strokes going in the same direction as the hair flow at this stage, as we're building
value in sections. And don't forget always keep your pencil pressure
extremely light. You can use any tool
to smooth your layer, cotton bud, small angled
makeup brush, blending stump, but I always go back to the Echo makeup brush as
the bristles are worn, so I always get a
good smooth blend. Now I'm using the five
B blue again to create a tone which is slightly lighter by lightening
the pressure. Also keeping a very light
pressure with the brush. You can see how the Igho
brush creates a beautiful, smooth transition here
and blends the graphite, fading into nothing,
fading to the paper. If I need a soft light tone, sometimes I'll just
use a graphite that's built up in the brush
directly to the paper. Now using the H blue to
add some lighter tones, you can see how I'm
working around and maintaining the brightest
tones within the piece, along with any highlights. This brush is
fantastic for keeping edges of value looking
soft and blurry. Oh Okay, so I'm using the
no pencil eraser to pick up some lighter,
thicker strands. The lead in this
eraser is quite soft, so it's great for erasing. I've made sure the
lead is quite blunt as well and rounded so it
doesn't leave a sharp line. Now that we have a
good representation of all the different values, we can start to hone in on the different sections and focus on tightening
up the detail. I'm not focusing on single
strands of hair just yet, only slight changes in
value within each section. Now another layer
of five B blue with a touch more pressure
for the darkest areas. Okay, so from here on in, you'll start to see me pay a little more attention to
the single strands of hair. I'm using very light pressure, and the strokes are quite
loose as I want to give subtle hints to
directional hair flow and individual strands. I'm making sure to leave small gaps between
the strands of hair, which would allow me to use the monozero eraser to pick
out lighter strands later on. I'm also using subtle
changes in pressure to create different tones
as I go where needed. The same technique again, but with the HB blue
for the lighter tones. A The harder lead in the perfection eraser
from Faber Castel is great for picking
up very subtle layers, whereas the softer leads in the Monozero and cornu erasers tend to pick up more graphite. Once again, using
the Coeur eraser to pick out some lighter
strands within the dark areas. So I'm just tightening the lines made by
the Conor eraser. Sometimes you pick up a
line that's too thick. When this happens,
you can outline the erased line to make
it thinner and sharper. Yeah.
6. Hair Study 2.2: Wavy Blonde, Light Tonal Range - Finishing Layers & Detail: Yeah. Okay, so at this point, I've tightened up all
the hair strands, and I'm really happy with the different
values on the page. From this moment forward, I start to really
hone in on detail. I keep my pencils and erasures
sharp throughout and pay really close attention
to all the tiny lines and changes in value for
each section of hair. The more time you
spend on this stage, and the more detail you capture, the better the final result. I'll be using mostly
a two H blue to create strands of hair in
the lightest tone sections, a H blue and HB blue
for the midtone lines, and from the black pencil set, mostly the HB and four B with a seven and eight B for the darkest area in
the middle of the piece. Once you make marks
with the erasers, you can then add depth
by using a brush to change the tone slightly
for individual strands. For example, a
darker tone strand would suggest that it's sitting
behind a lighter strand. And don't forget to soften the ends of any
highlights made by the erasers with a
soft makeup brush so they look like they're
naturally fading away. And once you're happy with
all the detail added, you can use the monozeo eraser to add the final flyaway
hairs to finish the area. Okay, so I'll be using
exactly the same technique we use to finish this section of hair to all other sections. So I'll let you follow along
with the time laps for a while without too much
interruption from me. However, I'll pop up
from time to time with explanations
as and when needed. I'm not brushing
every single strand made by the Monozero here, as I want to create
a layer and make some strands darker so
they appear further away. Don't forget to check the
edges of each curl of hair or value change to see
if you need to render a blurred or sharp edge
as I'm doing here. A good tip to bear in mind is that if you're
looking to achieve a really soft finish
to an area like creating soft baby
skin texture or hair, once you've nearly reached
the required tone, switch to a soft makeup
brush and gently smooth the last couple of layers of graphite to finish off. I'm just using a light
two H blue pencil to outline and create a
sharper strand of hair. Normally, running
your pencil along just one side will suffice
and help define the line. Using a battery eraser
is a great way to create a really light tone
if you're unable to achieve one
using the erasers. That's why it's so important
to keep the pressure of your pencils unbelievably light throughout the whole process. I realize here that the edge of this curl isn't quite as
dark as I want it to be, so I'm re establishing a
stronger line using the H blue. I'll have to reapply the loose strads of hair a bit later. Using the Mono zero to create the loose strands and then
the Hblu to neaten them up. So before you begin, remember, we want to add all the
different base tones first in sections and smooth
them out as best you can. Don't forget to keep all
the brightest areas intact. Then add smaller
tonal variations within each of those sections. Once you feel you have
a good representation of all the different
changes in value, you can then work each
individual section to add finishing detail. Be careful not to rush
the first two stages as we want the out of
focus areas of hair, the hair that's to the right of the photo to look
good, too. Have fun. Yeah.
7. Hair Study 3.1: Background, Soft Unfocused Tones: So we have three separate areas to focus on in our third study, each utilizing
different techniques to get the best result, which combined will help give your drawing
that extra pop. We'll be using a combination of brush work and
blending stump work to help keep the hair in the background looking
blurred and out of focus, lots of pencil and monoz eraser
work to emphasize sharp, focused hair in the
foreground and brush or tissue work to render super soft skin text shell
with light tones. Don't forget to mentally slow
yourself down before you begin so you don't accidentally
rush through the process, as we also want to
practice building our patients. Okay, so have fun. M Okay, so I'm starting on
the background in this study. The background doesn't
have too much detail, so it's a great place to start to get warmed up
using your pencils. I lay down three
passes of to be blue, smoothing out each pass. I'm just completing
the first pass here. You'll notice that after I
smooth out the first pass, it'll look quite blotchy. The second and third
passes will alleviate the blotchiness to help
make a more solid tone. I try several tools to blend. The first being the Isha brush. Second, a folded
tissue, and third, the mid stiff master
touch reflex brush. I used the tissue, as
that always creates a more even tone than the
eichow brush for larger areas. The mid stiff master touch as the bristles are really fine, so leaves a soft finish. I use brushstrokes going in all directions
when blending to create better coverage and use really light
pressure with all tools. Also, you'll notice me using
graphite that's already in the bristles to make
some lighter tones within the outer focus hair. I spend a little
extra time using the value chart that I made
earlier in the series to help make sure I create the correct
tones at the beginning of any drawing as this
will really benefit working out all other
tones as I proceed. Now the base tone is
complete for the background, I start to focus on the different tones within
the lighter blurry areas, starting off with HB blue
to add some lighter value, adding some to be
blue wherever needed. I use a combination of
blending stump and brush to keep all edges looking
blurry and out of focus. Pressure is always extremely light when using
a blending stump. Pressing too hard will have the opposite effect and
won't blend as well. The Ndabaser will pull out a
very subtle layer if needed. As mentioned previously, the hard lead in the
perfection arrays, that is fantastic for picking
up very subtle layers. Just use it like a normal
pencil, but in reverse, the lighter your pressure,
the fainter the erased line. I've just noticed a few subtle dark spots
in the background, so I'll gently dab
the kable razor to lift them and smooth out
with the master touch brush. If you study the
reference photo, you'll notice there's
a smooth transition from dark to light
on the background, going from top to bottom. To recreate this, I'm starting by using the
two B black pencil. Use unbelievably light pressure
with this set of pencils. Otherwise, you could
end up going too dark. You head down the page, lighten the pressure even more until it feels like it's
just the weight of the pencil alone
touching the paper. So you transition smoothly into the two B blue
tone underneath. Use pencil strokes going in all different directions
so as to create a solid, even tone and smooth off
using the eig show brush. To finish the
transition off and make the gradation as
smooth as possible, I use a lighter value
than the two B black. I'll use a five B blue. Remember to lighten the pressure as you head down the page. Once a gradation
is looking great, I smooth off with a
master touch brush, lifting any dark
spots along the way. Once again, lightening the pressure
as I head down the page. And deepening the
tone a little more at the top with the Fb black. We can vary at
pressure when using the perfection eraser to create different
highlighted tones. So for the next few minutes, I'm just going to finish off
this area as best I can, focusing on all the small, subtle changes in
detail and tone, keeping all lines looking
soft and out of focus. Then I'll be ready to
begin a different area. I'll probably need to come
back to the background as I proceed to make small tonal
adjustments here and now. But for now, I'm happy that
it's almost completed. I'm not using power here, using the soft lid in the battery eraser to sharpen and neaten the
edge of the cheek. Yeah.
8. Hair Study 3.2: Sharp Focused Strands: Whenever I move onto a new area, I always use the HB black to
cover any important lines that I don't want to risk losing by inadvertently erasing them. The HB black is a great
pencil to use as the lead is more stable than the
graphite le blue pencils, so we'll sustain any accidental
handle jumper wipes. Keep your pencil super
sharp throughout. You can use a blending block
to create a finer point and use a very delicate touch when adding details
like eyelashes. Pay close attention
to how the lashes fall and rise and try to
recreate the natural curve. We'll add the final layers towards the end of the drawing. Now, as I move on to the hair, just like in the
last two studies, I want to first add the initial undercoat
layer using a five B blue to all
the darker areas. This will immediately
separate the different tones and provide a better visual
map for you to follow. Keep all pencil strokes going in the same
direction as hair flow and use a echo brush to smooth off once
you're finished. Now to add all the
other important lines in the face using HB black, I use a blending
stump to smooth off. Pay extra attention to
all the patterns in the iris and notice
how at this point, I'm only drawing over
the darkest spots. You also want to pay close attention to the differences in line weight between the upper and lower
eyelids and lashes. The upper set is nearly always heavier than
the lower set. And back to the hair, I begin adding some of my darkest
value to the page, the H B black. I'm being really careful to only draw the
darkest strands. There aren't too many. Once I have a little of my
darkest value on the page, it'll really help me to make the right tonal adjustments
for other areas in the study, for example, the background. You'll see me use a four B black in a minute to do just that. H I'll make some
tonal adjustments here to the background with
a dark four B black and use an old Drowni brush where the bristles are worn down
to the nub to smooth out. The worn bristles in this
brush are fantastic for keeping the edges of values looking blurry and out of focus. Creating hair strands,
using a sharp HB black, using very delicate
pressure and paying close attention to all
the subtle changes in direction and tone. There will be many
equipment changes coming up while I
build the hair, so I'll let you follow
along with the time lapse for several minutes without too much interruption from me. I'll be mainly interchanging between different pencils from the black range and monozeo eraser work to pick out
some light strands. The pencils I'll be using will mainly be HB black for
the lightest strands, the four B and seven B black for the darker strands,
and very briefly, the eight B black and three B charcoal pencil for
the darkest strands. I used the conti three B
charcoal pencil for the darkest of strands only and
soft makeup brush to blend. Be careful not to overuse. A good trick to help accentuate any flyaway hair and make
it stand out is to run a lighter grade of pencil along one side of the raised strand of hair like I'm doing here. Be very careful not
to choose a pencil that's too dark or
to press too hard. Be sure to leave a
sharp line at the edge of the hair that's in
focus like I'm doing here, as this will help
separate the hair in the foreground from the out of focused hair in
the background. Now that I have
all the different value ranges on the page, I can tell that I need to do some light touching
up to the background. I need to go a little darker
at the top and make sure the transition is smooth
as I work down the page. I use a soft makeup
brush to smooth off, as this brush is good to
use for the final layers because the soft bristles
leave a really smooth finish. I then spend as much
time as it takes making minor adjustments
until I'm happy with results before moving
on to the next area. Yeah.
9. Hair Study 3.3: Soft Skin Texture & Final Adjustments: I've already added
the first layer to all the darkest shadow
points in the face, so I now want to start building the lighter
tones around them. I use a small soft makeup brush throughout as I want to
maintain a soft skin texture. Also, the drawing
study is quite small. If it was a bigger study
and I had more room, I might be inclined to
start blending with a tissue and finish off the last layers with
the soft brush. I make small changes
in pressure using the twoHblue to create
different tones where needed. And now deepening some of
those tones with an blue. And don't forget
to delicately lift any light graphite spots
using the b eraser. I feel the tip of the nose here has gone a little
darker and unexpected, so I lift a subtle layer
using the kneadable eraser. As I begin the lips,
I make sure to keep any lines in detail following the natural
curvature of the lips. This will give the lips volume and help them to look realistic. Using a soft makeup brush
to smooth off the lips and then a sharpened battery eraser to pick out the tiny highlights. I'm not using the power here, as there aren't any
bright white highlights. A small blending stump
is a great tool to add some mid tones
to small areas. We can then use a
sharpened battery eraser to work within those tones
to add some highlights, using both power on and off to create further
differences in tone or to pick up dark accidental graphite
spots that occur. Okay, so as I finish the eye and nearing the
completion of the drawing, I spend quite a bit of time making small adjustments
to tone and detail. Taking the extra
time to do this can turn a good drawing
into a great drawing. I cross reference all
tones with other areas in the drawing and to the
reference photo to make sure they're all in harmony with one another and try to make sure that no particular area is darker or lighter
than it should be, as this will look out of sync with the rest
of the drawing and immediately draw the
viewer's eye to that area. I know it seems like I'm going backwards and forwards
over the same areas, but sometimes small
elements can help play tricks on your
eyes like the amount of light penetrating through a
window at different times a day or issues with your
lighting setup, et cetera. This can make the values
on your page look a little different
from hour to hour. So I make small adjustments
as and when that happens. A room that's too bright
will cause you to overcompensate and add
value that's too dark, whereas your values will be too light in a room
that's too dark. I hope you enjoyed that demo. Some key things to
remember before you begin are to use
lots of brushwork and blending stump
work to help maintain the soft out of focus
tones in the background. Also, lots of soft
makeup brushwork to create smooth skin texture. If you're using a
more textured paper, tissue or mid stiff brush with fine bristles
may work better for working the graphite into the paper so as to make
a more solid tone. Don't forget to keep an eye on line weight between the
upper and lower lids. Also the natural
curvature of the lashes. So good luck and have fun. Yeah. A
10. Hair Study 4.1: How to Build Curly Hair - Dark Base Tones & Detailing: Yeah. Okay, so during this lesson, I'll be showing you how to
build tight curly hair. There's so much detail
and mess connected with tight curls that it can
be super confusing, knowing how to make sense of
it all and where to start. The simple steps that I use
when attacking curly hair are to first outline all the
main curls in the piece, the ones that are
normally sitting at the front of the
hair and in focus. Second, filling the
different tonal variations that sits in between
those curls, the areas of hair that are
behind the main curls, creating smooth transitions
as and when needed. Third, add all the
detail on top of those tonal variations,
and fourth, add detail to all the main curls that you outlined
at the beginning, the ones that are
normally in focus. Curls always look
awesome when completed, and I feel like the more
detail you can capture, the better the finished result. So before I begin
laying down any value, I'll make a mental note of all the subtle
changes in value in blocks and try to work out where the
separation lines are. You can see where they
are in this study here. Looking out for subtle
changes of value in block form can be useful for
all parts of a portrait, face, hair, clothes, et cetera. Whenever I draw curly hair, the first thing that
I do is to spend time outlining all the curls
that are in the foreground, the ones that are in focus, which I need to pay
the most attention to with regard to detail. This can take quite a bit of time depending on how
curly the hair is. Just the outline will
do, as we can tighten up on detail as we proceed
through the drawing. Those curls will act as a
great map to follow for all the changes in tone that are situated in between the curls. I'm now using the five B
blue to add a base layer to all the areas between the curls so I can add
darker tones on top. I'm careful not
to cover any area that isn't as dark as
a five B blue value. I'm using strokes going in all different directions as this will help create an even tone. I then blend the
graphite together using an e show makeup brush. If you look at the
reference photo, you can see that all
the detail within this dark area here
is a mid tone. This means I'll be
able to pull out the right tones when I
use the erasers later on. If there were any bright
highlights in this area, I would make sure to protect those highlights and
draw around them as you won't be able to make
bright highlights once you've covered an area
with your darkest values. This pencil is a seven B black, and as with the five B blue, I'm using strokes going in
many different directions to help create an even
cover before blending. Also, within these dark areas, I'll be rendering all
the subtle changes in tone as they appear in
the reference photo. The tone doesn't look as
solid as I want just yet, but I know there's a layer of quanti three B charcoal
pencil to go on top, and the powder from
that pencil will create a really solid tone with
lovely smooth transitions. Notice again how
I'm not covering the dark areas completely
with the conti three B. I'm leaving out
small areas which are slightly lighter in
tone as and where needed, as per the reference
photo and then use a small soft makeup brush with a very light touch to blend and smooth off
the charcoal powder. Be extra careful not to push any powder onto the light curls. I switch brushes to the Drowned Georgian short
fiilber brush in a moment. This brush is smaller and also completely worn
down to the nub. So it's a fantastic brush for
getting into tight spaces, also for giving edges of value a smooth finish or
adding blurry lines. And once again, using the
Georgian short fielber brush. This time, I'm creating
soft lines and tones. We can then pick out
some sharp strands of hair using the monozero eraser. I'm using powder that's
already in the brush or picking up some from the
charcoal already on the page. Don't forget to keep
pressure very light. The stable lead of the
Black Ranger pencils is great for perfecting
sharp edges. I'm constantly
keeping a sharp edge to the monozero eraser when making thin strands of hair by running it along
the sandpaper block. Here, I'm creating some
mid value marks to represent subtle detail that
sits behind the main curls. I can then use a
battery eraser powered on to make slightly brighter
marks here and there, which will add further depth. Even the lead of the
perfection eraser will allow another
different tone to be added. You can lift unbelievably
subtle tones using this eraser. Now using the F blue
to make some light, sharp, focused strands of hair. If you're stiff at a
brush or harder you press will dilute the
darkest of tones. That's why I'm gently dabbing a soft makeup brush here to
keep a really dark tone. Okay, so I'll let you follow
along by yourselves for the next several
minutes as I use the same tools and techniques to build the upper
part of the hair. There'll be many equipment
changes along the way, which I'll show on screen, but the same principles apply. Create the correct tone first
using pencils and brush. Use various erasers to create different highlighted
details and tones. Use pencils for any
sharp hair strands and repeat until you're
happy with results. Oh, and use a small soft makeup
brush to soften the ends of any highlighted
lines you make so they look like they
naturally fade away. Ah. Yeah.
11. Hair Study 4.2: How to Build Curly Hair - Light Base Tones & Detailing: Yes. Okay, so let's begin laying down some of the lighter tones
in this piece. I should point out that the overhead light that I'm using is throwing off the values a little and highlighting the
grain in the paper. If you want to see
a more realistic representation of the drawing, check out the pictures at the beginning and
end of this episode. I'm starting with a five B blue to fill in larger areas of tone. Then we'll focus on
tightening up the detail within those areas with each subsequent
passe that I make. I use strokes going
in all directions, circular also to create an
even cover before blending. I'm also varying my
pressure to create subtle changes in tone as
per the reference photo. Again, there'll be
many equipment changes along the way as I build
the lighter tones, which are again
shown on the screen. So let you follow
along for a while by yourselves without too
much interruption from me. But remember, we create the correct tonal
variations first using either pencils or
brush and blend those different tones together to make smooth transitions. Build value using
lighter grades of pencils first and add
darker grades until the required values
are reached and use various erasers to create different tonal
highlights and details. Use sharp pencils for
any focused hair strands and soften the ends of any highlighted strands
with a soft brush, and repeat this process until
you're happy with results. I'm adding tiny dots
of conti charcoal here to show the darkest spots
deep within the hair. This will create a darker tone and add another layer of depth. I now want to get the correct
tone for the background, as this will help figure out the correct finishing
tones for the lighter ls. I laid down two parcels of F blue and two parcels of HB blue. I've already outlined
the loose flyaway keels, so I carefully draw around
the outline for those. Again, using pencil strokes going in all
different directions, which will help
create an even cover. I then outline the flyaway
keels using HB black. I'm adding a slightly darker
line as this will stop the outline disappearing when I use a tissue to blend
the background. You can see that the brush
I'm using here to blend the graphite has left a
tone somewhat blotchy. So I go over with the tissue
to get a smoother blend. The tone is still not
as even as I'd liked, so I use another pass with the HB blue to fill in
all the lighter areas. One more layer of B blue for the background and
blend with the brush, and that'll be the last layer. I can then concentrate on finishing all the tight
curls in the hire. I know it may seem like I'm just going over the same
areas again and again, but with each new pass, I'm honing in on more
and more detail, making small adjustments
here and there to tone, detail, patterns
and transitions. For the last pass when I'm
nearing the end of a drawing, I use a light grade of
graphite pencil to go around all the tiny bits of
detail that need tidying up. An soft edges that
need sharpening up and any tones or transitions
that need attention. I also add the darkest of spots and lightest of highlights
to finish off the piece. I hope you enjoyed that demo. So before you begin, try to remember the four simple
steps to build curly hair. First, outline all the
main curls in the piece. They'll act as a roadmap
and help you to keep all the tonal
variations of the hair behind the main curls
in the right place. Second, render the background tones within the hair and create smooth transitions between the different tones
as and when needed. Third, add detail on top of
all the background tones, and fourth, complete the main
curls in the foreground, the ones that are in focus. Normally, there's so much detail to contend with when drawing tight curls that I find
it helpful to stick to completing small
areas at a time, maybe a couple of square inches. It may not too impressive
at the beginning, but by the end,
you'll be amazed at what you've created.
See how it get on. Yeah.
12. Conclusion: Hey, guys, you made it. Congratulations. I just
wanted to give you a huge pat on the back
from making it to the end of the eighth
and final episode. There were so many
drawing studies to get through that not only
tested your skill, but also your patients.
So we're done. There were many things to
take from this episode from learning how to
render beautiful, loose, wavy blonde bambunet locks
to straight strands, including an opportunity
to practice soft, out of focus tonal
changes once again. Also, a complete
procedural breakdown on how to build
tight curly hair. But out of all the studies
within this episode, I think the most important
aspect to take away would be the simple four step
procedure to build curly hair. O outline the main curls, two, fill in the tones
between those curls, three, add detail
to those tones, and finally finish
off the main curls. Please feel free to
try any study as many times as you like until
you're happy with results. So before I wrap everything up, I want to remind
you that you can upload all completed studies
to your class project page. Each student gets one project
page per class episode, but on that page,
they're able to upload all the projects from the
episode along with text. There's even space for thumbnail
photo at the very top of the page where you can add a drawing from the class
that you're most proud of. The thumbnail picture
is what will appear on the main class page for
everyone else to see. Students can press on
the thumbnail picture, which will open your
project's page for them to see all the wonderful drawings that you made
throughout the class. If you'd like to leave a review, you can hit the Reviews tab
and then press Lev ARview. All reviews are warmly welcomed, and I always love to hear
your thoughts on the class. If you have any questions
regarding the class, you can hit the discussions
tab where you'll find a discussion that I started
regarding contact me. You can hit ReplerO
one of these tabs and post your question and
I'll reply as soon as I can. That being said, I'd like to thank you all for your
time and dedication. I really hope you enjoyed working your way through
all the studies. Please feel free to give me a follow if you
haven't already done so and keep an eye out for
new and upcoming classes. Take care for now, and I
hopefully catch you see.
 Shayne Wise, Professional Portrait Artist