Transcripts
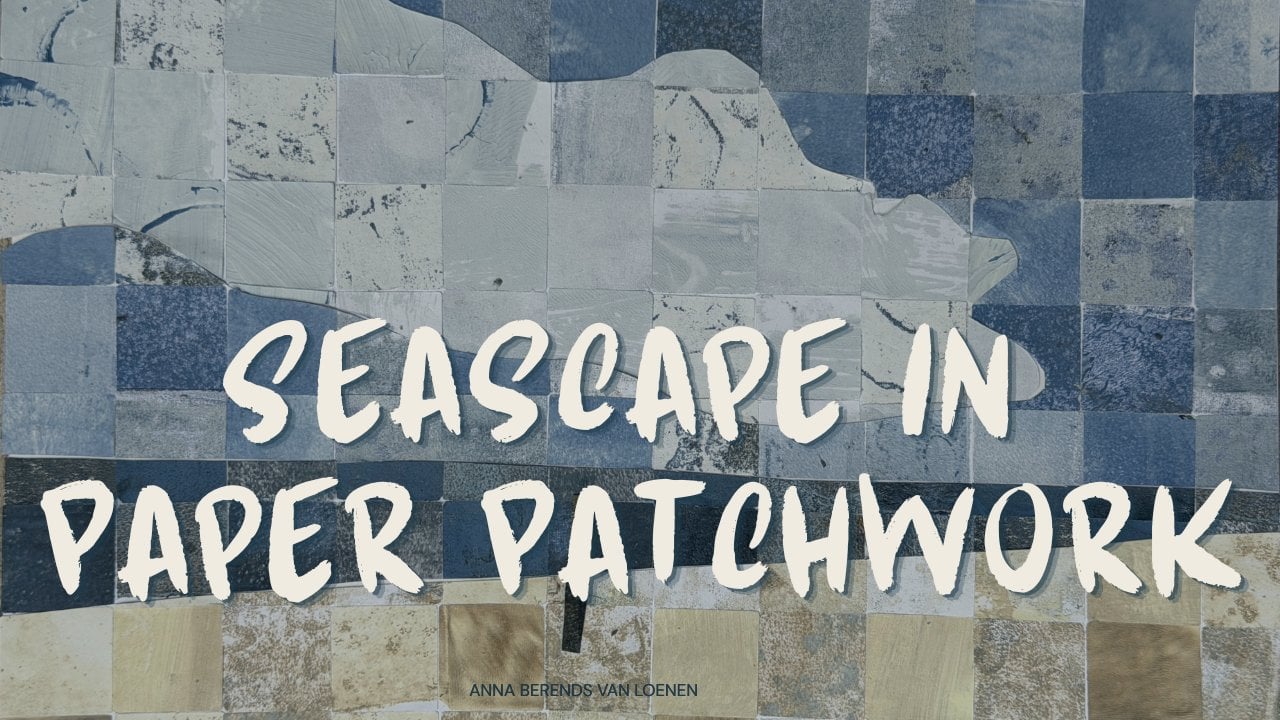
1. Introduction: We know that cozy feeling of
wrapping a quilt around you, noticing the texture and seeing the pattern
and seeing how all the pieces come together because each quilt
actually tells a story. And that familiar
and cozy feeling is exactly what inspired
me to make this class, turning these cozy patterns into a fun and playful
paper collage. I'm Anna Bern Swalune. I'm an artist, I'm a
professional mess maker, and I'm an online teacher. And my mom used to make a lot of patchwork
and a lot of quilts. She actually taught
others to do so too. And with each special occasion, she gifted me a quilt. For example, when I bought my first house or when
my daughter was born, and they're all really precious and they all tell
a different story. And I grew up with
those textiles. I grew up with colors. But even though I love textile, I love paper a bit more. So I wanted to translate this into papers into a
paper patchwork, into a paper collage. So in this class, we are going to
start off simple. We are going to
make a pattern that will help us learn more about
composition, about color, about textures, about value, and also about our intuition because that's really important if you want to play with papers. And then we're going to move on to a more structured design. And we are going to use traditional patterns
and turning them into patterns that
actually work for our papers or actually tell
our stories a bit better. So we are going to use those papers and play because
the most important thing in my work is creative
play and giving myself permission to
explore and to experiment. And in this class, two great worlds
just come together, the cozy feeling of a quilt and playful fun and
experimenting with papers. By the end of this class, you will have your own
colorful patchwork that tells your story.
2. Class Project: Now, let's talk about
our class project. That's probably one
of my favorite parts of a Skillshare class, not only because I can see what you've made
and comment on it, but you can also inspire others. For this class project, you don't have to
do anything fancy. You can just grab
a postcard size or your sketchbook and
make a paper patchwork. It could be really simple or it could be really elaborate. Just make whatever you love because the
most important thing is actually play and have
fun with your papers. And then you can upload them in the class
project section. I can't wait to see.
3. Supplies Needed: For this project, you're
going to need some papers, and it can be
papers of any kind. They could be book pages. They could be old road maps. They could be something
from the recycling bin, but they could also be your old artwork or
your jelly prints, or maybe just some scrap paper you had from previous projects. But why not use your
wrapping paper as well? And we are going to
turn them into squares. And I'm more the kind
of lazy person in this, so I like to use
the paper punch. And if you don't have a
punch, it doesn't matter. I have different options
for you as well, because first of all, you could use, like,
a cutting board. And if you don't have
a cutting board, you just use a knife. But when you use a knife, you probably want to
take care of your table. So you're also going
to need cutting mat. And a ruler. You
don't have to use a fancy quilt ruler or
petric ruler like this. You could also use a plain
school ruler to do the job. And if you don't have a
ruler or an exacto knife, there's always your last option. You could always just
use a pair of scissors. And when you've cut
all your papers into the squares, you
need a substrate. And as a substrate, you
can use anything you like. For example, you could
use a simple postcard, or you could just
use your sketchbook and make your paper
patchwork in here. And to put your patchwork in your sketchbook or
on your substrate, just use a simple glue stick. You don't need to use
MT medium or PVA glue. This will do the job for you. Are you ready to get started?
4. Creating Your Paper Blocks: First step is to find the right pages and make
some squares out of them. Well, these are my papers. As you can see, I decided on
doing some yellowish theme, but for now, you can grab whatever kind of
papers you like. This is just an old dictionary. I have something from
the recycling bin. I have something from magazines. This is just some
collage paper I made. This one too, even old
jelly prints you can make. You can use your old artworks, just some wrapping paper, and I don't only like this side, but I also like the back of it. So there are 1 million ways of finding paper
that you can use. But now we have
to get this paper to the right size to
make our patchwork. So I'm going to move
this all aside. Even old artwork from
my daughter's too cute. I move this all
aside because I'm going to show you that this box, this box is just some
leftovers from old projects. So I even use the
scraps of scraps, like you can see.
Why do I use them? Because I like to
work in this size? I use bigger sizes as well, but I like to use
work in this size, and they're all the same size, like you can see, for example, if I take this one, and this one and this one, they are all the same size
and that makes it easier to puzzle with them and to make the patchwork
that I want to make. We're going to make those squares and there are a
few ways how you can do it. I'm the lazy one, usually
the way that I do it, just take this one
from my daughter. I usually just get a punch, and I punch and
get this one out, and then I'll punch and
I get that one out. So this is the easy way to work. And I know most of you probably don't have a
punch, and you could buy one. Of course, they're really handy, saves you a lot of
time, a lot of work. But I do those patchworks a lot. If you don't don't
buy this punch. Please just use a
different method. One of the different methods is, for example, this cutting board. If I would measure
one of these squares, I think they're about a little bit less
than 2 centimeters, 1.8 by 1.8. Let me see it in inches. Well, this is about
0.7, Inches, I think. I'm not really good with inches, but it doesn't matter
if you have this size. You could say, I would like
to go for half an inch. You could say, I will
go for a full inch. I will go for a centimeter
or go for 2 centimeters, do what you think would
look best for your project, and it's easiest to
go for your project. So if I would take
this one, for example, this is not theater
poster, I would say, let's do the 2
centimeters because that's easiest for
me to measure. And I just put
this through here, put it at the two
centimeter bar. And I have this. And I do it the 2 centimeters. Again. And 2 centimeters. Again, now I can
keep on going with all my papers to get these
squares for the same size. If you don't have
a cutting board, of course, there are
so many more options. You could also do this
and take your knife. Because then you would just
go places on your board. Actually, there are
centimeters on the side, so I could say, like,
this is 2 centimeters. Yes, I actually knew
already. This is two. I'll just grab a ruler. You don't have to use this
patchwork or quilt ruler. You don't have to use a
patchwork or quilt knife. I use a simple exacto knife. And this is my square. And if I don't have
a knife and a board, I could always use my scissors. And I would take the back. And now I'm just lying up here. I could always do
this with a ruler, and now I'm just
using this board. Then every 2 centimeters, this and I do this. And I just grab my
scissors, cut, cut. And I have some perfect
squares that I could use. And when you cut
all your squares from all the different papers, you can actually make
your composition. I'm going to punish
a few of my squares. So we can start our composition.
5. Play & Adjust: Composing Your Patchwork: Okay, now I have a
bunch of squares, and I'm just going to
put them down on here. I'm just going to put them down and see which ones I like, which ones I don't like, which one resonate with me, make this a mindful exercise. I'm not gluing anything yet. I'm just placing them here to see what works,
to see what doesn't work. Y. Even have some piece
from the yellow pages. A And if I would glue them down, I would now have my
paper patchwork. It's just as easy as this. But I think I can make this
one better than the way it looks right now because I
just put them down randomly. I didn't even think
about making them, correct on making it, appealing. I'm just putting them down. I know they're going
to be appealing because the colors are in nice harmony with each other because they're
all yellowish and orange, so I know they
would combine good. But I could make this better because if I look at these two, for example, these two
are both light in color. If I take this light and
change it around, for example, with this dark you get
more variation in tone. So I think this looks better. But I have all the light
ones here in this section. So maybe I would take
a different light one and I would say,
let's take this one. Mm Hmm. I'm not I'm not 100% sure. Because it doesn't really
make a difference. You see me playing now
and switching it around. But if it works better, this one with this one, all of a sudden, these
two don't look good, and I don't like these to be in the same row because if I want to make a
nice composition, I have to use variation. I don't only use
variation in tone. I also use the
variation in the kind of papers I use in
the texture I have on there in if I have text, if I don't have text, if I use thick papers, thin papers, all the
variation works. And now, these two, this is just too much the
same same same. But this is even though
they're different, they're the same because they're both letters next to each other. I don't really
like that because, if I switch it around, I won't place this
one here either. The letters as well. One thing I could do if I would
place them together, I would also change direction because variety
of direction works. I put this here. Put this here. When
I put this one here, I have a nice way of all
the orange colors to let my eye move across
the composition. And I could actually
do this for hours and change the values and change where every block
or square actually lies. But I'm not going to take ours because it has to be a
mindful process as well, and it's not about perfection. It's about fun getting that
cozy feeling of a patchwork. So that's why I'm
not going to go any further than this
because I know it works, work better than it did before. And if not, I had fun doing it, and it always looks different
if I'm gluing them down. But if I glue them down, I first put them all down, then I'm going to switch
and see if I have enough variation in text, in other textures,
in color, in tone. I think of the variation
and then I think I'm done. Put this aside and I'm
putting this aside. Yes, I could glue
it down on there. But since we're
making a small size, I'm not going to
put the same paper, I'm taking extra paper, and I'm simply taking my gluetick and I'm
grabbing them one by one. Oh, yes, you could
actually line them up perfectly if you want to. I don't like perfect too much. I mean, they're perfect
squares already. Why should the rest be perfect, too? Doesn't make sense to me. I want to have that homemade
feel that a patchwork has. So I'm doing them down. They're going to be
more or less equal. I'm speeding things up for you. If you'd like to know
more about variation, your artwork to make
your composition work, please check out my class on rules of abstract art because they're not
only for abstract art, they're for every form
of art and they help you understand the
rules better so you can get better compositions. And when you know the
rules, you can break them. Actually, I like this one, but I think it's going to be
even better if I'm going to put another layer underneath. I am going to I think I'm
going to grab this one. Is there something
I haven't used yet. We like this one. So looks nice and go to my
little box of treasures. This is something
totally different. I'm going to put this here
and this one here. Yes. Okay. And there here have it. This is my yellow
easy patchwork card. Give me the all warmth. And I I make this in a
card and send to somebody, I send somebody my warmth
and my love as well. Exactly what a quilt or a
patchwork is meant to do. You can even spice them up a bit more like I did with
this one, for example, I actually put a frame on it, just bought it on Amazon. I have now in a little bit of foil wrapper so I
can sell it on markets. But here you have
actually the same thing, just a bit different size
and made it in greens. And if you understand
how it works, what I would say the rules
are, but they're not rules, but if you see how it works and how you can make
the composition work, you can actually make
it a bit harder, too, because with this one, I
made all these same squares, but I also made one
larger or 23 larger. And I spread them out. So I have a variety for
where they are. And there's also a variety on the texture that's on there. And what I did to make it all fit in this one composition, I made sure that the larger one was exactly four of
the smaller ones. So it would fit in the
composition perfectly. Otherwise, they would,
like, move a bit. You get a different composition,
and that's totally fine, but that's next level, and that's what we're
going to talk about later. So for now, I would
just stick with all the same sizes,
all the same squares. And sometimes maybe one
that's about four squares. And with this one, I stuck
to the same squares. But I was like, Yeah, I want to move my eye around. I want to have it more fun, and I want the
composition to work. And even though I
had the lights and the darks and the
midtones all combined, so it would look nicer. It was still a bit dull. So I decided why not change one of the squares
and make an orange one? My eye immediately
goes to this one. And even though it's exactly
the same like I did here, the whole vibe is
totally different because I made it with
different colors, and I made just one teeny, tiny difference on here. So if you know how to make
this easy basis patchwork, you can make whatever
you want to make.
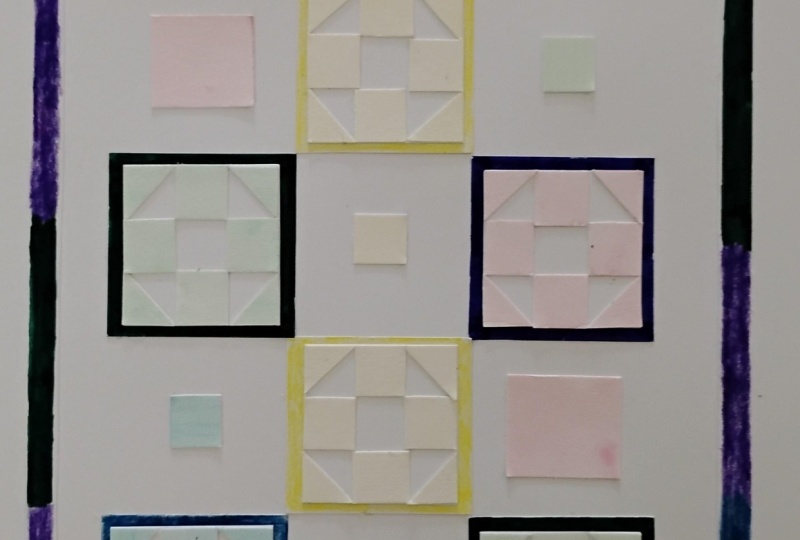
6. Finding Inspiration: Okay, first, I'll just
go to my pintas board. I made one from Wilt collages. And I can swipe through. I have a few in here that I
just like for some reason. And like, is there anything
I would like to make? I like free I'm free fret
quarter quilt patterns. Sounds good. So I'm going to
the website Haley stitches. These are not my patterns. They're free
patterns from Haley. I don't know her, but
I like this, I think. So that's I wanted to mention
her. Oh, I like this one. I like this one. We have
to put this to the test. She has multiples.
You know what? We're going to start
off with the first one. Yes, I know a lot
of people like to work on this checked paper. Absolutely fine if you have use it because this will help you. I also have this paper. It's going to be
more into detail. This could be fun. But I think it's just too
much for me right now, I don't want to get distracted. If you do have a
bullet journals, this is one from Fabriano. It's really easy to make your
grid on with these dots. This could be helpful
too, you know what? If you don't have this
at home, don't worry. Nine out of ten times
I just use postits. Why do I use postits to work on? That's just because
let me see if I here, open up this one. If I try them out and see
if this pattern works, I can put the pattern in here and see what
did it look like, and I can learn from it. This one, for example, didn't work out at all because
it was just too crowded. There was too much going on, too much text, too much lines. You hardly see any contrast. So this is a lesson learned. Maybe when I do it next time, I'll do it with more quiet or patterns.
Maybe it works better. But oh, this one,
I like this one. This one really worked for me. I did it in a monochrome. And yeah, I like this
one because it has a subtle balance between
lines, between colors. So I like this one, and this
would be something I would explore further because
now it's in my sketchbook, and I'm going to do this
one in my sketchbook, too. So I could take the posted, but just to make it a
little bit more neat, I am going to do this
in a bullet journal, and I'm going to do
this for you in here, not with a pencil. Because when you do it with
a pencil, you can erase it, but I think I'm going to
use this with my Sharpie. So you can see it
on camera as well.
7. Deconstructing Patchwork Patterns: Let me see. If I
take this pattern, I have to break it up in squares because I'm only going
to work with squares. That's why we practice
the square one. And if I look at the squares, it's going to be one,
two, three, four, five, six, seven,
eight, 99 squares. I'm not even using
the dots you could. That's why now you can see you
don't need anything fancy. To be nine, one, two, you could do this precise. Maybe it works
better if you do it precise. Let's sketch this out. We see that this
is a full square. This is a full square,
this and this. But these are triangles and those are triangles
that are half a square. It's a diagonal line. Actually, it is just this. Over here, it's going to go
in the opposite direction. And here and here. Actually,
this is the whole pattern. But why does the one on my phone looks a lot
more fun than this one? Well, that's because
of the color and contrast and that is because there are multiple
blocks next to each other. When you make your
patchwork pattern, start out with this one to
see if it works, for example. But I think with this one, it would look really
nice if again, I have about nine. Squares, sort of squares. I'm going to divide
this in nine, two. And I have a blank one. Then I have one that's divided in nine. Lanc. This is nine. Lankan nine. And now you see the
overall of the pattern, and it looks a lot more fun, even though I
haven't even filled out all the small
patterns in here. And if I would fill them out, I could do it in black and white like I'm doing right now. But I could also say, Well, I want to use color and see what happens if I
add some color. I have a bunch of colors
here, and you know what? I'm just taking just
taking orange, a green. I'm not even being precise on what I'm
getting out after one, two, three, four, five. I'll do a yellow. I'm not sure if that
is contrasty enough. Five. Yeah, this is five. Okay, and I'll do this one
first because actually, the way that it is
designed is that it. This one is color. This one is white.
This one is color. Since this is not going
to be the artwork, this is just going
to be our sketch. I don't have to
be too precise in filling out coloring it in. You could. It's fun to make
this a mindful exercise too. Sometimes I actually do it. It's just a make coloring
page almost when doing this. This This with filling it out and using it
as a coloring page, you actually got to
feel for the pattern because this looks totally different than what
it looked before. And why does it work?
Because of the contrast? Because we did this one, this
one, this one, this one, this one. You know what? I'll just take. What if we
would color it in differently? It would look exactly the same
one would look different. One, two, one. We have nine again. And we could actually divide the lines
differently. But why not? But we could also just
change once it recolor. So if I would take
exactly the same design, And I could color
it in differently. It's not like that I'm going
to do the red in where it's now white because then
you get the same vibe. But you could I would look
fun if you do it in a grid if you make it like you turn this around,
but keep this white. So it's more white. You could do it. Then you
have the floating objects. But what if I just switch
it all around if I, for example, make this one red. So yes, I'm doing actually the opposite
and the other one. But what if I decide not to
do the other white ones red, but if I would say, What if I take this
one, make this one red. Make this one. This
one. And this one. You see this is exactly the
same as this one was exactly. But just because we
color it in differently, it will look absolutely
different as a block. You can actually make
circles as well when you do a squared paper
patchwork pattern. But you could also decide like, no, I'm just turning
these around. What would happen if I'm
just taking the outsides. What would happen if I
would turn them around? Let's say I will keep
those colored too. Well, taking this one. You know, this is really it's getting my creative
juices flowing. So suddenly I'm just regaining
like, Oh, I can do this. I could do that. And that's just we're all in
the same pattern. And now it's all of a
sudden, it's a bow. So how could something that's more or less the
same look so different? And then what would it look like if we would make it like larger? This is just a vibe or something that an overall feel what
it's going to look like. But if you use your papers, it would look like
differently anyway. Now I picked the
colors pretty random, just to show you
what you could do. But you could really think about how you're
going to do it. But since the design was
all different squares, I want to put different
ones in here as well. So what it looks like
when you make one block, but what would happen if
you make a larger block? Because you don't have to stick to the postcard size
that we started using, you don't have to stick to this sketchbook
that I was using. You can make this larger in
two canvas if you really, really enjoy this process. This could be one
that we could use. You know what? We make
this a longer lesson. We're going to take
another one. Why not? This one, why does
this work? You see? Now, we'll design it. If I take squares, I'll just make a lot of squares. Don't know how many
exactly yet. Should count. I just take ten, I think. Actually, if I do this,
I don't have ten. I think 25, I'll just
take you know what? I think it look better if
I take just a bit extra. One, two, three, four, a 20. Well, I want to 25 by five. 25. This you see now, actually, these are four
squares all divided. So I am going to
probably have to add. I have to add some more. I have to think about this, but I could always add
some more lines. You know what? We are going to we're just going
to start here. Doesn't matter. Going
to like this, this. Yes, now we can
see this pattern. But then we get these edges. Actually, they go TT, I have that up here too. There's actually one line. This in goes right there. Yeah, this is somewhat the
pattern that's on there. And what works here is because
of the different colors. And actually, what happens is, take the red, red. And then the next
one, the orange. They're all next to this one. Orange. It's actually
brown in the picture, but I'm making it orange. But instead of making the
corners doing this color too, you could see that they ended up making this color,
making it another color. And actually, colors
that they do in the corners are the same colors. We put here and here. The next one would actually
be in the corner again. Corner again. But these are This is one. These are two. These are three. So one, two, three. And this one, it's
going to be even four, but, yes, it doesn't
fit my page. And it keeps on
going in circles, they're like circling
around the center. And what happens over here? I'll just draw an extra line. Happens over here, it's not like they are changing the blocks. They're not changing
the blocks at all. Yeah, well, actually, kind of, they are just
switching up colors, and they are turning
the triangle. So first, the triangle was, like, going to this direction, and now they're going to
take the opposite direction. And they just took to yellow. They took the color that was going around the orange anyway. They did it like this. That means you get
one large white one, white one, white
one over here, too. I made those lines in here, but they actually don't
have lines over there, stitching lines, but you
don't see them as much. This is one large area. With this one, they
changed it up, but they thought, we'll going
to change this one up too. Into a direction. So
this is how you actually going to take a look at your pattern and
see what happens, learn from it,
dissect your pattern because this one is all
the same direction, and then all of a sudden you
try to switch direction. And then it's the
same direction, but actually there are
just two different colors. So with this, you can actually play play with your pattern. And what they did over here, all the squares turned out white because they made
all them white. You get a focal point to the center and you
get this shape. But actually, in
the white section, that's happening exactly
the same as here. It's just square,
square squares. You just don't see them. So go through all
of your interest or your Internet inspiration and go through it and see what you like, see
what you don't like. And if it catches your eye, try to draw it and see what
kind of shapes you get. Because these are triangles, and it's not like this is a
trapezium shape or something. This is also a triangle. And let's draw it here. This is a square and a triangle, but in the same color. So if you do it in the
same color, here, too. Well, all of a
sudden, it doesn't look like a square or
a triangle anymore. I feel this up here. Mm hmm. This is the shape
you get over here. So start going through
all your inspirations, see what grabs your eye, start coloring it in,
start designing it, and see if it works for you. And when you do this first step of sketching and finding
out what you've done, you probably will find your favorite or maybe you have multiple favorites and you
have to do loads of them. If you find your favorite, we are going to the next step of choosing the right
papers to go with it.
8. Finding the Right Papers: Okay, well, I actually
like this first design. So I'm going to go
with the first design. But I think I'm going to go
with this color combination. And if I would make
multiple circles, then I don't want
this exact block to be next to this block because then I think it
would look really weird. So maybe I wanted to
a white section here, white here, and of
course here and then start doing my next circle. I think that's what
I would like to do. But first, I am going
to get my papers. Like you saw in my
sketchbook earlier, I just didn't have let me
see, let me go to the page. There's too much
in my sketchbook. You see all my other
doodles, as well. Can I find it I should have
this well prepared over here, so get the right page. I'll find the right
page for you. Yes. You see this was
just too busy and there was not enough
contrast between the colors. So I really learned
from this one. So if I'm going to
use the whites, I'm not going to use them all too busy because
probably you won't see my circle or I'll
do all the text, but my circle it's going to
be more like even color. That's why I'm going to try and see with my papers
and see how it works. I could cut new papers, but since I got my stache here, I'm first going to
start with this one. I like that it was
all different colors. I think I'm going
to grab a pink one. Or if I do the pink, if
I take, for example, this one with pink, it would look lovely in many collages. But if I do the white
spaces next to it, you won't see that this square is pink because it's
mostly white too. If I put a white one next
to it, not enough contrast. I'm not taking the ones with white too much next week.
I could take this one. I could take this one, for example, how many do I need? One, two, three, four, and then two halves is five, two halves is six,
one, two, three, four, five, and six. And if I do the whites, I could mix up some whites. I'll start off with doing
only the ones that I made in here's two halves
one, two, three, it's one two, three. No, I'm getting more quiet, too. I'm going for the
quieter whites, so you get to contrast more. Yes, I'm going to do these
three and see what happens. And maybe I'll find
a different color. Do a different circle next
to it. Start up with this.
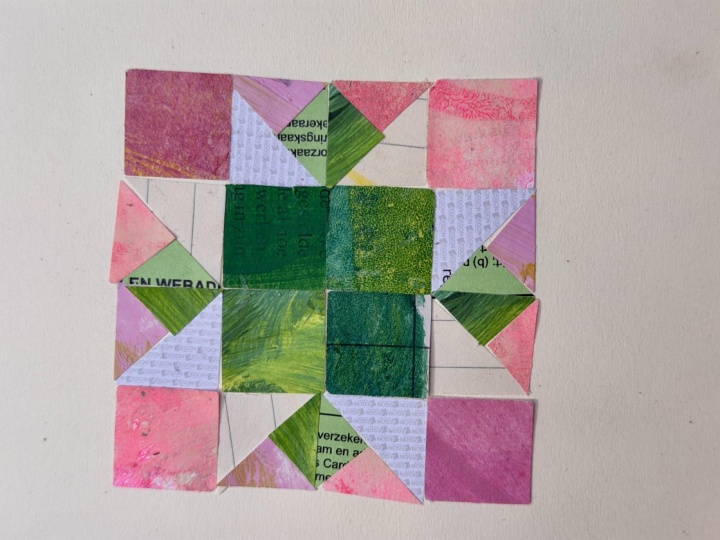
9. From Pattern to Collage: Create Your Paper Patchwork: Actually, it's pretty easy
because in the center, we have a white around
it, we have one, two, three, Four, because they
are all squares. Now we see this is not a
square, this is half a square. It sounds more difficult
than it is because well, actually, it sounds
as easy as it is. We're just going to
make it half a square. I'm going to cut
this square in half. Place this one here, and place this one here and I'm going to do the
same with this one. This one here. This one here. One thing that I try to
do is when I cut them up, I won't place them immediately
next to each other. I try to spread them out, so my colors or my pages are more cohesive because you see
this one coming there too. If I would cut it here, this one would have
loads of lines. This one wouldn't I would cut it here, would be even worse. Do I like it? Do I care? It doesn't really matter.
I'm just do this one anyway. And I have this circle. Like I said, if I would
take one next to it. I have three white ones. Go back for the white ones.
This is the first white one. I'll do some stripes again. And I'm just taking this. Why don't I have
three white ones. And what if I just do
a different color. Move it around too much.
I'll just take blue. I don't have to cut
these up because these are already triangles. There's two triangles. I'm taking another
blue to match it. I'm going to shake it up a
bit with different kinds of blue, see what happens. Taking this one, one, two, three, I'm not saying
too much of the whites. Four, two, I need
two more blues. I can take those
or I can cut them. No, I just cut this one. Just cut this one. Oh, this one. That's a nice wiggle.
Take this one. No, I'm going to make the
white line between them. So I'm going back to my whites. One. I guess I can take this 12. And Three? Yes. I'm going to put them here. Here. Take this one. And I it could be
exactly the same. Now I'm trying to
make more contrast to see if this works or
not and I'm just going to put them down like I did
with the square patchwork, so I can see what happens
if I put them in here. Just put this in the
middle. This is. One. No, I'm going
to cut this one up. One, this is nice contrast. One, you hear me thinking. This is never right
corner to get a new one. I'm just making a new one. This is actually part
of a text envelope. So it's always nice
to use your scraps. Take this one. I like this one. This is actually an
invoice from my dentist. Scrappy paper as well. No clue what this
is. This one here. This is the triangle
that was working. Put it on the opposite side, so I can difide this one more. White. The background of
this one is totally white. You see me having the
variation in lines. These are the same, but since these are going this direction, these go in the horizontal direction,
they do look different. Mm hmm. Put this here. And see what it looks like. Do I need to change something? Maybe this one is just
too busy for the rest. I like this one in the middle, but this one is
maybe it's too busy. I could leave it, but let me see what would happen if
I take another white. I actually have this
music sheet painted over. I'm going to take this one out. This would make it
look even better. I think I'm going
to leave it as is. You saw me looking for contrast. You saw me for not only
variety in contrast in tones, but also variety of papers. This is just more simple. You have more texture on this
one, but it's more busy, but it works together
because the white is quiet down. This one would work. Actually, what I do now is
just I'll grab my glue stick. If I do this in my sketchbook, I don't really care where
I'm going to put this down. If this is going to be a card that I'm going to
send to someone, then I'm going to let me see, I just grab another card. I can show you even better. Then I would take the
middle one. Take my glue. And put this in the
center of the card. Could measure it out.
I'm not going to measure it out because I don't like the measuring too much in here. I'm just gluing it down and now have an anchor for the
rest of the design. If I line these up nicely, then they would be
more or less straight. But I don't know if you see
the lines through the gesso. This line is it's not
really straight line. It, it goes a bit down, so it could be deceitful for your eye, that's
not centered. Beware of that. But like I said, I don't really care
too much about that. I would actually meson them and it's sento like this and
if it doesn't really work, you can still take
it off because a glue stick takes a
while before it dries, so I'm taking it off and
I could reposition it. I didn't have to now, but
demonstration purposes, of course, I'm putting it down. And now I just start
gluing the sides. I'll speed this up for you. Okay. Well, then we're
done with this one. Is it perfect? Not
at all. Was it fun? Definitely. Did I
learn something? Yes, about the contrast, about what shapes I could make. And actually, this was my inspiration and
with the same block, I ended up having circles
instead of this one. So yeah, I think this
is a success and I'm so curious which
pattern you actually chose and what we will see in the project
resources section so we can all enjoy your paper patchwork
and could comment on them. But yeah, this is mine.
10. Taking it Further: I was finishing up, and I was like, Yeah,
I could stop now. But no, I'm just
going to continue. I got some more whites because this would
look it looks fine. But if I make more whites, it will probably
look a lot better. So divided my so
I had my whites, and it could make
this white, too. But what if it would
be the larger picture, and you would have a
white circle here. And this would be just
a different color. How fun would that be? It's all of a sudden,
again, a different quilt. Oh, you get so much inspiration with doing this paper patchwork. It just keeps my mind on going, and I get so much inspiration. I'm going to change
these around, by the way, but I'm
going to glue them down. And I hope I'm going
to make someone really happy with this cart. Otherwise, I'll keep it myself, hang it up on my wall
because I like it. And I was talking
to you about making contrast and see
where the lines go. But this should come actually
naturally because yes, you could follow all the rules. But the best rule
to follow is follow your intuition because it makes your artwork look so much nicer if your heart
and soul is in there. And that's what everybody did when they made
the real patchworks the heart and souls in there. That's what they are known for. So please do that
with yours, too. Rules are there to
help you to guide you. But your intuition
is there to follow. Yes, I call it done, Brad. For now I'm calling it done.
11. Final Thoughts : Thank you for joining
me in this class. I hope you had as
much fun making paper patchwork as I
had making this class. I can't wait to see
what you've made, so please upload your project to the class project section. It's so inspiring to see all the different interpretations
on paper patchwork. And please leave
a review because that will not only make
me a better teacher, you will also support
my work here on Skillshare and you will help other students find
this class more easy. Please keep on playing,
keep on exploring. And remember, each
piece of paper can be turned in
something beautiful. Follow me here on Skillshare if you want to get inspired
with more lessons, want to keep updated for all the upcoming lessons and
for now, happy creating.
 Anna Berends van Loenen, Professional Messmaker