Transcripts
1. Introduction: Ta Ma. Are you getting into
the Christmas spirit? And do you want to have
some creative fun? Then join me in this
Christmas bubble class. I'm Anna Birn Salona.
I'm an artist. I'm a professional mess makeker and I'm a skill shared teacher, and I'm going to guide you
through the whole process. So it doesn't matter if you're an advanced artist or if
you're just starting out. Because I'm going to show you how you choose the
right bubbles. I'm going to show you how
you choose the right colors. I'm going to show
you how you mix your paints and
then pour them into unique Christmas bubble that's going to be your class project. But we'll also spice up your Christmas tree or will be a perfect
gift for a friend. So if you're ready to
have some creative fun, and if you want to make a mess, then come on and join
me in this class.
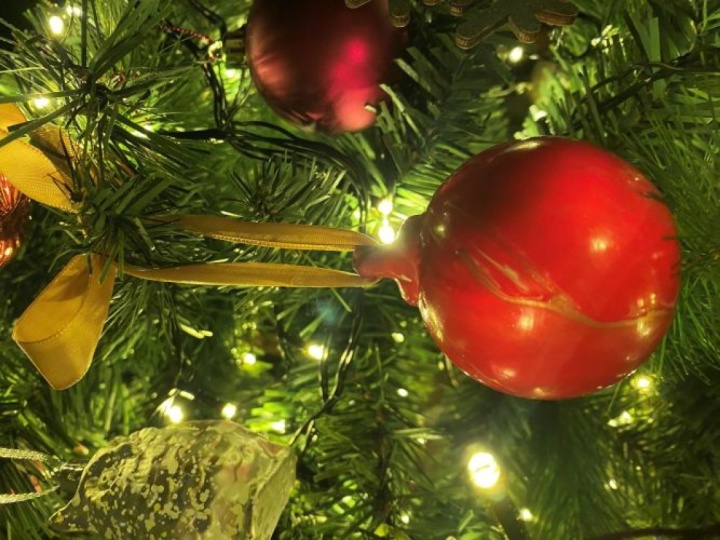
2. Supplies: First, we're going to need the star show, the
Christmas bubble. I would recommend you to
use whatever bubble you have lying around and
that you're not using. At the thrift store because it doesn't need to be
anything fancy. Even though I prefer
to use glass bubbles, you could also use
ceramic bubbles because both of them are nice and smooth and the paint
will flow nicely over it. You could also use
the plastic bubbles, but the reason I don't is because plastic
bubbles are usually made of two separate parts and when they're
attached together, you get a slight rim
around the bubble. When you pour paint
over the bubble, you would still see that rim. If you don't mind,
feel free to use it, but that's the reason why I
like to use glass bubbles. Glass bubbles more accessible and cheaper than
ceramic bubbles. So that's why I use
the glass bubbles. Before we can paint them,
we have to clean them. You can use alcohol or vinegar. It's just to decrease it. I like to use for this example, but I use both actually. But for this example, I'm going to use the vinegar
and I'm using spray vinegar because that's what
I'm lying around and that's because it's really easy. I just spray the bubble and
clean it with a paper cloth. When your bowls ready, we're
going to put it on a stick. And the stick I like to use is reusable straw because like the word says, you
could reuse it. You can buy it like everywhere, but to keep the
stick standing tall, you need a piece of styrofoam that I usually use or
like in this case, a piece of flower foam
just to get your stick standing tall so your
bubble would stay on top. You won't have to touch it with your hands
until it's dry. Of course, we're going
to need some paints. You can use the premixed paint. This is just ime, you
can buy it at Amazon. You can buy any kind of
premixed paint you would like. It's easy. But if
you have to buy it, I would just say don't buy it. Go for the regular acrylic
paint you have at home. For example, this
heavy body paint, you can make it more liquid
when you add a medium, and I like to add an
acrylic flow medium, but you could also add just a regular glass
medium or met medium. See if you have something
at home that you can use and otherwise,
buy the flow medium. This is a simple
one from Amazon, so you don't need
expensive stuff, but you could also
buy pouring medium. But if you want to mix them, you have to mix them
in a cup, of course. You need not only as many cups as the colors of paint you have, but you also need
an extra cup where you put those paints together, but I'll show you
during the process. And if you would like to
hang your bubble in a tree, of course, you need a
small piece of ribbon. Well, I think if you
have all these things, we're ready to start.
3. Prep your Baubles: First off, we're going
to clean this bob. Why? Because if you put
paint on here straightaway, you probably will fall off or wouldn't attach as much
or as beautiful as it could. That's why we're going
to clean this first. First I'll take this off, and then we're going to
clean and cleaning is not only because you want to get the better
attachment for your paint, it's also to see if
this will stay on. This white bubble, you can buy them in every
color you want. I use them secondhand because
why would you buy them new if you have some lying around that you don't use because you don't
like the color. But the only thing is if
you put something on there, the bottom layer could
shift because they're old, they're not really attached or the color isn't in the glass. It's like a slight
film going over. And when that happens, it's just a waste of your pain, it's a waste of your time. So what I like to do
is when I clean them, I can see if this will let go, or if it will stay on. Well, I'm using vinegar right
now and I'm using spray. Why? Well, you don't have to pray the one that I close by. And I rub rub this. And vinegar or alcohol will get rid of the
grease as well. That's why it adheres better to will adhere
better to the bowl. Well, now it's completely cleaned and we can
start using it.
4. Choose your Paints: Now it's time to
choose our colors. And when we choose our colors, we have to think of two things. First of all, they
need to be harmonious. Because when they are not, I'll show you on
the color wheel. Harmonious, I mean,
they're blue, green, blue violet, maybe
this side of the color wheel. They are nice together
because if you take them on the opposite
side of the color wheel, for example, red and green, the typical colors
for Christmas, you put them in a cup to
make the marble effect. They could blend and you
get a brownish color. If the muddy brownish color
is totally your vibe, please go ahead and do it. If not, I would recommend you take the colors that
really sit together. So in this case, I took
blues and I took this one, the golden to give
a shimmer effect. And yeah, they will
probably go good together. The other thing you
have to think of is don't make them
too much alike. This is dark one, this is
like medium light one. So you can actually
see the marble effect. Otherwise, they're too
close together the colors, and you won't get the
nice marbyn distinct look that you're going after. So please take colors that
are not too much alike. I don't have to be
the dark, the medium, the light, could be because then you get an obvious effect. But at least take two of them that differ enough.
This is the blues. These are actually pouring
acritic these are ready made. You can actually go ahead. You don't have to
add anything to it. If I go for more than heavy
body paints like these, and white, it's a bigger
bottle, so I'll keep here. Then we have to use medium
to make more liquid. But over here, I took two
colors are harmonious. They're more on this
side of the wheel. But still, they're
totally different. This one is darker,
this is a bit lighter and there are
two distinct colors. I wanted to add the white. It's going to be less
white and then I'm going to use from this
golden yellow and this concum pink because I want to have a liltle swirl in there just like I'm
doing with the golden. Over here. I'm going to two medium colors
and one light color. Well, please pick the ones you want to pick and
I'm going to prep, and I'll see you
in the next video.
5. Mix your Paints: When you use premixed paint, it's fairly easy to prep before you pour because you don't have to do
anything with it. The pouring medium is already
in here with acrylic paint. What we do we'll grab a cup and we'll grab
one of the colors. It doesn't really matter in
what order you want to do it. The only thing you
have to be aware of is when you want to see
more of a certain color, just put more in there than from the other colors.
Put this in there. This one there. You know what? I think I like a little bit more the dark. Put it in there again. Just some dots of the
golden, and that's it. You're ready to go. When you use regular acrylic
paints like this one, it's heavy body paint, but it doesn't matter if it's
this brand, cheaper brand, or if it's like golden, you need to dilute it to make it thinner,
to make it pourable. If you use high flow
paint, for example, you probably don't
have to add as much, probably even nothing compared to this one, which
is really thick. So what we're going to do? Again, we grab a cup. No and we put some
paint in there. But then we have to add
something to liquefy it. I'm using some acrylic
high flow medium. I'll just pour it in there. And usually it's about 50, 50. But I'll just to mix it to
see if the consistency works. You can use the spatula. You can also use
those straws that you pin the ball on later on. I'm going to mix this for you. It looks like since you
put white on there, it's going to be lighter
but not going to get his own color back because
it's going to be transparent. But think of it if
you dilute paint, it's going to be more
transparent as well. So don't make it too thin
and if it's too thin, it will just slide off the
Christmas bulb anyway. To see if you have the right
consistency, get this out. And see if it drips. Well, it doesn't
really drip yet, so I need to put in
a little bit more. Not too much more.
Like it's Christmas, I can compare it
with chocolate milk. If you have the cheap
chocolate, pre fat milk. Well, not the prefat you want
to have to do with powder. It could be really
thin. That's too thin. If you have the
melted chocolate, it's just too thick. You have to have the
right consistency. So what you do is like
the chocolate milk, add it with a bit of cream
to make it really crispsy. And then it's a bit thicker. And that's probably about
the right consistency. See this? I think this
is more or less okay. I actually drip from the cup. You know, it's okay. I can drip a little bit more. I'll add it teeny,
tiny bit more. Yes. This flows. Okay. We're done. But we're going to do this for every color because we cannot
put them in the same cup. You have to do three
different cups and then add them to together. We have the three pains. But I'm not going
to put them all in together because maybe we
need a bit of it later on. So I'm going to grab. Whoop. Put this aside. An extra cup, and I'm going to put the different
pains in here. This one in there. But the pink in there. It looks less, but as you saw the pink just went
all the way down. Just a tiny tiny
teeny tout white. Maybe just a little bit more pink because I love the pink. And we're done. Now, it's the same as this one, we're ready to pour.
6. Pour your Paint #1: Oh, you're going to
grab our first cup, and I'm going to pour. And while I'm pouring, I'm going to swirl. Make it go down
nicely on each side. I'll leave a little bit in the
cup. And now it will drip. But as you can see, I didn't cover everything. So I need to help it a bit. So it will cover everything. It's I mean, it's, it's round. And usually what I do is
grab the stuff that came down and put it on here. Stuff that came down
and put it on there. And I'm going to make some new drips because I don't want to interfere
with the pattern. But I do want it to
go all the way down because top side is going to be the bottom
when it hangs in the tree. So I have to push it everywhere. And I'm hardly touching
the ball when I'm doing this. The bubble. I say bowl because, yeah, and we say Christmas bowl,
it's Christmas bubble. I had to get used to that word. So I'm sorry if I say bowl, I mean Christmas bubble. That's just because English
isn't my first language. And if you don't
have enough lying around here on the bottom, you can always put something from your cup that's
leftover in there. So I don't want to
push it up too much. Like I said, I want
to keep the pattern. So if the drips go down with
a nice and lovely pattern. I will speed this
up for you a bit. Thank you. Got the drill. Okay. Let me see now, I'm grabbing something
from the cup. And I'm taking it and putting
it on here, let it drip. But trying not to interfere
with the pattern too much. Sometimes those little creeks just because it won't flow too
well if you help the flow. They will close themselves. Usually, I do this
on the ground, just because of the mess, but because of the video, I'm doing this on the table,
and now I'm like, This is so much better because I don't have
to lie flat on my belly to see where I still have
some spaces to fill. I have to check, but I think I got everything covered now. Oh. Well, this is it, and all we can do now is
just wait for it to dry. When's all dry. I can
show you the rest.
7. Pour your Paint #2: Before you go on to
the next bubble, make sure you cleaned your hands or anything else that
you're going to use. I mean, you can
reuse your tools. I reused my flower foam, and I'm going to reuse my pedal because why would I take a new one if I have a
perfectly good old one? But the only thing is
you don't want to have the blue on the other color. So cleaned my hands, more or less when there's
blue in my hands, it's just not it won't give way, but let's see how
this will work. And see, I'm swirling
a bit as well, so I'm going to it's going
to go almost everywhere, but also because it makes
it interesting pattern. Leave a bit in the cup,
just in case I need it. And like I did last time, I'm going to scoop
what's underneath. And put it on here. And you see, I used a bit
more orange than pink. And yeah, I like the white part, but actually, not as much
as I thought I would. So there's one thing
that you could do. You could leave like this and work the same way, like I did. You could say, like, Yeah, what if I just add? That's why I left
a bit in the cup. What will happen if I add a little bit more pink to the mix? You see, it's getting more
opaque instead of marbly. Do I want that or don't I? If I don't, I can put
something on there again, and it could be from the cup. But it could also be the drips. And see what happens
if I do this. I mean, you can let it
go all organically, let it flow the way you want. But you can manipulate
it as much as you like. If you're like, No, well, I like the white a bit
while the white is going more down, but I
don't like it enough. I could use some gold or
silver for the shimmer. Maybe you won't see the gold
well enough because yeah, the gold is quite
similar to the orange. I could use silver, but let me see. What if I shall I just
put it on here? Why not? I'm going to experiment,
see what happens. So you see what happens if
you start to experiment. Do I like those drops on there? I'm not really sure. We'll see. I'm going to grab this fill up. And since it's all
going to pour down, that's why it's called
pouring medium. You'll see the drips anyway. And you see over here?
I got it more mixed, and now I'm mixing it like this. And if you do that
with opposite colors from the color wheel,
it gets too muddy. It's already getting
muddy when you have colors that are quite similar. And that's also
because the paint that's lying underneath
is just Well, it's getting muddy what if
I take it from the cup? Yes, I don't have the
muddy colors too much. I know the pink will actually
go down in orange too. Big part over here. And when you have like the part
here, I'm going to grab it. It's not the best thing
to do, but if I like, do this, it's going
to drip by its own. Now it's not going
to be all the way. It's going to drip even better. So you get a marbly effect, too. But still, I think I'm going
to add a bit more to it. I'm not going to grab the bubble again 'cause I don't want
fingerprints on there. The colors combined. See? I'm just adding it
and making it flow. So I'm manipulating this a bit. So it's not only
like happy accents. The success could
be in manipulating, but your downfall could be
in manipulating as well, because if you
manipulate too much, it doesn't look
as fancy anymore. And I know a lot of people do marble bulbs with
putting them in a bob. It takes to much
work, and it takes up too much materials that I
don't have lying around, so that's why I choose
to do it. Like this. Anything is when your bubble
is just a bit too bank, you could probably see
that the drips are going to that side and
not to the other side. That's okay. But make sure
that the bubbles the drips are going down and not that you
get a pimple over here. Little burst because then it's probably not as nice anymore. I'm sorry, probably hear
me cracking because it's a styrofoam that
I'm leaning against. Well, now we have two bowls
and we just have to wait and see what happens
with this one.
8. Once they are dry: After a day or so, your bubble will
probably be dry. I had this overnight or
actually two nights, it feels fairly good, and this is what it looks
like right now. And the only thing we have
to do is put this thing back in and be careful. It's not too because you can scratch your paint,
of course, you can. But it's more when you like hold on too
tight to your bubble, it might break
because it's glass. Yeah, I just put this on
there without varnishing it. You can varnish it. If you varnish it, I prefer spray varnish
because it's easier and I do it outside
because of ventilation and because you don't get
those streaks from a brush. That's why I prefer
spray varnish, but you don't really have to. I do it sometimes and today, I really didn't
like it too much. Well, we have to
hang it on a tree, so I put on a ribbon. I. And just tie it up here and you're done. You can hang it in
your Christmas tree or you can gift it to a friend. Well, with this one,
it was just bit bent, so it got stuck on here. Well, you can just yank it out. But then it's possible
that you would, like, get chips off of here, and this is something
you don't want. So if you come across
one of those, of course, you can yank it off because
the the hanging thing, the hanging thing, I don't
know what you call it. This thing will
go over it to you probably won't notice it if
there's anything chipped. But still, I really don't
want to challenge things. So one thing that I like to do is either get pair
of scissors or an exacta knife and really
gently go through the paint. So it won't leave any
marks. Winger done. You can put this one in, and I know this
one is bit tight, this one isn't a
really expensive one, so that's why it bends easily. Put this in here. Flips.
I'll just do it like this. And yes. I'm done. Put this in my tree or
gift it to someone. I know these are
explosive colors, not everybody likes
this color combination. But hey, not everybody
is a traditional person, not everybody loves a
traditional Christmas. So there's fun. There's a combination
for everyone. And I know these are
Christmas bubbles. If you like these colors, they look really summery, so you can hang them all
year or just in summer. I just leave all the
fun until Christmas.
9. Examples: I wanted to show
you a few examples. This one I made earlier and
you see those dots on here. That's just because I took
colors that were just too close together and I
thought it got boring. To make less boring, I
just made dots on here. The pain that I used was
just really heavy body, called a three D pen. I'll check if I
can find it really quick. Yes, I found it. This was not the three D pen, but this is a fact liner, but that's more
or less the same. It has paint in there, just regular acrylic paint. Well, heavy body, of course. And because it has a small tip, you can just squeeze in it
and get blobs on there. But you can do this with
regular acrylic paint as well. Just get a small brush or
something like a toothpick, and you can make
those dots on there. But first practice on a
piece of paper or something. When you put it on here,
it would be nice and neat. Of course, you can put it on here straightaway you
can wipe it off with a cloth or a piece of itching
paper if it doesn't work. But just see for yourself. This is a really big one. You can hang this in
the tree, but usually I put this on a table
as an ornament, but this is a plastic one. I want to show you
because I'm not sure if it's clear. Use
a plastic one. You have this line
because this is where the two halves are connected. Even though you have
a real busy pattern, you will still see this line. If it doesn't bother
you, just leave at this. But I know it bothers me. That's why I usually just
use the glass balls. I'll show you another example. This one actually
has a cool effect, but this is what happens. You seal those crackles because the layer underneath was
just too old to purse, so it cracked when really
when I cleaned it, but when I put the paint on it, and I was lucky that
it stayed on here. So I just see those cracks. But sometimes the
paint will actually go off and you won't
have anything left. So that's why I
really want to clean it first with vinegar
or with alcohol, so I know that it's not
going to crack as much. But on this one, the effect
is actually really fun. It looks like spider. So you can actually make a
Halloween bowl out of this. For next year, of course. This was a dull one as well, so I decided to paint over
it like I did in actually, I'm going to show you with some leftover paints in
different video. But if it just doesn't work out, because not all
of them work out, you can easily paint
on them and you have a lovely ball to give away
or hang in your tree. Well, different. It's
more Christmasy. Well, I have loads of options I can show you because
it's addictive. So when you start doing it, it's going to be terrible
everything will go wrong. It will fall over.
Everything gets messy. But on the other hand,
when it works, it works. You see the gloss on this one, I have varnish on this one, so the glass is
really high. Yeah. Go ahead. Try. Have fun.
10. Leftover Paint Projects: One thing you can do with
the left to paints is grab a bubble and you don't
put it on a straw, you just hold it tight yourself because now you want it to
have it nice and steady. You could also just grab some paints and you
have a line like this, you make some nice
marks on there and you can make flowers. Or you can make random marks. Just be aware that
this paint is diluted. They won't cover as much as they do when you paint with
regular acrylics on there, which is fairly
easy to do as well. You have to be aware
that when it's wet, it could still drip. But if we are going for
more watercolor effect, maybe you probably don't mind. And you could use
regular brushes. I mean, these are
the simple flowers. You could think
about it a bit more. I'll show you on the other
side and what you can do more the abstract
work or maybe dip in the paints that has multiple colors and
dots like this. So much is possible
with leftover paint. I'm not saying you have
to do it like this. I'm just telling
you that there's so much leftover from a project. If it's the bubbles or if it's the paint or if it's paper, see if you can reuse it. It's not only more sustainable for the
environment, for the Earth, but it's a lot more
fun as well because it makes you creative in thinking, well, what are we
going to do next? The fun thing is, if you put the paint on here and
you don't like it. Just grab a cloth or like
I'm doing right now, just a piece of paper towel
and you can get rid of it. So so many possibilities. If it's dried up already a bit. Still have the
vinegar over here. But you can spray
with water as well. And you can clean it
up and start all over. So don't be scared if you think I don't have any fun
painting skills, you do. Beware. My fingers look blue. You don't see it on here please clean your hands before
working on something. Maybe it won't go it
off, but as long as it don't transfer, otherwise, you're making a lovely
bubble and it's pink and all of a sudden
get blue fingers. So I just want you to be aware. And most of all, have
fun. And you know what? I think I'll keep on
playing myself a bit more. For the leftover paint, I just grabbed an
old baking tray. And I'm grabbing
a piece of paper. This is just some
random leftover paper. And with the paints
I got leftover, I can actually make
something extra. So I still got some in here. Still, I got some pink
left. Going to a bit. And then I'm going
to move the paper and immediately see why
I have this baking tray. You can actually put protective film
underneath if you want to because then you will get everything that falls down and you can have another leftover. You can repeat all the
leftover processes and with that leftover paint, you can make acrylic skins for your paintings or whatever. But now instead of
lifting the tray, I'm going to just lift
the paper and I'm going to go to every corner, at least if I have enough paint. I'm going to move
the paint around and this is why
it's pouring paint. There are lots of techniques
how you can actually pour on paper or flat surfaces. But I'm not going
to teach you that. That's something
you can learn in other maybe skill
shared tutorials or you could learn
YouTube tutorials, but I'm just going to move this around and you see a unique art piece that you
cannot even make yourself. You can actually see
it involve coming to life and I have a bit
here that I don't like. Moving I didn't do well, this is not something
you should do with the pouring paint like just
put something in there. But hey, like I said, if you want to learn
those techniques, you can go somewhere else. This is just a leftover
paint fun projects. I'm going to move the paint
until I'm completely done. Then I'll come back
to you, no, first, let it dry and then
I'll come back to you with what we're
going to do with this artwork because we can
keep it as a piece of art, but we can do different
things with it as well. So the paper that I just used. I think this is cardstock
or a mixed media paper. I'm not sure because
it's leftover paper. I'll save most of my leftover papers because you never know when you
have a different project. But like I said, I'm going to finish this for you and
I'll cut back to you later. When this piece of
art is nice and dry, you can leave it as is. This one has a little
bit of shimmer in there because of
the pouring medium. You can leave it as is, or you can make actually
something from it because if you make your Christmas
bubble for a friend, you probably want to add a little card to say,
why you give it to them? Did you appreciate them. So what I love to do
is this is a punch. You can also draw
something on the back. For example, push this in here. I get it, make it open, so it sweeps out. Nice little cart. Actually, it's even a
small bubble as well. Hodes. Smaller punch. It's a hole in there. Then we get a lovely piece of ribbon. This is a label you can add
to your present and say, Well, dear friend, love
you for being a friend or thank you for helping
me out doing this or that. Just a way to say that you
think on them and why buy prefab labels if you
have those lying around, they're so much more personal and it's fun because it demtly matches
the bottle you've made, or maybe put it in
your R Journal. Never let anything go to waste.
11. Final Thoughts: I hope you had fun during this course while
mixing your paints, pouring your paints,
making a fun mess, making those lovely, shiny
and unique Christmas bubbles. And I hope you're
going to make loads more to spice up
your Christmas tree. Please upload your project to the project and
resources section. This is where you can fill in all the details
and press publish, so I can see your projects, comment on it, and others can get inspired by all
the lovely work you did. And I would be so
grateful if you would also leave a review because
when you leave a review, I know how to get
a better teacher, but it's also for others
to find this course more easily and maybe have
as much fun as you did. So for now, I just wish you
beautiful Christmas bubbles, and most of all, a
merry, Merry Christmas.
 Anna Berends van Loenen, Professional Messmaker