Transcripts
1. Introduction: Do you own a jelly plate? Are you looking for some
creative challenges that go beyond the usual techniques
from a jelly plate? Or are you looking to break free from those
constraints of precision? This class might
be right for you. I'm a pen, I'm an artist, I'm a professional messmaker. I'm a teacher and I'm a
recovering perfectionist. And jelly plate help
me to do so because with a jelly plate you never know what
you're going to get. Every print is unique. Yeah, there will
be some accidents, but some of them are happy
and sometimes you even get a result that's beyond
your wildest imagination. I use a jelly plate to make
collage paper for my art, but I also like to draw and
paint with my jelly plate. In this class, we're going to look at painting
on a jelly plate. The first technique
we're going to discuss is a single
layer technique. With a single layer technique, you paint one layer on the plate and then
printed on paper. The second technique
will be multiple layers on the plate before you
printed on the paper. The last technique is
somewhere in between. You're going to paint one
layer and print that layer, paint another layer
and print it again until you have multiple
layers on that paper. This class is for
every one jelly plate, not only for the ones that are looking for creative challenges, but also for beginners. We're not going to go over basics of printing jelly plate, but since we're
going to go through those three techniques
step by step, they're easy to follow even for a beginner if you
want to make a mess. If you want to have fun, if you want to learn to let go of perfection on a work swiftly, this adventure is unadmissible
for your creative journey. Come on and dive in and
let's print together.
2. Class Project: For the project of this class, you're going to use one of the three techniques that's going to be taught
during this class. A single layer could be
multiple layer on the plate, could be multiple
layers on the paper. You can use the images that are provided in the resources
in the workbook, but you can also use
your own images. And feel free to upload multiple projects because
it's fun, it's addictive. You can upload your work when you go to the
project section, project, fill in the
details and upload. I'd love to see a comment
on each other's work, and I will definitely do, because every print
will be unique. It doesn't matter
what image you'll use if you like this project, if you like this class, I would really appreciate it. If you leave a review, you can do that in
the review section. Just press the button, send. If you leave a review, it will not only help me to
become a better teacher, but will also help
other students find this class and have the same
fun results as you did. Of course, you can also share your work on Instagram
or social media. But don't forget
to tag me because I'm really curious and I
really want to see your work. And I'm really proud
of what you've done and hope so, are you?
3. Tools & Materials: You're looking at
the set up that I prefer to use when I'm
painting on a jelly plate. Since the paint dries
fairly quickly, we have to work quickly. And then efficient
set up is crucial. This is a set up that works for me, maybe it
works for you too. Just find the way that
suits your way of working. First, over here we
have the jelly plate, start the show, and this is
where all the magic happens. Underneath the jelly plate, you find an image. This is the image we're going
to use in the first lesson, or at least with the
first technique. I put it in a
protective cover sheet, which I taped down on my desk. We move and the jelly
plate won't move. Next it, I have my
palette on my pellet. I put down all the paints, I mix them, or I'm going to put them in the
order I'm going to use it. You can use the tariff
palette that you can use, any pet you have on hand. We're going to paint with
this paint on the jay plate. And for that you're
going to need some brushes, any kind will do. It's easy if you have a
smaller one for the details and a larger one for
the larger services. But again, use whatever
you have on hand. You can rinse them in some
water and then dry them off on a cloth or a paper towel
or whatever you have. You don't even have to
rinse them if you don't want to get some nice effect. Well, well we'll see. We
also have this prayer. This prayer, if you jelly plint print a lot,
you know what it is. It helps you distribute
the paint on the plate. Since we're painting
the brushes, we're not going to
use it as much, but we're going to
use it for like a background to roll out the paint and roll off the excess paint on this
piece of paper here. I'm right handed. So
that's why I have it here. We can only paint on
the jelly plate paint. I use regular acrylics. You can use soft body
or liquid equylics. They tend to dry even faster. I recommend just go for the
regular everybody wants. When you get the hang of it, you can always experiment with different kinds
of acrylics later on. You don't need the
precise colors I have. Just use what you have. These are colors
I'm going to use because they fit
the images I have. I have a red, I
mean it's a pyle, but you can have catmium. Choose your red. I
have a light blue. I have a darker blue, light
green, a darker green. I have a raw umber and have a yellow upside.
Then I have a white. And above titanium, I have
them in larger bottles, but any size will do
last but not least. I have the paper
which we're going to pull the print of the
plate and the paper, it can be just regular
printer paper. It could be card stock paper. Used the paper you have because
I don't want you to buy new stuff if you have most of the things you
need lying around at home. In this plate, you
have like an overview. It really zoomed out
when I'm going to paint, we're going to zoom in. You won't see everything. I'm going to show
you the pellets. So you're going to see
the paints, of course. I'm going to show
you gelic plate, but more up close so you
can see it more in detail. Well, it's time to dive in.
4. Single layer : Well, in this first
lesson we're going to work with just one layer. And we're going to
make this popsicle. And I just printed it out. It's in my resources and I put it in this
protection sheet. But when I put my
jelly plate on this, it starts to move. And I don't want it to move. I want to lay steals,
get better print. One of the things I like to do is put it down and
get some tape. It could be any tape. It doesn't need to have to be
sensitive tape or anything because it's just taping
down the plastic here. Here, I'm going to a
piece on the other side. Now, it won't move. It's safe to put my
jelly plate on there. You see my jelly plate is a letter size and I
print it out a four. It's smaller so
I'm just going to position it where
I want this to be. It's still a bit
dirty and it doesn't need to be dirty if you
don't want it to be dirty. But I like the
crunchy look gifts. I'll stick with the dirty, but you can easily clean
it with baby wipes or water because the paint
is going to dry so fast. I'm going to put it
out on the pallet. Before I put it on here, I'm going to see
the colors I need. It's like red, white, blue, and some pale color. Put down the red mode of course doesn't open. Always I want you larger bottle always gives a larger pull. Doesn't really matter, but
I never try anything away, just make extra prints on, it's a white blue. But I also see it's like
light blue and dark blue. Because you have
the shadows, well, I can mix it up with
like, for example, black. Think I'm going to
use some dark blue. This is a prum blue. I think I'm going to use that
for the background as well. Over here, it's a little d, make it too much. Again, this is darker white. It sounds really weird. Darker white. It's like
when you're painting snow, it's not pure white. You have like the hills on
top. And so you have shadows. And we have it here too and we have to give it a shadow color, I think because it's just a small difference just to get to use the blue or the brown, the raw umber. I'm not sure yet. I need to The wood
color just titanium B. If you just Kelly printing
it's easier to have smaller tubes
because it comes out easier than the archer ones. But it still works. What I'm going to do
let's shift this a little bit so it's work place for you. I have to work quick because it dries really
fast on the plate. I usually going to mix
those up before it starts. I have the darker
and a lighter color, but I do it quite often. I'm not going to
dilute it or anything. I just put it on like as it is. Put it on here because it
keeps my perfectionism away. And it makes me
just work quick and not think about the
weird details And gives me a nice tilt because I'm going to
show you what it's like. Maybe because you don't have
as much experience as I do. I'm going to use mat medium, but you can use any slow,
dry medium you want. Because then I don't
need to mix it up all before I start. I want to hear I can mix it
as I go with the brushes. It doesn't really matter if it's round or flat or
somewhere in between. You can use different colors, different brushes if you
have to work really fast, but you can also just wing
it. That's what I do. If you one brush, then we're going to use
some water, water on here. It's a beautiful effect. But what we want to
achieve today then, we would have a cloth or
something to dry it off on. You start with this white, because usually you're
going to do paintings, you do the details
less on a jelly plate. We start with the details first. Why the lower layer? The bottom layer. That's what
you're going to see on top. Well, it's printed
because you're going to do like this on the top. The bottom layer
is going to be on top that the shadows
on this side. When I flip it, it's
going to be on that side. Let's even though the extender makes it well, instead of 2 minutes,
you can take like 5 minutes to work on it. You'll have to be fairly quick. So that's really good not to think too much about
what you're doing. And I think I'm going to
use a bit of the blue, make a different kind
of white in here. Here. Yeah. I'm going to dry off the same brush and
I'm going to you, one thing is when you have
to, you can like free hands. But when you have to P,
then if you celebrate, you have like a guide. It's so fun for your perfectionism as well.
Because you have a help. I love a little help.
Every now and then, everybody does a little
darker in between. Darker, yeah. Shadows, winds. All right. Marsh and I want the shadows makes me hungry. What you go, I have to over here. You see I haven't rinched
it off that well, so you get like little, small pieces of see through. I don't want it. So quart
extra blue on there. It helps well to clean
it for the shadow. I think we go to the real We, I have it here for
the red as well. A great, well, I want to paint the
whole background and if I paint the whole
background blue party, it can dry too quick. So what I just do,
I'm going to like give it like party. You look. I'm just going to,
it takes me a bit more dark because I want to
stand out from the bloom with a different color,
Little bit more dark. I was already drying a bit, so the thing I'm going to do now is I'm going to get my paper and I'm just going to use
some card stock paper. And I'm going to
put it on there. You can use the bearing
just to press really, you can use a Brayer
to press really hard. But I like to use my hand
and see it worked out. Every print always
gets different. That's why I like about this. Oh wow. Let's see what happens.
This is the end result. Yeah, of course, when I
would have been painting it, I would have to shade, to shed board bit more here and post up a bit
with the blue maybe. But I like the roughness. I like yeah, the
weird kind of pain. Does it give? But I still have some paint
on here, left over. That's because the paint was
put on is a bit too thick. And that's what happens
when you do it, like with a pencil
or with a brush. So I'm going to take a bit of
just regular printer paper. Doesn't really matter
what paper you use. Let's see if I'm going to get the ghost prints
like the leftover. Yeah. But see, you still see a bit of ice cream
but not too much. So that means that I either
didn't use too much pain or I just was just quick
enough to pull it. Because it starts drying. Yeah. You can clean this off, you can leave it on there
for your next print. Something I usually do
when I have like paint left over like this is brush it on here maybe with a Brayer and get a
nice print of it. But I think I'm going to leave this pain on because I
think I'm going to use, I'm going to use this
for my next experiment. Clean the plate.
So you're going to see, well, not really clean. The cleaner you can see better. What I'm going to do
with my next print, let's do a recap of this single layer work quick because the
paint dries fast. Have your paint ready on your palette before
you start or use mat medium as an extender if you just want to work
a little bit slower, but don't be too precise. If you want to see every detail, use smooth paper to pull a
print because that's easier.
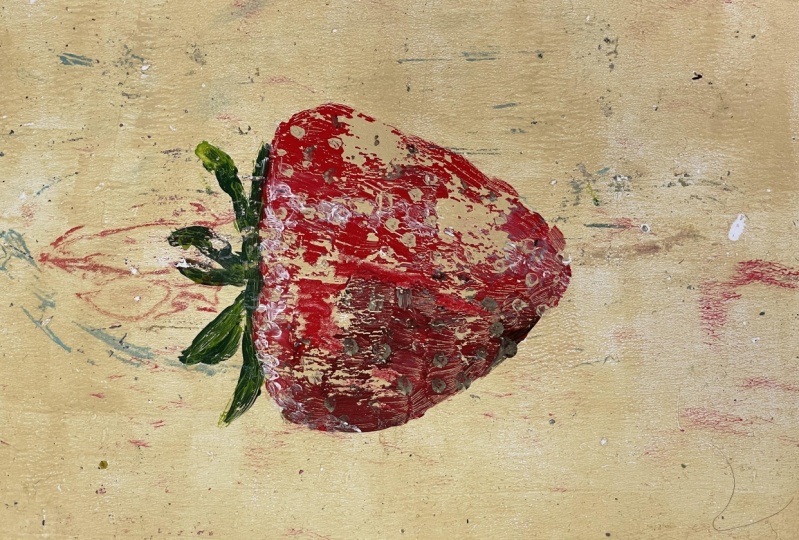
5. Multiple layers on the plate Part 1: Okay, this is the next one. It kind of sounds like we're living up because we're
doing multiple layers, but we actually have
some extra time. So we don't really
need the extender. It's still in here,
so we'll use it, but you don't really
need to because we're going to let the layers dry before we go on to
the next layer. Well, like I told you, you're going to see what it's usually on top of
the painting you have to put on here first because
you work like backwards. Well, the things I'm
going to see first are those tiny dots or like
freckles on the strawberry. And I'm just going to
those there over here. The light, I don't
do it too precisely. I'm going to do as a did
See they're darker here, so I'm not going to put
this color on there. Like maybe I'm going to put like a little bit more
of like raw umber. Let's see how it turns
out a little bit darker but they're still see
that much of difference. So it darker. Some spots I don't
like over here, they're so dark you
won't see them at all. So I'm not going to are
putting them there. This is so good for
you. Perfectionism. You're just going
to put some ducts, you know that there
needs to be precise. The whole thing isn't
going to be too precise. Yeah, I think I have enough but now I could like a color in the red but it's
just too much of a hassle. I'm going to wait
before this is dry. When this is dry, I'm going
to put the red on top. Well, waiting for it to dry
because I'm really impatient. I can already do like
a bit of the white. We really do everything because it's going
to be red on top, so it looks more red. Probably the end result here. And overhear that's
something as well. Now we can drink
a cup of coffee, drink a cup of tea and wait. Or you can get a blow dryer. I'll do this for you,
I'll be back in second. We usually, when I'm asked, how do you know it's dry, how do you know you can
put on the next layer? Well, it's a scientific thing, It's really hard you do this. Well, nothing comes
off, you're fine. You know, it's dry and, you know, you can start
with the next color. My next color is to be
red of over here on top, it's, it's going to be
really red in here. I'm going to put it like
on the background still. I'm going to move my
brush not too quickly. Don't press too hard because
if it's not really dry, I'm not going to ruin it well. But the white, it
doesn't really matter because it's a nice effect. And I don't mind that it dries while I'm working on because, Well, yeah, like I said, it has to dry anyway. It's going to be
fairly red over here. I'm going to make
it like the darker red like we used before. It's a lot darker here. Yeah. I'm going to keep in
mind what you put on first, that's what you're going to see. I usually put like
most of the red first, and then I'll do the darker. It's still mix, but it needs
to be more red. Raw. Umber. Yeah, well, I can let this try before I
go with the greens, but like I said
before, I'm impatient. So I'll probably just do greens. Right now I see lighter
and darker greens. And it doesn't have
to be precise, I just have a light
olive and a dark olive. Put them on my palette. And because you see the lights, it's like grains I want to
see that won't shine through. If you put dark on first, I'll just put on
the light first. Again, to precise, just a hint of light on the
movement on there. I don't even want
is in my brush. I'm going to blend it a bit. Yeah, I think this looks
like a strawberry to me, but I want to have
a background and maybe we can pick up
these crunchy things. So I need to put
the background on. I can work around it,
but yeah, I don't. I'm lazy. I just want to
get the whole background. So I'll just take a moment before I do
the background well, I'm going to use my expert technique again to
see if it's right. Yes, it is. So we can put a
background on the background. I'm not going to use a brush. You can if you want
to have the strokes, but I think I'm going
to use a Brayer because it's going to be more of a flat background and then the strawberry like this pop up. You can do it by
putting paint on here, but I think I'm going
to put it aside, put Bray on it and then on here I'm going to
use this like I, for the seeds on the strawberry. Still press lightly. I don't want to mess it up. I don't want to put
too much on there. That's why I want to
have a nice print, A thin layer, not too thin, because then I won't get
everything off thin enough. This is just practice. So you know how thin your
layer must be. Sometimes mess it, but that's
the fun of jelly printing.
6. Multiple layers on the plate Part 2: I'm going to take my cart sock, going to put it on top. You can use your bra,
you can use your barn, or you can just use
your hands like I do. Yes. I think I even pressure everywhere and let's
see what happened. It's so much fun. It's always oh, no. Well, see this happened. That meant that this was
probably dry enough. But I didn't put enough of the titanium buff on
top tube. Lift this off. One of the things I could
have done if I just put the print in like exactly
the same position, that's really hard now. I could put some met medium
on here and put it on there and sometimes I like
the grun shy look that has right now or I just start
all over, this happens. You see it happens
to me. Let's see. Yeah, I just put met medium on here. Let's see what happens. Let's see if I can lift it
off with the net medium. Well, and I want to have it like that's why you position it. You don't give it
as much as I do. That's why you position
it, right? Let's see. I hope I did it right. Believe the big crikey works. Yeah. No, I didn't. It didn't. What am I going to do? See what happens now. Yeah, I think that's enough. And see if I can
position you right. I hope I did. Otherwise I'm gonna just just get a go print. No, it won't go, it won't go anymore. What am I to do? See what it got. Sprint does. Oh, look at that. The
ghost print worked well. Not really what I want it, but better than the first print. And now you might be
thinking, I know why. If you can do it in your
experience, what am I to do? Well, I can tell you this
happens to everyone, but it doesn't really matter. That's part of the fun
and the learning process. That's why I don't use that
like expensive kind of paper. Well, not for these projects. At least this is one
I did just practice. It went up a lot better, but it still didn't get
everything off over here. Well, I like the granchy
look because you see, this is from the ice cream my
last time I want it before. Actually, I like this one
because it's not perfect. Now we have to think
of why did it happen. Could be not enough paint. Could be like too much paint. Well, I didn't put anything underneath, but I actually did. Just figure out, see
what happens to you. I love this one, I'm
going to frame this one. But yeah, that's what happens. Well, I'm going to do this again for you and now it's
going to be right. I'm going to do exactly
the same thing, but I'm going to set up a video. Well you can see that I just
worked a little bit quicker. I wasn't that good with yelights and things that
could have done it a bit. But yeah, since you've
done it before, I don't always want to
feel like doing it again. But overall, it
lifted up better. Problem probably
was I didn't dry this long enough before I
put the under layer on. The other layer I
put on thinner than I did last time because
it's too thick can pull. And when it's, it can pull, I use different paper, but that's just because
I had on hand. Sometimes you prefer
different kind paper a lot people like to do
it on tissue paper. See what works for you.
Again, different results, one I did yesterday. Still. It's fun. Yeah, I'm pleased so I could show you
that it happened to everyone, but still you can't fix it. Well, let's do a recap
of this multiple layer. Start with the details first because what's
first on your plate will be last on your paper and wait for each layer to dry. Otherwise, we'll smudge. Don't make the last
layer too thin. Otherwise, you won't pull the print and don't make
the last layer too thick. Otherwise, you will only
paint and the print either. Don't be too precise. It's not going to be precise
on your paper either. This is the fun of playing and
painting on a jelly plate.
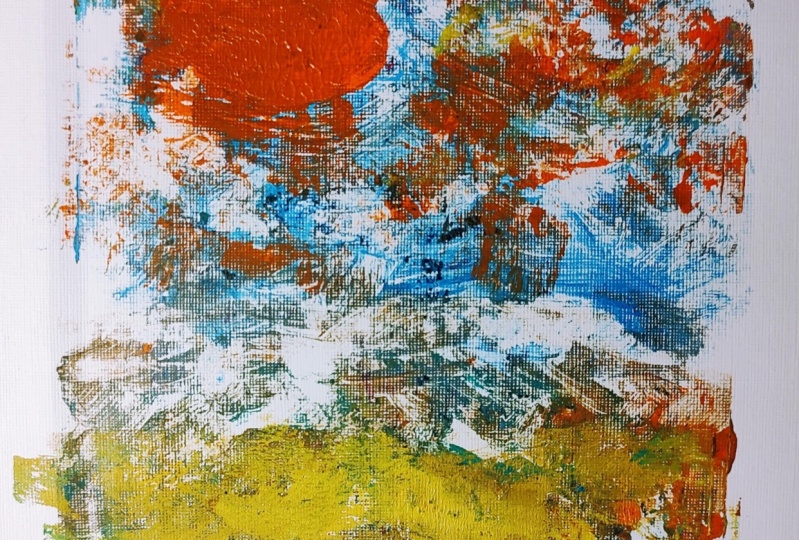
7. Multiple layers on paper Part 1: Okay, well, now we're going to do multiple
layers as well, but we're now going
to do the multiple layers on the plate. We're going to do the
multiple layers on the paper. While painting on the plate. Last time we were like
first the details and then we went backwards because
flipped over on the page. Now we're going to the
background and just build up. Well, that's why we're going
to start with the sky. This guy, we are going
to like blue with white. It's not rocket science. It's not really precise. The way you want to do it can
actually I put it on there, but you really need to. I think I'm going
to put it on here. Yeah, I'm still
going to do it here. Why? It has extra layers. Sometimes it's
quite nice to have that layer underneath
and sometimes it's quite nice when you're doing a
sky and you find out that too much bottom of your painting or your print is just a little
nicer than the top, so you can just flip it around. That's why I usually do
everything like this. I'm doing it a bit too white. I think maybe I'm going
to do like two prints. I think it's just too wide. I need it more blue or I can
mix it up, clean my brain. And that's what
I'm doing on site. I have like a piece of paper
and I'm just rolling it off excess P. I can just
go over this again, see where this takes me. You can use card stock, but I'm doing prints on paper this time just to
show the difference. I can put it on there like this, but since we're going to use different kinds of
prints on one paper, it's easier to position it. You have the positioning tool, you can show like this positioning tool you can put on here
from jelly plate, Not that cheap, it's easier
to find a different solution. I'm actually going to
use just like a corner. I'm going to put my
corner on that corner. So it's here, it has a side
of here, It's more or less, it's not precise, Maybe
that's in the charm of it. Let me see if I rub it down. Let me see what happens. Let
me see what happens if I lift it off. You see
it's more white. Actually, this
would be a fun one to paint a dog on
there or something. It's fun, not the background
I was looking for. I can either take like a pencil and make a dog
out of it because it's fun. Either leave it as it is because that's part of the charm, or I can
make a new one. I don't like it. I can
start like all over again. One, I can just I
have left here. Who's put it on there? I yeah, I'm not going to put
that white on that. Maybe I'm just going to
light blue finish on there. So if I do this mixing, well, see the upper corner, there was no percent,
I got a little bluer. See where it takes me,
then it's a little bluer. Now, I still want the clouds. Yeah, I can, but I
like these clouds too. Not too bad if I
take more prints, because left over papers are never left over
papers with me. I use them in my collage or I print something on top of them. Next time I'll stick with this. Yes, well the next under layer, it's like the grass
and like some of the hills here and
it's like greenish. Yeah, I think there's
some yellow in there now. I'm not going to print
here, of course, because then I'll go to my sky. I'm just going to do it here. Yellow. Just yellow a
screen put in here. I'm not sure if you
think I'm Mbling, but Yeah, I'm just
playing as you go, Swoop, se go here because it's almost a Kate here
to green here. And I'm not focusing on the
flowers at all at the moment, I'm focusing on this because
the flowers will be on top later on here, it's a lot darker, it's the heels dark as well. Here I need more yellowish. I can mix it up here as well. I don't want it to be too yellow because I think
I'm going to use the yellowish color
for grass there. I'm fine with this
just being green. I'm not wiping my
brush because I don't think I need to give
some texture as well. All I'm doing is I
didn't use Met medium. Probably wait too long, Put it up here in the corner
again and align it well. It's hard to align it
on the jelly plate. The positioning tool
is a lot easier to use if you don't have it. You can tape around
it so you have some thing you can measure it to a little bit of the
blue coming through. It's okay. See, I did some
greenish that's here. So they're here. Well, those are little surprises.
I'll work with that. But this is how it
ended up so far. No, I have to put in the flowers and the flowers are white and a little purplish. Take the white, the
dark green, dark green. This is more like yellowish
gray, the yellow ochre. At least I like yellow ochre, so I'm going to
use yellow ochre. You still need some of this? I don't think so.
Purple? Yeah, purple. Since we already have
a little bit of blue, I'm just going to
a little magenta.
8. Multiple layers on paper Part 2: Okay, well, here we go. I'm going to start
with paintings. I didn't work with any extender. I have to hurry up a bit. I should have probably this one Ms. Lisa gets legged edges and I don't mind if the like, the colors, like blends a bit. This movement there. Actually, I wanted to
do all this in one go with the things out there. But since I didn't
use the extender and I think I'm going to do
this in the second round, let's see where it is. That's why I have
to think ahead and not wow, you see what happens. Stu, I like it. Yes, I do. And I don't mind still out here because it
gives me a guide. See what I'm going to do there. Thank you. It doesn't have to be precise
still. You can. I like the bit of bit
freedom to go to it. Use a smaller brush maybe? Yeah, I'm going to use a
smaller brush but then I have to be supper quick. Well, let's see what happens. I have to well, the paper is curling up a little bit because I use printer paper instead
of cartridge paper. So that's why cartridge
paper could be a easier and I wanted to see I can manage with printer
paper on this one as well. So you can see it doesn't
need to make lovely arts. Take it off, you see
some of it coming here. It gives you the texture. Well, you can keep on going and make more of those grassy
things and flowers. One thing you could also do is like finish it up with like a pencil or a crayon or
probably in a marker. You can actually just a brush
and put chips on there, like to see it a bit more. I actually don't like it
because then I'm going to overthink it and
overwork it again. Because now I started
doing it and I'm like, yeah, I need to do it here too. I need to do it here too. That's something that
you should think of when you find a picture yourself. Make it too many
details. It's hard. I like the way those turned
out a happy with it. Make it multi layered. Now let's do a recap of
this multi layer lesson. Choose a picture with
not too many details because they make
it harder to print. Start with the
background, because you have that on
your paper first. Then dissect each layer which
comes, which comes later. The brush strokes are fun to use because
you give texture. Don't forget about
the drying time. If you want to have them off
your plate quickly enough, you can always add details later with your favorite medium.
9. Let’s make another: Okay, well I'm
just going to take to another one just
because why it's fun. I'll start with the first
layer a little bit white. But since I have to pick bottle, I'm going to pick it
up and put it on here. It looks like a pellet
knife I do brush. It could be more white this
time because it's more like a whiter sky It was
last time it mixes up. That's more card still. You never know until you
lift off your print. I feel more, I'd like this
one more than last time. Part stock this time, and I'm going to position it again over here at this time. Positioning is a
good thing because we have a little house. And if you don't
position it well, you have like a floating
house. A flying house. You want to be part of
the scenery taking off. Oh, well, steel
some greenish part on brighter but I don't mind. I actually like it.
I like this kind of. Yes, I like the
sky because Yeah, Yeah, it's going to work for me. Now, I'm going to do two things. Usually you would say
I will go for grass, but when I go for the grass, I don't position well, this will be on top that
this will be floating. Since there are still some grass like in front of the house. Just a bit because it's a hill, I'm going to do the house first. And then this, it's really important that
you look at your picture and see what's going on and how you're going
to work with it. Now, I'm going to need some red. It's already dry so I can
put it on the other colors. And it is like a darker red. So I'm just going to
do the raw umber. Love working the raw
armor, taking some red. And I'm starting with using
an extender ser be too precious about it all white rim we know later 'cause I'm going to do this
house in layers as well. It can be darker, a lot darker. It's going to be, it
looks really weird, but trust me, it's
going to be fine. Position the paper, I'm
going to take it off. It doesn't really
look like a house, but it's going to be a house. Trust me. I don't mind
the red still on there. We'll take it off
at the next print. And I'm going to smaller brush, I'm going to drop it off
a bit here, actually. Otherwise we cannot
see the door. I use my finger to rub it off, but you can also
use the cotton swap in here, where it's actually the
hardest way of working, but it's also one of the
most fun ways of working. See, we kept the house. Now we're going to
work on the grass. And the grass is
going to be green. Not always, not everywhere, light green and dark green N actually there my colors are a lot brighter than they are on the painting. That's okay. I can like it. I'm going to be part and see my brush is
a little bit wet. So that's why you
get those stripes. But I'll mix it up and you'll be better later, Darker green. Not so precise. I think I do a bit of this
between as well, more saturated when I use the burn number
or the raw umber. Yeah, I'm going to
need more paint work. Work, work it. I
think the row on it, it really well, more
light in there. But I think I'm going
to keep it like this. Again, if you use
like an extender, like Met medium, you
can be more precise. I don't want to put this, you know, I'm never
anxious or anything. But I'm excited because I have no clue how
it's turning out. It could be like flying house. It could be exactly right. See what happens.
I like the green. So, for a well, the house is on the hill. You do have some
highlights. Not as much as we still have the
blue picking through. You like it again, You
can paint it to make it more clear or make
it more precise. If you want realism,
don't use this technique, Just go painting
yourself or take a picture more accurate
than working this way. But I like it this way. This is going to be white in front and there
are some stems. So I can do the
stems if I want to, but I like it just the push. They call me
professional Meismaker. That's what I like
doing and that's what I'm doing here again, I'm going to position
the paper in the corner here and
it's easier because I'm using card stock
than print paper. It won't curl up. I
have dirty hands, so the back is dirty. And it doesn't really
matter if you put it in a frame or scan in, as long as you don't
do it in the front. Look at this, This
is what happened.
10. Leftover paint: I still have some
things left here. What I usually do
is finish paint. I have some green leftover. I'm not thinking about it. Of course, I can make a
beautiful new painting. I'm not going to bother. I have some red leftover. Put it on the plate.
No paint goes to waste if I don't have special
project to use it for, and I'm going to put
it on my jelly plate in any way I like now, I wanted to use it
this way. More white. Yeah, I don't have too
many colors right now because I was cares with
putting it on the plate. So maybe the result end result wouldn't be as fun and
exciting as it could be, but it doesn't
matter. Still fun. Soon going to use all the paint. Get my brainer out if I don't want it to be too thick and I cannot
pull the print, see things happening here that I would never
have thought of. I have you colarge papers. I'm going to show
you quite a few. These are a few of the
prints that I put with a left over paint from the
projects in this course. Some of them look, but they're fun as
like callarse paper. But some of them
I actually like, I actually like this one. Almost a piece of art
by itself, prettiest. Like I said, you can cut it
up and use it in Colgar. Nothing goes. Two wts.
11. Final thoughts: Did you have fun during this course swiftly
with the brush, making a mess and hopefully
make some beautiful prints? Oh, I can't wait to see them in the class projects if
you're still unsure. Those happy accidents
always happen. Let's try and see what
happens next time. If you want to go
over those steps, feel free to rewatch
this course or download the workbook you can find in the resources section. I also hope this made you more addicted to
your jail plate. I lit the fire, and I hope I'm going to see more of those
prints from you. Please connect to
me on Instagram. I like to see more of your
work, of your projects. Hopefully, I'll see you
in some future classes. Just follow me here on
Skillshare and you'll be updated when I have a new class and there will be
some more, I promise. Oh, hopefully I'll
see you next time and we'll have as much
fun as we did this time.
 Anna Berends van Loenen, Professional Messmaker