Transcripts
1. Introduction: You are thinking of trying to do something different
for your chelic mad 'cause you're tired of just rolling around the paint
and hoping for the best. This class is going
to shake things up. And draw to print a
jelly plate adventure. We are going to experiment with different drawing
materials like charcoal, oil pastel, ballpoint, pn, acrylic markers,
and so much more, all those techniques to make beautiful prints and
have fun making them. Hi, I'm Anna Brin Falune. I'm an artist. I'm a
professional mess maker, and I'm a teacher. And I love to
experiment and play. And, yes, I love mess. One thing you know
with jelly pad is that you're going
to get a mess. But other than jelly play printing always comes
with surprises. You never know what
you're going to get until you actually pull that print. There's something
magical about it. This class isn't step by step, do like I do, class.
No, not at all. Just see it as some
creative challenge, because, yes, I'm going to show you some of my techniques. But I'll challenge you
to go beyond them, to experiment with them
and have fun with them. Use your drawing materials in a way you've never
used them before. That's why this class is for beginners as well
as seasoned pros. The only thing is that I don't go over all the
jelly pap basics. So with this class, I'm sure you already know the
basics of jelly printing. And other than that,
we're just going to pay and see what happens. This class is structured around the different
drawing materials. So in each lesson, I will show you
what materials you need and how you can use them and how you
can go beyond them. And of course,
you're going to need your brayer and your jelly
plate and some paper. But I encourage you just to use the things you have
at home and just pick and choose the
drawing materials and the lessons and the
techniques that suit you. Or maybe that suits you. Maybe that pushes you
beyond the boundaries that you thought that
the jelly plate or your drawing materials actually. As a class project, I
encourage you to pick one of my techniques and upload them to the
project section. Or, no, better not. Go and experiment
with those techniques and find your own technique, maybe a technique that I
don't even know about. Upload that one to
the project section. Not only I can see
them in common on it, but you can inspire your
classmates as well. Oh, I'm so excited to see what you had made in the
project section. So grab your plate, grab your brayer, grab
your drawing materials, and I'll see you in class.
2. Supplies: The supplies you're
going to need is, of course, a jelly plate. This is just a small jelly plate just because it looks
better on camera, but you can use as large
or as small as you like. You can even make
your own jelly plate. Hop over to the
resources section, and I will have a
link there so you can have my recipe for
making your own jelly plate. This is an older one has
some stains on there, but that's absolutely fine. We are going to need a brayer because sometimes when we draw something
on our plate, we have to get it from
the plate to the paper. For example, with paint or with something
like a met medium, and then we need a
brayer to roll up the paint or to press the
paper onto the plate. Speaking of paper, it's absolutely fine just to
use regular printed paper. I use it too, but I
also use drawing paper. You can use regular
drawing paper. You can use a little bit
stiffer drawing paper like this one. You could even say, Well, no, I'm going to use some leftover papers like I
have in the recycling bin. Or music sheets or book
paper, as long as it's paper, with this course, it's important to use the
materials you have at hand. The only thing you need to have is a plate,
some kind of paper, some kind of medium to get the drawings to the
paper, for example, the met medium or the paint, you need drawing materials. I use several drawing materials, everything from watercolor
pencil to, for example, the charcoal or
many other mediums and it doesn't really matter what kind of material you use, I will give you different
kinds of options. This class is just to inspire you to use
your art materials, your drawing materials
differently. With each lesson, I'll show you what materials you need
besides the jelly plates. And other than that, we're
just going to have fun, explore, experiment, and play.
3. Acrylic Markers: One of the first
drawing materials we're going to use are
the acrylic markers. Why? Because these markers
have acrylic paint in them, and that's what you usually
put on your jelly plate. The difference is that an
acrylic marker has a nip. And with a nip, you can actually draw whatever you want to draw. It's more precise than when
you use a brayer or a brush. The downside for
some people could be that the paint
dries fairly fast. I cannot really put
paper on there and then pull your print directly on the paper because it's
probably dry at that time. That could also be an upside because you can take
your time drawing. You don't have to rush in order to pull your print because it's going
to be dry anyway. Take your time, draw
whatever you want, and then take some paint or
met medium or glass medium, or whatever medium
you like to actually pull your print from the
plate to your paper. Well, if you think,
like, I'm not really a drawing expert,
I got you covered. Because you don't
always have to draw, you can also print
an image you like. Choose one from
splash, for example, or one of your own pictures because they're
like, write free. Put them onto your plate
and start drawing. I will give you lots
of tips along the way. So, uh Mom, join me in
the first technique. I got this one from my
printer. I like it. But I rather go for this
one just because it has a little bit more
contrast and will probably be a lot
easier to draw. So I'm going to put this
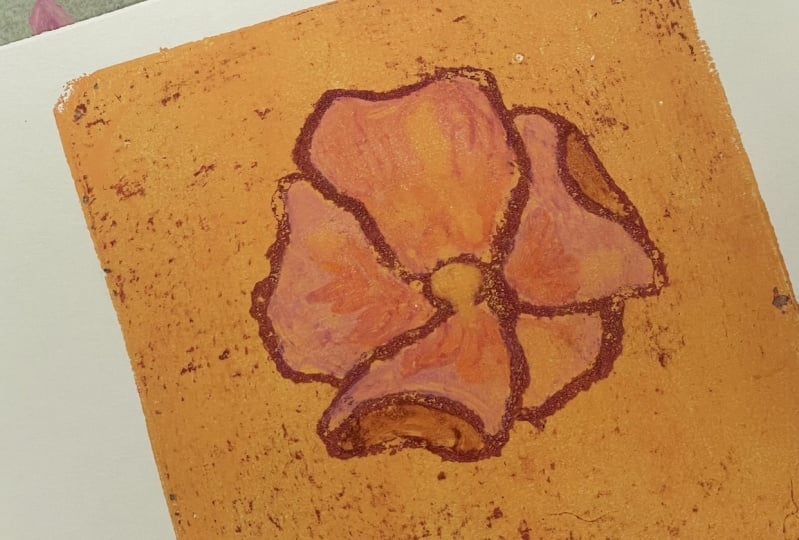
underneath my plates. And as you can see,
I can see the petals there like contrasd through the background. So
this is the one. With my plate, you
see, it's a bit dirty. I don't mind because it
gives a grungy look. Of course, you can clean
it with baby wipes, but no, I think I'm
going to keep it. I like the look
it actually gives me and I'm a lazy
printer, so that's why. When I'm going to draw, I'm going to start with
the things that I will see on top of the print because I'm going to
work with layers. When I put my paper on
top and I pull the print, the things that I draw on there first will be on top
of the paper and the things that I draw in last will go directly
on the paper. So it will actually be
some kind of background. So that's something you
have to keep in mind where you're going to
draw on your plate. So that's why I'm going to start with the center of the flower. I'm going to pick a little
bit of a darker color. And I'm just doing it. I have a creative freedom here. I mean, I'm using this as
a reference this photo, but I can do it in a way
I would like to do it. I don't see this
but really good, but again, my creative freedom. I think I'll have the on here. On top of this, I'm going to use a regular nip and I'm going around it, but
I don't really have to. I can go over it as well, but I don't see that
much paint coming out. With a brush nip,
you can actually start brushing immediately or drawing immediately
on the plate. But with these regular nips, you have to shake
your pen and then press the pen to get the acrylic paint
flowing from the pen. Let me see. Yeah, I got
some paint coming out. Yes, I'm ready to
draw with this one. You see, it's a lot better
go around the centers. This is just a regular,
easy, cheap marker. This is a better one,
and you can actually see it because it's more
opaque than the other one. I don't have any
special preference. I just use the colors I like. This one has a little bit
of a bigger nip on top. And this one that
has the brush nip. That's for the painterly feel. I think for jelly
plate printing, I love those the best. But again, that's a
personal preference. Well, I'll go over
it with the yellow. You don't see the orange
anymore, but it's still there. But that's just because
I just want to have the yellowy orange
glow on the center. Again, that's what
the picture said. So that is my reference
because I'm working in layers, it's still a bit wet, so it has to dry a little bit, so that's why I'm going to go to sites now so I won't
interfere with the paint, and I'm getting a pink
now really precise. That's just because if
it's still a bit wet, I can blend it with my other
marker that goes on top. That's why I'm doing
just one flower at a time instead of all of
them at the same time, what I did with the centers. I'm going to go over. Again, you don't see the other pink too much anymore,
but it's still there. I blends a bit. I'm going to get a lighter one. It's almost white. I think it's a bit too white, but I'll adjust it
probably later. But the flower that's in the foreground and the
foreground are lighter, like you saw in the photo. When I use this, I'm
cleaning my nip now. But when I use this one, you can actually see the contrast, you can see the depth
in the picture. It's easier to
clean the nip while you're working because
now it's not tried in. If you just go over and see your pen is just getting too pinkish, take it to the side. You can use an extra
piece of paper. I'm using just the paper
that covers my desk. It's just a way of
working that I like, at least in this projects. But I'm a mess maker, so you do. I'm going with this one. Again, I'm taking more
or less the same steps. And my lighter color is going to be in a little bit more pinkish than I
did with the other one. This one actually
has a chiseled nip, and I like this nip
because you can make small lines and broad
lines with this one. This one is the liquitex marker. You can see the
nip a bit better. And and I think the contrast is just a bit
too big with the other one. I'm trying to give
this an extra layer underneath the cream
color I put on there. You would still see the cream, but it's just tone
down a bit more. I can start with a
darker pink here because it's more in the background and it's behind the other petal. Now I have to
think, which petals do I do first or last or how am I going to show the difference between one
flower and the other flower? Usually it's just
because I'm doing them darker when they're
further behind. I'm going to speed
the process up a bit, so it's very similar as I
did with the other flowers. Well, now I'm going
to do the branch, and that's a bit more behind. Since it's almost the same
color as the background, you don't really see it. I'm just winging
it and thinking, what would be a logical place
to have a branch on there. I'm just connecting the bud
and the flowers and I'm making the branch
a bit irregular because that's what they are in the original
photo as well. I'm going to add some leaves. I know there are some
leaves somewhere. I have no clue where, but I love to add a little
bit of green, just another pop of color. So I'm just having some creative
freedom and deciding where I want to have the green. In order to see if
it's dry enough, if it's still glossy, it's still a bit wet and if you put some paint on
there to pull the print, it will probably just
mess everything up. I have to wait just
a bit to let it dry. And usually it dries
really quickly, but now it says a
bit wet because it just multiple
layers on top of I'm taking it off the image you can see
it a bit more clear. Now when it's more or less dry, I have to put something on there to pull the print and I'm actually thinking of
doing it with paint. And I have to be really
careful how I going to smudge brayer this
over the flowers. So I have to be really
sure that it's dry enough. And when I'm brying it, I'm just bring it, like, really softly and roll and pull, roll and pull, roll and pull. I know it's a different
color background, but I think this
will suit the image, and I'm going to do
it really careful. Don't put too much paint on there and certainly
not too little, otherwise, you cannot pull
the paint or the print. Since I'm doing
the roll and pull, roll and pull it off, I will get an even
layer of paint and it will create the best
possible pull as well. I'm going to put this on top, and I'll have to make sure
the paper won't move, and I'm making sure the paper or the paint
will stick to the paper. And it doesn't only have to
be like be firm on there, like you could do
it with a brayer or you can actually do
this with a ban as well. But the paint needs
to dry a bit too, because if the
paint doesn't dry, probably your print
will fail a bit. It could be the charm, but it could also go totally wrong. I've shown you the
different options just to press the paper to
the paint with my hands, the brayer, or the barn. But I can't really see
what it looks like, and it's hard to pull
it when I do this because it's sturdy
paper I have right now. I think it's 250 GSM
card stock paper. So what I'm going to do
instead of pulling the paper, I'm going to turn it around. Oh, I can see the
result already. Is it looks nice. But still, it can still
look different when I pull the jelly plate.
Oh, it looks nice. I'm pulling the plate
instead of the paper. You don't have to, but that's just what I do with
this kind of paper. I'm taking it slowly. You can still see there are
some marks in there where the paint didn't really
stick to the paper, if I just waited
teeny bit longer, it will probably be better,
but I still like it a lot. Yeah, I can fix this. I will be final. I can fix this. I don't have to
because I like it. Yeah, this is how you do your acrylic markers and you
see that it's blend already. Still fix it for you
with acrylic marker. That's the advantage of using acrylic markers instead
of using acrylic paint. I just putting this on and maybe smudging
it with my finger. I do this until I get the color I like and you don't
even see there were, like, mistakes in there, and I don't like to
call them mistakes. I like to call them
happy accidents because they really
work and give a certain feel that
you won't get if you just only draw them. This is the thing
you get when you draw on the jelly plate. I think it's a
total unique vibe, and I can't wait to see what you draw and what
your project will be.
4. Charcoal: The second material we're
going to use some charcoal. You could use, like, then
box from my grandmother. You can use those
charcoal sticks. You can make them
yourself as well. Or you could use those
pencils with the charcoal led or you could even
use some soft pastel. I'm not going to use
the soft pastel in the same way that I'm
going to use my charcoal. I think you could, but I'm going to use it in a different way. And if you're like, I don't
have any soft at all, and I don't have any charcoal, you could try almost the
same thing with a pencil, but it should be like a really soft pencil, graphite pencil. Yeah, I think that
will work well for this class as well,
this lesson as well. Come in and we're going
to see how you can actually draw and print
with the charcoal. With the charcoal, you cannot
really draw on your plate. You just won't see I see some, you see some smudges, but you
don't really see anything. I'm just grabbing
some baby wipes and you can see how you
can clean this a bit. A little bit of
flour left. Okay. But if you want to
use your charcoal, you need something to draw on in order to put this on here. Well, one of the
things that you can use is just regular paper, and I'm just using
some printer paper. I'll have to put this aside
and get the sprinter paper. Actually, I'm not
going to put this aside because when
I draw on here, it's different size
than my jelly plate is. I have no clue where I need to draw or if I
go outside the lines. I'll put this on here and I'm just Outline is it's more or less outline
and I know where to go. And I can draw
something in here. I can, for example,
a tree go out here, bushes out here a tree
being more abstract. If you don't like abstract
or you want to be more precise or you have trouble
with your drawing skills, you're just not confident. Well, you can either grab an image like
this one I printed. I see if you can trace it. It's hard to see. So then
you don't use this paper. You're going to use
some tracing paper, and you can just outline and use this image to
put on your gil plate. I like just to do some
wonky stuff for this time. So I'm going to leave
with it like this. I'm going to grab my gel plates, and I'm going to see
where it's my plate here, my plate, where I
have to position it. And if I can't see it where to position it, I already
put it on here. I can't see where
to position it. And when I stay
within the lines, you don't it doesn't
really matter if you do. And you can also put this down
here and put this on top, and you're like, Yeah, that's
where I want to have it. I want it like on the
top off like this, I'm going to use my hands
or I'm going to use my brayer to make
sure that's on here. Well, it gets on
here really easily, but I'm going to take this off, and you see my weird
whatever it is I drew. And this doesn't only work with the charcoal or the
pencil with charcoal. It works with regular
pencils as well, even especially when
you use a soft one. But with soft one,
it's a lot lighter. So the lines aren't as well as contrasting
as this would be, or you have to work really hard. You can definitely on
here. I'll show you. See? So if you don't
have charcoal, just use your pencil. You can also do this with, for example, some soft pacels. These are RM brand,
but any brand will do. I can't really draw on it a bit. You see it maybe a
bit, but not much. W pen Pacel you can because then you have a smarter
to put it on here. You can draw exactly
the same way like you did it on paper
and get it on here. But what I like to do is use
this for splash of color. For example, I want to
have some green on here. Maybe I also want
to have some blues. Just some fun play. I'm playing well, I'm
doing this course. I have a little bit of a plan, but not much because I
don't want to have a plan. Plans never work out when
you have a jolly plate. And now it's on here, it's still since it's like a powdery stuff, you can get it off and you
don't want to get it off, you want to keep it on here. But it doesn't if I go here,
it doesn't really transfer. So again, I need a medium to
put over this in order to print. I can do the paint again. But I can also use met medium. You can also use gloss medium, but the reason why I use
mat is because the charcoal and soft pastel are both medium, or met drawing materials. So that's why I'm
using the met medium. You can use gel medium as well. I don't want to put
too much on there, but definitely not too little because otherwise
it wouldn't pull. And I'm going to bray it over. You still see a little bit of blue and a little
bit of greenish, just subtle hints on there. Then I can use regular
paper to call it, printer paper, but I have
some book paper here as well. Let me see if it works. Does it fit? Yeah, it
fits well more or less. Let's see if it works. And be careful because it's
really liquid, this medium. You can really move the paper. You don't want to
move the paper. And I think with medium, it's better just to let it dry a bit to pull the whole
print, but just a bit. I'm not I don't need
anything heavy on this. That's also because book paper is more porose and it
really absorbs the moist. I think this is dry. Et's pull the print. Ta I pulled the print. You actually don't see this one. Not too bad. I thought maybe because I already
took a bit off. But you see the colors,
you see the blue, you see the bit of
the green in here. I definitely did something. When you do this with paint, you can actually
get sharper lines. It's still a bit on here. I don't know if there's
still some medium left here. Well, I hope so. Let's see what this does. I can just grab the
back of this one. See, it's not
smudging anymore on the paper, the charcoal. See like this, you can still
have a fun ghost print. And now all of a sudden, maybe it was still too wet, get the little birdie or
what is it? Sitting in. I like this one better
than this one. You see? This one is still too smudgy. I should have let this
dry a little bit more. The ghost print is a lot better. Yeah. Now, well, it's dirty. Like I said, I like
to leave some of it on here for my next
print to see what happens. But maybe this is
just a bit too much. I want you if you're
really clean, I'm a clean person, but not
clean with my chilly bread. I'll show you how to clean.
A bit too much, I think. And I'm just going to use my fingers and just
going to rub it. You see, when I
keep on rubbing it, it dissolves a bit. Sometimes it can take a while. And actually, I think it's doing pretty good right
now, pretty quick. So you can also see if why I prefer the charcoal because the liftof is just a
little bit better. But that's something you should experiment with too and it would be different if you
have paint on top of it. It would be different if
you had a matt gel medium. Be different if I had
different pull of paper. Now, it's a mess. I still have some
baby wipes here. I'm just going to take it
off with the baby wipes. Wow. And it's clean or as clean
as it can get for now. And we're on to
the next project.
5. Oil pastel : The next coloring tool we're going to use is a
pastel as well, but this time it's
an oil pastel. And again, we're not going
to draw on the plates. We're going to draw on paper, and it goes on the plates and goes back to
the paper again. Why would you
actually fuss about it and go from paper to plate
if you go back to paper? Well, just because I
love the way it looks. It looks less polished. Well, it looks less
polished anyway when you use an oil pastel. We're going to make a coloring book image
just on your plate. And we're going to
color it in with neo Color two crayons. And these crayons
are water soluble. You don't need to have neo
coolor. I love neoclor. I have all the colors,
but you can use any water soluble crayon you
have. You don't have it. Painting on it is
completely fine. Come on. I'll show you how to make an oil resist
or your jelly plate. This is a panda pastel, and I'm using a black one, but color doesn't matter which one you pick right
now. And you'll see why. I think I'm just going to make a simple flower with flowers, the petals are all
different sizes, shapes. Well, so you can go wrong. It doesn't matter what you draw. You can probably draw
this too if you're not you're really insecure
about your drawing. If you're secure
about your drawing, please draw something. It's a lot more fun than this. But now I've drawn this on here, I want to have
this on the plate. And something that's different
than with the charcoal. With the charcoal,
you're going to put it on and will be pressed. Now I'm going to do something different because now
I'm going to grab my plate and I'm going to
get some paint. Let me see. Yes. I'm going to take this one. But it's on here,
one of my prayers. And rolling and lifting, rolling and lifting,
rolling and lifting pull, roll and pull. I don't know how you say it, but if you just roll and
pull instead of this, this is what you do when you
want to blend the colors. But if you want to even
distribution of paint, you just go like this, well, I think it's even layer, and then you grab your flour or whatever you've
drawn on here. I mean, you've done this with
a tracing paper as well. I'm going to put this on here, and I'm really
going to rub this. Again, you can do
this with your head. You can do this with a brayer, or with a barn or
even with a spoon. And the reason why I want to do this because I want
to pull the paint. Yes. And how can you
get pulling the paint? Get the flour on
here? Well, it's pretty simple because
when I pull the paint, but the flour is still on
there. Why is the flour there? Because oil but
still is oil based, and acrylics is water based. So on where the oil is, acrylics just won't attach. That's what you see when
you put like in a cup, you put your water
and olive oil, for example, in there, you have like two layers lying
on top of them. They're just you get to resist. And over here with resist is something that I really want. So now you can see that it
doesn't really matter if you use a black flower or a
pink flower or blue flower, turn out the color of the paint because the flower
doesn't come on here, the paint just never
leaves the plates. All those pieces of here?
Yeah, I can if I want. I can take them off, but like I said, I like
that actually look. I like the grungy
look. Since I've been using crayons on here, I think I'm going to use crayons to color this in as well. But I'm taking
different crayons. I'm getting my Oh, let me open this my
car Dagon Color two. I have a lot more of those. But you don't need many,
I'm going to show you. But when you draw on this,
you don't see anything. But the fun thing
of these No Color two, water soluble crayons, Aquarel is if you like, water activate
them, for example, in cup of water,
put them in there. You can actually paint
them on your chili plates. I do this with this too. The only thing is,
it's really wet, you have to wait for quite
some time just to dry. But the fun thing is when
you have enough time to mix your colors
if you want to. Water again, if I
use too much water, you get those over here, you get cracks in your
paint or your crayon. And you have those little see throughs to the paint
that you put on top. Could be fun if you want to. And with too little water,
it just won't draw on there. This is like being
your child again. His coloring my color book. I made my own color color
plate. This is really mindful. I don't have to be really
fast because, why should I? It's wet. And I think I get darker color
just to color in here. Here because those are the
petals that were bent a bit. Since it's still wet,
I can actually mix it. I think I'll take this one. Just going to wet mix
it through, get colors. Let see get a different
color combination, and now I've filled
it up all the way, but you can also say, like, I'm not filling
it all the way. I just want to have it. The
inner part of the flour. And if you do the scratches, you would actually see
them the scratches as a texture on your paper. Actually, I like this. I do this and see if I can make this, probably can make
it a lot lighter. I think I'll leave it as
I have to let it dry. While you're letting it dry and if you're impatient like me, but you're really neat, you can now take your baby
oil or your baby wipe just to rinse this off or
just rinse it off, but polish it off. But I don't want to, I'm
going to leave it on here. But now I have to wait. Since waiting is
not my strong suit, I'll think I'll have a tea
break and I'll be right back. You want to know when it's
dry and you just lift this off and you just see where
are the glossy parts. The glossy parts aren't dry yet and the met parts are
a little bit more dry. Drink more of my tea then. I put on some of my paint because
I'm going to lift it, it's a little bit moist still, but I think if I do
it really careful, it will be okay and
otherwise, Oh, oh, yeah. No, I should have let
it just dry a bit more. Oh, why am I so
stubborn, so impatient. Maybe it gives a cool effect, but at least now
you know why you should let it dry and take
your time and take a break, taking breaks for an artist for anyone is a real good thing. Oh, even this and I'm just
grabbing a piece of paper. Creamy paper this time. Rub it. This is actually drawing paper. It's I think 160
GSM, drawing paper. I'm going to show you different
kind of papers as well. Let me see if I just flip this. Well, actually, yeah. You see, it's not as
tight as it should be, but I'm not pleased. Take this one off. And actually, it took
most of it on there. I don't mind. Anything I would have liked if
it wasn't smuch here. Other than that, I
actually like this look. Otherwise, it would be to,
you could actually draw it on paper instead of printing it
on paper. No, I'm pleased. I'm curious what
you are going to draw and how you are
going to fill in the colors if you have
more patients than I have to make a lovely piece, I'm looking forward to seeing
it in the project section.
6. Alcohol markers : Next dryer material
are some markers. We already have acrylic markers, but now we're going to
do the alcohol markers. Alco markers, you said, Yeah, they work on a jelly plate
as well, and I'll show you. And if you're like, Oh, I'm getting the hang of
it of those markers, I'm even going to show
you what it looks like. When you use these permanent
markers or Sharpie, they all work on a jelly plate. You just have to know how
to use them and how to get them from your plate
to your paper. Okay. Well, now get back to
drawing on the plate again. Actually, drawing on the plate. You can do that with
different kinds of markers. For example, if you use this is Ohh but I have
different brands as well, like the pro marker
or the cheaper brand. These are all alcohol markers, alcohol works really
good on your plate. Let me show you. I'm just going to
make a texture on here because even if it's
called drawing on the plate, that doesn't mean that you
actually have to draw. Well, draw on the
plate, but it doesn't need to be anything fancy. The fun thing is,
it looks like here, not seeing a thing. But you will see this
later on this light blue, just in case I'll put this
darker blue next to it. And we can make some circles. And of course, alcohol
markers have to dry as well, but they dry really quick. Actually, these are not the
only markers you can use. You can use permanent
markers as well. I mean, regular
permanent marker you can use to draw on
the plate as well. Able to draw with them on here. But then again, you have
to get this on the paper, but you know to drill by now. You can do this
with paint or you can do this with met medium, for example. What should we do? I'll try met medium, I'll do paint again because I need something just
to see the light blue. Okay. Man. Yeah, this
dries really quick. A little could do with
a bit more paint. To frugal. And you see me using
Amsterdam paint all the time. That's just because I
love Amsterdam paint. It's really easily accessible for me. It's affordable here. Amsterdam is our capital
here in the Netherlands. So I'll put a layer on there, just get a piece of printing
paper. Put this on top. Uh Let me pull the print. You see, even the light blue that you thought it
was not even there. The alcohol markers you can
have these are dark effects, but this one you can really
make a watery effect, especially when you
combine these with drops of isopropyl
alcohol or something, you can make cool effects. But you see why should you just constrain yourself to Paint. If you can use those alcohol
and permit markers as well. Wait to see what you
can make out of it.
7. Waterbased markers: When you think you are
done with a markers, think again because
now we're going to do the water based markers. Marks like this is
like a brush pen. It works something
like for lettering or drawing your coloring book. It has a nice brush tip. It is water based, but it's not really something
you use with. Water, for example, the watercolor markers because
we're going to use those two and they will look
totally different on your plate and react totally
different on your plate. I'll show you in this video. This is a brush pen. You use it for lettering
or your bullet journal. It's water based and you can coloring your color books and you can activate it
a little bit with water, but actually not too much. And the other one, you can actually use in a coloring book as
well for leathering. But this is watercolor marker. With this one, it looks the same if you like
the other brush marker, if you just put it
in a coloring book or if you do the lettering. But if you put it on here, you see this one's already drying and this one
isn't really drying yet. It takes a very
long time to dry. You see those
little marks that's like the water that reacts
to the jelly plate. And you can use it
on your jelly plate. It's totally fine. But if you pull a
print like this, this one, yeah, it
would actually go. It won't be everywhere
because yeah, you have those marks in between. This one probably wouldn't go because this one
is dry already. I have a different
watercolor marker. But to get this off the
plate, you use medium. You could use met
medium, gloss medium, or you can actually
use acrylic paint. But probably will just lift off right in the way you put it there because
it's dry right now. But this, even when it's
dry and like I said before, it takes forever to dry. It will reactivate
with the paint or the medium you put on
top because it's liquid and liquid is the same thing like water is and it immediately reacts and it wants
to get liquid again just like watercolor
does all the time. What do I do? I get some
paint, so I'll show you. Put aside here and why I do this? See the green will stay. But the other ones, now I didn't let them dry but
get the picture. The ones will activate and
we'll smug through the paint, which is absolutely fine. But that means you
cannot really use it to coloring in like a stencil, for example, or use it to make drawings because it
will all get smushed. But if you use it like a
background, it works perfect. Now it's all mixed up all the
colors. Just put it down. This is a drawing
material that doesn't really give you the
opportunity to draw. Well, you can draw on the
plate as much as you want, but you won't see the
drawing on the paper. Because when I take it off, You'll see it's actually mixed. Still see the green spot here, but I went with all the
other paint on top. So it does work
on a jelly plate. But for coloring in,
you could probably use one of the other markers like the cric mark
or the alk marker. I will probably
work a lot better. But if you still want to have
a drawing on top of this, I'll show you in the next
video, what you can do with it.
8. Ballpoint Pen: Maybe you're fed up
with Marcus right now. Now we're going to
use the bollpointPen. With BipointPen,
we're going to make something that looks
like a bossing stencil, and we're going to use
that for your jelly plate. We're going to
draw on the paper, and then you guess it for
the nine year jelly plate. But in order to see where I can draw one, not on the wet parts, I'll just put my
jelly plate back on. Oh it's a little bit bigger. Let's take these sides. And I'm going to
draw on the paper. But what I'm going to do
one I press really light. So that's the one you probably won't see on the jelly plate. The only parts that you
will see are the ones you press firmly on the paper. And that's why I use drawing paper because it's a
little bit thicker than, for example, printer paper. You can use printer paper, but if you use
printer paper, take, for example, about five
sheets, four, five sheets, put them all on top of each
other and then draw on the top one because otherwise,
when you press too hard, you will go through the paper, this way, you have the
most chance it will work. So now I'm using just regular
drawing paper. Let's see. Let's make a vase. Now press it down firmly. You can actually make this
as elaborate if you want. You can draw whatever you want, because it doesn't need any
drying time or anything. But I like to keep it simple. Why? Because since you
have to press, like, really firmly on here, my hand just gets really tired. That's why I choose
to do it like this, but this is just
a bit too simple. Put it on a table. Maybe you put a chair here. Just make some tablecloth. Why? Just because it's fun
and I can show you the different lines in this drawing put on
the jelly plate. And put the line. This What? Yes. I made a drawing. And now
we cannot really put it on here and then print it like this because
nothing will stick. So what we do, we are going
to put some paint on here. Well, no, I'm not going
to use the medium. I think I'm going to
use the paint, and why? Because otherwise, nothing from the painting will actually go on here. This one will work. Because o a bit too much.
Went a bit overboard. Put on here, just a thin linger. And again, I'm rolling
it by putting it down, lifting it off, putting
it down, lifting it off. And hopefully, it's
thin enough right now. I'm going to put this on
but positioned it right. And now I'm going to
press it lightly. I'm not going to use my barren. I'm not going to use my brayer. I'm going to use my
hands, but lightly. I just want to take
the paint off, but I don't want to
take my stencil off, actually, an embossing
stencil that I made. So I think it's good enough, and I'm going to pull
the paint. Let me see. I just put just a little
in mini teeny weenie. Too much pain on there,
or I didn't press enough, but I think if I press too hard, the lines will just go off. So you can leave it like
this if you want to. Otherwise, you just take a baby wipe and you can
wipe the excess clean. But be careful because you can wipe the lines off as well. Now, this is not
something I like to do. You know what? I'll think
I'll take it off on the top side and I'll I'll leave it where the tablecloth
is and where I'm going. I have to be really careful. You could also use a
cetick to do this. The thing is if I put
paper on here right now. I'm just too afraid
that I will take off the flowers or
the drawing as well. And you know what? This is what happens
with jelly printing. Either you get too impatient, either you don't
press good enough, well enough, maybe
you press too hard. Anything can happen. And I like that the jelly plate
isn't too predictable. That's why the results always different and you get
loads of happy accents, and you get loads of
accents that aren't really happy and you wanted
something really different. That's fine. I think
I'll leave it as it is. And now I'm going to put usually I would put a
new layer of paint on top, but I think I'm going to use the one that we made
in watercolor lesson. So now I'm putting this on. I'll take a brayer
that's a bit more clean. It doesn't look clean, but
believe me, this one is clean. More. It's hard to see if you
put enough met minium on, I think I've done so. And I think I'm going to lift this because otherwise
you cannot really position it right unless you may have a guide where to put your jelly plate or the
right size of paper. And if it's not really center,
I'm okay with it, too. Turnover because I can
get more firm rub on it. The thing is with met medium, we have to wait a
bit longer for it to dry to get lift off. Let's see what happens. You know what?
Wiping it all off. It looks okay, but I
actually like this feel to it. T on the background. Yeah, with the met medium, you see it gets
smudgy easy easily. It's fine if you don't put too much on there and
if you wait long enough and I just
didn't do both of it. But you see, you can actually
put your drawing on here. And this is a fun thing
because you can draw in a different way more
precise with a ballpoint. If you're like, Oh, I'm missing a line here
probably because I just think I got a
ghost print on the air. Probably because I wiped it off. You can just say,
Well, you know what? Let me see if I got a marker. I didn't expect doing this. But like I said, it's
like that's the thing that's part of making
a jelly print. You never know what
you're going to get. A You know what I like to do? I think I'm going to make a totally different
class on this. I can actually get
a piece of paper. I don't think I have a
pair of scissors here. You can actually make
a different vast too. You can make it more of
a mixed media piece. That's what I love
about jelly plate. It always brings
you to new ideas, brings you to something you
want to brainstorm about, want to make something
totally new. What can I do? What
can I make of it? So Yeah. What are you going to make?
9. Final Thoughts: Thank you for
watching this class. And, yes, I have just hit
the top of the iceberg. There's so many more
drawing materials. And actually, most
of them you can actually use on
your jelly plate. You can use your Stabilo. You can use your China marker. You can use your woodies. They're so much fun. I encourage you to try them out, go and play with
your jelly plate. Play with the kinds of paper. Maybe a tissue paper
works for you, maybe a piece of paper from
old book works for you, maybe even media paper. Just try and see how everything
reacts with your medium, your drawing material,
and your papers because the jelly
plate is an adventure. And I'm so glad you went
on this adventure with me, and I hope you're going to
continue this adventure. I can't wait to see all of your results using one
of the techniques, maybe a new technique
that's fun for all of us, and put it in the project
section so we can comment on it and enjoy what you made. And I would love it if you
would leave a review leaving a review doesn't only help others to find this course as well because it
makes it more visible, but it will also help me
become a better teacher and make the classes that you
like and you want to see. There's another class on
the jelly plate I make. It's a class that's
called painting on the jelly plate or paint print. Please check that one out
because it has the same vibe. It has different techniques on how you can paint with
your jelly plate. There are more classes to come. Of course, also on
the jelly Blade. If you want more inspiration, check me on Instagram
or just follow me here, and I hope to see you soon. Bye bye.
 Anna Berends van Loenen, Professional Messmaker