Transcripts
1. Welcome!: Hi friends. It's Tammy Prera and thank you for
joining me today. Today's class is about making
little Bitty presents. This is going to be
collage fodder or some era that you can
add to your projects. It's a very simple project
and what I mostly love about this idea is
digging into your scraps. I'm talking they could
be an inch by 2 " by 3 " pieces of scrap or maybe old art projects
or practice pages. All you need is a tiny snippet and you can do this
creative project. I love the uniqueness of it, the fun you can have with it, and it will have
your fingerprint on your project if you're embellishing an
envelope or a card. This little piece of is a piece of art
that you've created. Every one of them will
be completely unique. I'm an artist on Instagram
and I love sharing simple projects and I have very limited supplies
for this class. You just need some
scrap paper and glue, piece of card stock and
a pen, some scissors. You will have your own set of tiny little presents that you can use to embellish projects. They look great in collage, they will look great on
junk journals and tags. Anything you want to
put together in this we're going to be
working on our doodling, sketchy doodling technique
is so simple to learn, I can't wait to share with you my own take on how
I create this look. Now, doing it on these
presents makes it extra easy, and I can't wait to show
you that technique. Let's dive in and let me
show you what we're making.
2. Class Project: For your class project, I want you to delve into your
stash of papers or old art, or ugly art, whatever you
can get your hands on. And get your pen out
and let's doodle and make sweet little Christmas
present fodder pieces. Now the gift wrap on this present is going to
be from your paper stash. Maybe you've got
some gel prints or some watercolor practice pages or just leftover scrap paper. Pull that out, cut them into
the shapes that you want. Glue them on a piece
of card stock. And we will doodle
together and create these tiny little
pieces that would be great for all kinds of projects. And I bet you have other ideas beyond what I can think of. Please share that with me in
the class project section. You do that on your laptop
or desktop computer, and I cannot wait to see
what you've come up with.
3. Supplies: To make these sweet little
gift wrap presents. We are going to need
just a few things. One is some gift wrap paper. This is actually a photo
paper that I had done alcohol inks on scrapbook paper. Any little snip of
scrapbook paper, maybe you've done
some gel prints and you have that you don't
mind cutting into. You just need a tiny little bit. Maybe you have some ugly art, some experiments
that went wrong. We can use just a
tiny square of that and create some really
amazing little presence. We glue the gift wrap
paper onto card stock, some heavier paper, card stock. If you need it, you
could use index paper. We need pens for the doodling, I'm actually using the
micron two quite a bit. If you have any gel pens that are in gold and silver,
you might really like that. A food and suit case also works, It's a thicker,
darker black line. Now I'm experimenting with this glue sponge that I created. I really love this
method of just pushing in my pieces that need gluing. And then I can put
it straight onto the card stock or I also have some liquid
glue with a needle, nose applicator,
We need scissors. I have my craft scissors
for large cuts. I have some very fine tip, tiny scissors to really get into where the ribbons
are up in the top there. And that's all you need to
make the Famera pieces, these little collage
fodder pieces. I can't wait to get started.
4. Choosing the Right Paper: One of the great joys about this project is how
little you can go, what very little supplies
that you actually need. Here I want to describe some of the paper choices
that are available. Help you pick out what would be best for your focal point. Now, like I said, I work rather small scraps of paper that I just saved from another project
would work out really well. This little piece is
only about an inch. I could get multiples just out of this tiny scrap of paper. I like that modeled. Look, here's another
scrap of paper that would work well
for this present motif. Here's a scrap right here, just torn off from
a project that I had been working on
would make a nice paper. This project was from photo
paper art experiment. I did making my
own alcohol inks. I actually have used
one as a present motif, just chopping up photo paper. Another background I really
like gel plate prints. There's no pattern to it, it's just experimenting
with some colors. This would make a
great gift wrap paper, and these reds would look
wonderful for Christmas. I have a few gel plate prints I did with really
distinct patterns, and maybe they're just not
what you were looking for. But I save these because I can always collage and craft
with art that I don't love. These would make
really fun patterns in these triangles became
little Christmas trees. I actually followed
that pattern with my pen and created a Christmas
tree effect, ugly art. The paper is so good, you just hate to throw things
away. Or at least I do. Here is a way that
you can recycle this paper into this tiny
motif I'm talking about now. This project my three year
old granddaughter made. We were experimenting
with water, drops of watercolor paint. Then she just got
her paint brush and just made this great block. But if you take just a
section, just a block, and turn that into
the gift wrap paper, you would make a
great focal point. I liked the droplet
patterns in one idea. I took those droplet patterns
and outlined them with pen. Be sure to save your funky art. I like this one with its
gold metallic paint on here. Those make great highlights
for your gift wrap paper. But I will caution you, probably not the best paper is something that's
heavily patterned. That when you draw your
gift wrap ribbons over it, it might get hidden. This might be fun to
just put the bow on top, but I would tend to stay
away from papers with a heavy pattern or something
with a very dark pattern. I want something a little
lighter that will show my pin. Although you could always use a white gel pen with
something like this. Dig out your scraps
and let's get started.
5. Cutting Shapes: Now in terms of cutting shapes, I have three of my
favorite shapes, and one is a square. This square is just under 2 " around another
one is a rectangle. This is just 1 " by 2 ". You could even have one
that's just barely an inch tall and maybe
a half an inch wide. The other is more
of a trapezoid. When I cut in to the top, it's not perfectly
parallel sides and top, I have a trapezoid. If the sides are the same, then I have an
isosceles trapazoid. That's all the math
you're getting for today. I just want you to think of
different lengths and width. Here's one that's
going long ways, one that can go tall. A big fat square is fun
next to a tiny one. They would lay a cut together if you were doing
a collage motif, taking these three shapes, let's get them cut out
from our scrap paper. I'm looking to do, oh
gosh, as many as I can. Here's a good one. Maybe I'll just
do all this blue. Think from my photo paper stash. This is maybe I'll do
that extra big one. These are not just
for Christmas. Maybe you want to put
a little present shape with a birthday gift. Let's do a pink and blue one. I'm going to take
some of this white off and give myself
a nice long one. Like I said, I like
it when they have a thinner at the top than
they are on the base. This is all
completely free hand. I am not worried
about very neat, clean, perfectly straight edges. I'm doing the best I can. Maybe a couple of tiny ones, maybe a square one. Okay? I'm going to give
that a rectangle shape. I really had fun
with this last time. These triangles made really
clever Christmas tree shapes. Maybe something with all this
gold that is really pretty. I do like this pattern, and this is on watercolor paper. Was really experimenting with how the different
bleeds would play out. Let's try something. Yeah, let's play
with this a bit. There's no right or wrong,
we're just experimenting. I think I want to keep
those round shapes. I do like the more
solid color look. Let's stay in here and have that really pretty solid, maybe. A skinny one right here. Like I said, if I keep that
corner and then I turn it, I just eyeball the same width and then shoot for
that bottom corner. I think we've got a nice
selection here now, we're going to glue down.
6. Gluing Down: To glue down these pieces. I found this trick from
a preschool teacher. She actually made a glue
sponge for her class. Tends to be less messy. And I have my card stock, I really like the white
background to doodle on glue my gift wrap right on
top with my glue sponge. I give it a little tap and I
pick it up and on it goes. I always give it that warm hand pressed to make sure
it really sticks, won't see it lifting. Okay, this might take just an extra minute or
maybe it needs more glue. Let's see, let's try that again, I promise it really worked
the first time I did it well. So much for less messy. I see the glue on
here pretty good. So I'm going to
give my self space. I want room on top for the bow and space on the sides
for me to cut out, to doodle around that. I like a liquid glue for
the watercolor paper, for heavier card stock paper. If I was just using scrapbook
paper or copy paper, I could use a glue stick and
it would work just as well. But something with texture and something that's
a bit in weight, I think liquid glue
works the best. Now I poured glue
directly on the sponge, and I also decided to
add a bit of water. And I don't have
my ratios correct. I just started doing
this just days ago. I may have it too
watery. We'll see. We're going to keep
experimenting with that. Quit lifting. Come on now. Are you all lifting? All right? You guys
need to behave. I may have to change
my style of gluing. I've got more color on the
back. Let's do one of those. Let's have a green package. Otherwise, I want a space, at least on top, to do my bows on top
of each of my package. I don't want these to
be very close together, they need to have
some space apart. I'm going to keep
gluing and keep holding to get them
to stick really well and I'll be right back. So here we have them all glued
down better than others. But it'll be totally fine
not to worry at this stage, like the variety
we have here and some of the different
shapes we have going on, this is going to make
a great collection. The next step is to
start our doodling.
7. Sketchy Doodling: Some of my pieces needed
a little extra coaxing. I spent a little extra time really getting that
glue on there. They're working just fine. I don't know why
it didn't want to work quickly, but patience. I have a variety of pens. I wanted to show you some of the different looks
of these pens. I generally start out wanting to draw around my rectangle. Wouldn't you always know I get
bumps or lumps right away, and here I didn't. I left a gap on the top. I just do 345 little
swoopy loops. There you go. I'll
go around it a second time making sure I get lumpy squiggles on here. I do try to match my lines. I don't want any end of my
pen line to just be hanging. I like to connect all
my ends of my lines. I'm going to go through here just using a ballpoint
pen at this moment. See I didn't keep straight
to my rectangle shape. And that's fine because I am
going for a sketchy look. Sometimes I want my
pen to come out, sometimes I want it to go in. I'm purposely moving
my pen around, just ever so slightly switch
out to my number two micron. Let's put a bow up here. Let's see how I do now. Wouldn't you know I'm
doing perfect rectangles. That one wasn't perfect. That one looped a little bit. When I come back
in on this bottom, I'm definitely going to be
closer to the gift wrap, but I don't want to be much
farther out I'm coming in. But if my line was in, then I'm going to be drawing my squiggle on the
outside to me. That's what gives
that sketchy look. Just make it a one
inside the other. Maybe the ribbon is curling. I totally missed the
box on that one, I meet my edges. When I go back in, I'm
going to go close, but I'm going to come out here. Out and in, there we go. This is how I'm doing a
sketchy look on my gift wrap. Let's go ahead and
fill all these in. Your bot could be on the side, your b could be very centered. I try to make all different 2345. Let's get in there. I think the two micron
is my favorite for this, but it just depends on your
look that you're going for. Let's try the five and see
how we like this bigger bow. I have a bigger pen, my line is going to be bolder, blacker, Wherever my
pen line was at first, I'm going to try to be
outside of that one. Look maybe do a ribbon. Another ribbon over here. 1234. I don't mean to draw on my gift wrap, I want the pen to be on the outside for
now until I start to doodle on the gift wrap. These water colors that I
had used were not sealed. I didn't spray them at all. And so when they were
reactivated with my wet fingers, it left some of that
paint on my card stock. I'm not worried about it. It's totally fine. We've got several
more to do here. I think you've got
the hang of it. I'm back to my two. I think I really like that. So we'll have our
finished doodles of just our bows and the
outline of our packages. Now let's go in and embellish.
8. Embellishing: A couple of the packages. I had already added a
little bit of ribbon. I had done a few curly cues on either side of the package. Let's go in and add the ties
on the side of our package. You don't have to do
them perfectly centered, you don't even have
to do double lines. I think I'll add a
third on this one. Now here's one as
a Christmas tree, I had done these shapes on other triangles
and that's what gave me that initial idea. Now what do we want with these just poka dots or some type of ornament
shape on the tree, Or maybe just tiny
little hash marks and its trunk is way
over on the side. I think I like the shape and I'm continuing
the shape that was in the original stamp now, making marks that aren't necessarily fluent with
the pattern of the paper. Here's another little triangle I think I'll make a tree out of. I'm adding a bit of
squiggle to that one. Here's another rap. Ramsey. Ramsey? No, no, no, no, no, no, no. All right. Let's go
see what's going on. Thank you. Ram Z
for reminding me. Somebody was at the door trying to pick up
where we left off. One of my favorites is the
basic bow on top package. What if my bow was
on the package? Like I'm looking
down on the package, the top view, But I don't want to forget my
doodle around the outside. Who that line really got
away from me, didn't it? I really liked this one circle. I wanted to really
highlight that, this package, the
pattern is fairly dark, so I'm going to try
ribbon with a darker pen. I may end up going with
it with a metallic pen. Let's try this. What other shapes? Oh, what if you wanted to
create your own pattern? I am literally making tiny, tiny hearts in silver. The shape just is one oval filled in next to
another oval filled in. And there's that look, this one can have
swirly circles. Maybe they don't show very
well, but in the light, I really like a project where something shimmers and it's a surprise when you
find that shimmer. Let's add gold on this one. Maybe something on
top of the tree here. Gold here. We want some gold
baubles on this one. Well, my white work. Let's see how my white does now. It might soak in being a
watercolor paper, we'll see. It may not be very
vibrant white. Maybe two more down. Here we go. This is fun, right? We're just experimenting
and playing. Let's get my last package. There we go. Did I miss any this time? Have fun and do something different with each package
or do them all the same? Whatever you have time
for now for cutting.
9. Cut Outs: Now for cutting, I
try to make sure that I do some block
out cutting first. I don't want to
take my time and do detail cutting while I got
this whole big sheet of paper. So go ahead and separate
your little packages. If you really wanted
to take the time, you could have put in
a few smaller packages on any of your blank
cardstock space. Now, cutting out one of the simplest tips I have is keeping your elbow to your body. I'm right handed, my hand
is holding the scissors. These are my yucky
craft scissors. They have a lot of glue,
they're not super sharp. But my elbow stays
to my side and I'm moving my paper. It's up to you. Do you want to cut around
these lumps and bumps of your doodling like I'm doing here or do you want to
just cut it off straight? Trying to go with the
flow of my package. You have two steps
you could do here. Cut out all of your
package shapes now. Then save the detail work for a different
pair of scissors. I personally like cutting around the bow at the top a
little bit more detailed, but if you don't have time for that or you are
completely okay with a bow that has a more solid background,
go ahead and leave it. I'm turning my paper and I'm
not having to move my hand. I don't have to move my arm. I can sit in a very relaxed
position and just keep going. I have a very sharp pair of scissors that have
a very short tip. This actually has a
bit of a curve on it that makes it so simple. I'm still turning my paper, but it helps me get into the little crevices as
far as I want to go, I hope you find a really nice
pair of snipping scissors. These are nice to keep
by your sewing machine, really helpful for
snipping the threads. They're extra pointy if
you've got to do any of that ripping out
of pad stitches, I hope you follow the rule of having a pair of scissors
for whatever the project is. Do you have fabric scissors and paper scissors? Good for you. I was lucky enough to inherit several pairs of
scissors from my mom. She was a quilter and she
had a wall rack of scissors, peg board, if you will, that she hung her scissors. Those were the do
not touch scissors. These are for the
crafting room only. And she knew exactly
what scissors were good for what project. I'm going to continue cutting
and I'll come back to you with how to use these
wonderful focal points.
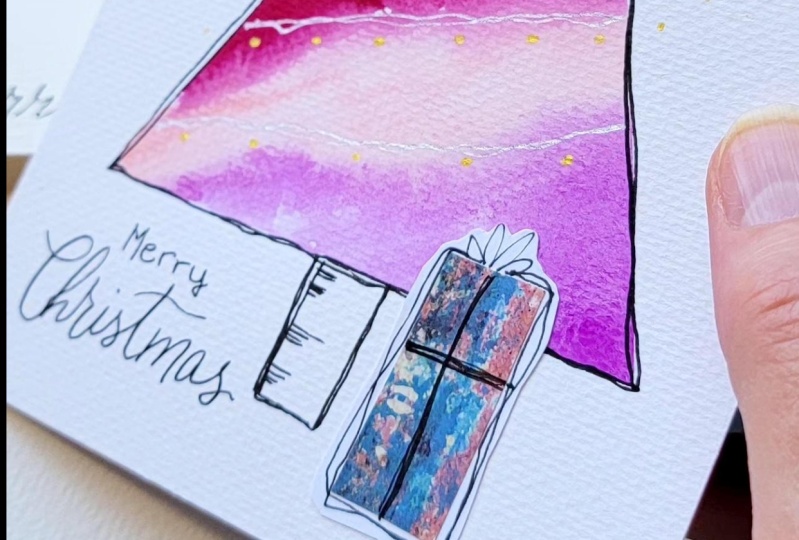
10. Project Ideas: Look at all these goodies. Oh, these look so wonderful. I'm so happy we took
the time to make these. Now for your project, you need to make
some little packages with your own special gift wrap. Go ahead and find
some scrap paper. Make some paper. Do whatever you can
do to get these made, because our project
is making them two. I have a couple ideas of
what your project can be. An envelope, a craft envelope. Craft paper envelope. How can we embellish this if
our address is going here? Maybe we can just glue down one little package in the
corner. Isn't that cute? Maybe a color coordinating or something really bold
and fun could go. Here you decide. Depends on your theme, depends on your need. Is this for Thanksgiving? Is this for a birthday? How do you want to play
with your project now? I'm thinking this
is working for me. I'm starting to love that guys. I don't know about my
little spongy glue. Sometimes it,
sometimes it didn't. I'm going to use my
little needle nose glue and place my package
right here in the corner getting
my sides down. Eggs are good. Okay,
perfect. Perfect. I have a card now,
maybe I want to put in a note in this envelope. What if we doubled
up some things? What if we made it a
big parade of packages? Something small, you
could layer them up. What if you layered
something big and small? Gosh, I think that looks great. I'm okay with that. Kind of make a little collage of
presents on my note card. This can be a greeting card, a birthday card, a holiday. You decide how you
want to overlap them. Now when I send happy mail, besides writing a note, I like to put a
little gift inside. Maybe it's something
for their junk journal. I could put a piece of my
project right in there. What do you think
I do like that, but I also have another idea. One is making a tag. I think I want my tag to
definitely fit inside my card. I'm going to snip it
right about here. How I make a tag is
trim off a corner. I take that corner and flip it over and trim off the second side to
make it as even as possible by eyeballing it. That's my closest
way I can do it. Pull, punch the
top. I have a tag. What can I put off my tag? One of my little tiny presents. I sure like things off centered, don't I think I like
this the best actually. I think it will
go in the center. I know I like off centered, but right here, it's going
right there in the middle. Now, one last touch for a tag. I just so happened
to have ribbon that. Remember I talked
about cutting with fabric scissors versus
paper scissors. And I didn't follow
my own rule and my fabric was fraying up because I was using
my craft scissors. I'm going to stick a touch of glue in touch on my ribbon. I got it on my paper
and on my ribbon. And I'm going to
hold that till it dries because I don't want my paper to get any glue on it. I can write my message here. This could be something
they could journal on. They can make this a bookmark. I'm going to stick it right
in there in my envelope. Silly me too, that in a bit, I have a gift. Now, as for tags, you might like to use them on a gift tag. Definitely make these smaller, they just told the
person's name. And go ahead and make a whole bunch of tags to
place on their presence. That one personal element
will mean so much. I think that's brilliant. I can't wait to
see your projects.
11. Wrap Up: Wow, thank you for
joining me today. I hope you had as much fun
as I did making these tiny, tiny presents as ephemera
for your projects. These great little pieces
of fodder to go in your collages to
embellish a card, to embellish an
envelope or a tag. There's so many ways
you can use these. Please show them to me. I can't wait to see
what you've created. Put them in the
project section of this class and I will be glad
to look at it and comment. And give you encouragement
for experimenting and trying different papers and different doodling styles
and cutting them out. I know it takes a
little bit of time and I hope you find
it relaxing and enjoyable and you're using up all those scraps you've
got laying around now. Would you take a
moment, review this? I would love to
hear your feedback, what you liked, what
could be improved. I need that feedback and I hope you take the time
to share that with me. Now, join me in other classes
that I have to offer. I can't wait to see you again. Have a great day.
 Tammy Prara, Making Matters