Transcripts
1. Course Description: Hello everyone. Dive into the word of Amedia painting with my beginner
Fendi tutorials. Unwind, Express
your creativity and craft stoning artworks
effortlessly. No prior experience required. Even if you are already
familiar with painting, you will discover
new inspiration. My course features seven
bite sized videos, four to 7 minutes each. Making learning a
breeze techniques are thoughtfully repeated for solidary
skill reinforcement. Take your time,
repeat paintings, and relish the process. The key is to savor
every moment, Explore the joy of repetition. I often create multiple
versions before framing my best pieces or sharing
them as thoughtful gifts. Some even choose to sell
their creation with high quality image of line
art and finish paintings. You will grasp each step easily. Gather your watercolors. 21 brushes, size 2.61 brush, masking tape, a board, watercolor paper, and your boundless enthusiasm. Join now for an
artistic journey there, simplicity meets beauty, and discover the pleasure of creating stunning
water media painting.
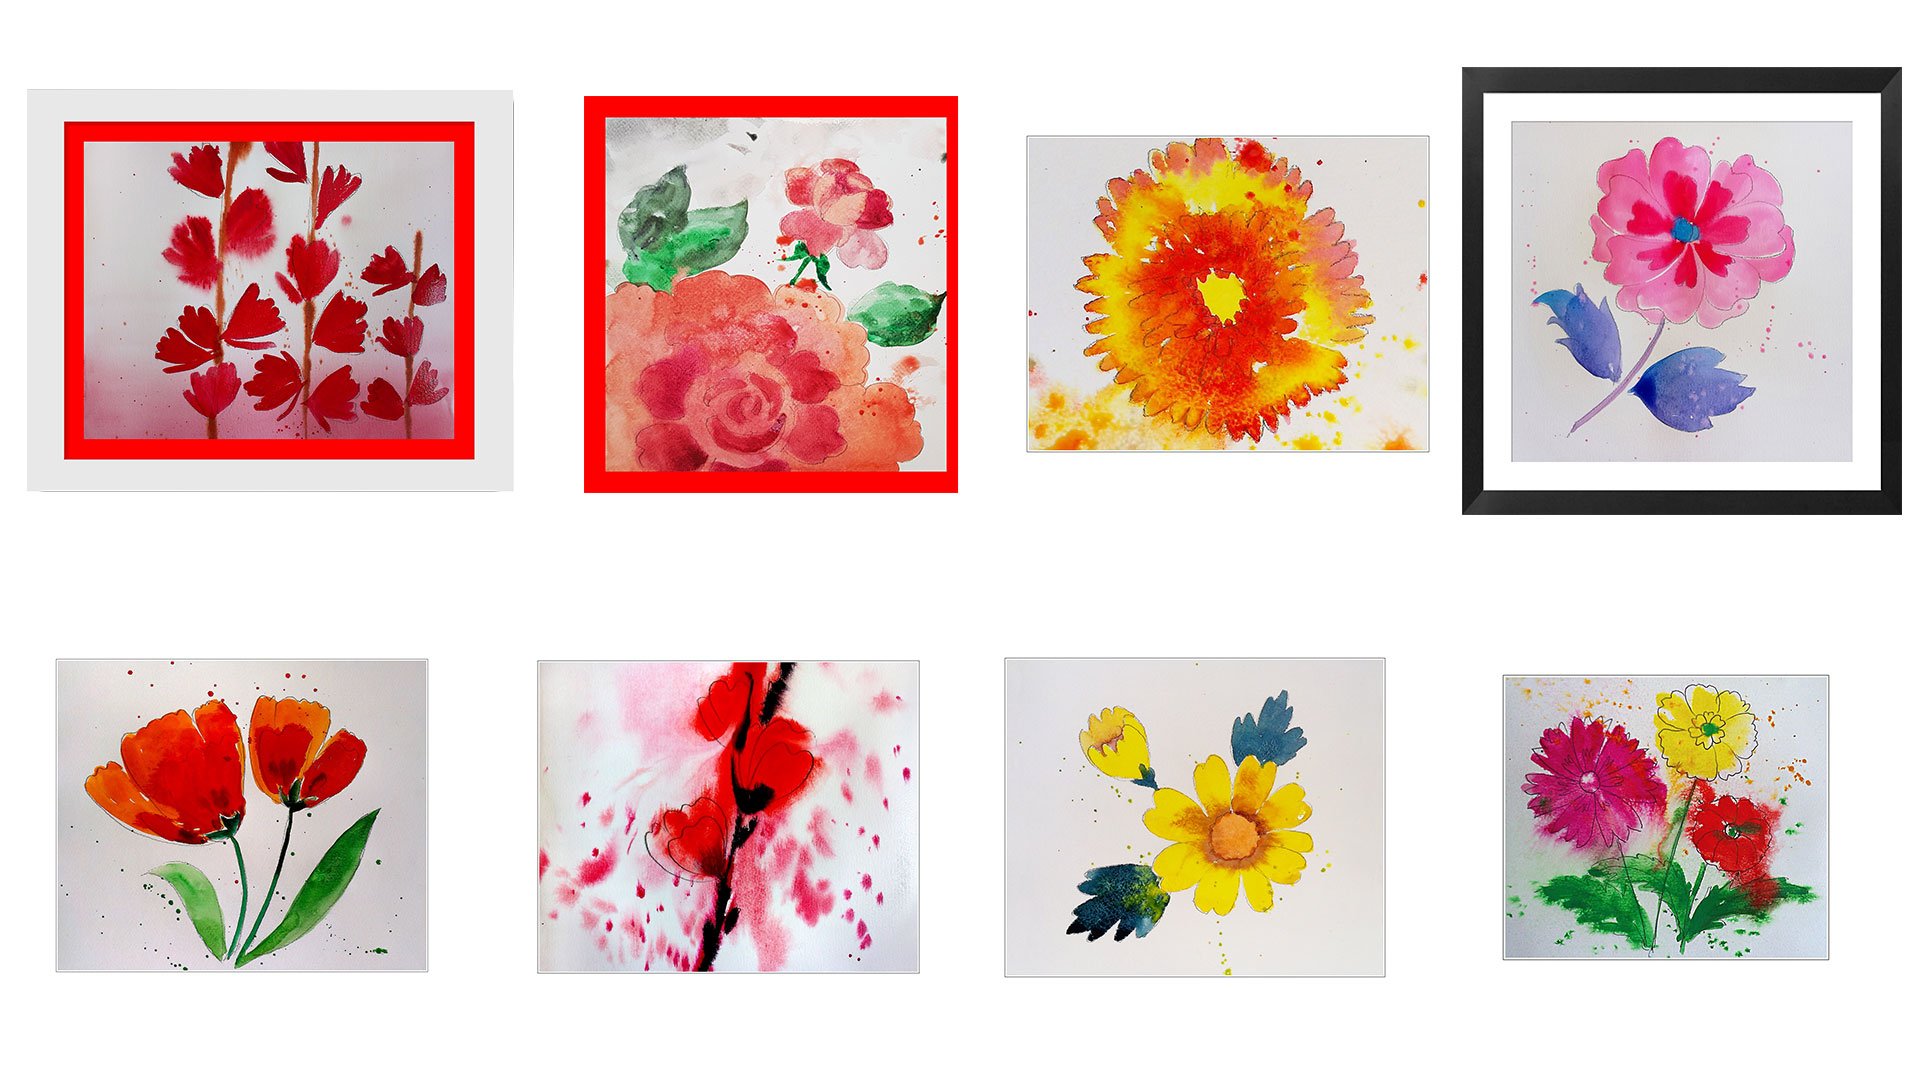
2. Fantasy 1 Web: For this wonderful painting, I'm using three
different techniques. The first one is
using a flat wash. The second one is called
Tt or wet on wet. And the third one
is on technique. Just follow the steps and take your time
to enjoy painting. Keep it easy. Take it very easy. Also prepared all the
materials you need. The design is over there. You can have their line art. As usually, I prepare my
color before painting. I make some washes and make them thinner or thicker by
adding some water to them. And also, let me say always
I tried the colors on the same material that I'm going to paint
my final painting, to be sure that what would
be the color in action. As usual, I start from
the outer part of each petal then easily
feel the inner part. So as you can see, I'm using
a very pale, reddish color. There's in fact a
mixture of red ink. It's colors ecole
color and some water. That's it about the color. I try to keep neat edges, don't mix colors very
far from the line art, but it's up to you this matter. Matter of taste, you can enjoy the accidental happenings could happen during your
painting, basically. As you can see, I feel the face color for
the second flower, I'm going to use a
mixture of blue and red. That is somehow violet, something between
violet and red. Sometimes it's towards blue, sometimes it's more
towards the red. It's up to you. We can use a different mixture, but I think that keeping
it simple would be fine, and also the harmony between
blue and red is wonderful. It is wise to let the first
color to be dry enough, otherwise they will
mix to each other. Because they are wetting means more accidental
happenings here and there for times. As usual, I use a slightly smaller
brush, maybe number two, number one or number
two round brush, I use a number 34 to
six for the leaves. And also I use a mixture
of the same mixture. I mean the mixture of blue
and some reddish color. That makes it more fun,
more visual interest. As usual, I start
from outer part of each shape somehow like
solving a puzzle, isn't it? It is fun. It is fun. Also, for the next leave, I start from red color, then add some blues. It is called wet In wet, you can see that when
the colors are wet, they disperse to each other, to each other on the paper. That's why it is
called wet on wet. For the third one, I start from the blue color and I'll start as usual
from the outer part. And for the stamps as usual, I use a smaller brush. That's it about this
wonderful painting, it's almost finished. I can also keep it as it is, or you may add some extra
details for the last part, I let the first layer to
be dried out completely, then I used a second layer
that would be somehow darker. And it's called dry on dry. That is an amazing result. You can see that then you
are using ink colors, you would reach
more vivid result. I hope you have enjoyed
this wonderful painting. You can make a seri
of your own painting. You can make several combination
of this composition, Can paint it in
different sizes as a gift or as a framed fino
painting on your val. I hope you have enjoyed this
wonderful painting also.
3. Fantasy flower2: For today's wonderful painting, we are going to use two
different techniques. One is called splash. I use it very often also. The other one is
called wet and dry. Skip the names and
follow the process. I believe that you
can do it very easily for this painting. Also, I'm using a
mixture of blue and red, but the result is wonderful. I start from a watery mixture
of water and blue color, so it's diluted watery,
pale blue color. I use this mixture to
paint the opponent petals, and then I use pale red color for the other two
opponent petals. I go through the same
process for the other lover. Let me say, I start from
two opponent red petals, and then I use a mixture
of blue and red. That would be surg
violet, let me say. And then for the last one I
use pure, watery blue color. I use a smaller brush
for a These leaves, they are sort of leaves
but they're imaginary. For the time I usually use number two round
brush, it's up to you. You can use number one. Number two, number
two for details. As usual, do the same
process for the other, but with red color. I use the same number
two round brush for stems and you can see that
the result is fascinating. I usually use some drops here and there you can
splash the colors. It is also called the
splash technique, or you can put it intentionally. I let the base color
to be slightly dry, then I use a thicker
layer on top of the base. Whenever the base color, base layer is dried out, you won't have spersion. But if you have a
still that base layer, you would result in spercion the colors
next to each other. And it is, it is, it is called wet on wet. But if the base
color is dried out, it is called wet on
dry, and it is fun on. The aim of this course
is just having fun, Having joy, enjoying your time. So take your time to enjoy
and make variations, make variations in
composition and colors, and enjoy your time.
4. Pansy Flower web: Pansy flowers are
really beautiful and very inspiring to me
for this painting. I'm using the glazing
technique that basically is putting a very thin layer of
color on the previous one. To taste my colors, I usually use the same
paper that I'm going to paint on it based on the previous
paint you can use. And dilute your
colors with water to make more battery
and more pale color. This is the way I usually do. I personally prefer
adding water to make thinner color and
also brighter color. As usual, I start from the outer part of
the petals as shapes are recognized by
their outer shape and just simply fill
the inner part. I have to use a slightly
thinner brush for the stem. I choose smaller number
two or number one, or number three round brush for the stem makes it easier to control and
also fill the color. Pay enough attention to the
amount of color you are picking two brush to add
more visual interest. I sometimes drop some
colors here and there. It makes it more attractive. In my opinion, it's up to you, but I think it is the
way that works for me. Sometimes I just drop
some water drops here and then I let the base color
to be dried completely. So that could add
the second layer. I will add a second
tin water color layer or wash layer to the base layer. And it is called
glazing technique. Basically, it is very simple. You color the second shapes, second petal in another color, or the same color that you were using to color
the base player. I personally choose
some different color because it makes more
visual interest to me, but it is a matter of
taste, depends on you. You can use the same color or choose another
different colors. You can leave some parts untouched so that
the minute layer could show up or you can completely fill
the second petal. Also. Also, you can drop some drops here and there to add
more visual interest. That's it for this painting, I hope you have enjoyed it. You can make a
seria of painting. You can paint in different
colors a set of three, or two, or four or five events to
hang it in your kitchen, in your bedroom or whatever, Or even a seria painting to present them as gift to your
friends or beloved funds. I hope you have
enjoyed this painting.
5. Pansy 2 web: This. Listen, we
are going to paint a very beautiful and simple
flower with just one color, or let me say the
shades of red color. I have used liquid at color, but it's up to you
mainly because it has more vivid colors as
well as I'm going to try and wet on dry technique. Do you want to be a scrit
about the technical terms? You can go through the process
easily without knowing the technical terms and
following the video. Keep it temple and
enjoy painting. Just as a general tip, if you use liquid water colors, you would have more
disperse because basically the pigments are very, very tiny so they can travel
very further on the water. I usually prepare my colors inside my palette and then try to see how dark or
bright they are on exactly the same paper
that I'm going to paint on. So keep in mind that
you have to use the same paper to see that if the color is bright
enough or ten all to try your
color on main paper. As usual, the edge of the
shapes are more important, so I pay more
attention to edges. I'll simply fill the inner part. I start from the outer
part of each shape, doesn't matter what it is. And then fill the inner part to make the colors
thinner and brighter. I just add some water. That's it. As you can see, if the colors are still and
I use another color on them, it is called on vet. The result would be
very fine effect. You can see how the colors
disperse and mix each other. Not a very precise matter, but in a very exciting matter. They disperse sometimes far from where you put
them on paper. It depends on the second
color, how thick, and also the first layer, How thin is, the thicker
color won't spread that much. The thinner the base layer is, the more the space
you would reach for the tim I'm using
a gray, that is, a mixture, could be a mixture of black or could be a mixture
of green with red color. Green. The complementary
color of the red you can use, it gives you more
colorful gray color. I describe the complementary
colors in a separate video. Just keep in your mind that green and red are complementary. Basically, it means
that if you mix them, you would reach a gray
color. That's it. Basically to have some more
variation as some red, pale red to my gray,
grayish color. I'm going to feel the shape of those leaves as I
add more green, more of red here
and there to have more visual interest almost. Flower is dried in your case. If it's not dried, you can use a hair dryer. Depends on the climate
you're living, the weather. So if it's humid, you have to use hair dryer. That's it about this flower. I hope you have
enjoyed this painting. You can now hang it on your wall or give it as a
present to your friend. You can repeat it
with your taste. You can use different colors. I hope you have
enjoyed this video.
6. Gerbera Fhd web: Bra or Goba. They are really
beautiful and lovely. Pink, yellow, white flowers. I love them very much
because of the vivid colors. For this lesson,
I'm going to use a diluted as color,
but it's up to you. You can use ecoline ink in fact. Or you can use
normal water color just as a matter of
hates experience. Usually colors are more opaque. They give you the chance to rectify your errors
if there is any, but it's merely a matter of taste based on the
fact that they art. They don't disperse
that much as if you put two G colors
beside each other. They don't usually mix and disperse to each
other that much. That's why I use
colors for today. Paintingy give you a sort
velvety touch usually, so I also like the mood that is a result of
using Gah colors. Start from the center of flower, then I use some orange color, and finally I use pure red. As I have used sort of watery
red color on each folor. I mean the right part of each floor is colored
in thicker layer or let me say the color that comes out of the gas
tube or Gh parts. Let me say on the left side, I have used more battery
colors and ends up in a sort of sense
of having volume. You can try the same
technique that I have used, or you may use the
same amount of water, premix colors, and
then you use them. Whatever the color is
on all the petals, I have choose the different
thickness of colors that let me say
brightness and darkness. It gives you sure, the ceiling of volume
that I like it, but it could be the same color that makes it move
flat and it's okay. Also after the petals, I'm going to color the leaves. I try to do mix the
petal color with leaves, but it doesn't matter
if you mix them also. It's okay because
they're going to enjoy the coloring process and the
accidents are very welcome. It's up to you. It's a
matter of experiencing, a matter of enjoying your time. Yes, that's it. I usually use a
smaller brush for the leaves because they
have more details. You can easily manage to color leaves with
a smaller brush. As usual, I start from
outer part of each shape, then fill the inner part. It makes it more easy. If you use a smaller brush, I keep it simple. I just throw the pencil design to have an other view
of the final design. But I'm not that
stocking the lines. And for final touch, I just drop some
colors here and there. I hope you have enjoyed
this lesson too. We can now hang
it in your world. You can make a say of this, my wonderful Gerbera,
or Gerber flowers. I hope you have enjoyed
spinting ourself.
7. Marigold FHD web: I love the flowers in general and parts my goals
are no exception, they're wonderful,
they last long. Usually you can see them
from spring till all. In fact, I love them not
only because of the colors, but because they're always
there for two days painting, we are going to paint
those wonderful flowers. I use Gu for this painting, you can also use the same color, but it's ot can use ecolink
colors or usual watercolors. I start from the inner
part of each flower with pure yellow color and then continue coloring
with number two, round for the petals G. Because of the final result that is
somehow like velvet effect, I like that effect for these flowers,
these lovely flowers. Definitely I like the effect, the velvet effect fits very well to the sort of manclesls. Another tip is that I start from outer part towards
the inner part, but sometimes I
stuck in opposite. But these are two, let me say, acceptable
directions. From the outer part
inward or from the inward towards the
outer part of the shape. That's my rule. That's my taste. I like this technique, but it's, I prefer this. I mean from outer
part of the shape inward or from inward to the
outer part of the shape. Because mainly it
matches the way the form is generated or let me
say is in a real world. If your lines rhymes with
the form makes sense. That's all about this
painting process. For the leaves and stems, I usually use a smaller brush. Number two. Number
one. Number three. As round brush would be fine, I usually use number two, round brush for the stems
and also for the leaves. You can also the having a
first layer dried enough so that you can color
the e, the second layer. But it is up to you. I prefer to let the first layer be dried completely because I don't have to care about mixing
accidentally the colors. And that's it. Fan now think gets finished. But you can also some
more colors here and there if you are
interested to make more attractive visual effect. I hope you have enjoyed
this wonderful painting. Now you can hang it
on your wall with a kitchen cozy corner of
your house or whatever. I hope you have
enjoyed this painting.
8. Fall Leaf Fhd Web: Oh what a lovely and
colorful season is. Fall, fall. There are plenty of colors, but mainly they are adjacent. I mean, you can
see mainly green, so you can see orange
and also brown red. For this las, let me
say for this painting, I'm mainly a mixture of very
a thin mixture of yellow and green that also includes some orange in it and
also a pale red color. I basically start
from this mixture. You can also make your own, but I've used a mixture of ocre, yellow and green mainly occur. You can do the same color with
a mixture of pure yellow, pure green, and tinge of orange. The same result would be
there is no Rangan, right? Because you have
plenty of colors. In fall, start from the
outer part of the shape. It's my rule everywhere in this course,
almost everywhere. I basically start
from the outer shape and just feel the inner part. As you can see, I pay more attention to outer
part of each shape. We are almost down
with the outer part. I also am going to describe
about two other techniques, the first one is wet on wet, you can see I'm using it, you have the T space color, then you add the second layer on it and they disperse
to each other. And also, I'm going to describe about scratching
technique later. Basically what I'm
doing now is technique. That means that you're
using a color on another minute layer would be a mixture of two
colors here and there. Sometimes one is dominant, sometimes the other one is the dominant color gives
you a chance of variety. I love, let me say
accidental mixtures. You can see those accidental
mixtures in real nature. I hope you enjoy these
wonderful mixtures. You will later be
able to control it more while it is
also accidental. But for now, just take your time and do
experiments as I am doing. For this time, as usual, I use a smaller brush and
also I use warmer color. Here is red. In fact, basically I use my red diluted color for
scratching technique. You can use a variety of things. I my pen without
any pencil in it. Let me say my technical pencil
without any pencil in it. Just to scratch the paper
and then you would have more color and that makes
it slightly darker. Can use a knife, small knife or whatever. Maybe you can also
use your nails. I prefer this technical pencil because it gives
me more control. As you can see now the
wet color is going to go to deeper part
of the surface, makes it more interesting. As usual, drop some colors here and there to make
it more interesting. I hope you have enjoyed this wonderful fall leaves
and also make a serie of those lovely leaves to hang on your walls and give
them to your As gift. Just enjoy your time by doing those wonderful
colorful fall leaves.
 Madjid Yeganegi, Art instructor