Transcripts
1. Welcome: So a lot of people think self portraits is a
very difficult thing. Now, in many ways, technical, realistic self portraits
are probably hard. It's an activity,
takes a lot of time. However, today,
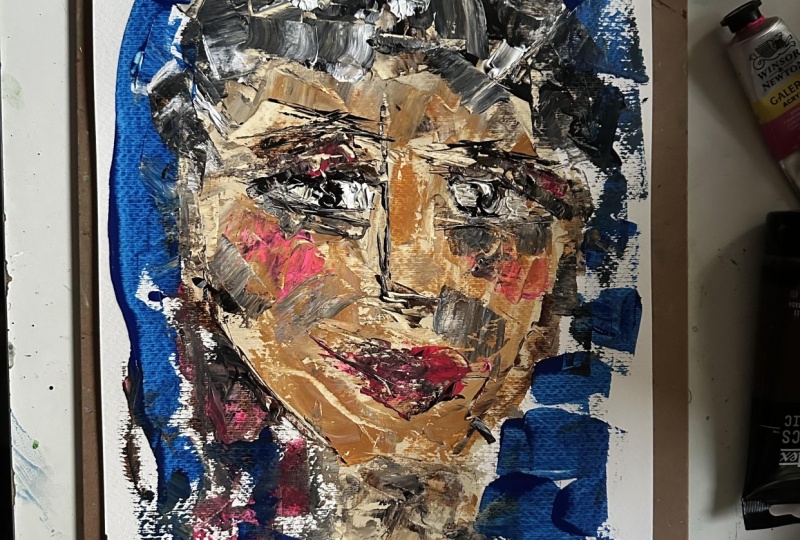
we're going to be doing an abstract version
of a self portrait. We'll be looking at our face, understanding where
our eyes come where, es come where, smile
comes where hair comes, where receding hairlines come. But we are not going to be doing these fancy self portraits
today. It's abstract. Hello, I'm Sangita Angela Kumar, and I normally take
classes and art sessions. I will be focusing primarily on acrylic paints and palette
knife for my painting. Now, you can use
whatever you want, but thick acrylic paint is more pliable and you can
move it around. So that's what I'll be using. The point is having
fun and trying to recreate your face
in the abstract form. But do post. I love it when people post what they what they have learned in the class. And it will be really
wonderful to see your interpretation of this
class and also of your face. Feel free to also put
before and after, like, your face and then
also what you drew. Might be interesting
as an activity. The essential facts and the rules and the lack
of rules are the same. So let's get started.
2. Your Face: What we're going to be doing
is we're going to be doing an abstract self portrait. And for this, you
need your face. Hopefully, everybody has a feas, so that will be very
nice if you can join in. So if you have a mirror, look at your beautiful face,
and it is beautiful. Ha. And so just like you can close your eyes and touch
the top of your head. And just with your hands move
down and feel your ears, and then the bottom
of your chin. Okay? So this is the
top of your head. This is the bottom of your chin. The halfway point, if
you see, is your eyes. So it's really
interesting because your eyes are literally halfway from the top of
your head to your chin. And these are your ears which are at the
top of your eyes. So now, this is art
Lesson one oh one. I mean, my art teacher
taught me this one. We were doing self portraits, but we are not going to be doing these fancy surf portraits
today. It's abstract. So but I just want to tell you a few of the important
things halfway to your eyes and your is
the bridge of your nose. Now, some people
have stubby noses, some people have long noses, some people have however
their noses are. But essentially, our faces are symmetrical
to our own faces. So if you do this, generally, your face like your eyes and everything is symmetrical
to your own face. It may not be symmetrical
to your neighbor's face, but definitely to your own. You learn this
officially in class. But I'm just taking you through
understanding your head. Now, above your eyes
come the eyebrows, and then your hairline comes definitely not in the
top of your head. Like a lot of us have hair. Some of us don't, which is also. Halfway is your hairline and halfway is the
bridge of your nose. And then the lips come between
the nose and the chin. So all faces are symmetrical. It's just that the symmetry
is uniquely yours. And that's what we're
going to study today, and we're going to
be going through, understanding the face and
creating an abstract painting. It's like an abstract
self portrait. It's not as bad as drawing
a realistic self portrait. That's I find very challenging. But an abstract version
of what you think your face is is what today's
activity is going to be. So this is an understanding of feel free to touch your head, touch your eyes,
understand the shape. Like, some people
have round eyes, some people have long eyes. So feel your ears, understand your eyebrows,
understand your nose, to have a long nose,
you have a wide nose. I have a yeah, I have different noses. Well, we all have
different noses. Whether you have round eyes, square eyes, square face, round face, oval face, whatever shape you have, this is not an activity
to put yourself down. Actually, it is on the
contrary, it is your face. And that's what the
beauty is in you. So I would encourage
you to embrace that.
3. Supplies: When it comes to using paper, you're welcome to
use acrylic paper, which is heavy weight. This is 400 GSM. Ideally speaking,
that would be good. However, if you don't
have access to this, you're welcome to use
any mixed media paper or even if you like, you can use a watercolor
paper because it's heavier, so it holds the paint. I will be using
acrylic tube paint. You don't need to
necessarily use this brand. You're welcome to use
any brand that you want, but this is what
I will be using. These are more or
less the colors that I will be using
for the session. But essentially, I'm using
tubes because they are easier to play around with and it's important that you
choose your colors first. So I'm basically taking out a few colors that I
think I will use. I definitely may not use blue, so I won't bother taking it out, but I mean, want to use a red. So this is titanium white. This may help with the
tones for my skin. This is nice for a
light colored person. Feel free to experiment
with the colors. Not everyone's skin
tone is the same. If you have green eyes, if you have blue eyes, if you have brown eyes, if you have fluorescent eyes. Because it's abstract, you
can really experiment. Like, for example, um, I'm going to be adding a little variety in shadows with light
brown and dark brown. Also, if you like adding gold. This is the fun thing about this activity is it's
not really authentic, so if you want to make your skin blue, you're
welcome to do so. The point is not to limit yourself in checks
if you'd like. This is a nice, Naples yellow
is a nice skin tone color. So I'm getting a lot of reds
and because I'm Indian, I'm sticking to
browns and beige and pinks and to mix colors
and crowning us White. You don't have to use
all these colors. You can pick and choose
what you'd like, which is why you have to figure out what
color tone you'd like. I'm going to show you
what I will be choosing. So there are about
three types of yellow. Four types of yellow
that I picked. Again, this is just
to mix a tone. This is what I'm gonna
be using for browns. I'll be using again, different types of whites. So titanium white is one. And then I'm also going
to be experimenting with these different
types of whites. And in terms of black,
I'll be using Mars black, a little bit of pink and a
little bit of terracotta for variation if I'd like for my lips and cold if
I want to be fancy. Now, because I know I know more or less
this is my skin tone. This is what I'm
going to be using. However, you're welcome. I'm going to be trying a
little bit of this as well, and a little bit of this just to experiment with what I'd like, and I'd probably use a burnt umber to experiment with the
shades and highlights. You can use the pinks
to do this as well. But for me because I
have a dark skin tone, I'm going to be experimenting
with these colors. But, for example, if you
were a fair skin tone, then you would probably
not have these colors, and you'll probably
have this with a dash of yellow and pink. So what colors you choose for your skin tone is really
up to your experimenting, but I will be using I will
be experimenting with this, but not all colors will work, but that's where the
abstract open feeling comes where you experiment
with your colors, and you can build
it as you'll see. You can build it. Even
if you make a mistake, you can add a few more
colors and mix it right there on the artwork itself. Along with that, I will
be using palette knives. So you don't need many,
but I'm just showing you. Like, there are
different kinds of I generally don't use these
big palette knives. I use a thin one and this. But because it's a face and I need a variety,
I'm using it. But this is good enough. If you have one, just get this. This one is good enough for
using for this activity. Because I'm going
to be experimenting with eyes and adding a little highlight in the
eyes, I'm using the small one.
4. Choosing Colors: Oh, in an ideal world, it would be very nice
if you could use all these paints and
complete your illustration. However, if you don't
have all these colors, what I would say is if you can maybe get unbleached titanium, naples yellow is a
good skin colour one. I always like pink opera rose because it helps
with the skin tone. It also helps if you want to
add some blush to your skin. For Indian skin tones, I often use a combination
of raw sienna. Naples yellow, either this brown or the burnt umber brown. So that is, of course, dependent on your skin tone
and skin color. But today, I'm interested
to experiment with these. If you don't have all
these colors, that's okay. Just get a skin tone that you feel is closest to your tone. If you have these
small, small ones, then I would probably mix yellow with a little bit of brown and a little bit of white. So that gives you the tone
that matches your tone. But then again, if you want
to make your skin pink, you can if you want to make your skin red or gold, you can. So experiment with
what you feel. If you want to make your skin blue, you're welcome to do so. Whatever you are able
to get your hands on, whatever is accessible,
that's most important. But the non negotiables, of course, are a palette knife. This is not an
activity with a brush, although no one is checking, so if you want to use
a brush, you can. But the fun and the spontaneity that comes with a palette
knife is something else, and the feeling you'll get
is something else, as well.
5. Palette Knife Basic Technique: So you put the paint here,
and then you fly it flat. Okay? The second option is
you apply paint on the side, and then you draw lines. Then you can apply
it at the tip and then fly it like this. So I'm just going to give
you a demonstration. So I'm going to
take a little bit of paint on the
back of the knife. I'm just gonna paint. So this is when you apply the paint and you drag the
paint across the page. If you drag it less, then it doesn't create
this kind of texture, and then it creates
like a bulb of paint. For example, I'm not
going to so this happens is you get
a less opaque line. Whereas if you drag it, then you get a little
bit of what's in the bottom layer. Why
is this important? Because when you paint
with two different colors, if you drag a little more, then the color below it
emerges, and that's really fun. So the way you do it is that you squeeze the paint, right? And you just pull back to line the edge
of the palette knife. And then you in an angle where the line is
facing, you draw a line. You can go left right
to add more color. You can drag this. If you want to add
more variation. But generally, for
markings, it's draw line. And for curves, it's
like, it's it is. But essentially, this is a line. Now, if you have
paint left over here, you can lean in and lean out. But I was showing you about
the color ray, the bleeding. So let me try and show you
this is the back of the paint. So now, if you can see, the light blue is below and
the dark blue is on top. So now what I've done
is I've created like a dual color with variations. So this creates a
beautiful texture, which is something that
see you can see this. It's very, very beautiful the
process of painting that. Challenges with
things like eyes, I would say, is
creating a circle. So what I would do is
I would just dab it. So it's not exact circle, then if you want to just move it to the edge, and
that's what happens. Then you want to line the eye. It doesn't have to be perfect. Like, you can see, there's a
little smudge with the eye. But you can still see
that it's an eye, right? So that's what you can do. And if you don't
want the eye, you can just smudge it out. Something that I really
love doing, adding gold. So for example, now, I've created this texture. So now, as you can see, the blue is still visible. But the gold is now also
created the markings. So just feel free to experiment if you want
before getting started. You can also mix colors. So like, right now, this is the gold has a
little bit of yellow, so it's a little bit
of a turquoise look. So now I'm putting
in a turquoise here, and I'm going to put in yellow. Now I've brought it both here. Now I can I can mix it well, or I can mix a jag it
to create a gradient. Whatever color you
choose, you can mix it. You can add it. And then when you
slide it like this, you get a beautiful texture
with a mix of colors. So that's how you paint it. And then, again,
like I said earlier, if you want to draw a dot, then you get paint in the tip of the tip of your
brush, you draw it. And you move it in the shape of what you want, but
don't be afraid. You have to trust the process of the beauty coming through. And another thing I
want to tell you is, if you want, like, for example, I've done all this,
but I don't like that there's so much green. So the nice thing about acrylic paint is you can paint over. Like, if I want to if
I want to add color, you can just paint
over the acrylic. So acrylic dries really fast. So if you let it dry,
then you won't blend it. Then you can add extra
colours into the process.
6. Rough Practice: We're not going to
start straightaway. We're gonna just start checking how loose you are
with your hands. Most faces I'm
drawing with a pen. Most faces are round oval. So it's kind of long round. And the other one
is the pointy chin. So like a jaw line. So it's kind of like a triangle
that goes into kind of a square and then become circle. So this is for me, this is my face.
This is what I have. Of course, my face is
not so thin and long. Your face could be round,
it could be square, it could be oval, it could be
different different shapes. So it's very important
that you look at shapes. And so when you're touching
your face and understanding, okay, what is the
shape of my face? More or less, these are the shapes that you
will come through. I find this a very
common structure. So when you're
looking at shapes, this is what you
have to approach. When you're touching your face, try and figure out, is it a round face? Is
it a square face? Now, when it comes to faces, let's just say you have a
you have a round face, okay? This is what I kind of talked
about in the beginning. Halfway to this is more
or less this point. That is the top of your ears, and that's also
where your eyes are. Okay? Okay. And then from
this comes your nose, and then halfway from
your nye to nose, Then your hair comes here. Okay. And if you have less hair, if you have more hair, and then of course,
that's your neck. Now, that's if you
have a round face. Even for It's halfway. So if you go, this
is probably halfway. You don't need to measure
it, be instinctive. So if it's half half, so this is the top of your
ear, this is your eyes. You may think there's
so much space between the eye and the head, but it's the crown of your
head, top of your head. This is the top of the head. Okay, this is the nose, and halfway down is from your nose to your
chin is your smile. So when you understand that, you've understood the
basics of a face structure. Now, I know this
looks like a doodle. It's just giving you
an idea about faces. And, of course, you're welcome to study about
faces and face structures. This is just to
give you an idea. Coming back to shapes, this is not a masculine
feminine thing. It's just about your face. So many men have round faces. Many women have round faces. Many men have rectangle faces. Many women have rectangle faces. What is your face shape? Is up to you figuring out
when you touch your face? Again, we're not getting
too technical into it, but if you can't figure
out the idea of your face, it'll be easier to even
approach it in an abstract way. That is a brief understanding of shape and form and symmetry.
7. Self Portrait Demo: So I'm taking this just
for creating a shape. I'm going to just plop a little
bit on the on the paper. And I'm just gonna create a
shape with my knife, okay. It doesn't have to be perfect. But, like, now I'm a
round face in this. So I'm just gonna create a little bit of a
chin for myself and here are my ears because I have
understood that this is kind of the halfway
point of my face, right? So now this is very,
very fair for me. So I'm just going to add onto
my brush I add some colors. But this was to establish
my face and the shape. So now, right there
on the paper, I'm mixing these colors. You can mix it on the
side and bring it on, but I want this to be
a little instinctive. I think that burnt umber
was a little too burnt, but I'm building the colors, so I'm going to try this brown. So as I'm working the paint, it's actually
mixing and creating a shade that I'm
more happy with. Okay. My ears were getting lost, so let's get my ears back. Alright. Now, the advantage of having two colors is
that when you scrape, you get this richness of tone. So, for example, now, if I want to make my nose,
in that spot, I can, which I'm not gonna What happens is I can
make these markings, and the lighter color
or the darker color, whichever you choose comes out while you're
mixing the colors. I think this is a little lighter
version of my skin tone, but I'm going to just go
with it because otherwise, it's going to get lost, but I will build on
it as I continue. This is the top, and
this is the bottom. And so I'm going to find
a spot in the middle. This is the middle of. This is where my eyes are gonna come. This is my ears. I can create the whites of my eye or I can create
the blacks of my. So I'm gonna have
fun little bit, and I'm going to add whites of my to make it a
little interesting. That's my whites. Now I'm going to get a black. Okay, I'm not gonna
get too much. It's just a little bit,
too. That's really wide. I'm using leftover to
create a little line. I create like a shape. I have big eyes, so I have to make sure I'm being
authentic to my big eyes. But with that, I'm drawing
a shape of my nose. Alright. Now I have black hair, but I also have white hair. I'm gonna be mixing a
little bit of black. A little bit of gray. On a little bit of white. So now I'm gonna
focus on my hair. I have um I have short hair, so What I'm doing is I'm just using the leftover to just extend
my neck a little bit. Just for the shadows. I can always go over this part. It's helpful to have a tissue. So now I'm going
to just brighten my skin because it's
looking a little muddy. And so I'm going to maybe add a little
bit of sienna opaque. I don't know if this will work. Again, I'm just experimenting. I don't know how this will look, but I just want to add
some color into my skin. I'm just adding a little
bit of color to my skin because brown has
red in as well. I know it may be like,
What are you doing? It's just not looking like you. But this is where you're working with the paint,
understanding it. I don't know if
you can see this, but there's a richness to the
skin tone that I'm getting, which normally, I wouldn't probably get unless I was mixing all
these colors together. This class is for brave
people we're open to looking a little bit like
hydra here, but that's okay. There are a few
things I want to add. Like, I'd like to add a little
bit of pink onto my face. I'm gonna have a little fun with my lips because it
would be nice to have. So again, bridge of
the nose halfway down. Let's give me a little blush. I'm building on the
colors. So it's creating. Now that I've given it a little
time, it's kind of dried, so I can I can go back and add a few
variations of colors. Okay. Similarly, I can work
on the eye shape. Just moving the paint around
to create more sheep. It helps having a tissue
to wipe your paint off. Now you may think, Okay, the form is not really exact, but that's
what it is, right? This is about experimenting with a semi abstract approach. Now, I would like to create
a shadow above my eyes, so I'm taking a little brown. So as I'm creating this, I'm creating a shape to my eye
by adding a little shadow. You see? So similarly, so I'm darkening the
colors for the shadow. Wherever I need a shadow, I'm adding the darker color. But see, this is where I
would be so curious to see how you guys did in terms of getting your choosing your tone, choosing
your palette. Sparse eyebrows, so to make her smiling. Now, I'm also putting the leftover paint around because I'd like to
also fill this space. So I'm not wasting anything. And that's why if you'd
like to add your blues or your golds and this is just
purely on your instinct. And if you've gone
a little over, where you can cover it
and bring the shape back. Whether you feel
it's beautiful or, like, and if you accidentally spill,
you just wipe it off. It looks nice. You're just basically
moving the palette, you're putting paint
on the surface, and you're just
experimenting with Now, I really like blue,
and I'm feeling really sad that I don't
have blue in my art. So I'm going to
add a dash of blue just because I'd like to. Alright, so that is
the final version. It's not It's not
authentic and it may not even look like who
you are, but it is My ears got lost here. It is what it is, and that is abstract acrylic self portraits. Et's have a little color here. Again, if I'd like to add form. I feel like a little
bit of darkness here. We'll add a little more. Now, another thing
if you'd want to, like, I really like this style, but if you'd like to add a little bit of
white highlights, I don't know if
this is gonna help. But what I do is I just
add a little blob and I just just to give a little bit of highlight.
Sometimes it helps. Then if you'd really like to
experiment with eye color, you can make your eyes brown. So for example, not
everybody has black eyes. So you can add just a little bit on the sides to add a little bit of variety. But then if you want to
add more definition, so what I do for lines is that I run my palette knife
while squeezing the paint. So then it's kind
of like eyelashes. So from far away, it
looks really nice. Up Close, it looks
like a big fat mess, but that's how we
are in our own way. But I hope you really
enjoyed this process. Any leftover paint
that you don't want to use can paint it away. And I'm feeling this
painting is a little dull to brighten
their surroundings. So if you have,
like, fluorescent, I'm going to be using
a little bit of floorcent to kind of
brighten brighten this up. You know, to just take
away the take away things. And I'm not I'm not thinking so much about where I'm
putting the lines. Just let your process
help you with the flow, just to kind of give it a
little bit of variation. Then, of course, you're
welcome to add more gold. I love experimenting with different tones and
colors. So that's it.
8. Demo for Rectangle Form : I'm just going to
set up my paper. And this time around, I'm using this
mixed media paper. It's not so hard, but it's not so soft either. So I'll be using this, right. So let's just make some space. So I'm going to show
you different varieties of faces. I'll use a smaller. So I'm going to use a
smaller palette knife, and I'm going to use let's
try this unbleached one. And for highlighting
and shadows, I'll be using brown
shade of tone for lips. I'll be using this. If you want to add
stuff, you can. If not, then that's also fine. But I'm going to be just
experimenting with this. I will be using a black. Whatever's leftover, I'll
just be painting around it. Okay? So now today, this one, I'll do
rectangular face, okay? You can drag the paints
along to fill it. It creates a nice
texture when you do. So this is the face shape, okay? There's a little now I'm just, again, halfway mark
remember we talked about. This is the year. And now this time around, I'm gonna be using
brown paint to mark the ice maybe brown paint to add some hair. 'Cause not all hair is black. And now, given that I have some paint on my palette knife, I can spread it, or I can
use it to mark the nose. And use a little bit of pink to mark the Oops. Let's give her a
little bit of mush. I'm not using so much paint
as I did in the other one, but this is just
to have an idea. Okay. I do want to
give her a neck, you? So now what I'm seeing is
she's looking a little pale, and I would really like her
to have a few shadows, too. Well, you can give her a
semblance of her body, as well. But she's looking a bit pale, so it would be nice to give
her a little bit of color. So now I'm gonna use this this color a little bit
of it to add a few shadows. So, for example, just to line her eyes to
give her a little, it's time to get a
little bit of white in. You can use a
little bit of white to mix with the paint and add some depths in her face. This is a little bit
of naples yellow, which is a little like I feel
like it's it's a nice skin. But I'm just adding I'm
not using too much logic. I'm just adding the paint in. Okay. This is more or less done, but I want to, like, create a little shadow. So let's get a little
bit of for her nose. A little bit of shadow
for her neck because So this is a different approach. Now, you can leave it
blank if you'd like, or you can add a little color. I'm going to be adding
a little turquoise. Maybe the dread. If you want to add some black. Work on getting rid of the
colors that are already on. So now it's kind of less. So now I can add black
without mixing colors. Again, like I said,
squeeze slightly and mark the edge of
your knife for lines. And again to give a little
more depth and definition. Now, let's add some
depth to her hair. Then if you feel like her
eyes are getting lost in her her face, you can just have a little bit of But try your best to
be light handed that way. Mm hmm. This isn't me. This
is somebody else. Then if you want to change here, like if you feel like you want to give her more of a shape, you can just go over it and That is a rectangle shape
that I created this. You can create a man. You can create a
woman. In this case, I've created a woman. You can experiment
with her smile. You can make her frowning. You can give her more
of her chin definition. But it all depends on
how you're moving. And like here, I've kind of curled and given it
like a curls structure. So it looks like she
has curled hair. So this is how you
play with things. So we had began with
her looking very pale, but I literally
built up her face by adding her little
darkness above her eyes. If I want, I can add a little
darkness below as well. But for her, I won't do that. So it depends on what
you'd like to do. And then, of course, if there are these patterns
that have come, that's okay. That's part of it the
charm that's there. This is the rectangle
version of a face. If you have a face
that's rectangle, then you know what I like
about this process is that it is instinctive and it doesn't look like it's
going to work out, but then eventually it does. And that's the
beauty of this form where it's just paint and a
paper and a palette knife. And then you have fun creating the shapes and what
you want with it. And then you get
this beautiful form.
9. Round Face Male Portrait with Blue eyes: This time, I'm gonna be doing a round face as round as I can. Now again, half half. More or less. I'm
not measuring it. Extending it a little bit. I'm also not as you can see, I'm not actually drawing
the shape of the year. I'm just making marks, you know? Let's get Nick. Now, let me add a
little bit of yellow, just to see what
happens if you add a little bit of This
is a different yellow. This is a pale yellow. But for some variation. K. I'm gonna use a little bit of osianaopiqu to mark the ice. And, like, you see, I
just made a mistake here. That's okay. That's
not a big deal. I make him a little angry. And, of course, leftover paint just marking it into the hair. This person is a bit angry. I'm going to add a little
white because I feel like he's become a
bit of a yellow man. So the white what I'm
hoping will balance. Et's get some white
into the ice. We'll give him a straight
blue eyes for fun. I'm just wiping
the paint around. Right? So Mr. Angry man with blue eyes. Is get a little bit
of darker shade for some shadows in his nose.
I mean, it's different. This one is nice. Naples yellow is nice because it becomes
like a skin tone. I'm just feeling like yellow is just making him look
like he has jaundice, and I don't want him to
look like he has jaundice. So like I said, he's just
we're not being perfect, but just by adding
colors and mixing them, we're getting different tone. I'm just gonna jazz it up a
bit and have fun with it. I like this dark color,
so I'm gonna see if I can add a little bit. Oops. Yeah, on that note, just be careful about spilling because
sometimes it doesn't go. So sometimes, adding black
kind of creates a definition. So be here, so weird. Oh, oops. That's okay. He still looking
angry, that's fine. Even with the Osi, we got some nice So, yeah, so this is a round face a round face
shape of a man.
10. Project: For your project, understand your face and create
an abstract version of what you think your
face looks like using a palette knife
and acrylic colors. And it will be really
wonderful to see your interpretation of this
class and also of your face. Feel free to also put
before and after, like, your face and then
also what you drew. Might be interesting
as an activity.
11. Thank you: Thank you so much for
joining me in this class. I hope this exercise was great for your ego, not
just as a painter, but even understanding
and appreciating your face and seeing
how beautifully you've been made
beautifully your eyes and your ears and your
mouth and your smile and, you know, everything,
your hair, your hairline, or the receding
hairline that you Um, I hope this activity
really helped you. It helped you
understand yourself. It helped you
understand what you're comfortable with abstract
artists fun that way, because it allows you to play and enjoy the paints, as well. So I really hope you
had fun in this class, and don't forget to
leave a project. And so I can see and celebrate
what you created, as well. Thank you for joining me. I will catch you in the
next class. Bye.
 Sang, Artist & Media Creator