Transcripts
1. Introduction: I enjoy looking at birds. I enjoy photographing birds, but never realized how much I would love and enjoy
illustrating them. There are many types
of bird illustrations. Cartoon birds, folk
birds, traditional birds, abstract buds, line of birds, birds you can draw
with a pen or ink or charcoal or watercolor wash. I love folk birds and
watercolor books. And in this class, I'll be teaching you step-by-step
on how to paint birds. In Procreate. Birds are my
favorite illustration studio. I find that drawing a
bird really relaxes me. It's my perfect way to relax
and unwind during my d. Hi, I'm Dan Kumar enjoying
the pandemic. I got into digital illustration, being a full-time mom and a part-time content creator,
videographer, photographer. I find that drawing birds were the perfect width to
infuse joy into my D. I wrote and illustrated
a children's book called swan friends and created
a coloring book, animals in the world. Last year I drew an
illustrated my first bird. I loved her relaxed, it made me feel and
I couldn't stop. I made 12 birds and
ended up assembling them to make a yearly calendar,
a devotional journal, and found out that my
illustrations made the perfect cards and gifts to give to
friends and family. In this course, I'm going
to share my methodology, take you step-by-step through my process and give you an easy to follow guide to become a
master at bird illustration. In this class you
will, number one, look at references of birds
and choose one to illustrate. Number two, I'll teach you
about sketching birds. Number three, how
to color block. Number four, we will look at adding details and
finer details. Number five, a look at adding shadows and highlights
to your bird. Number six. And finally, a look at what to do
after you've created and illustrated your first
bird in post-production. The fun part of drawing them is that there are so
many ways to do them. I still draw it and learn a lot every time I
draw a new bird. A simple illustration
of a bird can turn out to be a
very realistic one. For your project. Using what you've
learned in this class, you can share the illustration
you've made of your bird. It could be a sketch, a watercolor, or a
mixed media bird. I will be giving you
resources for this class, a procreate brush set to paint and add details
to your bird, as well as proper texture to add a little drama
to your final drawing. So if you want to learn how to sketch birds and procreate, add color, details,
shadows, and highlights. Well, you've come to the right
place. Let's get started.
2. What You Need for This Class: For this class, you
will need an iPad, which is compatible
with an Apple pencil. For this class, I'll be
using the Procreate app. But these principles
can be applied to any other digital medium of drawing, Photoshop,
fresco, sketches. The essential thing you
need for this class are a good set of blending
and feathering brushes. Feather brushes are fine
for brushes are nice to have to give a little
character to your final bird. Agreed, blending brush works very well to blend the colors. Essentially having a
good texture blending tool and a good feathering
brush is all you need. I know everyone has their
favorites in procreate. But if you don't have brushes, you're welcome to download the procreate brushes
I've created, especially for this class. Cornea browser and click on
Skillshare and you'll be, you'll find yourself
in the class and go to Projects
and Resources. And then I've written a little
bit about what you can do. You can also have access to the full drawing birds
in Procreate kit, which is free for Skillshare. You can download the
Procreate files. And I've given project prompt, which is a peacock. I did most of my bird
illustrations on the small iPad. And I needed only five
layers for my process. For a smaller iPad, or 2500 by 2500 pixel
is good enough. It also gives you a lot
more layers to work with. And for the iPad Pro, I stick to a 5 thousand
by 5 thousand pixel, and that gives me a
high-quality illustration. So whichever iPad you have, you can use these settings for creating your canvas
to procreate files. One for a smaller iPad and
one for a larger iPad. Jpegs draw birds and procreate peacock and help
support file for that. And then a brush
set drop bird sang, which I'm going to
open right now. And read before you. Draw birds in Procreate, which is kind of a document. And here I've given Lisa, are linked to Lisa's brushes, which I talked
about in the class. But let's go back here. So all the files will
be downloaded here. You get this. Okay, so I'm gonna
double-click on the Dropbox procreate and immediately imports
the file on Procreate. So this is what the
file looks like. Up here is the sketch layer, which is, I've already made it. M. M is multiply. It means that when you're
drawing underneath, the colors show up. If I didn't put em, it would, it would just be white. So then I've labeled it sketch, color, details,
highlight and shadow, which is each lesson will be that drop birds, sang brush set. So let's install that. Okay, so now I have the
job birds sang brush set. Now in this, I've also given
you some brush stamps. Alright, so these
are the stamps. So if you stamp this than
the sketch will come, you have different sketches that I've done for this class. And the harder you press, the larger it becomes. If you're crested soft, if you make it small. So these are different,
different birds. There are about ten sketches. If that is, if you don't want to use these, these ones here, how, if you'd like to use this, what I would recommend
is getting freehand. So when I've copied
it and make sure this is selected
otherwise it won't copy. Select this on the layer. Three finger swipe. Copy, not Copy All. And then go here. And three-finger swipe
down and say paste. So as you see this color and
suddenly become more vivid, It's because this has come in, then you can just resize
this to your liking. Make sure you make the
sketch layer multiply. Otherwise the color inside
here will not show. Okay? So then these are the stamps and these also the
sketches that we have here. The sketches will be here, like, as you see,
they're still here. So you can choose made
it on m multiply. So I can draw under that. So for example,
this is, let's see, let's make this a
light blue bird. It's not, but I'm just
for fun doing this. So under this layer
for coloring, you can color this like this. This is one brush, brush, nice. Then this is mono line
tapering primarily, therefore, linework if you want. A slightly thicker
and so basically the texture taper monoline has a little texture in it and
the monoline taper is smooth. The texture blog
is for blending, or it basically
draws the color from the top into it and kind of gives it
a nice textured look. For a little variation,
creative variation. Then if there's
some green brushes, There's some variation of green, then this is my favorite. I have given three
feather brushes, one, smudge, buildable
and feather. What is feathered brush
does is, for example, if you use it as a smudge, then whatever you made, you can just pull the color out. Okay. Now I'm going to
remove the sketch and show you because
it's hard to see. So I've basically made a feathered brush
that makes feathers. This is very, very important, at least in this class, for when you want to make birds and give them a
more realistic look. It's just an added brush set. So I've given you three
versions of this. This is a very nice smudge. This variation is
nicer as you can see. So this helps with that. Okay, coming back to the sketch, then, we have tapered gouache. So this has this has like, similar to that but it has
more of a gouache look. Bird is a very unique bird. What I've done with this, I don't know if you
can see the bot. There's a gouache line
work that can be seen. Now if I use the same brush to blend it in, blended
really well. So if you wanna do line work, which is very subtle, lewd
in the direction of the bud. And that would be really cool. This is the scatter brush. So when you're, when
you're sketching, you can choose like a black and use this
for sketching yogurt. Then texture filler. Again, a nice texture
brush you'd like. I really like texture. So everything I've made actually is a very good smudging
with along with texture. So this is very nice because it draws the color from each other. And it helps when you're sketching and
coloring the birds. Like, I really like this texture on the bird is quite nice. Alright, Next, this
is an opaque liner, which is basically again for
line work and detail work. Most of the liner brushes
are for detail work. Then this is basically
watercolor. Bird is not blue. This is a nice watercolor
if you want to fill it quickly here. So what I do generally
with this opaque liner is that I long press and
make this eraser. Okay. And then I use this to erase the mortar of the
like when I go over it. This is a little wider. So everything is
billable that way. This is more transparent. Finally, this is a gouache, opaque, very subtle lines that give it a nice border. Then you can use the
fine liner or the taper. Them online tapers, nice. But how I do it generally isn't. I would use the feathering
brush to smudge it. So even like for example, if I'm gonna do
like a white here. And if I want to
smudge that into this, it gives a very nice and
it's both with smudging it. If I want to put
the dark into this, I go from dark to light. And if I want to go
from light to dark and I do that, the
more you pull down, the more it extends itself,
you can make it bigger. If you want to paint it fast. That's it. Overview of the brushes that
you can use for this class. You can just drag this up with you and you get
a double window. Now for example, for
your project work, you'd want to use
the pKa credit. So you just drag the peacock onto the procreate
file and import that. I've taken you through. Let's close this right now. I've taken you
through the basics of okey colors and pilots. You can copy all and add this element to your final
peacock if you want to. If you wanted to,
valid and all it. If you want, you don't need to. Again make this M before
you're going to color it. And then start. This is from the Projects
and Resources Project. If you want more sketches, what you can do is come
to the class resources. And that will give
you a little more. So it will be about
dense sketches. So you can just
say, I want this. You can put your email address and you pay 0 and you
just view content. Now in this you will
get much, much more. You will get a robin
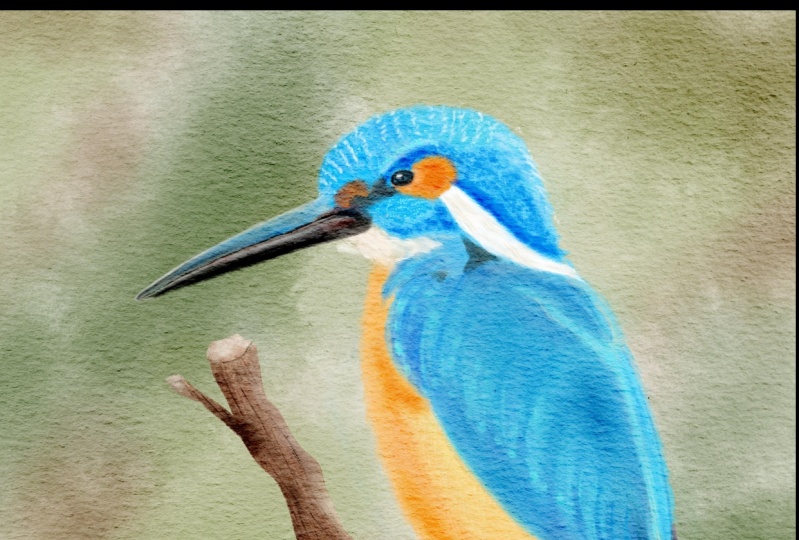
peacock parrot, oriental dwarf king fisher, northern cardinal,
hummingbird, peacock feathers, Eurasian golden RIO. I think I'm saying that right? The oldest. So if you want a little
more intensive downloads, you're most welcome to come to the camera one and take it. It is free for the
Skillshare students. So that is available
for you as well. So that's a look at the
projects and resources section. When you want to
create a project, just say Create a Project. Prompt you to upload
the image, right? The project title,
project description. You can add a video like if you want to send your
time-lapse, you can do that. You can even add an
image or a link. So that's a look
at the resources that you will get
free for this class.
3. Project: There are two ways you
can do your project. First, you can find
a bird you'd like to draw and use what you've learned in the class to
create your project. You can voice your sketch
or even your final. But the second is
that you will find some rough sketches of birds
in the resources section. And even in your procreate file, you're welcome to use these
as your starting point to block colors and add details to any posts should
be encouraging. And I know others too, we love to see your progress.
4. What To Draw: I normally use Pinterest to find source materials to draw from. I come from a school of
thought where tracing, copying are great
ways to learn skills. Over time as drawing birds became a part of
my muscle memory, I started using references,
procreate artists. Richie says, do whatever
floats your boat. Just be careful not to
sell your traced artwork. I love the line from honest designers were
in Bernard says, Copy to learn and not earn. So don't be afraid to find inspiration and
make it your own. I read somewhere
that any device that improves your ability
is acceptable to use. There also templates to help you with the shape
of birds as well. Lisa glands has a
nice bird template on Procreate as well. I'll leave you a link in the description
box to her guides. But like I said, the
more you practice, the more familiar you
get to drawing birds. I may have begun
tracing the lines, are trying to figure out
where the DJs would sit. But now I just have to look at a bird and I
understand the shapes. So to get to that
point, of course, add to draw more than 20 birds, but stick with it and it
will become muscle memory. But because you're learning, it's okay to use the sketches
that have been provided for you to work on as you
learn from this class. And when you find the bird
that you really love, feel free to copy it or trace
it, at least the sheep. Another thing I do when
I get a reference, I source the colors
from the bird. Now what I've realized and
this is a quick tip also, photographs give very
unsaturated version of the bird. What I do is I create a
small palette in the site. And then eventually I start brightening that
pallet up as I'm painting. Let's begin with the first
step to create a Canvas. If you have a smaller iPad, use the 2500 by 2500
pixels, 300 DPI. You can record a
time-lapse if you'd like. That's up to you. For larger iPads. Or 5 thousand by 5
thousand gives you enough layers to work with. Again, this would
be 5 thousand by 5 thousand with 300 DPI. And again, you have
all the options of choosing a time-lapse
if you'd like to record what your processes. Also feel free to
post the time-lapse on social media and as
well as your project, I would love to
see that as well.
5. Sketching: I first begin with
a rough sketch, which gives me an idea about
the shape of the bird. Then I lower the opacity of what I have just
drawn, the rough shape. On a layer below. I sketch on a little neater
version of the rough sketch. A few tips to sketch
is keep a light hand. And some people like to
add details in the start. I sometimes do it like
maybe give a rough idea, but I generally tend to add details with
paint and shadows. So that's where my details gum. And once I'm done
with all of that, my final step is to clean up the lines and give
more definition, but we'll get into that later. But the sketch work is
your foundation work to define a shape
and the contouring. What I focus on in the shape
of the bird is the wings, The Dummy of the bird, the eye, the beak. And if there's any flourish
that goes around it. For example, drawing
a sparrow and drawing a peacock is completely
different because for a peacock, the flourishes aren't
as important as though when my approach with
every bird is different. But essentially the wing, the tummy, the deal,
the eye, the beak. Those are the components
which I focus on. Once this is done, you can
begin with the color blocks.
6. Coloring Your Bird: When I started, I never used to understand
color blocking. But now that I'm
drawing more and more, I realized the importance
of layering of base color. Just like the rough sketch. Color blocking gives
you an idea of the colors that are
coming together. If you're sticking to
a minimal palette, that makes things easier, you can color pick your bird according to the colors
that you're burdened hats. But remember that a photograph may give a less saturated color. So what I do generally, if I get a saturated
color which is not matching my eye on my screen, I just bump up the saturation to make it slightly
more brighter. Many times in watercolor
and gouache paint, the colors look transparent. So having a color block layer or a base layer to create removes
that transparency issue. Remember that sometimes if you don't like the colors
that you've chosen, you can always change the
color later in digital. That's the beauty of it. Whatever you do is editable. One tip. Don't use pure black or pure white because you can
change any Saturation. Black will always be black
and white will always be, always take a little off
white and off black. It'll still look black
or white to the eye. You will be able to tweak
it if you choose to. Color blocking also comes in
handy when you're shading. But I'll tell you
more about that in the shading and
lighting section. For now, let's look at
laying the base layer. You can lay your base color. In the next lesson, we'll be
looking at finer details.
7. Fine Lines and Details : Finer details to your bird, give you a bird, a
shape and a definition. This is when you add strokes. This detailing can happen
through a Procreate brush, the feather brush, the
one that I made you, comes in handy in this one, fine lines and details help
define the shape of the bird. It also enhances the colors and the detailing really adds
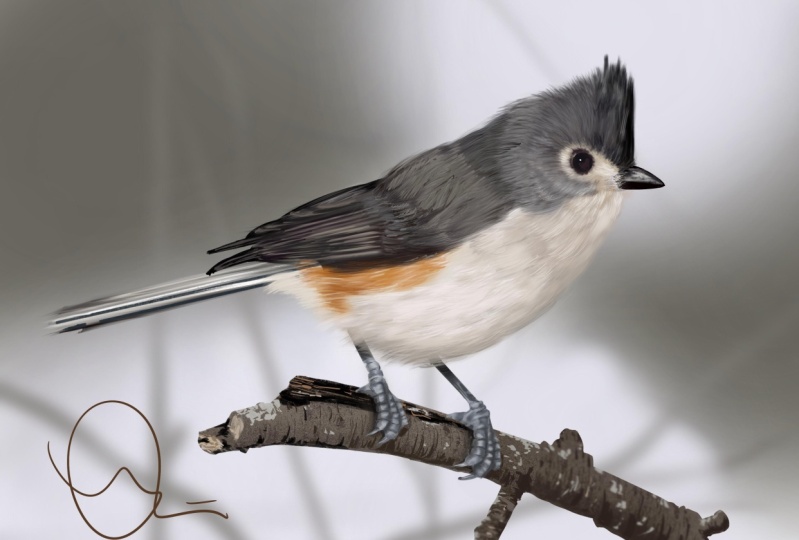
to the beauty of the bud. A great example of this kind
of detailing is a peacock. Without the detailing,
the bird would probably look much more
abstract with just the beans. The peacock is a great example
of detailing and lines. The peacock feather is a great example of fine
lines because it's not just a stroke or a line or
feathering in the feather, there are so many elements like solid colors within
solid colors in a layer. But it's not just the feathers. Even the body of the peacock has different elements to it. The element connecting the
feathers to the body is also a different shape and needs to be defined by lines and details. Even the peacocks
body and its face, as well as the
elements around it. Looking at the peacock,
you can tell that it needs a lot of detailing, but the same can be
said about any bird. Every single bird has
its own definition. A flamingo is very
different from a peacock. A pigeon is very different
from a flamingo. So every bird has its own
markings and detailing. I would advise to go
through references and see each buds markings and take what you love
from those markings. Like this peacock I've
illustrated is based from several different
peacock references and brought together
to make one. This one is completely different from
another illustration. Make sure you look and observe the bird
references very carefully. And pick and choose
what you'd like. Because it isn't necessary to always use every single detail. Adding details and not adding details is
really up to you. The more detailed you go, the more realistic
your bird looks. But don't be afraid to
add only a few details. It all depends on
what you're trying to communicate and what
you're trying to draw. So don't be afraid when it comes to fine lines and details. To do more or less. It all depends on
what you want to do. There are no rules when it
comes to illustrating birds. Especially when it comes
to fine lines and details. Stage of adding fine lines
and details will help you define where the shadows
and the highlights come. And that's the next lesson.
8. Shading and Lighting: After your bird is
done and you're happy with the colors
and the design, fix a point of sunlight. A simple thing about
shadows and highlights is where the direction
of the light is. Whether you're light is the sun, whether it's a candle,
whether it's a window. There needs to be light
coming in from somewhere. It's always safe to either
choose a left or right. When you wanna be adventurous, you can choose top or bottom. But essentially to be safe, I stick to left or right. The key about shadows and
highlights is to be consistent. You can decide that the
light is going to come from the left and then keep
the shadows on the left. Because logically,
light diffuses shadows. So if the light is
coming from the left, the highlights will be on the left and the shadows
will be on the right. Similarly, if the light
source is on the right, the highlights will be on the right and the shadows
will be on the left. You can also change the
angles of the light. It can be far up side, bottom. All of that changes the area of your
highlights and shadows. Sometimes it helps drawing an arrow and figuring out
where your points are. Because I dropped
from references, I generally look at the photographs and I
choose my point of light. Shading and highlighting is important because it really
brings life into your blood. It changes a flat colored bird into a more 3D looking bird. Shading and
highlighting is often the last thing I do when
I'm doing the bird. Because I finished
defining the colors. I finished defining the shape. I add two layers on top, black and one is white. I change the blending
mode to overlay. When you draw overly on black, it makes whatever color
you're drawing darker. And whenever you color on white, it makes it a little lighter. So this way, you're not being dramatic in your
shadows and light, and it's in sync with your illustration when it
comes to shadows and light, I would recommend experimenting
with blending modes. Add light, Multiply, Lighten, and overly our blending modes that really worked well when it comes to
lighting and shadows. In the next lesson,
we will look at what more you can do
with your illustration.
9. Post Production: After you've
completed your bird, export it as a transparent PNG. You can also add a background. You can add stamps and
washes and status. You can add a photo. And you can even
add texture people. Everything is content. You may have heard or seen this viral video where
a mother is seeking. Everything is content,
everything is gone too. Don't forget to film it. Don't forget to film it. It's a very true statement because everything
you do is content. Make sure you're sharing
things on social media. And make sure you always
have a transparent PNG file. So it's easier to
upload on websites.
10. 10 Draw Birds in Procreate | Ending Thoughts: What are the things
I want to talk about is not feeling overwhelmed too, when you're doing your drawing. Sometimes when we
begin our drawing, it doesn't look very great and we tend to get discouraged. So as I end this course, I want to leave you with
these thoughts that if you're doing a bird and it's
looking like a big mess, you're probably on
the right track. And a way to counter that if it's really making
uncomfortable that there's a mess. Number one node that
it's going to get better with the feathering and with the combination of
shading and highlighting, you're gonna get
a beautiful form. But something that helps me is I begin my illustration with
the eye, the eye of the book. Because then I know
what I'm drawing and I know that there's a shape and I know there's a focal point. So the eye is actually
quite simple. It's just one black fill of the eye of the bird
and one white dot, which is like a catch light. This I have found is so simple. And it gives you a bird
a form almost instantly, so you feel a little
better about it. So that's, that's a tip and encouragement
and leave for you because it is very overwhelming sometimes when your
drawings don't look the way you'd like them to, but be patient
because eventually it probably would be better
than your imagination. How I do it is, for example, if you want
have a very fixed line, then I just select the circle
and then I color the light. Okay? So it's a solid
black line, right? Of course, if you
want to give you a bird light eyes,
that's also fine. Then you take like
not too much texture, but like I am using
the sketching pencil. And you do a dot, which is a reflective light. And as you can see,
I've got a light. It's very simple. It's just an I and a white dot. Now, if you want to
be super adventurous and create more catch light, then you can even follow, can even do like, right? So that's very, very simple. It's a line, a black circle with a dot
and a line if you'd like. But actually this is
more than enough. You don't actually
need to do that. Now if you want to be
adventurous and you say, Oh, I want to do more
than you can create. A line width around line to give the shape if you want to be
like extra creative. But like you, like you
see it actually doesn't. It's perfectly fine. Now if you want to be breakaway, then you can do that. But that will become way
too cute for your bird. Yeah, 11 little dot is enough. So that's something I
wanted to just share. When you do the eye, the shape of the
bird automatically starts coming into motion. You also sad, feeling
better because, you know, you're drawing a bird. Birds are my favorite
warm-up exercise. Whenever I don't
know what to draw, I always go back to my
references and draw a new bird. The sky literally is the limit. I hope you enjoyed this class. I hope you enjoyed learning
how to sketch birds, calibers, add details and
highlights and shadows. I really encourage you
to do the project. I think it will help you in
terms of practice as well. Great teachers and great artists see practice,
practice, practice. I wouldn't say practice
makes perfect, but practice does improve
your art and your skin. So again, I hope you enjoyed
this class and I wish you all the best for your journey in drawing
birds in probate.
 Sang, Artist & Media Creator