Transcripts
1. Introduction: Tell everyone, I'm Denise Love. Today we're going to dive
into the world of charcoal. In this class, we're taking charcoal way beyond
the ordinary. We'll be using colored charcoal, experimenting with
water effects, and making bold marks
that speak volumes. I'm thrilled to guide you
through this journey. We'll be creating some
abstract samplers. We'll see how colored
charcoal works and reacts, And then we'll
jump into crafting larger abstract pieces that
are as unique as you are. Whether you're a seasoned
artist or just getting started, this is for you. Let's explore. Let's experiment, And let's make something
seriously amazing. So grab your charcoals
and let's dive in.
2. Class Project: Are you ready to put your
new found charcoal skills to the test and create something
that's uniquely yours? Your class project is all about embracing the
techniques we've explored and infusing at your personal creativity into
a larger abstract piece. I'd love for you to share
your samplers that you created to experiment
with color and marks, and then the larger piece
that those inspired. Remember, this project is about embracing experimentation. So don't hesitate to try new things and let your
creativity flow freely. Your abstract charcoal
pieces are a testament to your artistic journey and the skills you've
gained in this class.
3. Supplies: Let's talk about
the supplies that we're going to be
exploring in class. This class, I want
to be all about charcoal and how we
can push charcoal further than we ever thought
was possible and create some yummy abstracts just
using charcoal things. I have extra large
charcoal blocks by win. I love these. These are some of my favorite pieces
to create with. I've pulled those out. I like those because
they're very soft. They put a lot of
powder, lot of graphite, lot of charcoal down
as you're going. And they're very soft
and they're water soluble and they look
beautiful when you add water. After that, I found these
create a color charcoal sticks. I liked it because
there were more colors. They are much harder
than the derwin sticks. They are not as
blendable with water. They're water
soluble, but you see where you marked with these
even after you add the water. Whereas the win,
that powder just really separates right into
the water beautifully. I'm thinking like this for big washes and big
swash of color, this would be great for lines
and marks and things that you didn't need the water to separated out
into pretty washes. This is a lot harder. The other thing
that I have that I love is tinted charcoal pencils. This is a lot of
different colors that the pencils
come in by derwin. These will be great
for mark making and fine details and just
adding some interest. We've got those. Another thing that I want you to consider
is some charcoal powder. It's really fine
powder that's in here. You want to wear a
mask. Usually when you're playing with powders, you're not breathing these in. This is so fine
that it blends in beautifully to make charcoal
powder water colors. When we talk about water colors, Derwent has tinted
charcoal water colors. They're harder than my
other water colors. Even when you wet them, they're still a little bit harder. The color wash is very subtle. I made some of my own
charcoal water colors. The easiest way to do
that is to get some of your very favorite tubes of water color and mix a little charcoal powder
in with that color. And I show you how to do
that. It's super simple. I also have a little spoon thing that you can use. I've
got a couple of these. One of these was like
a Martha Stewart, this says recollections on it. It's just little, tiny spoons. But you can use a
plastic spoon to, you don't have to have
anything special. I just happen to have, you can use a little plastic
spoon to get that out. I also got a palette
knife because basically what you do is a little bit of pre
mixed water color, a little bit of charcoal powder. You mix those up into a
beautiful charcoal color. Then if you like it enough, you could mix a larger
quantity and put them in your own little water
color tubs and have those for projects and things
that you wanted to create. I have created several
pre mixed colors mixed with the charcoal powder. Put them into containers. I have several
colors already made. When I got really
interested in playing in these, that's an option. Two, you can make your own. I love that I might
be playing in those. It's basically the
water color mixed with charcoal powder just gives
it a pretty smoky quality. I'm going to be working on some Canson Heritage
watercolor paper. I love this paper,
it's 100% cotton. This is the 140
pound coal press, 23 by 31 centimeters, or approximately nine
inch by 12 inch size. And I love the way that cotton watercolor paper reacts to watercolors and
different things. It's different than
a wood pulp paper or student grade paper. But use any paper that you have on hand to
experiment and play in. I will be using some painters
tape to tape my paper down. Then I tape these to a
hardboard art panel. People always ask
me what these are, so I just wanted to tell you these are these are
hardboard art panels. You can get them
in several sizes, ampersand makes them and you
can get off brands also, probably on different sites
or from the hardware store. I love taping stuff
down and these are small enough or convenient enough that I can move them off my table
when I want things to dry and I can
still be working on other stuff.
They're fantastic. They come in lots
of different sizes. That's my basic supplies that I'm going to be creating
with in class today. I want you to gather all the charcoals that you
happen to already have, or any of these
look interesting. Definitely come and play
with some of these with me. And charcoal powder is
excellent for making your own. So I can't wait to see what
you're creating in class today with all these ideas.
So let's get started.
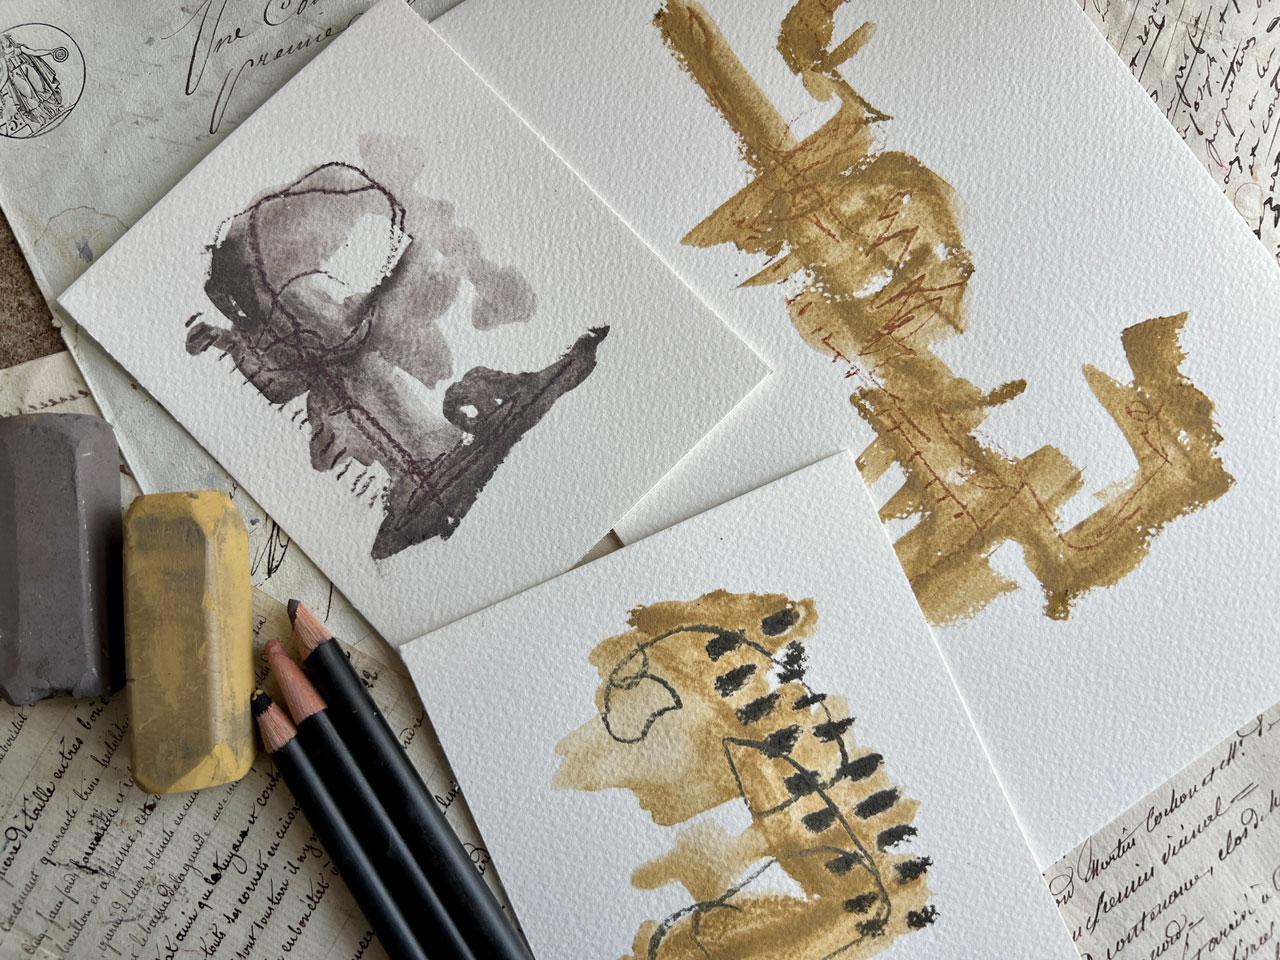
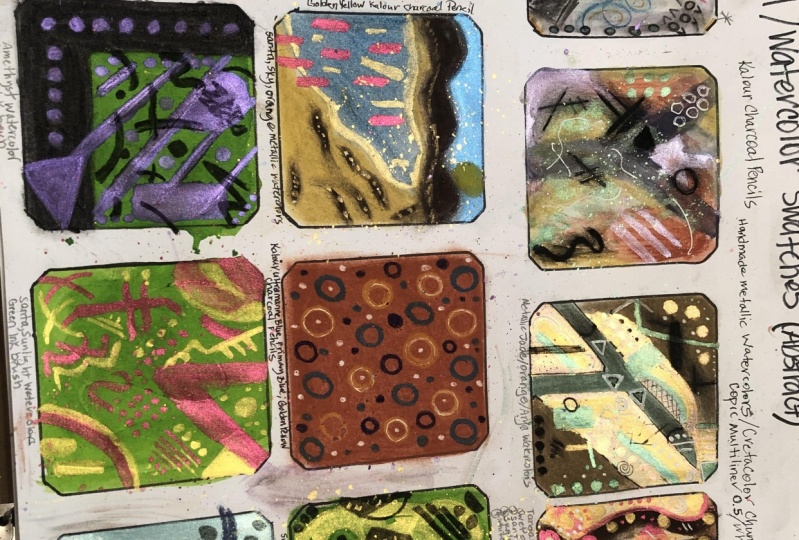
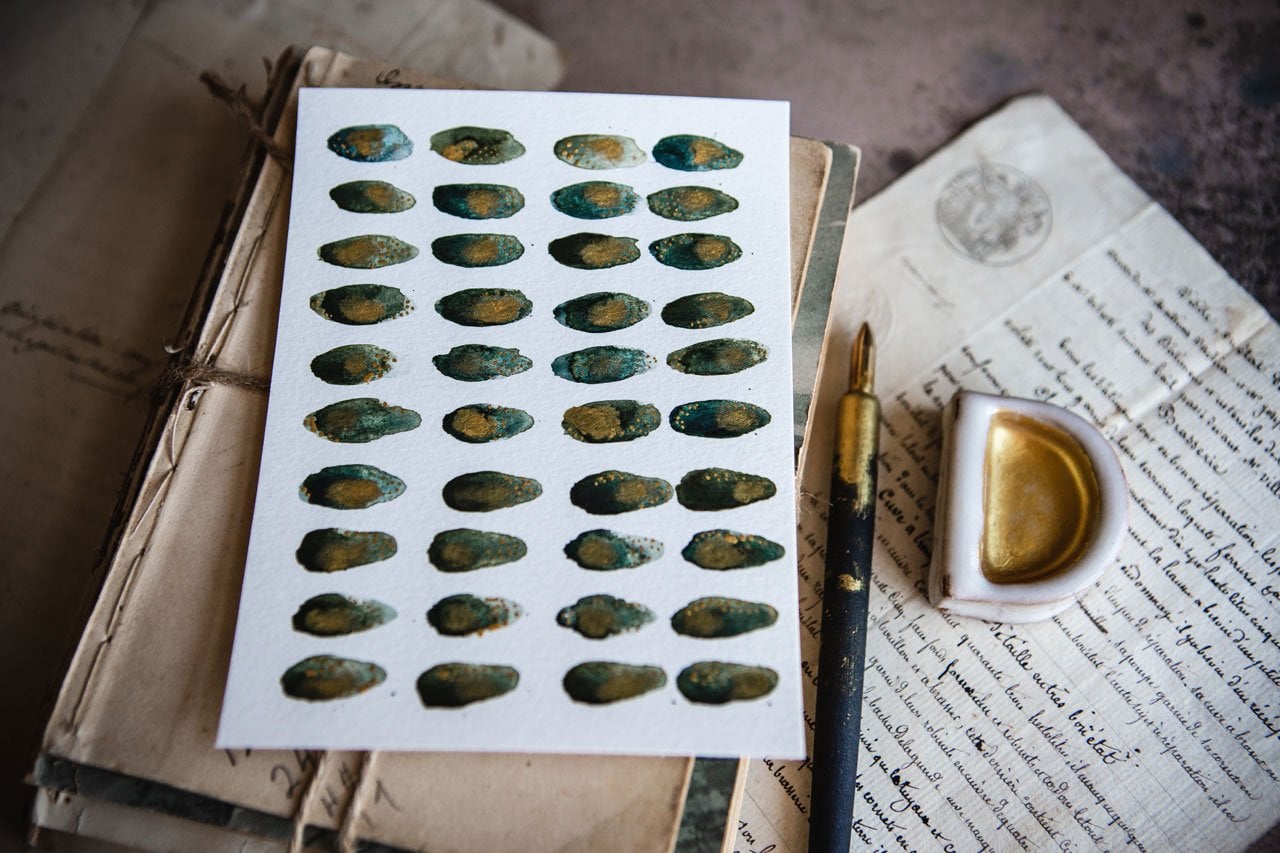
4. Color Swatching: Let's take a look at
making some color swatches of all the charcoal that we've managed to pull together
from our stash. Or if you try out some of the ones that I'm
using here in class, I'm going to focus on the Derwent extra
large charcoal sticks. This was the very first
thing that I had got really excited about with the charcoal as these
great big blocks. Then I found the
creative color blocks that have 12 colors in it. Instead of just the six, which I really thought who more colors. Then I also have the Derwin
charcoal pencil collection. That's the ones that I'm
focusing on in class today. I've narrowed it down to
some of my favorites. That doesn't mean that that's all the charcoal
that's out there. There's all kinds of
charcoal out there. There's other charcoal pencils,
there's vine charcoal. A lot of charcoal is black. I want to focus on some of these that have some
colors in them. They're going to be dark
and charcoal esque, but maybe not just
black charcoal. And I want to see
what these look like. This is my painter's diary, my painter's color diary, And I use the watercolor
pad. It's nine by 12. What I like about these, it's a nice heavy watercolor paper. It's got blank pages like
this that are already filled in and you're ready to paint
your different materials on. And then it's got a
nice separator piece to keep everything clean off of the back of the
page before it. I've got a couple of these now, and every once in a while I'll pull out a set of
supplies and I'll think, oh, okay, let's color swatch
everything that I've got. In this particular collection, I have some handmade
watercolors, say all my golds. I've got my Daniel Smith's in another book, my watercolors. And I've got my Cura Taki
watercolors in another book. So you can see how
handy this is. You can make these yourself. It's just a nine by 12
piece of watercolor paper. You can draw blocks and stuff. I've even put these
in a half down here so I can fit all my
pencils on this page. I've just written on here with my seven millimeter
fine tip Posca pen because that's what
I had on my desk. You can do it with pencil.
You can do it with any pen that you
want in pin spine. I just want to experiment with what each of these
looks like on here. I'm going to color
some of these on here. Then we can come back with
a little bit of water, say like a little
bit of water here. We'll be able to see, if we add water to this piece, what is it going to look like? I do love these because they're water soluble and they give you a really
pretty water color. Es, look, look at that color. It's such a beautiful color. Not sure what exactly all
the colors in this are. I'm sure I could
look it up online, but I know that I've
got six sticks. So we're just going
to go with those six and just see what we got. I'm going to go ahead and
do the same thing with my create a color
set and my pencils. I'm going to speed this
up and I'm going to do all of them here so I know
what we got to start with. And I can then start planning pieces that I want to create. The biggest difference too, on these derwent
extra chunky ones, I hope they come out with
another set of colors for the, the biggest difference in that versus these
creative color ones. These are harder, they are
not nearly as soft as that. That's good for lines
that you want to make and maybe marks and doing some
plans and stuff like that. But it's less good
for, I don't know, great big chunky blocks that
I like to get with these. I just wanted to point
that out to it'll also let you see what the differences
in the different brands are. If you find another brand of some chunky charcoal that
you think I would like, definitely mention that because I love chunky stuff like this. All right. I'm going to go ahead and I'll speed
this up a little. Get these all
swatched out for us. I think this is graphite, even though it says
it's a charcoal set. I think this is
graphite. All right. Because that's a pencil. Okay. The biggest difference in these two is this one, super water soluble,
really soft chunky, these are a lot harder,
they blend in less. When you add the water,
it's like you can see the lines still in
there that I drew. Or as those lines blended out into smooth
water color looks then the two that I think are graphite aren't water
soluble at all. That was good to know
before we get started. I love these microfiber
cleaning cloths. You need some of these
in your art room if you don't already have them. They're in the cleaning
aisle of different things. But I love these for getting chalky stuff mostly off my
hands when I don't want to get up and run and wash my hands every couple of minutes when I'm working with the charcoal going to be washing my
fingers on here. I'm not smearing charcoal all over paper where I didn't
intend it. These are great. All right, so there's our stick and pencils, color swatch. And now we can see from these three different
types of mediums, exactly how it's going to blend and do with the
water added to it, and we can see what we can
get with these chunks. All right, so I will
see you back in class. I want you to go ahead and
I want you to go ahead and do the same
samples on all of your charcoals that
you have currently, so that you have a full set
of colors to pick from. And I'll see you back in class.
5. Charcoal Watercolors: Another thing that I
wanted to talk about with charcoal is
charcoal watercolors. These are all dry charcoals
that I used here. I've also gotten in one of my boxes that I get
from sketch box, some of these tinted
charcoals that are already mixed into
watercolor pans. It's a little set of six. There might be, may
be more colors. I don't know, I
haven't looked lately, but I got inspired
after I got these because I've made my own
graphite water colors. Basically, what you do
to make graphite and charcoal water
colors is you need some charcoal powder or
the graphite powder. If you're going the
graphite route, I have a whole graphite
series charcoal powder is basically the same. It's just a really fine ground
powder that we can use. If you want to make your own, you can look at make your own charcoal watercolor
class that I've got. You just substitute
charcoal for graphite. But basically you mix in
a solution of gum Arabic. This says, four tablespoons of gum Arabic to one teaspoon of honey and one
teaspoon of glycerin. Then you get your powder
out, colored powder out. And then you mix in
some charcoal powder, and then you mix that into
your own water color. I've done that with
several colors. After I got inspired and was making the
graphite water colors, I made some charcoal water
colors very similar to these. What I discovered
is it's basically like adding black
powder into your paint. Like black color,
as you can imagine, it just comes out a darker shade of whatever it is
that you're doing. But to go one step
further than that, you can also take some of
your favorite water colors. Let me just pull some down here. You can take some of your
favorite water colors, put some out on a little pad, mix in a little charcoal powder, and you can mix your
own water colors. Charcoal water colors. We just put a
little of this out. I've got a little
bitty scooper here. Maybe a little bit
of charcoal powder. You'll just have to play
on how much is enough. Maybe you want more,
maybe you want less. Then basically take a little palette knife
and mix that all in. It's going to give it like a, a darkness, a smoky quality. It's going to just change
the way that paint looks. If we put like a regular color
down and we try that out, I just want you to see some of the differences that
these might give you. The regular color is
going to look like this. Then the color that we've got, that we've put charcoal powder in it, is going to
look like this. And you can see it's
going to have that dark, smoky charcoal feel. You can turn any water color
into charcoal water color. Then I've made several
here just because I was interested in making
my own water colors. I thought, oh, I love the
graphite ones so much. I'm sure I'm going to love the charcoal ones just as much. You can see the yummy quality
that these have to them, how it darkens it and makes
them rather beautiful. I just wanted to give you
more ideas on how you can create with charcoal without it necessarily being just
the charcoal sticks. My water colors seem to be a little more soft or
pigmented. I don't know. They loosen up and wet up a little easier
than these wins. These seem to be nice and hard. I don't know if I
used more pigment or what they've done
that made them so hard. Just to give you an idea of some different things
that you could try out to push your
charcoal work further. The easiest way to do this is to pick some of your
very favorite pre, mixed water colors and mixed
charcoal powder in it. Then as it dries,
you'll see some, maybe a little bit
of a granulation. It'll just look darker. It'll have that quality that's making people look
at it and say, it's very interesting what's
going on in those colors. I wanted to throw
that idea out at you, since we're talking
about charcoal. And you can make
your own charcoal watercolors to play in, in addition to working
with the sticks. So now it's not
nearly as limiting as what you might have been thinking when you
first got started. Isn't that cool? All right, so let's go ahead and I'll
see you back in class.
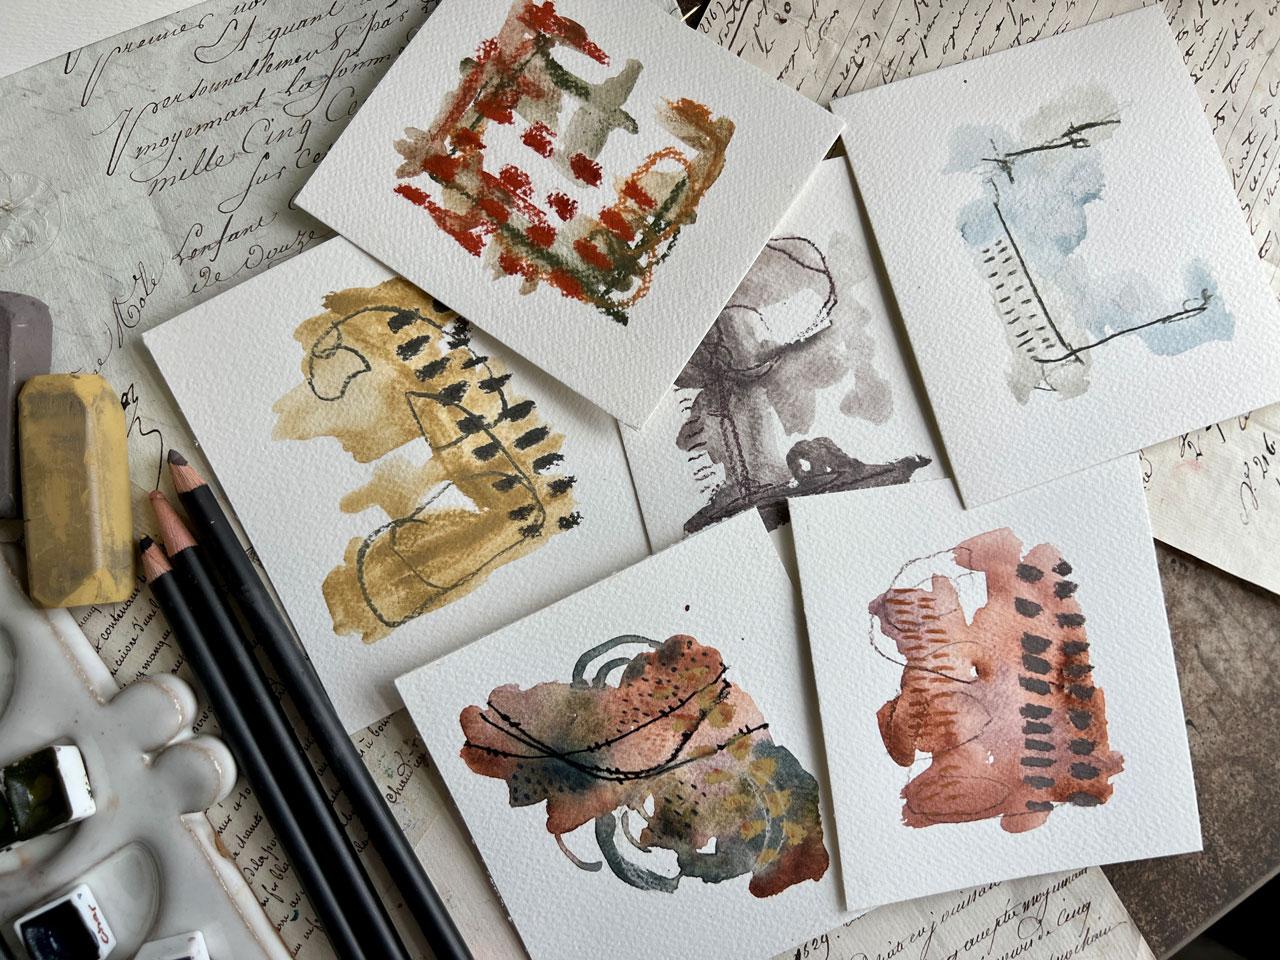
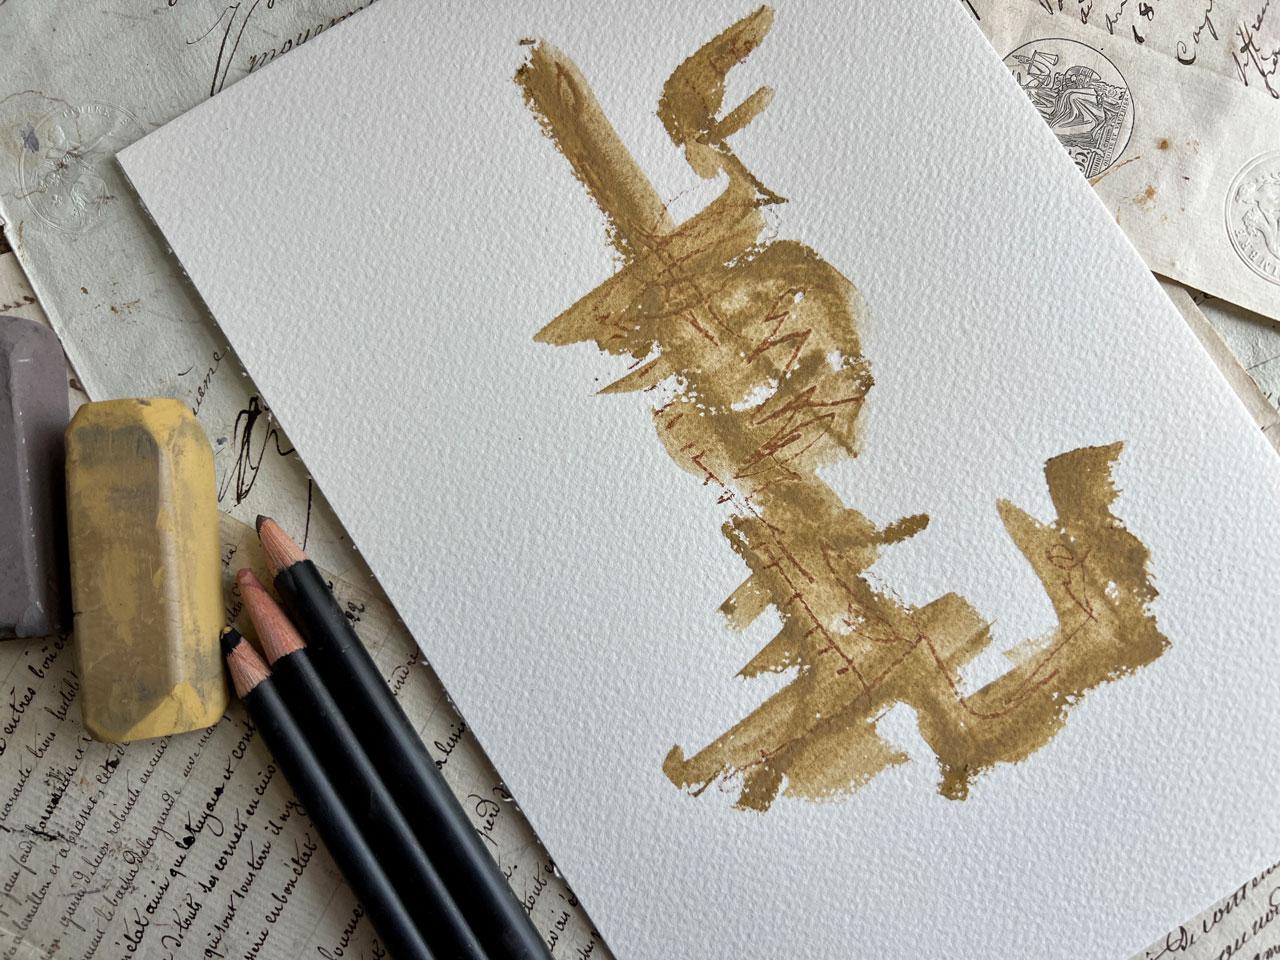
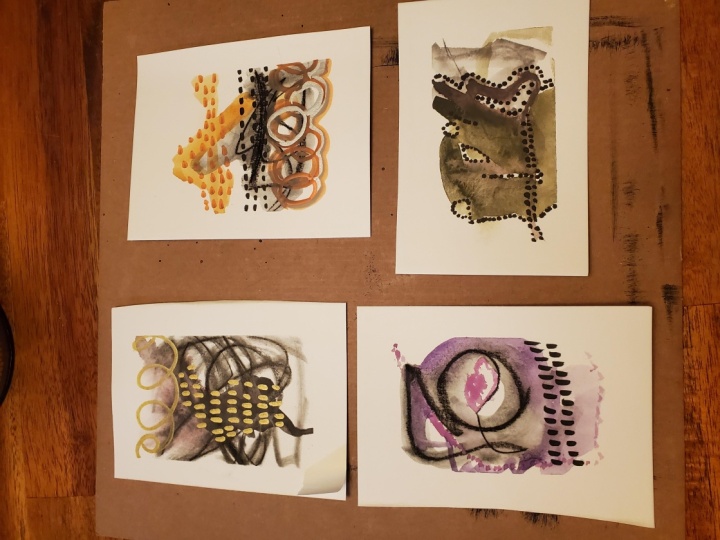
6. Samplers: I thought it would be fun to do many samplers just to explore each type of material that we've got here and
see how it works. And if we'd like it
and what we want to possibly do going forward, you can treat these as one big piece and just do big
pieces with your charcoal. I love to do that. You could treat each one of these
different and say, well, here I'm going
to do some blocks. And here I'm going
to do some pencil. And here I'm going to
do some watercolor. You see what I'm thinking there? We could do like
sets of two where we test some different
methods in little doubles. You had like little sets of two. I just want you
to start thinking and maybe getting creative in
what you're thinking about. We're going to do
some abstracts. I want to keep these maybe
a little more simple. Not put so much stuff in here that I've overwhelmed
everything that I've done. But I'm going to play with these first two colors right
here, because I love them. It's like a lavender.
It's like a yellow. I might mix those, Got my microfiber cloth to clean
my fingers if I need it. Then I might go ahead
and start swishing some water in here and just
seeing what do we get. Like, I love these minimalist abstract pieces that we can do. I could push some of this ad and then come back here
with some extra water. Like a piece right there
if I wanted. I love that. Let's push some of this around and just see
what can we create. These are just little minimalist abstract testing
out the supplies. This looks like one of those
statues on what is it, Easter Island, where they've got those big
statues, the heads. It still does. I
can't unsee that. All right, Let's try to
create a color ones. Got those right up here. What can we do a little
different with these? Maybe we could get a
couple colors in here. I like this red,
maybe this orange. Now if I go put water on this, some of this is
going to mesh funny. Because now I've got
multiple colors in here. But let's just see what it does. Let's just be brave. Oh my gosh. All right. Let's, let's just let
it do its thing there, then we can come back
on top of these. I got to come back here. Still noting that head. You see what I'm also
showing you here is the so you can keep
reworking them if you're like, oh, don't like what that did. Let me go back and
try something else. We can come back in here and
moving that charcoal around. We don't have to be
stuck with whatever we did with acrylic paint. That's very
interesting. Let's use a water color that
you've mixed up. I'm going to use this
one that we used as an example just
to get started here. Look how pretty that is. I might mix that in with something that
I've already mixed up. I've got these color, don't
ask me what these are. I made these a long time ago
when I was experimenting. Pick your favorites
and make a few, which is what I did and then I'm not sure what these were, if I ever wanted them again. Too bad this is a pretty purple. You know what I
could do now that I'm playing with
these a little more? Let me make sure I get these
with some water in them, so they're already activated. I'm really obsessed with these yummy little blobs where you start
off with a color, then you come back in and start laying other colors
in beside it, and then you've got
some yummy mark making that maybe
you do on top of it, because I already know that I'm loving that and
obsessed with that. Let's just go ahead and I'm going to create
one of those too, with whatever colors
I got over here. There's nothing saying that these are all going to
go together perfectly. Who knows what I was thinking
when I mixed some of these. But I'm just going
to play and just see what do we get if we do that. I love that. Experimenting,
wild, abandon that. Just go and see what you get. Oh, look at this one. So pretty already, I don't even know where some
of this stuff comes from. A lot of times you don't
know how many times I'll look at something
and I'll think, did I make that so
many times I do that. Okay, let's do one more. What have we not
experimented with? We have not experimented with these little wins.
Let me get these out. Let's just do this blue. See, these are so hard that this might be
the perfect thing for very light minimalist, not going to be nearly as pigmented as say,
these other ones. It is fun to experiment with different styles
as we're doing this. This is something
interesting and different. Let's stop set me okay. Now we can look at
these and think, okay, what else could
we do with these? Are they done? Did we
like it just like it was? Do we want to add some
other stuff to it? Do I want to come back on
top and add some marks to these to really bring
out something else. Let's just take whatever this looks like, chocolate brown, and come back and
start playing on top of what we've already
created here. The purpose to do in things like this is to get you used to
playing with the materials. If you're not used to
experimenting with charcoal, say it's to get you playing with the materials and figuring
out how to use them. What they do if you do
this or if you do that, this is a green moss. You can figure out then
like which tools are good for spreading with water and which tools are
good for bark making. Which can you do all that with what colors do
you want to use? Because these are
all dark and smoky. It's not like you're
going to get big, vibrant, different colors. Except when you mix your own, like that one, feeling like that could be a
big one right there. This is how you get
to bigger pieces of art and you move into
different areas. Let's see, I'm looking for about whatever this
color is, Heather mist. Now, we could come back in here and put some pretty marks. See that looks like that's
what that color was. Look how pretty that is. I could come back over
here with some lines. See how good the pencils are
for mark making details. That's what I want to
do with the pencils. Okay. I'm loving those too. Do I need anything else there? I don't know, that's
not my favorite, but it is very interesting
to see what it does. I could come back in
with something chunky, it's especially like this mark. These are great for that
because they hold their form, they're not flaking
off and breaking down. Whereas the big, chunky,
thicker ones over here, the rent ones are so soft that they crumble and break
as you mark stuff. Okay, that was interesting. All this one over
here feeling like, what if we take some
chunky charcoal? It's coming in here
with some big mark. At this point, I want you
to experiment with mark. It's not to be super deliberate, I want you to even put a
timer on yourself and say, okay, I'm going to do
this for 5 minutes. That almost limits the amount of time that you
can stop and think about stuff you get out of your own mind when you
do stuff like that. And that's what I
want you to do. I want you to get out of
your own way in creating. Look how pretty that is. If you think what I'm doing is not pretty, it
doesn't matter. What you do is not
up for me to judge. It's what feels good to you, this is what feels good to me. I just want you to start
experimenting and just seeing like what can you create if you did this or
if you did that. I like those lines. This is the way too that
you figure out, oh, I like these marks or I
like those marks and I like these marks in this
medium pencil, whichever format
you, you have there. This one's real pretty here. Let's come back with
this light moss color. We can do some light
scribbling in here. Press down a little bit and get some extra little
oomph behind it. You can come back in
here with some marks. I like it. I like it. I do like how light
that is unexpected, how much I like that
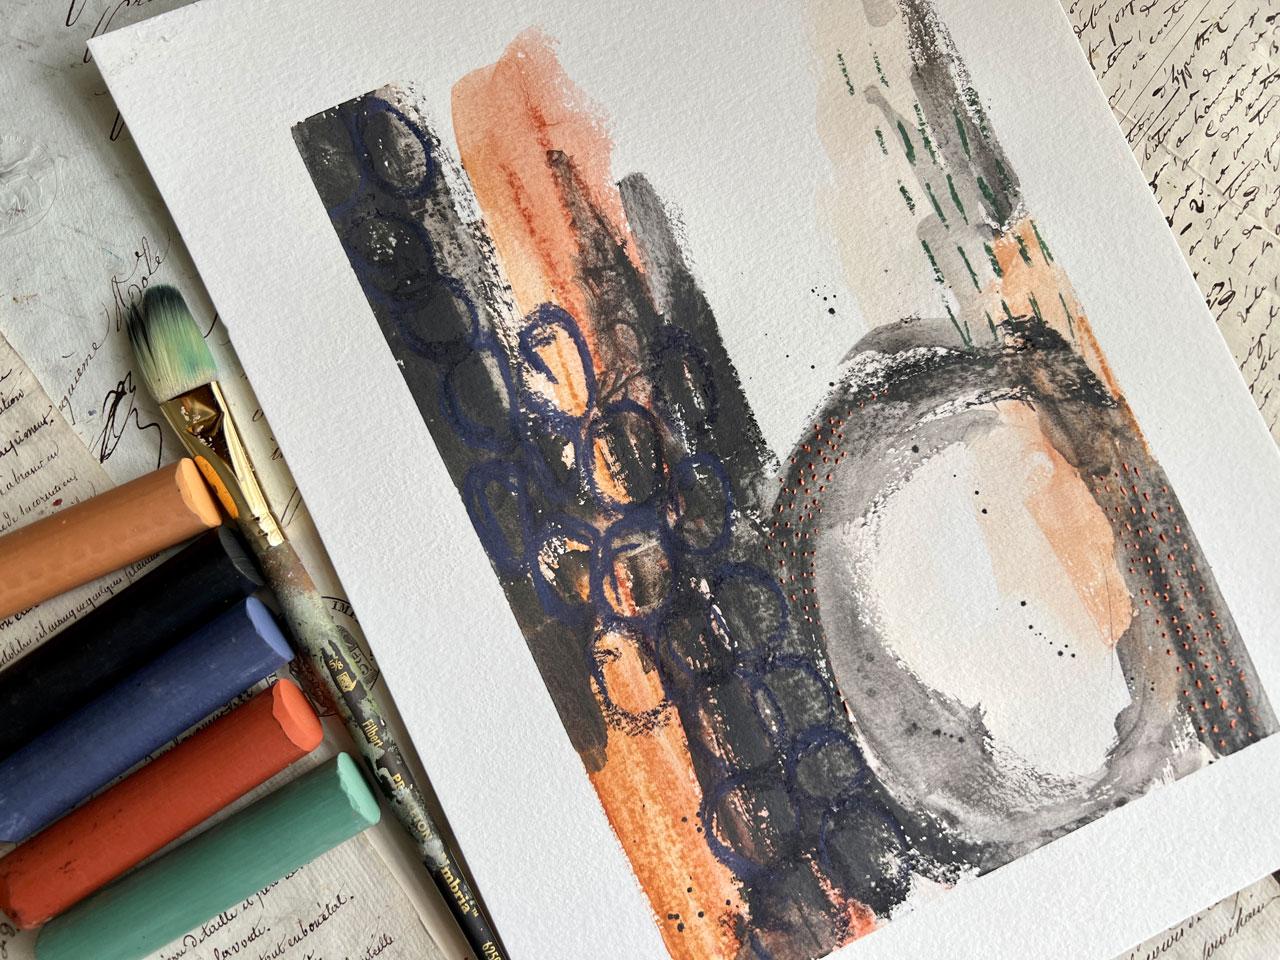
at this point too. I'm all about mixed media. If you wanted to do
postcapin or something fun on top of this,
you certainly could. I'm going to resist because I want to keep it all charcoal. Look at this big chunky thing.
Let's see what these do. If we'd even see it. You
don't even see that. If I went back with Posca
pen with little white dots, that would have
been interesting, but it does add an
interesting texture in there. Pull this up and look at that. It did change what we
had going on in there. But you see how
light and just wispy and almost minimalist really, in the amount of pigment
that you got on your piece. It's very interesting
how all this works. I need for this one to dry. All right. There we
go. I love that. I've got some charcoal over
here in different weights, medium, light and dark. I'm wondering if I
didn't do like some of my very favorite things that I normally do
with an ink pen, If I couldn't do that with
charcoal, Twirl the pencil, as you do that, you keep
the line a lot thinner, you keep it finer like you're creating that
point as you go. That's an interesting
little thing to discover. Then we could come
back and I could make my little pearls
that I like so much. You know, I like my really
heavy bold pencils, like 14, 12. I knew I was going to
like this charcoal. Look how pretty those are. Okay, that's super fun. And then we can look
at this and think, what else do we
want to do in here? Do we want some big
blocked colors? Maybe I do with the
chunky charcoal. Maybe I would have liked that in that red instead of this yellow. That's why we do
these pieces little. I try not to blow stuff. I knew I just blew
that for film. But for the most part, I try
to tap powders on paper, towel on my table. All right. I'm going
to leave those at the. Well, I started it. I'm just going to
put a little.in these just adding to what
we got going on in there, we could do some type of mark. What if we do this? What do we got here?
This is slate. Could make dots. I'm a dot girl. We could like some dots. Oh, yeah. Okay. Look at what the pretty dots do when
you get up there with the dots. I'm loving that. All right. We know what project
I'll be doing today. It's funny every
time I make a class, and I've made a lot of classes, I different spots
in my life there. For a while I was in this
Act shapes and now I'm in blobby colors that
blend together phase. And I just love these so much. Oh yeah, good one. All right, for the moment, check out our little samplers trying out each one of
our different supplies. Once you find the
style you like. If it's this one for instance, I want you to do
a whole bunch of them and practice and play. I love this one and I love the. That's the direction I
think I'm going to go. This would have been
my favorite probably a year ago because I was in the very minimalist
light water color. Let's see how it blends and
does and what we can create. That would have been the way
that I would go a year ago. But next year maybe I'll be doing something
completely different. I'm going to separate these out. These are going to be my
little samples and examples of what I might want to
create, if you like, the colored water colors with
the graphite powder in it, go ahead and mix up some
colors for yourself. You can get these
little half pans off of Amazon or you can
get them at the art store, or you can just make
up some of those and have them on your watercolor
palette ready to use. Like I could just
keep using it on my disposable palette if I
wanted these re wet just fine. Make yourself up
a few the colors that are your very favorite. Because I'm going to be
using these even though I don't remember what these
colors are anymore. I use Senilia and Daniel Smith. So that might be some
Daniel Smith colors. But look how pretty that is. I hope I can even make that
again, bigger. We'll see. I'll see you back in class.
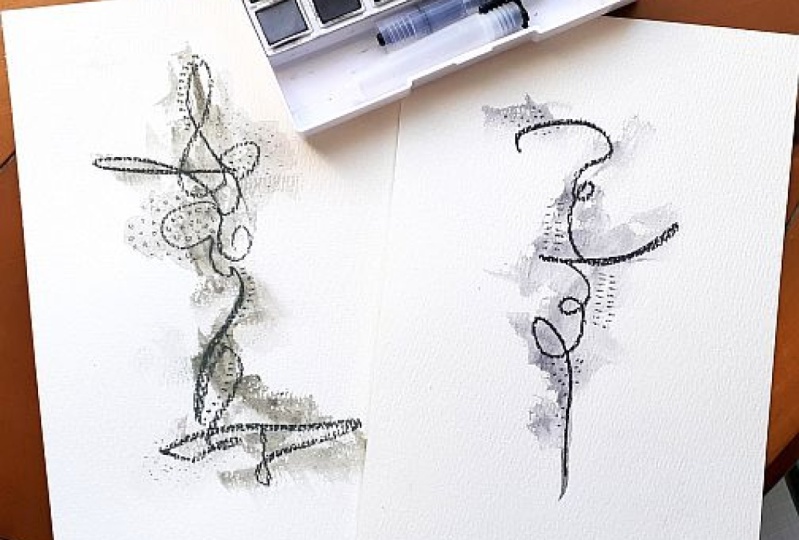
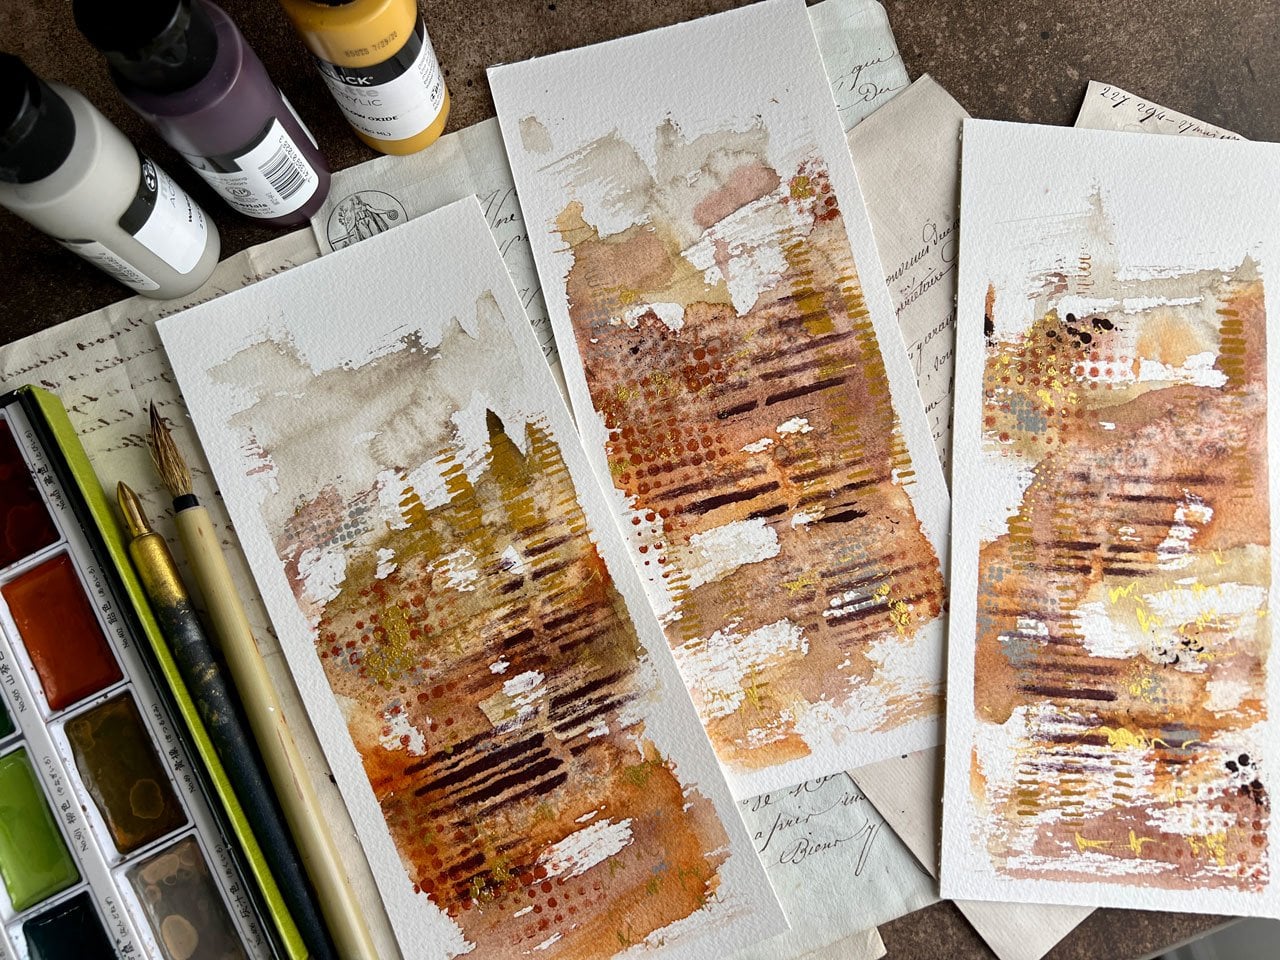
7. Half Page Abstracts: I thought it would
be fun to create some bigger ones
of these abstract. Starting off with lines
and marks and then coming back in and filling that in with some water
color and some water. And just seeing like what
we can turn this into, I'm going to just jump
in and go for it. That one made a
big L, didn't it? I'm going to get a little
more water here and just see like where can we go
with something like this. Might come back on
top of that and mark some more because
it's going to be super dark when you get on top like that, because
it's still wet. That's very interesting
what we can create. When we do that, I might come back with some pencil on top, very inspired by our
little samplers. See pieces here. Let's come back with this glowing embers. I did this, let's just
soften that back out. See how these just blend. And all that powder just turns
into a pretty water color. And it doesn't stay
with the harder ones. The harder ones,
you can still see lines under there with these, you can just get water. All the lines just do their
own thing and go away. Maybe I'll do another
one of these. When I was telling you,
I usually set these up and tap them and blow them. You don't want powder everywhere on all your work surfaces because then you have a mess every time
you're creating stuff. But if you've got like some towels that you could put down here and tap off that powder, you make the messes less. So the first one or two of these that you do, if you get into this fun little abstract, move
everything around. The first one or
two that you do, you may not like do six at
a time, don't just do one. I've been using my
Raphael soft Aqua number zero Quill brush to move these around because that's the brush
that's my favorite. Now that we did that, that's
actually my favorite. Sometimes you got to get into the groove and let
stuff start moving and look at that real
fine lines in there. I'm holding it real
far back loose, letting the pencil do some of its own thing and it's
getting in there on that wet charcoal and letting loose and
doing some good stuff. I love that. I'm not
loving this one, but I am loving that one. All right. Super easy,
minimalist spread there. We can get the powder off our fingers because I'm
going to peel that tape. Let's get that off our fingers if you like the minimalist
style where we're creating these little minimalist charcoal
watercolor pieces, do a bunch of those. Takes some practice to
get down your marks, how you're holding your pencil, and how we actually want the marks to
look when we're done. This is not a throwaway
piece of art. This is something I could
keep adding layers on top of. I could add more to that. I'm not filling that today.
I'm going to save that. Maybe put that away,
maybe cut it up and use it in some other things
that I want to do today, I'm filling that, that made it a good three minute paint day. These are fast and
pretty easy to do. Look how pretty that is.
Now that is what I'm looking for. Very minimalist. A whole series that I
could do like that with different marks and
different shapes and just see what we could get. That's a pretty set one
I'll save, think about. I might mark make on top. I might cut up for
something else. That one will be
a. Think about it later. This one will be. Check out how fun that
looks as a little series. All right, so I
can't wait to see if you try out this
little technique. And I'll see you back in class.
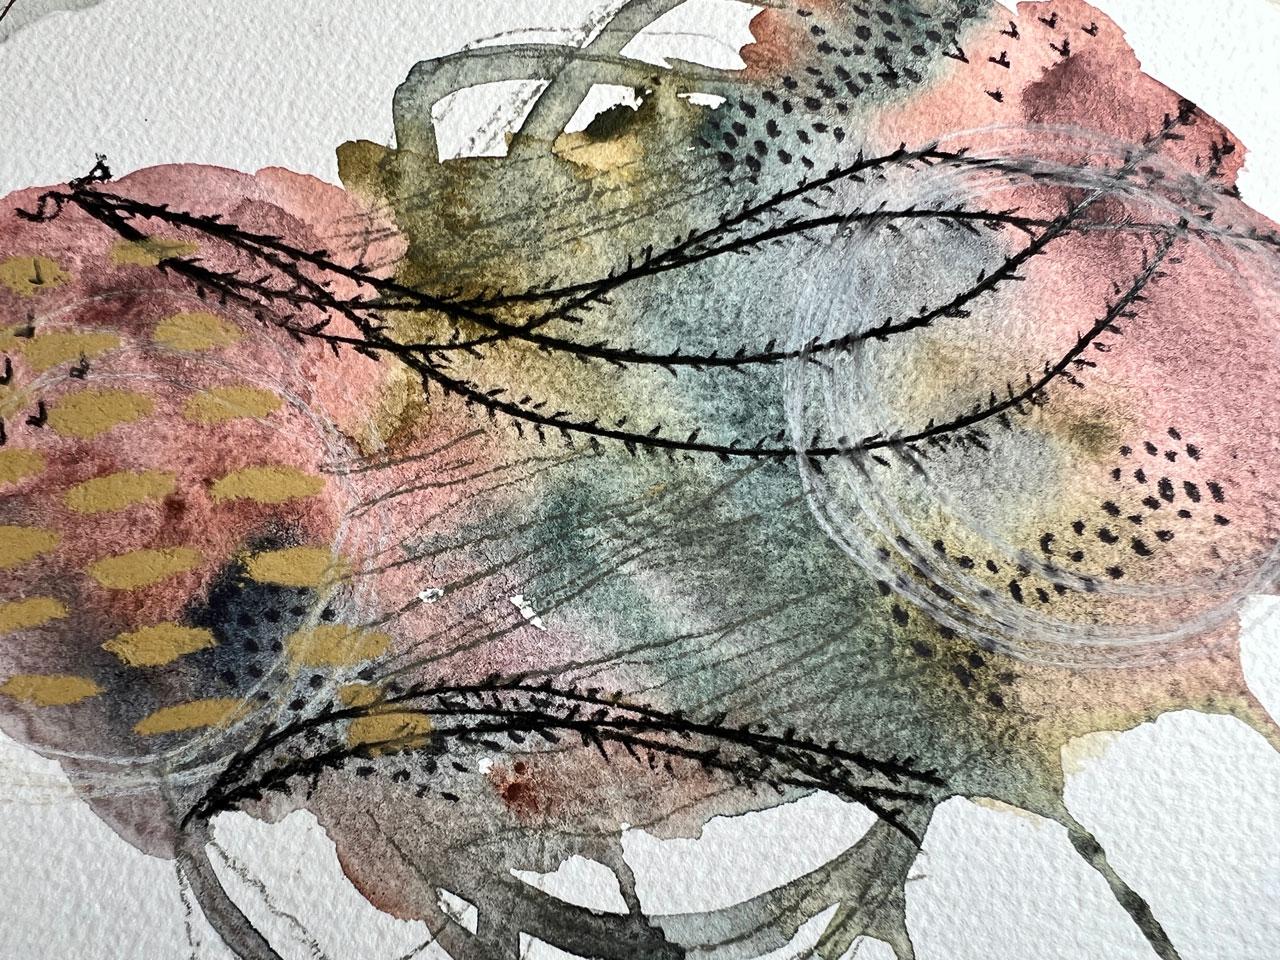
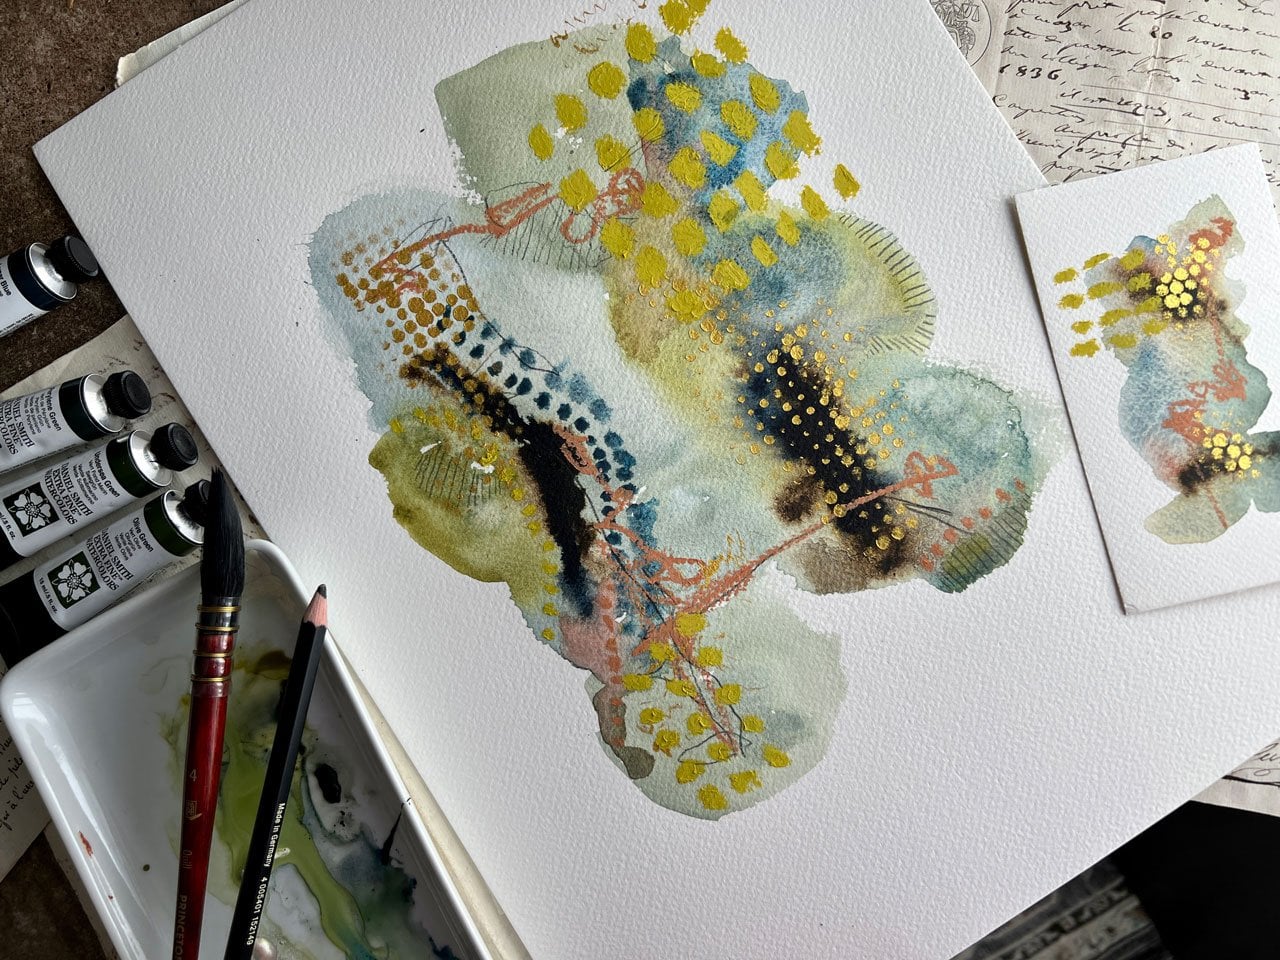
8. Larger Charcoal Watercolor Abstract: I thought for this
project we could go big. Very inspired by this little
sampler that I created. The different colors, maybe some watercolor lines in there. Let's just see, with the ones that I pre
made where I just mixed premade colors with
some charcoal powder. Let's just see what
can we create. And don't ask me
what these colors are because I made
these a while back, but it's just colors mixed
in with my charcoal powder. I did have this color that we actually made where I was
showing you how I did that. I might just tag some
of that color in. This is one of
those where I just start in two spots and
make my way to the middle. I am trying a little bit, I'm trying to think of
the composition as I go bigger and just see what direction or shape
am I wanting to go. Now that I've laid
those two right there, I may be going in more of a
little swoopy in this way. If I don't get same amount
of space all around, I'm not afraid to trim these up. Let's go with some
of this green. I'd like that. That's like green gold mixed in with charcoal is what that
looks like to me. I'm not positive
that's what that was, but it looks like it's what
it was. I like green gold. I want to use green
gold a lot of times, and sometimes green
gold doesn't like me, but in this one I'm thinking, wow, look how pretty that is. Then there was this real
pretty turquoise teal or whatever this color
is that I got going on. That's pretty pretty. There's a little
bit of a lavender. Maybe I'll fill in some of these little holes that I'm making was some
of this lavender. I'm not sure what I was thinking when I picked the
colors to make. I think I was just
like, oh yeah, let's just make a
bunch of colors. Now, I think if I
were making these, I'd be more deliberate like, let's pick a color palette and then I'm going to
make some colors that speak to me from
that color palette. Some of these I made last year, sometimes the idea like charcoal class hits a year
later and you're like, oh, let's do some of the fun
things that I have made up. Let's use them. Just tap some color in here, no rhyme or reason there. And how I was laying these down. I was just experimenting
and just seeing like what, what would it do if I did
this or if I did that? What if I had some of those loops coming
down here that I liked that I thought was so
pretty in the other piece. And maybe we had someone over here because I did think
those were really pretty. That's fine. All right. I do want some darker
color over here. I think I'm fading out. So pretty. I think I'm going
to like this one. I hope I'm going to like it. And you know what we could
do. We could drip some. We could drip, we could
do some drippiesk. Let me get a piece
of paper top hole. Oh, so that's fun. All right. I'm liking that. Let's stop at where it's that did have some
good direction there. All right. So don't forget some little drips if you're
thinking drips, I like it. I love what this blue
and green are doing. That would be a pretty piece, just blues and greens. All right, let's let this dry and then I will come back on top and maybe Mark make,
I'll be right back. All right. This one is mostly dry. Now, I'm going to start
Mark making on top of it. Let me set these
out of my way of my hand because
on the other one, I'm taking my
inspiration off of this. I really loved our
swoopies. I like the dots. I liked the heavy spot
of color in there. I thought all those elements really made that
piece what it was. I'm going to do the same
thing on the bigger piece. I'm going to try to twirl the pencil a little bit
as I'm drawing these, so I keep that nice
sharp fine line. Let's just go for it. Look at that. Oh my
gosh. So pretty. Oh my gosh. I love how the black is a really pretty contrast to the other things that we've
got going on in here. We're giving it like
that little spark. That's pretty, we might put
like a little ribbon up here. Could end these with like a
little dot there at the end. That way you know that
that was on purpose. Then we could get in here with some fine dots or we
could do little leaves. A lot of times I'll do little
leaves on some of these. Now that I've thought
of that, let's just come off of
there like it is. Little leaves, you don't
have to get super fancy. Can just be like a line coming off of there where
you're like, oh, what is that? Is that a vine? Is that a leaf? Oh yeah. You might go ahead and set
up something for your hand. I've got just a
stick that I use, that's a old paint stick
from the paint store, which is the cheap, free, easy way to do, because even though the charcoal that we've mixed with water, basically seal all
that powder down, this new powder that
we're putting on top, we could very easily
smear this with our edge of our hand as we're
working our way across our. Your hand is on your
piece the better. Okay, that's pretty okay. Then I also like I liked dots. I liked the big chunky
piece in there. I'm thinking big chunky
piece over here. Oh yeah, I like that. Then I also like some
of these yummy dots. Just pick a dark color and
we'll do some dots in here. This is just thistle. I'm just, we'll just draw some dots or lines or hash marks or whatever your favorite
mark making thing is. Just like with
regular water color, I'm letting the separations
of color guide where I start and stop a particular
mark that I'm doing. When I'm doing
something like this, I do like gold and
white and black. I'm trying to do
my best to stick with just the supply that
we pulled out to work with. But as you're working, if you start thinking, oh, I need some gold, ooh,
I need some white. Don't be afraid to pull that out and do that
on your projects, trying to stay
true to the medium that I wanted to
play with today. I'm going to not do that. This is more of an
exercise in discipline. Making yourself see like, well, what can I get if I stay
within this particular medium? You learn lots of stuff
when you do that. When you reach outside your comfort zone
and you don't go right back to the thing
that you always do, you just so much, then you discover things
that you're like, oh, I can do this again and
I know I'm going to like it. Whereas otherwise you
might be like who? I don't know if I'm going
to like this or not. I'm screed. Oh, look at that. Now, I can't tell you how
much I want white on here, and I don't think
our white is really going to do anything for us. If I do white charcoal, I do feel like it needs
a little something. What does it need? What can
I do? What does it need? See, I don't think
we're going to be able to see it if I do this. Let's do this on our sample. Well, you kind of see that. I look at that, you
can kind of see it. All right, we're going to do it, we're going to do
that over here. Just something a
little different, maybe a little over here. It's just going to pick up
some of the other color too. All right. That was interesting. I do like the little
extra detail I got in there with that fun. All right, that was fun. We could also do some
scribble marks or something. What do you think it
needs? I need you to vote. What else do we want to
put on here before we say, okay, I love that. I think I will do like some scribble in here.
I want something. Oh, look at that. That was nice. Kind of keeping it white, airy. Look at that. Oh yeah, yeah. There we go. I'm loving that right there. Let's do some of that up here. We could do some of that
line coming this way. Oh, yeah. Okay. Now I'm
feeling better about that. We got some extra movement in there that we weren't
really getting before. All right ya, I like that. Alright, let's see. Got
some pretty pink here. I don't know. This
could be done, it could be where I want it. I could add a little
extra black in there if I wanted it to come off
this side over here. Let's just do it like there was a second
little set of vines. There we go. I like
that. There we go. We could throw in like
a few little birds. I like birds with my vines. And that'll draw the eye into the different areas and just add some more
interest there to look at. Oh, yeah, See, there we go. All right, I'm filling that,
let's wash our fingers off. Okay. Then there's something
else I want to show you. On a piece like this, we can make the edges a decled edge. I'm going to peel the tape. I would normally let's talk
about finishing these pieces. I would normally go and add
some soft pastel fixative, because this is charcoal. So I go outside and
spray this with some fixative and that will
fix that charcoal down. That is how I would finish that. But I want to go
ahead while we're on camera and make some
decled edges for this. I'm just obsessed with these
pretty blobby abstracts. Lately, you'll see these pop up here and there on
lots of things that I do because that's my
current favorite thing. Here's another thing too. If you blow the charcoal, you'll blow it to the
edge of your paper, which you don't want
to do, blow that off. Before we get fixed on anything, I'm going to get a
piece of wax paper. I'm going to use the wax
paper to protect this. My favorite way to rip an edge is with my
dual edge ripper. You can also do this
with a metal ruler, if you've got one that's big
enough you could do this. With that, I'm going to
rip these from the back. I'm going to look at
the front and say, how far of an edge
do I want to make? The edges are fairly even
on the left and the right, so I want to tear
about the same amount. I feel like I want to come
right up in here on that. I'm thinking that maybe
I want to take off. Let's just see, Let's
just measure this. I'm thinking I want to take
off about an inch and a half. Inch and a half. If I come in an inch and a half
here, that's real close. That gives me about
an inch to that. If I come in on an
inch and a half here, there's 3 " over here, and there's about
2.5 " over there. I really want to take
an inch and a half off one side and 2 " off the other. An inch and a half off of this side would be
about right here. And I'm not getting
really exact here, I'm just eyeball on it. You can be as exact
as you want to be. This dual edge ripper has a really torn edge and
a really subtle edge. And I'm going for
the subtle edge. You just want to tear the
paper towards the ruler. Leaning on the ruler
as hard as you can. There we go, on the other side, and you don't want
to smear it around. I want to be careful
there on this other side. I wanted to take off
about 2 ". All right. I'm going to flip this paper
over. Since I smeared that. I don't want to get extra charcoal where
I didn't intend it. I'm going for about 2
" about right there. A lot of times too, I'll tear the paper before I
ever start painting, and then I don't have to
worry about this at the end. But this is a look
there. I like it. This is a nice
getting it centered. If you didn't center it
when you were painting, that's about 2.5 right? There's about two, maybe. I want to take off about
an inch at the top. Okay. In at the top. About right there. I don't want it
to be so close to the edges that it almost
feels uncomfortable. But I don't want it to be
so far away from the edges that it looks like our
piece wasn't big enough. I paint intuitively. All right, this last side
is the drip at the bottom. So I'm just going to get
very close to the edge, but enough that I can grab it and imply that
the drip kept going. But I don't want to be I want
there to be enough space. So it looks correct. Not that it looks like
our piece was too small. And not that it looks like
our piece needed more room. All right, check it out. That's a pretty
piece. All right, that is our yummy piece
inspired by our sampler. I think we did
pretty good there. I loved using our pre
mixed water colors mixed with graphite
to create that. I hope you enjoy picking out some of your favorite
water color mixing them. I said graphite charcoal,
the charcoal powder, mixing them up with
that and getting that yummy smoky quality. Because you can almost, when
you get closer to these, you can see that smoky
quality in there. I mean, you can tell it's like, what is that yumminess
that's underneath the color? You don't know why it's got
that smoky quality to it. It's very interesting. The way that that does that, hope you enjoy making a few of your own charcoal water colors and trying out this project. And I'll see you back in class.
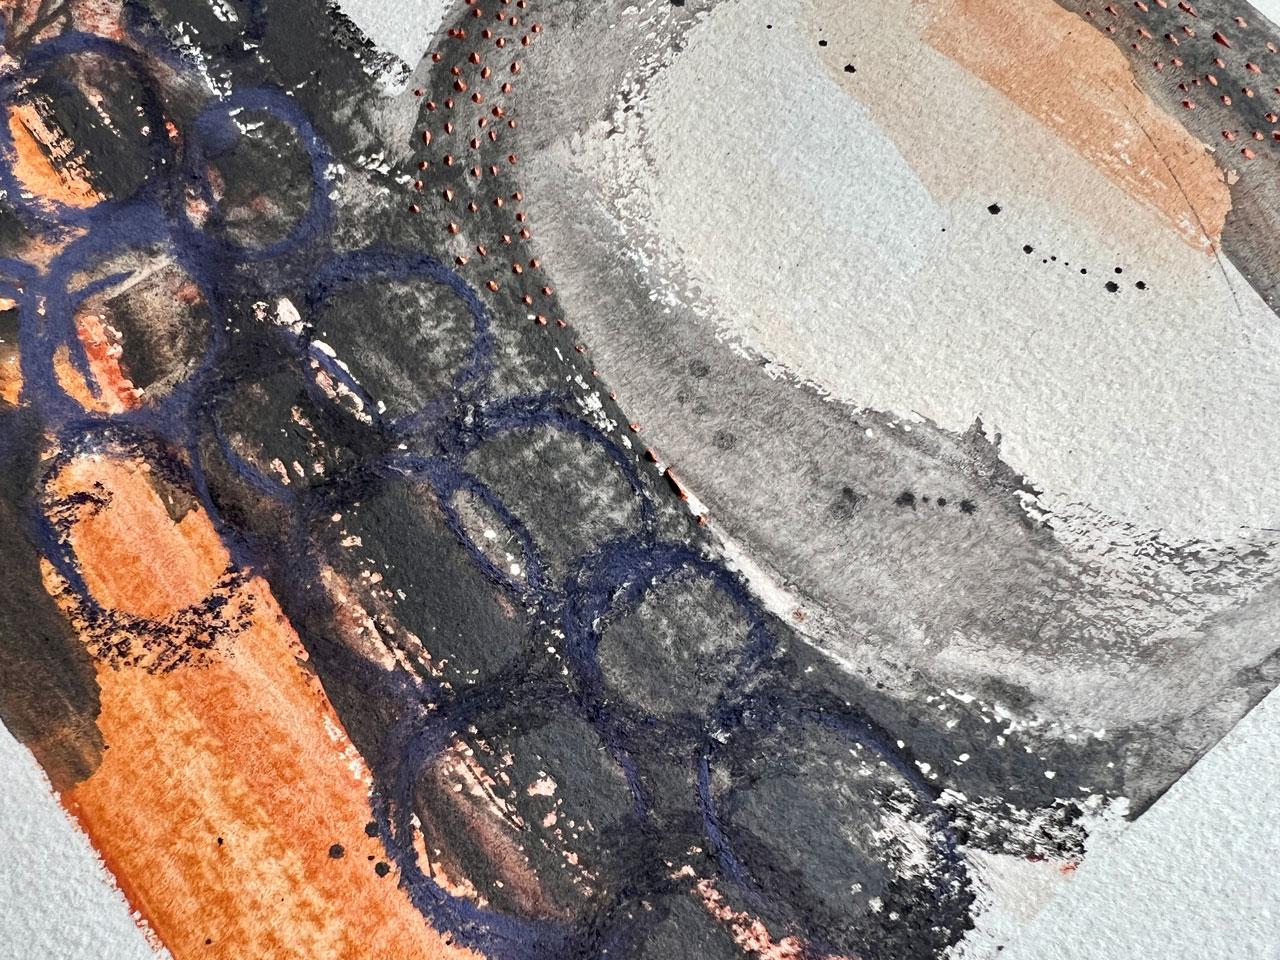
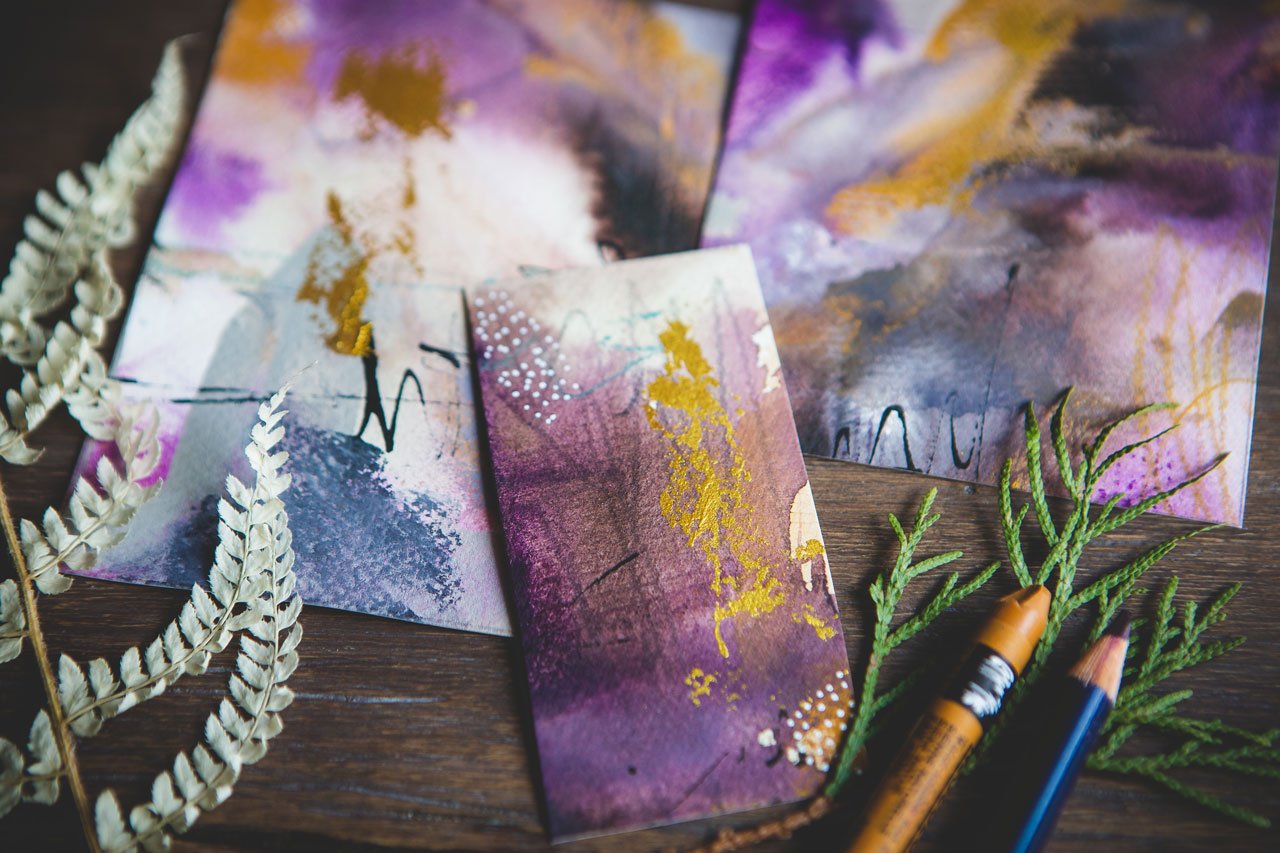
9. Urban Charcoal Abstract: For this one I thought, what if these are
charcoal colors? They're like got a little bit of deepness to them and
they're real pretty. But I think what I'll
do here is maybe start off thinking rule of thirds a little bit and
getting some of this going. I've just pulled several colors out of this created color box that blend and spoke to me. I'm going to go ahead
and get some water. I'm going to use a mop
brush, a quill brush. This is my Princeton quill four. I'm going to start swishing these colors around
and getting them to start doing something a little different than what I
normally do with paint. I love how you can paint
with these charcoals and see definitely like this. Okay, totally got
excited there now. I'm wondering if we come
back with the black, it's all wet and this is
not as easy to move around. What if I get the
derwin charcoal? I'm going to get
all the charcoals. What I like about
the derwin charcoal, extra large blocks, the water soluble also
not as tough as these, They're softer charcoal
and I like that they're a little softer
and that we could maybe do some other
stuff with them. Oh, look at that. Okay. All right. Let's go ahead and
get some of this moving and doing some fun stuff. Got most of that. Doing some fun stuff, got a few other colors that we could come back and mark, make. And just feeling our
way around here. I want to do a little
more water with these. We can liking that. We've still got blue and
green to add in here. So I can come back now
and add some marks. I'm not feeling
like I want to fill the whole page, I want
there to be white. I'm just feeling
like maybe now Mark making in an interesting
way would be fun. I'm using that coal press paper. I started saying something
there and it got distracted. I came back with
a super wide tape because I want to be able
to peel the tape off. I think it's a painter's
tape, but I'm not positive. It's called STI KK, but I can always use my heat
gun on it if I have to. But I wanted to be able to have a gigantic border around this when I was finished,
that's why I did that. I also have some blue over here. What would I want to do
with the blue thinking, what might not be
able to see this? But we're going to try it. Maybe some big circles in here. This might be one of those
elements where you notice it as you get closer.
I'm okay with that. Let's just keep on going
with that. I liked it. See if I pull that
closer to the camera. See how we can see it.
If we get real close and it focuses. I like that. Let's just do it all the way up. That's an interesting.
If you get close enough and you can see
it, that would be fun. We could also take our brush and put some of this charcoal
on it and do some splatter. We could try that. I
like trying new things. I'm trying to give you
guys lots of ideas. See, all right,
that's super fun. That works wet and dry. All right. This is a
fast, easy project. I just wanted to see
where we could go. I could, now that I've
got this going in there, could come back with some
of this is B relief. We could come back
in here now with some dots and have it be
like three dimensional. Let's do it. Let's just be brave and do it. Okay? What do we want to do? I want to go around the circle. Do I want to fill in some
of this peachy color? What feels good? What
are you thinking? Let's go circle and let's
get a little in here. It's not like it's
got to be everywhere. Can just put it in a few spots, you get, it's a little detail that you're like,
oh, what is that? That's so interesting. I like it when you have
things that you see as you get closer as a bonus. This is a metallic. I
like the thought that it will give a little tiny
bit of shine in the light. Oh yeah, see I like that. It's not a lot, but
it is there and it's a little tiny bit of an element That's interesting
as you get closer. That's pretty cool. I think
I'm going to stop it at that. I could put some
over here or there. I like it right there
though. Like less is more. Okay. I'm wanting to
see what we got now. If we're maybe we're done. Let's just peel the
tape and take a look. I've got a little
microfiber cloth. I'm going to try to get any
charcoal off my fingers. I don't want that to transfer. Let's see if I can get
this tape of Oh, yeah. Yeah. Well, be very
careful on the angle. There we go. Oh, look at that. All right. That's
completely different than some of the stuff
that I've created, but super cool. Check that out. And the colors that we
played in, that was fun. I liked this inspiration
and the colors that we just pulled in subtly,
something different. I just wanted to give
you something to play. We have some movement. We have Rule of Thirds where I separated this off and put
this at that bottom third. Super fun. All right, there was our
inspiration. Color palettes. I'm digging that and I'll
see you back in class.
10. Finishing Sprays: Let's talk about how you
might finish these pieces. Charcoal or chalky pieces are probably best
framed behind glass. You can put a fixative on here, because these chalky pieces, if I touch them, that chalk still comes back
off on my finger. You want to make
it so it could at least be touched by
the framer to be framed without smearing it before you even
got it protected. Usually I will spray
things that are chalky, like pastels or charcoals
with a fixative. I like the senilie, soft pastel fixative that will set the chalky
bits in place. It does not for the most part, like permanently adhere
it like you could still probably go and rub your
finger across it and smear it. But it is going to set it
well enough to keep it in a plastic sleeve and then
take it and have it framed. If you're taking them to an art festival
or something like, it would be protected
enough for somebody to then be able to take it home
and take it to the framer. The reason why it's
not going to like permanently grew everything
down is because it's powder. And there's no way to
hit every tiny piece of that powder and glue it down
to the paper basically. But what we're trying to do
is set the very top layer. It at least will be a tiny bit protected from something
accidentally touching it. If you have some
workable fixative in your studio and you
don't have the other one, but maybe you have the
workable fixative, that would also be
probably just fine for a coat on your
piece to at least protect it because
it's made to put a protective coat
on something so you could layer more
stuff on top of it. So that would probably be okay. I don't generally spray
pieces with varnish, but you're welcome
to try a varnish. You want an art
varnish that's non yellowing and that's acid free. This Cryalon mar varnish is a good choice, don't get shiny. I prefer satin or matt
if you do get a varnish. But again, I would take a
test piece and test out the different ones that you're
considering and see if you like what it looks like and
what it does to your piece. At the very minimum, I do like to at least try to fix those powders so
that it could be framed, but I don't really like
lots of stuff on top. So I do a minimal of finishing
on the top of my pieces. I hope that helps
you out how you can at least protect
it for a bit and then store these in clear a free art leaves to keep
them pretty for longer. All right, I'll see
you back in class.
11. Final Thoughts: Congratulations, creative souls. From the first mark on the paper to your vibrant
abstract masterpieces. You've embarked on a journey
that's all about pushing the boundaries and exploring colors and expressing
your unique voice. As you reflect on this
creative adventure, remember that art is a
voyage of self discovery. You've dived into the
dynamic world of charcoal, redefining it with color
and water and bold marks. Your art is not just visual. It's a reflection
of your emotions, experiences, and the energy
you poured into every stroke. The beauty of abstract
art lies in its freedom. It's the freedom to
break the rules, the freedom to express
without constraints, and the freedom to let
your imagination run wild. My fellow creators, keep
these colors flowing. Those textures evolving and
your imagination ignited. Continue to explore, experiment, and
surprise yourself of what you can achieve. Let your art be the
canvas for your emotions, a mirror to your soul and a
beacon of your creativity. Thank you for being
part of this class and for sharing your
passion with the world.
 DENISE LOVE, Artist & Creative Educator