Transcripts
1. Class Introduction : Hello everyone, and
welcome to the class. I'll be teaching you
an easier approach in beta white Florida. Hopefully by the
end of this class, you'll now be able
to confidently paint these daisy illustrations. I'll show you the materials
that I'm going to use from Beaver paint brushes. And the ulcer. Show you how to create mixtures
to represent different. Go one by one and discuss these three basic
floral elements to bet those the leaves in
the center of her flower. Also introduced techniques
such as the wet on wet, wet on dry and
degraded or sticky. This glass will also
contain two demos. First is an easy illustration you can use for
practice like this. Another one for the
mark optics being in project of this class, you'll be able to
create realistic DC, his illustrations that
you can use as Bruce and old artwork or any kind
of art merchandise. Now let's get started.
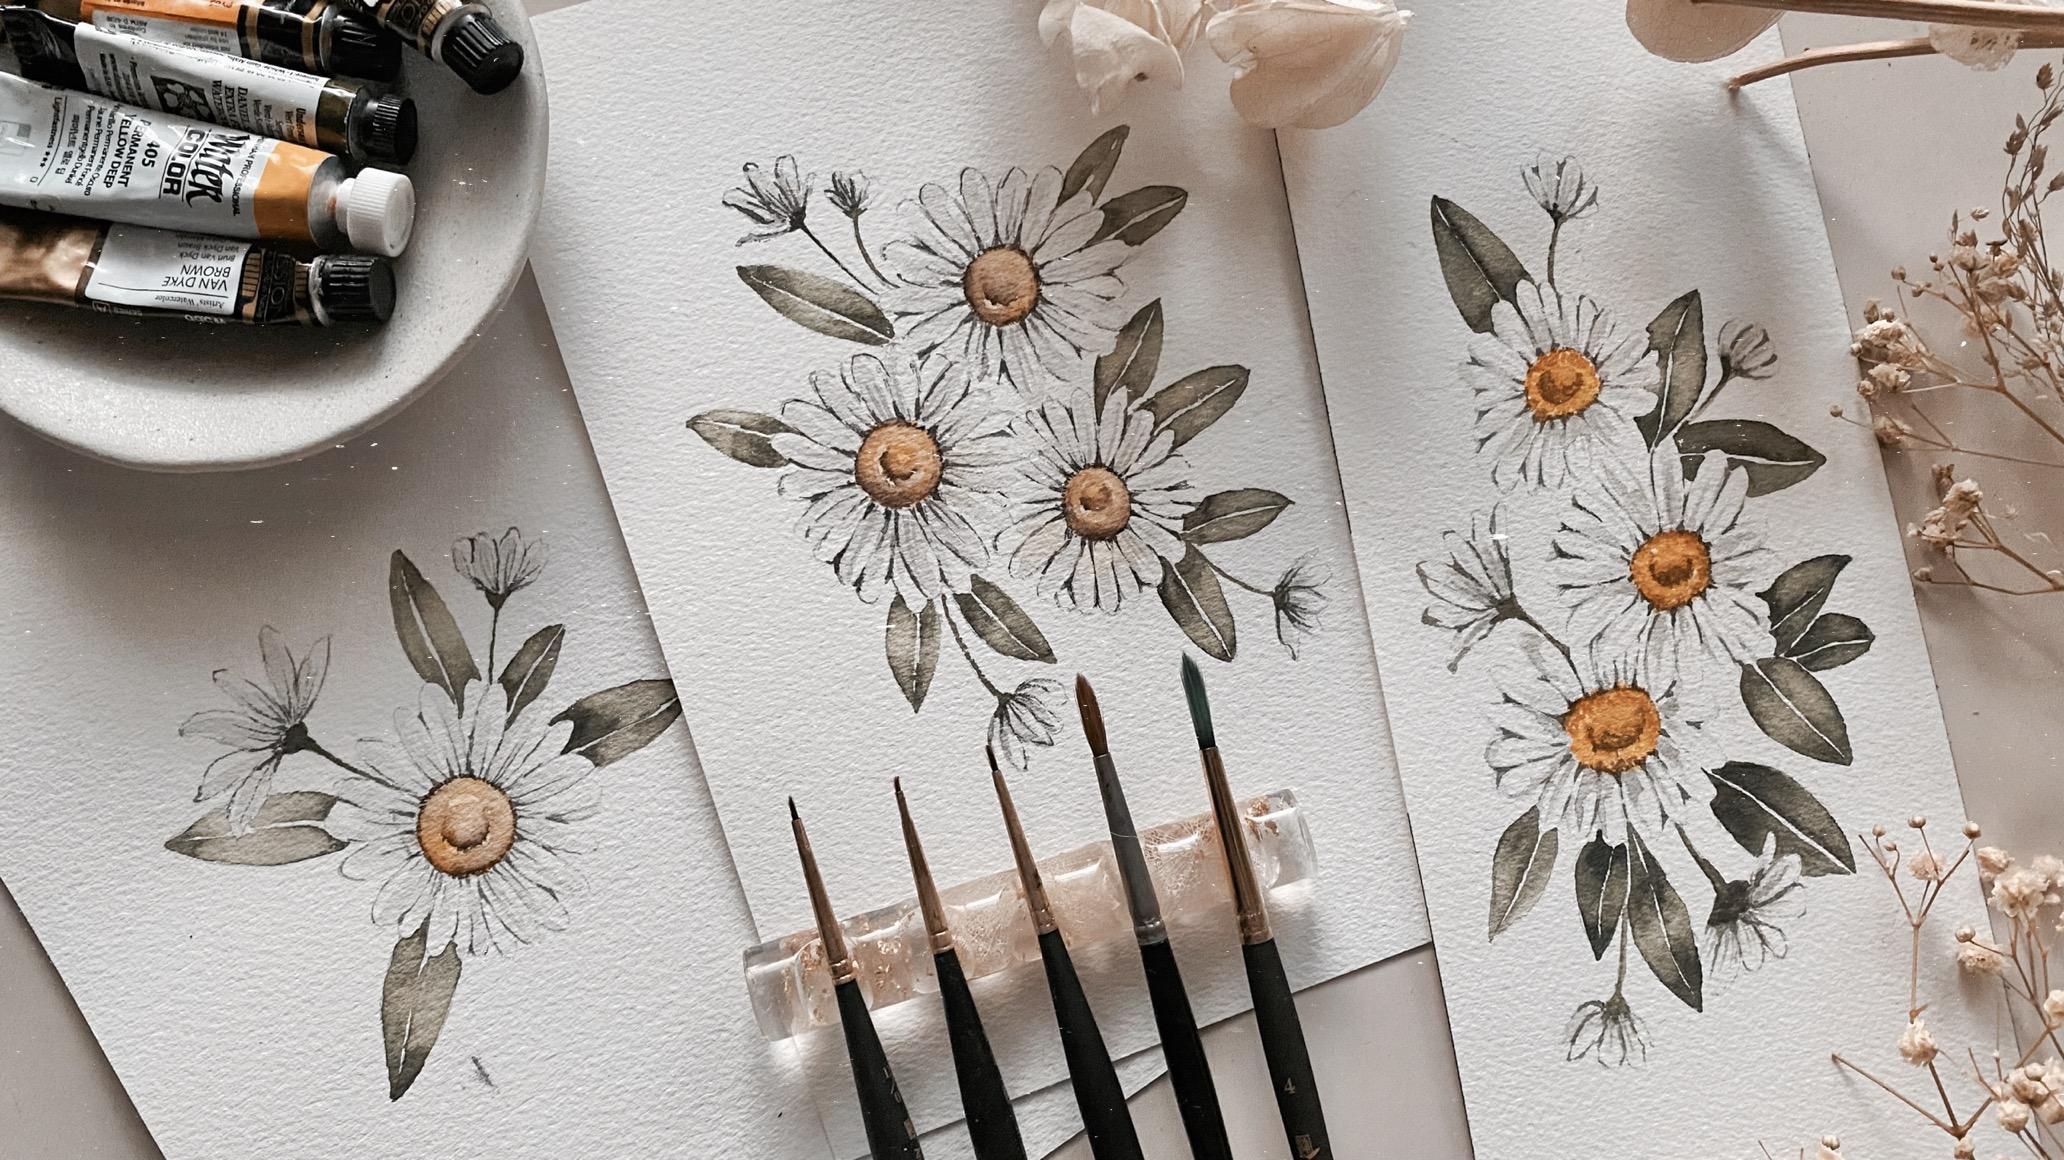
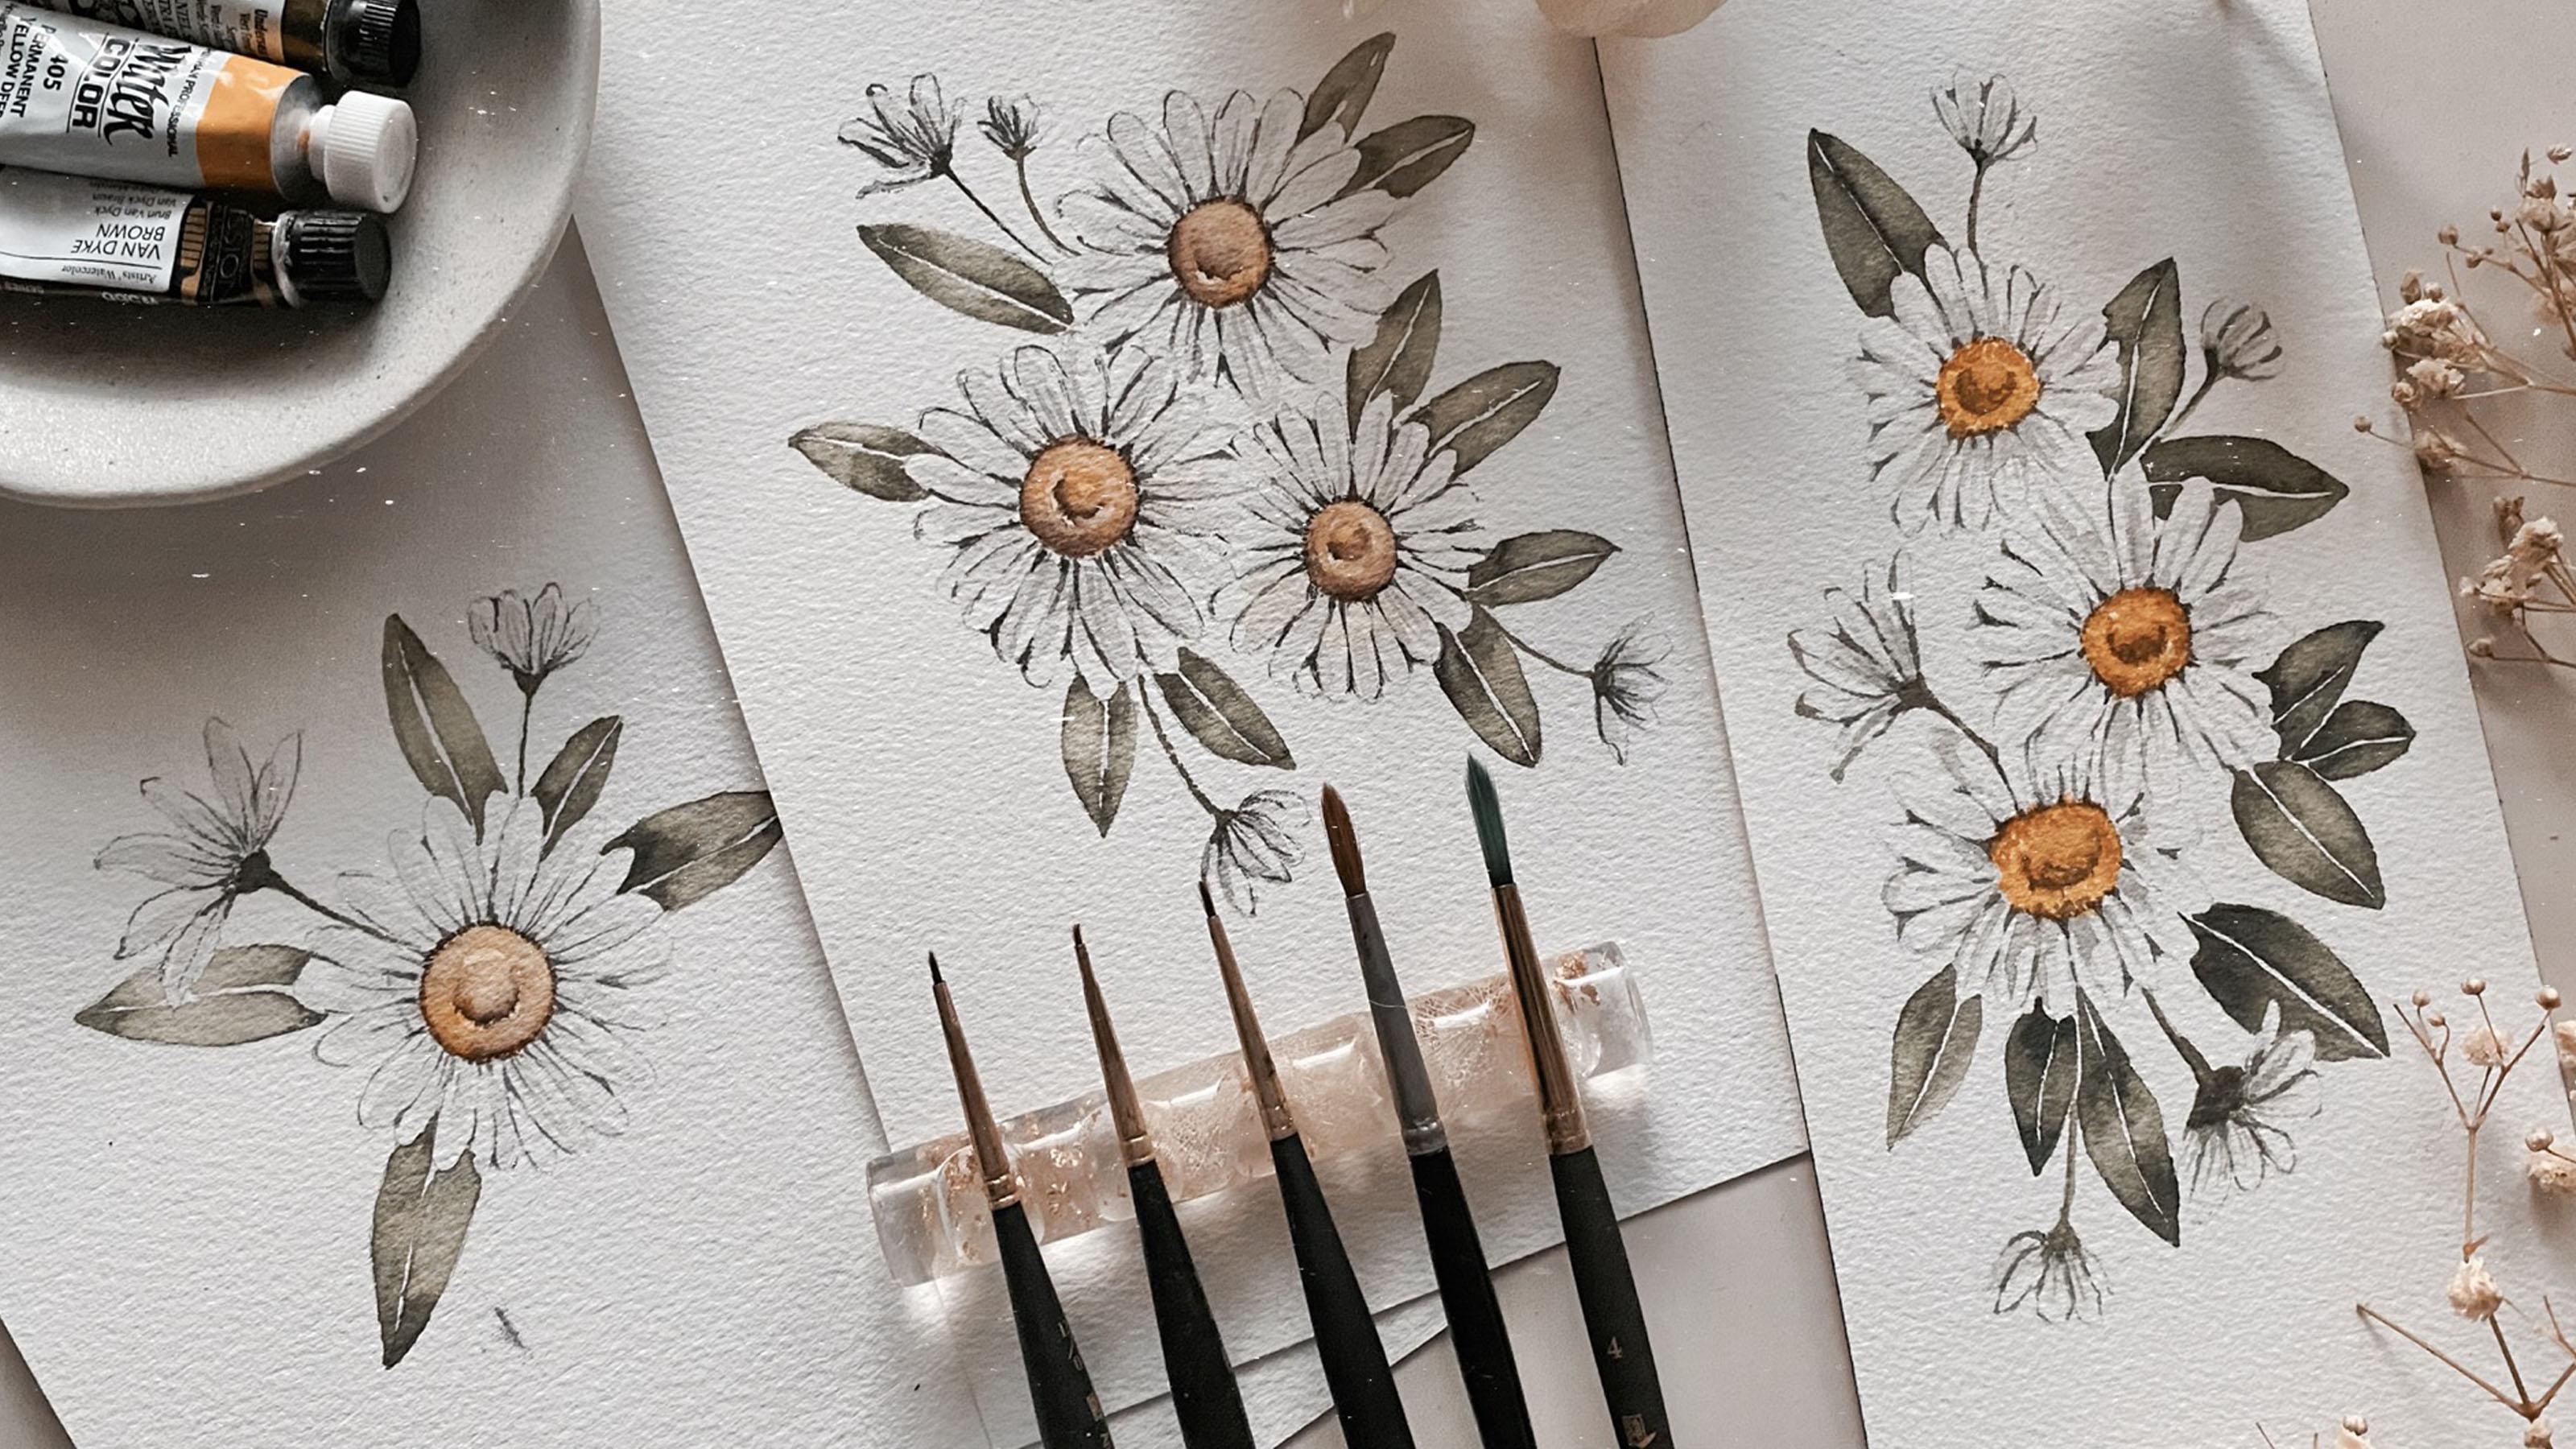
2. Painting Tools: In this portion of the glass
I'll be providing you did He deals on the materials that we will be using
for her artwork. Let's start off with a paper. For realistic
botanical painting. I normally use arche
watercolor paper, either in cold pressed or rough. These are 100%
cotton in 300 GSM. This type of paper, it can actually withstand
multiple layers of washes and it doesn't
wrinkle easily when wet. Thus, it's really ideal
to use this kind of paper in painting
botanical illustrations. Next are the brushes. Basically you'll be needing
two types of brushes, ground brushes in detail
brushes for this artwork, particularly we
will be prepared in one round brush in
SICE to work for, to beat with thick pigments. Another dog brush
in six or four, beat our washes and also for blending detail brushes in painting our details in octets. Of course, we won't
be needing beings. For the petals are the
main color for flower. I will create a light
mixture of gay using ivory, black and Chinese way. For the leaves, I'll be
using undersea green. And far too Center for flower. I'll be using hansa yellow
and permanent yellow deep. And for its details and a
shade of brown would do. But in this course I'll
be using raw umber. Then here are some
additional materials that we can add the word list. We need to prepare
two glasses of water. One would be for
cleaning the brushes and another one for
clean or support there. And of course we can use it
their shoe for some NIF thing that I also do recommend
using this hemodynamic pilot, preferably once we had a lot of wealth for preparing or
mixtures and color mixing.
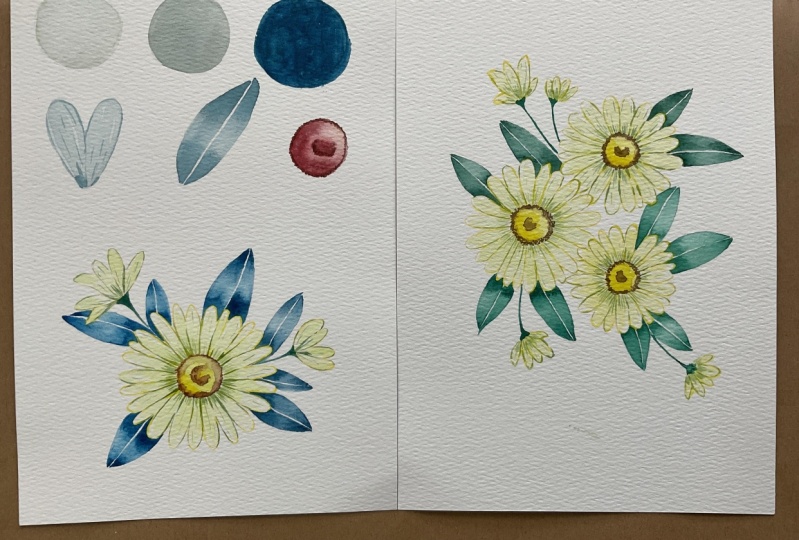
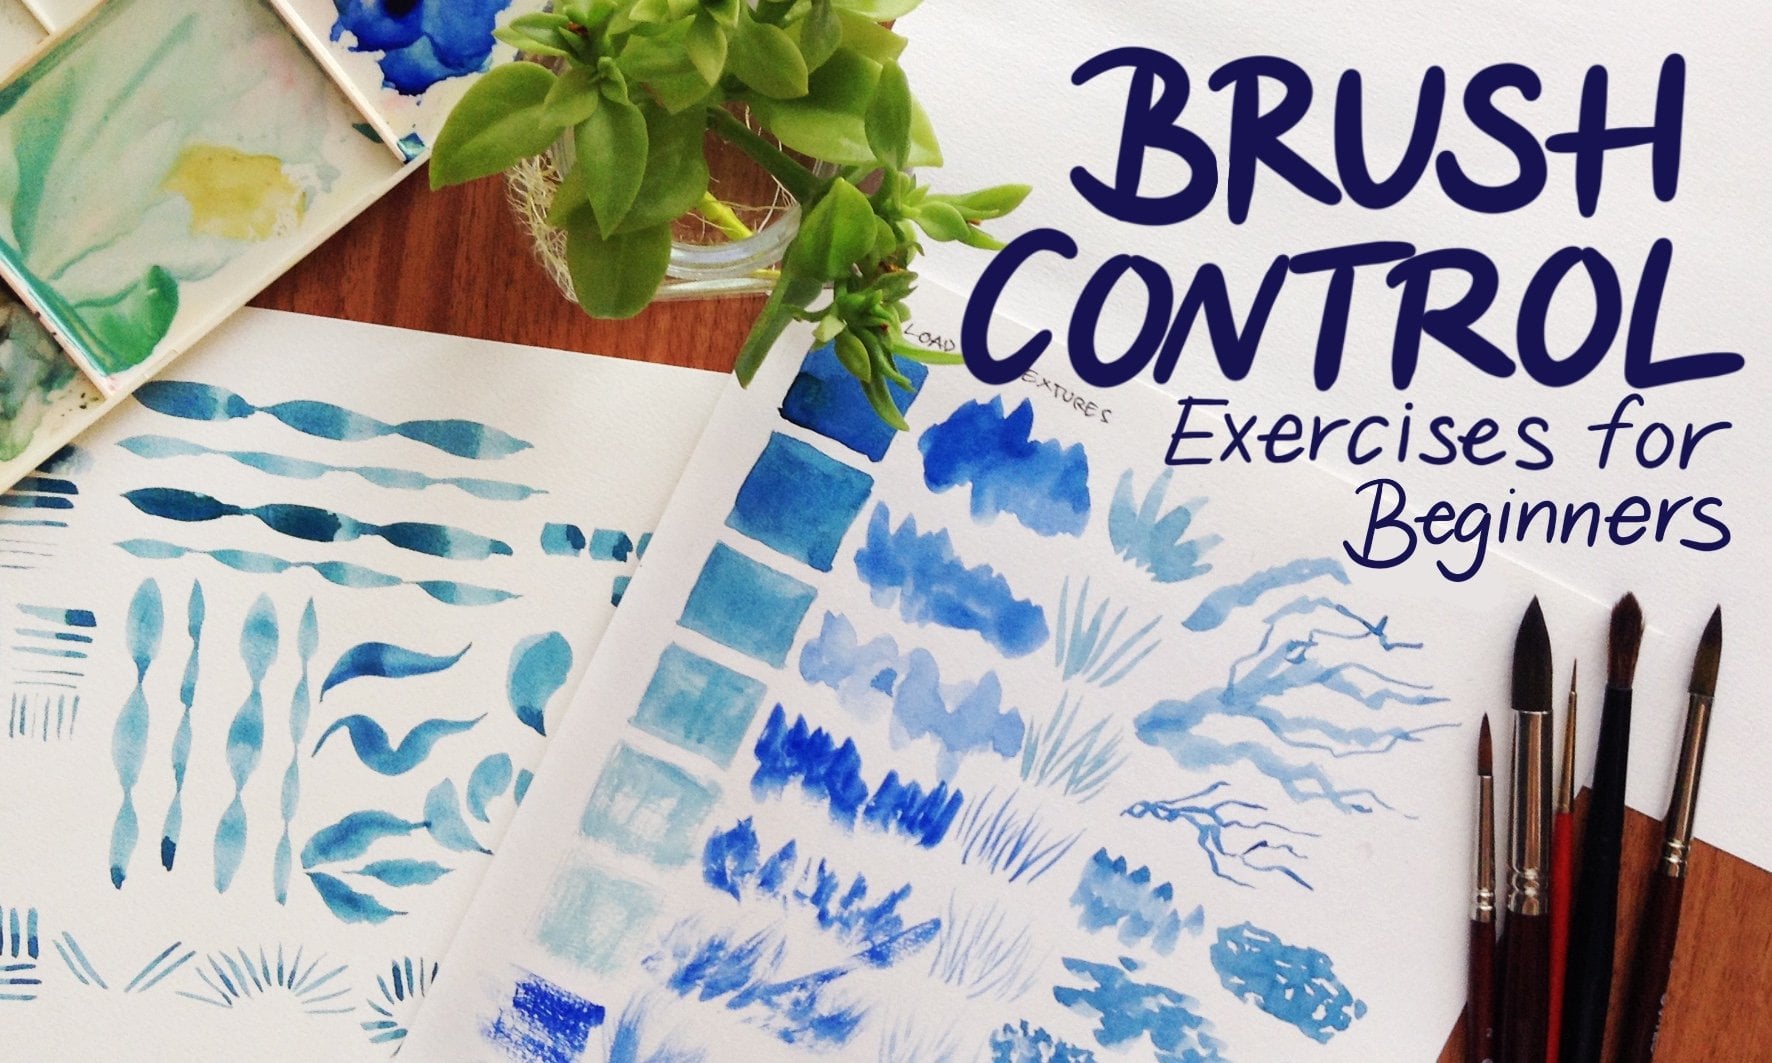
3. Preparing Painting Mixtures and Consistencies: In this portion of the class, I'm going to teach you how
I prepared the mixtures and fainting consistencies in
creating or DC elements. For botanical
illustrations, it's really essential that you showed
tonal values in your artworks. In this way, your paintings
would look more realistic. The stream mixtures
I'm about to teach you will represent or tonal
values such as highlights, mid tones, and shadows. For this exercise,
you can start by creating three shirt goes through represent
these mixtures. For the first circle we will be preparing are the mixture. Basically, this is
our lightest don't wash and corresponds to the
highlights of her beating. The mixture consists of native percent water
and then brush. To create this mixture, I'll be adding water to
one of my wealth and add the very small amount of pigment creating a DIY light mixture. As you can see, it appears
very light and transparent. This will however your
percent or highlights which shows part of our illustration
where light is not. Now let's move on meter second
mixture, the milk mixture. This would represent our
mid-tones are the actual color. If for each subject,
this mixture is composed of 50% water
and 50% pigment. This time or mixture is somehow darker compared to
where the mixture, milk mixture is more pigmented and less transparent compared
to where the mixture, which is our
lightest don't wash. Thus successfully
representing or mid tones. The last mixture is
called the cream mixture. This will however present the
darkest parts of her being. Things such as the shadows,
details and outlines. Composition is 9% pigment
and dead percent water. So basically it's thicker compared to the dual mixtures that we have prepared earlier. To create this mixture, I will just add pigment
on my brush and dip at one time in the water
than their uric be applying it on the paper. Again, this mixture
should be very thick, should be the darkest among the three mixtures.
We have pavement. There we have worked
be milk and cream, Percent or highlights,
mid tones and shadows. You can practice first creating
least mixtures as I'll be using these terms into step-by-step process in
painting or illustration.
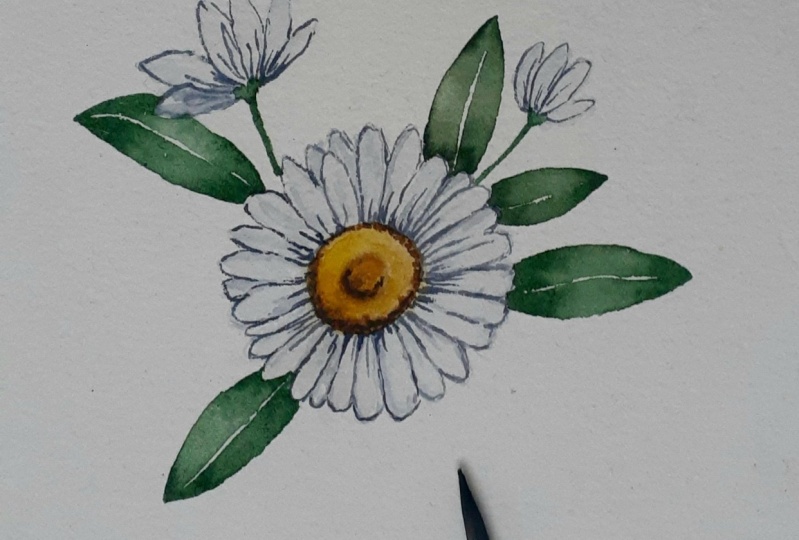
4. Painting Daisy Elements: In this section of the glass, I'm gonna show you how I will
be painting or DC elements. Go one-by-one and teach
you how I beat the pathos, the leaves and the
Center for flower. Sketches are also available in the resources section
of this glass. For the petals, I'm gonna start by creating a team mixture of light and applying a flat
wash as our first layer. I'm gonna wait for the first
layer to dry up to prevent. Once the first layer
is completely dry, I can now apply
the second layer. The second layer
will be composed of strokes using the milk mixture. As you can see, I'm leaving
out some Persians in spaces for the first day or two still appear representing
her highlights. Same process. I'm going
to wait for this layer to dry up before I
apply my third year. Once complete the guy it up, I'll be creating a
cream mixture and apply small stroke
is to add shadows, making the partitions and the ends of the pathos
more prominent. In adding the details
of using B or a milk mixture and create
some fine lines sort methods. Next up will be the leaves. I'll be teaching you the
graded wash stick neat. In order to do this, I'll first apply a
thick cream mixture on both ends over a leaf. And while it's wet, I'll pick up a clean
brush with clean water, blending it in the center. I'll be leaving a thin
line gap to serve as are beans and applied
the same thickness on the other side of friendlier. We were able to
successfully show a smooth blend or transition
from dark to light. This thick, neat
allowed us to create a beautiful gradient that's
still shows her highlights, mid tones and shadows. Now we move on with
the Center for flower. This is quite complex as we will be applying multiple layers and they started with it, the mixture of Hansa yellow. And while it's wet, I'm just dabbing
small amounts of permanent yellow deep
for an edit texture. Now let's wait for
this layer to dry off before proceeding
to the next layer. The next layer, I'll be adding the cream mixture for Ember. To add this. You can add a milk
mixture of yellow to show more color and
sat there for flower. Now it's time to
add the shadows. I'll be adding more browns for better your percentage Asia, the fruit dollar value. Once all of these layers
completely dry, OK. It stamp to add outlined
store out there in inner circle of the
center of our flower. I'll be creating a
cream mixture of America to add spots
around the two circles. Then apply clean
water to blend it, allowing the newly
painted spots to be. You can add a milk
mixture of yellow to show more color on the
center of our flower. There we have our p elements
are benthos, leaves, etc. You can now move onto
the next lesson.
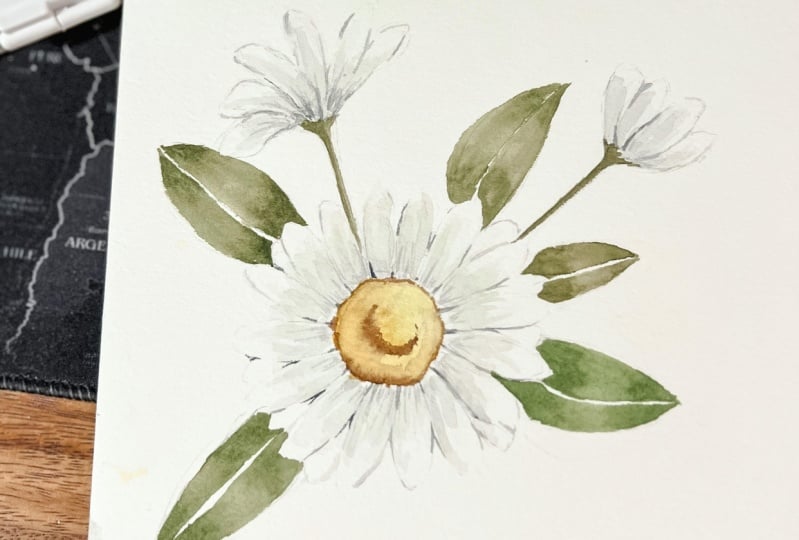
5. Painting Practice: Mini Daisy Illustration: For this portion of the class, I'll be showing you how it beats a minute illustration before you proceed to painting a
complex DC bouquets. This will serve as our
practice and applying our techniques to
create or DC elements. In this way, you won't
be too overwhelmed and we'll just focus first on
the media illustration. Sketch is again available in the resources section
of this class. Please ensure that the
pencil markings or life, as it may somehow appear in their artwork as we were
building loyalty and white. I'll start off with my
first layer composed of a theme mixture of applying
it as a flat wash on her bed. Well, waiting for your
first layer to dry up at transition to
painting the leaves first. Same with the previous lesson. We'll be using the
graded wash to show a beautiful transition
from light to dark. Don't forget to leave out a thin line gap before painting the right
side of the leaf. Then we'll proceed to apply a gradient wash on
the other side, I do recommend to use a smaller brush to
meet the ends with cream mixture to prevent yourself from googling
beyond the sketch, then use a bigger brush to
blend them with clean water. As you can see, this type
of technique allows us to have a smooth transition
between r3 tonal values, making the elements
appear more realistic. As we wait for your
leash or dry up, we can continue applying the same process on
the remaining leaps. Be cautious in painting these, as you may accidentally
paint on some of the petals. Once you're done painting
the leaves of barbecue, we can now add our second
layer for the benthos. For our second layer, I'll be applying a milk mixture and create them even strokes. Seen with what I've
shown earlier. I'm not gonna cover
the bed those entirely leave out species in some
parts from the first layer. This will allow us to retain
highlights door painting. I will be adding second layer with milk mixture on all the petals in the sketch. As we wait for this
layer to dry up, I will then jump into painting
the center of your flower. First step is to apply a team mixture of Hansa
yellow and while it's wet, gently dab permanent
yellow deep on the left side of both our
inner and outer circle. Make sure that you blend
these using bean water. As you wait for
decentered to dry up, we can go back to
painting the petals. I'll use a cream
mixture of paint to add some shadows and details. Basically add short
lines in the hands of the benthos To show
it's British Arts. This will somehow
gradually create an effect under foods
are for mythos. I will add small and fine
strokes using Tilt Brush, somehow like broken
lines that would serve as the outline
of her bed thoughts. By adding these strokes, we were able to get
really show the shape of her flower using broken lines is better than creating
solid lines for the outlines it to appear
mortgage of this thing. I'll do the same process in painting for the
smaller flowers. In order to add
texture in deepness, I'll be using milk
mixture and create that even strokes at
the Center for benthos. To make the shirts a thinner, use the tip of the brush
rather than its belly. Now let's go back to
the center for flower. It's time to add spots to both the inner and
outer circle and gently applying clean water
allowing them to bleed. I'm also going to apply
spots on the inner circle. Again, ensure that
you will be blending a good clean water for a
very smooth transition. We can add mortal
umber to add textures. Jumping into the stem. I will simply use your cream
mixture of under theory. I guess we're done with
our imine illustration. We can now move on
to the next lesson.
6. Painting a Daisy Bouquet: Now for the mark on V6 version of where
this illustration, I'll be giving you a
quick walk-through on the eight simple
steps that we have discussed from the
previous lessons. We will be needing a
new sketch which is also available in the
resources section and glass. Step one, start by
creating base layers. Faint all batholiths using
a great team mixture. And they all center of the DC flowers with Hansa
Yellow Deep mixture. To finish off your
first layer at the flat wash on the
smaller flowers as well. Step two. Well waiting for the
base layers are dry up. Start meeting the leaves using
the graded wash technique. Using a small brush. Apply your cream mixture
of undersea green on both ends and use a different brush with
clean water to blend. And don't forget to leave out the thin line DAP for the wings. Then do the same technique
under remaining deep. So for illustration, step three, applying midtone should apply milk mixture of
great to create your mythos, ensure that you leave out spaces for the first
player to appear, retaining the highlights
of her painting. Step four, I'd deepness to
the center afraid bases by dabbing milk mixture to permanent yellow deep around both the inner and outer circle. Step number five,
prepare cream mixture of undersea green to paint
the stems of red daisies. Ensure that your cream mixture to be able to show the
color of the stems. I suggest to use just the tip of the brush to make thinner
and small strokes. Step six, produce
fine details and outlines of your petals by
creating short strokes. Applied these shocks
in the end and the perdition of the petals to show shadows and distinction. You can also create broken
lines following your sketch. To create your outlines. You can follow how I painted the shadows and outlines
in this illustration. As you can see, I'm
just using the tip of my detail brush and painting
to achieve thinner strokes. Keep applying shadows
and outlines to add liveness and texture
to your bed boss. Step seven, add details
to the center by applying small brown spots around the inner
and outer circle. While it's wet. Blend it with clean water
to add more details. You can add more
ghettos and brought them birth to show
its actual color. Last step is to add
your finishing touches. Meet the petals
and the center of the flower appear
more prominent. By applying more
details and outlet. I'll be using a thick
cream mixture and added thought shift ivory black for the petals to appear
more prominent. Same with the center. This time, I'll be adding
a thicker cream mixture and then we're done. Proceed to the next glass for
final project discussion.
7. FINAL PROJECT: Before your final project, I'm going to put in some recommendations
that you can follow. First is to practice on creating the mixtures and individual
elements are for DZs. Next, as an additional exercise, you can follow my guides on being in amenities illustration. For your final project. Once you feel like you're ready for the mark of the subject, you can now follow my guide
on the step-by-step process. In a DC bouquet. You can also create bookmarks
like there we have it. Thank you and I hope you
learned a lot from this class. Don't forget to follow
me on Skillshare. Some reviews and upload your projects in the
project gallery tab so I can comment an APU and beating your own
DC illustrations. Once again, thank you and
see you in my next class.
 Tin Bejar, Watercolor Artist