Transcripts
1. Introduction: Hi friends. It's Lisa Hetrick. I'm so grateful you're joining me today for the skill share class. I am super excited to be sharing some fun, watercolor and ink techniques with you today. In this class, you will learn how to paint whimsical flowers with watercolor and inks that are bold and graphic and easy to paint. I'll walk you through each watercolor painting, an illustration technique demystifying the hell twos along the way. Before we start painting the final project together, you can paint beautiful, whimsical flowers that air radiant with color and happiness. Watercolor and inks are really easy color mediums to work with, and the possibilities are endless. There are so many things you can do with the work that you create. I believe we all need a bit of light, love and encouragement in our daily lives, and it is my intention to help you create more joy in your life. Through painting, may you find pause from the hustle, pure joy and inspiration here. I'm so excited that you're here. Let's get started and have some fun
2. Basic Supplies: So I'm going to get started by sharing some of my favorite supplies and maybe some alternatives for you. This is one of my favorite watercolor papers. It's made by arches, and it is a watercolor tablet, and this paper is hot press paper, which means it's a It's a very nice bright weight peeper, but and it is a glued onto a tablet, and it is a smooth, smoother surface than, ah, cold press paper that I'm going to show you next. But this is one of my favorites. The colors always show very vibrant on this paper, and it is easily accessible and readily available in most stores. Now here is another brand. This is by Kansan. This is the extra large water color tablet from cancer, and I really do like this £140 paper. It's a cold press paper. It's got texture on one side, and it is smooth on the other side, and it's a really good, economical, bright white paper to use for your watercolor projects. And another one of my favorites I'm sharing three today is this watercolor, um, paper from Strathmore. And this is another water color tablet that is from the 400 Siri's and it comes, um, in cold press and hot press. But I really like the cold press. They're cold. Press paper from Strathmore is a little bit different than the Can Seuin. It is a little less in the bright white category, but it is a really great peeper. Okay, so now we're gonna move on to talking about some of my favorite watercolors, and that's a liquid watercolor. My favorite brand is from Doctor Ph Martin's, and I'm sharing a couple different colors here that we're gonna be using in the project that I'm gonna be sharing along the way today. But I really love the radiant watercolors from Doctor PH. Martin's. And I also love the high dress watercolors from Doctor Ph. Martin's. I really love the qualities of liquid watercolor. They're very easy to work with, and they're very, very vibrant. This is also some India ink from Doctor Ph. Martin's. It's the Bombay Eat, and it works very, very well with the radiant watercolors. I also have two white acrylic, um, paints here. Wait, acrylic inks. Excuse me here, one from Della Ronnie and one from Ph. Martin's and I'm going to be using the dollar Ronnie today. Okay, here are some of my favorite brushes. Now, you can use any brush that you want for this project that we're gonna be doing today for some of my favorites. This is from the silver brand. These air, black velvet and I have a few brushes here. And the reason why I really like them is that they they hold a lot of water. So you never have to kind of get back into your water, the whole Pete. Really well. And there are really, really nice brush. I also love using water brushes, thes air from mental. They have a great reservoir and hold a lot of water, and they come to a very, very nice to tip. So these air great for on the go and I also use them a lot in the studio. This is my favorite white pen. This is from Unipol Signal. I believe this is the unicorn of white pens. And it doesn't amazing job of writing on top of your watercolor pieces in on, um, watercolor paper. So it's pretty awesome. Have a couple of other black pens here. This is a kopeck multi liner and then again, a pet pen. Tell Technica pen you really just need a waterproof pen. That's going to be great to draw on watercolor paper. All of the supplies I've shared here are in a handout in the your project section of the class. So head on over there and download she.
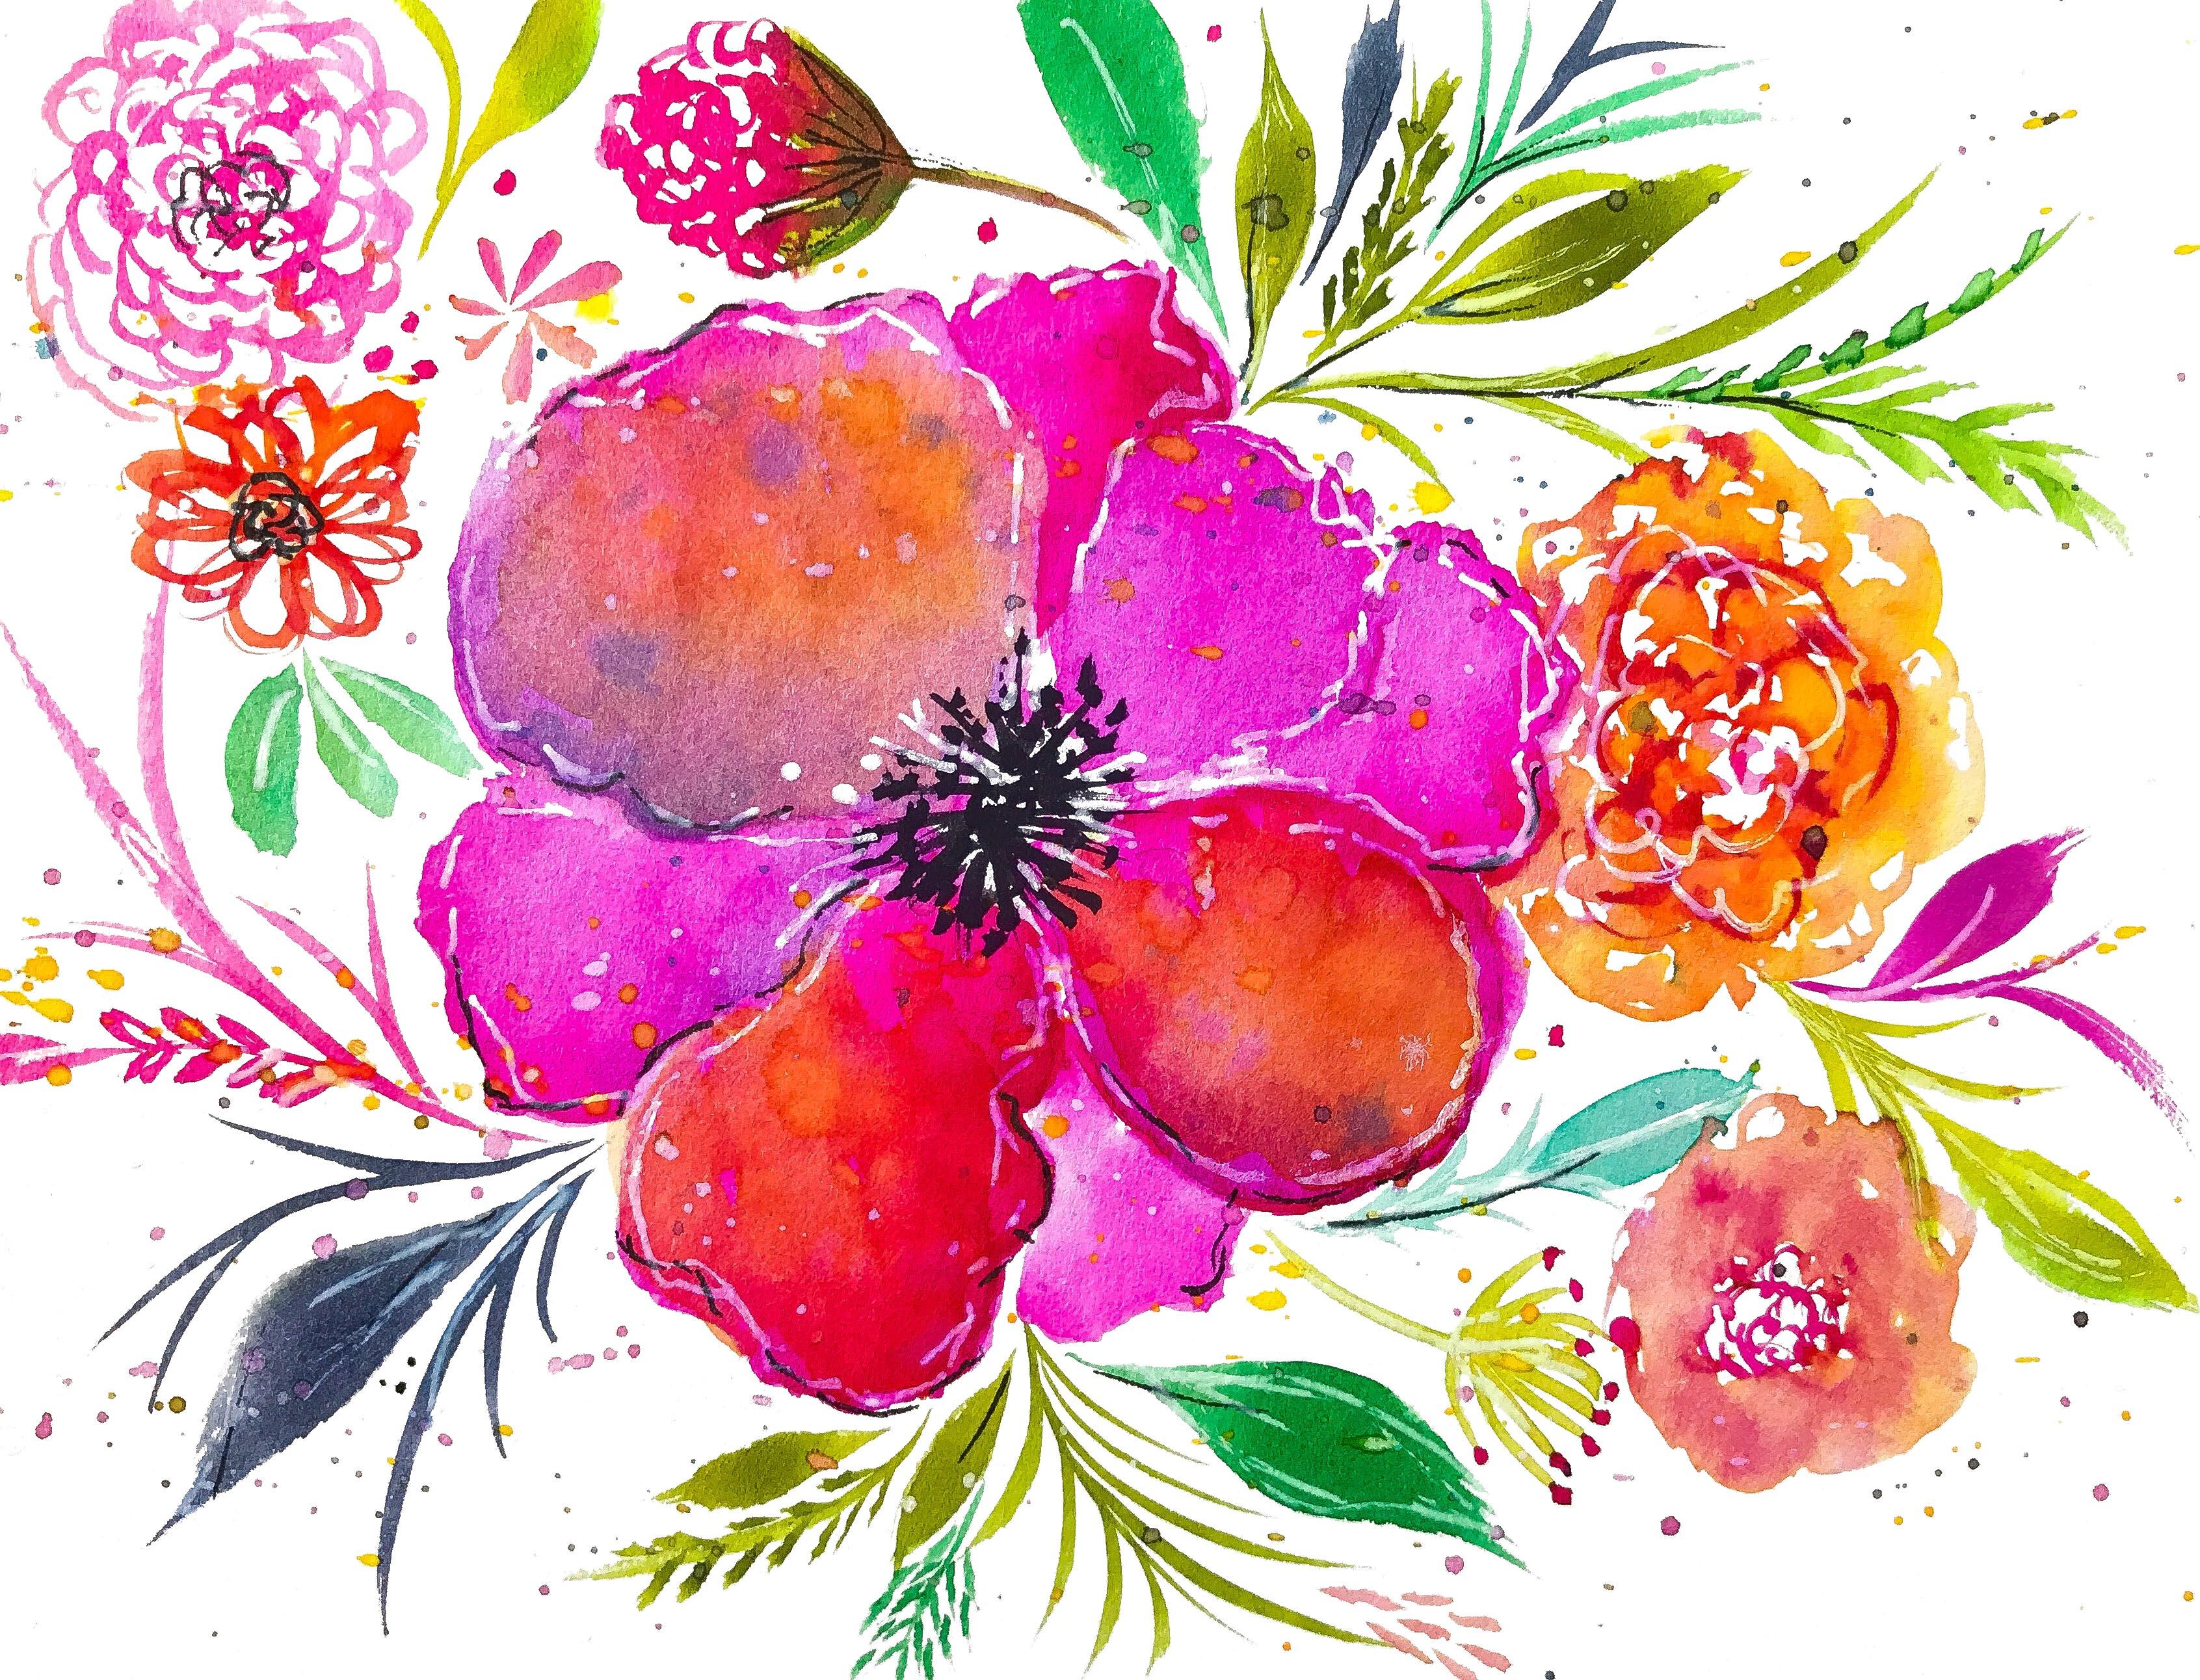
3. Class Handout + Reference: to make things a little bit easier. As we step through each technique for the watercolor process, I've created a download for you that's in the your project section and totally available to you to download onto some watercolor paper and follow through each video using this download with the techniques. So super simple. It's here for you. And it, um, may help simplify the process a little bit as we move to the project. So here is a sample of the final project that we're gonna dio. And I thought I would share a couple other samples of different kinds of old graphic watercolor projects using the supplies that were going to using today. Thes these projects are so much fun to do, you can tell I got a little bit excited there. The colors the Doctor Ph. Martin's watercolors that we're going to be using are so radiant. But remember, you could use any of the water colors that you may have on hand, and it'll work perfectly for this project that we're gonna dio. So let's go ahead and move on to the next step
4. Selecting Your Color Palette: So now let's move on to selecting your color palette for the project. So I have this porcelain plate here. It's a really inexpensive plate that I picked up a target. You can use anything that you're comfortable with for putting your liquid watercolors on porcelain plates work really well because the color flows really super well. So the's doctor Ph Martin's radiant other colors will flow really, really well on, um, a porcelain plate or any kind of plate. So we're gonna go ahead and I'm gonna go ahead and put the colors down on the plate. But here is the section on the handout that I have just kind of swatch doubt the colors that I'm going to be using. And when you're selecting colors for your project, I focus on using a lot of different pinks and oranges and yellows for flowers, and I will always pick like one green, this one I'm gonna be using olive green, wild rose, um, the the violet colors called cyclamen or cyclo mean and the, um, the tangerine color and then the daffodil yellow. And the reason why I like these colors is that they all are very complimentary to each other. And when I'm working with flowers, which I paint mostly I'm always using, I tend to use bright colors that are in the pink and the yellow families or the violet families. So there are a lot of amazing color mixing videos here on the skill share platform. Um, and I will be sharing a little bit more about color mixing with the Ph Martin's radiant watercolors in a future class. So for this class, I really just wanted to share some of my favorite colors and for you to kind of focus on some of the pinks and the violets and yellows and a little bit of the tangerines colors that are really super vibrant and fun for flowers and for florals. So I went ahead and swatch down that olive green color, and I think it's important to go ahead and swat your colors out so that you know what you're working with and so that you can, um, color mix on the plate as Ugo. So I have an olive green here, and then I have this wild rose color, which is ah, lot like, um, opera rose or really, really super bright, bright pink this cyclamen color is a really kinky violet color so it doesn't skew on the grape side of um, or the deep violet side has a lot more pink in it, so it's a really nice complimentary combination that works well with the Rose. Now this tangerine color is a fun. It's a very vibrant. It could be toned down and can kind of turn a little bit into a peach color as needed. But it's very, very easy to work with. And you're going to see along the way how I'm gonna use this peach and the staff Adele Yellow to really pop and make the cyclamen color and the wild rose super vibrant. And I'm also going to be mixing that olive green color along with the daffodil yellow in this back area of this plate. Teoh create like some yellow greens, so you really only need Thies, this small combination of colors to create a beautiful composition. So whatever colors you choose from your watercolor palette, just make sure there's something that are vibrant and fun and something you really want to play with. So let's go ahead and move into the next video
5. Painting Leaves + Foliage: Okay, so now it's time to start painting the leaves and the foliage. So if you want to follow along using that hand out, we would be using this section right here called brush strokes for the leaves and foliage. And I also have my sample in the download as well. So if you want to download that for references, well, the full color sample. Okay, so we're going to be using around tip brush. You can use a fore worst six or eight, but I really want to focus on talking about how they use the round brush and half the brush to do all the work to create the different leaf and foley and shapes. So I'm dipping my brush in here, and I'm using my four, um, brush in here and I want to show you how the tip of this brush is very comes to a really, really nice point. And I'm dipping it into my olive green and I want to show you a little bit about what I do . It's just kind of warm up my hand a little bit and you can hold the brush. Whatever is comfortable for you, I tend to hold it a lot of different ways, sometimes vertically, horizontally. Sometimes I hold it like a pen, But if you're holding the brush and you're moving the brush across the paper, you can let the tip of that brush really do the work, and you can get a lot of different thin and thick lines. And as you can see here, I started off with the really thin line and then pushed down on the brush to utilize the whole head of the brush and then brought it back up to create that organic leaf image. And no matter how you do it, it turns out different every single time. So it just takes a little bit of practice and in depending upon the size of the brush. So here's an eight brush. You're going to an eight round. You're going to get a different look and feel so with the eight round rush as I'm dipping it in here toothy um, to the olive green, you can see that I start to get a much wider brushstroke, and I'm just kind of playing around with the color a little bit here. So really, when creating these leaf images that are going to be part of the filler pieces to your your whole watercolor flower. Um, you're using your round brush, and you're just kind of using the brush and having it do all the work for you to create these different kinds of shapes. Now, of course, you could color in. You could naturally just create the shape of a leaf. But I think it's really fun and easy and kind of important to learn how to use the different brushes that you have, especially the rounds, because they come to a really nice point in a tip, um, to get different line weights and to get different shapes. So now I want to show you a little bit about creating more of the foliage that I create as filler images. And you can see here that I'm just really working with my hand, just kind of creating a natural when I call a flicking motion. Now you could do the flicking towards you. I tend to do the flicking away from me. So after I dip it into the color, I apply into the paper and I just use this flicking motion with my wrist and create that natural line. Sometimes it could be thicker. Sometimes it could be thinner. As you can see here, it's a little bit thicker because I pressed down a little bit more on my round brush to create that look and feel. So I'm flicking out to create that a long, gated line. And then, um, you can nest smaller flicks next to that elongated line to create that kind of fern like feel. Now, one of the things I want to point out here is that my brush is not. This is not a wet on wet technique where the paper is wet. My brush is really doing all the work and my brushes wet. So I'm varying the the amount of water that I'm using with my brush. So here you can see I did that nice, long flicked line. And then I'm just nesting smaller, um, teardrop like images next to that line to create another style of a fern image. And it's really super simple that round brushes, really doing all the work. But you can see that this is a really nice graphic approach, and in the final project you can see how it is ends up being a nice filler around the bloom . Yeah, I know. I showed a lot of the ferns in the green, but I went ahead and changed up the color a little bit in the rose and the wild rose. And this is really just kind of, ah, flicking motion that you're using with your hand in your wrist and you're really getting it kind of warmed up and loose and free. So sometimes people feel a little intimidated by just getting wild and free with their brush. But really, the brushes, the tool you were the person that's controlling the tool so you can do all of these techniques really easy easily by just letting the brush do the work for you. You can see here that I'm just nesting the side of the round brush in these little teardrop images and nesting them together to create another graphic fern like filler image. So feel free to practice these different techniques on that practice. Hand out before you go ahead and move to the next section, and the next section is going to be painting the rosettes, so let's go ahead and move on
6. Painting Loose Floral Rosettes: Okay, so now we're gonna move Teoh the loose floral rosettes, thes air, great filler flowers. And they're so simple to paint there really vibrant. And they can be interpreted to be kind of any kind of palm. Paul me late flower. And you can see here in this composition how I've just kind of added him around the main graphic flower, and they become a really beautiful color filler flour. And I have, um I use a round brush when I'm creating these. Or sometimes I use this, um, pen tell, um, water brush. It's a fantastic brush for doing these techniques, but really want to use a round brush with a really good nice find tip. You could use any round brush that you're comfortable with, and I always start with either like a yellow or the light color. So I'm working with the light color on the inside and kind of moving out to a little bit of a darker color on the outside so you can see me color mixing here a little bit. I've got a little bit of the yellow and a little bit of the cyclamen, mixing it together to just kind of um, create another color just playing around. So I dipped into the cyclamen, and you can. What I'm doing here is just kind of doing what I call brush dancing. So it's a little little tiny strokes of that are creating small, like half moon shapes there, like pedals from like the inside of the center of a flower. And then, as I'm working my way out here, I'm dipping into a little bit of yellow, a little bit of water, and I'm kind of using the paint that is already there in the center of the flower and just swooshing it out around the outer edges of the flower to start to build the outside of the flower. And again, I call this. This is Ah, this is not a wet, a super wet technique, but just the brushes wet. The paper is dry, and I'm working with a lot of the color that I'm already applying, that I've already applied to the center and just kind of working my way around the flower. So it's really densely colored on the inside of the flower with the violet, the cyclamen color, and as I'm working out and around, I'm dipping my brush and water and dabbing it down and then dipping it in color and just kind of using the whole head of the brush to swipe some color around to start to build that round puffy flower shape. So you start to get this rosette kind of feel, and these make amazing filler flowers in your floral composition. And as you can see, they're really, really simple to create. You need very, very little color, and you're just working from the inside out so you could start this with either a yellow on the inside and work your way out. But I like working using that, um, that deep violet, that cyclamen color or deeper violet and working my way out with a little bit of yellow to get some nice variation of color in the composition. So and you could do so many different kinds of color combinations of these little rosettes . But the technique is just brushed dancing. You're just kind of dab dab, dabbing the brush around to create this pom pom me like flour, and it is so super simple. You can see that these brush strokes are really, really easy to Dio and you're really just working with the paint from the center out. This technique is a lot easier than it looks that from the finished product, isn't it? So you really, really are just working with water, the Pete and parts of the brush to create this beautiful graphic flower that has a lot of texture and a lot of dimension. So let's go ahead and move on to the next video.
7. Painting Graphic Daisies + Buds: Okay, so we're gonna go ahead and move onto painting the daisies and buds, and these are graphic filler flowers as well. So here is the section on the handout for you to go ahead and practice if you're using the hand out for practice. Um, but you can see in the composition how I've added in thes little daisies and these little bits around the main graphic flower to help kind of pull it all together. So again, amusing the number four brush another round brush because I want to use parts of the whole head of the brush. And I really want to focus on using that tip of the brush. So I'm going to go ahead and, um, have been some water, and we're going to start with one of using the the very, very tip of the brush to create a more traditional looking graphic flower. And this time you're you're really illustrating these pedals with your brush. And again, this is a motion that we're all very much used to creating. We've doodles with this kind of technique. I'm sure you have doodled, but it's really easy and effective way to Pete. You're just making these little loops and nesting your loops together around in a circle to create a graphic daisy look. And this technique is again not a wet on wet technique, the papers not wet. Your brush is wet and you're applying color with your brush on and adding a little bit of color. Here. You can see that the daisy has already wet from the first round of making the loops. So I'm just going in and gabbing in a little bit of that wild rose color to get that vary Gatien and kind of two tone dimension of color without doing the color mixing ahead of time . Um, and just going ahead and doing them in the loops, the little Daisy loops. Okay, so now we're gonna move on to another form of the daisy by using the whole head of the brush and depending upon which size brush, your using will be the size of the pedal that you create here. So I've got this size for brush so you can see that my pedals are really a lot smaller. But you're just taking the holding the brush vertically and then laying it on its side to use the whole head of the brush to create that pedal look. And this this technique gives you more of a graphic filler flower that's not open line, like the other one that we just illustrated, um, and painted a mixture of open line daisy filler flowers and a mixture of these solid silhouette flowers that are solid color. Give your give your painting and give your composition a lot of variety and texture and are just really fun to create. You get a lot of little different kinds of things going on in your composition. So, just like with the open line Daisy, I'm going ahead and just adding and gabbing in a little bit of color to just get like that to tone. Look to that graphic daisy. Okay, so moving on to the buds, this is one of my favorite things to Dio. So in the last video we talked about doing brush dancing for the center of a flower. So when you're creating these buds, you do the same exact technique. You doing a little tiny half moons and kind of brush, dancing them into a little bit of ah, an ob along circle in one color and then we're gonna go ahead and add a little bit of the green stem to help form the bud around this little bud flower. These little flowers that you've created so really, it's just a cone shape that goes around the edges of the flower that you've created, and then a little stem that comes across the bottom and then just rolling. A little bit of that color down in this case have got a little bit of that cyclamen color that I'm drawing down into the olive green and creating that coon shape to just make it feel like there is a flower getting ready to bloom out of this. But and it's such a super simple things easy thing to paint your really just working with the brush dancing, creating these half little half moon shapes and creating this little cone with paint, adding a stem onto it. And it really does become a really nice filler flower for your composition. You can use all different kinds of colors to create these buds, and they make great filler flowers for your overall composition. So let's go ahead and move on to the next video
8. Painting the Whimsical Flower: So now we're going to move on to painting the graphic flour and layered blooms. So here's the section of the handout that you can practice this technique on, or you can practice on any piece of watercolor paper that you have, and we're going to go ahead and illustrate this flower and paint it. Now you could use a light pencil, or you could use a marker to kind of draw out these layers first if you'd like. But I would encourage you to just go ahead and use your brush and the very, very light, light wash of color to create these graphic blooms. So these graphic pedals and as you can see here, the pedals aren't uniform. They don't have any kind of symmetry going for them. We're just kind of drawing out thes huddles around in this circular shape to create this graphic looking flower. Now I'm not gonna lie. I know you're freaking out because in this kind of does look like a little bit of a hot mess. But we're not really going for realism here. We're going for creating ah flower that has a really big, bold graphic look. So this is just the beginning shape. And then we're going to start the layer and layer color on it, too, to give it definition. So using that really, really super super light color and you can see that I'm really toning down and watering down that wild rose with my brush and a lot of water. So I'm gonna go ahead in here and I'm applying color on that pedal and le I'm You can see that I am really watering down the color so that we're working on the first layer of color and this is called under painting. When you're working on the first layer, you're working from light to dark, and that's what we're going to do to build the different layers of this flower. So I'm just working around every other pedal and adding in that 1st 1st layer of that wild rose color really, really super wet brush and super wet washes of color. If I would have gone in with that wild rose and without a lot of water, it would be really, really dense and dark, and I don't really want that to happen right out of the gate here, so I'm dipping into that wild rose, washing this color down and laying in that first under painting of color, and you can see that now, the flower starting to get a little bit of shape to it. And I really just use that outline that I drew in with the painting at the beginning when it drew him with the paint as just my guidelines, very much so. Like I would of with a pencil. But again, if you're more comfortable with the pencil, you can do it with the pencil and use that as your outline. So now I'm going in and I'm adding in the cyclamen color. But one thing I want to note is that I made sure that the first layer of color was completely dried. You could use a heat tool to dry it off in between or just let it dry because it is very, very wet. And in order for this layering of color that you see here toe happen and get that definition between the pedals, you really have to make sure that your layers are dry in between. So I'm going in now with a with a wet brush but not as wet as it waas when I did the first layer and I'm dipping in the water and I'm dipping into the cyclamen color. And I am not doing long stroke painting of these blooms. I'm doing little tabs of color around the edges of the pedals so that the pedals can start to shape themselves and get definition. And you can see that some you start to see with this layering that some of the pedals air coming forward and some of the pedals air going backward. So we're starting to be able to create some definition between the different layers here. And I'm not painting the entire flower with that second layer of color. I'm just starting on an outer edge between the cyclamen and the wild rose, like right here. I'm doing the wild rose, and I'm dabbing that color it. Now I call this technique staining, So I'm dipping in my water. I'm I'm gabbing off and get it. Taking some of that heavy, heavy water off my brush. I'm dipping into the color and I'm just working in small sections and staining the paper to get that color. And I really like this technique because you're able to preserve the color of its underneath because it's already dry and it's not really moving. And I'm able to get some of that lights and darks that are happening. So there's some light color shining through the bottom because the of these transparent watercolors are beautiful for that. So right now, this is something I alluded to in the couple of videos back. I'm taking the daffodil yellow and I'm dabbing it on top of the wild rose color and I'm taking the tangerine here and I'm gonna dab it on top of the cyclamen color, and you can see that these two colors once I've layered them on top of the cyclamen in the wild rose you. It makes it pop, and you get even mawr texture and dimension with this color. So again, I'm just staining the paper a little bit and adding this color on top, and you can really start to see the pedals, get some more definition and start to get. You can see which peddles air coming forward and which peddles air going backward, and it's really starting to create the bloom, and it's very, very graphic approach. So beautiful color, beautiful color. So let's go ahead and move on to the next video for adding the details
9. Adding Details + Texture: Okay, so we're gonna go ahead and move on toe adding the details with inks and splatter and just really taking this flower to the next level and giving it that whole bold graphic look. So we're going to be using this acrylic white paint. Teoh. Add a little bit of density to the theblaze, um, that I've already created. So I went ahead and put some of this acrylic ink out on my palette, and I'm going to mix some of the cyclamen color in with the acrylic ink. Now you could use in a white acrylic Pete. You could use some white wash paint. You could use anything that you have that's white. But I really like this white acrylic ink because it's thinner and it's easier toe work with . It's not going Teoh, and it's matte finish. It's not going to be shiny on your project, so I've gone ahead in. I'm gonna also do this with the tangerine, and you can see that I am staining the blooms with a little bit of this color, adding a little bit of this ink to the different parts of the pedal. This ink that's mixed with the water color gives some of the pedals a little bit more of no opaque look to them. So I'm gonna go ahead and heat this up and just kind of make sure to dry in between before I move on to using the multi liner. Now, I could go ahead and use some water color to kind of paint in those center that center bud inside the flower. But for this, I'm using the kopek multi liner. You can use a Sharpie or any kind of black waterproof ink pen that you have, and I'm just doing a technique called Scrambling, which I'm just kind of doing these half moon circles and making the center of that flower okay, and it's super simple. We're just kind of doodling that in now. I'm moving ahead and using the unicorn of white pens, the Unipol signal, and I'm just going around the edges of the flower. And I'm kind of scratching that white color in to create a little bit more definition, and you can start to see where those pedals we're just pedals before are now becoming more like the whole flower. And there's graphic components that air starting to become more apparent because I'm using the white pan using the black pen and again right here. I'm using the black pen to kind of scratch in some color around the edges of the pedal. Is this meant to be really loose and really doodily like and take a look at this texture and dimension. Look at all that white of a pass ity that we've got there with that white paint. Um, wait acrylic ink mixed with the cyclamen color and the tangerine. So you've got a lot more texture and dimension than we had before with just the watercolor . Now here's my favorite technique ever. I love this because you could make a huge mess. I'm dipping my round brush and it's super super wet, and I'm dipping it into the different colors that I have on my plate and just, um, letting it splatter onto the whole bloom. And by doing this, I'm getting ah, lot of little dots that when they're dry, those colors are gonna mix with the balloon, and they create these really great extra tent texture and dimension effects that really make this whole composition kind of fun and really create that graphic. Look that we're going for with these blooms. I like to use the white a lot, and especially when the whole composition is done and you do this splatter last, it's really unpredictable, and it gives you a lot of really neat effects. So look at all the detail in the texture and dimension that you're able to achieve with adding just a few details to your final bloom. So let's go ahead and move onto the next video.
10. Painting Whimsical Flowers Project: So now let's paint some whimsical flowers, shall we? Okay, so here is an example of all of the techniques that we used in a composition that I painted . So we're going to move ahead and paint something very similar to this, But we're gonna work in a small format so that it feels a little bit less intimidating when we first get started with all the techniques. So this piece of watercolor paper is sized at foreign 1/4 by 5.5. So it is a smaller sized piece of watercolor paper. And, um, it's a lot of versatility to the size. And I'll talk a little bit about some of the different things you can do with your project in the next video. But let's go ahead and start to create our winds ical flower bloom. And I'm so excited. So let's get going. Okay, So we're going to move into the very beginning here and get started with painting the flower. So, just like I had shared in the video where we were learning about creating this flower, we're going to start with the under painting first. So I went ahead and, um, just kind of loosely drew with my flower, the the outline of the flower in the different shapes. And you can see that this flowers taking a completely different shape than the one that I had created before. So I started with the under painting, and now I'm kind of moving in, and this kind of got a little bit too much color there. But, um, really just kind of adding some of the first layers of color into this really big long qi bloom that I have created. So this is gonna be a really fun flower completely different from the one during the technique section. So this is the very first layer and just kind of carving out the different pedals with between the wild rose and the cyclamen color and doing the under painting getting that 1st 1st layer of color in. And I'm going to make sure that it's super dry and drying it off with the heat tool before we move to the next section of layering the color. Okay, so everything is super dry, and now we're going to start Teoh the glazing or the layering part of the pedals, and this is adding in the different layers of color to start to build the shape of the pedal. So again I'm working with the cyclamen color and the wild rose. And I'm working with not as much water as I did during the first under painting part, but just a little bit of water. And I'm taking some color and I'm staining the paper and you will notice again, just like we did during the technique portion of the videos. Prior to this one. I'm just adding the color and staining the paper but not drawing that color all the way across the pedal. So this is where it starts to add. A lot of the layering begins to add some texture and dimension, and the pedals are starting to come forward. We can start to see which peddles air coming forward and which peddles air going backward to create this whole composition of this bloom. And this bloom is really kind of walk. You looking that it's super fun, and it's going to be quite the graphic flower very different from anything that we've painted earlier in the other prior videos. So I went ahead and heat that up again and made sure it was completely dry, and now we're going to pop these pedals with color. So in the technique portion videos I shared how I use the tangerine color or the daffodil yellow color toe layer on top of these different pedals, to hop those colors that air underneath and again this part of the technique. And because this flower is pretty big, you can start to see how layering that daffodil or the tangerine color really starts the change the pedals and it's really popping all of those different layers. Okay, so now we're going to move on to using some of the white acrylic ink on these pedals to create a little bit more texture and dimension, and again, a little bit more of a no. Paige, look to certain areas off this flower, this wonky, wonky flower. So I'm adding a little bit of that acrylic ink in with wild rose and the cyclamen, and I'm staining different parts of the pedal with this layer, and the layers underneath it are super dry, so this white acrylic ink is laying on top and creating a lot more texture and dimension and helping again helping with some of these pedals. to pop forward and some of the pedals to pop backwards. So we're starting to get that whole bloom shape by adding another layer of texture. And this white ink is perfect for that, um, mixed with the water color. It also blends really, really super well on the pedals and you're going to see in the final composition how much texture this white ink adds to the project, and it because it's so fluid. It's really blends well but adds a lot more a pass iti to the flower. Okay, so we're gonna go ahead and move on to adding the leaves and the foliage around the flower to start to build this whole composition on this piece of watercolor paper. So I'm using the tip of the brush to flick the color out and create these long grass like looking, um, pieces. And then I'm also using the whole head of the brush to create the leaves that are shooting off the flicked foliage pieces. So I'm going to keep doing this around different parts of the flower, just flicking out some long lines and then adding a little bit of those using the head of the brush and using a parts of the brush to create that fern like feel from the different techniques that we used during the leaves and foliage part of the video during the technique section. So I'm just taking all of those different techniques that we did there and just using them all together around the flower. So lots of flicking lots of using the whole head of the brush to create, to create the leaves, changing up the colors and using a little bit of the tip of the brush to create some more filler parts around this composition here. And this is just so fun to do easy to do. And it comes together really, really quickly. Okay, so now we're gonna move on to painting the filler flowers, and we're going to start with the rosettes. And as we learned earlier in the other video, um, technique section I'm gon head in here and created those half moon shapes and using the brush to dance around the paper to create that rosette look and feel and just pulling that color out from the center. And the really cool thing about this is you can create different kinds sizes of your rosettes and have gone in and done done. A couple of those loopy, loopy daisies and used also use the brush to create some smaller daisies. Now you can see that these daisies create kind of graphic approaches to the look and feel of the composition, but also are really, really great for filler flowers. And I'm changing up the colors and adding, creating another little rosette here and there and also creating the bud, um, to attach to the whole composition and just working my way around the flower, using all of the different techniques that we learned in the leaves and the foliage in the days east section, creating whole leaves with the whole head of the brush and really letting that brush dance around the watercolor paper to create these really, really beautiful filler flowers. And you can see slowly but surely the whole composition comes together, and it has this really neat graphic and layered look and feel to it that makes it really super fun. Okay, this is my favorite part of the whole composition, and that's adding the details. So I'm starting in the centre of the flower using the black pen and just creating that whole center portion of the flower, scrambling around, creating these little circle shapes with the black ink and then going around the edges of the pedals with the unicorn of white pens. The Univ. All signal white pen. And I'm also going to use that white pen around the different graphic flowers and the leaves and the foliage. And I'm just kind of scratching it in, sort of doodling it and really loose and really free, just like I'm doing right here with the black ink. And this. Using these inks on top of the watercolor and using them in this doodle like fashion and just kind of scratching him in, really creates a super super graphic look to it and just adds a whole nother layer of texture and dimension. Okay, I know I said the part before it was my favorite part, but I really love this part. I know I shared that before, but adding the splatter and this is sort of like the final finishing touch to the composition, but really adds again, more texture and more dimension. It kind of makes it a lot more fun, and I'm starting in first with the white acrylic ink and just kind of splattering it on by tapping that round rush on my finger and letting that color just kind of freely dispersed all over the composition. And then I'm adding some more color by going into the yellows and the tangerines. Everything's already still a little bit wet from me painting, so when we add the splatter in, it just kind of mixes with the water that's there and you really, really end up with a beautiful graphic look. So I hope you've really enjoyed this tutorial. This is the final results, these big graphic watercolor blooms and on this smaller format piece of paper, watercolor paper, you really get the feel for the whole composition. Um, and look at this, the color so vibrant and it's really, really was a pleasure and Superfund to paint with you.
11. Thank YOU + Final Thoughts: Thank you so much for joining me for the painting. Whimsical flowers class. I really, really enjoyed sharing this with you. Here are some samples of projects that I've created with the supplies that we've used in this class. And I really, really encourage you to share your project with me in the your project area. And don't hesitate to reach out to me if you have any questions along the way. As you start to, um, try out the techniques and I hope you really, really enjoyed this class. I am super excited to be sharing more classes here on the skill share platform, more watercolor classes, more painting classes and different things to help you create more joy in your life. So I hope you're having a wonderful day and I'll see you next time. Thanks so much for watching
 Lisa Hetrick, Watercolor Artist + Surface Designer