Transcripts
1. Welcome To The Class!: Hello, everyone. My
name is Will Elliston. And today, we'll be painting
an atmospheric city scene. Cityscapes might seem
daunting or complex at first, but don't worry because
I'll guide you through a very enjoyable and
relaxed approach that might just make it
easier than you think. Even if you don't want to
paint the project yourself, you'll learn a lot through watching and the
information I share. We'll focus on loose
expressive brushw to suggest detail without getting
bogged down in perfection. Use simple techniques
like wet on wet blending, soft washes, and lifting to create
reflections, light, and movement without needing to paint every
single tiny detail. So whether you're an
experienced artist or you think this class is a
bit too ambitious for you, it's all about having fun
and capturing the energy of a city in a way that feels
effortless and natural. I've been a professional
artist for many years, exploring lots of different
subjects from wildlife and portraits to cityscapes
and countryside scenes. I've always been entranced by the possibilities of watercolor. When I started, I had no idea where to begin or
how to improve. I didn't know what
supplies I needed, how to create the
effects I wanted, or which colors to mix. Now I've taken part in many
worldwide exhibitions, been featured in magazines, and been lucky enough
to win awards from well respected
organizations such as the International
Watercolor Society, the Masters of
Watercolor Alliance, Windsor and Newton, and the SAA. Watercolor can be overwhelming
for those starting out, which is why my goal is
to help you feel relaxed and enjoy this medium in
a step by step manner. Today, I'll be guiding you
through a complete painting, demonstrating a variety
of techniques and explaining how I use all
my supplies and materials. Whether you're just starting out or already have some experience, you'll be able to
follow along at your own pace and improve
your watercolor skills. If this class is too challenging
or too easy for you, I have a variety of classes available at different
skill levels. I like to start off with a free expressive
approach with no fear of making mistakes as we create exciting textures
for the underlayer. As the painting progresses, we'll add more details to bring it to life and
make it stand out. I strive to simplify
complex subjects into easier shapes that
encourage playfulness. Throughout this class, I'll be sharing plenty
of tips and tricks. I'll show you how to turn
mistakes into opportunities, taking the stress out of
painting in order to have fun. I'll also provide you with
my watercolor mixing charts, which are an invaluable tool when it comes to choosing
and mixing colors. If you have any questions, you can post them in the
discussion thread down below. I'll be sure to read and
respond to everything you post. Don't forget to follow
me on Skillshare by clicking the Follow
button at the top. This means you'll be the
first to know when I launch a new class
or post giveaways. You can also follow me on Instagram at Will Elliston
to see my latest works. So let's get started
with learning exciting watercolor
techniques and how we can use them to create your own expressive atmospheric
city scenes. Let's get started.
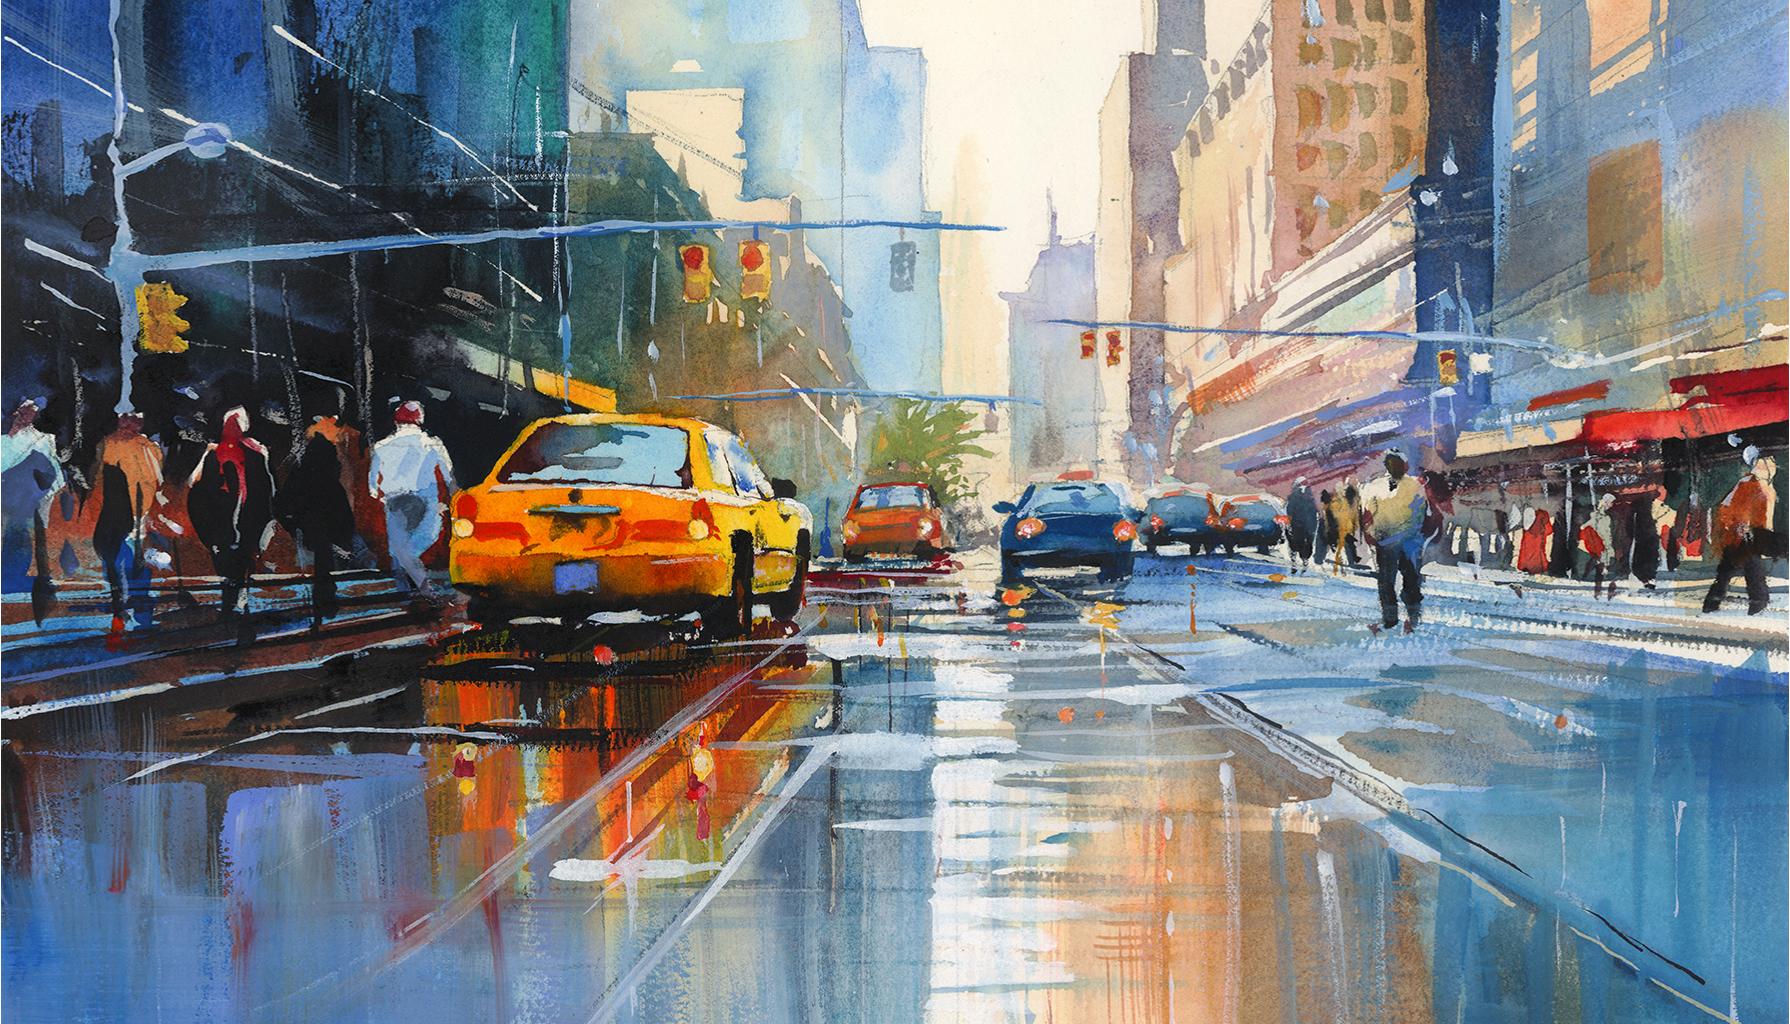
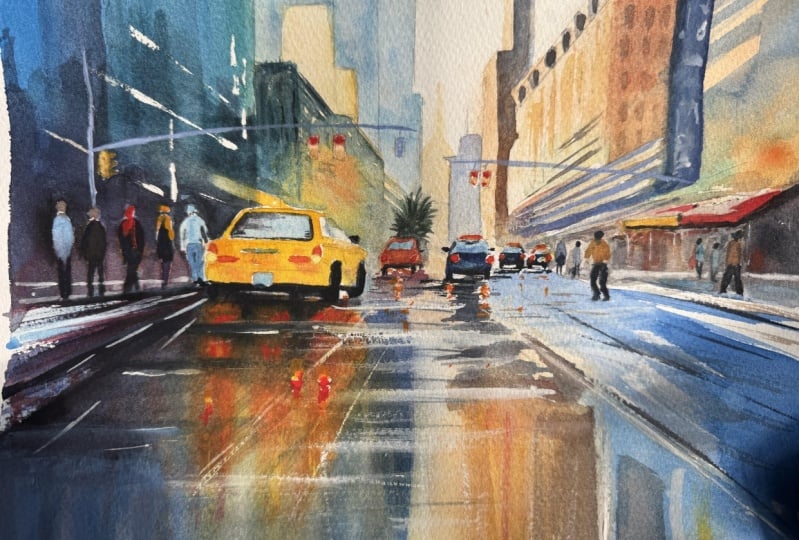
2. Your Project: First of all, thank you very much as always, for
choosing this class. Today, we'll be painting a very expressive city
scene that allows us to enjoy the expressive
nature of watercolor without worrying about all
the minuscule little details. What I love about
city scenes is that they don't have to be
perfect to be powerful. In fact, the best
urban paintings are the ones that feel loose
and full of atmosphere. We'll embrace the
magic of watercolor, letting the paint flow, blend and create beautiful
unexpected effects. This project is designed
to be approachable and fun with techniques that can help you suggest
detail instead of painstakingly painting
every single thing. To help create reflections
with easy flowing brushworks or how to imply figures or paint buildings without
overcomplicating things. Even if you've never painted
a city scene before, you'll be surprised
at how quickly things come together when
you focus on shapes, light, and movement
instead of tiny details. In the resource section, I've added a high
resolution image of my finished painting
to help guide you. You're welcome to
follow my painting exactly or experiment with
your own composition. As we're going to be focusing on the painting aspect
of watercolor, I've provided templates
you can use to help transfer or trace the
sketch before you paint. It's fine to trace when using it as a guide for
learning how to paint. It's important to
have the underdrawing correct so that you can relax and have fun learning the
watercolor medium itself. Whichever direction
you take this class, it would be great
to see your results and the paintings you
create through it. I love giving my
students feedback, so please take a photo
afterwards and share it in the student project
gallery under the Project and resource tab. I'm always intrigued to
see how many students have different approaches and how they progress with each class. I'd love to hear
about your process and what you learned
along the way, or if you had any difficulties. I strongly recommend
that you take a look at each other's work in the
student project gallery. It's so inspiring to see
each other's work and extremely comforting to get the support of your
fellow students. So don't forget to like and
comment on each other's work.
3. Materials & Supplies: Before we get started
with the painting, let's go over all the materials and supplies you'll
need to paint along. Having the right materials can greatly impact the
outcome of your artwork. So I'll go over all the supplies I use for
this class and beyond. They're very useful to have at your disposal and will make it easier for you
to follow along. Let's start with the
paints themselves. And like most of the materials
we'll be using today, it's a lot to do
with preference. I have 12 stable colours in my palette that I
fill up from tubes. They are cadmium
yellow, yellow ochre, burnt sienna, cadmium
red, Alizarin crimson, Opramarne blue, cobalt blue,
serlean blue, lavender, purple, viridian, black, and
at the end of the painting, I often use white gouache
for tiny highlights. I don't use any
particular brand, these colors you can
get from any brand, although I personally
use Daniel Smith, Windsor and Newton
or Holbein paints. So let's move on to brushes. The brush I use the most is
a synthetic round brush like this Escoda Purl brush
or this Van Gogh brush. They're very versatile because
not only can you use them for detailed work
with their fine tip, but as they can hold
a lot of water, they are good for
washers as well. They're also quite affordable, so I have quite a few
in different sizes. Next are the mop brushes. Mop brushes are good for
broad brush strokes, filling in large areas and creating smooth
transitions or washes. They also have a nice tip that can be used for smaller details. But for really small details, highlights or anything
that needs more precision, I use a synthetic
size zero brush. All brands have them,
and they're super cheap. Another useful brush to have is a Chinese calligraphy brush. They tend to have long bristles
and a very pointy tip. They're perfect for
adding texture or creating dynamic lines
in your paintings. You can even fan them
out like this to achieve fur or feather
textures as well. And that's it for
brushes. Onto paper. The better quality
of your paper, the easier it will be to paint. Cheap paper cuinkles easily
and is very unforgiving, not allowing you to
rework mistakes. It's harder to create
appealing effects and apply useful techniques
like rubbing away pigment. Good quality paper, however, such as cotton base paper, not only allows you to rework
mistakes multiple times, but because the pigment
reacts much better on it, the chances of
mistakes are a lot lower and you'll be more likely to create
better paintings. I use arches paper because that's what's available
in my local art shop. A water spray is
absolutely essential. By using this, it
gives you more time to paint the areas you
want before it dries. It also allows you to
reactivate the paint if you want to add a smooth
line or remove some paint. I also have an old rag or t shirt which I use
to clean my brush. Cleaning off the paint
before dipping it in the water will make the
water last a lot longer. It's always useful to
have a tissue at hand whilst painting to
lift off excess paint. Also, you never know when an unwanted splash or drip might occur that needs
wiping away quickly. I also have a water dropper
to keep the paints wet. When you paint, it's
important to have them a similar consistency to what
they're like in the tubes. This way, it's easier to
pick up sufficient pigment. A hair dryer is useful
to have for speeding up the drying time and controlling the
dampness of the paper. And lastly, masking tape. And this, of course, is just to hold the paper down still onto the surface to stop it sliding
around whilst painting. Also, if you plan on
painting to the edge, we'll allow you to create a
very crisp, clean border. And that's everything that
you need to paint along. I, of course, encourage
you to explore and experiment with any medium or technique or colors you want to use to make
this painting truly yours. Now, let's get on and
start the project.
4. How to Sketch It Out: So the first thing we're going
to do with the sketch is add a horizontal line
straight through the middle, just so that we can keep
everything parallel to that horizontal and another one vertical so that we know
what a true vertical is. And in the middle
where it crosses, that's going to be
our vanishing point. So we can do a few
more diagonal lines coming from that central point, and we can use that to help define the perspective
of the painting. And now I'm going
to start adding the basic shapes of the cars, which are just circles
for the time being. And we're going to
use those lines, those diagonal
lines as guides for the perspective of the
buildings and of the figures. You can see these figures are
just spheres at the moment, just stretched out circles, just keeping everything
simple to begin with. Whenever I draw a vertical line, I try and match the sides of the paper and that vertical
line in the center, make sure everything is perfectly straight
because otherwise, if the verticals off, then it can feel a bit disorientating. And you can see how when I'm
drawing this car, roughly, that I'm following that
line to the center, the horizontal vanishing
point in the middle. It's quite a simple
perspective this drawing. Even though there's lots
of elements going on, the perspectives quite simple
because it's dead center. So whenever you want to draw
the line of the building. If it's not horizontal
or vertical, it's aiming straight
towards that central point. That means that the cars
directly in front and the center are basically we're seeing it
from the rear view. There's no perspective
per se on them. And then as the cars go out
and as the buildings go out, there's a bit more
perspective to them because it's further away from
that vanishing point. And whenever I'm adding a shape, I try and match that
vanishing point. I have in my mind's eye
that point in the center, and everything is kind of focusing in on
that point there. And this drawing stage, the sketch is the most
foundational part, really. You need to make sure
that the sketch, even if you use the trace, the tracing template is
accurate because it's the skeleton in
which the whole of the painting is made from. So if that's wrong, it'll make
the painting much harder. Oh
5. Applying Masking Fluid: So now I've taken all the time I needed to get the drawing as refined as possible because
that's going to help me much more with the painting. If everything's loose
with the drawing, then there's no way I can
make sense of it once the chaos of watercolor
gets involved. So I made sure everything
was pretty much correct. Just the outlines of things. And now I'm going to start
applying masking fluid. Now, you don't necessarily
need to use masking fluid. You can use white paint or gouache at the end of any color
to bring back the lights. Also, you could cut off a bit of masking tape if you
don't have masking fluid. But I just use a toothpick
just to get in some of these difficult areas that are quite fine. I
don't use a brush. I use a toothpick or something. And I won't go over the whole of the masking
fluid in this video. I'll just jump to the painting after I've applied all
of it so you can see.
6. Light Tones: As a general rule of watercolor, we paint from light to dark. Of course, we can always
break the rules once we've mastered the fundamentals
and we know how to fully manipulate the medium. But to keep things simple, painting from light to dark is a good step and
strategy to have. So I'm starting off light looking and thinking
in my composition, where do I need to
paint an underlayer? And actually, if you want to go a step further
before the underlayer, we've got to think
about where we might want to keep the
white of the paper. Of course, we've
used masking fluid to pick a few highlights out and that will maintain
the white of the paper. But actually, I
think I'm going to keep the sky itself,
the white of the paper. I'm not going to paint
any blue in this. So that'll have a nice contrast with the deep darks we'll
add at the very end. So I've just mixed
a yellow ochre to begin with, a yellow ochre. But I've dirtied it up
a bit with a bit of burnt sienna or even a
bit of neutral tint, because the pure pigment here that I'm using
is a bit too vibrant, so I have to tone it down a bit. And I've pre wetted
the sky area, even though you can't see
it because it's pure water. Where the left building
touches the sky, I've just made the paper quite damp and I'm allowing
the water to soak in a bit. Of course, on this
right hand side, there's a hard edge where this brown building meets the sky, but I'm going to have a kind of wet on wet edge
on the other side. So I'm mixing that burnt sienna with a bit of yellow ochre. And I'm starting to just dab and you can
see where I've wet the paper and it's just
flowing out by itself. With this underlayer stage, it's the easiest part really because we're not
really adding details. We're just adding
expressive color. And I'm making sure
I'm not painting into these cars and taxis and
figures at the moment. I'm just blocking
out the buildings. And I'm not using a
small brush either. I'm using a Chinese
calligraphy brush, but you can use a mop brush. It doesn't really
matter as long as it holds enough pigment and you can get nice broad brush
strokes rather than having to use
a small brush, which means you're topping
up the brush all the time and creating sharp lines rather than big broad lines. The street is going
to be quite wet, so I got to be aware of the
reflection that I'm painting. The reflections will
be more distorted, so it allows us more freedom, and we don't have to be
so strict on ourselves. But basically, the reflection
is we're mimicking the top. But we can be very abstract
with reflection, and really, we're going to have fun expressing watercolor
later on with the reflection. We're not going to be so
direct with the details. So now that I've let the water
soak into the sky a bit, I can apply a bit
of pigment there, and you can see that it just has a bit of a soft edge there. It's very subtle, and that's
all it needs because I don't want a big contrast between the buildings and the sky in the background
in the distance. I don't want it to
be too jarring. You can't paint every single
detail because there'll be nothing to focus on and
it'll be too overwhelming.
7. Adding Blues: Because when we look
at a cityscape, there's lots of details. There's so many windows. I'm not counting out every
single brick and window. I'm just trying to get
the general shape. As long as you have the
main elements correct, color, light, and atmosphere, then
everything comes together, and atmosphere is, of course, quite a general perm. And what do I mean
by atmosphere? Really, I'm talking
about whether they're soft edges
or hard edges, whether it's a low key painting
or a high key painting, all of the things that I'll talk about later in the class. But at the moment, you
can see we're just doing an underlayer and it's all
pretty much the same color. It's like a burnt orange color. And I've specifically chosen
this burnt orange color because we'll have strong
blues later in the painting. And these strong blues, when contrasted
against this orange, they'll compliment
each other because they are complimentary colors. Burnt Sienna is, of course, an orange, a burnt orange. I'm already applying some
blues right now just lightly. And in between blue
is purple and green. So sometimes I'm mixing a bluish green or
a purplish green. When it comes to thinking about
what color I want to add, I'm trying to think of it in context to the
rest of the painting. For example, I'm not going to add a bright pink at this stage because there's nothing that yet connects the pink
to the painting. And when I'm adding
this purple and green, I'm influencing blue
into it because blue will be a dominant
color later on. So I'm allowing it to be
connected in that way. So I've dried it off completely, and now I can start
doing some other under layers like some of
the blue underlayers. I'm using just serlean
blue at the moment, and I've got my Vidian green. I'm going to use this blue
to paint the windscreen, the back windscreen
of this taxi. Notice how I've changed
to a smaller brush here because I'm not doing
big broad strokes now. I'm painting smaller shapes. So you change your brush or your brush size depending on the size of the shape you're
painting on your canvas. I need to make sure
these lines are very specific because
this is going to be a bright yellow
taxi, hopefully. And if I overlap the
windscreen on that car, where it's meant to
be yellow because of the translucent
nature of watercolor, the vibrancy of the
yellow will be lost. Likewise, later on, when I
paint it with the yellow, I'll have to be
careful not to go over onto the blue
of the windscreen. These cars in the
distance, however, can be a bit more broad because I don't think I'm going to
paint them yellow. I'm not sure what color I'm
going to paint them yet. They'll probably be a
darker, muddier color. It's just that main car on
the left that's going to be the highlight, really. A
8. Painting With Spontaneity: So this is one of
those paintings that's actually quite difficult
to paint step by step. You can, of course, try
and these early stages, at least with the underlayer, where you can follow
along bit by bit, you can follow step by step. But eventually, as we transition into the more
expressive side of the painting, the looser style, then it
becomes less predictable, and we have to rely on
spontaneity, which, of course, is impossible to follow step by step because
what might happen in my painting will be different to what
happens in yours. Because we allow ourselves to be spontaneous with
watercolor and by forcing water to do what we want rather than allowing the watercolor to
do what it wants, we kind of lose the magic of that medium of what makes
this medium so special. So you could technically
paint exactly step by step. You could scrub out
your spontaneity and make it match mine, but the magic will be
lost if you do that. So it's your choice which way
you want to use this class. Of course, by being
more spontaneous, it is more risky. It's also more scary because you don't
know how it might go. And there's always an ugly
stage of a watercolor painting where you don't know whether
it'll come together at the end or wherever it
won't maybe it will. But it's definitely the
right direction if you want to learn how to embrace
the looser style, the more expressive style of watercolor and
your painting will be much more unique if you
follow that spontaneity. That's why I think
it's more valuable to have this footage slightly
sped up so that you can better see how I'm trying to manipulate the
pigment rather than you actually having to
pause every second and follow every single action I
take to complete accuracy. So whilst going
through these stages, I'll try and explain
what colors I'm using and what exactly
I'm trying to achieve. But it become when we get into the more
expressive stages, I'll talk more about the
fundamental concepts that will allow you to paint
in this kind of loose, spontaneous way,
spontaneous way yourself. So whilst I was talking there, I continued with
the serlean blue. I changed back to
my larger brush, and I mixed this cadmium yellow with a bit of red to
make it slightly orange. And I was very
careful when adding this yellow because I don't want it to completely
merge with the blue. So I made sure the edges
were were a bit damp, not completely wet, not
completely dry either. I don't necessarily want
there to be hard edges, but I don't want them
to run into each other. I took a bit of
precaution to make sure that the yellow didn't
mix with the blue, otherwise, of course,
it would make a green, which I'm not
really looking for. Taking back this
Cerlean blue and applying a lot of
it in the top left. Bit of purple as well. I'm making sure not to go over the people quite
yet, the figures. Notice how I started off
with the pure Cerlean blue. And then to the left, I influenced a bit of purple, and to the right, I
integrated a bit of green. So I'm trying to make
the wash a bit more interesting than just
a pure single colour. Mixing red. Actually, that's a
pure cadmium red, and I'm applying it
onto that wet yellow. I didn't do it straightaway
because it was too wet before when I
applied that yellow, and it would have just spilled out and made the
whole thing red. But waiting a bit, waiting
for the paper to dry a bit, it maintains the edge a bit. An wet on wet edge.
9. Large Shapes First: Mixing a bit of lavender. This lavender is Holbein, but I know Daniel Smith
also do a similar lavender. It's a bit like a gouache
because it's opaic. It's not very translucent, when you paint over the top, it really blocks out
whatever's underneath it. And even though
things are getting a bit more complex now, I'm still keeping to
the same strategy. When filling out these shapes, I'm either painting
completely vertical, completely horizontal
or following that line to the horizon
line in the dead center, that diagonal line that reaches that vanishing point
in the middle. And even at this stage, when you look at the actual
shapes and the marks, they're nothing in particular. You can't necessarily
see buildings there, but we're kind of
implying it bit by bit. I've added those little
rectangles in perspective. Maybe they're
billboards or something or awnings or signs on the top of shops and I'm
painting them to the edge. I'm not actually
painting over them. Now, starting on
this right hand side of the ground, I'm using again, lines that point towards
the direction of the middle and all these lines just draw
the focus into the middle. They help the viewer or
help guide the viewer. Then here's a pure vertical
line that mirrors the top. So it's quite random where
I'm adding these lines, but as long as they're either pointing towards that
vanishing point or they're purely vertical or purely horizontal, it
should make sense. I'm even painting reflections of buildings I haven't
yet painted up above, and I have to be wary
because there's a gap in between the buildings
in the middle where the white of the
sky comes through. I need to make sure
in the reflection I maintain that white strip
of light in the middle. Now, you can use a mop brush. The reason I've decided to
use this is purely because I like to experiment
with different tools, and I encourage you to try
out different brushes, different colors, different
techniques all the time. I'm still doing
that, and this is one of the first times I've
used this kind of brush. And I'm finding in the
process of painting it, painting with it, its advantages
and its disadvantages. I like the fact that it
holds a very fine point, so I can fill out a lot of area whilst also maintaining
a nice, fine point. And by tilting it, the hairs are quite bouncy, so I can put a bit of pressure and create a nice
little sweeping hard edge. As we're painting over this
second layer of the building, you can see we did that kind of brown underlayer to begin with, and now we're painting
on top of that. And I'm not necessarily
thinking in terms of three D. I'm looking at my references, and I'm trying to
simplify it into a shape. Basically, it might
be an abstract shape, but this blue washer
that I just painted, is one single shape.
10. Colour Harmony: The eye is very good
at detecting colors. When you go outside
or look around your house and you seek out
something that's green, you'll automatically pick
out everything that's green. And then if you shift red, you'll only see what's red or likewise have blue or purple. And you can do this
when you paint. If you're looking at
this painting now, if you just focus
on the blue colors, you can actually see that
they're independent shapes. So you just match
those shapes and then as they come together, they create the
illusion of depth without even
thinking about that. Particularly with these
buildings in the background, I don't want them to be too
dark because things that recede into the distance
have air pollution. So there's particles in
the air that make them softer and not as dark
because the contrast is less. The atmosphere in the air
makes that contrast less, and that's how we
create that atmosphere that atmospheric perspective. So as we move closer
to the foreground, we're going to make
it a bit darker. That's what I'm going to do now. I'm going to get this burnt
sienna, a bit of red. Then I'm going to add a bit of blue into this to
neutralize it a bit. This brown is a bit too potent. With everything blue around, it looks a bit out of place. It's adding a touch of blue brings it into
unity a bit better, unifies it, connects it well. Even though you can't
necessarily see the blue in it when it's mixed
with that brown, it's more like a gray. There's a nice transition
of blue at the top. Then it kind of goes to a bit of a grayish purple and then brown in the middle. And then as we go down to the bottom,
it gets a bit darker. Keeping those verticals
nice and clean. Then painting in
some suggestions of windows using that same
grayish kind of color. A few fine lines there, which could be interpreted
as windows as well. Making a bit of a redder color, adding a bit of that
camium red into the mix. O. I can't really explain
what I'm doing now. I'm feeling it and purposely
trying not to overthink it, trying to imagine in my mind's eye what
makes sense rather than rationally thinking
about windows or bricks, thinking about shapes and
how they work together, thinking about the temperature of the paint I want to use, and then the tone of it, whether I want it to be lighter or darker than what's around it.
11. Simplifying Complexity: So whilst I'm painting in
these nondescript details, let's talk a bit about
simplifying complex details or complex scenes and how to imply
details instead of having to paint every single little
thing you see because, of course, when painting
a busy cityscape, it's easy to be overwhelmed by the sheer amount of detail, the countless windows, bricks, street signs, cars,
people, lights, whatever. They all try to
compete for attention. But as artists, we
don't need to capture every single element
to be able to create a convincing and
engaging painting. In fact, it's quite
the opposite. We use simplification as a
way to improve the painting, and it's one of the most
powerful tools we have by implying details rather than
rendering them precisely, we can create a sense of
realism without losing the energy and spontaneity that makes watercolor such
an exciting medium. Because a painting rather than a photo should capture
the essence of a scene rather than a full realistic
representation of it. When we focus too much
on individual details, we lose the overall mood, the overall depth, and the movement really
of the painting. And watercolor in particular is well suited for suggestion because it has the natural
ability to create soft edges, blended washes and
unexpected textures that mimic the complexity
of the real world. And also, whilst we're painting, it might feel necessary to
paint in all the details. But actually, when we
look at paintings, our eyes naturally fill in
all the missing information. If we just suggest
enough of a subject, the viewer's brain will complete the picture without us needing to paint every single
brick or window. This approach allows for a more expressive
engaging composition and prevents the artwork from feeling stiff or overworked. So like I always say, and it can't be repeated enough, is focusing on big shapes first. Instead of jumping straight
into fine details, we needed to start by identifying the major shapes
within the composition. And for this city scene, it was blocking in those
building masses to begin with, laying out the street or working out the major
light and dark areas. And now that we've done that, now we're about a third of
the way into the painting, we're working and trying to figure out the
tonal arrangement, the value or the contrast
to find the forms. Rather than outlining
every brick or architectural feature, we're focusing on how light
and shadow defines the scene. The distant buildings,
we don't need to show windows
drawn individually. It can just be suggested
by a shift in tone or a few broken lines. And
that's what we've done there. We've added a few lines to imply the
architectural features. And at the end of the painting, we won't necessarily it won't be pointed out,
it won't stick out. We'll just accept
it as a building. And the reflections on
the wet pavement can be achieved with loose gestural
brushstrokes rather than rigid detailed lines because puddles and reflections are quite abstract anyway.
12. Building Up The Reflections: Let's continue with
adding the reflections. So I'm adding a few
vertical lines here of yellow ochre and a
bit of camium yellow, adding a bit of burnt
sienna in there as well. And then we can start doing all the start working from
the top down from where the car meets the road
and how it connects to the bottom using this same kind of bluish color, but
a bit toned down. It's not a vibrant blue. And I'm adding a few ripples, a few fine lines. But even though they're fine, they're not
necessarily detailed. I'm trying to be quite
selective with where I'm adding detail or
areas of interest. I don't want it to
be too cluttered, and that is a great way to keep a painting from
feeling cluttered, to choose where to place the
most detail and where to let the brush stay loose
and expressive. Our eyes are naturally drawn
to contrast or sharpness. So adding a few well
placed windows or street signs or figures in
the focal area can imply that similar details exist elsewhere without
actually having to point them out or paint
them out individually. It's a little trick
of composition. If you create the focus and attention where
the detail is, then the peripheral vision of the viewer kind of adds
in those details itself. The nice thing about
cityscapes is that a lot of the modern architecture is
almost quite abstract anyway. They don't have
traditional windows. A lot of the time you can't differentiate the windows
from the walls or just the shapes of the buildings are quite abstract anyway. So we can get away with
messing around with that. And one of the things that got me quite confused
when I was learning how to paint is so if I'm
not painting details, then what should I put there? How do I imply that detail? Well, watercolor
has a beautiful way of creating textures
and shapes naturally. So if you have faith in
the medium and you allow the pigment to blend
and flow unpredictably, it can suggest brickwork
or stone textures or reflections without
actually needing to paint the detail manually. And there's a whole range of techniques that I'm
showing you in this class and other classes from dry brush from dragging the brush
across this rough paper, that can create the illusion
of aged walls or texture. And then towards the end of the painting, we'll lift paint, and we can selectively apply
that to different areas and the way light might catch on the buildings or the
reflections or windows. And broken lines can
suggest railings or the lamp posts or the separation between the
road and the pavement. So we have to put
a lot of faith in watercolor to do some
of the work for us. And that, in turn, helps us create a painting
that's more spontaneous, more lively, and once
you're comfortable with it, more enjoyable as
well, because you're just going with the
flow, you're having fun. You're not stressing about it. You can also see how I've
incorporated negative space or the unpainted area or at least the
lightly painted areas. And they can be just as important
as the filled in areas. By leaving some areas undefined, we create a sense of
atmosphere and depth. I'll use this technique
for the figures as well.
13. Finding Balance: Like in most things
with painting, it's all about balance. And the essence of
finding the right balance is understanding
what to include to enhance the narrative and
the emotional impact of your artwork and what to exclude to avoid that
clutter and confusion. And the best way to figure it
all out is to ask yourself some questions when
you're observing your artwork and the
subject of your painting. You can ask yourself, Where do I want the viewer's
eye to go to first? Identify or select
what you want as a focal point as that
central interest, and then ask, is it a
vibrant splash of color? Is it a dramatic contrast or perhaps a specific subject
like this yellow taxi, I think is my focal
point because it has that splash of color of the yellow that I'll
paint in later. That's what I'm intending.
Then it has that contrast between the light of the yellow and the dark
of the background. And also, it's quite
a specific subject. It's if this is going to be
a New York kind of scene, which I think it is
looking at my reference, they all seem to
be New York taxes. So that's quite iconic
specific subject. This area should
be the area with most detail and clarity to
draw attention immediately. That's what I'm
going to focus on and put extra care
around this edge. Everywhere else is
a bit wishy washy, but when I'm painting
out this taxi, that's where I'm going
to spend most of my concentration for
details at least. Then you've got to ask yourself what elements are essential
to the composition. You got to determine
which components in your scene are necessary to
convey the scene accurately, and does the inclusion of a certain building
or certain figures or objects support the story or the mood you're
trying to create? And if not, then remove those elements or components
or at least simplify them. You don't need to paint
everything you see. If you only paint what
adds to the story, paintings are stories,
really, visual stories. And if you had to put this
painting into a simple story, it's a wet daytime
in the afternoon, I'd say, the reflections, the interplay of reflections. So I'm only going to focus
on the things that focus on that kind of narrative. Then you would ask, where
can I allow the watercolor to create texture and depth naturally using the elements that make watercolor
so unique and special? Because watercolor has
this unique ability to blend and move on paper and create those interesting
textures and gradients that you can only
achieve in watercolor. And we can use this
to our advantage in areas like the background or less significant areas where detail can be suggested
rather than fully rendered. A, you might want
to ask yourself, can the direction of brush strokes add
to the composition? The time I imagine or I see my brush strokes as
arrows almost that force the movement and
lead the eye and contribute to the overall
dynamism of the scene. We can use varied
brush strokes to reinforce the feeling or
the structural elements. You can have dry brush smoke or very wet soft movements as well.
14. Begin With The End In Mind: Okay. Lot of these
questions, of course, come from the mindset before
you actually start painting, you have to begin
with the end in mind, and that's one of the
most powerful mindsets to have because unlike other mediums where
layers can be built up and reworked forever, watercolor is very delicate
and very unforgiving. It's a fluid process that requires a lot of
foresight and planning. And every decision we make from the very first wash to the
very final details should be planned out or
at least informed by the clear vision we have of where we want
the painting to go. And this approach allows us
to work with more confidence. And the stronger our vision is, the more deliberate
our choices will be, and we might avoid
common pitfalls like overworking or
muddying our colors. Because it can
happen quite easily. Once we lay down a wash, it's obviously very
difficult to take it back. And this means that
every stroke or color choice should
be quite intentional. So by starting with a mental image of what we want the finished painting
to be like, of course, we can't actually
it's impossible to think of it so defined
in our mind's eye, but we can have the
general feeling, the idea of it like a
roadmap for ourselves. Where we want to preserve
certain highlights or manage color harmony and
some areas where we can allow the
natural spontaneity of watercolor to come through. Because we don't
want to get lost in unnecessary details or
hesitate over color choices. So when we begin with
the end in mind, we establish a clear
direction from the start, and hopefully it allows the painting process to unfold
smoothly and purposefully. Now I'm painting
this focal point of the yellow or orange taxi. With that vibrant orange yellow. It's not a natural ability to be able to visualize
the final painting. It's quite an
abstract thing to do. I struggle with it
still nowadays, and it's something you
always got to work on. When I first started painting, it was extremely difficult. But you can break it down
in order to help you out and figure out how
you want it to look. You can ask yourself, where do I want the lightest
and darkest values? Because watercolor relies on the preservation of the white of the paper for highlights, and we don't ever add white paint until
the very end, really. Most of the light
of the painting is coming from the white
of the paper itself. So we've got to think
about the values and where we want those to be. And, of course, sketching
before you do the painting, even in little sketchbooks. I'm not even talking about the outline sketch of
the painting itself, just a tonal sketch about the size of the palm of
your hand is very good for helping you visualize
how you want the painting to be then what mood or atmosphere
do you want to convey? With this city scene, it's quite energetic and
vibrant and quite sharp. But maybe you would want to
do a misty one, a softy one. We, it's a foggy rainy day,
and it's raining at the time. So knowing this from the
start helps determine what techniques or color
choices you plan to use. Then you can plan
your composition.
15. Colour Strategy: We've also got to think about a color strategy
before we begin. Unlike other mediums,
where we can just endlessly adjust the colors because watercolor
is transparent, each layer affects
the one beneath it. So this makes intentional
color choices essential for achieving
that harmony, depth, and a strong focal point. And also helps prevent muddiness and generally
enhances the mood. So when it comes to color, we can break it down
even further and think about three key aspects to consider limiting your palette, understanding warm
versus cool tones and deciding on your
layering approach. So a limited palette means selecting just
a few key colors to work with rather than using every single paint or
tube or shade available. And this restriction
actually helps create a natural color
harmony and ensures that all elements of the
painting feel unified. So why is a limited
palette effective? Basically, it forces us to mix colors rather than rely
on pre mixed ones, and it leads to a more natural way of creating transitions and
subtler variations in tone. And it prevents
typical color chaos. When I was first painting
or starting out, I was overwhelmed and
everything became quite chaotic and uncontrolled because I was applying too many
different colors, and it was overwhelming and the painting looked
very disjointed. Nothing really
matched because I was using a certain set of colors to paint one area and a different section to
paint another area. So a limited palette
reduces that chance of muddy colors which happen when too many pigments are
unintentionally mixed together. So how can we choose
limited palette? Usually, we pick
one warm color and one cool version of
each primary color. And that's basically what
I have in my palette. I have a warm red, a cool red, a warm blue, cool blue, a warm yellow,
and a cool yellow. And this allows for a
wide range of mixing, but it doesn't really add
unnecessary complexity. I have a lot of
earth tones as well. The bottom four are
my earthy tones, and they're quite good
for painting city scenes, urban scenes, as well
as natural landscapes. They ground the composition because they're
quite neutral tones. And you've got to think
about the overall mood. Do you want it to be
vibrant and high energy like this painting, or maybe you're inclined to softer and muted colors
or cool calming colors. And your palette should
reflect this intention. When we commit to
a limited palette, we train our eyes to see color relationships
in a more clear way. And we then also develop a greater
understanding of how hues interact with watercolor. A, uh
16. Warm Vs Cool Tones: Okay. When it comes to planning
warm versus cool tones, we can use this to
create depth and atmosphere because
the interplay between warm and cool tones
is very fundamental in achieving that contrast
and mood in the painting. To start off very simply, we know what warm colors are. They're reds, yellows oranges and they tend
to feel closer more vibrant and that makes them excellent for focal points
actually because they are naturally more vibrant and have a feeling of closeness
and tangibility to them. Yet, cool colors
tend to recede into the background and create
depth and distance. And if your painting
was mainly warm colors, then you could use a cool color just to make an area stand out, and that will be
the focal point. But a lot of the time,
like in this painting, warm colors like the yellow of that taxi and the
red of those people, those figures are great
for focal points. So how does this temperature
affect the composition? We've just touched on foreground
versus background and using warmer tones in the foreground and cooler
tones in the background. And that helps create
the atmospheric depth, making distant objects
feel further away. That's why I've added that red on the right hand side as well. Then you have light
versus shadow. Warm highlights and cool
shadows add a sense of realism because shadows
are often not just darker, but they have cooler
undertones to contrast the warmth
of the light source. And usually the sun being
yellow or at sunset, orange and even red, that definitely makes the
shadows much cooler. But if we're talking
about artificial light, and we had a cool light
like some LAD lights are, in fact, cooler or
Christmas lights. Some of them are kind
of a bluish white, then actually their
shadows would be warm. So there's always exceptions. Then mood and emotion. A painting dominated by
cool tones can feel calm, serene, or quite moody. A lot of this blue
that we're using in this painting is quite moody,
maybe because of the rain. It wouldn't make
much sense really to paint a rainy scene with lots of warm colors because
the blue obviously is associated with the
wetness and the rain, whereas warm tones create energy, excitement,
and vibrancy. So how can we balance
these warm and cool tones? Well, first of all, we
need to avoid making everything too warm or too cold. The contrast between the two is what makes the
painting quite dynamic. So that's why we've got
a bit of both going on. But we still have to identify
a dominant temperature, whether it's warm or cool. I'm going for cool and this as my dominant painting, my
dominant temperature. And then we're using
the opposite warm tones quite sparingly for contrast. You can see with that blue, we've also got some
greens that are cool. We've got some purples, and we don't have actually
that many reds in there. So when planned correctly, warm and cool tones don't
just create visual contrast. They enhance the
storytelling and the depth.
17. Tonal Strategy: So whilst I was just talking
about warm and cool tones, we began painting on top our darkest tones on
top of this taxi, where we have the strongest
area of contrast because, again, that contrast
creates the focal point. Whilst color strategy
plays, of course, a very important role in
creating harmony mood, of course, color is one of the main things we think about
when it comes to painting. But actually, tonal strategy is arguably even more important
because tonal values, the lightness or darkness of different areas
in a painting, are what give a painting
structure, depth and clarity. A well planned tonal
strategy ensures that the composition remains visually engaging and it's really
what makes it readable. The colors is like the gravy. It adds an extra
level of excitement, but it's the tones that make
everything very readable. Even if the colors
were removed entirely, the painting should
be understandable. A good idea is actually to do a lot of paintings just with, black and white or neutral tint. That's what I did
when I studied. I forgot about color
for a bit and I just focused on getting the
tonal relationships right. It's the tonal values
that define form, create depth and
establish contrast. And without a clear
range of tones, the painting can appear flat, unstructured or
confusing to the viewer. So some questions you
can ask yourself, again, is where the
vocal point is. That's where we want to
have the highest contrast. That's why I've painted
such dark blacks next to this bright orange
or yellow taxi. And after that, where should the viewer's eye move
through the painting? We can use these tonal lines on the reflections or the
light highlights on the buildings to give that
sense of movement that draws the painting forward as if there's a sense of
movement on the road. And the viewers gaze naturally is led further
into the painting. And warm and cool tones
can convey depth. By having tonal
values organized, we can separate the
foreground, middle ground, and background to enhance
that illusion of space. So we've got high contrast here in the foreground
with the taxi, a little bit less contrast
in the middle ground, and then in the distance, we've just got faint
buildings, really. If all areas had
similar midton values, the painting would
feel monotonous. And if everything was all
dark with no highlights, again, it would all
feel quite monotonous. So having a strong
balance of light, mid and dark tones, those three different
levels of tones can help keep the
composition quite dynamic. A, uh
18. Relationship of Tones: A good way to think of these tonal relationships
and to plan them is to identify them
before we actually begin, like anything, especially
with watercolor. So before we start painting, whilst you're watching
this, it helps. We can analyze the subject, even if you want to paint
from your own photograph or even if you go out playing
air and paint in real life. We've got to analyze subjects in terms of
values rather than colors. And the best way
to do this is by squinting your eyes
because it reduces the colour distractions and allows you to see the overall value structure more clearly. And I spend so much
time squinting my eyes. I naturally do it now. So I look quite odd
when I'm painting because my eyes are just
squinting all the time. Also, what you can do, you can convert a reference photo
into black and white. If you have the final image, I have final painting in the projects and
resource section, you can use your
mobile or computer to change that to black
and white to see how the tonal relationships
are working in that, and you can even try painting
it in black and white if you're too overwhelmed
with the color aspect. There's no harm in trying in
sepia or black and white, Pain's gray, any monotone color. This is where thumbnail
sketches can be useful as well, because it minimizes
everything and you can use a pencil which is obviously gray
scale to plan the light, mid and dark areas
of your painting. It's a good idea to think of these values in a
kind of hierarchy. So light values, basically, the paper left untouched
or lightly washed, like the sky is just
the white of the paper. We use those for highlights
or a glow a feeling of glow. And that's what
this achieves here, that brightness of
the sky coming down. And then we have mid
tones or mid values, which actually take up
most of the painting. The majority of the
painting are mid tones because they're not too dark
and they're not too light. And it's where the
mid values lie that actually help create the form and the structure of things. And then the dark values are the very deepest tones that we use underneath the
cars where the light can't get to and they used to create high contrast and
the grounding elements, the areas of impact. We have to use them
quite sparingly. Depending on the
subject, of course. If we're painting
a nighttime scene, then maybe there'll be more
dark values than mid values. So it really depends on the subject and the message
you want to convey. But just having these
concepts in mind can help you plan your painting no matter what the subject is. You can just test your painting's tonal
strength by stepping back, squinting, and trying to see, does the focal point
still stand out? Or when you look
at your subject, you can check the balance of the dark mid or light
values and ask, is there a variety
which is emphasized? Is it more of a mid dark
or light value painting? A,
19. Common Tonal Mistakes: Yeah. Let's talk about some of the main mistakes
when it comes to tonal work or a strategy when it comes to figuring out the use of values
in a painting. One of the most common things
that people face and I certainly faced is a
lack of strong darks. Of course, it's quite
overwhelming to just use thick dark
pigment on a painting, especially in
watercolor when it's associated with quite a airy, sketchy style rather
than a bold, dark usage. Many paintings suffer from being too light or having
weak shadows. It also it's quite
difficult with watercolor because when a pigment is wet, it looks a lot darker
than when it's dried. So you could mix what looks
like a deep dark black, a full black, but when
it actually dries, it looks more like gray. But it's important to have the deep dark rich values
because it adds drama, and it helps define the
form and the contrast. When it came to mixing those
darks underneath the taxi, it was very thick on my
brush, even right now. When I'm going over
this building, you can see that it's thick because it's grabbing
the turf of the paper. And you can imagine if the pigment is all
sludgy and pasty, then when you brush it's like dry brush marks because there's less water
on there, obviously. So but that's what it has to be like if you want to achieve these dark darks. If you dilute it too much and it runs freely
off the brush, then it probably means
there's not enough pigment, and when it dries and
the water evaporates, you're going to be left
with a bit of a light dark, not a full rich dark. Related to that, one
of the other errors or pitfalls is too
many similar midtones. If everything is a midtone, then the painting can feel
quite dull and monotonous. So, of course, the majority
of the painting is a midton, but we need to make sure that
as well as the dark darks, we need some highlights as well. And while strong
contrast is important, we don't want to make the painting feel
heavy or unbalanced. We don't want to
overwork the dark areas because I said there's
a lack of strong darks, doesn't mean we should then
overwork the dark areas. Of course, everyone
is different, and I've gone through
different stages of mistakes. When I first started,
I wasn't dark enough, and then I went
through a stage of painting overly dark and
overemphasizing the darks. Another tricky
element of tones is when it comes to shadows because when we
think of shadows, we usually just think of
it being one flat tone. But actually, shadows should have subtle shifts within them. And we can use wet on wet technique to create soft
transitions and gradations that make shadows feel a bit more realistic. A,
20. Combining Colour & Tone: Now that we've talked
about tonal strategy and color strategy, we've got to think about how
they get combined together. If the tonal
structure is strong, then almost any color
palette will work actually. And that's quite a relief
because like I said, the color is just the gravy that improves the dish
rather than the main meal. Even the most vibrant
color schemes need a good range of tonal values
to keep them readable. But then once we have the tonal strategy
organized in our minds, then we can start thinking
about what temperature rather than color necessarily to
integrate into these tones, rather than being overwhelmed
with the idea of color, we've got to think
about the tones and then the temperature
of those tones, warm lights against
cold shadows. I'm just adding a few horizontal lines to the reflection on the road here to
make it feel a bit more grounded because there was a bit too many vertical lines and not enough to ground it. Now I'm going back to the right hand side
buildings and just re wetting that pigment
and bringing it down to the pedestrians, the
figures on the ground. Trying to make some kind of
sense to the figures because, again, I don't want to paint the figures in a detailed way. I want to do as minimal
as possible while still making them
understandable as figures. Usually, people or figures
tend to be the focal point. But actually, they're a
secondary focal point in here. They're not actually meant to be the most attention seeking
element of the painting. And if I focus too much on them, if I add too much detail, they'll compete for attention, and it wouldn't look so
appealing or captivating. So I'm trying to add life
and that human element to the scene and also scale by adding
human figures in there. We then get a sense of
the scale of the scene. But I don't want to
draw too much attention away from the key elements like the taxi and
the reflections. Just enough to establish
a narrative and context. Creating a sense of people
going about their day caught mid step in
the bustling city. Some of them have
got their stance with open legs, some of
them are crossed over, some of them are standing still, loose gestural kind of treatment that blends them
naturally into the scene. I don't want them to feel
too static or isolated. And I don't want them to
look all the same, either. So I'm going to slightly vary the colors that they're wearing and the
tones that they have.
21. Painting The Figures: And when it comes to
painting these figures, I'm certainly not going to
focus on the facial features or every clothing fold or
the body shape in detail. I'm just trying to use broad loose brush strokes
to imply the figures. Mainly silhouettes. I'm painting silhouettes,
but trying to make them a bit more dynamic
than a flat silhouette. I'm not trying to give
them individual detail. Just a few well placed brush
strokes to find the legs, the torsos, the heads. Suggesting bit of movement
without excessive detail. As always, we're trying to avoid excessive detail except
for the main focal point. Also a bit of movement. And we do that by
slightly blurring some of the edges or creating a bit of distortion that adds to
the movement of the scene. And the contrast between
the crisper edges on some of the more static
objects like the billboards or the cars and the loose
edges on the moving elements. And it creates a
kind of impression of activity of they've
got something to do. And I'm using a
bit of wet on wet. So I have to wet some of the edges to create
that effect, obviously, and some wet on dry to get
some of the sharper lines, and a bit of dry brush, I think a bit later when it comes into refining
them a bit more. And then we got to think about the tonal contrast as well, because some figures are painted darker than the background
and some of them are painted lighter that helps them stand out without
overwhelming the composition. And that the one chap on the left next to the taxi is the one closest
to the focal point. That's why I'm putting a
bit more detail on him and why the contrast is stronger on him because it's
closer to the focal point. And it doesn't compete. It kind of draws the viewer
into that section a bit more. Some of the figures are closer to the foreground
while others. The ones that are receding
into the background, I put less and less detail in to create a natural sense
of perspective and depth. I'm just trying to think of my gestural and abstract
way of painting, which can be deceivingly
difficult to do, especially when you're trying to paint a human that
we all know so well. It's a matter of
less is often more. And restraint can lead to something that's more
compelling in the end, even if it feels a bit off
whilst we're painting it. When it's all
finished at the end, it should be a bit better.
22. Scraping Lines: Now I completely dried the
painting with a hair dryer, and I've got a little
scratcher tool here. You can use a tofpick or you can use a palette knife, which
I think I'm going to use, and I'm just going
to use my spray gun, my Mr., just to
evenly wet it out. I need to wait a few seconds because it needs to rewet
the pigment evenly, and you can see I
can scrape away these lines in a
confident manner. I'm standing up to
do this to make sure that I can apply broad strokes. And this, of course,
will only work where the pigment is dark. I don't want to do too many. I spray, I wait a few seconds
for it to fully absorb. There are only fine lines
and could use a brush, but I think there's something fun about scraping
away to reveal those lines. You can see how the
procedure has taken place. We started off with big shapes, and now we're working
on the smallest shapes with the finest
lines and details. But we still have a bit to go because there is a bit of
refinement left to have. There's a few
corrections I want to do before we can call
this painting finished. The taxi is, of course, the main focal point, the thing that grabs
the attention. But actually, the reflections, I think, is what makes the
painting most special. That's what I want to
try and work on a bit. Even though it's not
necessarily the focal point, I want to apply very thick
warm paint underneath. I'm using this
rectangular brush, not a round brush. To make sure that it's nice and even because I want these to be
quite horizontal. I realized that was a
mistake because I'm adding a reflection to
something that doesn't exist, so I had to rub it out of my tissue. That was too dark. The reflection was too dark
from the building above. I added pure water on there and scrubbed away
to make it a bit lighter. Uh, I want to maintain a lot of those dark darks
underneath the car. So a few arbitrary strokes that aren't
trying to convey realism, they're just trying to
add to the feeling. They're nothing in particular. It's not like I'm painting
a building or a window or anything in particular. Just for example, now, orange and blue go
so well together, I feel like I need
a nice little play of those colors interplay
of those colors. I'm adding lavender, which is basically blue
with a bit of white and using a broad
strokes just to apply that in there. A
23. Layering Approach: With watercolor being such
a layer based medium, of course, in oil and acrylic, you can also layer paint, but it's kind of a
fundamental an integral part of the watercolor
medium layering, you have to think about
your approach to layering because there are different
ways to go about it. You can gradually build
them up little by little, or you can make bold direct
applications of paint. So when you gradually layer
paint or in some ways, it's a glazing technique. It's a gradual layering of thin, transparent washes,
and we build up color intensity over time, and it's a bit more
controlled that way. And why would we want to
use that kind of layering? Maybe we want to create a
softer, more luminous effect, which might be perfect for light filled scenes
rather than dark scenes, because if we were going to gradually layer up a very dark scene, it
would take a long time. We may as well go bold. But it also allows for
subtle transitions. And by that social transitions, I mean, with tone and color, and it's ideal for delicate
atmospheric effects like mist or cloud or
water reflections. I've actually done a lot
of gradual buildup on the reflections on
the street, actually. And it provides a
bit more control over the color intensity, and it lets us slowly adjust values rather than committing to
anything too quickly. This is also relevant to other subjects
like my portraits, where you might want to create gentle skin tones or delicate reflections
or things like that. It also enhances the depth because these are
transparent layers, they can give the
illusion of distance. So each layer must be completely
dry before adding the next unless you want to
blend them together. Of course, wet on wet painting, you don't have to wait
for it to dry completely, but technically, wet on wet painting is
actually the same layer. If you want to layer them,
they have to be completely dry and you'll start with light, diluted washes and then
gradually deepen the tones. But you don't want to paint too many layers going
over the top and painting five layers actually makes
the vibrancy a lot more dull. Then there's the other
option of the bold, direct approach. M
24. Direct Painting Approach: Notice how I've
completely rubbed off the masking fluid and exposed
the white of the paper, and I'm going to use
those white highlights to maintain the vibrancy. You can see where the
traffic lights are and the little back
lights of the taxi there, and the other blue car. I'm just going to but also,
like I said at the beginning, if you didn't use
masking fluid or you haven't started painting yet and you don't want to
use masking fluid, you can do what I'm
doing now using pure white squash just to
paint in those whites, then you can dry,
and it works pretty much the same as if you
didn't use masking fluid. Then once it dries, I'll go back with a vibrant
orange or something. Anyway, let's continue
with what we were talking about before with
applying color. The other approach
to applying paint is bold direct
color application. Instead of layering, we can apply colors boldly in one go. That's more of the
wet on wet technique, taking advantage of the
fluidity of watercolor. And why would we want to
use bold applications. But probably because it creates more spontaneous
fresh brushstrokes that capture more
energy and movement. It enhances vibrancy as fewer layers allow colors
to remain pure and strong. And it forces us to trust our instincts and embrace that unpredictability
of watercolor, and that's where the magic
really comes through. And that's why as a student,
it can be really tough to persevere with the bold, unpredictable nature
of watercolor because it takes a
while to trust it, and you have to get
through a lot of awful paintings before you
create anything worthwhile. I have hundreds and hundreds
of terrible paintings, and that I just had
to work through. I painted them and
threw them away and then painted more
and threw them away. And it took it seemed like
it was going to be endless, and I wasn't even sure
whether I'd improve at all, but little by little, I could I was starting to trust
myself a little bit more, and once that fear goes away, even if the results aren't good, as long as the fear goes away, that's when it can
start being a bit more authentic and
fresh and exciting. Because there's
something more than just detail and accuracy. Getting that emotion
through it goes more than principles and
it's beyond technique. It's something that I can't necessarily explain
because it's a feeling. But of course, once you get
all your prerequisites done, which I've talked
about in this class, then you're allowing yourself to express what you want to. You're opening the
path for your soul to come through in your paintings. And when painting expressive high energy
subjects like these cityscapes or maybe floral compositions
or even wildlife, that have a lot of
movement in them. That's when these
bold applications can be great and, of course, wet on wet and
allowing the colors to mix naturally on
the page rather than controlling them too much adds to that loose and
pretonistic feel rather than the high realism approach. A.
25. Adding Highlights: There's different ways
to create perspective. In a countryside scene, you're going to be using a lot of atmospheric perspective
because there's not many man made structures with clean straight lines
found in nature. But when it comes to a
city scene like this where most of it is man made, we rely on other ways. And the basics of understanding perspective is, first of all, we got to like I said,
at the beginning, know where the horizon line is, and that represents
the eye level and helps anchor the scene. And that's basically
halfway or just above halfway across the paper. Then we've got the
vanishing point is the spot where parallel
lines converge. So that's where all these
diagonal lines face, and that's dead bang in the
center of the paper as well. And the converging lines guide
the eye into the distance. And you can see
that on the roads, the buildings, particularly
with the reflections. Then we can use
scale and overlap. Closer objects appear larger
and more detailed while distant objects become
smaller and less defined. You can see the cars
are obviously smaller, the people are a bit
smaller and so forth. Now we're coming towards
the end of the painting. Let's quickly go over all the
little strategies we used. We focused on capturing the
energy and atmosphere of this city through strategic
use of reflections, color contrast, and
expressive brushwork. And the wet pavement
and street provided a perfect opportunity
to explore reflections, softening edges to create
depth and realism. We also balanced warm tones like the yellow taxi against
cool blues and greens, purples to enhance
the visual interest and direct the viewer's eye. Also, to avoid
overwhelming detail in such a complex scene, we simplified shapes using
loose gestural strokes to suggest movement and atmosphere rather than rigid precision. And perspective
played a key role with the converging lines and the diminishing detail to create depth and
diminishing contrast. And high contrast
in the foreground. While we were selectively choosing where we
want detail and abstraction to help maintain clarity and a sense
of spontaneity. And hopefully by combining
all these techniques, we've brought to life the scene and making
it feel dynamic, immersive, and hopefully
rich in storytelling. When you look in closely, you can see there's not actually much detail in individual parts, but when you look back at it, you can see as a
whole, it makes sense.
26. Final Thoughts: Welcome back and congratulations on completing this class. I hope you found it easier or at least more fun than
you might have expected. Painting cityscapes doesn't
have to be overcomplicated. It's all about creating a mood and letting the
paint do the work. We explored techniques like
loose wet on wet washes, simple laying for depth, and easy ways to suggest
figures and movement, all while keeping it
light and stress free. I hope this class has
shown you that painting city scenes can be
fun and expressive. Remember, watercolor painting is not just about technical skills, but also about expressing your creativity and
personal style. I encourage you to continue
exploring, experimenting, and pushing your
boundaries to create your own unique
watercolor masterpieces. As we come to the
end of this class, I hope you feel
more confident and comfortable with your
watercolor painting abilities. Practice is key when it comes
to improving your skills, so keep on painting
and experimenting. I want to express my gratitude for each and every one of you. Your passion for
watercolor painting is so inspiring and I'm honored
to be your teacher. If you would like feedback on your painting, I'd
love to give it. So please share your painting in the student projects
gallery down below, and I'll be sure to respond. If you prefer, you can
share it on Instagram, tagging me at Will Elliston, as I would love to see it. Skillshare also loves
seeing my students work, so tag them as well
at Skill Share. After putting so
much effort into it, why not share your creation? If you have any questions
or comments about today's class or want any specific advice
related to watercolor, please reach out to me in
the discussion section. You can also let me
know about any subject, wildlife or scene you'd
like me to do a class on. If you found this class useful, I'd really appreciate
getting your feedback on it. Reading your reviews
fills my heart with joy and helps me create the best
experience for my students. Lastly, please click
the Follow button Utop so you can follow
me on skill share. This means that you'll be
the first to know when I launch a new class
or post giveaways. I can't wait to see
what you create, and I look forward to
painting with you in my next class until
then Happy painting.
 Will Elliston, Award-Winning Watercolour Artist