Transcripts
1. Intro: Hey, guys. I'm
Sebashni an artist, illustrator, and
service designer, and a Skillshare teacher. Welcome to my class,
and let's paint some colorful animals and florals using fun
gouache techniques. I mainly work with
watercolor, gouache and inks, and I license my work
to fabric companies, greeting cards companies, and other stationary
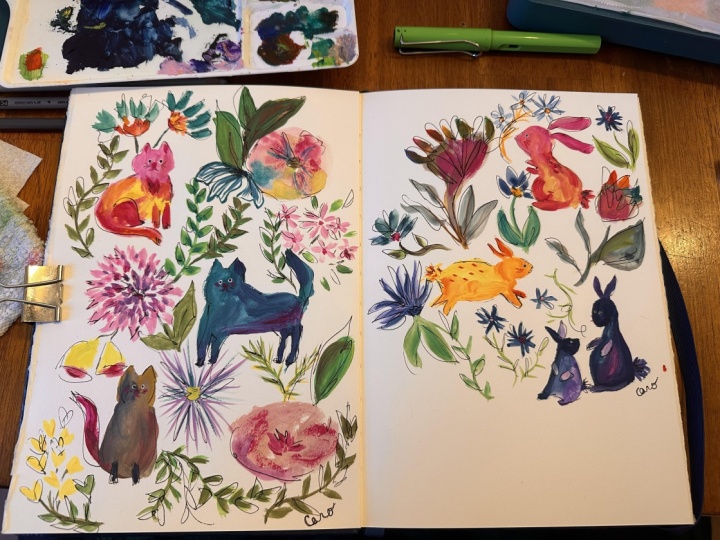
manufacturers. Today, we are going to
paint colorful cats and florals and some cute
bunnies and florals. Inside the class, I'll share
the supplies that we need, and I'll show you how I
prepare my color palette. I'll teach you how to simplify the animal from your
reference photos, and I'll teach you some fun techniques that I
use in my painting process. So please come join me, and I can't wait to
share the joy of painting animals and
florals with you guys. I hope that you
join me and learn some playful gouache techniques. See you inside the class.
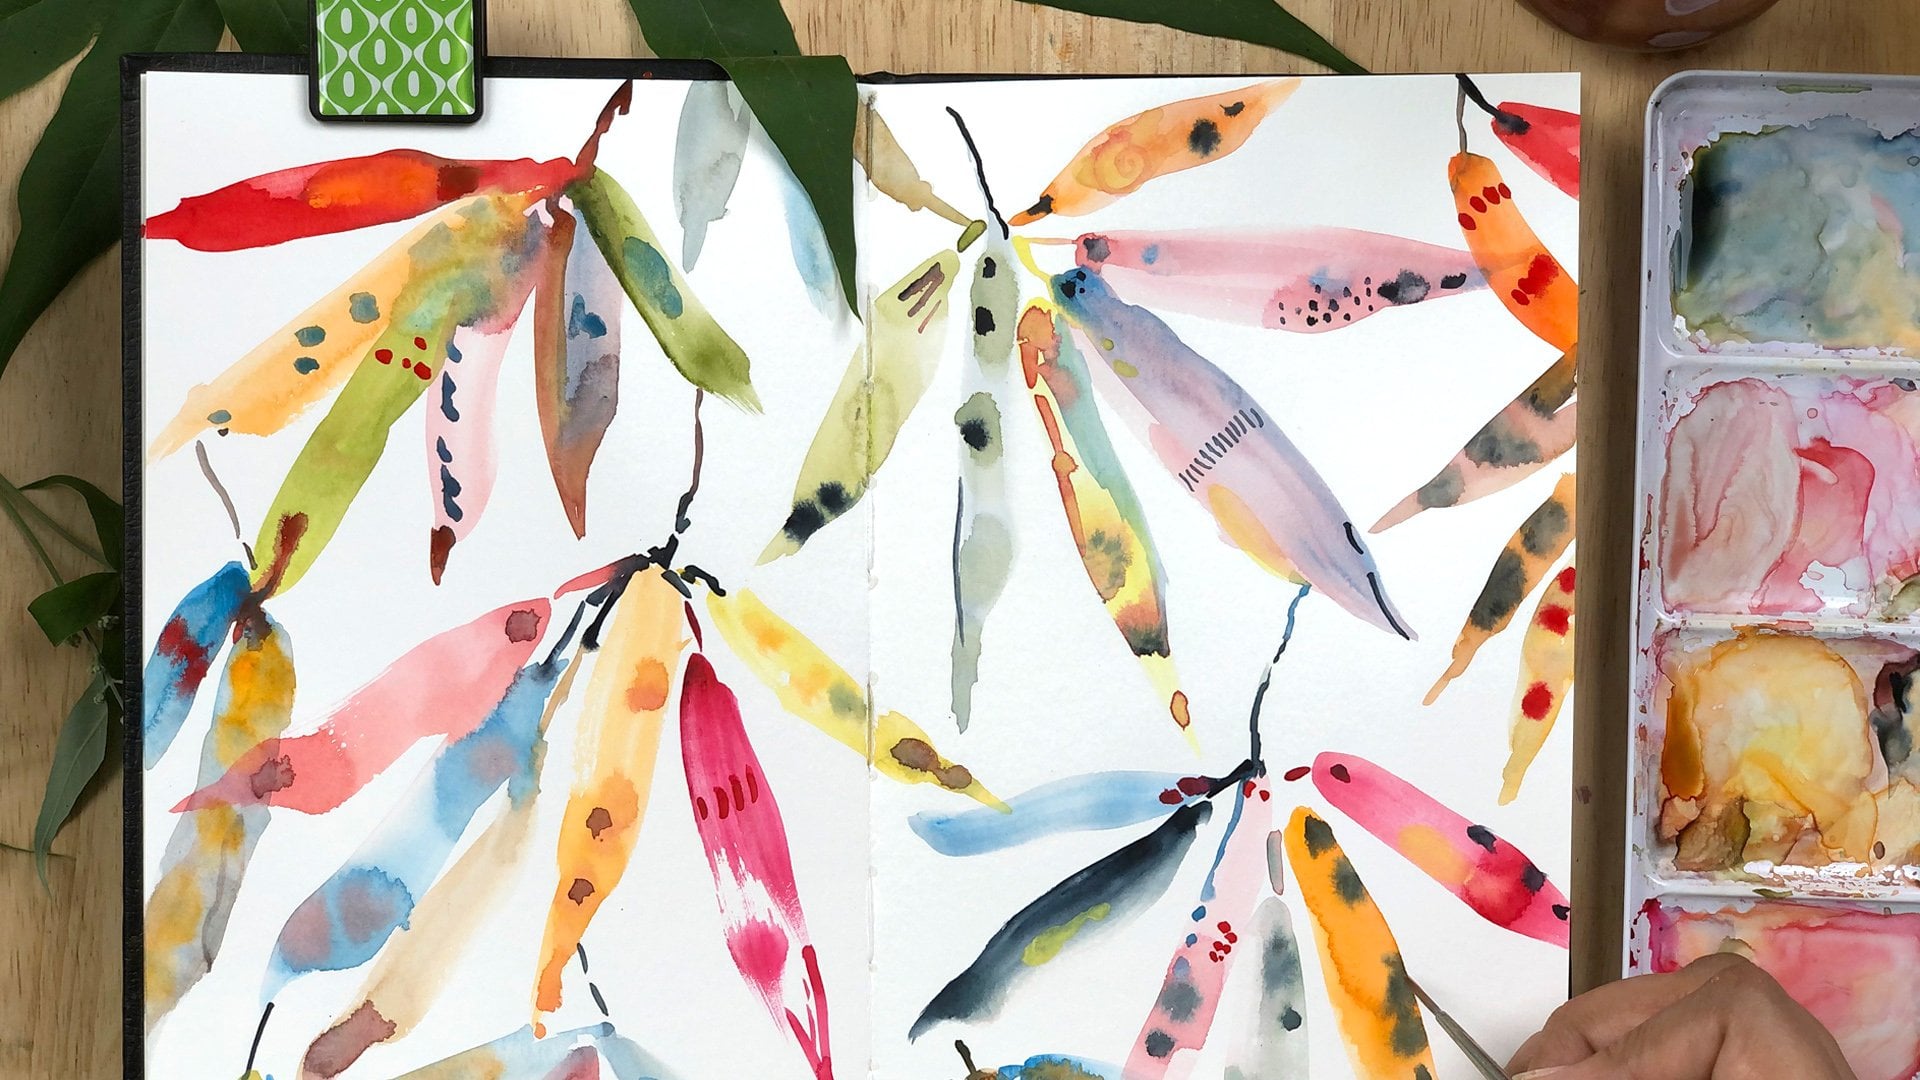
2. Supplies Needed: Now, let's see the materials that we are going to
use in this class. I have here the Shinhan
professional gouache set. Actually, I bought a
set A and set B. I have arranged the colors in groups so that I can easily
pick them up. I use a lot of colors
in my artwork, so these work great for me. So you'll be needing
extra tubes of white, as you can see, I have
run out of the white. So I bought two extra tubes, and you'll be needing three
brushes from large to small. And we need a palette
for mixing or colors. And we need water container, and we need a spray bottle to reactivate or paint
if they are drying. It's very, very handy when you want to dilute the
paints on your palette. And we need watercolor paper. This is 300 gsm. We need paper that is at least 300 gsm so that
the paper won't buckle. And I prefer hard dressed
paper for my gouache artworks. And you'll need a masking
tape to tape down our paper. In the next lesson,
I'll show you how I prepare my palette
before I start painting.
3. Preparing Our Palette: Now I'm going to show you how I arrange my colors on my palette. I squeeze a little
bit of paint from the tubes and I
arrange it in groups. This makes the color mixing
job very easier for me. For example, I mix a
lot of pink and yellow, so I've placed them
close to each other, and I add a little bit of
white to each group if I want to make lighter
shades of any color. And I put all the
greens together and the blues together and all
the earthy colors together. So I can see all the colors
that I use in front of me. I mix colors intuitively. So this palette setup
really works for me. Now we are all set
to start painting.
4. Cats and florals Medium bitrate: Now, let's paint
cats and florals. I'm keeping the
reference image that I collected from unsplash
in front of me. We're not going to
copy the cat exactly. I'm just going to keep
it as a loose reference, and I'm going to refer to only
the silhouette of the cat. And I'm going to use
the color of my choice. Of course, I pick the pink. If you don't have
pink in your palette, you can mix crimson red and
white to get a nice pink. I'm starting with
the pointy years We don't have to look
at all the features and details, the forms. Adding a little bit of yellow and kind of blending
it with the pink. And you can always come
in with another color, and blend it while
it's still wet. So for this cat,
I'm going to use all the pinks and some
yellows for the accent. And let's make him a
little bit chubbier. So now I'm taking yellow. And kind of blending
it on the body. I like it when the
paint strokes are seen, whatever subject I paint because that gives a
nice hand painted look. It doesn't necessarily have
to be too flat and opaque. I believe a balance of
opacity and a little bit transparency makes
a whole painting very interesting and fun. I'm adding the front
leg with a darker pink just a simple long stroke. And now I'm taking yellow
to paint the tail. If you see my hand
going out of the frame, that means I'm reaching for the water to dilute the
paint a little bit. I'm making the tail fluffier and changing the
color and just nice curve. And I'm coming in and making the back leg a
little more defined. Now, I'm painting the curve that the back leg makes
when the cat is sitting. And we are almost done
with our first cat. I don't know why I painted
the pointy thingy. I'm just going to
try and fix it. You know, some weird things
happen when you paint. We can come back and add
the features to the cats, once you finish painting all the silhouettes of
the cat and the florals. Finally, we can
paint the features. Now let's move on to
painting our next cat. I'm going to use the shades of blue and maybe a little
bit of purple later. So I'm mixing different
shades of blue from light blue and the
darker shades. I've chosen the reference
image of the cat, which is a different
pose from the first one. All our three cats
will be different. I'm going to simplify it just like how we did
with the first one. So we're starting
with the pointy ears. With a light blue. And if you don't have light
blue in your palette, you can always mix
some white and make any of the color to
a lighter shade. And of course, you
can choose the colors that you prefer when you're doing your project so that you can make it your own. Also, if you are searching
for a cats reference image, you can just use the keyword silhouette cat so that it'll be easier
for you to focus on just a outline and take the techniques that
you have learned from this class and apply it in
your own animal paintings. I'm using the side of
my brush and applying little pressure and
making the tail bushy. If you're new to
painting animals, cats are great subject
to start with. It is so simple to draw cats, and not only that, it's so
fun to draw this cute animal. I'm going to add some lavender. I don't think that's working, so I'm going in with purple. You know, that's the fantastic
thing about gouache. If you don't like a color, you can bring another color and paint just
right on top of it. It's not a big deal, and the opaque nature of the
paint helps us to do that. So I'm using a dark
blue to paint the legs. Just simple stroke,
thin strokes. And with this, we are
done with our second cat. And now it's time to
paint a cute third cat. So I'm starting
with a creamy color and taking a little bit yellow. Even though its head is tilted
in the reference picture, I'm making it straight and go to paint it
super simplified, grabbing a darker
color for the body. It's an yellow ochre. You know, I haven't used
pencil lines as a guide, but you can always sketch your sketch and outline
of the cat, if you want. I use pencil lines
only if I paint something more structured and
very planned, very precise. It really helps you loosen up a lot when you practice
without the pencil lines. And just focus on the shape
of what you're painting. I'm grabbing some white and
mixing a lighter version of the brown because I don't
like how dark the edges are. And I'm just toning it down because the sides
have become too dark. And now let's add a tail, and I'm dabbing in with
pink because I don't know, there should be
pink on everything. I guess I have an
obsession with pink. I just have to put
it everywhere. Let's add some
colour to the body. And the legs front legs
with the deepest brown. And now we are done
with all three cats. So next up, we're going to
paint some gorgeous florals. I'm grabbing some red for
the center of the flower. Gonna be totally
imaginary florals. I'm taking a lighter
peachy pink and just adding some
simple short strokes. Grabbing in slightly darker pink and adding another
round of short petals. Grabbing more pigment and repeating the same
simple strokes, mixing a nice bright
fuchsia color. You know. Instead of using the same color for
the whole flower, I like changing the colors
slightly within the flowers, so the flowers look more interesting with all the
beautiful variations. We are going to fill
the rest of the page with beautiful
florals and leaves. So I'm mixing some few
different shades of green. You have to play by mixing
some greens, blues, and browns and even yellow ocher to get different
shades of green. You can even add white
to tone it down. I'm painting a tiny branch of leaves coming out
from the flower. You can just use the side
of your brush to make some simple strokes and change the angle and one tiny leaf
facing down like that. For our next flower,
I'm grabbing some brown to paint the
center of a flower. I'm mixing some yellow ocher, slightly darker yellow ocher and painting an abstract circle around the dark to
add some depth. I'm mixing pale yellow by adding a little bit
of yellow to the white, and I'm using the side of my brush to make
broader strokes, adding more white to
the yellow and mixing a nice cream color
and kind of using the side of my brush to
make a nice round shape, suggesting it's a flower. I'm grabbing a little bluff pink and adding it to the edge. I'm grabbing some more colors, and I'm adding a few marks. I'm drawing a few marks on the petals just to make them interesting and
add some character to it. I'm taking some
pink and adding it, and it's blending beautiful
with the underneath layer, making a beautiful effect. Also, we can add blue, and you can see it's
kind of turning into a greenish blue. You can just play
around with gouache. It's a very versatile medium, and you can see all the colors that we added on top is kind of blending with the
underneath layer and making a beautiful effect. Now let's dab some bright yellow that yellow
really pops out, and I really love it. Now, let's paint our third large flower at
the bottom, right. I'm going to paint a
flower which is facing up. I'm just using marks, a few marks to suggest
the flower is facing up. I'm just loosely
painting with my brush, and it's kind of tapered at the bottom
and broad at the top. I'm bringing in a darker
colour, a deep purple. To add the center, just a
few strokes that are facing up and adding a little bit
of yellow at the bottom, and maybe add some red to make the center
more interesting. Next, I'm mixing
some lighter blues to paint a fan shaped floral on the top right just with
a few small strokes. And now connecting the
petals with bright orange. O and adding a little bit of
contrast using dark pink and adding a stem maybe
make it a little bit darker and adding another
stem branching out and using the same
process to paint another fan shaped floral facing the right connecting
all the petals. It's fun to draw these
abstract florals. These are imaginary. If you ever get stuck with not knowing what
floral to paint next, you can just use the keywords, wedding bouquet or just
floral bouquet on Pinterest, and you'll get tons of options with all the florals
beautifully arranged. You can see a variety
of florals arranged in a bouquet from big sized
florals to the smaller size. So it'll be easier
for you to use those as inspiration for
your floral paintings. I'm grabbing some green, and I'm going to add a couple of leaves, large leaves here. It doesn't need to be perfect. I'm using some brown
to paint another leaf. Let's make it a
little bit darker. I'm painting a few
brown dots here to paint some small florals,
daisy like florals. I'm mixing some pink
here and just painting a tiny daisies and
filling up this space. Now that we are done
with larger florals, our job is to only focus on filling the rest of
the white space. So we are going to keep
adding flowers and foliage. I'm drawing a thin stem for this flower with
some tiny leaves, adding another leaf here. I'm grabbing some fuchsia and dabbing on top of this leaf. I like how it turned into
a nice, rusty color. I like the transition
happening within that leaf. I'm just going to fill the white space at the bottom left, and I'm adding a thin branch. Painting a thin branch, and I'm grabbing some
yellow and just scribbling, suggesting some tiny flowers coming out of the thin lines. And with the same yellow, I'm drawing a
center of a flower, grabbing some lavender and adding long thin strokes
to make a flower. I usually avoid placing two flowers that
are same, colored. Here I have placed it next
to the pink and lavender. But it doesn't look pad because both the flowers
are totally different. So it looks fine. I'm grabbing some green and adding it in
this white space. Actually, it looks too muted, and I'm going to make
it a little brighter. So it's so easy to change
things around with gouache. And now I'm going to draw a
trumpet shaped flower here. I'm taking yellow and
drawing a flower, which is trumpet shaped
and grabbing some pink. Actually, my palate is so dry. Gouache dries so fast, and you need to mist it
so that it stays moist. And just two simple shaves. We have created a
beautiful flower. And let me add one more
here and fill up the space. I really love this
part where you challenge your brain
to come up with different variety of flowers and keep on filling
the white space. I drawing elongated petals. Just few simple lines, and you'll get a nice flower and I'm going to
make the center. I'm going to make a little
contrast to the center. And let's add
another flour there with mixing and mixing
some turquoise, and then I'm going to just draw an outline of the flour
with the tip of my brush and I'm going to fill
it with thin lines. You can hold your brush
upright and make it very thin lines with
very little pressure. And let's make the center dark. Okay, I'm grabbing some yellow, and oh, I actually
forgot to wash my brush, and the turquoise
blue that I had in my brush turned the yellow
into a beautiful green, and it really pops out
next to that blue cat. And let's connect all
these tiny daisies with a deep brownish black. And let's add tiny
leaves with green. You know, when I
first bought this, gouache set from Shinhan, I wasn't really sure about
the quality of this gouache, but I'm really, so, so happy with this paint set. I'm glad I bought these
because the colours are so rich and the
pigment flows very easily, and it gives excellent coverage. Now I'm going to paint a simple abstract flower
in the top right. And with just a blob and
a few circular shapes, you'll be able to create
a simple abstract flower. This is a fun way
to paint florals. Leaves are very good
to fill up the spaces. Anywhere you see white space, you can fill it with
a simple leaf or a tiny flower, a simple flower. It's good to step back and see where you still need to add
the leaves or the florals. So the overall painting
is more balanced. And let's add an abstract
leaf shape here. And now I'm taking green to
paint a fan shaped leaf. There's so much
green going on here, so I'm breaking it
up with some pink. My palate has gotten very messy, but I love that, and we
need not worry about that. Missy palate tells that we have had a happy
time making art. So I'm adding extra
petals to our main flower here and mixing some pink to turn these into
pretty looking birds. You know, when I started
painting with gouache, I was under the
assumption that gouache is used to create flat
graphical looking artworks. But once I understood all the characteristics
of this medium, you know, how it behaves with
more water or less water. And when I played with the consistency and
figured out how it worked, only then I started
to enjoy this medium. Since gouache has the qualities of both watercolors and acrylic, you know, it's so easy to take advantage of those qualities. Once you understood this, it is so, so easy to
paint with gouache. Now that we are done
with our florals, let's move on to adding
features to the cat and mixing some white to
paint the eyes of the cat. So the idea is to
draw a white dot, and then once it's dried, you can come back in with black and add another dot to the center of
the white circle. I usually do it with white
marker and black pen. It's so easier when you do it with white marker and black pen. And now let's grab some pink and add blush to the
cheeks of the cat. Since we can do light on dark and dark on light using gouache, I'm going to go ahead and add some details to the body
and the tails of the cats. I'm using a variety
of colors to do this. You can add lighter
mog on the dark areas and some dark dashes
on the light areas, we can just play around
and add the details. The results will
be so interesting. And with some simple dashes, you can make interesting
details on the cats. Okay, now let's add some
mid ribs to our leaves. I'm using a contrasting color to add the mid
drips to each leaf. I like that lavender and lemon green combo and maybe another petal here
and fill the space. And some yellows
on these leaves. And I'm just as seeing
where I can add the yellow, and I'm seeing a space here, and I'm still stopping
and seeing where I can add more yellows,
maybe some here. So let's fill that up. I know I said we are done
with the botanicals, but I see the possibilities
of adding more things. Okay, now let's add the
black dots to the eyes. You know, like I said, it's very easier when you do
it with a pen and just a white pencil
or a white pen. You can use a white marker, but I don't know why
I'm doing with a brush. Maybe I like to
challenge myself. Okay, now let's add some
whiskers to the cats. Just use a tip of your brush. And with a few flex, it can easily paint
these whiskers. And now let's add nose. Just a small inverted triangle. You really need to have
very little water in your brush when you are
adding these precise details. Otherwise you won't be able
to control your brush. And yes, if you really
mess up anything, we can always paint on top
of it and change things. But just make sure the
bottom layer is dry. This is the wonderful
thing about gouache. It's a very forgiving medium. If you're done with
your painting and if you still have leftover
paint on your palette, if it gets dried completely, might be a little
hard to get the paint back to the original
buttery consistency, even though it's a
water based medium. In such cases, you can
use the leftover paint. To use it as a wash for background of your
future paintings, or you can just use it like how you normally
use a watercolor. I do that a lot. Or another
thing that I recently tried is to put my whole
palette in an air tight box, and I kept it in the
refrigerator overnight. And to my surprise, the paint didn't dry at all. I just sprayed a
little bit of water, and I was able to carry
on with my painting. So here we go. We are done with our colorful cats and florals, and now it's the time
to take the tape off. Always pull the tape away from
your artwork in an angle. Do not pull it vertically. It might damage your
artwork or the paper. So here we are with our happy
cats and happy florals. In the next lesson, we'll paint
some bunnies and florals.
5. Bunnies and Florals: Hey, guys, welcome you all back. Now we are going
to paint bunnies and florals using gouache. We have a reference image
from Unsplash ready. And let's make some pink
and grab some yellow, and I have a nice peachy
pink in my brush now. And now I'm visualizing in my brain where to put the bunny, maybe one on the top right
and another one maybe here. I'm going to start with
the top right one now, and I'm starting with
the face of the bunny. And loosely referring to the inspiration
image we have here. I'm adding darker pink and
adding variation to the face. And now I'm going
to add the years. Bunnies have nice long years. I'm just going to exaggerate
and making it long. And let's add a second one here. You need to start with the tip of your brush and then apply a slight pressure and drag
it really simple years. We are done with
the head and years, and now let's move
on to painting its body and grabbing some
yellow for its torso area. I'm just loosely painting some pink and add that round areas, and I'm adding the feet. So now I can fill the body. It's slightly darker pink. And adding a dark color to
define the round areas. You can sketch your bunnies
before you start painting. If you want to challenge
yourself and have some fun, you can jump right in and
start painting loosely. It doesn't have to be perfect. It gets so much
easier with practice. Okay, now it's time
for the fun part. My favorite part is adding tail, adding short fluffy
tail to a bunny. No matter what animal I paint, it's always my favorite
part to add tails. I'm rounding up the back a bit. Okay, now we are done
with our first bunny, and it's time to paint our second bunny with
some yellow in my brush. I'm painting a jumping bunny. You don't have to exactly
copy your reference image, and you can take
artistic license. You can really simplify it
or modify it a little bit, and you can stylize
them however you want. Okay, now I'm starting to worry that it's
looking like a turtle. But I know once I add the
long ears and fluffy tails, it's gonna look like a bunny. Just kidding, I'm going to focus and make it look like a bunny. Madding the back
leg and painting the outline of this belly
area so that I can fill the body maybe make it a little bit darker. And I'm taking a orange
to add the second feet. And add this front feet. And now it's time to add
the years to her bunny, giving it a slight wiggle
and adding the second one, slightly hiding
behind the first one. I'm going to add a little bit of contrast with the dark color. I love this guy. It looks like he's
happily jumping. Next I'm gonna paint
a third bunny. I want it to be different
from our first two bunnies, so I'm trying
something different. I'm referring to the head of
the bunny image on the left. And I'm going to
refer to the body of the other bunny
image on the right. I'm doing this for the first
time. I hope I get it right. The bunny's head
is facing right, and it's like it's looking
back over his shoulder. I'm mixing some purple to paint
his leg so that it stands out and going back in with lighter blue to cover the front area and maybe making
it a little bit lighter. You can use the color of your choice to paint these bunnies. I'm fixing that feet a little bit and rounding up this part. Now it's time to add
fluffy tile to our bunny, and I'm taking
turquoise for this. I'm using the same color
to paint the second year. Gouache tends to dry quickly, so I'm using my spray bottle
to spray a little bit of water on my palette to
stop them from drying. With blue in my brush, I'm painting the front leg, just like two hands
coming from either side. Okay, that leg has become
a little bit broader, so I'm going to make it thin
by using a darker blue. I love how the front legs are popping out against
the dark blue. And we are almost done
with our bunnies, really super simple bunnies. And now it's time to start
painting our botanicals. I'm going to keep it very,
very loose and starting with yellow archer and painting
the stem of our first flower, grabbing some cream to paint the petals using
simple long strokes. I'm going to go back in with
different colors for each petal and just dab in my brush, using the tip of my brush and matching it to the
pointy edge of the petal, not fully painting the petal, just on the top of it. I don't want to put
red and pink together, so I'm skipping a petal, adding blue in between them. It's really so much fun to
paint abstract flowers. There are no rules. You don't
have to follow any rules. You can just play and have fun. I'm finishing this by
adding a bright green. And let's add an
abstract branches coming off of this stem. And let's move on
to the next flower and starting with
the wiggly lines, wonky lines, loosely
drawing with my brush. Now grabbing some pink and adding a blob that
will make our flower. Just adding short strokes on top of it with
different colors. I'm going back and forth
to my water container and washing the brush while I
switch the colors each time. I'm taking some yellows and dabbing on the wet
area of this flower, adding some interesting marks to make the flower so
fun and add character. Painting some thin leaves
coming out of the stem, and I'm planning to
add some leaves. I'm grabbing gray
stones in my brush and starting to paint the
wiggly outline of the leaf. And going back in with lighter gray and
filling the inside of the leaf and adding
one more leaf here. Just a simple one. And now I'm going
to mix pink and going to add mid ribs
and veins to the leave. It's a nice contrast
against that gray tone. And I'm going to fill this
space with an abstract flower. Just scribbling a
few marks here, and then I'm going to grab some yellow and paint an
abstract flower. I'm going back in with the same yellow and painting
the center of a flower, and I'm grabbing some
pink to paint the petals. Not very perfect petal, but just some abstract
shapes, varying the colors. Grabbing some cream and painting the outer
layer of the petal, now switching to green and continuing with
the outer layer. I love how a variety
of botanicals are filling up our page with
varied shapes and colors. I'm grabbing some blue and adding a tiny stem
for this flower, and then adding a darker color just for a little
bit of contrast. And I want to extend
this stem so that the overall composition
looks more connected. I want to paint a flower here and I'm going to
grab some yellow and painting a scrively line and painting tiny leaves
coming out of it. Not the perfect leaf shapes, suggesting those are
some botanical shapes. And I'm grabbing some purple
and painting a flower at the top and just using the lighter purple to drag the darker purple and
painting some petals. Now, let's move to the
bottom right area. I'm just going to
place a dot and then paint the petals around it. You start with the
tip of your brush and then slightly apply pressure, you'll be able to get the
perfect petal shapes. I'm going to repeat
the same process and placing more dots and painting more of those
flowers and fill this part up. I'm just enjoying this
process playing with variety of brush techniques
and painting techniques. I hope you are also having fun. I'm going to grab some orange
and connect these flowers. And now I'm grabbing
some blue and painting a blob and I'm
going to go back in with green and painting on top of the blue to make
it look like a flower. And now I'm painting a leaf
on the top right using green. Just some abstract leaves. I'm stopping and seeing
where I can add things, maybe a leaf here, and then one more leaf here. And scribbling on top to
make it look like a flower. And I'm grabbing some blue and painting a simple flower with some simple petals and adding
muted green for the stem. I'm filling the spaces as I go and adding couple of leaves. And I'm going to
fill the space on the left by adding
a pink dot and then adding a simple petals
in a variety of colours. I'm adding a green petal and then grabbing some blue
and adding another petal. Okay, I just want to
slightly modify this flower. Um, I'm just going to add some yellow and defining the edges. Oh, now I love the transition
of colors on these petals. And adding a yellow
leaf for the flower at the bottom and grabbing some black and
adding a stem here. Just want to add some organic
shapes to our painting. And I'm just using my brush
and using the color pink, adding some flower like
shaves at the top left. And I just love how
our whole painting is turning so pretty. I'm going to add a
couple of daisies here, so I'm using blue for
the tiny thin petals. I'm going to add one more
daisy using the same colors. And now I'm gonna connect these
two flowers using a stem. And then adding another
tiny branch here. Adding a leaf here, using black, and then adding tiny mocks on the stems to add some interest. And adding one more tiny leaf. That part is looking too black, so I'm dabbing it
with some blue. Let's add a super thin branch
coming out of this flower, using the tip of her brush. And then I'm
grabbing lemon green and adding tiny
flowers to the stem. And I'm going to paint
a blotchy flower here, just a round shape and then going back in with
a contrast color, adding some pink at the
center to make it look like a flower and adding some marks on this flower to make it look a
little bit detailed. And I'm mixing some dark
green for adding marks. Now, our painting
looks almost full. And we can step back and see which areas
need some filling up. Even add some marks
on your botanicals. There are no rules with guash. You can go light to dark or dark to light for adding
your details. And I'm grabbing some yellow and adding thin lines
for this flower. No, the highly
concentrated pigment of the guache gives us a
very vibrant colors. And since the colors
are so saturated, it works perfectly to create
a very colorful artworks. You can add subtle colors to
some parts of the flowers. Layering is so much fun
and easy with gouache. And also, I love how
gouache is very flexible. You can use it to do
very precise artworks and also we can use it
to paint very loosely. It's a very forgiving medium. Okay, now it's time to
add eyes for our bunnies. I'm going to use my black pen to add the circle for the eyes. And then I'm going
to come back with white pencil and draw an
outline around the black dot. The matte finish of Quach helps us to use other
art materials on top, so it's easy for us to do the
eyes using pen and pencil. Also, you can add
wonderful details on top of Quach
using color pencils. I use the technique
all the time. Grabbing some pink
to add blushes, to our bunnies and I'm
going to add some whiskers. You can use a very
fine brush for this. Or you can do it with
the color pencil too. Oh, my God, these guys look so adorable once we have
added the features. And now you can grab
some paint and add tiny details on the
body of the bunny. All the bunnies can add some
accent color to the ears. Just play by adding tiny
mags on their bodies. And you can add some details
on the tail if you want. I'm grabbing some pink to add details on
this yellow bunny. While I have this color, I'm also adding
details to its tail, and I'm going to go back in with blue and adding details
to our pink bunny. And yes, like I said, you can
do this with color pencils also pink and adding a dot
for the nose of the bunnies. They look super
cute, aren't they? You can go ahead
and add leaves on the white area if you see any and I don't
want to overdo it. I'm just adding some
mid ribs to the leaves, and I better stop
adding more details. I'm just going to
grab some pink to fix this feet a little bit. And that's it. We are done
with our bunnies and florals. I hope you enjoyed. I just want to do one
final thing and add a little depth to this flower
by adding this dark pink. And here we go. Our joyful bunnies and flowers. I hope you had fun painting this with
me, just like I had. And please feel free to ask
if you have any questions. Thank you.
6. Thank you and Keep Going: Thank you so much for staying
with me and painting along. You can go ahead and
make some patterns and play with colors using the
paintings that we made today. I hope you really enjoyed. And if you want to
see more of my works, you can follow me on Instagram at Subashn dot art factory. So thank you so much
again. Bye bye.
 Subhashini Narayanan, Artist, Painting the Natural World