Transcripts
1. Paint your Pet In Procreate Intro: Hi everybody,
welcome to my course on how to paint your
pet and procreate. My name is Karen see OCHA and I have been a
graphic designer, illustrator, and a fine artists
for more than 30 years. I've been using Procreate
since it has come out. I love the program, and I have pretty
much switched over to digital painting and
the last recent years. In this course, I'm going
to show you how to draw your pet using
Procreate's pencil. And we're going to paint
using Procreate's brushes. But I'm also going
to have some brushes available of my own if you
would like to upload those. And then when we're done
with our illustration, I'm going to demonstrate how to upload your image to a print on demand forum
where you can get a canvas done or hat or a
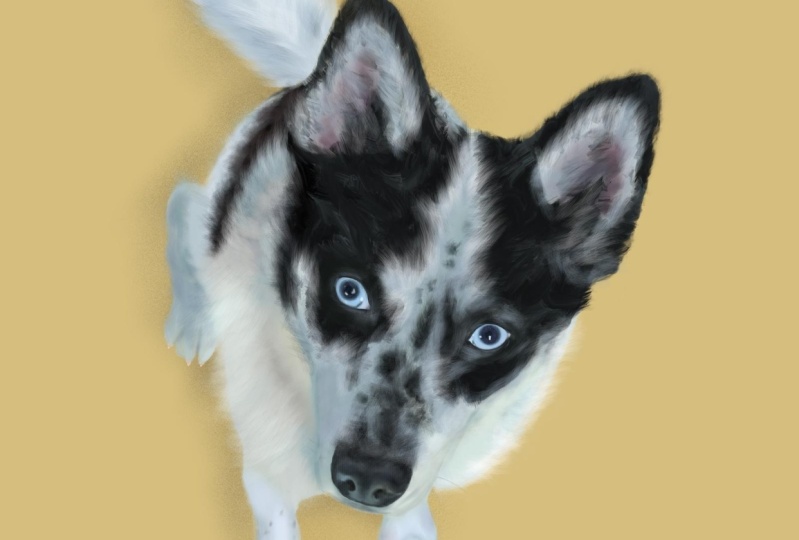
mug or something like that. So this is my painting I did of my daughter's
dog and procreate. And then I brought it into Canva where I had
this canvas May, It's a beautiful gift. It's going to look great
in her new apartment. And I appreciate you
taking my course. I love to teach and I
love to see what you do. So please post your images up on the project section
of whatever you did. If you have any questions, I'll try to get back
to as soon as I can. Thank you so much. I can't wait to teach you, so I'll see you inside.
2. Create a High-Res Document: Alright, let's
create a new canvas by clicking that plus sign on the top right corner and then the new canvas plus
sign in that dialogue, you're going to create
your canvas 12 " by 12 " or 3,600 DPI pixels, and make that a square. And we're going to make
it an RGB color mode. In Procreate, there's a lot of amazing brushes you can
use for this course. And they are in the
painting brush library and the materials brush library and the sketching brush library. I have them right here. So all you're gonna
do is go up to the top of the brush
library and hit that plus sign and
make a new library. Then you're gonna go find
your brush wherever it is like in the pencils or the sketching and swipe that pencil to the left and
you're gonna see duplicate. And when it says Duplicate, you'll see a new brush. You're going to take
that brush and bring it into your new library. I'm showing you how
to do that here. So I just made my new library. I'm calling it class brushes. I already have one, but I'm
just doing this to show you. I'm going to hover over
that name and then drag my brush right
into that library. And there you have it. Now if you edit those
brushes by clicking on them, you didn't ruin the actual brush that comes with
procreate and you didn't move it out of their
libraries that they came in. I'm gonna do one more brush. Let's go into the
painting library. I'm going to find the oil paint. I'm going to slide
it to the left. I'm going to duplicate it. I'm going to take it
and hover it over. If you move your library closer to your brushes
that you're looking for, It's easier to drag them in. So that's what I did here. I hover over the Library and
I drag it into the library. Grab your pencil and we're going to click on the wrench and the add your photo
and we're going to navigate to our photos in
our iPad and find your dog. There's my illustration
already done and you could see Rockies right there. I'm going to click on
them and he's going to import into my Canvas. Now I'm just going to make sure he's selected
and make them as big as I can on my canvas so we keep the resolution as we're
painting is large as possible. Now that we have
our pet imported, we're just going to
take our brush or pencil and just trace
around our pet everywhere. So I'm tracing all of those little fur lines in
his ears very loosely. I'm not even doing a great job because
I'm going to bring in my reference photo
into my my canvas. And I'm just using
these as a guide. And the reason is, I mean, I could draw my dog if I want, it would take me awhile. But doing this saves
a lot of time. So I'm going to trace over every little detail that
he has so around his eyes. And you can see that there's
a little lighter eyelid area there and around all of his beautiful little
markings that he has. And I'm going to go
draw a little tufts of for everywhere I see detail, I'm going to be
tracing that detail. So let me zoom out so you could
see his cute little tail. He's just a little cutie. And I think these
are going to be so good when you're done,
you're going to love it. Everybody can do this. It makes a great gift. And it's especially nice when you did it yourself
with your own hand, your own brushstrokes,
your own calligraphy. And everybody's is going to look slightly
different than mine, obviously, because
we're all different and that's the beauty of
every piece of art. So as I finished tracing him, I'm just going to say that
this is going to be a layer on itself and it's going to be
above your painting layers. So you're going to literally make your painting layers
below this tracing. And it's just a guide. We're not going to use
this line for anything, so it doesn't have
to be perfect. You can see here that I'm
being careful around his nose, his nose, his nostrils, and then there's a
little light reflected. Sometimes we'll have a
hard time drawing that. So do it as neat as possible around there and
it's also around the eyes, be super neat around those, but the four areas just like
make little marks, whatever. If he has something special, please add it in to this drawing and I'll see you in the painting
section next.
3. Blocking In, First Steps: Let's import our PET image
into our reference window. So you're going to click
on the wrench and Canvas, then go down where it says reference and just click
on that. It'll turn green. When you get to your window, you're going to just tap that. And I typed in the word
dog and obtain pictures of rocky and Paisley and pick
the photo that you like. It'll pop in the window and
you can see that you can scroll in on it just by
putting your fingers over it. You can move it all
around your canvas. And you can just put one
finger on it and keep it there and pick up a color
for your color palette. Create a new layer. And on that layer, you want to try out the
brushes that you made in your brush library and see which brushes are best
suited for your pet. As I'm playing around
with these brushes and trying to get
the feel of them. I decided that I maybe want
to add a few more brushes to our brush library that we
created for this project. And under the procreate brushes, the one labeled painting, there was a few brushes. I really liked to
get started with this painting if you
weren't going to use the brush that I created. And that would be the Salamanca, the spectra, and the Tamar. Those three brushes
are really amazing. There's a lot of
great brushes right here in Procreate that you can create your pet width. So all of your brushes
that you use globe into your recent Brush Library and if you can't
find where it lives, you just swipe it to the left. It says find and it will find where that brush
you got it from. And this one is showing
me that it's in the painting brush library and that's you can
find it again. I created a palette using the
photo of my little rocky. All you do is click that
circle up top, add the plus. Just tap on the Plus to
create a new palette. And it will prompt you to make a palette out of your photos, pick the same photo you use, and it will literally take all the major colors out of your photo and make you a brand new palette
that you can use. It's not always accurate, so you might still
want to tap on your photo to create a good, a better color or
a different color. Or you might want
to mix your own. So here I'm creating a new layer and I'm
calling it the base layer. And it's underneath
my sketch layer, which I'm naming that sketch. We always want to keep the
sketch layer on the top layer and everything we're working
on on the bottom layer. So basically I'm just taking
that brush and coloring in Rockies whole body
everywhere with this neutral color of gray. I know he's white, but it is a good idea. If your dog is black,
put a gray down. If he's white, put a gray down. Just pick a neutral medium
color for the base tone. Because we're going
to paint over this. We're gonna go darker
for, you know, for the darks and
we're going to go lighter for the highlights. And you just want a full
range in your paintings. So it's really
good to just start blocking in with a base color. Now, my hand sometimes makes the eraser jump on and it's
frustrates me actually. And you just have to notice that it's happening and
just recap on your brush. Now, I am going to just paint the white areas
with this gray. And I'm going to go back
and pick a darker gray, almost black but not
quite black to do all the black patches on
his cute little person. I'm just going to
keep filling in everywhere that I see
that I might have missed. You'd really don't
want any gaps in this. You want it
completely filled up. Because if we make a
clipping mask later, it's not going to
paint in that area. So you really want
to make sure that your whole entire base
is completely filled. So here I am picking
my darker black color. It's not completely black. It is a grayish black. And the brush I'm using also
is it doesn't come out dark, so sometimes they
come out transparent. So I didn't notice with procreate and a lot
of my illustrations, especially the ones I
do for beer labels. There's sometimes
looking a little transparent when you put
them over type or something. So I literally need to make this base layer
opaque in the end. So I will show you that
at the end of this video. So when you go to print
it over anything else, you will not have
anything shining through. This paint is when you paint in Procreate, it is transparent. There's, it's not always opaque unless you're
just using a flat color. So when we're doing
this base layer, I'm being neater around
areas where the ears are. Um, you know, there's not a lot of foreign years,
whether it's for, it's really short and the areas where the fur is
a little bit longer, I might not be used me I'm
not being really neat at all. So this is why I think
anybody can do this because you're not I'm not
being careful with it. And as long as I'm going in the direction and I'm filling in these colored patches to match the dog using
my reference photo. You can't go wrong,
you really can't. Now I'm zooming in so I
can get a better look at the nose and I'm zooming
in on my reference photo. So take your time and I've been doing
this a long, long time. So it looks easy sometimes
for other people, but really just take your time
and if you make a mistake, you can double-tap
your way out of it and just have fun with it. I'm just tidying up
the nose a little bit. I'm going to just try to make those lines as
crisp as they can. So anywhere where there's like a lot of firm being
a little bit loose, but also where you need
to see more detail. I'm going to be a
little bit more tight with my line work. The other tip I have when you're doing the base and any part of your painting is to make sure
that you're coloring in, in the direction the
way the fur grows. Because if you don't, it's going to look
really weird at the end. It's, your eye is going to go
there and you're gonna say, oh, what's that there? It looks a little out of place. It doesn't look right. And you're not going
to realize why. So if you're not going in the direction of the
growth of the firm. This is with any painting. If you're going to paint
with a real brush, you're gonna do the same thing. In Procreate. It's a really
great practice to create separate layers for
anything that is separate. So you're gonna do your
base layer or you're blocking in layer
for the base and then your eyes or your nails, or the nose or your whiskers. They're all gonna be on different layers,
separate layers. So when I'm doing these
eyes on a separate layer, I'm going to my Selection Tool. It's just the top-left and I am tracing around the
eye and you have that little marching
ant thing going on. And then I'm going
to go down to the add down there on
the bottom and we're gonna go do the other eyes. So I am tracing
around both eyes. So now they're both selected. And I'm going to grab
an airbrush tool, which I grabbed a
medium airbrush tool and or brush I should say. And I just fill them
in with a solid color. I'm being very neat now. And the, the brushes
I'm using for the eyes again is the air
brush, brush set. And I'm using a brush that is medium hard, not super soft. And right now I'm
just going around and making it super tiny. And I'm just going
around the eyes and I'm just going
to make these eyes, I'm looking closely
at Rockies picture and just trying to mimic
exactly what I see. I'm going to put the
highlights where I see a little bit highlight. And you can see I put
the base color down is a medium type of a blue. And now I took my airbrush, just putting the whites of
the eyes and I'm just moving my wrist carefully to
get that roundness. You can always fix it
if you don't like it, Do your double top and keep
doing it until you get the right motion or
the right Look down. And then I'm going back. And I'm going to start putting
in the iris of the eye. I'm changing my
opacity a little bit. And right here I'm
lightening up the bottoms of the eyeballs before
I put the iris in. And just putting that shine
and that gleam on the eye. Here we go. We're going to put the circle in the middle with an S airbrush. It's not completely hard. It's got a slightly blurred edge because his eyes
looked like that. So try to just mimic what
you're seeing in your photo. Now I went back to my
airbrush tool and I'm adding a little bit of darkness
to the edges of that. The roundness of his eyeball. That's just going
to make his eyes look more three-dimensional. And we're going to add a
little gloss over the top and those little spots for the
reflection of the light. And you know what, He's looking really
ugly right now. But trust me, this
is going to be a beautiful painting in the end, you just keep going with me and keep working
on this with me. And you'll see your painting
will be beautiful too. I grabbed a very, very bright blue there to add the light
reflection in his eyes. And it put a dot. And then I also did
another.in white. And I'm going to smudge that,
I think a little bit too. And I know it's not
exactly what you see, but I'm trying to just
maybe exaggerated, I guess, somewhat
you're the artist, so you It's your
artists prerogative to do whatever you feel is
best for your painting. Now, I'm using the
airbrush and it's more of a tighter airbrush and I'm trying to do the
curve around the eyes so my hands a little shaky. But in Procreate,
if you start at one end and you hold
it for a second, you can create a
beautiful, perfect arch. So that's what I did here. I'm just doing my arch and holding it and it
creates a perfect arch. It smooths it out for you, which is really a great
feature in Procreate. Here I go again. I'm going
to start in the corner. I'm going to trace the, I am holding it and boom, it makes a beautiful arch
and move it where I need it. Check the other eye out, make sure it's even. And let's do the bottom as well. See, everybody can do this. Okay, so little rocky, we're going to make
some shading on you. And you can see in
the photo there's a lot of little blue. And I like that blue, actually the blue in
any painting you want, some contrast of color and
color is a funny thing. So I'm used to painting, but I do know that
It's good to have cools next to warm so you can excuse for is on the warm side. So the shadow should
be in the cool side. And that's going to really make the painting pop and
look really great. In this photo I have of rocky. He has the light
coming basically from the bottom left corner because
the windows are behind me. So he really doesn't
have a lot of bright sunlight on them
to make a big contrast. He's very neutral
so we can pop the light a little bit
in this if we want. I just created my shadow layer and I'm going to turn it
into a clipping mask. And you can see there that
little arrow pointing down. You can see I made
it a clipping mask. And that is going to
create this layer, masking the layer below it, which is the base layer. And wherever you paint on it, it's only going to
stay inside the lines. So I would paint on it and sometimes I'll see
there's some gaps which means I have to go back to
my base layer and fill in those gaps because
it was a little too transparent and the painting
pickup or whatever. So it's really great. So I love using clipping masks. And if you were to export
this into Photoshop, you will see that those
clipping masks are retained there so you can further work on it in Photoshop
if you had two. So not only do we
have a clipping mask, we're going to change
the opacity of this. So right now it looks
like really blurry. It doesn't look normal. So I'm gonna go
back and I'm going to tap on the layer right there. And I'm gonna go through my opacities and
make it a multiply. Or maybe a linear
burn will work. But really right now
I'm using a multiply, which is pretty normal. To make it just blend
in to the layer below. So when I paint, I tend to, especially in Procreate, I'm
a little bit more loose, so over painted some of these areas and I'm
just taking my eraser and the same brush
and just taken out some extra spots and
lightening up some areas. It's always like a union
when you're painting. To finish up this base layer, I'm going to just
keep playing with it. I'm happy with it. I'm going to add some
pink to the ears because the skin
layer is thinner. That's why we see it to be more pink and ask
them to shine through a little bit on the next layer when we
start doing the fur. So I will see you again in the next video where we're
going to begin painting.
4. Painting Fur, Metamorphosis: So our base layer
is what setting the tone for the whole
entire painting. And you want to zoom
out of it and just take a look at it and see what
needs to be adjusted. I'm taking my blending tool here and anywhere
that rocky has, I don't know what
your dog looks like, but since he has the black
and white next to each other, I know from previous
experience that the first layer might show
a horse harsh edge there. So I'm just going to blend that. So when I add the front top, the two for colors will
blend beautifully together. I'm kinda like your hair, how you put highlights
and low lights in it. So yeah, just zoom out
too good. Look at it. And I'm deciding that the pot
area needs some adjusting. And anywhere you're going
to add more detail. You want to just make sure
it's sharp on the edges. And if it's not so detailed, it can be a little
bit more blurry. And if I don't like the shape
of it, I'm going to change, change it a little bit and just keep adjusting your
base layer till you're happy with it so the subsequent layers will really shine and add
to your painting. I made a clipping mask above this base layer and it's
got those shadows in it. But I'm going to work
this into the base layer, has little toe nails. He's got like three
black ones and for white ones, they're
different colors. So he's so cute, but you just want to put that
little extra detail in because you can add a layer
later in a different layer. But I think, like I said before, you need to have
it below your fur. And I think it's just
going to work better on that layer then if you
did it on a upper layer. So I'm just going to
continue on adding his toenails to the back layer and just just tidying up that back leg and foot
a little bit more. So that when we add the
first layer on top, it's just going to look amazing. So now I'm just
going to decide on which brush I want to use. Go to start using
the short hair brush or the short hair brush that
I created, the very similar. And we're going to start making
these short strokes that go in the same direction
as the growth of the firm. I'm going to pick out my
brush, this brush here. I could see it has those
longer hairs in them and it's gonna be great for his
tail and maybe in his ears. And he's got long fur around
the side of his body, around his neck
line and go husky. And I don't know what
your dog looks like, but just just pick the brush
that best matches your dog. I'm going to pick the
creamy white color here and it's light
creamy white anger, start with that short
brush and just fill in. Starting at the back, you're going to work
from whatever is furthest away from you to
whatever is closer to you. Here I am. After I put that widened, I'm going in with that black
with the same brush and I'm just literally
filling that area in going in the
direction of the fur. And I'm just going to
keep switching from the lighter fur colors to
the darker fur colors. And I'm going to keep just
like pushing them in together. And I might even use my
blending tool slightly. Now here I'm going right behind the eye because that's on a
separate layer and that makes it so much easier to be able
to do that whole blocking in this area and go right
behind the eye that way. So I'm flicking my brush out into that white area to
create some of that. For now, I'm going back with the white with
the same brush and I'm flicking it back-and-forth
into the black and into more down the side of his body wherever
I see a highlight, you want to just add
that now I'm adding some of this bluish
gray in here. And I'm just going to fill that in as very much like when
we were black and get in. I'm just gonna go back
and add some more of the for going with the
stroke back-and-forth. I'm just going to keep
moving down his body. I'm adding the highlights. I'm just going back
and forth from the lights to the darks and just layering them with my brush
and pushing and pulling. And sometimes I'm
smudging it to work with the smudge brush right now to blend some of
those brushes in. And I'm using the same brush that I was using to paint with. Like I said before,
whatever brush you're using if you want
to smudge with it, which is a good idea, just tap the little finger there and hold it for a
couple of seconds. And it will say you are
using the same brush. So I'm going to just copy
my little image here. I like that blue, so I'm adding that blue. It looks kind of funny, but
in the end you're gonna be surprised how that blue really, really works in the image. And we're going to
blend that and get his little toes in there and
just get everything looking. It's really just shapes. Everything is just shapes. Now I'm going to
blend the back for, you know, on his
back into that foot. So I'm going back to my
flowing through here and I am continuing down his
body now I'm gonna do this throughout the whole
entire dog everywhere. So I think I'm just
going to put you on play for where you
could just watch. And I'll see you
in a few minutes. So for the tail, I'm adding these really
dark darks in there because they are going
to show up later on. Underneath the next layer of this further I'm putting
through because like I said, the the paint brushes are slightly transparent so
you're going to have the paint flow through the the other layers
that you put in. And basically it helps
it look more like fur. And I am just adding
these little tufts of for the darker side and the lighter side you're
going to add the weight. The weight is literally going to be like the highlight
at the end. You're going to keep
using those middle tones. Never use the white until almost like when you're
done with that area, you want to add the
lightest light on top because that's going
to really make it pop. So I grabbed my
selection tool and I drew close to the air and around the tail
so that I can make my marks is close to the ear as possible without
drawing over my ear. And it looks like I'm
using the turpentine to create the toughs
in the in the fur. And I'm mixing it
with the fine hair. So I use both those brushes in here and you really need to
decide what's good for you. So the harsher brush
might be good for the underlayer of
the darker for, and then when you
get close to making it to the top of the fur, you're going to use the
more defined brushes. And I'm adding a
little bit of blue in there because there is blue. And that looks really awesome. That looks like for that
looks like his tail. It looks pretty awesome. Because it's tail
is behind his ear there you wanted work
on that before you work on his ear so
that you can have the for overlapping the tail and
it will look more natural. If you can't see
what you're doing. It's really good idea to change your background color to something that's not
in your paintings. So I threw a few colors in there and decided to keep it
with the brown color, which is kinda like my
flower color there. But this way I can see the edge of his white
for and the blues. And it's a nice actual
complement to this, so it looks really good and it's going to
help me to just, you know, make some
color evaluations and see my edges a little bit. Better. Looking at your reference photo and make your
assessments as you go. And remember what is
on the top layer. Like the little tougher that might be on
the top of the ear. Make sure you paint the back
like the darker color first. And then you can paint over lighter and
lighter and lighter as you get closer to you
and see those top hairs. Now I'm going to move
on to the other side of his face and close in
this side with the black. That's the easy part. We already did this
on the other side. So you should be able
to get that done. And you can see that
I left the ears, but I put the black all
around the edge of the ears. And we have that pink there. And I'm just going
to keep filling in the face to get all
of that dark black. We're not painting
every little strange at first separately amine,
it will be too much. So we're painting
flat areas of fur and then adding the
little details on top. It's an illusion. It's
all shapes and illusion. He's already starting
to look really good. Now we're going to go towards the ears and I'm going
to add some more of that gray near the top and in the middle like I'm not even being super neat
here a little down, just fly in that color
in there just to get those marks going
in the right direction. So when we overlay with
the lighter colors of lighter whites and grays, it will look like the ear fluffy fur that
he has around his ears. Once you start seeing it appear like it
looks like real for, it looks like magic almost. I always loved this, this part of the
painting because as I'm adding on these more
refined details, and I'm just going
pretty quickly here. You can see the air is
just literally looking so for alike and fluffy
and beautiful. And I have to say, I'm very grateful for the
animals and I've had in my life and this little guy is two. And we got him
during the pandemic. And I had to put my
previous dog to sleep that I had for 14 years and
she was my hiking buddy. But I am very grateful to have these beautiful
creatures in my life. They make our lives so much better and to be able
to paint them and keep them on their memories alive for such a
long time because they become a part
of our family. And it's a beautiful thing
to recreate their image. And especially if you're in
your own hand because it's your emotions also coming
through onto this image. And, um, you know, it's, it's yours and it's, it's your expression of your relationship
with this animal. So I'm happy to share this with you and I'm hoping that
you're going to enjoy it. And your images are going
to come out spectacular. Any painting, you're
always going from sort of a not very detailed to details. So here I'm using one
of the hair brushes or mind just with those fine hairs
and I'm pushing it right. Is that bad? Look how beautiful that
looks and it looks like for all ready. I'm just zooming out
and assessing him and just seeing what I want to
work on next and just yeah, just give it a little look, take a break and give
them a look and just decide what you want to work on next and where you want
to build up the layers. Where are you want
to keep it looking more detailed and where
you want to make it look more loose because your eye is going to focus on those
areas that you make detailed. So think about that
just to position of the loose and the
focus or the unfocused, I should say, in your painting. I will let you know where
to get my brushes in the project PDF that's
attached to this lesson. And I just want to say
you can definitely do this whole project with
just the procreate brushes. I'm adding in his spot some
more because I know I'm going to add some fine
lines if for over it. So I'm kinda shines through
that so I'm making it dark. And then I'm going to just
add those fine lines of for going through those
little spots on his nose. And I'm going to add
a darker blue to the side of his face
there, so popped out. And you can see I added those light blue highlights and it looks kind
of funky at first, but after we get all
those little in there, it's going to look beautiful. In every painting. We're always painting the light because we can't see
anything without light. And so we're adding the dark. So we can always
add in the light. We're always starting from the darks and building
it up to the light. And the light comes in
many shades of colors. It's either warm or it's cool. Usually, if your light
that's shining on your object is a
warm color and it usually is coming from
the sun, which is warm. The shadow areas are
always gonna be cool. If you squint your eye, sunny day and you
look at the grass, you can see it's
like a yellow green, but the shadow areas are
actually like a purply blue. And that is the warm and
cool notice because the, the color of light, the number color or Kelvin of light in certain temperatures
is a different number. And I think like the
white brightest light, white is like 5,000. And then it goes up
and down from there. Cool or warm. So you would see those yellow lights that you've prepped for
your mosquitoes. I don't know which number it is, but it's not 5,000, which is like daylight. And so that's the theory with the coloring in
on your painting. It's always better
to put a cool shape next to a warm sunlit area. As I'm scrubbing in his fur, I could see my
camera is shaking, so I apologize for that, but it's coming out fabulous. I'm zooming out and
I'm seeing that he is looking really good. And even though
he's not realistic, it appears realistic and
it's because your eye is always going to
fill in the blanks. And it's good to have a
place for your eye to rest like those dark
spots near his eyes. We don't need to put
too much further, just like a little
shadow here and there, a highlight here and there. And you're, I will
just fill in the rest. So we don't need to stress
out about any of this. Ever. Do not stress out
about your painting. And I guarantee you if you're
following along with me that your painting is just as good or even
better than mine. And I'm excited to
see what you did. So please put it in the
project for me to see. If you have a question, I'll try to answer it the best I can. It might not be right
away because I do work a lot and I just love teaching. So I will get to you
as soon as I can. He's the cutest little
feet and I'm just going to look for a
little inking pen. We're going to have a fine tip to draw in the little
black nails that he has. I'm using the studio pen to paint in the black of his nails. And I realized after I
zoomed in and paint to those nails black that I should have been
painting the other paw. And so I painted the other paw. And then I came back and I
erased those, the right plot. And even professionals
make mistakes. So now I'm just going around and I'm really looking
for the details and going in with my fine tooth
comb and just tidying up everything and just adding where I needed
a little shadow here, a little highlight there, a little few hairs there, and don't forget to
add those whiskers in Indiana you can use your one of your pencils would look
work really well with that. Maybe the Narendra pencil
or just something that just gives a light little line, make it super small
and flick it. And then you're gonna get
a nice little whisker, but do them on a separate layer so that if you make a mistake, you're not going to be
making those whiskers over something you painted
and you're gonna be upset that you have to redo it. So always, always through different things that require extra attention, you want to put it
on a separate layer. This little portrait of rocky is coming along really great. I'm finishing up his nose. And I think the Fuhrer
looks beautiful. I think his eyes look beautiful. I hope yours is coming
out just as well. And it's something that you're gonna cherish
for a long time. And don't forget,
in another video, I'm gonna show you
how to upload it so you can make a
canvas out of it. Or anything from a key
chain to a bed sheet. You can make a bed sheet. This might be a
little too small, but you can do a lot of
print-on-demand things with this portrait of your
pet or a friend's pet. And it's just going to make
a beautiful keeps sake. For very long time. I'm adding all the lighter areas around the eye
shapes just to pop those eyes out and give it a little dimension to show
where his eyebrows are. And then everything
is just shapes. You don't have to
freak out like, I don't know what to do, but it's like just
little shapes. Just zoom in on one little block and find
that block on your painting. And just kind of just
paint what you see. In art school to learn
how to draw something. We literally took our papers
and divided it up into like 1 " squares and
then took our photo and drew a grid on
it in 1 " squares. And we only drew what
we saw in the square. We didn't pay attention to any other part of the painting. This way you get a
super realistic look because you're just simply
copying the shapes. You can see here them
just zooming in. And I'm just trying
to copy where those little lines are going
in the shapes are going. The other thing is if you sketch upside down or you're
coloring in upside down, you will not be drawn to what the object is as much
as up just observing. So I often turn my
images upside-down. Well, I'm working, especially here in
Procreate because it's so easy to do and it just
helps you observe more and not get caught up in
what the actual object is. Becky looks really amazing. And for the final touch, we're just going to
add one more layer and we're going to go
into our brushes and look for materials and then
pick out a texture that you like and set the opacity to anywhere 30-50 and stumble in a little shadow
under your dog. So rocky really needs this, needs a little bit of gravity. And I actually think
that I made it too dark. And I also think that
you should make it a multiply in the transparencies. And when you export it as a PNG, it will blend in a lot better with any application
you're going to add it to. In the next video, I'm
going to show you how to make sure that your image is opaque so you can upload it to the print on-demand forums.
5. Getting the file Ready for Export: So let's make a
background image that is opaque for our print
on-demand applications, we're going to select the
group and duplicate the group. And then we're going
to flatten into group, make sure you turn off that shadow that you
made behind your dog. So you just have
this silhouette. Then you're getting
up to that ribbon and you're gonna hit Automatic. And you're going to
select the background. When you select the background, you're going to hit Invert and
it's gonna select the dog, then go up to a new layer
and fill it with white. After you fill it with white, you're going to
take that layer and bring it below your dog. Then if you turn
that on and off, you can see by my blue
background that it was very transparent
and now it's opaque. So to export this, turn off your background. I know I have it on here, but turn it off and then make your export your
file as a PNG file. And you're all set.
6. Print Your Artwork on a Canvas or T-shirt: Hi guys. Let me show you how I
make a product in Canva. If you don't already
have a Canva account, you'll just have to make one. And it's very easy. I made one. I'm a pro member because
I use it all the time. And now on the homepage, I'm just going to scroll through the products and I
chose the t-shirt. The canvas is the correct
size for the t-shirt, and I've already
uploaded my dog. Just click on Upload Files and click on wherever
your photo lives, photo library, or Choose Files. When you upload your image
will take a minute or two to propagate into your library. Then you just click on it and it'll appear on your Canvas. Then I clicked on the Type Tool or the text tool I should say, and hit the subheading and I typed in a little
sentiment on the bottom, you had me at work. Now, I'm just going to adjust my type by clicking on the type and adjusting it to a new font. Right here, I changed
the line width because I thought it
was too spaced out. So then I went to space
between me and at, and I got rid of that space and I hit the return
because I know that if I center that there'll
be a space in front of the a and you want
it more centered. So get rid of that. And then I clicked on the
type and found a new font. If the top, the top left there, you could just find
a font that you like and change it
to the size and change the line height so it's not touching each other or it's a little space better. And you could also
change the color of it. So I changed mine to the
blue eyes of my dog. So I have the Pro account and I could pick a
background and I picked a watercolor
backgrounds like swoosh. But what you can do in
Procreate is create one with watercolor brush and
make it a PNG file. So the background is transparent and you
can upload that and use that swoosh and not have
to pay for a Pro account. So here I am putting my solution there and I want
to change the color of it. I don't like the
color, so it's letting me just change that
to a blue color, am sizing it and centering it. Want to make sure
everything is centered. So just go up there
and center everything. So it's just the way you want. Now I kinda like turning
this sentiment on. It's like an angle to match the background
that I just added. That's going to
look really cute. They could do whatever you want. This is just a demonstration
I'm making for you. And I'd probably do something different if I spent
more time on it. But basically,
you're just adding your elements and adding your type and
changing the color. And Canva does the rest. Alright, that looks really cute. Now we're going to go up
to that little arrow up on the right-hand corner and share and we're gonna
look for the t-shirt. There it is. We're going to click
on that and look at it makes a mock-up of your
shirt and I'm looking, I'm like, I gotta get
rid of that background. It's got to be darker because
it's almost the same color. So I'm going to go click on
that again and adjust it. And I do that on purpose just to show you that you can always adjust things even
before you print it. You have that mock-up
there and you could see how it looks
on your t-shirt or whatever mock river product
that you are buying. So I made it a little darker blue and it went to the front, but it's going to pop back
to the back where it was. And that looks awesome. So I'm just gonna go ahead and and buy this
shirt is so cute. Look at Rocky on my t-shirt. You got the right size and Canvas will just
wants you to be happy. So if you don't like it, they
are going to replace it for you if the print doesn't
come out right or whatever. So now that I'm in there, I'm like, I think I
want to make a canvas. So I'm going to go back, I'm going to go back and
look for the canvas. And there it is, I'm doing the, it's horizontal, but I'm
looking for the portrait. So there is a popped in
and it resize it for me, which is absolutely fabulous. So I'm just going to go
back and resize him. So before you do that,
you might want to save this canvas and
duplicate it in Canva. So you can go back to that
t-shirt if you want to. So I'm just going to
resize everything here to make it fit my Canvas. I'm just doing this quickly
for demonstration purposes. And when I'm done, I'm gonna go through
the same process of ordering my Canvas. And in the beginning, I showed you the
photo of paisley and the print actually came
out stunningly beautiful. The color was perfect and the canvas itself was
really great quality. So thank you for watching
my video on how to create a pet portrait
and procreate, and how to upload it to
a print on-demand site. Most of the sites will
be very similar to this. So if you follow this, you're gonna be able to upload to any print on demand like printf full or even red bubble
or something like that. And thank you so much again. And I can't wait to
teach the next tutorial, please like and share
my Skillshare class. I love teaching
and I thank you so much and I'll see you
in the next videos.
 Karen Ciocca, Graphic Designer, Illustrator, Fine Artist